
Chapter Five
Library Module—Quick Develop
In the days when analog film ruled the roost, you could find one-hour photofinishing services practically anywhere. Their value was the ability to quickly process and print your images. In this chapter, we discuss a much quicker way to process your photos: in Lightroom, with Quick Develop.
Before we dive into Quick Develop, it is helpful to take note of what we have covered so far. Up to this point, we have focused on the aspects of the Library module that help you increase the speed and effectiveness of your image rating, organization, and file management. But there is much more. The Library module can help streamline how you process and develop your images. In particular, you can use Quick Develop to make both simple and complex image corrections to a single image or to a group of selected images. You can make these changes without leaving the Library module.
Quick Develop is intuitive and easy to use. As a result, this chapter will be simple and brief, too. First, we will examine how to use the presets to supercharge your image-processing workflow. Next, we will look at how to correct white balance. Finally, we will examine how to make more general tonal corrections and enhancements.
The Lightroom presets provide you with the ability to be prepared for anything and to apply settings to your images at a moment’s notice. In the Library module there are three types of presets: Saved Preset (Develop setting), Crop Ratio, and Treatment (Figure 34).
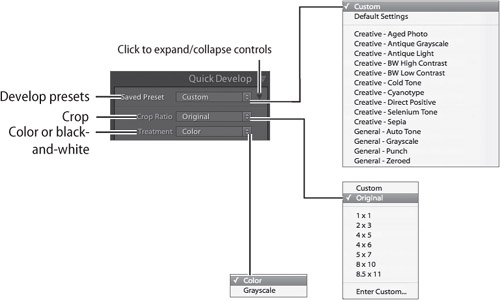
The Saved Preset is one of the most useful presets, as it allows you to access your Develop setting presets. These can also be created, modified, deleted, and accessed in the Develop module Preset panel, located on the left of the interface (Figure 34). Here you can take advantage of the full power of the Develop module Develop settings simply with the click of a button. Plus, as you spend more time working in Lightroom, you can create other presets that will work best with your particular workflow.
The Crop Ratio preset automatically crops your images to a specific aspect ratio. The downside of this feature is that you have no control over what is cropped; still, it can provide you with a quick preview of a particular crop ratio without your having to leave the Library module. This feature works best when you combine it with the Develop module.
For example, make a selection of multiple images in the Filmstrip. Next, in the Quick Develop panel choose a crop ratio. This will apply the crop ratio to the entire group of selected images. To modify the crop so that the composition works best with each image, press the R key to go to the Crop tool in the Develop module. Modify the crop. Select the next image, modify the crop, and continue. This is the quickest way to successfully change the crop ratio of a group of images.
Note
When using the Crop tool, you can press return or enter to accept the crop. After you do this you will need to press R again on the next image to reselect the Crop tool. If you would like to keep the Crop tool active, follow this technique: Press Control (Windows) or Command (Mac) + the arrow keys to navigate to the next/previous image while keeping the crop active.
The Treatment preset gives you the ability to apply a color or grayscale (black-and-white) treatment to your image. The grayscale conversion is based on color temperature and tint values; therefore, you can make changes to Color Temperature and Tint in order to further modify the grayscale image.
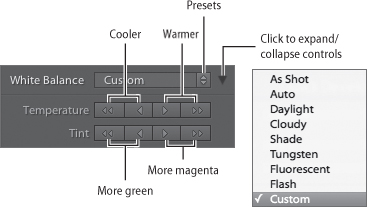
Color can be compelling, engaging, endearing, or shocking. Color has the power to convey emotion, to convince, to remind, and to illuminate. For the photographer, learning how to work with color is paramount. In the Library module, use the Quick Develop White Balance panel (Figure 35) to streamline the color corrections and enhancements of your images.
Before we talk about how to create “correct” color, it is worth mentioning the general subject of color balance. In digital photography, color balance has to do with correcting images based on color temperature. Because different color temperatures create different colors, you can run into certain problems.
To learn how to use the white balance controls in Lightroom, let’s consider a specific photographic scenario. For the sake of this discussion, say that you photographed a person wearing a white T-shirt who was standing in the shadow of a building. Your hope was to create a warm portrait. Upon opening the image in Lightroom, you discover that that white T-shirt is blue; in fact the entire image has a blue cast. Don’t worry—you haven’t made a mistake. This cast is the result of the cool color temperature of shaded areas.
To fix the color, click on the white balance menu and choose Shade. The white T-shirt will now appear white and correct. To finish off the image, click one of the right-side temperature arrows to increase the overall image warmth.
The Temperature and Tint arrow buttons allow you to increase an effect incrementally. Use the single arrow to add a smaller incremental change; use the double arrow to add a larger one.
With the White Balance menu you can choose a color temperature preset to try to match and fix the light color for your images. Use the Temperature arrow buttons to cool (add more blue) or to warm (add more yellow) the image. Use the Tint arrow buttons to add more green or more magenta.
While the Library and Develop panels are each distinct, they do share many of the same options for modifying tone and color. In particular, in the Library Quick Develop panel you can access all of the same controls as in the Develop panel for changing Exposure, Temperature, Tint, and more (Figure 36). However, the two sets of controls work differently. Unlike controls in the Develop module, the Library Quick Develop controls work incrementally, making them best for instituting relative or minor changes. Use the single arrows for making smaller incremental changes and the double arrows for larger adjustments.
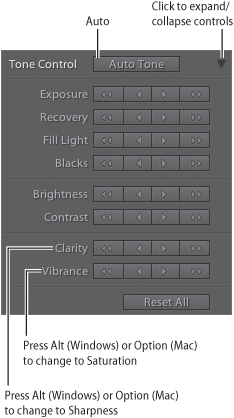
For a real quick fix, press Auto Tone to adjust the tone automatically in your photos. When you press this button, Lightroom will analyze and adjust your image so that there is adequate detail in the highlights and shadows. While Auto Tone may not give you the best final results, it can “normalize” your image so that it becomes a strong starting point to build from. Next, click the controls to adjust the photo’s white balance, color saturation, and tonal scale.