
Chapter Eight
Develop Module Overview
Comparing digital photography to traditional film photography is sometimes a bit of the stretch, but it keeps the blazing-fast pace of digital photography rooted in a larger historical context. Your personal history also shapes and directs how you work and think about photography. I first discovered the magic of making pictures in high school. My dad’s camera and the school’s darkroom brought my early images to life.
In Lightroom, the Develop module is where all the fun takes place and we see the image emerge. We don’t work with darkness or chemicals anymore, but digital postproduction, processing, and developing are still an art form. This is important to remember, especially if you want to separate yourself from the crowd and create images with impact.
This chapter provides an overview of how to work in the Develop module, laying the foundation for the more complex image-making steps in later chapters. Here we will cover workflow, the interface, shortcuts, presets, and history.
With these next few chapters, my hope is to equip you with necessary technical skills and also to share a bit of the passion I feel is required to create engaging and stunning photographs.
The panels are one of the most important aspects of the Develop module. A glance at the left and right panels (Figure 45a) shows the most frequently used tools in Lightroom. On the top left, the Navigator panel reveals a dynamic preview of the image. Next, in the left panels you will find controls to help track, preserve, and access the history of the edits made to an image. Roll over a thumbnail image in the Filmstrip and see a preview in the Navigator panel.
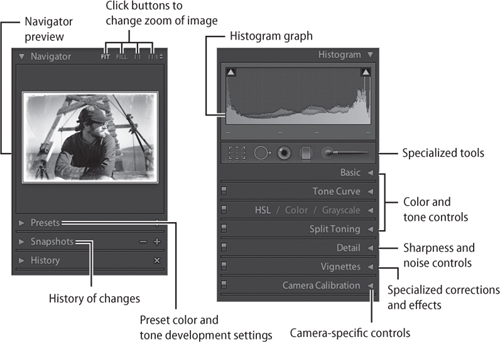
On the top right, the interactive Histogram panel provides a visualization of image data, which can help when you’re evaluating an image. (For more details on how to use the Histogram see Technique #50.) Use both the Navigator and Histogram panels to access broad information about an image.
Because the majority of your work will take place in the right panels, it is important to note how they are organized. The first four panels, where you’ll do the bulk of your work, allow you to make a broad range of color and tone changes. Below them are more specialized panels, which enable you to sharpen, reduce noise, add/remove vignettes, and more.
The toolbar is another important feature of the Develop module (Figure 45b), providing access to various view modes. Here are rating and ranking displays and buttons that add, remove, or make changes. Or you can use the Navigation buttons to scroll through your images. Click the Slideshow button to enter the Impromptu Slideshow option. Finally, drag the slider to change the Zoom level.

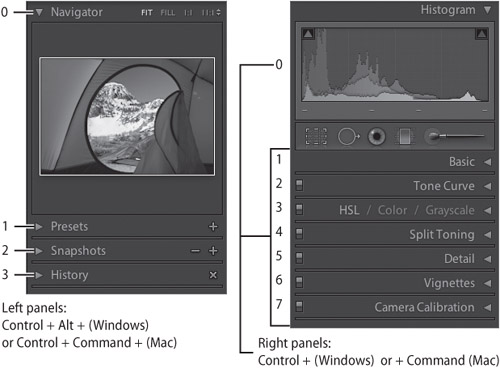
For me, the Develop module interface is a sight for sore eyes after I’ve been working on the computer for a long time. It is simple, intuitive, and easy to use. To make your workflow even better, learn these valuable Develop panel shortcuts (Figure 46a).
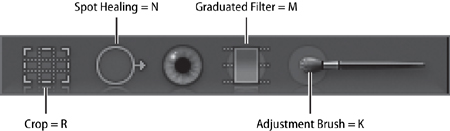
Below are a few more Develop panel interface shortcuts that you will soon use on a regular basis (Figure 46b).
The Develop module is equipped with more than 20 default image-processing presets. Presets allow you to save a group of settings and apply them to other photos. You can use the default settings or create your own. Either way, the preset will remain in the Develop module until you delete it.
These presets can be used either as the final image adjustments or as a starting point from where you make further customized changes.
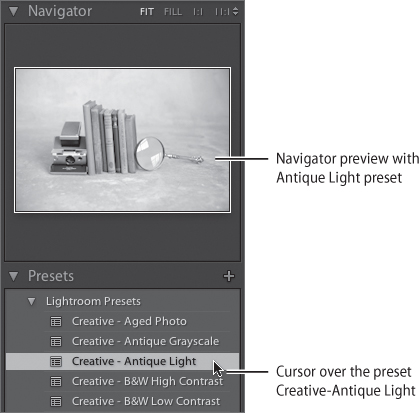
In the Develop module click the Lightroom Presets folder to view the list of default presets. Next, position the cursor over the preset name and the Navigator panel preview will reveal how the image would look with those particular settings (Figure 47a). Once you have found the preset you would like to use, click the preset name to apply those settings.
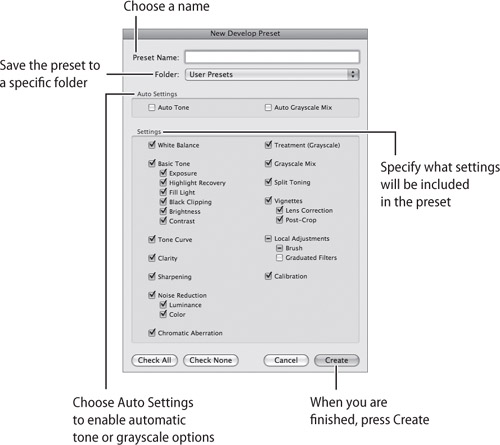
To create a new custom preset, make changes to the image with the Develop module panel sliders. Next, click the Create New Preset (+) button at the top of the Presets panel or choose Develop > New Preset. This will open the New Develop Preset dialog (Figure 47b). Next, work your way through the dialog and then click Create to save the preset. The preset will be added to the list in the Presets panel in the specified folder.
Not only are Presets something you can use, but you also can share the wealth. For me this is incredibly helpful, especially when I create a preset on my laptop that I want to use on my desktop. And here’s the good news—sharing presets is easy.
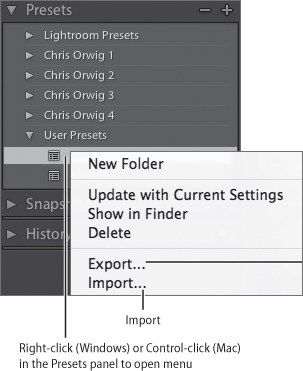
Before we begin, please note that Exporting Presets allows you to share the preset without the images (see Technique #47 to export the preset with a catalog and images). To export or share a preset, right-click (Windows) or Control-click (Mac) a preset and choose Export (Figure 48a). Next, type a name and click Save. It is as simple as that!
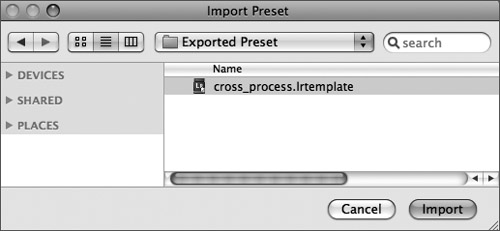
Once the preset has been exported, you can import it into Lightroom in a similar way. In the Preset panel, right-click (Windows) or Control-click (Mac) where you want to import the preset, and choose Import. Next, double-click the Preset template file (Figure 48b). On Mac only, if you double-click a file with an .lrtemplate extension in the Finder, Lightroom will install the file automatically.
The History and Snapshot panels (Figure 49a) allow you to save and track the progress of your image editing, so you can always go back and undo what has been done.
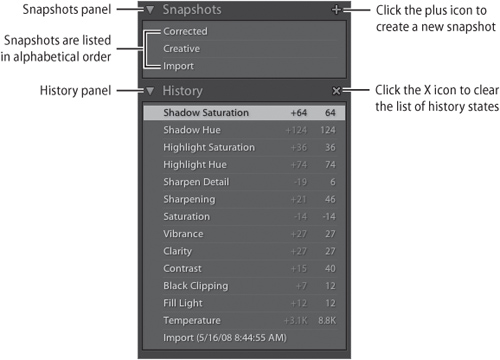
The History panel keeps a detailed step-by-step record of any adjustment made to the photo. The adjustments recorded include everything from an applied Develop preset to an added one-star rating. To take full advantage of the History panel, position your cursor over the list in the History panel to view the different effects in the Navigator panel. If you determine that one of the effects is best, click on it to revert the image to that state. When the History panel list of image states becomes too long, click the X icon to remove them all. But use caution, as this will permanently delete all the of History states.
The Snapshots panel was created for use either by itself or in tandem with the History panel. For example, if the History panel list gets too long, you can click on a particular History state and create a snapshot of it by clicking the plus icon in the Snapshot panel. Continue to create snapshots of the important History states and then clear them all. Once you have created snapshots, position the cursor over a snapshot name to view a preview in the Navigator panel, or click on the snapshot name to apply the desired settings to the image.