
Chapter Fourteen
Slideshow Module
Years ago I watched one of my favorite photographers present his work in a slideshow using a slide projector. There was the hum of the projector fan and his voice narrating a wonderful collection of images. In a darkened room, seeing his work come to life inspired me to create my own slideshows.
The presentation was dramatic, yet I knew that creating an analog slideshow was a tedious process of sequencing lots of mounted slides, keeping them clean, and keeping them in order. You had to insert every slide in the carousel one at a time, and if you wanted to add or remove a slide, which happened over and over, you had to reshuffle the entire carousel—an experience that these days few people miss!
That said, showing off your work in a slideshow format is still an invaluable aspect of the photographic experience, and Lightroom makes it a breeze. In this chapter, we’ll look at how to create, customize, and share your work with interactive slideshows in the Slideshow module.
In Lightroom, once you’ve learned some basic operating principles, you can apply them to all the different modules. So even if you’ve never used the Slideshow module before, you can get up and running with only a quick look at the options:
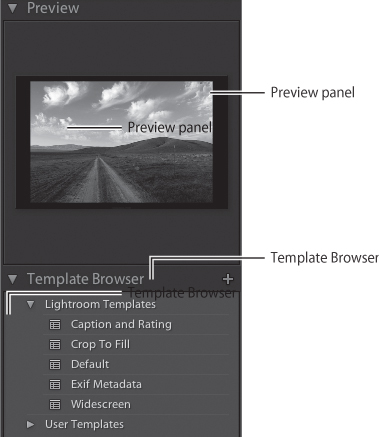
Slide Editor view is the large preview in the middle of your screen. It shows you an accurate, real-time preview of any adjustments you make to your slideshow.
Template Browser allows you to create a slideshow based on a template. Hover your cursor over the different templates to see the differences in the Preview panel (Figure 81a). To select a template click on the template name and it will appear in the Slide Editor view.
Options panels on the right side of the screen help you customize the layout of your slideshow as well as the playback options. We’ll cover these panels in more detail in the next tip, Creating a Slideshow.
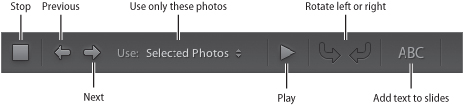
Text rotation and playback controls are found in the toolbar below the Slide Editor view (Figure 81b). These controls allow you to add text to your slides, rotate the text, start and stop your slideshow, and manually advance the slides.
Tip
If you don’t see the toolbar below the Slide Editor, press the letter T on your keyboard to toggle the toolbar on again.
Note that the Collections panel on the left and the Filmstrip at the bottom appear in all of the modules except the Develop module. This is important because it provides an easy way to choose which images will be a part of your slideshow without your always having to switch back to the Library module. If the Filmstrip isn’t visible just press F6 on your keyboard to bring it back.
Now that you’re familiar with the basics of the interface, it’s time to create your first slideshow.
You should start the process of creating a slideshow in the Library module because that’s the easiest way to choose the images you want to include. Here you can select a variety of images, even images spanning multiple drives and folders. In the Library module, select the images you would like to use for your slideshow and then switch over to the Slideshow module.
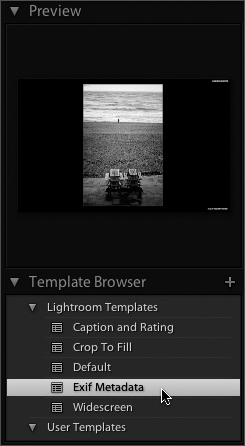
Hover your cursor over the various template names in the Template Browser panel to see a preview in the Preview panel. When you find a template you like, click on its name to change your layout (Figure 82a). You’ll learn more about customizing your layout in the next technique, but for now remember that every slideshow is based on a template, even if it is just the default template.
To see an instant preview of your slideshow in the middle of your screen that includes layout, overlays, and slide duration, click the big Preview button on the right side of the screen. When you’re ready for showtime, click the Play button, and the slideshow will take over your entire screen.
Another great way to create a slideshow is by selecting a smart collection that contains a dynamic set of your favorite images. For example, choose the Five Stars smart collection if you want to display your best portfolio images, or choose the Recently Modified smart collection to share all the images that you’ve worked on in the last two days. With smart collections it’s easy to show a group of images with common attributes instead of manually selecting images one at a time.
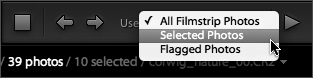
For even more control over which images are included you can choose the new Use pull-down menu in the toolbar (Figure 82b). This lets you easily control whether all the photos in the Filmstrip, just the selected photos within the Filmstrip, or just the flagged photos in the Filmstrip are included in the slideshow.
Customizing a slideshow lets you emphasize what’s important to you when you present your images. As in other Lightroom modules, the panels on the right are sequenced from top to bottom on purpose, so let’s work our way through the options.
Options panel – This panel includes basic settings for applying a stroke (border) and a drop shadow to each image in the slideshow. Any changes made in the panels on the right are not slide specific—they affect every slide in a slideshow.
Layout panel – Use the Layout panel to control the size and position of your images on each slide. If you want the margins on all four sides to match, make sure the Link All option is enabled. If you’d rather go for a more freeform approach, you can use your cursor to move the guides in the Slide editor.
Overlays panel – The three types of overlays you can add to a slideshow are your identity plate, your star ratings, and text overlays. With the Shadow controls at the bottom of the Overlays panel you can add a drop shadow that will affect all the overlays, regardless of type.
To add a text overlay to your slideshow, click the ABC button below the Slide Editor, choose from the pull-down menu the type of text you want to add, and the overlay will be added to the slide. For even more options, choose Edit from the text pull-down menu and you’ll see the possibilities are virtually endless. You can add as many text overlays as you like.
Now you can use your cursor to move or scale the text, and you can even rotate the text with the text rotation icons in the toolbar (Figure 83a). Use the Color, Opacity, Font, and Face controls in the Overlays panel on the right to further customize each text overlay to your liking.
To temporarily hide your text overlays without actually deleting them, just toggle the Text Overlays option in the Overlays panel. To delete a text overlay, select it in the Slide Editor and press the Delete key on your keyboard.
Backdrop panel – You can dramatically change the look of your slideshow by changing the background color of your slides, but I recommend keeping things simple so the emphasis is always on your images. One subtle way to add a bit of depth to your slides is to use the Color Wash option, which is a gradient effect that blends from your background color to your color wash color. Another way is to enable the Background Image option, drag an image from the Filmstrip, and use the Opacity slider to adjust the transparency of the image to a pleasing level.
Note
The color wash and background image can mix together, so turn off the color wash if you want to see only the background image.
Titles Panel – The Titles panel is new for Lightroom 2 and adds a nice professional touch to the presentation of your images. You can enable an Intro Screen and Ending Screen in the color of your choice (black is a great choice) so that the experience fades up from black at the beginning and fades back to black at the end. For a dash of extra self-promotion, you can enable your custom identity plate to show at the beginning or end (or both) of your slideshows. In addition, you can change the identity plate for each screen to give useful information about the slideshow, or even add your Web site information at the end.
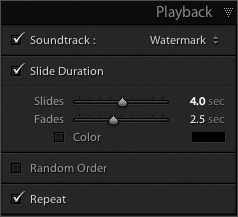
Playback Panel – This is where the action happens. Use the Playback panel to control slide duration, fade speed between slides, and whether your images should fade to a color between each slide. Using the fade color option might look funny if you’re also using a colored background for your slides. But if your slideshow is just images with a solid background, then matching the background color and the fade color can add a nice cinematic effect. Last, you can also set your slideshow to present your images in a random order and to repeat, or loop, indefinitely.
When you have a second monitor, Lightroom will detect it and include an extra section called Playback Screen. It allows you to select which screen the slideshow plays on, and to choose whether to blank the other screens. Also, in the multi-monitor section in the Filmstrip there’s an option to preview the second screen on the first screen. With this feature, if clients are looking at one screen, you can see what they see, and thus know where they are in the slideshow.
After you’ve spent a lot of time customizing your slideshow design, you can save it as a template for future use with different sets of images. Just click the Plus (+) icon in the Template Browser panel on the left, give your template a memorable name, and save it in the User Templates folder or a new folder of your choice. Now you can apply all your custom settings with a single click instead of remembering and recreating all your choices. To delete a user template, select it in the Template Browser and click the Minus (-) icon.
If you have made a few tweaks to a slideshow design and you want to update an existing user template instead of creating a new one, just right-click (Windows) or Control-Click (Mac) on the name of your template and choose Update with Current Settings from the context menu.
The ability to save a template is convenient, but the ability to save a complete custom slideshow, including which photos are in the slideshow, as an output creation is an incredibly useful technique. After you’ve chosen your images and customized your slideshow settings, click the arrow or the plus (+) icon in the Collections panel to reveal the New Collection pull-down menu, and choose Create Slideshow (Figure 83b).
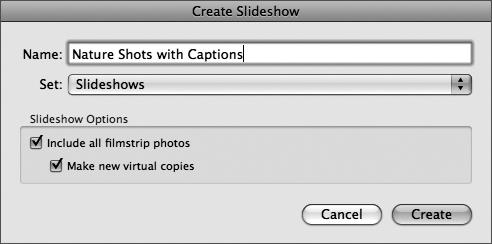
In the Create Slideshow dialog you can give your output creation a name and save it into an existing collection set. You also get to decide if all images currently in the Filmstrip are included and whether or not to create new virtual copies just for this slideshow. Your new slideshow output creation is saved under the Collections tab and remembers all the images and all the settings for that presentation, making it really easy to use the same slideshow over and over again for different audiences.
Adding music to your slideshows is a great way to set a mood, tell a story, or impress a client. The method of adding music is slightly different between Macintosh and Windows, but getting your music files set up ahead of time will make the process pretty painless.
If you’re using a Mac, start by creating a playlist in iTunes that includes the songs you want in the order in which you want to hear them. After you’ve arranged your songs in iTunes, switch back to Lightroom and open the Playback panel in the Slideshow module (Figure 84). Now enable the Soundtrack option and choose your custom playlist. If you don’t immediately see your new playlist, just choose the Refresh Playlist from iTunes command in the pop-up menu and then select your new playlist.
If you’re using a Windows computer, start by organizing your music files in a folder and naming the files so that they’re in the order you want to hear them. Next, switch back to Lightroom, open the Playback panel in the Slideshow module, and enable the Soundtrack option. Now click to choose the folder that contains your music files and you’re ready to rock!
To verify that you’ve selected the correct playlist or folder, click the Preview button and listen to the audio. If it’s the right music that sets the appropriate tone, you’re ready to jam. If you need to adjust the audio, just follow the steps outlined above until you get it right.
The Slideshow module is best suited for showing off your work on your own computer, but there are times when you’ll want to export your slideshow to share it with others. Lightroom 2 lets you export your slideshow as either an Adobe PDF or as a sequence of JPEG files. The PDF option is the most portable and immersive experience, so let’s start there and explore the options.
When you’re ready to share your slideshow masterpiece, click the Export PDF button on the left side of the screen. The Export Slideshow to PDF dialog presents you with a handful of options (Figure 85).
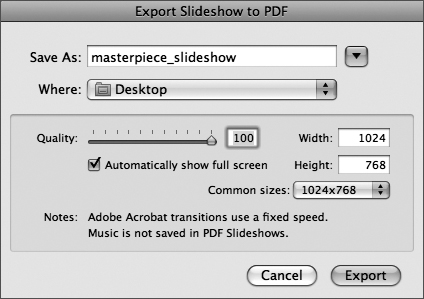
After giving your PDF a unique name (Lightroom will automatically append the .pdf extension for you), your next step is to specify the JPEG compression to apply to your photos. I always want my images to look great, so I tend to keep this option turned up to at least 90. If you have a lot of images in your slideshow and the resultant PDF is too large, the easiest way to save file size is to drop down the quality a bit and export again.
If you know the dimensions of your audience’s display, choose the setting that matches from the Common Sizes pull-down menu or enter the dimensions in the Width and Height fields. If the target display is your own computer, then choose the Screen option from the pull-down menu and Lightroom will detect your current monitor resolution and export a slideshow to match.
Adobe Acrobat and Adobe Reader offer a way to view PDF slideshows with a really slick full-screen viewing mode. Instead of relying on your viewers to know about this option, I suggest enabling this option on export so your audience will have a more immersive and compelling experience. Think of it as autopilot for your viewers because all they have to do is double-click the PDF document.
Not all the custom slideshow settings from Lightroom can be retained in a PDF presentation. Specifically, the Playback options for soundtrack, slide transition speed, randomization, and looping are not preserved in the exported PDF because those attributes are controlled by the viewer’s preferences in Adobe Acrobat or Adobe Reader. Despite these few exceptions, PDF is a great way to share your work because anybody with a computer has the free Adobe Reader software (and if they don’t, the price is right) so they should be able to view your slideshow without needing any new software, plug-ins, or downloads.