
Chapter Fifteen
Print Module
As WWII photographer W. Eugene Smith once said, “Negatives are the notebooks, the jottings, the false starts. . . . A proper print is the only completed photograph.” There is something special about a print. And the photographic process feels complete when you hold that print in your hands. It is easier for me to delete a digital file than to throw away a print. I’m sure you’d agree that printing is the most satisfying aspect of your workflow.
In this chapter we’ll focus on the Print module and how to create stunning, high-quality prints. First, we’ll learn about Print Collections and how to use print templates. Next, we’ll discuss how to use the Contact Sheet/Grid Layout engines. Then we will dig into how to get the most out of Picture Packages. From there you will learn about adding Overlays to your print layouts. Finally, we will discuss how to use the Print Job panel to “complete” a photograph and create a stunning final print.
The majority of your organizational work takes place in the Library module, including creating collections. But you can also create collections in the Slideshow, Web, and Print modules. Why create a collection? Collections give you the ability to group photos in a way that is not contingent upon the folder structure or where the photo is actually saved.
The advantage of making a collection in the Print module is that you can create groups of photos based on your print needs. This is especially helpful because the photos you select to print are typically quite different from the photos grouped for other purposes. The photos that I select to print are the best of the best.
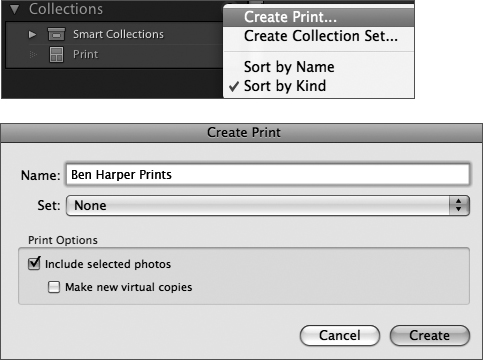
To create a print collection, navigate to the Print module. Next, select the photos in the Filmstrip that you want to add to the collection. Then, click on the plus (+) icon in the Collections panel and choose Create Print (Figure 86). Now, type a name for the collection and select the Include selected photos option. Finally, click Create.
Once you have created a print collection, a distinctive icon appears next to the collection name. This icon reveals where the collection was created, i.e., the Library, Print, Web, or Slideshow module, and also whether you will still be able to view, use, and access the Collection in the Library, Slideshow, and Web modules.
You will discover that creating prints and print layouts in Lightroom requires making prints at specific sizes or configurations over and over again. In these cases, using a predetermined template or creating your own template can dramatically increase your workflow productivity. For example, you could use the Print module template to create and print a contact sheet. Or you may simply want to use the print templates as a starting point to customize a layout to make unique print layouts.
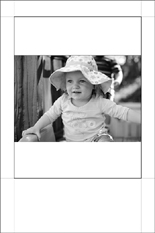
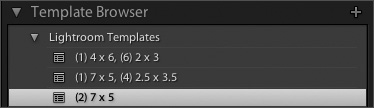
To use a print template, select one or more photos in the Filmstrip. In the Print module, open the Preview and Template Browser panels (Figure 87a). Next, position your cursor over one of the Lightroom templates. As you hover over the different templates you will see the layout appear in the Preview panel above. When you have found the template that will work best, click on the template name to select it. Once you have selected the template, your image(s) will appear in the main window inside the selected layout (Figure 87b).
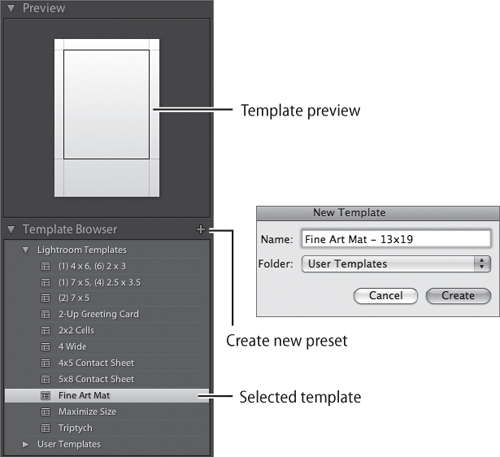
After you have selected a template you may find it helpful to customize the layout by using the panels on the right (this will be discussed in detail in the subsequent techniques). Once you have finished customizing the layout, you can save it as a custom template. Simply click the plus (+) icon and give the template a new name, select where you would like to save it, and press Create.
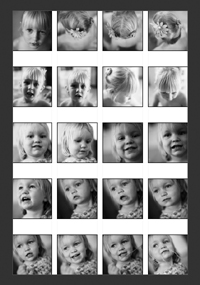
One of the photographer’s most common printing necessities is to create a contact sheet. Contact sheets allow you to print a grid of many thumbnails on one page. Photographers frequently create contact sheets to review images or to create a visual catalog to keep on a CD, DVD, or hard drive. This visual catalog allows you to “access” the images without having to browse the media storage device.
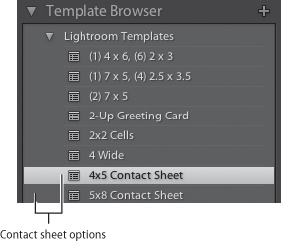
Creating contact sheets is an integral step in most workflows, and the good news is that Lightroom makes the process simple. To create a contact sheet grid, select multiple images in the Library module or in the Filmstrip (Figure 88a). Choose one of the two Contact Sheet templates in the Template panel (Figure 88b). The layout will appear in the main window (Figure 88c).

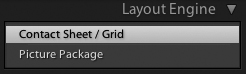
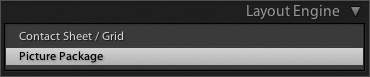
The Print module allows you to choose between two Layout Engines: Contact Sheet/Grid and Picture Package. The Grid layout is useful for creating and customizing layouts that fit within a rigid and traditional grid. To use this type of layout, select a Grid template (as described in Technique #88) or simply click on the Contact Sheet/Grid option in the Layout Engine panel (Figure 89a). Now that the Grid layout has been selected, let’s examine how to further customize the settings using the Image Settings, Layout, and Guides panels.
In the Image Settings panel (Figure 89b), select from the following options to suit your preference. Choose Zoom to Fill if you are not concerned about seeing the entire image and would prefer that the image fill the entire image cell. After choosing this option, position the cursor over the image and click and drag in order to change the part of the image that is shown (Figure 89c).
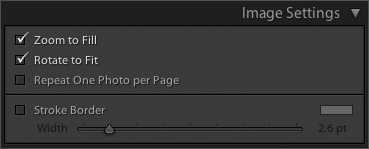

Next, choose Rotate to Fit to view the largest image that fits in the image cell, regardless of its horizontal or vertical orientation. As the name says, select Repeat One Photo per Page in order to create a contact sheet with one image per page. Next, choose Stroke Border in order to add a border. Click on the color chip to choose a new border color, and move the border sliders to change the size.
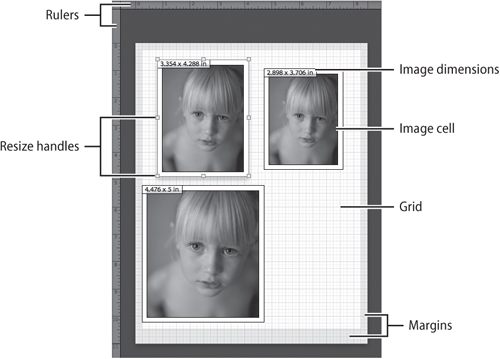
The Contact Sheet/Grid layout can be fully customized using the Layout and Guides panels (Figure 90a). In the Guides panels click Show Guides and you will see the results in the main view area (Figure 90b). To learn how to use the guides, try clicking each guide on and off to see how it affects the display.
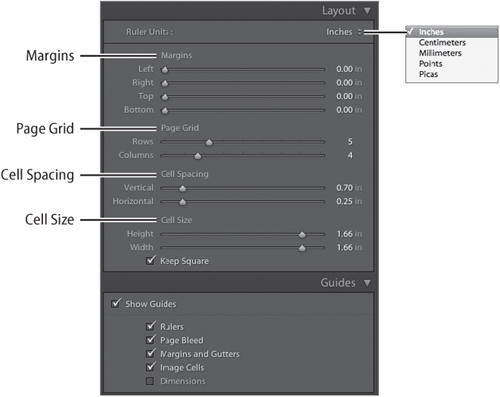
Use the Layout panel to make specific adjustments to the layout (Figure 90a). If you have chosen to show the rulers in the Guides panel, select an increment size. Typically inches works best, as most prints will be made to specific inch-sized papers.
Drag the controls to make the following layout modifications: Use Margins to control the margins surrounding the edges of the image layouts; use Page Grid to increase/decrease the number of rows and columns; use Cell Spacing to increase/decrease the distance between the images; use Cell Size to increase/decrease the image area; check Keep Square to make all cells perfectly square, or uncheck this option in order to create rectangular cells.
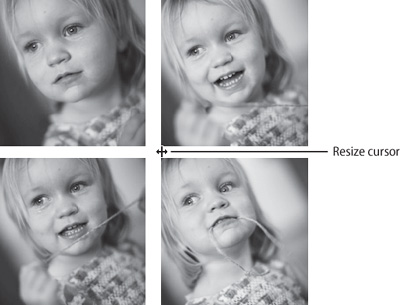
Finally, if you find the Layout panel sliders difficult to use, position the cursor over one of the following areas of the layout: Margins, Cell Spacing or Cell Size. Once you see the cursor change into a line with two arrows in the middle (Figure 90c), click and drag to resize that aspect of the layout.
The Picture Package layout provides you with the ability to create a flexible layout for printing one photo on one or more pages. This type of layout can be especially helpful when you need to print one image in multiple sizes for a client. In order to use the Picture Package layout, first, in the Library module or in the Filmstrip select the image that you would like to use. Next, select a Picture Package template in the Template Browser panel of the Print module (Figure 91a) or click on the Picture Package option in the Layout Engine panel (Figure 91b).
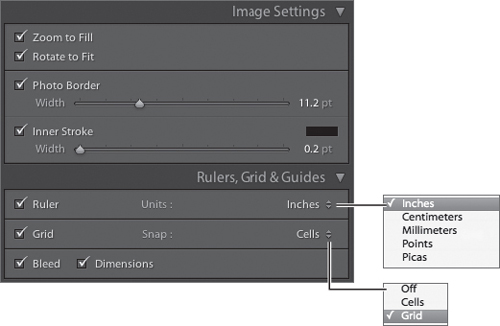
Next, use the Image Settings and Rulers, Grid and Guides panels to begin to customize the layout (Figure 91c). In the Image Settings panel you can choose the following options:
Zoom to Fill if you are not concerned about seeing the entire image, but rather you prefer that the image fill the entire image cell.
Rotate to Fit in order to view the largest image that fits in the image cell regardless of its horizontal or vertical orientation.
Photo Border to add a specified width around each image.
Inner Stroke to add a color brush stroke around each image.
Note that as you increase the stroke width the image will scale to compensate the added width.
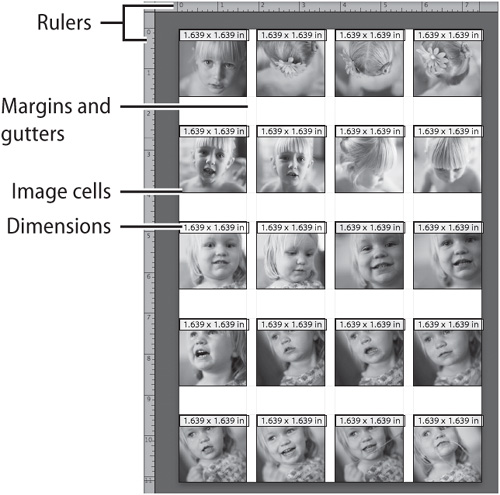
Next, modify the Rulers, Grid & Guides controls (Figure 91d) to change how the layout is displayed:
Ruler displays the Ruler and Units around the image layout.
Grid displays a grid behind the images and offers a Snap option so that the image cells snap to the grid or to other images.
Bleed displays a bleed area as a slightly grayed-out area around the edge of the layout.
Dimensions displays the image dimensions above each image.
Make sure Show Guides is ticked in the View menu for these guides to work.
The picture package Cells panel (Figure 92a) allows you to add images and customize images sizes in the layout. You can use the Picture Package layout to add as many cells as you want, and you can customize the layout arrangement in a wide range of configurations.
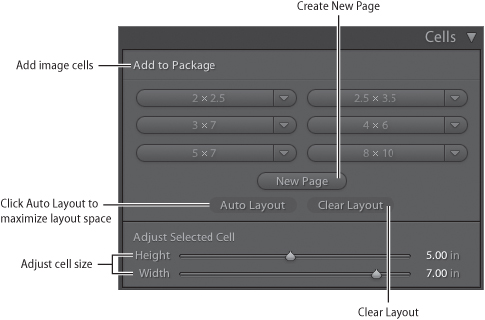
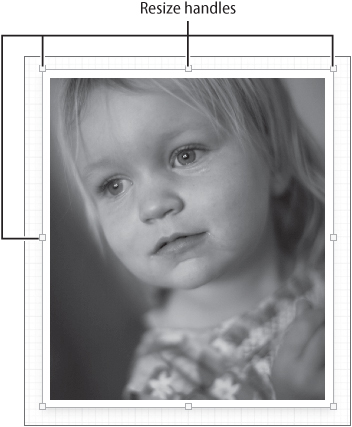
To use the Cell panel, click one of the buttons to add a cell to the layout. Choose from one of the six preset options. If the added cell doesn’t fit on the page, Lightroom will automatically create a new page for the image. If you want to create a new page, click the New Page button. Next, click-drag the cell to reposition it on the page. To change the size of the image cell use the slider controls or click-drag one of the many resize handles (Figure 92b).
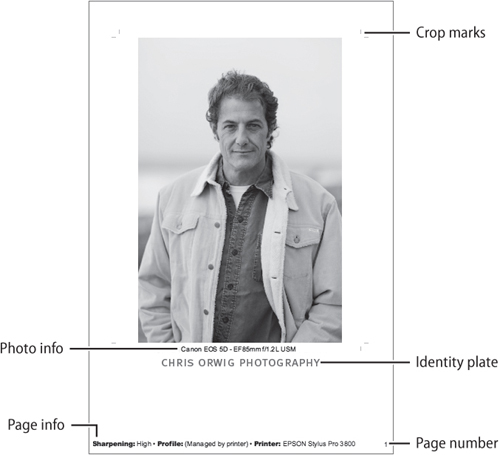
The Overlays panel (Figure 93a) can be used to add creative and/or technical information to either the Contact Sheet/Grid or Picture package print layouts (Figure 93b).
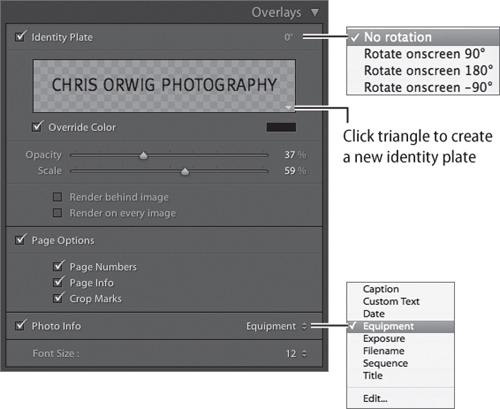
You can choose to add a personalized identity plate to the print layout by clicking on the Identity Plate option. To rotate the identity plate, click on the degrees icon in the upper left corner and choose an onscreen rotation option. To choose or create a new identity plate, click on the triangle icon in the bottom of the preview window. Next, choose Override Color to change the color of a text-based identity plate. Then you can modify the Opacity and Scale (or size) with the slider controls. In order to reposition the Identity Plate click and drag it in the main window area. Finally, you can choose to render the identity plate behind the image or choose to include it on every image.
The next two areas of the Overlays panel allow you to add Page Options and Photo Info to the image. Page Options allow you to add Page Numbers and Page Info to the bottom of the layout. In addition you can add Crop Marks for easier trimming after the photo(s) has been printed. Next, choose Photo Info to display a range of information including: Caption, Custom Text, Date, Equipment, Exposure, File name, Sequence, and Title.
Lightroom provides you with all the printing controls to help create dynamic and stunning prints, whether or you are sending your images to a lab or printing them directly to a desktop printer.
To send your images to a lab, you will need to convert the files to JPEGs. Navigate to the Print Job panel (Figure 94a) and Choose Print to: JPEG File. Turn off Draft Mode Printing (unless, of course, you want to print preview-quality drafts of the images). Change the File Resolution by hovering the cursor over the resolution number. When the cursor becomes an icon with a hand and two arrows, click and drag to the left or right to decrease or increase the resolution.
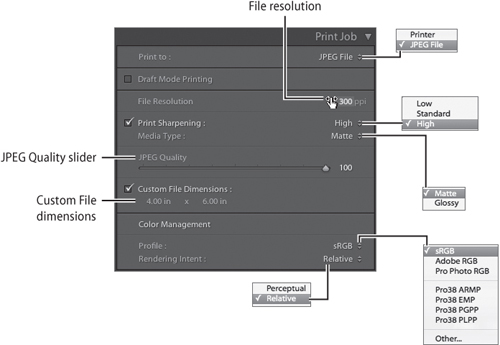
Turn on Print Sharpening and choose Low, Standard, or High, and a Media Type (photo paper) of Matte or Glossy. Next, choose a JPEG Quality with the slider. Turn on Custom File Dimensions and hover the cursor over the file dimension numbers. When the cursor become an icon with a hand and two arrows, click and drag to the left or right to decrease or increase the dimensions. Finally, under Color Management, choose a color Profile and Rendering Intent by clicking on the menu options.
In the Print Job panel select Print to Printer (Figure 94b) for printing your images to a desktop printer. Choose Draft Mode Printing in order to speed up the process and save resources when printing low-quality contact sheets or prints.
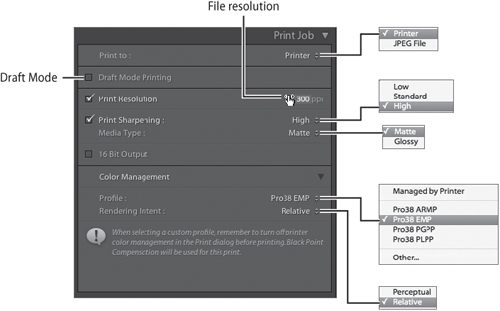
Next, turn on Print Resolution and hover the cursor over the file resolution number. You can also type in any resolution between 72 and 480 ppi. When the cursor becomes an icon with a hand and two arrows, click and drag to the left or right to decrease or increase the resolution. Turn on Print Sharpening and choose Low, Standard, or High; select a Media Type of Matte or Glossy.
In the Color Management controls, select a Profile for the particular printer and type of media (For example, in the screen grab below, I have chosen a profile for the Epson 3800 Enhance matte paper). Choose a Rendering Intent of Relative or Perceptual. Typically, Relative will work best, so try that first. If you do not like the results try Perceptual. (For more information see the sidebar “Which Rendering Intent is Best?”)