
ONE OF THE great things about programming in Minecraft is that in addition to looking at your creations on a 2D screen you can actually bring them to life in a virtual 3D world. You can walk around them, go inside them, make them bigger—even blow them up if you like! By using the ideas originally created to display 3D objects on a 2D screen, you can code 3D objects in Minecraft, turning the ordinary into the extraordinary.
In this adventure you find out how to use the minecraftstuff module to create 2D lines and shapes, which, when combined with a little maths, allow you to program a clock so big you can stand on its hands as they go round (see Figure 6-1). After you have mastered creating 2D shapes, you then learn how to combine them to create enormous 3D structures in seconds.

FIGURE 6-1 A massive Minecraft clock
The minecraftstuff Module
minecraftstuff is an extension module to the Minecraft API, which was written for Adventures in Minecraft and contains all the code you need to draw shapes and control 3D objects. It has a set of functions called MinecraftDrawing, which allows you to create lines, circles, spheres and other shapes. Because this complicated code is in a separate module it makes it simpler for you to create the code, and it’s easier to understand too. Modules are a way of splitting up a program into smaller chunks. When programs get too big, they are more difficult to read and harder to understand, and it takes longer to track down problems.
The minecraftstuff module is included in the “Adventures in Minecraft” starter kit that you installed in Adventure 1, and you can import it into a Minecraft program in the same way as you import the minecraft and block modules.
Creating Lines, Circles and Spheres
When you combine a lot of small, simple things, you can create something as large and complex as you want. In this adventure, you’re going to use lots of lines, circles, spheres and other shapes to produce a really big Minecraft structure. In this part of the adventure, you create a new program, import the modules you need and set up the minecraft and minecraftdrawing modules. Later, you use the functions in the modules to draw lines, circles and spheres.
Start up Minecraft and Python IDLE. You should have had a bit of practice with starting everything up by now, but refer to Adventure 1 if you need any reminders.
- Start by opening IDLE and creating a new file. Save the file as
LinesCirclesAndSpheres.pyin theMyAdventuresfolder. - Import the
minecraft,block,minecraftstuffandtimemodules by typing the following lines:import mcpi.minecraft as minecraft
import mcpi.block as block
import mcpi.minecraftstuff as minecraftstuff
import time - Create the connection to Minecraft:
mc = minecraft.Minecraft.create() - Use the
minecraftstuffmodule to create aMinecraftDrawingobject by typingmcdrawing = minecraftstuff.MinecraftDrawing(mc)
Drawing Lines
The MinecraftDrawing object has a function named drawLine(), which when called and passed two positions (x, y, z) and a block type as parameters it creates a line of blocks between those positions—just like the setBlocks() function you first learnt about in Adventure 3.
The following code uses the drawLine function to create a line of blocks like that shown in Figure 6-2:
drawLine(x1, y1, z1, x2, y2, z2, blockType, blockData)

FIGURE 6-2 The drawLine() function creates a line of blocks between two sets of x,y,z points.
Now update your program so that it uses the drawLine() function to create three lines in Minecraft — one straight up, one across and one diagonal from the player's position. Add the following code to the bottom of the LinesCirclesAndSpheres.py program:
- Find the position of the player by typing the following code:
pos = mc.player.getTilePos() - Draw a vertical line of 20 blocks from the player’s position straight upwards, by typing
mcdrawing.drawLine(pos.x, pos.y, pos.z,
                   pos.x, pos.y + 20, pos.z,
block.WOOL.id, 1) - Now draw a horizontal line of 20 blocks by typing
mcdrawing.drawLine(pos.x, pos.y, pos.z,
                   pos.x + 20, pos.y, pos.z,
block.WOOL.id, 2) - Draw a diagonal line of 20 blocks across and up:
mcdrawing.drawLine(pos.x, pos.y, pos.z,
                   pos.x + 20, pos.y + 20, pos.z,
block.WOOL.id, 3) - Because you will be adding to this program, add a time delay so there is a gap between each section. The gap lets you can see what is happening:
time.sleep(5) - Save the file and run the program. You should have created three lines of blocks, each in a different colour of wool: one running vertically from the player’s position, the second running horizontally and the third running diagonally between them.
Drawing Circles
You don’t have to stick to lines—you can also use MinecraftDrawing to create circles, by using the drawCircle() function, passing a centre point for the circle, a radius and a block type. You can create a circle by using the following code to call the drawCircle function:
drawCircle(x, y, z, radius, blockType, blockData)
To create the circle shown in Figure 6-3, add the following code to the bottom of the LinesCirclesAndSpheres.py program:
- Find the current position of the player by typing the following code:
pos = mc.player.getTilePos() - Draw a circle, starting 20 blocks above the player and with a radius of 20 blocks:
mcdrawing.drawCircle(pos.x, pos.y + 20, pos.z, 20,
block.WOOL.id, 4) - Add a time delay so you can see what’s happening in the program and to give you a chance to move the player:
time.sleep(5) - Save the file and run the program.
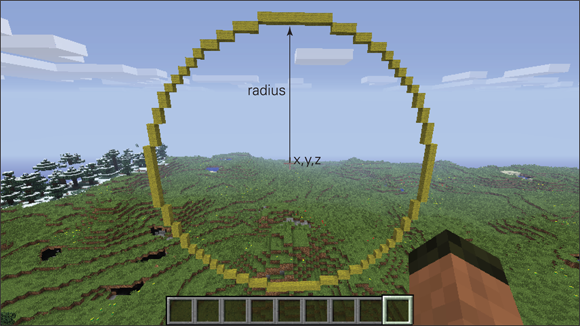
FIGURE 6-3 drawCircle creates a circle using a radius around a centre position (x,y,z)
The lines are drawn again first; you then have five seconds to move the player before the circle is drawn directly above the player.
Drawing Spheres
The drawSphere() function is similar to drawCircle() in that you work with a centre point, a radius and a block type. You can create a sphere by using the following code to call the drawSphere() function:
drawSphere(x, y, z, radius, blockType, blockData)
To create the sphere shown in Figure 6-4, add the following code to the bottom of the LinesCirclesAndSpheres.py program:
- Find the current position of the player by typing
pos = mc.player.getTilePos() - To draw a sphere starting 20 blocks above the player, with a radius of 15 blocks, type
mcdrawing.drawSphere(pos.x, pos.y + 20, pos.z, 15,
block.WOOL.id, 5) - Save the file and run the program.

FIGURE 6-4 drawSphere creates a sphere using a radius around a centre position (x,y,z)
The lines and circles are drawn again, giving you five seconds to move the player before the sphere is redrawn.
You can download the complete code for lines, circles and spheres from the Adventures in Minecraft companion website at www.wiley.com/go/adventuresinminecraft2e.
Creating a Minecraft Clock
After seeing how to create circles and lines in Minecraft, perhaps you can see how you would create the clock in Figure 6-1. The face is simply a large circle, and each of the hands is a line. Now comes the difficult part—working out where to put the lines and how to make them move.
In this part of the adventure, you use trigonometry to work out where to point the hands by turning the angle of the hand into the x and y coordinates on the clock face (see Figure 6-5). You’re going to make the hands seem to move by first drawing them with blocks then removing them by drawing them with AIR and then drawing them again in a new position.

FIGURE 6-5 Finding where to point the hands on a clock face
To create your clock, follow these steps:
- Create a new program for the Minecraft clock by opening IDLE and creating a new file. Save the file as
MinecraftClock.pyin theMyAdventuresfolder. - Import the
minecraft,block,minecraftstuff,time,datetimeandmathmodules by typing the following code:import mcpi.minecraft as minecraft
import mcpi.block as block
import mcpi.minecraftstuff as minecraftstuff
import time
import datetime
import math - Create a function,
findPointOnCircle(). When you pass this function the centre of the circle and the angle of the clock’s hands, the function returns the position of the clock’s hands as shown in Figure 6-5.def findPointOnCircle(cx, cy, radius, angle):
x = cx + math.sin(math.radians(angle)) * radius
y = cy + math.cos(math.radians(angle)) * radius
x = int(round(x, 0))
y = int(round(y, 0))
return(x, y) - Connect to
Minecraftand create theMinecraftDrawingobject:mc = minecraft.Minecraft.create()
mcdrawing = minecraftstuff.MinecraftDrawing(mc) - Find the player’s current position by typing
pos = mc.player.getTilePos() - Now you’re going to create variables for the centre of the clock (which is 25 blocks above the player’s position), the radius of the clock face and the length of the clock hands:
clockMiddle = pos
clockMiddle.y = clockMiddle.y + 25
CLOCK_RADIUS = 20
HOUR_HAND_LENGTH = 10
MIN_HAND_LENGTH = 18
SEC_HAND_LENGTH = 20 - Draw the clock face using
drawCircle():mcdrawing.drawCircle(
clockMiddle.x, clockMiddle.y, clockMiddle.z,
CLOCK_RADIUS, block.DIAMOND_BLOCK.id) - The program is not finished, but you should run it now to check everything is working and that a large circle (the clock face) appears above the player.
Next you add the code to your program for the hands of your clock:
- Start an infinite loop. All the code after this point will be inside this loop.
while True: - Ask your computer what the time is by using the function
datetime.datetime.now(). You then split the time into hours, minutes and seconds. Because your clock is a 12-hour clock, not a 24-hour one, you need to specify that if the time is after noon, 12 should be subtracted from the hour (so that, for example, if the time is 14:00, it is shown as 2 o’clock). Do this by typing the following code:timeNow = datetime.datetime.now()
hours = timeNow.hour
if hours >= 12:
hours = timeNow.hour - 12
minutes = timeNow.minute
seconds = timeNow.second - Draw the hour hand. The angle of this is 360 degrees divided by 12 hours, multiplied by the current hour. Find the x and y position for the end of the hand using
findPointOnCircle()and draw the hand usingdrawLine()by typing the following:hourHandAngle = (360 / 12) * hours
hourHandX, hourHandY = findPointOnCircle(
clockMiddle.x, clockMiddle.y,
HOUR_HAND_LENGTH, hourHandAngle)
mcdrawing.drawLine(
clockMiddle.x, clockMiddle.y, clockMiddle.z,
hourHandX, hourHandY, clockMiddle.z,
block.DIRT.id) - Draw the minute hand, which is one block behind (z–1) the hour hand, by typing:
    minHandAngle = (360 / 60) * minutes

    minHandX, minHandY = findPointOnCircle(
        clockMiddle.x, clockMiddle.y,
        MIN_HAND_LENGTH, minHandAngle)

    mcdrawing.drawLine(
        clockMiddle.x, clockMiddle.y, clockMiddle.z-1,
        minHandX, minHandY, clockMiddle.z-1,
block.WOOD_PLANKS.id) - Add the second hand, which is one block in front (z+1) of the hour hand:
    secHandAngle = (360 / 60) * seconds

    secHandX, secHandY = findPointOnCircle(
        clockMiddle.x, clockMiddle.y,
        SEC_HAND_LENGTH, secHandAngle)

    mcdrawing.drawLine(
        clockMiddle.x, clockMiddle.y, clockMiddle.z+1,
        secHandX, secHandY, clockMiddle.z+1,
block.STONE.id) - Wait for one second:
time.sleep(1) - Again your program is not finished, but you should run it to check that the hands appear. Have a look at what happens as the hands move.
You may have noticed that the hands of the clock aren’t cleared away as they move. The next step is clearing the hands of the clock by drawing them again using AIR:
- Clear the hour hand:
    mcdrawing.drawLine(
        clockMiddle.x, clockMiddle.y, clockMiddle.z,
        hourHandX, hourHandY, clockMiddle.z,
block.AIR.id) - Clear the minute hand:
    mcdrawing.drawLine(
        clockMiddle.x, clockMiddle.y, clockMiddle.z-1,
        minHandX, minHandY, clockMiddle.z-1,
block.AIR.id) - Clear the second hand:
    mcdrawing.drawLine(
        clockMiddle.x, clockMiddle.y, clockMiddle.z+1,
        secHandX, secHandY, clockMiddle.z+1,
block.AIR.id) - Run the program to see the result of your efforts: a massive Minecraft clock above the player. Make sure the player is on the correct side of the clock, though; otherwise time will be going backwards!
You can download the complete code for the Minecraft Clock from the companion website www.wiley.com/go/adventuresinminecraft2e but I strongly recommend that you type in the code yourself as you read through the steps. You’ll learn a lot more that way!
Drawing Polygons
A polygon is any 2D shape made up of straight connecting sides. It can have any number of sides, from three (a triangle) upwards. As you can see from Figure 6-6, you can create any number of interesting polygons in Minecraft.
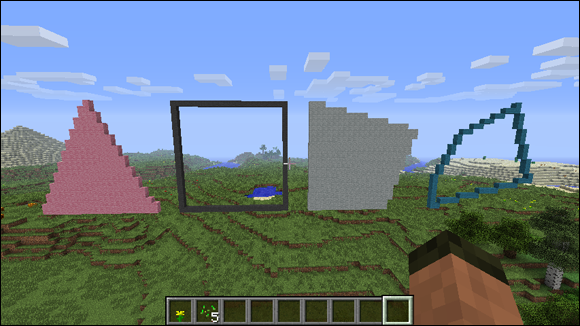
FIGURE 6-6 Examples of polygons in Minecraft
Although they are 2D shapes, you’ll find polygons extremely useful for making 3D graphics because you can create virtually any 3D object by connecting lots of polygons together. When polygons are used together to create 3D objects, they are known as faces. You can create some awesome structures this way. Just look at Figure 6-7, which shows the skyline of Manhattan Island, created by lots of polygons (see how it’s done at www.stuffaboutcode.com/2013/04/minecraft-pi-edition-manhattan-stroll.html).

FIGURE 6-7 Minecraft skyline of Manhattan Island, New York
You can create polygons (or faces) using the drawFace() function in MinecraftDrawing. The function expects a list of points (x, y, z) that, when connected in sequence, create a complete polygon. Passing a True or False in the filled parameter determines whether the face is filled, and the final parameter is the type of block the face should be made from (see Figure 6-8):
drawFace(points, filled, blockType, blockData)
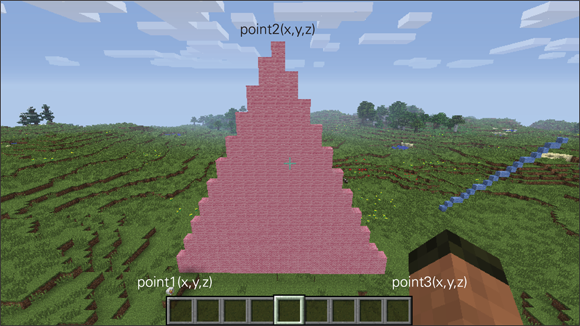
FIGURE 6-8 drawFace() used to create a triangle from three points
Create a new program to experiment with the drawFace() function and create the triangle shown in Figure 6-8:
- Open IDLE and create a new file. Save the file as
Polygon.pyin theMyAdventuresfolder. - Import the
minecraft,blockandminecraftstuffmodules by typingimport mcpi.minecraft as minecraft
import mcpi.block as block
import mcpi.minecraftstuff as minecraftstuff - Connect to minecraft and create the
MinecraftDrawingobject:mc = minecraft.Minecraft.create()
mcdrawing = minecraftstuff.MinecraftDrawing(mc) - Get the player’s current position:
pos = mc.player.getTilePos() - Use the
minecraftstuff.Pointsclass to create a list of points:points = minecraftstuff.Points() - Then add three points (x, y, z) to the points, which, when joined together, create a triangle:
points.add(pos.x, pos.y, pos.z)
points.add(pos.x + 20, pos.y, pos.z)
points.add(pos.x + 10, pos.y + 20, pos.z) - Use the
MinecraftDrawing.drawFacefunction to create the triangle polygon:mcdrawing.drawFace(points, True, block.WOOL.id, 6) - Save the file and run the program to create the triangle polygon.
Pyramids
Find a picture of a pyramid and take a good look at it. What do you notice? What shape are its sides? What do all the sides have in common? How many sides does it have?
As you probably know, each side of a pyramid (except the base) is always a triangle. The pyramids in Egypt had four sides (or five if you include the base), but they can have any number of sides from three upward. Did you also notice that the base of any pyramid will fit exactly into a circle! Take a look at Figure 6-9 to see what I mean.

FIGURE 6-9 A pyramid made of triangles, which fits exactly into a circle
You are now going to create a program, which by using the drawFace() and findPointOnCircle() functions, makes any size of pyramid, of any height, with any number of sides:
- Open IDLE and create a new file. Save the file as
MinecraftPyramids.pyin theMyAdventuresfolder. - Import the
minecraft,block,minecraftstuffandmathmodules by typing:import mcpi.minecraft as minecraft
import mcpi.block as block
import mcpi.minecraftstuff as minecraftstuff
import math - Create the
findPointOnCircle()function, which will be used to work out where each of the triangles which make up the pyramid will be placed:def findPointOnCircle(cx, cy, radius, angle):
    x = cx + math.sin(math.radians(angle)) * radius
    y = cy + math.cos(math.radians(angle)) * radius
    x = int(round(x, 0))
    y = int(round(y, 0))
return(x, y) - Connect to Minecraft and create the
MinecraftDrawingobject:mc = minecraft.Minecraft.create()
mcdrawing = minecraftstuff.MinecraftDrawing(mc) - Set up the variables for your pyramid. The middle of the pyramid is the player’s position. The values of these variables change the size (or radius), height and number of sides of the pyramid.
middle = mc.player.getTilePos()
RADIUS = 20
HEIGHT = 10
SIDES = 4 - Loop through each side of the pyramid; all the code after this point is indented under the
forloop:for side in range(0, SIDES): - For each side of the pyramid, calculate the angles of the sides of the triangle and then use
findPointOnCircle()to find the x, y, z coordinates. The angle is calculated by dividing 360 degrees by the total number of sides, multiplied by the number of the side which is being drawn, as you can see in Figure 6-10. Type the code as follows indented under theforloop:point1Angle = int(round((360 / SIDES) * side,0))
point1X, point1Z = findPointOnCircle(
middle.x, middle.z, RADIUS, point1Angle)
point2Angle = int(round((360 / SIDES) * (side + 1),0))
point2X, point2Z = findPointOnCircle(
middle.x, middle.z, RADIUS, point2Angle) - Create the points of the triangle and use
drawFace()to create the side of the pyramid as follows:points = minecraftstuff.Points()
points.add(point1X, middle.y, point1Z)
points.add(point2X, middle.y, point2Z)
points.add(middle.x, middle.y + HEIGHT, middle.z)
mcdrawing.drawFace(points, True, block.SANDSTONE.id) - Save the file and run the program. A pyramid appears above the player—and traps him inside!

FIGURE 6-10 The angles of a four-sided pyramid
This program can create pyramids of any size and with any number of sides. Try changing the pyramid variables in the program and re-running it. Figure 6-11 shows a couple of impressive examples.

FIGURE 6-11 Minecraft pyramids
You can download the complete code for the Minecraft pyramid from the Adventures in Minecraft companion website at www.wiley.com/go/adventuresinminecraft2e.
Further Adventures with 2D and 3D Shapes
Using the drawFace() function, you can create any sort of polyhedron, which is a shape with flat faces (just like the pyramids you created earlier), so why not create some more?
You can find lots of polyhedron examples and good ideas at the following websites:
- Maths is Fun (
www.mathsisfun.com/geometry/polyhedron.html) - Kids Math Games (
www.kidsmathgamesonline.com/facts/geometry/3dpolyhedronshapes.html)
Quick Reference Table | |
Command |
Description |
mcdrawing.drawLine(0, 0, 0, 10, 10, 10, block.DIRT.id) |
Draw a line between two points |
mcdrawing.drawCircle(0, 0, 0, radius, block.DIRT.id) |
Draw a circle |
mcdrawing.drawSphere(0, 0, 0, radius, block.DIRT.id) |
Draw a sphere |
tri = minecraftstuff.Points() filled = True tri.add(0,0,0) tri.add(10,0,0) tri.add(5,10,0) mcdrawing.drawFace(tri, filled, block.DIRT.id) |
Draw a polygon or face (e.g. a triangle) |

Achievement Unlocked: 3D master, creator of massive structures, all hail the pyramid builder!