
Lesson 3. Strings and Packages
In this lesson, you will:
• learn more about the String class
• learn how characters are represented in Java
• use a system property to ensure platform-independent code
• use StringBuilder objects to dynamically construct strings
• learn how to iterate through a collection to operate on each of its objects
• use System.out to display report output
• organize your classes into packages
• increase your understanding of the access modifiers public and private
Characters and Strings
Strings, or pieces of text, account for up to 50 percent and more of the objects created during the execution of a typical Java application. While Strings are objects, they are made up of sequences of individual characters. Java represents a character as a primitive type known as char. Since a char value is of a primitive type (like an int value), remember that you cannot send messages to it.
Characters
Java includes a char type that represents letters, digits, punctuation marks, diacriticals, and other special characters. Java bases its character set on a standard known as Unicode 4.0 for representation of its characters. The Unicode standard is designed to accommodate virtually all character variations in the major languages of the world. More information regarding the standard can be found at http://www.unicode.org.
Java uses two bytes to store each character. Two bytes is 16 bits, which means that Java can represent 216, or 65,536, characters. While that may seems like a lot, it's not enough to support everything in the Unicode standard. You probably won't need to concern yourself with supporting anything over the two-byte range, but if you do, Java allows you to work with characters as int values. An int is four bytes, so the billions of characters it can support should be sufficient until the Federation requires us to incorporate the Romulan alphabet.
You can represent character literals in Java in a few ways. The simplest form is to embed the actual character between single quotes (tics).
char capitalA = 'A';
Characters are essentially numerics. Each character maps to a corresponding positive integer from 0 through 65,535. Here is a test snippet that shows how the character 'A' has a numeric value of 65 (its Unicode equivalent).
assertEquals(65, capitalA);
Not all characters can be directly entered via the keyboard. You can represent Unicode characters using the Unicode escape sequence, u or U, followed by a 4-digit hex number.
assertEquals('u0041', capitalA);
Additionally, you may represent characters as a 3-digit octal (base 8) escape sequence.
assertEquals('101', capitalA);
The highest possible character literal that you may represent as an octal sequence is '377', which is equivalent to 255.
Most older languages (for example, C) treat characters as single bytes. The most well-known standard for representing characters in a single-byte character set (SBCS), the American Standard Code for Information Interchange (ASCII), is defined by ANSI X3.4.1 The first 128 characters of Unicode map directly to their ASCII correspondents.
1 In fact, ASCII is only a true standard for seven of the single byte's eight bits. Characters from 0 through 127 are consistently represented, but there are several competing standards for characters 128 through 255.
Special Characters
Java defines several special characters that you can use for things such as output formatting. Java represents the special characters with an escape sequence that consists of the backslash character () followed by a mnemonic. The table below summarizes the char literals that represent these special characters.
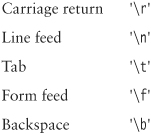
Since the tic character and the backslash character have special meanings with respect to char literals, you must represent them with an escape sequence. You may also escape (i.e., prefix with the escape character ) the double quote character, but you are not required to do so.
Strings
A String object represents a sequence of char values of fixed length. The String class in Java is probably the most frequently used class in any Java application. Even in a small application, thousands of String objects will be created over and over.
The String class supplies dozens of methods. It has special performance characteristics that make it different from most other classes in the system. Finally, even though String is a class like any other class in the system, the Java language provides special syntactical support for working with String objects.
You can construct Strings in a number of ways. Any time you create a new String literal, the Java VM constructs a String object behind the scenes. Here are two ways to construct a String object and assign it to a reference variable:
String a = "abc";
String b = new String("abc"); // DON'T DO THIS
Avoid the second technique.2 It creates two String objects, which can degrade performance: First, the VM creates the literal String object "abc". Second, the VM constructs a new String object, passing the literal "abc" to its constructor. Equally as important, it is an unnecessary construct that makes your code more difficult to read.
Since strings are sequences of characters, they can embed special characters. The string literal in the following line of code contains a tab character followed by a line feed character.
String z = " ";
String Concatenation
You may concatenate a string to another string to produce a third string.
assertEquals("abcd", "ab".concat("cd"));
String concatenation is such a frequent operation in Java that you can use the plus sign (+) as a shortcut for concatenating strings. In fact, most Java concatenations are written this way:
assertEquals("abcdef", "abc" + "def");
Since the result of concatenating two strings together is another string, you can code many + operations to concatenate several strings into a single string.
assertEquals("123456", "12" + "3" + "456");
In the previous lesson, you used + for addition of integers. Java also allows you to use the plus sign, known as an operator, to concatenate strings. Since the + operator has different meanings, depending on what you use it with, it is known as an overloaded operator.
String Immutability
As you browse through the Java API documentation for String, you will notice that there are no methods that change a string. You cannot alter the length of a string, nor can you alter any of the characters contained within a string. String objects are thus immutable. If you want to perform any manipulations on a string, you must create a new string. For example, when you concatenate two strings using +, the Java VM alters neither string. Instead, it creates a new string object.
Sun designed String to be immutable to allow it to act in a very optimized manner. This optimization is crucial due to the very heavy use of Strings in most applications.
StringBuilder
Often you will need to be able to construct strings dynamically. The class java.lang.StringBuilder provides this capability. A newly created StringBuilder represents an empty sequence, or collection, of characters. You can add to this collection by sending the append message to the StringBuilder object.
Just as Java overloads the + operator to support both adding int values and concatenating strings, the StringBuilder class overloads the append method to take arguments of any base type. You can pass a character, a String, an int, or other types as arguments to an append message. Refer to the Java API documentation for the list of overloaded methods.
When you finish appending to the StringBuilder, you obtain a concatenated String object from the StringBuilder by sending it the toString message.
![]()
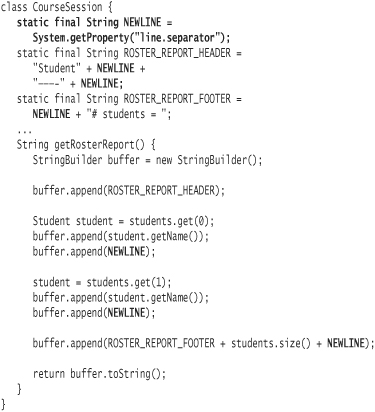
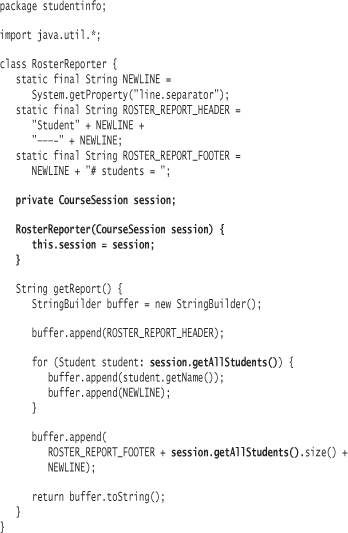
Users of the student information system need to produce a report showing the roster of a course session. For now, a simple text report with just a list of the student names in any order will suffice.
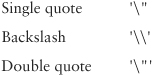
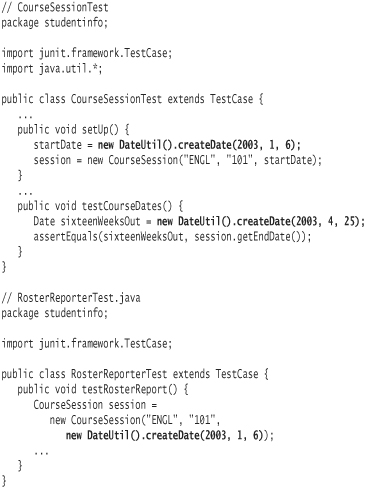
Code the following test in CourseSessionTest. The assertion shows that the report requires a simple header and a footer showing the count of students.
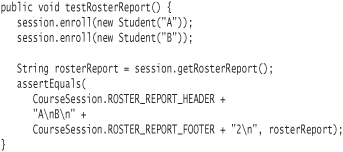
(Remember that testRosterReport uses the CourseSession object created in the setUp method in CourseSessionTest.) Update CourseSession with the corresponding code:
For each of the two students, you pass a String (the student's name) to append, then you pass a char (line feed) to append. You also append header and footer information to the StringBuilder object stored in buffer. The name buffer implies that the StringBuilder holds on to a collection of characters that will be used later. The line that constructs the footer demonstrates how you can pass a concatenated string as the parameter to the append method.
You defined the getRosterReport method in the CourseSession class. Code within a class can refer directly to static variables. So instead of:
CourseSession.ROSTER_REPORT_HEADER
the CourseSession code uses:
ROSTER_REPORT_HEADER
When you learn more about the static keyword in Lesson 4, you will be told to refer to static variables and static methods only by scoping them with the class name (as in CourseSession.ROSTER_REPORT_HEADER), even from within the class they are defined. Doing otherwise obscures the fact that you are using static elements, which can lead to troublesome defects. In the case of class constants, however, the naming convention (UPPERCASE_WITH_UNDERSCORES) makes it explicitly clear that you are referring to a static element. The second, unscoped, form is thus acceptable (although some shops may prohibit it) and is an exception to the rule.
If you look at older Java code, you will see use of the class java.lang.String-Buffer. You interact with a StringBuffer object the same as with a StringBuilder object. The distinction between the two is that the StringBuilder class has better performance characteristics. It does not need to support multithreaded applications, where two pieces of code could be working with a StringBuffer simultaneously. See Lesson 13 for a discussion of multithreading.
System Properties
Both the method getRosterReport and its test contain the use of '
' to represent a line feed in many places. Not only is this duplication, it is not portable—different platforms use different special character sequences for advancing to a new line on output. The solution to this problem can be found in the class java.lang.System. As usual, refer to the J2SE API documentation for a more detailed understanding of the System class.
The System class contains a method named getProperty that takes a system property key (a String) as a parameter and returns the system property value associated with the key. The Java VM sets several system properties upon startup. Many of these properties return information about the VM and execution environment. The API documentation method detail for getProperties shows the list of available properties.
One of the properties is line.separator. According to the Java API documentation, the value of this property under Unix is '
'. However, under Windows, the value of the property is '
'. You will use the line.separator system property in your code to compensate for the differences between platforms.
The following changes to the test and to CourseSession demonstrate use of the System method getProperty.
Test code:

Production code:
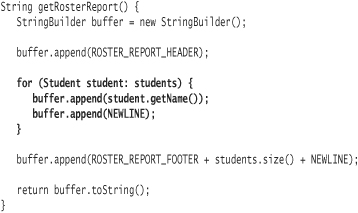
Looping through All Students
The test method testRosterReport demonstrates how to produce a report for two students. You know that the code to construct the report is written with the assumption that there will be only two students.
![]()
You need to produce code that supports an unlimited number of students. To do this, you will modify your test to enroll additional students. Subsequently, you will recognize that the production class contains duplicate code—and the amount of duplication will only get worse—since the same three lines of code are repeated for each student, with the only variance being the index of the student.
What you would like to be able to do is to execute the same three lines of code for each of the students in the ArrayList, regardless of how many students the ArrayList contains. There are several ways of doing this in Java. The most straightforward means in J2SE 5.0 is to use a for-each loop.3
3 Also known as an enhanced for loop.
There are two forms of the for-each loop. The first form, which uses opening and closing braces following the loop declaration, allows you to specify multiple statements as the body of the for-each loop.
for (Student student: students) {
// ... statements here ...
}
The second form allows you to define the body as a single statement only, and thus requires no braces:
for (Student student: students)
// ... single statements here;
In Lesson 7, you will learn about another kind of for loop that allows you to loop a certain number of times instead of looping through every element in a collection.
The Java VM executes the body of the for loop once for each student in the collection students.
A reading of the above for-each loop in English-like prose: Assign each object in the collection students to a reference of the type Student named student and execute the body of the for loop with this context.
Single-Responsibility Principle
![]()
New reports are continually needed in the student information system. You have been told that you must now produce three additional reports. And you can surmise that new reports will continue to be requested. You foresee the need to change the CourseSession class constantly as the reports are added.
One of the most basic design principles in object-oriented programming is that a class should do one thing and do it well. By virtue of doing this one thing, the class should have only one reason to change. This is known as the Single-Responsibility Principle.4
4 [Martin2003].
![]()
Classes should have only one reason to change.
The one thing CourseSession should be doing is tracking all information pertinent to a course session. Adding the capability to store professor information for the course session is a motivation that is in line with the primary goal of the class. Producing reports such as the roster report, however, is a different motivation for changing the CourseSession class and as such violates the Single-Responsibility Principle.
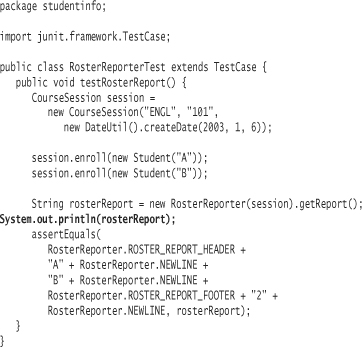
Create a test class, RosterReporterTest, to demonstrate how a new, separate class named RosterReporter can be used to produce a roster report.
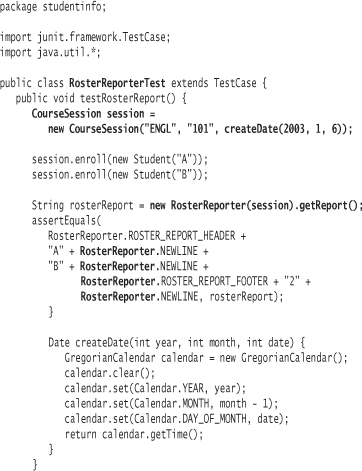
The method testRosterReport is almost the same as it appeared in CourseSessionTest. The chief differences (highlighted in bold):
• You construct an instance of RosterReporter with a CourseSession object as a parameter.
• You now use class constants declared in RosterReporter instead of CourseSession.
• testReport constructs its own CourseSession object.
You should also recognize and make note of the duplication—both CourseSessionTest and RosterReporterTest require the createDate method. You will soon refactor this duplication away.
Add the new test to AllTests:
Much of the work of getting the test to pass involves moving the code over from CourseSession. Do this incrementally—don't make any changes to CourseSession or CourseSessionTest until everything is working in RosterReporter.
The bold code in the example above shows the significant differences between RosterReporter and the corresponding code in CourseSession.
To arrive at the code above, first paste the body of getReport from CourseSession directly into the corresponding method in RosterReporter. Then modify the pasted code to request the collection of students from CourseSession by sending the getAllStudents message instead of accessing it directly (since the method no longer executes in CourseSession). Since you removed getAllStudents in the previous lesson, you'll just have to add it back to CourseSession.
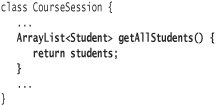
Also, in order for code in RosterReporter to be able to send messages to the CourseSession object, it must store a CourseSession reference. You do this by assigning the CourseSession passed to the constructor of RosterReporter in the instance variable session.
Next, remove the report-related code from CourseSessionTest and CourseSession. This includes the test method testRosterReport, the production method getRosterReport, and the class constants defined by CourseSession. Rerun all tests.
The current class structure is show in Figure 3.1.
Figure 3.1. Class Diagram
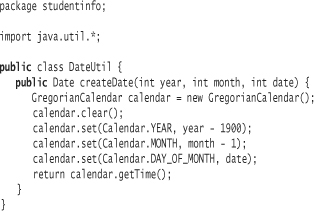
Refactoring
Both CourseSessionTest and RosterReporterTest require the createDate utility method. The code in createDate has nothing to do with course sessions or roster reports; it deals solely with constructing date objects. Including minor utility methods in classes is a mild violation of the Single-Responsibility Principle. You can tolerate small doses of duplication, but in doing so you quickly open the door to excessive, costly duplication in your system. In a larger system, there might be half a dozen methods that construct dates, all with pretty much the same code.
Here the duplication is obvious, since you directly created (and hopefully noted) it. An alternate approach is to not even let the duplication occur: As soon as you recognize that you might be introducing duplicate code, do the necessary refactoring first to stave off the potential duplication.
You will create a new test class and production class. You must update AllTests to reference the new test class. The code for all three follows.
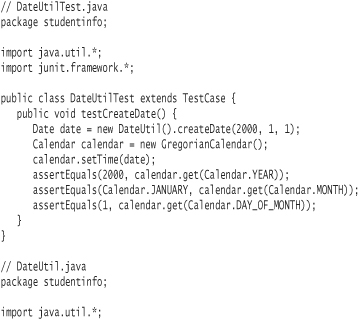
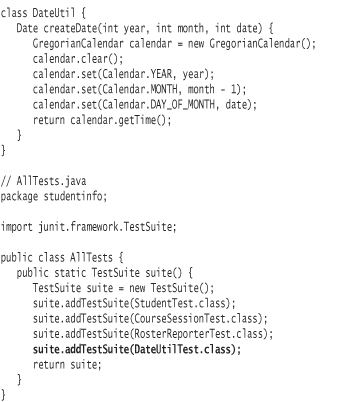
Previously, no tests existed for the createDate method, since it was only a utility for use in test classes themselves. When extracting code from one class to a new class, you should always move along any tests that exist into the corresponding new test class. When tests do not exist, you should expend the time to create them. This will maintain the sustainability of your system.
Now that you have created and tested the DateUtil class, you want to update your code to refer to it. At the same time, you want to remove the createDate method from both CourseSessionTest and RosterReporterTest. One solid approach is to remove the createDate method from both places and recompile. The compiler will tell you precisely which lines of code refer to the nonexistent createDate method.
![]()
Use the compiler to help you refactor code.
Change these lines.
In order to use the createDate utility method, you must construct a DateUtil object each time. In the case of CourseSession test, you construct a DateUtil object twice—a prime candidate for refactoring. You could create an instance variable to hold onto a DateUtil instance. A better solution, however, is to convert the DateUtil to a static method—a method you can call without creating instances of DateUtil. You will learn how to do this in Lesson 4.
System.out
The getReport method returns a String that contains a report of all the students enrolled in a course session. In the production student information system, the String isn't going to be of much use to anyone unless you print it out or display it somewhere. Java provides output facilities to allow you to redirect information to the console, to files, and to other destinations. You will learn about these output facilities in depth in Lesson 11.
In this exercise you will modify the test so that the report displays on the console. It isn't yet a requirement, but sometimes you need to be able to display things for various reasons. The next section goes into some of these reasons.
In the Setup section of this book, you coded and ran a “Hello World” application that printed text to your console. The line of code to print the text on the console was:
System.out.println("hello world");
Look at the J2SE API documentation for the class named System, located in the package java.lang. You will see that out is a static variable, of the type PrintStream, that represents the standard output stream, also known as stdout or simply “the console.” You can directly access this console object using the following static variable reference:
System.out
Once you have this console object, you may send it a number of messages, including the message println. The println method takes a String (among other things) and writes it to the underlying output stream.
Add a line to RosterReporterTest that displays the report on the console by using System.out:
Rerun your tests. You should see the actual report displayed onscreen. If you are running in an IDE, you may need to use System.err (the standard error output stream, also known as syserr), instead of System.out, in order to view the results.5
5 The results might appear in a window named “console.”
You'll note that I placed the additional line of code all the way to the left margin. I use this convention to remind me that the code is intended for temporary use. It makes such statements easy to locate and remove.
Revert these changes and rerun all tests once you have finished viewing the output.
Using System.out
The most frequent use of System.out is to post messages to the console in an effort to locate defects in a program. You insert System.out.println statements to display useful information at judicious points in your code. When you execute the application, the output from these trace statements can help you understand the flow of messages and data through the objects interacting in the system.
Debuggers are far more sophisticated tools that accomplish the same goal and much more, but simple trace statements can occasionally be a more rapid and effective solution. Also, in some environments it is not feasible to use a debugger.
Regardless, you should find minimal need to debug your code, or even insert trace statements into it, if you do TDD properly. If you do the small steps that TDD prescribes, you will introduce very small amounts of code into your application before finding out you have a problem. Instead, the better solution is to discard the small amount of newly introduced code and start again, using even smaller verified steps.
![]()
Build your system in small increments of test and code. Discard an increment and start over with smaller steps if you have a problem.
Most developers do not write console-based applications, although you are probably familiar with many of them. The compiler javac itself is a console-based application. Simple server applications are often coded as console applications so that developers can easily monitor their output.
Refactoring
If you haven't already done so, remove the testReport method from CourseSessionTest and remove the corresponding production code from CourseSession.
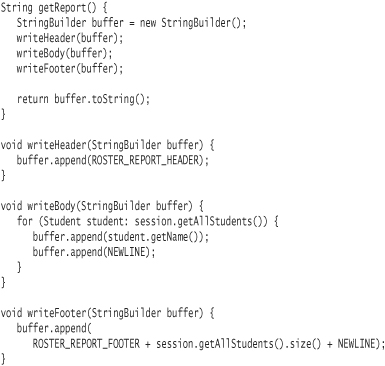
The writeReport method is still short, but conceptually it is doing three things. To make understanding even more immediate, you can decompose the code in writeReport into three smaller methods, one each to construct the header, body, and footer of the report:
Package Structure
You use packages to arbitrarily group your classes. This grouping of classes, known as the package structure, will change over time as your needs change. Initially, your concern will be ease of development. As the number of classes grows, you will want to create additional packages for manageability reasons. Once you deploy the application, your needs may change: You may want to organize the packages to increase the potential for reuse or perhaps to minimize maintenance impact to consumers of the package.
So far, your classes have all ended up in one package, studentinfo. A typical way to start organizing packages is to separate the user interface—the part of the application that the end user interacts with—from the underlying classes that represent business objects and infrastructural objects. The RosterReporter class in the previous example could be construed as part of the user interface, as it produces output that the end user will see.
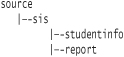
Your next task will be to first move the studentinfo package down a level so that it is in a package named sis.reportinfo. You will then separate the RosterReporter and RosterReporterTest classes into their own package named report.
First create a new subdirectory named sis (for “Student Information System”) at the same directory level as studentinfo. Beneath this directory, create a new subdirectory named report. Move the studentinfo subdirectory into the sis subdirectory. Move the RosterReporter and RosterReporterTest classes into the report subdirectory. Your directory structure should look something like:
Next, you will change the package statements of all your classes. For the packages in the report subdirectory, use this package statement:
package sis.report;
For the packages in the studentinfo subdirectory, use this package statement:
package sis.studentinfo;
As you did in Lesson 2, remove all the class files (*.class), then recompile all your code. You will receive several errors. The problem is that the RosterReporter and RosterReporterTest classes are now in a separate package from the CourseSession and Student classes. They no longer have appropriate access to the classes in the other package.
Access Modifiers
You have already used the keyword public for JUnit classes and methods without an understanding of the full meaning of the keyword, other than that JUnit requires that test classes and methods be declared public. You also learned that instance variables can be declared private so that objects of other classes cannot access them.
The public and private keywords are known as access modifiers. You use access modifiers to control access to Java elements, including fields, methods, and classes. The access modifiers that are appropriate for a class are different than those that are appropriate for methods and fields.
By declaring a class as public, you allow classes in other packages to be able to import and refer directly to the class. The JUnit framework classes are located in various packages whose name starts with junit. In order for these JUnit classes to be able to instantiate your test classes, you must declare them as public.
Neither the CourseSession nor the Student class you built specified an access modifier. In the absence of an access modifier, a class has an access level of package, also known as default access. You can refer to a class with package-level access from other classes within the same package; however, classes in a different package cannot refer to the class.
For “safer” programming, the preferred tactic is to start at the most restrictive level and then open up access as needed. Exposing your classes too much can mean that clients can become unnecessarily dependent on the details of how you've put the system together. If you change the details, the clients could break. Also, you open your code up to being corrupted by providing too much access.
![]()
Protect your code as much as possible. Relax access modifiers only when necessary.
The CourseSession and Student classes currently have package-level access. You can keep them at that level until a class in another package requires access to them.
In order to get your code to compile, you will first have to add an import statement so that the compiler knows to look in the studentinfo package for the Student and CourseSession classes. The modification to RosterReporterTest is shown here:
package sis.report;
import junit.framework.*;
import sis.studentinfo.*;
public class RosterReporterTest extends TestCase {
...
Add the same import statement to RosterReporter.
The classes in the studentinfo package still have package-level access, so classes in the reports package will not be visible to them. Change the class declaration to be public for Student, CourseSession, and DateUtil, as shown in the example for Student:
package sis.studentinfo;
public class Student {
...
You will also receive a compilation error for AllTests.java. It no longer recognizes the class RosterReporterTest, since RosterReporterTest has been moved to a different package. For now, comment out that line in AllTests.java:
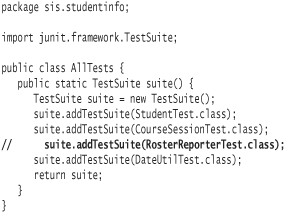
You will soon create a new AllTests for the reports package. Be careful when commenting out code—it's easy to forget why the code is commented out.
After recompiling, you will receive lots of errors for each message sent from the code in the reports package to Student and CourseSession objects. Like classes, the default access level for constructors (and methods) is package. Just as classes need to be public in order to be accessed from outside the package, methods and constructors also must be declared as public. Do so judiciously—you should never make blanket declarations of every method as public.
As a matter of style and organization, you may also want to move public methods so they appear before the nonpublic methods in the source file. The idea is that a client developer interested in your class will find the public methods—the methods they should be most interested in—first. With IDEs, this organization is not as necessary, as most IDEs provide a better way to organize and navigate through source for a class.
When finished, the production classes in studentinfo should look something like the following.
Student.java:
package studentinfo;
public class Student {
private String name;
public Student(String name) {
this.name = name;
}
public String getName() {
return name;
}
}
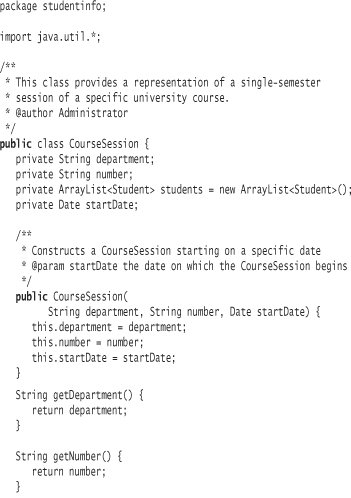
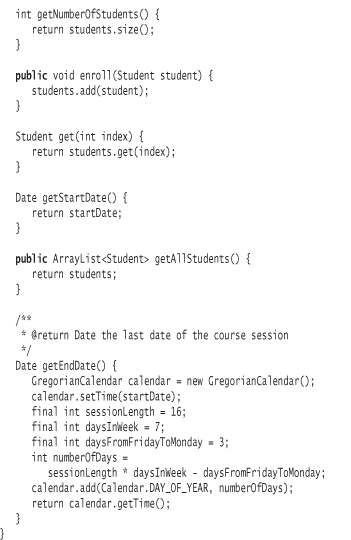
CourseSession.java:
DateUtil.java:
At this point, everything should compile. Your tests should also run, but don't forget that you commented out RosterReporterTest. It's time to add it back in.
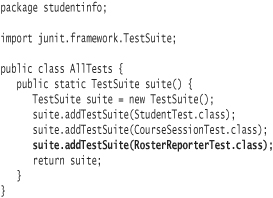
Create a new class named AllTests in the sis.report package. Generally you will want a test suite in each package to ensure that all classes in the package are tested.6
6 There are other ways of managing test suites; your IDE may provide some assistance here. Also, refer to Lesson 12 for a dynamic way of gathering tests.

You can now remove the commented-out line from the class student-info.AllTests.
Create a class named AllTests in the sis package by placing its source file in the sis directory. This class will produce the combined test suite that ensures all classes in the application are tested.
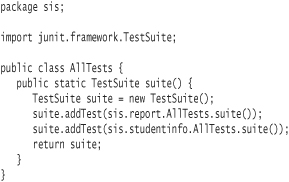
Instead of sending the message addTestSuite to the suite, you send the message addTest. As a parameter, you pass along the results of sending the message suite to the appropriate AllTests class. Sending a message to a class instead of to an object will result in a static method being called. I will discuss static methods in the next lesson.
You will want to pass sis.AllTests to JUnit in order to run your entire test suite.
Using Ant
From here on out, I will be using an Ant script to do my compilations, now that I have more than two directories to compile. Ant is a platform-independent tool that allows you to create specifications of how your project should be built and deployed.
If you are using an IDE, you should be able to get it to build your entire codebase easily. Under Eclipse, for example, all of your source code is compiled automatically each time you save changes to Java source.
Regardless of whether or not you are using an IDE, you may want to use Ant in order to obtain IDE and platform independence. Other alternatives are to build a shell script or batch file as I demonstrated in Lesson 1. You can also use one of a number of available make tools. A make tool is a build tool very similar to Ant, but most make tools are very tightly bound to a specific operating system. Few make tools provide the ease of building Java applications that Ant does. Ant is the most effective way of doing builds in Java.
I highly recommend that you learn how to use Ant. Your IDE may suffice for your own personal needs, but it might not be sufficient in a team environment. If you work in a team environment, you will want a standardized way of building and deploying your application. Most development shops have standardized on Ant as a way of ensuring the system is built and deployed consistently and correctly.
See the sidebar “Getting Started with Ant” for a brief overview of using Ant.
Getting Started With Ant
This sidebar will help you obtain a basic understanding of how to work with the Ant build tool.
Most Java IDEs come with Ant support already built in. If you are not using an IDE, you can follow these steps to be able to use Ant for your builds.
- Download the latest version of Ant from http://ant.apache.org.
- Follow the instructions available with the Ant distribution to install Ant. Set the environment variable
JAVA_HOMEto the directory in which you installed the J2SE 5.0 SDK. - Update your system's path environment variable to include Ant's
bindirectory. - Create a build.xml file in the root directory of your project.
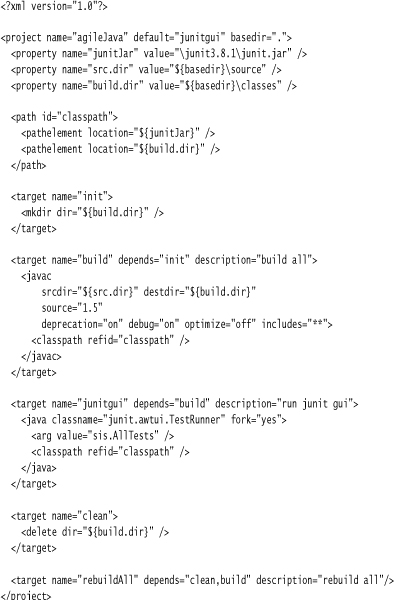
Regardless of whether you are using an IDE or not, you will put together a build.xml file that contains the instructions on how to compile, execute, and/or deploy your application.
Here is a starter build.xml for a project named agileJava.
Exercises
- Create a CharacterTest class. Don't forget to add it to the AllSuites class. Observe the zero tests failure. Then add a test named
testWhitespace. This test should demonstrate that the new line character, the tab character, and the space character all return true forCharacter.isWhitespace. Express that other characters return false. Can you find another character that returns true? - Java has certain naming restrictions on identifiers—the names you give to methods, classes, variables, and other entities. For example, you cannot use the caret (
^) in an identifier name. The Character class contains methods that designate whether or not a character can be used in an identifier. Consult your API documentation to understand these methods. Then add tests to the CharacterTest class to discover some of the rules regarding Java identifiers. - Assert that a black pawn's printable representation is the uppercase character
'P', and a white pawn's is the lowercase character'p'. For the time being, you can accomplish this by adding a second parameter to the Pawn constructor. However, note that this creates a redundancy in representation. You'll improve upon the solution later. - (This exercise and Exercise 5 are closely related. You may suspend refactoring until you have completed Exercise 5.) When a client creates a Board object, they should be able to assume that the board is already initialized, with pieces in place. You will need to modify the Board tests and code accordingly. Start by changing the assertions on the number of pieces available at time of board creation: There should be 16. Delete
testAddPawns; it is not useful in its current form. - Add an
initializemethod to Board. Theinitializemethod should add pawns to create two ranks: a rank for white pawns (the second rank) and a rank for black pawns (the seventh rank). To store a rank, use an ArrayList whose contents are Pawn objects. You declare such a list as ArrayList<Pawn>.Add an assertion to
testCreatethat the second rank looks like this:"pppppppp". Assert that the seventh rank looks like this:"PPPPPPPP". Use a StringBuilder and aforloop to gather the printable representation for the pieces in each rank.Ensure your solution is as well refactored as you are capable of. Expect a good amount of duplication in adding pawns to the ranks and in other areas of Board. You will learn to eliminate this duplication in later lessons.
- Assert that the board looks like this at initial setup, with a dot character (a period) representing an empty square (rank 8 is the top row, rank 1 is the bottom row):
........
PPPPPPPP
........
........
........
........
pppppppp
........Remember to ensure portability in your tests and in your board-printing method by using the system properties appropriately.
- If you have implemented your chess board code and tests to this point using String concatenation, change the code to use the StringBuilder class. If you have used StringBuilder as the primary basis for your solution, change your code to use String concatenation. Name some differences in the structure and readability of the code.
- Modify your test to display the board on the console. Ensure that it appears as expected. If not, correct the test and fix the code.
- You will need to revisit this code in later exercises to remove even more duplication when they learn about loops and other Java constructs.
- Create an Ant build file to compile your entire project and run all of your tests with a single command.