Lesson 8. Exceptions and Logging
In this lesson you will learn about exceptions and logging. Exceptions in Java are a transfer control mechanism. You generate exceptions to signal problematic conditions in your code. You write code to either acknowledge or handle exceptions that are generated.
Java provides a flexible logging facility that allows you to record information as your application executes. You might choose to log exceptions, interesting occurrences, or events that you want to track.
Things you will learn include:
• the try-catch block
• checked vs. unchecked (runtime) exceptions
• errors vs. exceptions
• the throws clause
• the exception hierarchy
• creating your own exception type
• exception messages
• working with multiple exceptions
• rethrowing exceptions
• working with the stack trace
• the finally block
• the Formatter classes
• the Java logging API
• logging to files
• logging handlers
• logging hierarchies
Exceptions
In Lesson 4, you saw how your code generated a NullPointerException when you did something with a variable that was not properly initialized.
Exceptions are objects that represent exceptional conditions in code. You can create an Exception object and throw it. If you are aware that there might be exceptions, you can write code that explicitly deals with, or catches, them. Or, you can declare that your code chooses to not deal with exceptions, and let someone else handle the problem.
A thrown exception represents a transfer of control. You may throw an exception at any point in code; other APIs may similarly throw exceptions at any time. The VM may also throw exceptions. From the point the exception is thrown, the Java VM transfers control to the first place that deals with, or catches, the exception. If no code catches the exception, the result is abnormal program termination.1
1 This is not necessarily the case when your application is executing multiple threads. See the lesson on threading.
![]()
You will ultimately need to build a user interface that allows for entry of test scores for students in a session. The user interface is where anything can go wrong: a user can type a number that is too large, they can type nothing, or they can type garbage. Your job will be to deal with invalid input as soon as it is typed in.
Test scores typed into the user interface come in as String objects. You will need to convert these strings into ints. To do so, you can use the Integer wrapper class utility method named parseInt. The parseInt method takes a String as a number and attempts to convert it to a number. If successful, parseInt returns the appropriate int. If the source String contains invalid input, the code in parseInt throws a NumberFormatException.
Start with a simple test representing a successful case:
package sis.studentinfo;
import junit.framework.TestCase;
public class ScorerTest extends TestCase {
public void testCaptureScore() {
Scorer scorer = new Scorer();
assertEquals(75, scorer.score("75"));
}
}
Get this to pass:
package sis.studentinfo;
public class Scorer {
public int score(String input) {
return Integer.parseInt(input);
}
}
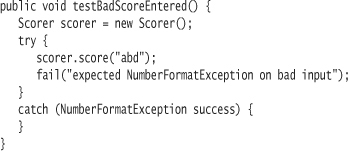
Then write a second test that shows what happens when invalid input is passed to the score method:
public void testBadScoreEntered() {
Scorer scorer = new Scorer();
scorer.score("abd");
}
This isn't the complete test, but it will demonstrate what happens when code throws an exception. Compile the code and run the tests. JUnit will report an error instead of a test failure. An error means that code within the test (or, of course, code that the test called) generated an exception that was not handled. The exception's stack trace appears in the details window in JUnit, showing that the Integer class generated a NumberFormatException.
You want your test to demonstrate that the score method generates an exception when clients pass invalid input to it. The test case documents a case for which you expect to get an exception. Thus, you want the test to pass if the exception occurs and fail if it does not.
Java provides a construct called a try-catch block that you use to trap exceptions. The standard form of a try-catch block contains two blocks of code. The try block consists of code that might throw an exception. The catch block contains code to execute if an exception is generated.
The code in testBadScoreEntered presents the most common idiom used when testing for exceptions. The try block wraps the score message send, since it is the code that could generate the NumberFormatException. If the code in score generates an exception, the Java VM immediately transfers control from the point the exception was thrown to the catch block.
If execution of the code in score does not raise an exception, control proceeds normally and Java executes the next statement in the try block. In testBadScoreEntered, the next statement is a call to the JUnit method fail. Scorer-Test inherits fail (indirectly) from junit.framework.TestCase. Execution of fail immediately halts the test method; the VM executes no more of its code. JUnit reports the test method as a failure. Calling fail is equivalent to calling assertTrue(false) (or assertFalse(true)).
You expect score to generate an exception. If it does not, something has gone wrong, and you want to fail the test. If score does generate an exception, the fail statement is skipped, since the VM transfers control to the catch block.
The catch block is empty. Tests are about the only place where your catch blocks should ever be empty. Normally, you want to deal with a trapped exception somehow. You would do this in the catch block. In this lesson, I will present you with options for managing a caught exception.
In testBadScoreEntered, receiving an exception is a good thing. You document that by naming the NumberFormatException object in the catch clause success. Most code you will encounter will use a generic name for the exception object, such as e. Nothing says that you can't improve on this. Use an exception name to describe why you expect an exception.
The “exception test” represents what other client code will have to deal with. Somewhere in the user interface code, you will have code that you structure very similar to the code in testBadScoreEntered. The test documents the potential for score to generate a NumberFormatException and under what circumstance that potential exists.
Dealing with Exceptions
One tactic for managing exceptions is to catch them as close to the source (the point at which they are generated) as possible. Once you catch an exception, you might be able to provide code that deals with it. Providing code that converts a problem into a legitimate action is a way of encapsulating an exception.
You can also head off the exception. In the Scorer class, you can provide an additional method, isValid, that allows the client to test the validity of the input string. You put the burden on the client to guard against calling score with invalid input.

A client first calls isValid. If isValid returns true, the client could safely call the score method. If isValid returns false, the client could apprise the user of the invalid input.
One benefit of using this construct is that the client would not have to code a try-catch block. You want to use exceptions as little as possible to control the flow of your code. By catching an exception as close to the source as possible, you eliminate the need for clients to use try-catch blocks to manage their control flow.
Another possibility would be for the score method to have a try-catch block. When it caught a NumberFormatException, it would return -1 or some other special int value that the client could recognize.
Checked Exceptions
![]()
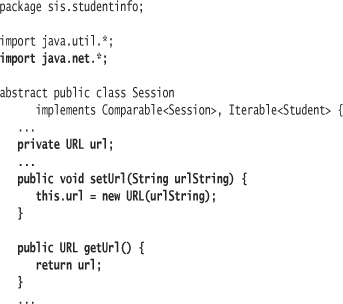
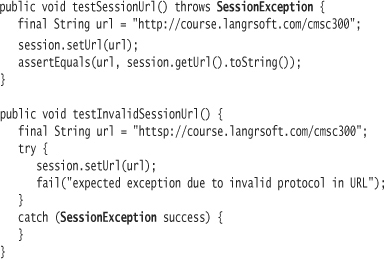
Each course session at the university will have its own web page. After creating a Session object, you can send it a String representing the URL2 of its web page. Session should create a java.net.URL object using this string. One of the constructors of java.net.URL takes a properly formed URL string. To be properly formed, a URL must follow a number of rules for its component parts, such as the protocol name and host name. If you create a java.net.URL with an improperly formed URL, the constructor of java.net.URL throws an exception of type java.net.Malformed-URLException.
2 Uniform Resource Locator, a pointer to a resource on the World Wide Web.
A simple test in SessionTest sets the URL into the session as a string. The test then retrieves the URL as a java.net.URL object. Finally, the test ensures that the URL object's string representation (toString) is a match for the URL string argument.
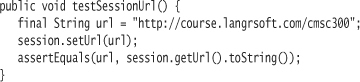
The code in Session is just a setter and getter:
When you compile, however, you will receive an error:
![]()
Java defines the exception type MalformedURLException as a checked exception (as opposed to an unchecked exception). A checked exception is an exception that you must explicitly deal with in your code. You may ignore an unchecked exception (such as NumberFormatException), but remember that ignoring an exception may not be safe.
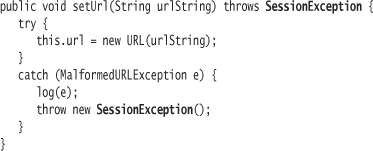
Any code that can generate a checked exception must be handled by the method in which the code appears. You handle an exception either by using a try-catch block or by declaring that the method simply propagates the exception to any of its callers. To declare that the method propagates the exception (and thus otherwise ignores it), use the throws clause:
![]()
The code phrase throws MalformedURLException says that the method setUrl can possibly generate an exception. Any code that calls the setUrl method must either be enclosed in a try-catch block or it must similarly appear in a method that contains an appropriate throws clause.
The test itself, then, must either catch MalformedURLException or declare that it throws MalformedURLException. Compile to see for yourself.

(Don't forget to add the java.net import statement to SessionTest.)
Unless you are specifically expecting to receive an exception as part of your test, simply declare that the test throws an exception. Do not enclose the setUrl call in a try-catch block. You are defining the test. For this test, you are defining a “happy case” in which you know that the URL is valid. Given these two things under your control, an exception should never be thrown during the execution of the test unless something is horribly wrong. You can safely ignore any exceptions for the purpose of such a positive test. In the unlikely event that an exception is thrown, JUnit will catch it and fail the test with an error.
You still need a negative test, one that demonstrates what the client will see when there is a problem:
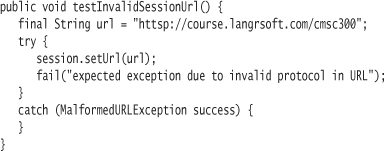
You will need to import the MalformedURLException class.
Exception Hierarchy
In order to be able to throw an object as an exception, it must be of type Throwable. The class Throwable is at the root of the exception hierarchy as defined in java.lang. Throwable has two subclasses: Error and Exception. The checked and unchecked exceptions you will work with derive from the class Exception.
Sun reserves the Error class for serious problems that can go wrong with the Java environment itself. Errors are unchecked, and you should not have any usual reason for catching instances of the Error class. Error exception types include things such as OutOfMemoryError and InternalError. You are not expected to write code to recover from any of these situations.
The Exception class is the superclass of all other exception types. Sun defines exceptions generated by the VM or the Java class library as Exception subclasses. Any exceptions that you define should also be Exception subclasses. Subclasses of Exception are sometimes referred to as application exceptions.
Unchecked application exceptions must derive from RuntimeException, which in turn directly subclasses Exception.
Figure 8.1 shows the core of the exception hierarchy.
Figure 8.1. The Exception Hierarchy
Creating Your Own Exception Type
You can create and throw an exception object that is of an existing Java exception type. But creating your own custom exception type can add clarity to your application. A custom exception type can also make testing easier.
As mentioned earlier, you want to propagate exceptions for things that you cannot otherwise control in your application. Prefer any approach where you have a means of preventing an exception from being thrown.
One case where exceptions are more appropriate is when a constructor takes a parameter that must be validated, as in the URL example. You could control validation via a static method call (for example, public static boolean URL.isValid(String url)). But it is reasonable for a constructor to generate an exception as an alternative to forcing clients to first make a static method call.
![]()
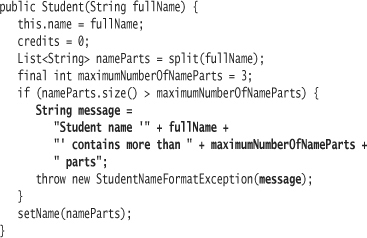
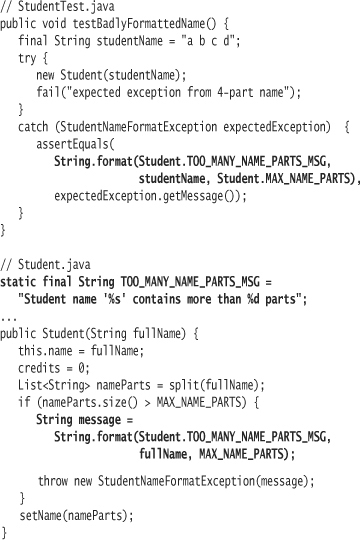
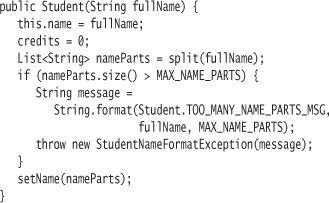
For example, you may want to reject creation of students with more than three parts to their name, as in this test implemented in StudentTest:
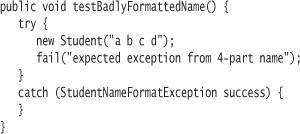
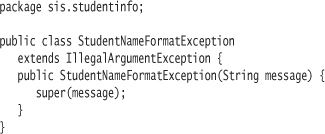
The first step toward realizing this test is creating a new Exception subclass. Before extending Exception directly, you should peruse the Exception types that Sun provides in the Java class library. Look for a similar Exception type on which you might want to base yours. In this case, java.lang.IllegalArgumentException is the most appropriate place to start. Create your StudentNameFormatException class as a subclass of IllegalArgumentException:
package sis.studentinfo;
public class StudentNameFormatException
extends IllegalArgumentException {
}
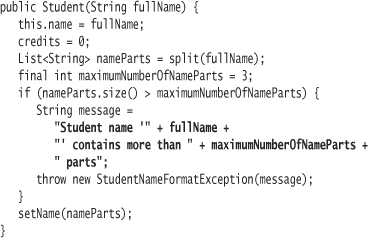
That's all you need to do to define the exception type. Your new test should now compile and fail, since you do not yet generate the exception in the code. To make the test pass:
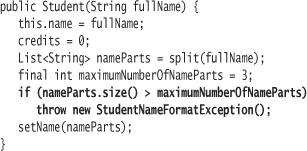
The code demonstrates that you create a new Exception object just like any other object:
throw new StudentNameFormatException();
You throw the exception object using the throw keyword:
throw new StudentNameFormatException();
Since your class StudentNameFormatException is a subclass of IllegalArgumentException, and since IllegalArgumentException is a subclass of RuntimeException, you do not need to declare the throws clause on the Student constructor.
Note that there is no test class for StudentNameFormatException! The reason is that there is virtually no code that could break. Yes, you could forget to extend from an Exception superclass, but your code would then not compile.
Checked Exceptions vs. Unchecked Exceptions
As the code designer, you may designate StudentNameFormatException as checked or unchecked. There is considerable debate on which to prefer. One argument suggests that checked exceptions cause more trouble than they are worth.3 One reason is that changing method signatures to add new throws types breaks client code—potentially lots of it!
3 [Venners2003].
The reality is that most code can't do anything about most exceptions. Often, the only appropriate place to manage exceptions is at the user interface layer: “Something went horribly wrong in our application; please contact the support desk.” An exception generated by code buried deep in the system must trickle out to the user interface code layer. Forcing all intermediary classes to acknowledge this potential problem clutters your code.
A general recommendation is to eliminate the need for clients to deal with exceptions as much as possible. Consider a way of returning a default value that the client can manage as part of normal processing. Or consider instead requiring a client to follow a protocol where they execute some sort of validation. See the example above, where clients of the Scorer class first execute the method isValid.
Some developers promote checked exceptions, claiming that forcing client developers to immediately and always acknowledge exceptions is beneficial. Unfortunately, many developers choose a far worse solution when confronted with checked exception types:
try {
doSomething();
}
catch (Exception e) {
// log or do nothing
}
Doing nothing within a catch block is an anti-pattern known as Empty Catch Clause.4 Logging the exception is tantamount to doing nothing. There are a few rare cases where Empty Catch Clause is appropriate. But doing nothing means that you are hiding a potentially serious problem that could cause even worse problems down the road.
![]()
Avoid propagating exceptions, but do not create empty catch blocks.
Messages
Most exceptions store an associated message. The message is more often than not for developer consumption. Only sometimes is the message appropriate to present to an end user of an application (although the message might be used as the determining basis for an appropriate end user message). You typically use the message for debugging purposes. Often you will record the message in an application log file to help document what caused a problem.5
5 See the second half of this lesson for a detailed discussion of logging.
The class Exception allows you to create a new exception object with or without a message. You can retrieve the message from an exception using the method getMessage. For an exception object created without a message, getMessage returns null.
You may want to store an error message within a StudentNameFormatException object that provides more information.
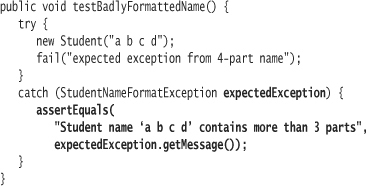
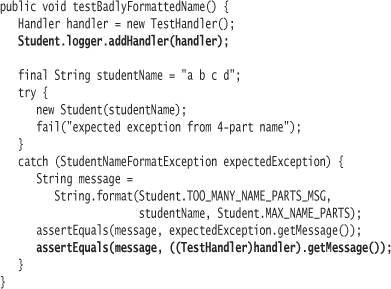
Instead of declaring a temporary variable success to hold the exception object, you now declare the variable name as expectedException. Just catching the exception is no longer enough for success; the message stored in expectedException must also be as expected.
The test will fail, since e.getMessage() returns null by default. You must modify the StudentNameFormatException constructor to take a message parameter. The constructor can then call the corresponding superclass constructor directly.
The Student constructor can then put together a message and pass it off to the exception constructor.
The exception message string does represent duplication between the test and code. You may refactor it now if you choose. Later in this lesson, you will learn how to dynamically construct the message using the String method format. I will refactor the code at that time.
Catching Multiple Exceptions
It is possible for a single line of code to generate more than one exception. Each exception can be of a different exception type. A method that throws more than one exception can list each exception type individually:
public void send() throws ObjectStreamException, UnknownHostException
If both exceptions derive from the same class, you can instead declare that the method throws an exception of the common supertype:
public void send() throws Exception
The try-catch block can have multiple catch clauses, each representing an exception that might be thrown.
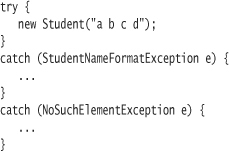
If code within the try block throws an exception, the Java VM transfers control to the first catch block. If the type of the exception thrown matches the type declared in the catch clause, the VM executes code within that catch block. Otherwise, the VM transfers control to the next catch block, and so on. Once code in a catch block is executed, the VM ignores all other catch blocks.
In the following code, the second catch block catches any exception that is of type Exception. Since all (normal) exceptions extend from Exception, this “catch-all” block will trap any application exception other than StudentNameFormatException, which you already trapped with the first catch block.
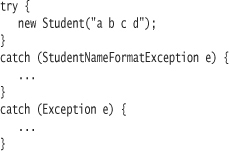
A catch-all is useful for trapping any unexpected exceptions. You should usually include a catch-all only in your top-level class, the one closest to the user interface layer. About the only thing you will be able to do in the catch-all is to log the error and possibly show something to the end user. What you gain is the ability to keep the application from crashing or visibly failing.
Use extreme discretion when introducing a catch-all. If you introduce new code in the try block or in the code it calls, this code can generate a new exception. The problem is that you might be unaware of the new exception, even if it is a checked exception. Hiding errors is bad.
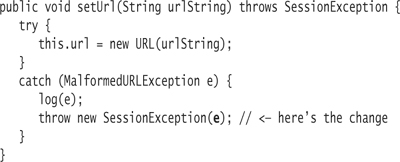
Rethrowing Exceptions
Nothing prevents you from catching an exception and then throwing it (or another exception) from within the catch block. This is known as rethrowing an exception.
A common reason to rethrow an exception is to catch it as close to its source as possible, log it, and then propagate it again. This technique can make it easier to determine the source of a problem.
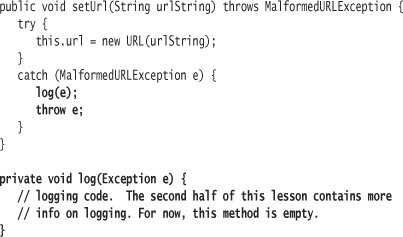
In the above changes to setUrl, code in the catch block passes the caught exception object to the log method, then rethrows it. A refinement of this technique is to create and throw a new exception of a more application-specific type. Doing so can encapsulate the specific implementation details that caused the exception.
Instead of throwing a MalformedURLException, you want to throw an instance of the application-specific exception type SessionException. Once you have created the exception class:
package sis.studentinfo;
public class SessionException extends Exception {
}
You can alter test code to reflect the new exception type:
Finally, you can change the production code to throw the new exception instead.
The downside is that you lose information with this solution: If an exception is thrown, what is the true reason? In a different circumstance, code in the try block might throw more than one kind of exception. Rethrowing the application-specific exception would hide the root cause.
As a solution, you could extract the message from the root exception and store it in the SessionException instance. You would still lose the original stack trace information, however.
In J2SE 1.4, Sun added the ability to the Throwable class to store a root cause. The Throwable class provides two additional constructor forms: one that takes a Throwable as a parameter and another that takes both a message string and a Throwable as a parameter. Sun also added these constructors to the Exception and RuntimeException derivatives of Throwable. You may also set the root cause in the Throwable object after its construction via the method initCause. Later, you can retrieve the Throwable object from the exception by sending it the message getCause.
First, modify testInvalidSessionUrl to extract the cause from the SessionException instance. As part of the test verification, ensure that the cause of the exception is the reason expected.
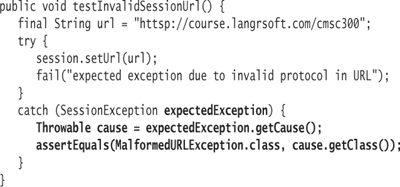
The assertEquals statement ensures that the class of the cause is Malformed-URLException. The code to make this comparison demonstrates some reflective capabilities of Java—the ability of the language to dynamically derive information about types and their definitions at runtime. I will explain reflection capabilities in further depth in Lesson 12.
In short, you can send all objects the message getClass, which returns an appropriate class constant. A class constant is a class name followed by .class. MalformedURLException.class is a class constant that represents the Malformed-URLException class.
The test will fail: If no cause is explicitly set, getCause returns null. You will first need to modify SessionException to capture the cause upon construction:
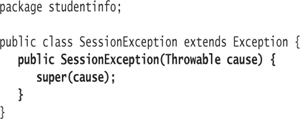
You can then change the production code to embed the cause in the SessionException instance.
Stack Traces
Lesson 4 taught you how to read the exception stack to help decipher the source of an exception.
You can send the stack trace stored within an exception to a print stream or print writer using the printStackTrace method defined in Throwable. One implementation of printStackTrace takes no parameters, printing the stack trace on the system console (System.out) by default. A crude implementation of the log method might do just that.
private void log(Exception e) {
e.printStackTrace();
}
(Try it.) For a production system, you will want a more robust logging solution. Sun introduced a logging API in J2SE 1.4; I discuss logging in the second half of this lesson.
The stack trace representation printed by printStackTrace contains information that might be useful for more advanced programming needs. You could parse the stack trace yourself in order to obtain the information, which many developers have done. Or, as of J2SE 1.4, you can send the message getStackTrace to the exception object in order to access the information in already parsed form.
The finally Block
When an exception is thrown, the Java VM immediately transfers control from its point of origin to the first catch block matching the exception type. Java executes no further lines of code within the try block. If no try block exists, the VM immediately transfers control out of the method. You may have the need, however, to ensure that some bit of code is executed before control transfers out.
The optional finally block ensures that the Java VM always executes some piece of code, regardless of whether or not an exception was thrown. You may attach a single finally block to the end of a try-catch block.
The prototypical reason for using a finally block is to clean up any local resources. If you have opened a file, the finally block can ensure that the file gets properly closed. If you have obtained a connection to a database, the finally block ensures that the connection is closed.
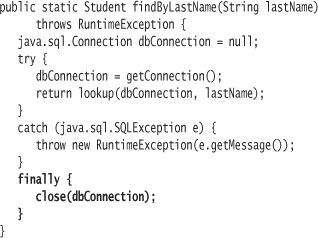
(Note that the example is here for demonstration purposes only. Refer to Additional Lesson III for a brief overview of interacting with databases via JDBC.)
Both the lookup method and the getConnection method can throw an SQL-Exception object. You call the the lookup method after obtaining a connection. If the lookup method subsequently throws an exception, you want to ensure that the database connection gets closed.
If no exception is thrown, Java transfers control to the finally block upon completion of the code in the try block. In the example, the finally block makes a call to close the database connection. If an exception is thrown, Java executes code in the catch block. As soon as either the catch block completes or the VM directs control out of the catch block (in the above example, through use of the throw statement), Java executes the finally block, which closes the connection.
If you supply a finally block, the catch block itself is optional. For example, you may not want to attempt to handle an SQL exception from within findByLastName. Instead, you declare that findByLastName can throw an SQLException. But you still need to close the connection before the VM transfers control out of findByLastName:

Under no circumstances should you include a return statement within a finally block—it will “eat” any exceptions that might have been thrown by the catch block. Some developers also promote the more strict notion that you should not return from either a try block or a catch block; instead only return after completion of the whole try-catch block.
Refactoring
Creating a string to present to the user often involves concatenating several substrings and printable representations of primitives and objects. The Student constructor provides an example:
In the Student constructor, you combine five separate elements to form a single string—three substrings, the full name, and a constant representing the maximum number of name parts allowed. You must likewise construct a string in the test method. Concatenations of larger strings, with more embedded information, become very difficult to read and maintain.
The String class supplies a class method named format. The format method allows you to pass a format String and a variable number of arguments (see the information on varargs in Lesson 7). In return, you receive a string formatted to your needs. A format String contains elements known as format specifiers. These specifiers are placeholders for the arguments. A format specifier tells the formatter how to interpret and format each argument. Often, but not always, you will have one format specifier for each argument.
For those of you who are familiar with the language C, Java's String formatting capability derives from a comparable C feature used in functions such as printf. The Java implementation is similar but provides more features and safety. Do not assume that a Java format specifier works the same as an equivalent C format specifier.
Start with testBadlyFormattedName and replace the concatenation with a call to format. Also, introduce a class constant for the maximum number of name parts allowed.
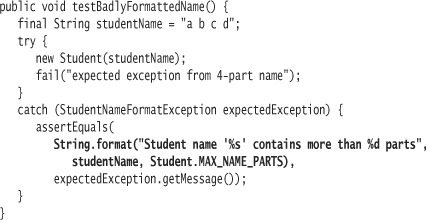
The call to format has three arguments: the format string and two format string arguments. Within the format string are two format specifiers: %s and %d. The first format specifier corresponds to the first argument, studentName. The second format specifier corresponds to the second argument, Student.MAX_NAME_PARTS. A format specifier always begins with a percent sign (%) and ends with a conversion. A conversion is a character or character that tells the format method how to interpret the corresponding argument.
The character s, as in %s, indicates a string conversion. When the format method encounters a string conversion in a format specifier, it replaces the format specifier with the corresponding argument. In the test, format replaces %s with the contents of studentName:
Student name 'a b c d' contains more than %d parts
The character d, as in %d, indicates an integral conversion to decimal. In the test, format replaces %d with the value of Student.MAX_NAME_PARTS (which you will set to the int literal 3):
Student name 'a b c d' contains more than 3 parts
The String method format is a utility method that delegates all the work to an instance of the java.util.Formatter class. The Formatter class supplies more than a dozen different conversions, including date conversions and more-sophisticated conversions for numeric values.
One very useful conversion is n, which stands for “new line.” If you provide the format specifier %n, the formatter replaces it with the platform-specific line separator (usually "
" or "
"). This saves you from having to provide code that accesses the system line separator property.
Some of the other things Formatter supports:
• internationalization
• the ability to provide arguments in an order that does not match the order of format specifiers
• sending output incrementally to a StringBuilder or other sink
The API documentation for java.util.Formatter is long and detailed. Refer to it to understand how to use additional conversions or how to work with the additional features of Formatter.
As a final step, you can refactor to introduce a class constant for the error message. The following code also shows the implementation in Student:
Logging
In most enterprises, it is valuable to track interesting history as applications execute. The job of logging code is to record significant events and data supporting those events. As a developer, it is your job to determine what is relevant enough to track. Once you make this determination, you insert code at judicious points in the application to write the information out to (typically) a log file or files. You later can use the logs to answer questions about performance, problems, and so on.
Figuring out just what to track is the hard part. Currently, you are logging nothing. You lose information on any errors that occur. The lack of relevant problem data can deprive you of the ability to solve problems. Worse, you may not know you have a problem until it is too late (this is one reason to avoid empty catch blocks).
Minimally, you should log all unexpected error conditions (exceptions). You may also want to log critical calculations, execution of troublesome routines, or interesting data. You can also choose to log virtually everything that occurs, such as every time a method executes.
Logging everything, or logging too much, has its problems. Log files can grow at an extreme rate, particularly as use of the system increases. Logging has a minor performance penalty; excessive logging can lead to system slowdown. A worse problem, however, is that if there is too much information being logged, you will not be able to physically analyze the voluminous amount of data. Problems may get lost in the forest. Logging becomes useless. On the code side, logging has a cluttering effect and can bloat your code.
It will be up to you to determine how much to log. In some circumstances, where it is easy for you to deploy updated code (for example, a web application), err on the side of logging too little information. Where it is difficult to update deployed code, err on the side of logging too much information. Having more information will increase your prospects of solving a problem. Err on the side of logging too much information when you know that a section of code has problems or when the code presents a high risk (for example, code that controls critical components).
Logging in Java
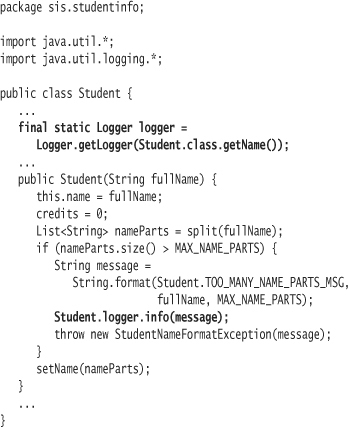
Java supplies complete logging facilities in the package java.util.logging.6 For an exercise, you will learn to use the logging package to capture exception events. The Student constructor throws an exception. Let's log it. Here is a slightly modified Student constructor with a placeholder for logging.
6 While Java's logging facilities are adequate for most needs, many developers prefer to use the freely available Log4J package (http://logging.apache.org/log4j/docs/).
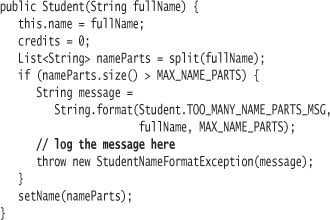
The first question is how to test that an appropriate message gets logged when you throw the exception. Or should you bother with such a test?
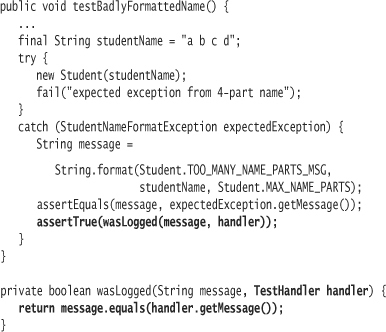
Remember the first rule of testing: Test everything that can possibly break. Logging can definitely break. Take a stab at a test:
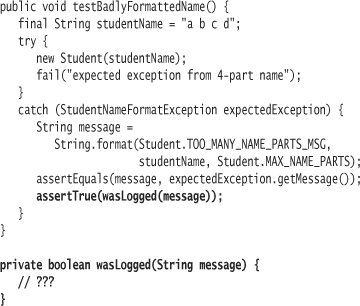
How do you determined whether or not a message was logged? The method name wasLogged represents the intent of what you need to determine. The contents of wasLogged will represent how you determine it.
Learning how to test an unfamiliar API such as logging, sometimes involves playing around with the API until you understand how it works. Without this more complete understanding of the API, you may not be able to figure out how to test it. In this exercise, you'll write a bit of “spike” code that provides you with a better understanding of the logging API. Then you'll throw away the spike code, write a test, and write the production code to meet the test specification.
In Student, create an “intention message” in the constructor:
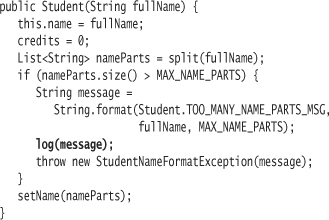
Then code the log method.
private void log(String message) {
Logger logger = Logger.getLogger(getClass().getName());
logger.info(message);
}
To log a message, you need a Logger object. To obtain a Logger object, you call the Logger factory method getLogger. As a parameter to getLogger, you pass the name of the subsystem within which you are logging. Later in this lesson (in the section entitled Logging Hierarchies), you'll learn more about the relevance of the subsystem name. Passing in the name of the class is typical and will suffice.
If a Logger object with that name already exists, getLogger returns that logger. Otherwise, getLogger creates and returns a new Logger object.
The second line in log calls the Logger method info, passing the message parameter. By using the info method, you request that the message be logged at an informational level. The logging API supports several levels of message log. The Logger class provides a method that corresponds to each level. From highest to lowest, the levels are severe, warning, info, config, fine, finer, and finest.
Each logger object maintains its own logging level. If you attempt to log a message at a lower level than the logger's level, the logger discards the message. For example, if a logger is set to warning, it logs only severe and warning messages.
You can obtain and set the logging level on a logger using getLevel and setLevel. You represent the logging level with a Level object. The Level class defines a set of Level class constants, one to represent each logging level. The Level class also supplies two additional class constants: Level.ALL and Level.OFF, to designate either logging all messages or logging no messages.
Modify the wasLogged method in StudentTest to return false. Run all your tests. By returning false, you cause testBadlyFormattedName to fail. This failure reminds you that you will need to flesh out the test.
On the console, you should see something like:
Apr 14, 2005 2:45:04 AM sis.studentinfo.Student log
INFO: Student name 'a b c d' contains more than 3 parts
You have successfully logged a message!
The UML class diagram in Figure 8.2 shows the relationship between Logger and Level. It also includes Logger's relationship to other relevant classes that you will learn about in the upcoming sections.
Figure 8.2. The Logger Hierarchy
Testing Logging
Now your problem is figuring out how to test the logging. First, however, as I promised, you must throw away the spike code in Student. Discard the log method and update the constructor by removing the call to log.
Don't forget that writing code without tests is a good way of getting into trouble. Make sure you specify what you're going to code first.
While you have successfully logged a message, its output went to the console. How are you going to intercept this message for the purpose of writing a test?
The logging facility lets you direct messages to destinations other than the console. You can also direct logging to more than one destination at a time.7 The Logger stores handler objects that it uses to determine the logging destinations. A handler object is a subclass of java.util.logging.Handler. The class ConsoleHandler represents the behavior of sending output to the console. Most shops prefer to redirect logging output to files, using a FileHandler, so that developers can later peruse the files. You can tell the logger to route messages to alternate destinations by sending it Handler objects.
7 The UML diagram in Figure 8.2 shows that a Logger can have multiple Handler objects by using an asterisk (*) at the end of the navigable association between the two classes. The * is a multiplicity indicator. The absence of a multiplicity indicates either 1 or that the multiplicity is uninteresting or irrelevant. The relationship between Logger and Handler is a one-to-many relationship.
Unfortunately, you wouldn't be able to write test code that reads a log file, since you haven't learned about Java IO yet (you will in Lesson 11). Instead, you will create a new handler class, TestHandler. Within this handler class, you will trap all messages being logged. You will provide a getter method that returns the last message that was logged. Once you have built this handler class, you can pass an instance of it to the logger.
For each message you log, the Logger object calls the method publish on the Handler object, passing it a java.util.logging.LogRecord parameter object.
It is the publish method that you will override in your Handler subclass to trap the message being logged. You must also supply definitions for the other two abstract methods in Handler, flush and close. They can be empty.
package sis.studentinfo;
import java.util.logging.*;
class TestHandler extends Handler {
private LogRecord record;
public void flush() {}
public void close() {}
public void publish(LogRecord record) {
this.record = record;
}
String getMessage() {
return record.getMessage();
}
}
In testBadlyFormattedName, you first obtain the same logger that Student will use. Since both the test and the code in Student pass the Student class name to getLogger, they will both reference the same Logger object. Subsequently, you construct an instance of TestHandler and add it as a handler to the logger.
public void testBadlyFormattedName() {
Logger logger = Logger.getLogger(Student.class.getName());
TestHandler handler = new TestHandler();
logger.addHandler(handler);
...
}
Any messages you log will be routed to the TestHandler object. To prove that Student code indeed logs a message, you can ask the handler for the last message it received.
On a stylistic note, I prefer coding the test as follows:
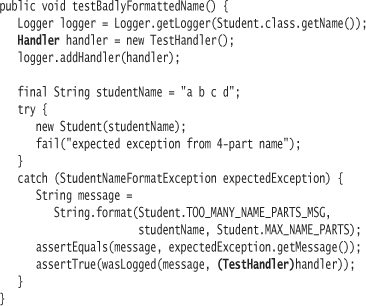
Instead of assigning the new instance of TestHandler to a TestHandler reference, you assign it to a Handler reference. This can clarify the test, so you understand that the addHandler method expects a Handler as a parameter (and not a TestHandler). The wasLogged method needs to use the getMessage method you created in TestHandler, so you must cast back to a TestHandler reference.
The test should fail, particularly since you should have no production code in Student to meet the specification of the test (you deleted it, correct?). Demonstrate the failure before proceeding. For all you know, the new test code might not do anything, and if you get a green bar, alarms should go off in your head. (It happens. Sometimes it means you forgot to compile your code.) Sticking to the method will help you keep your cool and make fewer mistakes.
Another reason you should have deleted the spike code is that you will produce a better, refactored version this time around. You currently have duplicate code: Both StudentTest and Student include a complex line of code to retrieve a Logger object.
In addition to using a Student class variable for the logger, the modified test inlines the wasLogged method:
Here's the resurrected, refactored Student code:
Logging to Files
Sun designed the logging facility to allow you to change logging characteristics at runtime. You can quickly route log messages to a file instead of to the console without having to change, recompile, and redeploy code.
The default behavior is to send logging messages to the console. This behavior is not hardcoded somewhere in the Logger class; it is located in an external properties file that you can freely edit.
Browse to the directory in which you installed Java. Within this directory, you should be able to navigate into the subdirectory jre/lib (or jrelib if you are using Windows). Within this subdirectory you should see the file logging.properties.8 Edit the file using any editor.
8 If you don't have this file, you can create it. Use the bits of content that I demonstrate.
You can use properties files in many circumstances to store values that you may want to change with each execution of an application. Sun chose to allow you the ability to configure logging behavior using a properties file. The layout of a properties file should be self explanatory. Comment lines begin with the pound sign (#). Blank lines are ignored. The remainder of the lines are key-value pairs, like entries in a hash table. Each key-value pair, or property, appears in the form:
key = value
Several lines down into logging.properties, you should see:
# "handlers" specifies a comma separated list of log Handler
# classes. These handlers will be installed during VM startup.
# Note that these classes must be on the system classpath.
# By default we only configure a ConsoleHandler, which will only
# show messages at the INFO and above levels.
handlers= java.util.logging.ConsoleHandler
# To also add the FileHandler, use the following line instead.
#handlers=java.util.logging.FileHandler,java.util.logging.ConsoleHandler
Swap the commenting around. Comment out the line that sets handlers to only the ConsoleHandler. Uncomment the line that sets the property handlers to both the FileHandler and the ConsoleHandler. By doing so, you tell the logger to route output to objects of each handler type.
Nearer to the bottom of logging.properties, you will find these lines:
java.util.logging.FileHandler.pattern = %h/java%u.log
java.util.logging.FileHandler.limit = 50000
java.util.logging.FileHandler.count = 1
java.util.logging.FileHandler.formatter = java.util.logging.XMLFormatter
The logging facility uses these lines to determine how the FileHandler works.
The value for the java.util.logging.FileHandler.pattern is a pattern for naming the log file. The %h and %u that currently appear in the pattern are known as fields. The %h field tells the FileHandler to store log files in your home directory.
The file handler replaces the %u field in the pattern with a unique number. The goal is to avoid the conflict of two log files sharing the same filename.
Rerun your tests and then navigate to your home directory. Under most versions of Windows, you can do so using the command:9
9 You must change to the drive on which the user profile is located. You can view the full path of your home directory, including the drive on which it is located, by executing set USERPROFILE.
cd %USERPROFILE%
Under most Unix shells you can navigate to your home directory using the command:
cd $HOME
Within your home directory, you should see a file named java0.log. The number 0 is the unique number replacement for the %u field.
View the contents of java0.log. They should look similar to this:
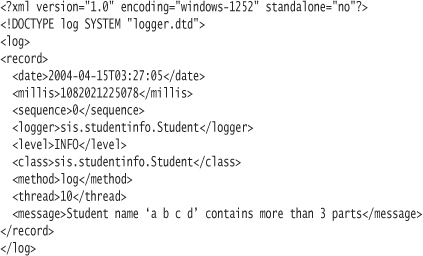
It's not the two lines of logging message you expected. Instead, the message appears in XML format.10 The logging facility allows you attach a different formatter to each handler. A formatter is a subclass of java.util.logging.Formatter; Sun supplies two formatter implementations. SimpleFormatter produces the two log lines you saw earlier. XMLFormatter produces the output you're currently seeing in java0.log. You can code your own formatter class to produce log output however you wish.
10 eXtensible Markup Language. See http://www.w3.org/XML/.
Find the java.util.logging.FileHandler.formatter property in logging.properties. Its current value is java.util.logging.XMLFormatter. Change the value to java.util .logging.SimpleFormatter and rerun your tests.
The contents of java0.log should now look the same as the output produced by the ConsoleHandler.
Testing Philosophy for Logging
In the previous section, Logging to Files, you changed logging behavior by modifying the logging.properties file. The ability to make dynamic changes using properties files is very powerful and allows your system to remain flexible.
Note that the test you wrote executed regardless of where the logging output went. Your test code instead proved that your code sent a specific message to the logger object. You were able to prove this by inspecting the message sent from the logger to one of its handlers.
However, the destination of logging output is another specification detail, one that needs to be adequately tested. It would be very easy to make invalid changes to the properties file. When the application shipped, those changes would cause serious problems. It is imperative that you test not only your Java code but also how the configuration of the system impacts that code.
You could write JUnit tests to ensure that log files were correctly created.11 The strategy for the test would be:
11 ...once you learned how to write code that works with files. See Lesson 11.
- write out a properties file with the proper data
- force the logging facility to load this properties file
- execute code that logs a message
- read the expected log file and ensure that it contains the expected message
Or you could consider that this test falls into the scenario of what is known as integration testing. (Some shops may refer to this as customer testing, system testing, or acceptance testing.) You have already testing that your unit of code—Student—interacts with the logging facility correctly. Testing how the logging facility works in conjunction with dynamic configurations begins to fall outside the realm of unit testing.
Regardless of the semantics—regardless of whether you consider such a test a unit test or not—it is imperative that you test the configuration that you will ship. You might choose to do this manually and visually inspect the log files like you did in the previous section. You might translate the above 4-step strategy into an executable test and call it an integration test. You will want to execute such tests as part of any regression test suite. A regression test suite ensures that new changes don't break existing code through execution of a comprehensive set of tests against the entire system.
Logging is a tool for supportability. Supportability is a system requirement, just like any other functional requirement. Testing logging at some level is absolutely required. But should you write a test for each and every log message?
The lazier answer is no. Once you have proved that the basic mechanics of logging are built correctly, you might consider writing tests for additional loggings a waste of time. Often, the only reason you log is so that you as a developer can analyze what the code is doing. Adding new calls to the logger can't possibly break things.
The better answer is yes. It will be tedious to maintain a test for every log message, but it will also keep you from getting into trouble for a few reasons.
Many developers introduce try-catch blocks because the compiler insists upon it, not because they have a specification or test. They don't have a solution for what to do when an exception occurs. The nonthinking reaction by the developer is to log a message from within the catch block. This produces an Empty Catch Clause, effectively hiding what could be a serious problem.
By insisting that you write a test for all logged messages, you don't necessarily solve the problem of Empty Catch Clause. But two things happen: First, you must figure out how to emulate generating the exception in question in order to code the test. Sometimes just going through this process will educate you about how to eliminate the need for an Empty Catch Clause. Second, writing a test elevates the folly of Empty Catch Clause to a higher level of visibility. Such a test should help point out the problem.
Another benefit of writing a test for every logged message is that it's painful. Sometimes pain is a good thing. The pain here will make you think about each and every logging message going into the system. “Do I really need to log something here? What will this buy me? Does it fit into our team's logging strategy?” If you take the care to log only with appropriate answers to these questions, you will avoid the serious problem of overlogging.
Finally, it is possible to introduce logging code that breaks other things. Unlikely, but possible.
More on FileHandler
FileHandler defines more fields, including %t and %g. FileHandler code replaces occurrences of the %t field in the name pattern with the system temporary directory. On Windows, this is usually c: emp; on Unix, this is usually /tmp.
The FileHandler code replaces occurrences of the %g field with a generation number. You use this field in conjunction with the java.util.logging.File-Handler.count (I'll refer to this as the shortened property-name count) and java.util.logging.FileHandler.limit (limit) properties. The limit property represents how many bytes will be stored in a log file before it reaches its limit. A limit value of 0 means there is no limit. When a log file reaches its limit, the FileHandler object closes it. The count field specifies how many log files that FileHandler cycles through. If the value of count is 1, the FileHandler will reuse the same log file each time it reaches its limit.
Otherwise the FileHandler tracks a generation number. The first log file uses a generation number of 0 in place of the %g field. With a log filename pattern of java%g.log, the first generated log filename is java0.log. Each time a log file reaches capacity, the FileHandler bumps up the generation number and uses this to replace the %g field in the filename pattern. The FileHandler writes subsequent log entries to the log file with this new name. The second log file is java1.log. Once the FileHandler closes count log files, it resets the generation number to 0.
Logging Levels
You may want to log messages for special purposes, such as for timing how long a critical method takes to execute or for introducing “trace” messages that allow you as a developer to follow the flow of execution in the system. You may not want these messages to normally appear in the logs when the application is run in production. Instead, you may need the ability to “turn on” these kinds of messages from time to time without having to recode, recompile, and redistribute the application.
As mentioned earlier, the Java logging API supports seven logging levels: severe, warning, info, config, fine, finer, and finest. You should restrict normal production logging to severe, warning, and info levels. Reserve the other levels for special, ephemeral logging needs.
Suppose you need to log the execution time of the Student method getGpa. You are concerned that it may not perform well under heavy load. Introduce logging messages at the beginning and end of getGpa, using the fine Logger method.
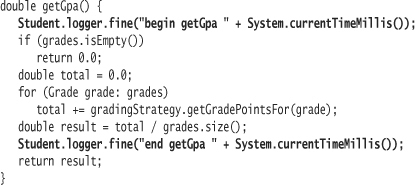
Recompile and rerun your tests.12 You won't see these new logging messages either on your console or within a log file.
12 Here I've chosen to take a lazy logging route—no testing—because these are temporary log messages.
In order to view the logging messages, you must configure the handler to accept messages at the lower logging level. You typically do this within logging.properties. Edit the logging.properties file and make the modifications noted in bold:
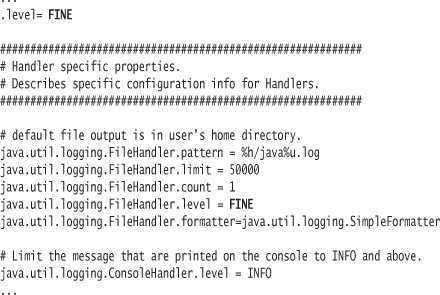
You designate both the global level (.level) and the FileHandler level (java.util.logging.FileHandler.level) to accept any message logged at a FINE or higher level. The logging facility first ensures that the request level is as high as the global level; if not, it does not send the message to the handler. If the logger sends the message to the handler, the handler similarly determines whether the message should be logged.
In other words, the global should either be the same level or lower than any handler levels. If the reverse is true, no messages will be logged by a handler. For example, if you were to set the global level to INFO and the File Handler to FINE, the FileHandler would never log any messages.
Rerun the tests one more time and ensure that the timing log messages appear in the log file but not on the console.
Logging Hierarchies
When you retrieve a logger using the Logger class method getLogger, the Logger code returns either a new Logger object or an existing Logger object if the Logger has already created one with the same name. Calling Logger.getLogger (Student.class.getName()) creates a logger with the name "sis.studentinfo.Student". Using this fully qualified class name for a Logger is usually sufficient.
The following language tests shows how getLogger returns the same Logger object when called twice with the same name:
public void testLoggingHierarchy() {
Logger logger = Logger.getLogger("sis.studentinfo.Student");
assertTrue(logger == Logger.getLogger("sis.studentinfo.Student"));
}
The fully qualified name of a class represents a hierarchical relationship. The top level of the hierarchy, or tree, is sis. The next lower level is studentinfo. Each class within studentinfo is a leaf on the tree. You can see this hierarchy more clearly by looking at the directory structure in which Java creates compiled class files.
You can take advantage of this naming hierarchy with respect to logging. The logging facility creates an analogous hierarchy of Logger objects. If you create a logger named sis.studentinfo.Student, its parent is sis.studentinfo. The parent of a logger named sis.studentinfo is named sis. You can demonstrate this by adding to the language test:
public void testLoggingHierarchy() {
Logger logger = Logger.getLogger("sis.studentinfo.Student");
assertTrue(logger == Logger.getLogger("sis.studentinfo.Student"));
Logger parent = Logger.getLogger("sis.studentinfo");
assertEquals(parent, logger.getParent());
assertEquals(Logger.getLogger("sis"), parent.getParent());
}
The benefit of this hierarchy is that you can set logging levels at a higher level. For example, you can set the logging level to Level.ALL at the sis logger. A child logger uses the logging level of its parent if it has none itself.
Additional Notes on Logging
• The logging facility allows you to attach arbitrary filters to a logger or handler. The Filter interface defines one method—isLoggable—which takes a LogRecord as a parameter. Using information in the LogRecord, the job of isLoggable is to return true if the message should be logged or false otherwise. You might code a Filter implementation that ignores log messages over a certain length, for example.
• The logging facility provides support for internationalization. See the Java API documentation for more information and Additional Lesson III for a brief discussion of internationalization in general.
• You may need to change logging properties while the application is already executing. Once you have changed the physical properties file, you can use the LogManager class method readConfiguration to reload the properties file. In order to do so, you will need to represent the properties file as an InputStream. See Lesson 11 for information on how to read files using input streams.
• You learned to modify the logging.properties to define logging characteristics at runtime. You can supply a custom configuration file instead of using the logging.properties file. To do so, set the value of the system property java.util.logging.config.file. One way to do this is on the command line when you start the Java application. For example:
java -Djava.util.logging.config.file=sis.properties sis.MainApp
• The Logger class provides convenience methods for logging special situations. You can use entering and existing to simplify logging entry to a method and exits from it. You can use the throwing method to simplify logging an exception. Refer to the Java API documentation for Logger for more information.
Exercises
- Write a test that calls a method named
blowsUp. Code the methodblowsUpto throw a new RuntimeException with the message"Somebody should catch this!". Run the test. Verify that it fails with an appropriate stack trace. - Make the test pass without removing the call to
blowsUp. Ensure that the test fails ifblowsUpthrows no exception. - Ensure that the caught exception contains the proper message. Change the message, and see the test fail. Change it back in order to keep the tests passing.
- Create a test that calls a new method named
rethrows. Therethrowsmethod should callblowsUpand catch the exception. It should then wrap the exception in a new RuntimeException and throw it again. UsegetCauseto ensure that the caught exception contains the original exception. - Modify the test to expect a new exception type, SimpleException, when calling the
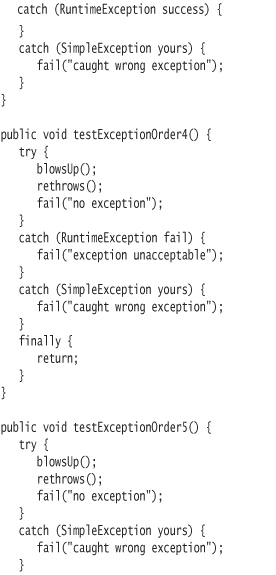
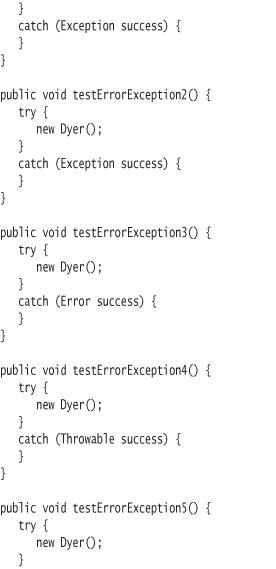
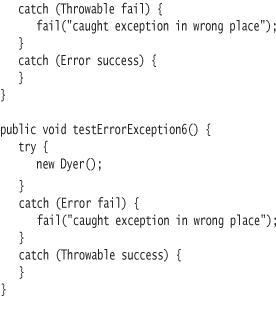
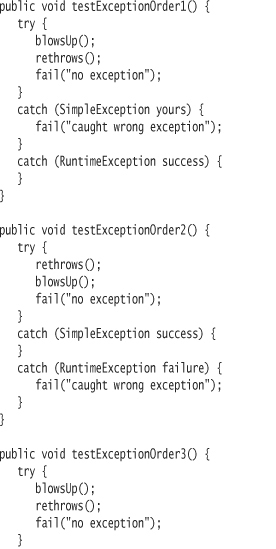
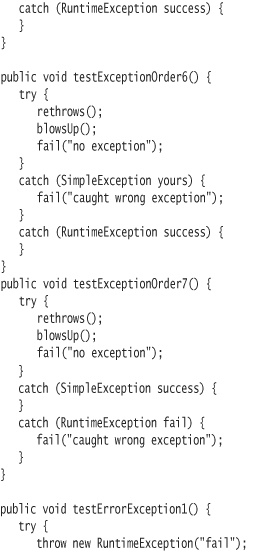
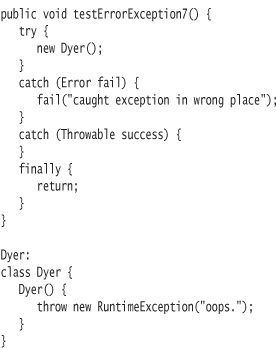
blowsUpmethod. SimpleException should extend RuntimeException. - Which of the following test methods will not compile? Of those that compile, which will pass and which will fail?
- What compiler error would you expect the following code to generate? Copy it into a test class of your own and make it pass.
public void testWithProblems() {
try {
doSomething();
fail("no exception");
}
catch (Exception success) {}
}
void doSomething() {
throw new Exception("blah");
} - What is wrong with the following commonly seen code?
public void doSomething() {
try {
complexOperationWithSideEffects();
} catch (Exception e) {
e.printStackTrace();
}
} - Write a method to log an exception to a given log with the stack trace in reverse order (so that the point of failure is at the tail of the log instead of the head).
- Create a custom Handler which discards the messages it receives and counts the number of times that messages were logged at various levels of severity. Use a map to store the count by severity.
- Create a custom log message formatter that you can optionally construct with a CountingLogHandler. If no CountingLogHandler is passed in, the formatter should produce output in the form:
LEVEL: message
For example:
WARNING: watch out
If a CountingLogHandler is passed in, each message should show the count for the current level. For example:
WARNING: watch out (WARNING total = 1)
Make sure you write tests for both circumstances.
Then ensure that the CountingLogHandler uses the custom formatter as its default. Modify the CountingLogHandler to store formatted output in a StringBuilder so that your test can request the complete logging summary.
Finally, edit the logging property file and assign the custom formatter to the ConsoleHandler. Visually ensure that logging messages sent to the ConsoleHandler come out as expected.