
Additional Lesson I: Swing, Part 1
Swing is Java's standard library for cross-platform GUI (graphical user interface) development. The Swing API provides a rich feature set, allowing you to construct sophisticated user interfaces. Using Swing, you can construct applications that allow the user to interact through basic controls1 such as push buttons, entry fields, and list boxes or using advanced controls such as tables, trees, and drag & drop.
1 Also known as widgets or components, controls are elements of graphical user interfaces that either present information or allow end users some aspect of control over their interaction with the user interface.
This chapter introduces Swing. It is an overview that shows you the basics: how to construct simple applications using some of the more common widgets. By no means does this chapter encompass everything about Swing. In fact, it only scratches the surface. Authors have devoted entire books, and even multiple volumes, to the topic.
Learning the basics of Swing, however, will provide you with a foundation for understanding how the rest of it works and how to go about finding more information. Once you have learned how to build a table widget using a table model, for example, learning how to build a tree widget using a tree model is easy. The Java API documentation usually provides sufficient information about how to use a widget. For more complex widgets, including the tree model and things such as sophisticated widget layouts, the Java API documentation often has a link to a good Sun tutorial on the topic.
More important, in this chapter you will learn various approaches to and philosophies about how to test Swing applications. Developers often view testing Swing applications as a difficult proposition and decide instead to forgo it. As a result, Swing code is frequently an untested, poorly designed mess.
This chapter is as much about ideas for testing Swing as it is about Swing itself. Testing Swing applications can be difficult, but that isn't an excuse to not do so. There are huge benefits to having well-tested, well-designed user interface code.
There are two different aspects of design for user interfaces. The Java you design and code to construct the user interface is the aspect you will concern yourself with in this chapter. Another aspect of design is the aesthetic and functional quality of the user interface—its look and feel.
The look and feel represents requirements—how does an end user need to interact with the application? The customer, or perhaps a user interface design expert working with the customer, should derive and present these requirements to the development team. Many shops involve members of the development team in the GUI design as well. The format in which the customer presents requirements to the developers could be screen snapshots, crude drawings, or various formalized diagrams.
You will learn about:
• Swing application design
• panels and frames
• buttons and action listeners
• lists and list models
• Swing layouts: BorderLayout, GridLayout, FlowLayout, BoxLayout, GridBagLayout
Swing
Swing is not your only choice for GUI development, but it is available to you “out of the box.” The Eclipse IDE was built using SWT (Standard Widget Toolkit), an API that you could also choose to use for your applications.
Swing is actually built atop another Java API known as AWT (Abstract Window Toolkit). Sun introduced AWT with the first version of Java as the sole means for producing GUIs. It consisted of a small number of widgets that at the time were guaranteed to be available on all platforms supported by Java. This “lowest common denominator” design decision allowed you to build cross-platform GUI applications but restricted your expressiveness with respect to GUI design.
AWT is known as a heavyweight GUI framework. Java tightly couples each AWT control to an equivalent control directly supported by the operating system. The operating system manages each AWT control.
Swing, which was introduced a few years after AWT, is, in contrast, a lightweight GUI framework. Swing eliminates the lowest common denominator problem by creating controls that use heavyweight controls as a “shell.” Swing components inherit from AWT components. They add custom rendering and interaction code so that they act and look far more sophisticated than the controls supported by all operating systems.
You can attach a look and feel to your Swing application so that it mimics a specific operating system. For example, you can tell Java to render your Swing controls so that they look like Motif controls or like Windows controls.
Getting Started
![]()
You will build a simple Swing application that presents a lists of courses to the end user. It will also allow the user to add new courses.
As you learn Swing, you might start with spike solutions—bits of code that demonstrate how Swing should work. Once you get these spikes working, you will go back and figure out how to test the Swing code. This chapter sometimes presents its material in this fashion: I will demonstrate how to code something in Swing, then supply code that shows how to test it.
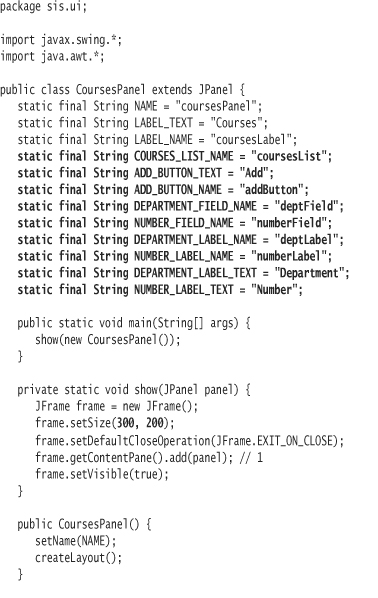
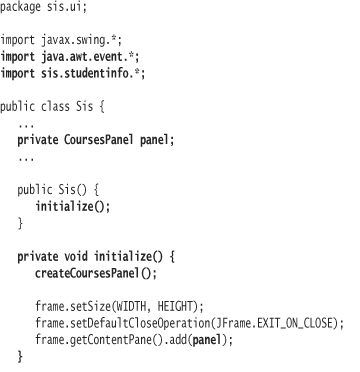
Most applications, whether they use Swing or not, initiate with a frame. A frame is a top-level window with a title bar and border by default. The frame is largely drawn by and under the control of your operating system. Within Java, the Swing frame class is javax.swing.JFrame. Building an initial application in Java is as simple as constructing a JFrame, setting its size, and making it visible.
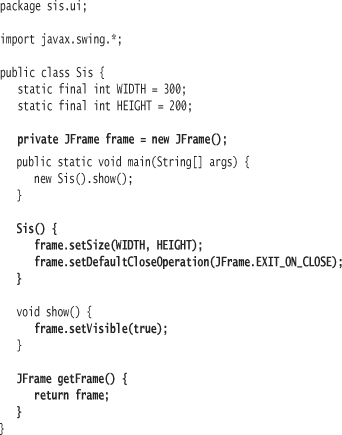
Create the class Sis (short for Student Information System).
The definition for Sis includes a main method to allow you to execute the application from the command line. About the only things you ever want to do in a main method are to construct a new instance and call a single method on it. You may first need to call a method to parse the command-line arguments. If your main method is more involved, you need to refactor. Resist adding any real logic to main—main is usually not comprehensively tested.
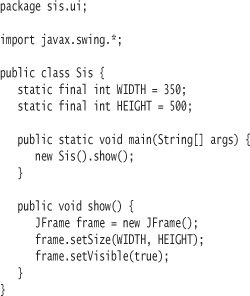
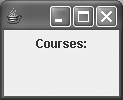
Compile and execute Sis. You should see a simple frame window (see Figure 1). Experiment with this window and note that you can do things such as size it, minimize it, or close it like any other windowed application. You may also want to experiment with the setSize and setVisible messages to see how they impact the frame. Try omitting either or both message sends.
Figure 1. A Frame Window
The only problem is that when you close this window, the Java process does not terminate. Behind the scenes, Swing creates user threads. Exiting the main method does not result in the termination of these user threads. See the section Shutting Down in Lesson 13 for a discussion of user threads and daemon threads.
You can tell the JFrame to terminate the Java process by telling it to exit on close:
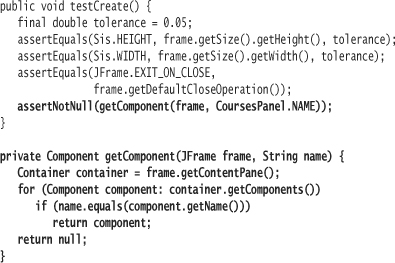
Now that you understand what it takes to build a frame, you can toss this code away and write a couple of tests. You will want to refer to the Java API documentation to see what kinds of queries you can send to a JFrame object. The tests show that you can inspect each piece of information you use to initialize the frame. You can also query whether or not the frame is visible.
The code that meets this test ends up slightly different than the spike code:
When you run the test, you will see the frame window display on screen, because the test instantiates Sis. Resist embedding such tests that pop up windows. It is very distracting and will slow down your tests considerably. You will learn techniques later that eliminate the need to render the user interface while running tests. For now, a test or two that pops up windows might be considered acceptable.
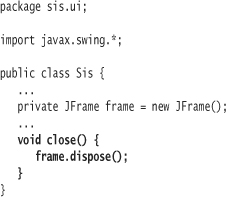
The frame window does not disappear even after the test completes. This is a bigger distraction that you can fix. In your test's tearDown method, tell the application to close:

Close the application by having it dispose of the frame window:
Swing Application Design
Designing a Swing application revolves around the organization of responsibilities germane to any application based on a user interface. These responsibilities include displaying information, managing input, modeling the business logic, and managing the application flow.
The terminology for these responsibilities is reasonably standard. A view displays things to the end user. The JFrame object in Sis is a view object. A controller manages input from the end user via the keyboard, mouse, or other device. A view may interact with one or more models, also known as domain objects. For example, code in the Sis application will need to interact with model objects of type Course and Student. Finally, the application coor models, views, and controllers. The application is responsible for the sequencing of a user's experience.
There are many ways to approach building Swing applications. You might hear different terms for these responsibilities. You might also encounter terms that imply various overlaps and combinations of the responsibilities. For example, Swing classes themselves often combine view and controller logic. (In fact, when you hear me refer to view in this chapter, I usually mean the combination of view and controller.) Nonetheless, the core responsibilities always exist. In this lesson, we will see where TDD takes us in terms of design—I've not forced any rigid design on the development of your example.
For the example, you will initially code the view portion of the Sis application. Per the Single-Responsibility Principle, the only code you should have in a view class is code responsible for displaying and arranging the user interface. A significant benefit of organizing the code this way is that you can execute the panel as a stand-alone application. This allows you to concentrate on developing the look, or layout, of the user interface.
In contrast, many Swing applications do not follow this rule. The view class in these applications is cluttered with other interactions. For example, the view class might send a message to a model class that in turn accesses data from the database. It is virtually impossible to display the view in isolation—that is, without executing the entire application. This design results in a significantly decreased rate of layout development. Often, you can access the view in question only by traversing a number of other application screens.
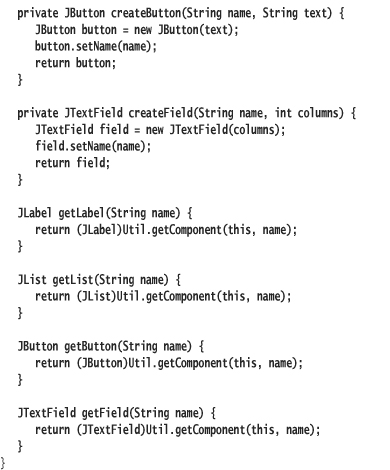
Panels
A JFrame envelopes a content pane—a place where you put visual content. A content pane object is a container of type java.awt.Container. You add other components to a container, including things such as list boxes, text, and containers themselves. In Swing, the workhorse container class is JPanel. Like JFrame, the JPanel class is a view class, used only for display purposes.
You may have noticed the package and naming convention. Swing components all begin with the letter J (JFrame, JPanel, JList, and so on); their containing package is javax.swing or a subpackage of javax.swing. The package java.awt (or a subpackage thereof) contains AWT classes. AWT class names do not use a prefix.
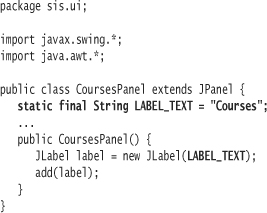
Your first piece of relevant user interface will be to display the text “Courses:” to the end user. You could directly embed this text in the JFrame's content pane. A better approach is to build up a second container consisting of the text, then embed this container in the content pane. To do so, you will create a JPanel subclass that displays text to the end user. You will then embed this JPanel in the JFrame's content pane.
Here is the spike for the JPanel:
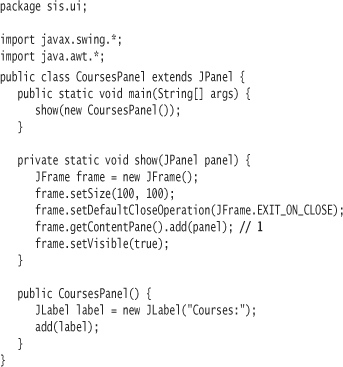
The spike uses a main method containing a bit of “driver” code to allow you to manually test the panel. If you were to code a second panel class, you would be compelled to refactor this driver code into a common utility class.
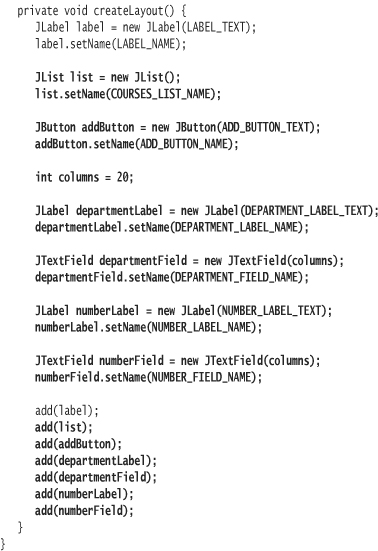
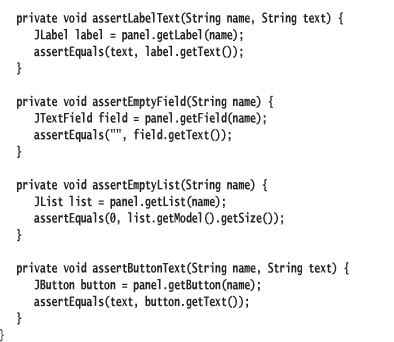
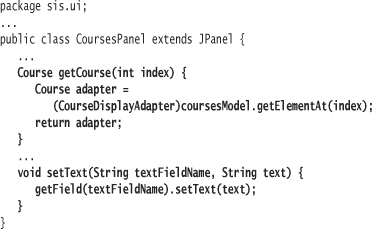
Within the constructor of CoursesPanel, you create a new JLabel object. A JLabel is a widget that displays text to an end user. You specify the text via the constructor of JLabel. In order for the JLabel to be displayed, you must add it to the JPanel using the add method.
CoursesPanel does not define add, nor does the JPanel class from which CoursesPanel extends. You must traverse the inheritance hierarchy up to the class java.awt.Container in order to find the definition for add. It makes sense for add to belong there: You add other components, including JPanel objects, to Container objects.
Following is the inheritance hierarchy for CoursesPanel.
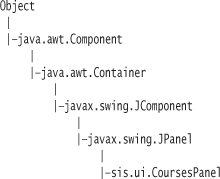
Everything in Swing sits atop the AWT framework. Everything is a Component. All Swing components (JComponent objects) are also containers. JPanel and CoursesPanel are therefore containers.
In order to display a panel, you can add it to the content pane of a JFrame. The line marked 1 in the show method of CoursesPanel accomplishes this.
Compile and execute the CoursesPanel spike. The result should look like Figure 2.
Figure 2. A JPanel
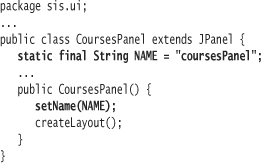
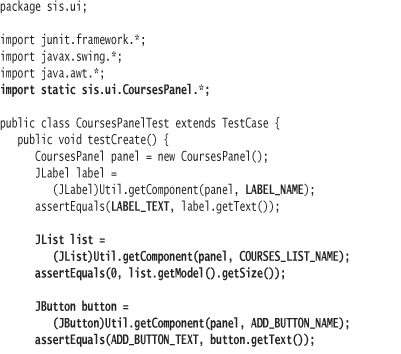
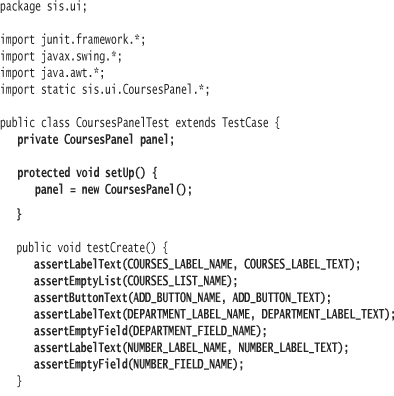
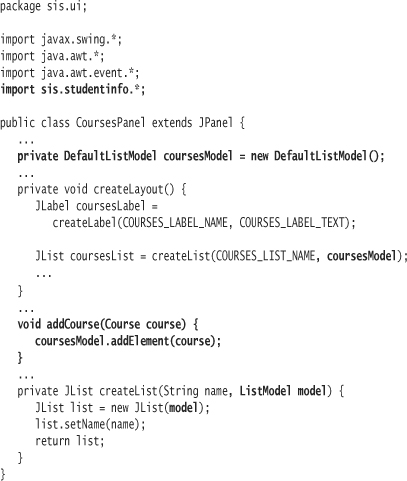
What should a test for CoursesPanel prove? For now, the only significant thing that CoursesPanel does is to present a label to the user. The test should thus ensure that the panel contains a label with the correct text:

The job of the method getLabel is to take as its parameter a JPanel and return the first JLabel object encountered within the JPanel. Since a JPanel is a Container, you can ask it for the list of components it contains using the getComponents message. Each element contained within the list is of type java.awt.Component. You must test the type of each element using instanceof to determine if it is a JLabel. You must also cast the matching element in order to return it as a JLabel type.
The use of instanceof suggests that perhaps a better approach works to determine if a component exists. For now, the technique will suffice until you have to test for a second type of component—or a second label.
Is this test necessary? The answer is debatable. You will always manually execute a Swing application from time to time to take a look, even if you were to write thousands of automated tests. In doing so, you will quickly determine whether or not a specific component appears.
One could also ask the opposite question: Is this test sufficient? Not only could you test that the widget appeared in the window but you could also test that it was presented in the appropriate font and appeared at the correct coordinates.
My view is that the test may be mild overkill, but it's not a difficult test to write. I would rather expend the effort than find out the hard way that someone accidentally changed the JLabel text in one of 200 screens. Positioning-based layout tests (tests that prove where the label appears onscreen) are another matter. They are notoriously difficult to write and even more difficult to maintain. A bit of aesthetic distress is not usually a barrier to successful application execution.
More important is that you write tests for any dynamic user interface capabilities. For example, you might allow the application to change the color of text when the user presses a button. You will want to write a test to ensure that this action and reaction works as you expect.
The CoursesPanel class differs from the spike only in that it defines a class constant representing the label text.
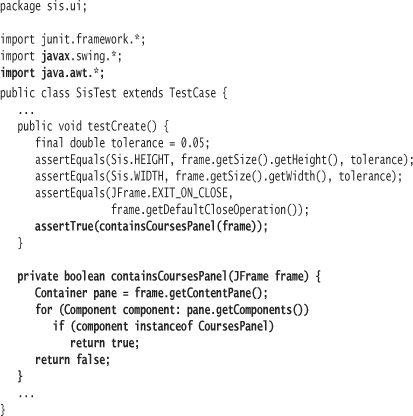
In the Sis application, you want CoursesPanel to represent the main view. The modified SisTest uses a similar mechanism to that in CoursesPanelTest to prove that the content pane contains a CoursesPanel instance.
You're already familiar with how to get a frame to include and show a panel. You wrote virtually the same code in the “driver” for CoursesPanel.

The tests pass.
Refactoring
In the course of building this example for the book, I coded the Sis constructor to include the statement that makes the frame visible. Michael Feathers reminded me that constructors are for initialization only. It's a bit of a stretch, I countered, but you could consider displaying the window as part of its initialization. To which he replied, using wisdom from Ron Jeffries, that a constructor has a lot of nerve doing something it isn't asked to do.
I listened to the voices of these two and fixed the deficiency. However, I still consider that GUI widget and layout construction is simple initialization. Putting panels within a frame is layout initialization. While you could conceivably separate this layout initialization from object initialization, there is little value in doing so. A JPanel subclass with uninitialized contents is of little use. Forcing clients to make an additional call to initialize its layout is redundant.
Separating the setVisible statement from the constructor is of potential value, however. In the case of SisTest, doing so allowed for a separate initialization test that doesn't force the frame to be rendered. In production systems, it's often valuable to initialize a frame behind the scenes, later controlling its visibility separately.
Ultimately the decision is somewhat arbitrary and thus academic. With regards to CoursesPanel, a future requirement may require a developer to create a CoursesPanel subclass. Putting initialization code in a separate method makes it easier to override or extend the initialization functionality. Yet you want to avoid designing for future what-ifs (that often never come). It's just as easy to wait and make the change down the road—if necessary.
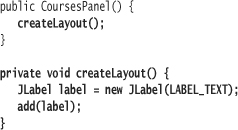
An acceptable compromise is to consider simple design rule #3 and extract initialization to a private method for readability purposes:
The code in SisTest.containsCoursesPanel is very similar in form to that in -CoursesPanelTest.getLabel. Both methods loop through the components in a container and test for a match.
The duplicate code is a problem that will only get worse. Adding buttons, list boxes, or other component types will require a new method for each type. Additionally, suppose you have two labels on a panel. The current code will grab only the first label.
One solution is to provide a name for each component. You can then loop through the list of subcomponents until you find a matching name. This solution requires a little more management overhead in your view class, but it makes testing easier. It also can make aggregate operations on components easier, as you'll see later.
All component and container classes inherit from java.awt.Component. In this class you will find the methods setName and getName that respectively take and return a String object.
Starting with the code in SisTest:
The corresponding changes to CoursesPanel:
Part of the secret to eliminating duplication is to push toward use of abstractions. For example, the new getComponent method deals in terms of abstract components instead of the concrete type CoursesPanel. Pushing the code in CoursesPanelTest in this direction leads to:
At this point, the getComponent methods are different only by the first line. For lack of a better place, move them into a new class as class methods and refactor. Here is the code for the resulting class, sis.ui.Util, as well as for the modified test classes:
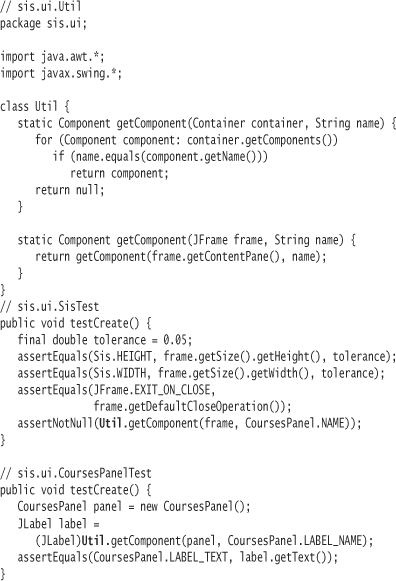
The new method calls are a bit more unwieldy. One reason is the new need to cast. You'll refactor when or if casting duplication becomes apparent. But the short-term solution is a vast improvement—you've eliminated method-level duplication that otherwise would become rampant in short time.
More Widgets
![]()
The SIS application should allow users to add new courses. To support this, CoursesPanel can contain a couple of entry fields in which the user may type the course department and course number. The user should be able to click an “Add” button that adds a new course, created using the entered department and number, to the list.
The test for the view:
The qualified class constants were getting a bit unwieldy, so I decided to do a static import of the CoursesPanel class. In this case, there is little possibility for confusion about the origin of the class constants.
The role of new component types JButton, JTextField, and JList should be apparent. Code for most of the assertions against the new widgets is similar to the previously coded test for the label.
The assertion against the JList object is different. It proves that the JList on a newly constructed CoursesPanel is empty. You can determine how many elements a JList contains by first obtaining its model, then asking the model for its size. A JList uses a model object to contain its data. You will learn more about list models in the upcoming section, List Models.
The modified view class:
The tests should pass. You should see a window similar to that in Figure 3 when you compile and execute the view class.
Figure 3.
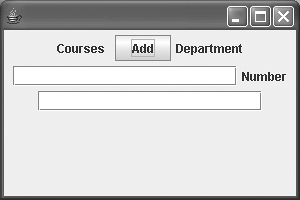
The user interface is a mess. You'll rectify this in the upcoming section entitled Layout. Also, nothing that would seem to be a JList appears in the window. One reason is that you have added no elements to the list—it is empty. You'll fix this in time as well.
Even with only seven widgets, you've written a good amount of tedious code to test and build the user interface. Let's see what we can do to tighten it up.
Refactoring
The getComponent method calls require casts. For example:
JTextField numberField =
(JTextField)Util.getComponent(panel, NUMBER_FIELD_NAME);
Since you must retrieve two text fields from the panel, you have two lines of code with the same cast. This is a form of duplication that you can eliminate, using convenience methods that both eliminate the cast and make the code clearer.
The separate utility class Util contains the getComponent method. However, it is perhaps more appropriate for CoursesPanel to have this responsibility, since a panel is a container of components.
The following listing shows a highly refactored CoursesPanelTest. Some of the changes to CoursesPanelTest will necessitate changes in CoursesPanel—see the listing after this one.
While some of these refactorings eliminate duplication, technically not all of them do. However, those refactorings that do not eliminate duplication help improve readability. First, even though only one list needs to be verified, creating assertEmptyList more clearly states the intent. Second, extracting assertButtonText allows the entire body of testCreate to contain singleline, simple, consistently phrased assertion statements.
Each of the new assertion methods contains two implicit tests. First, if no component with the given name exists within the panel, a NullPointerException will be thrown, failing the test. Second, if the component is not of the expected type, a ClassCastException will be thrown, also failing the test. If this implicitness bothers you, feel free to add additional assertions (e.g. assertNotNull), but I don't view them as necessary.
The new assertion methods are very general purpose. When (or if) you add a second panel to the SIS application, you can refactor the assertion methods to a common test utility class. You might choose to move them to a junit.framework.TestCase subclass that all panel test classes inherit.
In most systems, Swing code and associated test code is excessive and repetitive. Take the time up front to do these refactorings. You will significantly minimize the amount of redundancy and overall code in your system.
You can refactor component creation in CoursesPanel in a similar manner. The following listing shows new component creation methods in addition to the get methods required by the test.
Button Clicks and ActionListeners
When you click a Swing button, some action should take place. When you click on the Add button in CoursesPanel, you want a new course to show up in the list of courses. Code to accomplish this will require three steps:
- Read the contents of the course department and course number text fields.
- Create a new Course object using the course department and course number text.
- Put the Course object in the model for the courses list.
Adding a new course with these steps is a mixture of user interface responsibility and business logic. Remember, you want CoursesPanel to be a more or less dumb class that just shows information to the user. Clicking a button is a controller event, one that you can respond to with an action. The details of the action—the business logic—does not belong in CoursesPanel.
For now, you still need to write a test for the view class. Code in the panel class still needs to tell “someone” to take action when a user clicks the Add button. The panel test will prove that clicking on an Add button triggers some action—an action that has yet to be defined.
You can wire a button click to an action method by using a callback. Java supplies the interface java.awt.event.ActionListener for this purpose. To implement ActionListener, you code the action method actionPerformed. Code in actionPerformed should do whatever you want to happen when someone clicks the button.
After defining an ActionListener class, you can assign an instance of it to the button. When a user clicks the button, logic in JButton calls back to the actionPerformed method on the ActionListener object.
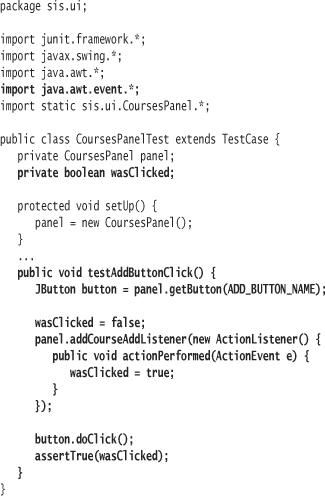
You will usually want to implement listeners as anonymous inner classes. Here, the sole job of the ActionListener is to ensure that the actionPerformed method gets called when the button is clicked. The JButton class provides the method doClick to emulate a user clicking on a button.
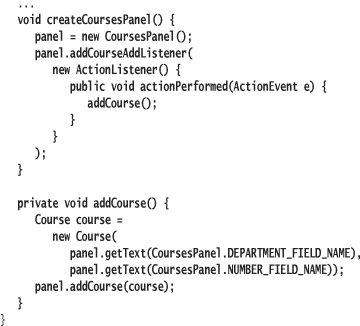
CoursesPanel must supply a new method, addCourseAddListener. This method simply attaches the ActionListener callback object to the JButton object. Some production client using CoursesPanel will be responsible for defining this callback and passing it to the view. The view remains blissfully ignorant of any business logic.
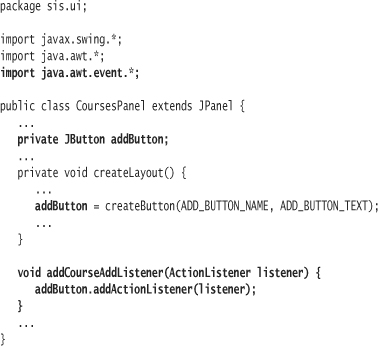
You must change addButton to be a field and not a local variable for this to work.
The method addCourseAddListener is a single line of code. For view code other than layout, this is your ideal. If you find yourself putting while loops, if statements, or other convoluted logic in your view class, stop! It likely contains business or application logic that you should represent elsewhere.
List Models
You have gotten the view to represent part of the equation: Tell “someone” to do “something” when the user clicks Add. You know that the result of clicking Add should be that the courses panel shows a new course. You want your view class to treat these as two discrete operations; you'll implement logic elsewhere to connect the two.
The view should allow client code to pass a Course object and, as a result, display the course object. It doesn't care how the Course object comes into being. Add a new test to CoursesPanelTest:
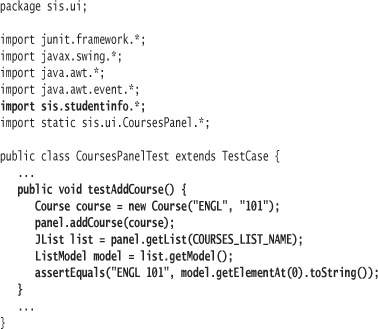
The test sends the addCourse message to the CoursePanel. It then extracts the underlying model of the JList. A list model is a collection class that notifies the JList when something in the collection changes.
The JList view needs to show a useful representation of the objects contained in the model. To do so, JList code sends the toString message to each object in the model. The final line in the test asserts that the printable representation of the first object in the model is the concatenated department and course number.
A list model is a class that implements the interface javax.swing.ListModel. For JList objects, you will normally use the ListModel implementation class DefaultListModel. Interestingly, the ListModel interface declares no interface methods for adding elements. DefaultListModel does (addElement). You will want to declare the model reference (coursesModel) as being of the implementation type DefaultListModel and not of the interface type ListModel.
In the CoursesPanel method createList, you now pass a ListModel reference to the JList as you construct it. The addCourse method takes the Course passed to it and stuffs it into the model.
Use of toString
I mentioned in Lesson 9 that you should not depend upon the toString method for production code. A toString method is generally more useful for developer-related debugging activities. A developer might need to change Course output from the form:
ENGL 101
to something like:
[Course:ENGL,101]
The modified string would be inappropriate for the CoursesPanel user interface view. Another conflict can arise if two different views must show Course information in different formats.
In either case, you can and should introduce a display adapter class that wraps each course and provides the toString definition needed. You store these adapter objects in the JList model.
![]()
The user now wants to see a hyphen between each department and course number in the list. Modify the test to require this new display format:
A simple implementation of the adapter class is to have it subclass Course and override the definition of toString.
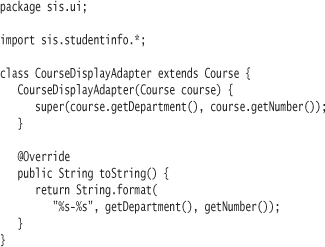
The CoursesPanel addCourse method must change:
void addCourse(Course course) {A
coursesModel.addElement(new CourseDisplayAdapter(course));
}
Later, when you need to write code to obtain a Course selected in the list box, you'll need to extract the target Course from its adapter.
The Application
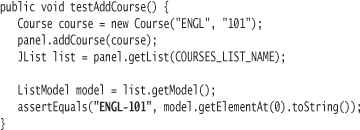
Now that the view is in place, you can specify how the application should use it. It's time to tie things together.2 Here's a new SisTest method, testAddCourse.
2 Depending on your mindset, you might have found it easier to have started building from the application and driven down into the view. Even while I was constructing the view, I had in mind how I wanted the application to tie things together.
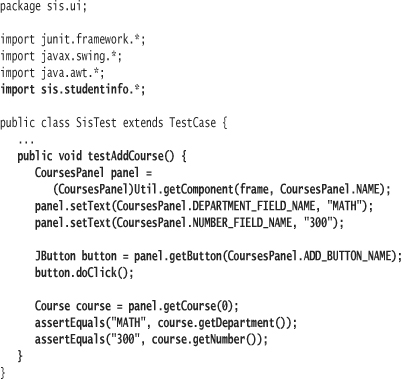
The test drives the application from the perspective of an end user. It's almost an acceptance test.
First, the test sets values into the department and course number fields. It then emulates a click of the Add button using the button method click. In order to ensure that the application is behaving correctly, the tests asks the embedded CoursesPanel to return the first Course in its list.
You'll need to add a couple of methods to CoursesPanel to support the test:
Since a CourseDisplayAdapter extends from Course, you can assign the extracted adapter object to a Course reference to return.
Code changes to Sis (including a few minor refactorings):
The Sis class ties together the action listener and the ability to add a course to the panel. Most of the code should look familiar—it is the client code you built in tests for CoursesPanel.
You'll need to add the getText method to CoursesPanel:
String getText(String textFieldName) {
return getField(textFieldName).getText();
}
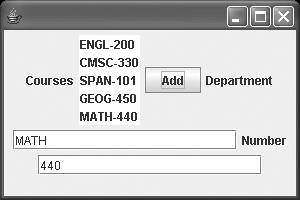
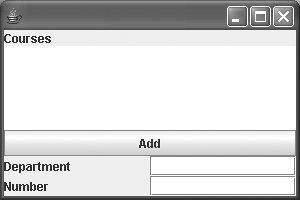
You can now run Sis as a stand-alone application and experiment with adding courses. The screen shot in Figure 4 shows Sis after a user has entered five courses. It's still a mess!
Figure 4.
Layout
The user interface for the Sis application is so poorly laid out that it's confusing to the end user. The problem is that by default, Swing lays out components to flow from left to right, in the order you add them to a container. When insufficient room remains to place a component on a “line,” Swing wraps it, just like a word in a word processor. The component appears to the left side of the panel below the current line.
In Figure 4, the first line consists of four widgets: the “Courses” label, the list of courses, the Add button, and the “Department” label. The second line consists of the department field, the “Number” label, and the course number field.
Resize the window and make it as wide as your screen. Swing will redraw the widgets. If your screen is wide enough, all of the components should flow from left to right on a single line.
Swing provides several alternate layout mechanisms, each in a separate class, to help you produce aesthetically pleasing user interfaces. Swing refers to these classes as layout managers. You can associate a different layout manager with each container. The default layout manager, java.awt.FlowLayout, is not very useful if you want to create a professional-looking user interface.
Getting a view to look “just right” is an incremental, taxing exercise. You will find that mixing and matching layouts is an easier strategy than trying to stick to a single layout for a complex view.
An alternative to hand-coding layouts is to use a tool. Many IDEs provide GUI (view) composition tools that allow you to visually edit a layout. Using a tool can reduce the tedium of trying to get a user interface to be perfect.
You will learn to use a few of the more-significant layout mechanisms in an attempt to make CoursesPanel look good. Little of this work requires you to test first. Instead, you should test last. Make a small change, compile, run your tests, execute CoursesPanel as a stand-alone application, view the results, react!
GridLayout
You'll start with a simply understood but usually inappropriate layout, GridLayout. A GridLayout divides the container into equal-sized rectangles based on the number of rows and columns you specify. As you add components to the container, the GridLayout puts each in a cell (rectangle), moving from left to right, top to bottom (by default). The layout manager resizes each component to fit its cell.
Make the following changes in CoursesPanel:
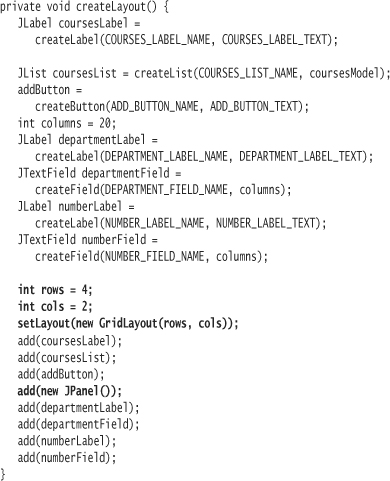
You assign a layout manager to the panel by sending it the message setLayout. In createLayout, you send the message setLayout to the CoursesPanel object, passing it a GridLayout instance.
The result of executing CoursesPanel using the GridLayout is shown in Figure 5.
Figure 5.
The coursesLabel ends up in the upper left rectangle. The coursesList, the second component to be added, is in the upper right rectangle. The Add button drops down to the second row of rectangles, and is followed by an empty JPanel to fill the next rectangle. Each of the final two rows displays a label and its corresponding field.
Since each rectangle must be the same size, GridLayout doesn't have a lot of applicability in organizing “typical” interfaces with lots of buttons, fields, lists, and labels. It does have applicability if, for example, you are presenting a suite of icons to the end user. GridLayout does contain additional methods to improve upon its look, but you will usually want to use a more--sophisticated layout manager.
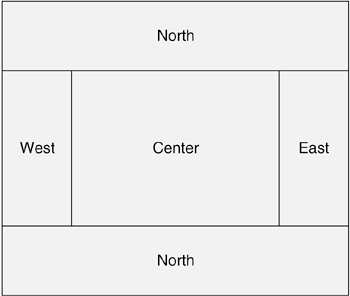
BorderLayout
BorderLayout is a simple but effective layout manager. BorderLayout allows you to place up to five components within the container: one each at the compass points north, east, south, and west and one to fill the remainder, or center (see Figure 6).
Figure 6. A Border Layout Configuration
For CoursesPanel, you will replace the GridLayout with a BorderLayout. Your BorderLayout will use three of the available areas: north, to contain the “Courses” Label; center, to contain the list of courses; and south, to contain the remainder of the widgets. You will organize the southern, or “bottom,” widgets in a subpanel that uses a separate layout manager.
The createLayout method already is overly long, at close to 30 lines. CoursesPanel is a simple interface so far. Imagine a sophisticated panel with several dozen widgets. Unfortunately, it is common to encounter Swing code that does all of the requisite initialization and layout in a single method. Developers create panels within panels, they create and initialize components and place them in panels, they create layouts, and so on.
A more effective code composition is to extract the creation of each panel into a separate method. This not only makes the code far more readable but also provides more flexibility in rearranging the layout. I've refactored the code in CoursesPanel to reflect this cleaner organization.
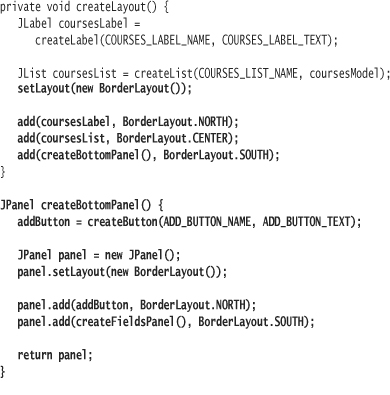
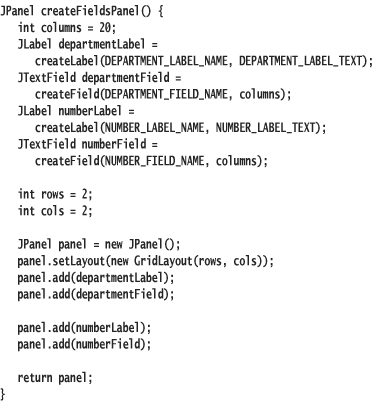
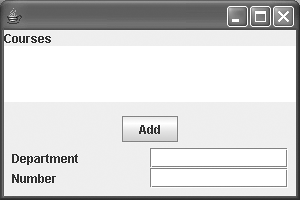
The code in the CoursesPanel constructor sets its layout to a new instance of BorderLayout. It puts the label on the north (top) side of the panel and the list in the center of the panel. It puts the result of the method createBottomPanel, another JPanel, on the south (bottom) side of the panel (see Figure 7) The benefit of putting the list in the center is that it will expand as the frame window expands. The other widgets retain their original size.
Figure 7.
The code in createBottomPanel creates a JPanel that also uses a BorderLayout to organize its components. It places the Add button north and the resulting JPanel from createFieldsPanel south. The createFieldsPanel uses a GridLayout to organize the department and course number labels and fields. The result (Figure 7) is a considerable improvement but is still not good enough. Again, make sure you experiment with resizing the frame window to see how the layout reacts.
A Test Problem
If you rerun your tests, you now get three NullPointerException errors. How can that be, since you neither changed logic nor added/removed any components?
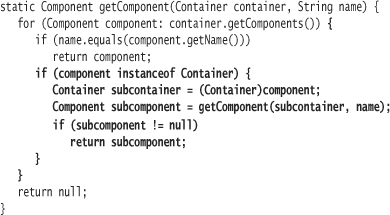
When you investigate the stack trace for the NullPointerException, you should discover that some of the get methods to extract a component from a container are failing. The problem is that the Util method getComponent only looks at components directly embedded within a container. Your layout code now embeds containers within containers (JPanels within JPanels). The code in getComponent ignores Components that have been added to subpanels.
The Util class doesn't have any tests associated with it. At this point, to help fix the problem and enhance your test coverage, you need to add appropriate tests. UtilTest contains three tests that should cover most expected circumstances:
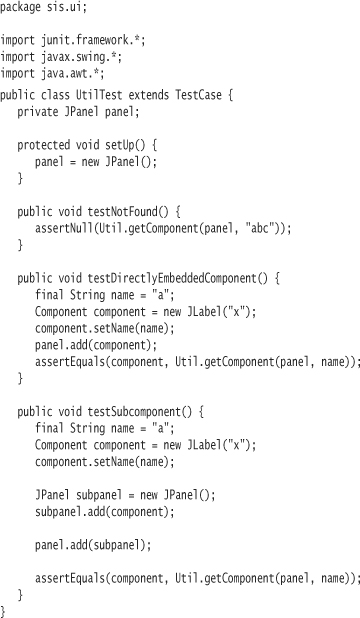
The third test, testSubcomponent, should fail for the same reason your other tests are failing. To fix the problem, you will need to modify getComponent. For each component in a container, you will need to determine whether or not that component is a container (using instanceof). If so, you will need to traverse all of that subcontainer's components, repeating the same process for each. The most effective way to accomplish this is to make recursive calls to getComponent.
Your tests should all pass with this change.
BoxLayout
The BoxLayout class allows you to lay your components out on either a horizontal or vertical axis. Components are not wrapped when you resize the container; also, components do not grow to fill any area. The bottom panel, which must position an Add button and the fields subpanel vertically, one atop the other, is an ideal candidate for BoxLayout.
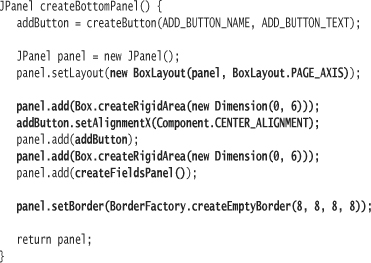
You must pass an instance of the panel to the constructor of BoxPanel and a constant indicating the direction in which to lay out components. The constant PAGE_AXIS by default represents a top-to-bottom, or vertical, orientation. The other option is LINE_AXIS, which represents horizontal orientation by default.4
4 You can change the orientation by sending applyComponentOrientation to the container. Older versions of BoxLayout supported only explicit X_AXIS and Y_AXIS constants. The newer constants allow for dynamic reorganization, perhaps to support internationalization needs.
You can create invisible “rigid areas” to separate components with whitespace. These rigid areas retain a fixed size even when the container is resized. The class method createRigidArea takes a Dimension object as a parameter. A Dimension is a width (0 in this example) by a height (6).
You may want to align each component with respect to the axis. In the example, you center the Add button around the vertical axis by sending it the message setAlignmentX with the parameter Component.CENTER_ALIGNMENT.
A final tweak is to supply an invisible border around the entire panel. The BorderFactory class can provide several types of borders that you can pass to the panel's setBorder method. Creating an empty border requires four parameters, each representing the width of the spacing from the outside edge of the panel. Other borders you can create include beveled borders, line borders, compound borders, etched borders, matte borders, raised beveled borders, and titled borders. Take a look at the Java API documentation and experiment with the effects that using different borders produces.
The code now produces an effective, but not quite perfect, layout. See Figure 8.
Figure 8. Using BoxLayout
GridBagLayout
To fine-tune a layout, you will be forced to work with GridBagLayout, a highly configurable but more complex layout manager. GridBagLayout is similar to GridLayout in that it lets you organize components in a grid of rectangles. However, GridBagLayout gives you far more control. First, each rectangle is not fixed in size—it is generally sized according to the default, or “preferred” size of the component it contains. Components can span multiple rows or columns.
The modified createFieldsPanel code shows how to lay out labels and fields using a GridBagLayout. (The code in the method presumes that you have statically imported java.awt.GridBagConstraints.*.)
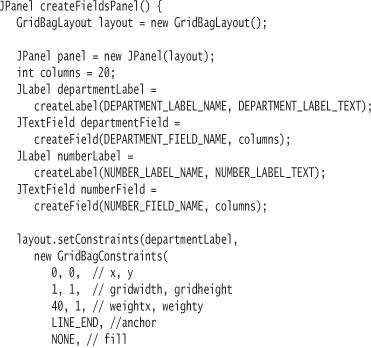
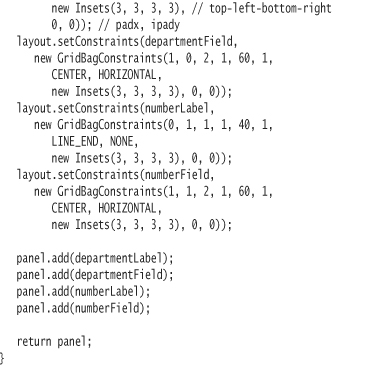
After creating a GridBagLayout and setting it into the panel, you call the method setConstraints on the layout for each widget to add. The setConstraints method takes two parameters: a Component object and a GridBagConstraints object. A GridBagConstraints object contains several constraints for the Component object. This table very briefly summarizes the constraints (see the API documentation for complete details):
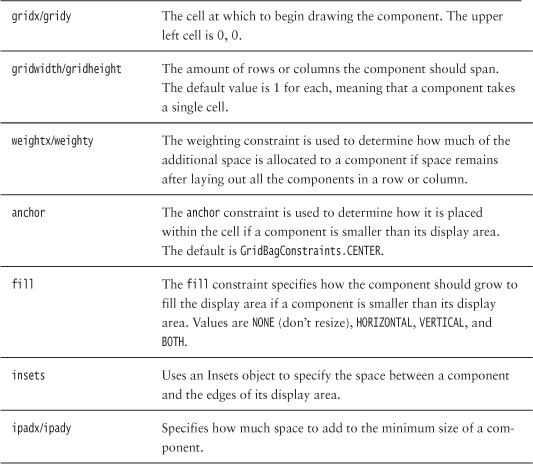
Each of the fields in GridBagConstraints is public. You can construct a GridBagConstraints object with no parameters, then set individual fields as necessary. Or, as in the listing for createFieldsPanel, you can specify every possible constraint using the alternate GridBagConstraints constructor.
The best tactic is to sketch, on paper or whiteboard, a grid representing how you want the output to look. Use the gridx/gridy and gridwidth/gridheight constraints to determine the relative sizes and positions of the components. Then concentrate on the anchor and fill aspects of each component. Code the layout to these sketched specifications and modify if necessary. You can then experiment with the insets and weightx/weighty constraints (and occasionally the ipadx/ipadx constraints) to tweak the spacing between components.
Obviously there is a lot of redundancy in createFieldsPanel. The following code is modestly refactored.
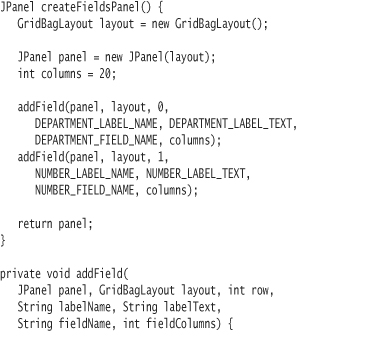
The onerous nature of such code should drive you in the direction of extreme refactoring. Consider replacing repetition in the construction of GridBagConstraints objects by using a simplified utility constructor. If you need to represent more than a couple of fields and associated labels, consider representing each pair using a data class. You can then represent the entire set of fields in a table, iterating through it to create the layout.
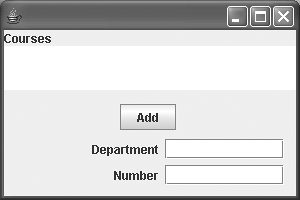
Figure 9 shows a layout that is getting close to being acceptable. Resize it to see how the field components fill to their display area.
Figure 9. Using GridBagLayout
As of Java 1.4, Sun introduced the SpringLayout class. This layout manager is primarily designed for the use of GUI composition tools. The basic concept of SpringLayout is that you define a layout by tying the edges of components together using constraints known as springs.
In CoursesPanel, you might create a spring to attach the west (left) edge of the department text field to the east (right) edge of the department label. The spring object attaching the two components is a fixed five pixels in size. Another spring might attach the east edge of the department text field to the east side of the panel itself, also separated by a spring of fixed length. As the panel grows in width, the department text field would grow accordingly.
Creating a SpringLayout by hand is fairly easy for a panel with only a few components. It can also be incredibly frustrating and difficult for a more complex layout. In most cases, you will want to leave the job to a layout tool.
Moving Forward
You've only scratched the surface of Swing! In the next chapter, you'll tighten up the look and the feel of CoursesPanel with some fine-tuning. I'll then run through a few more generally useful Swing topics.