
Appendix C. Getting Started with IDEA
This appendix demonstrates how to build and execute the “Hello World” application using IntelliJ IDEA. Before you attempt to use a sophisticated IDE such as IDEA, you should first learn how to do command-line compilation, execution, and testing of Java code. Learning these fundamentals will ensure that you can use Java on any platform you encounter.
IDEA
IDEA is a Java IDE built by a Czech company called JetBrains. IDEA has been one of the driving forces behind Java-specific intelligent features in an IDE. Many of the valuable features sported by other Java IDEs appeared first in IDEA. IDEA is also an open tool, meaning that third-party vendors and individual developers can enhance its capabilities by writing plug-ins for it.
I've used IDEA for several years, alternating between it and Eclipse as my primary IDEs (the choice my client often makes). One thing I've noted about IDEA is that it promotes the notion of least surprise: Generally, if you want to do something, IDEA does it and in a way you might expect or hope for.
IDEA also happened to support all of the new features of J2SE 5.0 well before Eclipse, in time for me to write this appendix before my deadline.
You can obtain the latest version of IDEA from the JetBrains web site at http://www.jetbrains.com. The version I used at the time of writing this appendix was IntelliJ IDEA 4.5.1. Follow the instructions at the site for downloading and installing IDEA. You should have already installed Java before bothering to install IDEA.
The installation program walks you through a number of questions regarding how you want IDEA configured. In general, you can go along with the defaults and just hit the Next button.
The following instructions are intended to be a brief introduction to getting started with IDEA, not a comprehensive user's guide. If you need more information, refer to the help supplied with IDEA or contact JetBrains support. Expect that the instructions shown in this appendix should not change dramatically in the near future, barring any significant changes from JetBrains.
The Hello Project
Start IDEA once you have installed it. IDEA will show you the dialog shown in Figure C.1.
Figure C.1.
The “Hello World” project will be throwaway. Change the text untitled to hello in the Name field. As you type the project name, note that the directory specified in the Project file location field changes automatically. You may want to make a note of the location so that you are aware of where it is in your file system.1 Click the Next button. You will see the dialog shown in Figure C.2.
1 IDEA saves information on recently opened projects, so usually you will not need to worry about the location.
Figure C.2.
If you see nothing listed in the Project JDK field or if you do not see a version of Java that is 1.5 (5.0) or later, click the Configure button. Use the Configure JDK to add (+) new JDKs as necessary. You will need to know the installation location of J2SE 5.0.
Ensure you have selected a J2SE 5.0 JDK and click Next. Continue to click Next, accepting the defaults for each panel. Click the Finish button when IDEA first makes it available to you.
The initial project screen, shown in Figure C.3, is spartan. A tab marked Project appears in the upper left corner, oriented vertically. Click this tab to open the Project tool window (see Figure C.4).
Figure C.3.
Figure C.4.
Select the top entry in the hierarchy tree—the first entry named hello. This is the project. The next entry below, also hello, is the module. Simple projects you build usually will need to contain only one module.
Click your right mouse button after selecting the hello project in order to bring up the project context menu. The first entry in this menu is New; select it. You should see a screen that looks like Figure C.5.
Figure C.5.
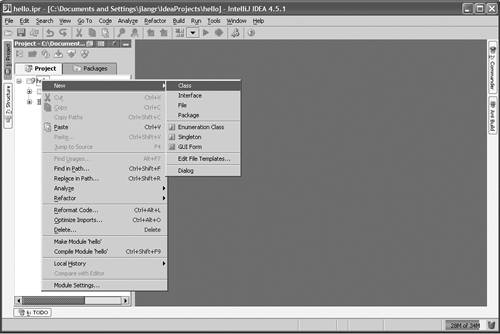
Click the menu item Class. When prompted for a class name, enter Hello. Make sure you enter the class name with the correct case! You should see an editor with a starting definition for the class Hello (see Figure C.6).
Figure C.6.
In the Hello.java editor window, change the code to reflect the Hello code as originally presented in Chapter II, Setting Up:
class Hello {
public static void main(String[] args) {
System.out.println("hello world");
}
}
The Project tool window to the left now shows the expanded project hierarchy. Beneath the src entry, you see your new class Hello listed. Right-click this class entry to bring up the context menu. See Figure C.7.
Figure C.7.

Click the menu entry Run "Hello.main()", third from the bottom of the menu. Note that you can press the key combination Ctrl+Shift+F10 as an alternative to using the menu. You need not save your source files before attempting to run programs—IDEA saves them for you automatically.
IDEA might present you with a dialog asking whether or not you want to create an output directory. If so, simply click Yes.
A Compile Progress dialog should appear briefly. Before IDEA can execute your program, it must compile it to ensure there are no problems. The first time you compile, it may take a little longer; subsequent runs should begin more quickly.2 Presuming that you have no compile errors, you should see an output window at the bottom of IDEA (see Figure C.8).
2 The slow initial compilation appears to occur each time you start IDEA.
Figure C.8.
Success!
Next, you'll change the source code to deliberately contain errors in order to see how IDEA deals with them.
Change the source code in the Hello.java editor to something that should generate an error. Here's one possibility:
class Hello {
public static void main(String[] args) {
xxxSystem.out.println("hello world");
}
}
Observe that off to the right, there are a couple of visual indicators telling you that the code has problems. In the upper right corner of the editor a small square will appear; it will be red. It was green until you mucked up the code. Below this square, you will see one or or more thin red lines. These lines indicate the problem spots in the code. You can hold your mouse over a line to see the error message. You can click on the line to navigate to the problem spot.
Try running Hello again and see what happens. Since you've already executed Hello one time, you can quickly execute it again using one of at least two ways: either press the Shift-F10 key combination or click the Run arrow (a green arrow pointing right, like the play button on a CD player). The Run arrow is located on the toolbar beneath the menu and above the Hello.java editor.
Instead of seeing the Run tool window with the correct output, you see the Messages tool window (Figure C.9). This window presents you with a complete list of error messages. Off to the left are various icons that help you manage the messages. Hold your mouse over any one of the icons for a second or so to see a tool tip that explains the icon's use.
Figure C.9.
If you double-click a specific error message in the Messages tool window, IDEA will put the text cursor on the specific location in Hello.java that contains the error. Correct the error and re-run Hello.
Running Tests
This section walks you through the first part of Lesson 1, in which you create a StudentTest class and a corresponding Student class. The goal of this section is to show you how to effectively do test-driven development in IDEA.
Start by creating a new project. Click on the File menu, then click New Project. IDEA will present you with the same series of dialogs as when you created the hello project. This time, type the name of the project as lesson1. Then follow the same steps as when you created the hello project—keep clicking Next. When you click Finish, IDEA gives you the opportunity to open the project in a new frame. Select Yes.
Before you enter code, you will need to change some project settings. From the Project tools window, select the Project (lesson1). Right-click to bring up the context menu and select Module Settings.
You should see the Paths dialog, shown in Figure C.10.
Figure C.10.
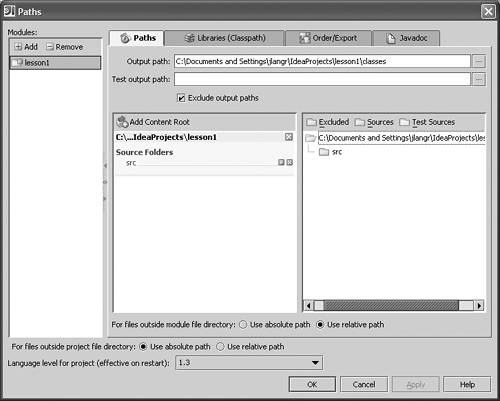
First, you must configure the lesson1 module to recognize the J2SE 5.0 language level (if it doesn't already). Near the bottom of the dialog is a drop-down list marked Language level for project (effective on restart). The parenthesized comment suggests that you'll need to exit IDEA and restart it for changes to be effective.3 You'll do this shortly. Now, click on the drop-down list to expose the selection list. Choose the entry that indicates version 5.0.
3 While some of the new features of J2SE 5.0 will work, others will not do so until you restart.
Next, you must specify where the module can find the JUnit JAR file. (If you're not sure what this means, refer to Lesson 1 as well as Chapter II on setting up.) Click on the tab marked Libraries (Classpath) (it appears at the top of the Paths dialog). Your Paths dialog should look like the screen snapshot shown in Figure C.11.
Figure C.11.
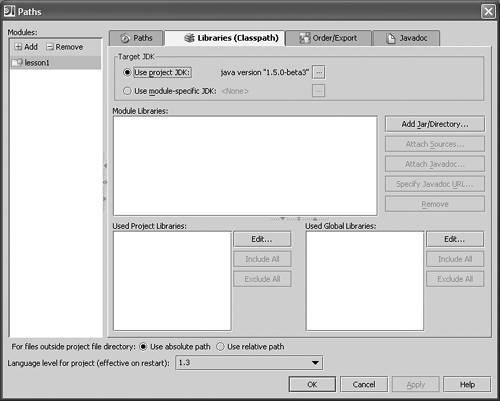
Currently the Paths dialog shows that you have no libraries (JAR files) on your classpath. Click the button Add Jar/Directory. You will see a Select Path dialog. Navigate to the directory in which you installed JUnit, select junit.jar, and click OK. You should be back at the Paths dialog.
Click OK to close the Paths dialog. Exit IDEA, then restart IDEA. Make sure you completely exit IDEA—close the hello project frame if it remains open.
IDEA will probably reopen with the hello project, not the lesson1 project. If it does so, select File→Close Project from the menu. Then click File→Re open and select the lesson1 project from the list of recently opened projects. If the lesson1 project does not appear, click File→Open Project. You will then need to navigate to the directory in which you created the project. If you accepted the defaults, under Windows this directory is probably C:Documents and SettingsuserNameIdeaProjectslesson1, where userName is your Windows login name.
Once you have reopened Lesson 1, right-click in the Project tool window. Select New→Class from the context menu. For the class name, enter StudentTest. In the StudentTest.java editor, enter the initial code from Lesson 1 for the StudentTest class:
public class StudentTest extends junit.framework.TestCase {
}
From the Project tool window tree, right-click and select Run “StudentTest”. Create an output directory if asked to do so. You should see something like the window in Figure C.12.
Figure C.12.
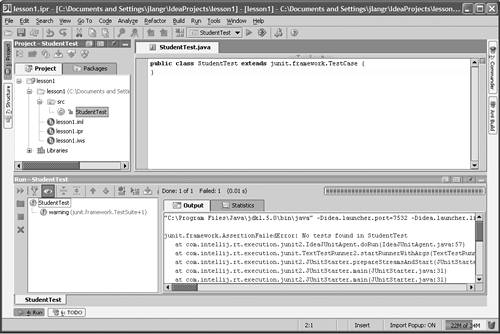
The pane in the lower right quadrant shows output from the test run. This is JUnit output—IDEA has integrated JUnit directly into the IDE.
If you can't see enough of the output, drag the slider bar up. The slider bar appears just above the Run tool window and separates the top half of IDEA from the bottom half. Move the mouse slowly over the slider until you see a double-headed north-south arrow, then click and drag.
Make sure you're following along with the directions in Lesson 1 as you proceed. As expected, the Output window shows a failure, since you have defined no tests in StudentTest. Modify the StudentTest code:
public class StudentTest extends junit.framework.TestCase {
public void testCreate() {
}
}
Rerun (Shift-F10). Now, instead of a red bar and an error in the Output window, you see a green bar and two lines of output. The first line shows the actual java command passed to the operating system. The second line says that the “Process finished with exit code 0.” Good. You demonstrated failure, corrected the problem, then demonstrated success.
Next, the fun part. Modify the StudentTest code again:
public class StudentTest extends junit.framework.TestCase {
public void testCreate() {
new Student("Jane Doe");
}
}
You should see red indicators to the right. The class name Student appears in red. You can hold the mouse over any red for more information. If you click on the class name Student, you will see a little light bulb to the left of the line after a short delay. Click on the light bulb. See Figure C.13.
Figure C.13.
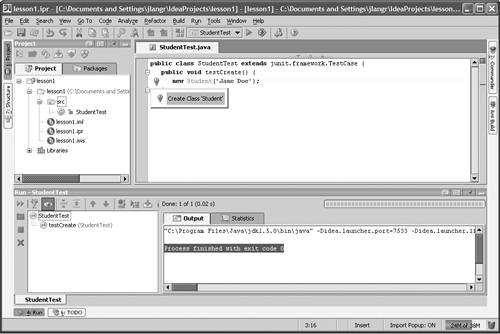
The light bulb represents the “intention actions” tool. It presents you with a list of actions that you can effect. As an alternative to clicking the light bulb, you can bring up the list of actions using the Alt-Enter key combination. IDEA builds the intention actions list based on what it thinks you want to do. In this case you can select the only entry in the list, Create Class “Student”. When asked for a package, just click OK.
Figure C.14 shows that you now have two editors, StudentTest.java and Student.java. You can bring up either one by clicking on its tab.
Figure C.14.
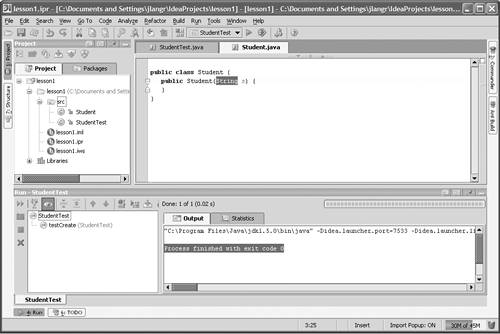
The intention actions tool is one of many ways in which IDEA reduces the amount of code you must type. You have a Student class with a bunch of the relevant code already filled in. The generated class code is currently in “template” mode—you can press tab to move through various relevant fields. This gives you the opportunity to replace template code with your specifics. Tab to the argument field and replace the argument name s with name. Tab again or press the Esc key to exit template mode.
You should see no red indicators. Rerun and ensure you see green results from JUnit.
Continue with the remainder of the Lesson 1 exercise. Take advantage of the various intention actions as IDEA presents them to you. Experiment with alternate ways of effecting things. If you've been leaning toward mouse-directed options, try the key combinations to see if they help you go faster. And vice versa! Dig through the menus available and see if you can effect actions from there.
Taking Advantage of IDEA
IDEA, like most modern IDEs, is full of many time-saving features. It behooves you to learn how to master your IDE. The difference between a novice using only the basic features versus an expert taking full advantage of the IDE can be measured in weeks over the lifetime of a one-year project.
Code Completion
One valuable feature is code completion, which I'll also refer to as auto-completion. When you begin typing things that IDEA can recognize, such as class names, package names, and keywords, click Ctrl-Space. IDEA will do one of three things: It may say “No suggestions,” it may automatically complete the text you began typing, or it may bring up a list of selections to choose from. You can navigate to the selection using the cursor (arrow) keys and press Enter or you can click on the desired selection. IDEA will finish your typing based on this selection.
Pressing the Enter key results in the new text being inserted at the current location. If you instead press the Tab key, the new text will replace any text immediately to the right.
Get in the habit of pressing Ctrl-Space after typing two or three significant characters. I press it all the time. You may be surprised at what IDEA is able to figure out about your intentions.
IDEA provides two additional kinds of code completion: Smart Type and Class Name. These are more sophisticated tools triggered by alternate keystrokes. Refer to the IDEA help system for more information (Help→Help Topics).
Navigation
One of the most significant strengths of using an IDE such as IDEA is the ease with which you can navigate through Java code. Click on the Go To menu. The size of this menu suggests how flexible this feature is. Click on the Class selection from the Go To menu. Type the three letters Stu. Pause. You will see a drop-down list of appropriate classes to choose from.
Class navigation is basic but important. More valuable is the ability to navigate from directly within code. Open the StudentTest class. From the line that reads new Student("Jane Doe");, click on the class name Student. Then press the Ctrl-b key combination (b for “browse,” I suppose). Pressing Ctrl-b is equivalent to selecting the menu option Go To→Declaration.
IDEA will navigate directly into the Student constructor. You can return to your previous edit location by using the key combination Ctrl-Shift-Backspace. Learning all these navigation shortcuts will save you considerable time. I've watched programmers, even recently, use inferior tools. They waste several minutes every hour in manually navigating through a list of classes and scrolling through large amounts of code.
Searching is another form of navigation. IDEA understands Java and how it all fits together, making searches far more effective. Suppose you want to find all code that invokes a certain method. Using a programmer's editor, you can do only text searches against code. Suppose you're trying to find all client classes that call a method named getId. There might be other classes that implement getId; the text searches will report uses against these classes as well.
But IDEA can use its Java smarts to help you find only the usages you're interested in. As an example: In the Student class, click on the constructor. Right-click and select Find Usages from the context menu. Click OK when presented with the Find Usages dialog. The Find tool window will appear at the bottom of IDEA. As with the Messages tool window, you can double-click an entry in the find results to navigate directly to it.
Refactoring
Another important capability is the built-in refactoring support. IDEA automates a number of refactorings that allow you to quickly and safely transform your code. Take a look at all the entries in the Refactor menu to get an idea of the things you can do.
The simplest and perhaps most valuable refactoring appears first—Rename, also effected by Shift-F6. In a few keystrokes, you can safely change the name of a method. This means that IDEA also changes any other code that calls the method to reflect the new name. It also shows you the proposed rename before it applies it to your code. This allows you to back out if you recognize a problem with the potential refactoring.
I use the Rename refactoring all the time. Rather than waste a lot of time coming up with the “perfect” method or class name, I'll often go with a name I know to be inferior. This allows me to immediately get moving. After coding a little, a better name usually suggests itself. A quick Shift-F6 and I'm on my way. Sometimes I might change a method name more than a couple of times before I'm satisfied.
Code Analysis
IDEA supplies you with a code analysis feature known as the code inspector (Analyze→Inspect Code). You execute code inspection on demand against a single source file or the entire project. The inspector looks for problem spots in your code, including things such as unused methods or variables or empty catch blocks. The list of options includes over 300 categorized entries. You pick and choose what you're interested in: individual entries or groups of related entries or both.
The inspection can take a bit of time to execute. When an inspection completes, the inspector presents you with a tree showing all the results. Each result is a detailed explanation of the problem or potential problem in your code. From a detailed explanation, you can click to navigate to the corresponding trouble spot. When possible, IDEA will give you the option to automatically correct the problem.
IDEA may report dozens or hundreds of entries that you may not think are problems. It's up to you and your team to decide the items that are relevant. Some items are not problems at all. But virtually everything on the list can point to the potential for trouble in certain environments or circumstances.
The practice of TDD can mitigate most of these concerns. In Agile Java, you've learned to build things incrementally and not always to an overly robust expectation. You can “get away” with things that would be deemed unacceptable in the absence of good testing.
Relax. Some others might consider the style in Agile Java to be fast and loose. Certainly there is always room for improvement in my code. But I don't worry about it as much when doing TDD.
I consider the bulk of code I come across difficult to understand and maintain. Blindly adhering to standards can seem like a good idea, but often it can lead you to waste considerable time for little gain. If you instead look to the simple design goals of testability, elimination of duplication, and code expressiveness, you will rarely go wrong.