
The Internet is part of our everyday lives. The Internet’s penetration into the life of an Access developer is no exception. Almost every Access 2002 object can be saved as HTML. Furthermore, Access 2000 introduced a new object type called data access pages. Using data access pages, you can quickly and easily create a Web view of your data. Data access pages are extremely flexible and scalable. The simplest data access page can be created as easily as any Access form. On the other hand, using the Microsoft Script Editor (MSE), you can turn your data access pages into powerful Web pages. Probably the biggest downside of data access pages is that they must be viewed on a machine with Internet Explorer 5 or above, and Microsoft Office installed. This makes data access pages an excellent candidate for intranet applications, but not for Internet applications.
Probably one of the most basic but powerful features in Access is the capability to save database objects as HTML (HyperText Markup Language) documents. Table data, query results, form datasheets, forms, and reports can all be published as HTML. Each of these objects is covered in the following sections.
When saving table data to HTML, you can store it in the HTML file format so that it can be easily published on the Web. Just follow these steps:
Click Tables in the Objects list of the Database window.
Click to select the table whose data you want to save as HTML.
Choose File|Export to open the Export Table dialog box.
Use the Save As Type drop-down list to select HTML documents.
Enter a filename and select a location for the HTML document.
Click Export to finish the process.
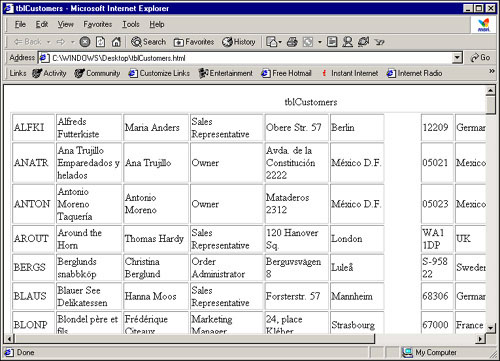
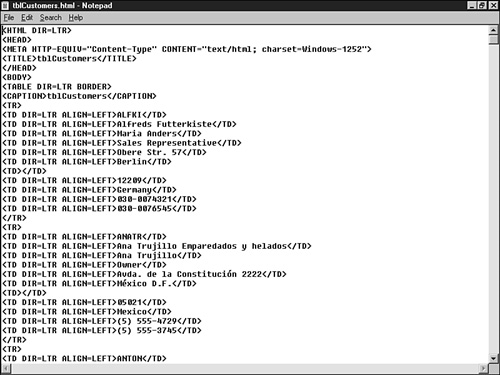
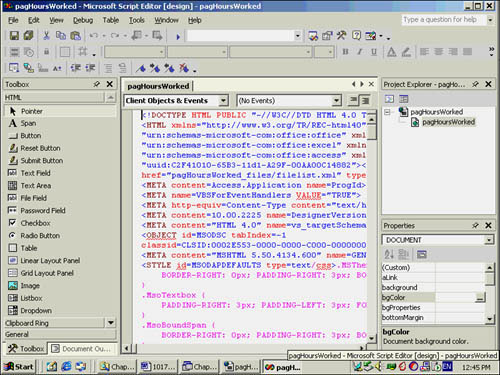
The file is exported to HTML and can be viewed from any Web browser. (See Figure 26.1.) You can also view the HTML source, as shown in Figure 26.2.
The capability to save query results as HTML means you don’t need to save all fields and all records to an HTML file. In fact, you can even save the results of Totals queries and other complex queries as HTML. Saving the result of a query as HTML is similar to saving a table as HTML:
Click Queries in the Objects list of the Database window.
Click to select the query whose results you want to save as HTML.
Choose File|Export to open the Export Query dialog box.
Use the Save As Type drop-down list to select HTML documents.
Enter a filename and select a location for the HTML document.
Click Export to finish the process.
Only a form’s datasheet can be saved as HTML because an HTML file is a static file. It doesn’t change as the data in the database changes, nor can the data in the HTML file be modified. To save a form’s datasheet as HTML, follow these steps:
Click Forms in the Objects list of the Database window.
Click to select the form whose results you want to save as HTML.
Choose File|Export to open the Export Form dialog box.
Use the Save As Type drop-down list to select HTML documents.
Select a filename and location for the HTML document.
Click Export; this opens the HTML Output Options dialog box.
Select an optional HTML template that’s applied to the HTML document. By selecting an HTML template, you can easily maintain a consistent look for your Web publications. Select the type of encoding that you wish to use, and click OK.
Reports and their formatting can be saved as HTML, too, which is an elegant way to publish data on an Internet or intranet site. To publish a report as HTML, just follow these steps:
Click Reports in the Objects list of the Database window.
Click to select the report whose results you want to save as HTML.
Choose File|Export to open the Save As dialog box.
Use the Save As Type drop-down list to select HTML documents.
Click Export to open the HTML Output Options dialog box.
Select an optional HTML template that’s applied to the HTML document. Select the type of encoding you wish to use and click OK.
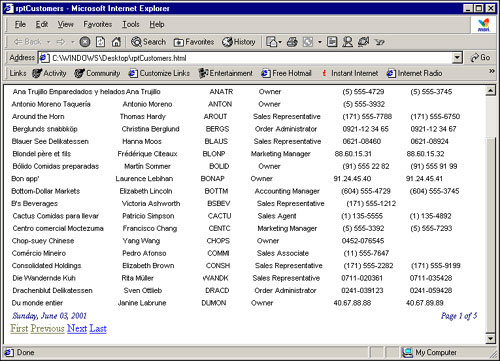
Figure 26.3 shows a report published as HTML. Because the report is a multipage report, several HTML files are generated. Each page of the report is linked, and the user can easily navigate from page to page by using the First, Previous, Next, and Last hyperlinks automatically generated during the export process.
Just as you can link to dBASE tables, Paradox tables, or ODBC data sources, you can also link to HTML files by following these steps:
Right-click within the Database window and select Link Tables; this opens the Link dialog box.
Use the Files of Type drop-down list to select HTML documents.
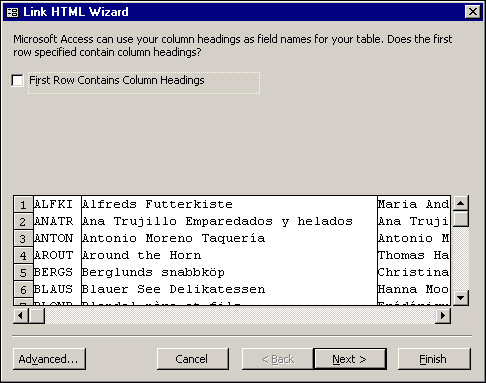
Select the HTML file you want to link to and click Link. The Link HTML Wizard appears. (See Figure 26.4.)
In the wizard’s first step, indicate whether the first row of data contains column headings. You can also see Access’s proposed layout for the linked table.
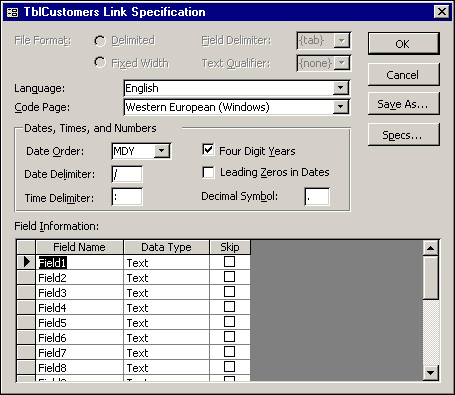
Click Advanced to designate specifics about the linked table. The Link Specification dialog box opens. (See Figure 26.5.) Here you can select which fields you want to include in the linked table, date delimiters, and other specifics of the linked file. Make your selections and click OK.
Click Next to proceed with the Link HTML Wizard. In the next step, you select a field name and data type for each field in the HTML file. Make your selections and click Next.
In the wizard’s last step, you supply a table name for the linked table. Make your selection and click Finish.
You then see a message that the table linked successfully. The table appears in the Database window with a special icon indicating that it’s an HTML file. (See Figure 26.6.)

The linked HTML file can be browsed, queried, and reported on just like any other table. However, none of the data in the linked file can be modified.
The data in an HTML file can be imported so that it becomes exactly like any other Access table; follow these steps to import an HTML file:
Right-click within the Database window and select Import; this opens the Import dialog box.
Use the Files of Type drop-down list to select HTML documents.
Select the HTML file you want to import and click Import to open the Import HTML Wizard. This wizard is almost identical to the Link HTML Wizard.
In the wizard’s first step, you indicate whether the first row of data contains column headings. You can also see Access’s proposed layout for the imported table.
Click Advanced to designate specifics about the imported table. The Import Specification dialog box opens. Here you can select which fields you want to include in the imported table, date delimiters, and other specifics of the imported file. Make your selections and click OK.
Click Next to go to the next step. Here, you have the choice of importing the data into a new table or adding it to an existing table. Make your selection and click Next.
In the next step, select a field name and data type for each field in the HTML file. You can also designate whether you want Access to create an index for the field and even whether you want to exclude the field entirely. Make your selections and click Next.
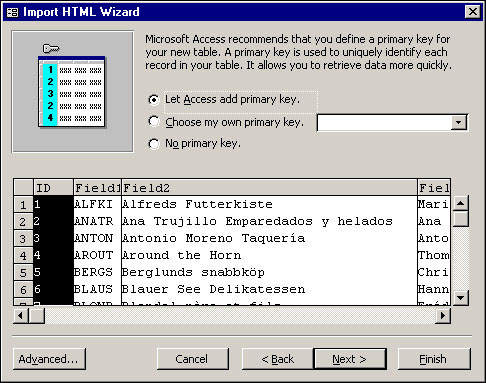
Next, the wizard lets you designate a primary key for the imported table. If you prefer, you can have Access supply the primary key. (See Figure 26.7.) Make your selection and click Next.
In the wizard’s last step, supply a table name for the linked table. If you’re concerned about whether the imported table is normalized, you can have Access launch the Table Analyzer after the import is finished. Make your selections and click Finish.
You then see a message that the table imported successfully; it appears in the Database window just as any other Access table does.
Data access pages were introduced with Access 2000. In Access 2000, they were considered version 1 technology and were somewhat challenging to work with. Data access pages have improved significantly in Access 2002. Using data access pages, you can quickly and easily create a Web view of your data. Data access pages are extremely flexible and scalable. The simplest data access page can be created as easily as any Access form. On the other hand, using the Microsoft Script Editor (MSE), you can turn your data access pages into powerful Web pages. Probably the biggest downside of data access pages is that they must be viewed on a machine with Internet Explorer 5, or above, and Microsoft Office Web Components installed. This makes data access pages an excellent candidate for intranet applications, but not for Internet applications.
Data access pages are created in one of the following four ways:
Using AutoPage
Using a wizard
From an existing Web page
From scratch
To create a data access page using AutoPage, follow these steps:
Click Pages in the list of objects in the Database window.
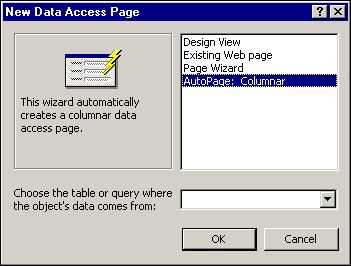
Click the New button in the Database window. The New Data Access Page dialog box appears.
Choose the table or query on which the data access page will be based.
Select AutoPage: Columnar from the list of options for creating a data access page (see Figure 26.8).
Click OK. The data access page is created (see Figure 26.9).

To create a data access page using a wizard, follow these steps:
Click Pages in the list of objects in the Database window.
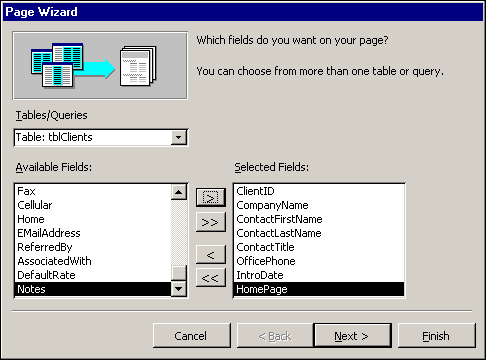
Double-click the Create Data Access Page By Using Wizard option. The Page Wizard appears (see Figure 26.10).
Select the table or query on which you want to base the data access page. In Figure 26.11, the tblClients table is selected.
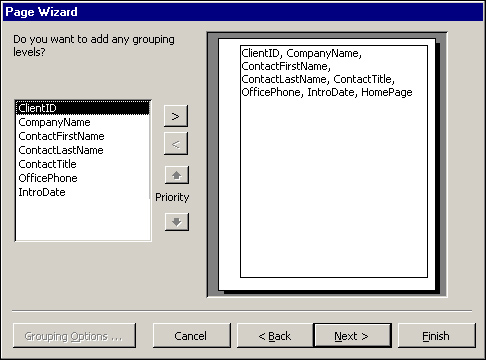
Select the fields that you want to appear on the data access page. In Figure 26.11 the ClientID, CompanyName, ContactFirstName, ContactLastName, ContactTitle, OfficePhone, IntroDate, and HomePage fields are selected. Click Next to continue.
Add any desired grouping levels to the page (see Figure 26.11). In Access 2000, the created page was rendered not editable when grouping was applied. Fortunately, this is no longer the case in Access 2002! Click Next to continue.
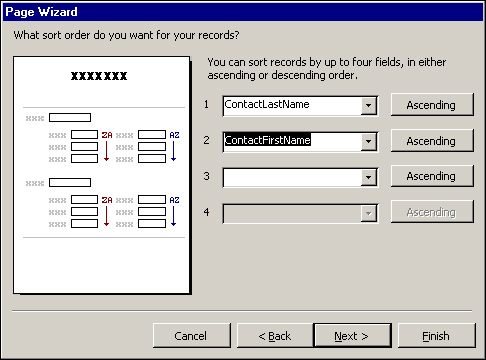
Select a sort order for the records included on the page (see Figure 26.12). In the figure, the page is sorted by the ContactLastName field combined with the ContactFirstName field. Click Next to continue.
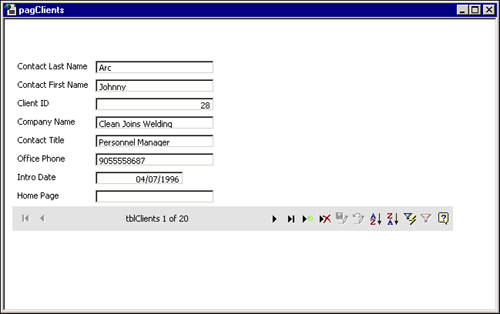
The last page of the wizard asks you for a title for the page. You can also opt to apply a theme to the page. Enter the title, select whether you want to apply a theme, and then designate whether you want to open the page or modify the page’s design. Click Finish to complete the process. If you clicked the check box to apply a theme to the page, the Theme dialog box appears (see Figure 26.13). Select a theme and click OK. Figure 26.14 shows the completed page in Design view. Figure 26.15 shows the completed page in Page view.


Data access pages are not stored in your database file or project. Instead, data access pages are saved as HTML files. To save a data access page, follow these steps:
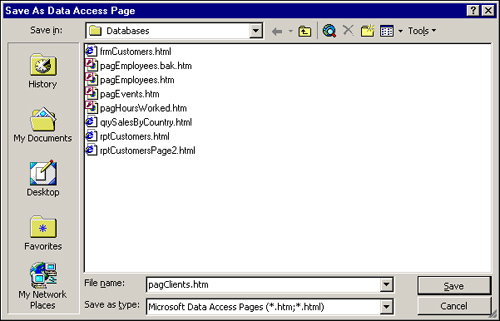
Click Save on the toolbar. The Save as Data Access Page dialog box appears. (See Figure 26.16.)
Enter the name of the HTML document. In the figure, the name is entered as dapClients.
Click Save.
A dialog box appears, suggesting that the connection string should point to a UNC path. Doing so ensures that the data behind the page is available over the network.
Although the data access page is saved as a separate document, it appears in the Database window (see Figure 26.17). Notice in the figure that a ToolTip appears, indicating the name and location of the saved HTML document. When the data access page is opened from within Microsoft Access, it appears as a window within the Access environment. To view the page as it will appear in a browser, right-click the page in the Database window and select Web Page Preview.

You might already have an HTML document that you have created. Fortunately, Access 2002 allows you to base a new data access page on an existing HTML document. To create a data access page from an existing Web page, follow these steps:
Click Pages in the list of objects in the Database window.
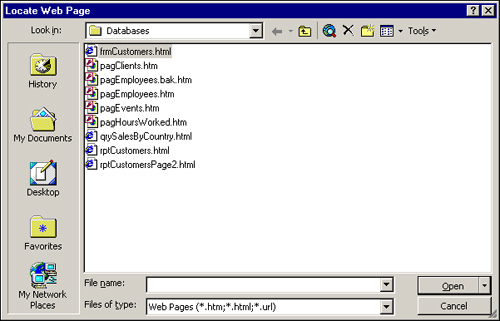
Double-click the Edit Web Page That Already Exists wizard option. The Locate Web Page dialog box appears (see Figure 26.18).
Select an existing HTML document and click Open. You can now edit the page right within the Microsoft Access environment.
Although the Data Access Page Wizard is very powerful, there are times when you will want to build a data access page from scratch. To do this, follow these steps:
Click Pages in the list of objects in the Database window.
Double-click the
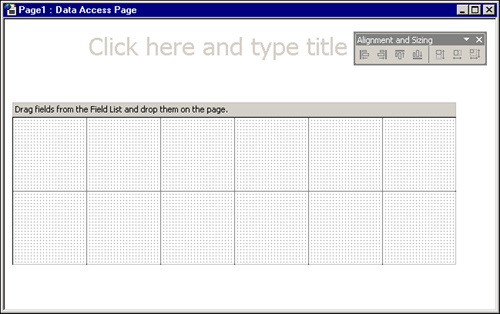
Create Data Access Page In Design Viewoption. A blank data access page appears (see Figure 26.19).Add controls to the data access page and set their properties.
You might wonder how to associate a table from your database with a data access page that you build from scratch. The process differs somewhat from the process of associating a form with data. The process is as follows:
Click the Field List tool on the toolbar. The Field List window appears (see Figure 26.20).
Notice that the Field List window shows two expandable lists: one with the tables in the database, and the other with the queries in the database. (See Figure 26.21.)
To add all fields from an existing table or query to the data access page, drag an entire table or query from the field list to the data access page.
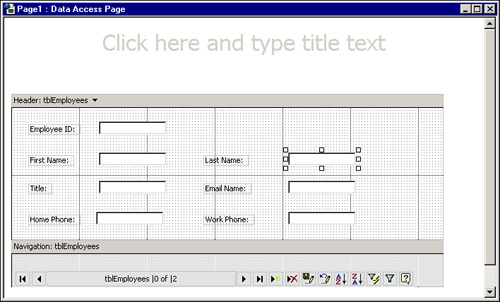
To add specific fields from a table or query to the data access page, expand the field list to display the desired table or query, and then drag and drop individual fields to the data access page. In Figure 26.22, selected fields have been added from the tblEmployee table to the data access page.


Note
Because data access pages are stored as separate HTML documents, Access will not be able to locate the data access pages associated with a database if the pages are deployed to a different directory structure than the structure that existed when they were first created. This problem can be seen if you try to work with the data access pages associated with the Chap26Ex.mdb located on the sample code CD. You must write code to “fix” the links to the pages. The Northwind.MDB database that ships with Access 2002 contains sample code that you can use in your applications to fix these broken associations.
Just as a form or report has properties, so does a data access page. Many of the properties are similar to those of forms and reports. The most important properties are discussed in this section.
To modify the properties of a data access page, you must first make sure that the page is selected. The easiest way to select the page is to click its title bar. Among the most important properties of a data access page are its Data properties. These appear in Figure 26.23, and the most important properties are discussed here.

The ConnectionFile property designates the name of the Office Database Connection (.odc) file or the Microsoft Data Link (.udl) file that connects a data access page to its data source. Using an ODC or UDL file, you can easily modify the source of the data underlying a data access page without having to make changes to the page itself.
To enter the ConnectionFile property, click the ellipsis within the property. The Select Data Source dialog box appears. (See Figure 26.24.) Here you can select an existing ODC or UDL file, or create a new file.

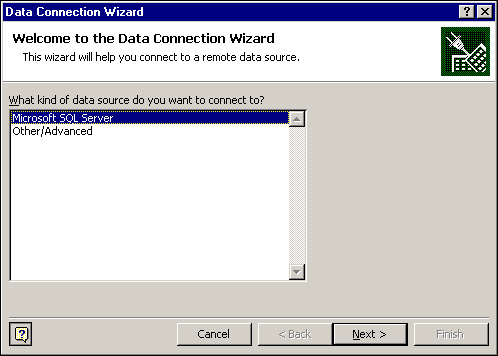
Click New Source to create a new ODC file. The Data Connection Wizard launches. (See Figure 26.25.)
Select Microsoft SQL Server to connect to a SQL Server database, or select Other/Advanced to connect to another type of data. Click Next.
The dialog box that appears varies based upon the type of data you selected in the previous step. If you want the page to connect to data in a Microsoft Access database, select Other/Advanced. The Data Link Properties dialog box, shown in Figure 26.26, appears.
Select Microsoft Jet 4.0 OLEDB Provider and click Next. The wizard prompts you for the database name.
Enter the database name and click Test Connection. Click OK to close the Data Link Properties dialog box. The wizard shows you the tables and queries located in the selected database (see Figure 26.27). Click Next.
Enter a name and an optional file description for the ODC file (see Figure 26.28). Click Finish.
Select the newly created ODC file in the Select Data Source dialog box. The name and location of the ODC file is entered into the ConnectionFile property.


The ConnectionString property sets an ADO connection string to be used to connect to a database. The string contains all information required to connect to the data source underlying the page.
Another important property is the DataEntry property. By default, the DataEntry property is False. This means that, when the data access page is viewed from within Microsoft Access or within a browser, all records in the underlying data source are available. When changed to True, records can be added, but existing data cannot be seen (see Figure 26.29).

The MaxRecords property allows you to designate the number of records that a connection sends to the local computer. If this property is not set properly, extremely large volumes of data can travel over the Internet or over an intranet to the user’s browser. This can cause severe performance problems. It is therefore a good idea to set this number to the maximum number of records that you feel are appropriate for a user to retrieve.
The RecordsetType property can be set to dscUpdatableSnapshot or to dscSnapshot. With dscUpdatableSnapshot the data in the resulting data access page can be edited. If you select dscSnapshot, the data is rendered view-only.
The UseRemoteProvider property determines whether the data source control uses the Microsoft Remote Data Services provider for data connections. This property can be set to True only for pages that are read from a Microsoft Internet Information Server (IIS) using an HTTP or HTTPS (secure) address. When used, the Microsoft Remote Data Services provider fetches data by passing the HTTP or HTTPS request to Microsoft Internet Information Server. IIS makes the OLE DB connection to the database.
By default, the record navigation control on a data access page allows you to perform the following tasks:
Moving to the next, previous, first, and last record
Moving to a new record
Deleting an existing record
Saving changes to a record
Cancelling changes made to a record
Sorting in ascending or descending order
Filtering data shown on the data access page
There are times when it is not appropriate for all these features to be available. To customize the properties of the record navigation control, you must first select it. To do this, click the control while in Design view of the page.
Probably the most important property of a record navigation control is its RecordSource property, which is located on the Data tab of the Properties window. It is used to designate the table or query that underlies the data access page.
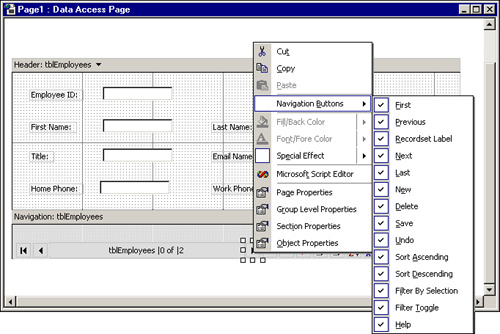
You can easily add and remove buttons from the Navigation control. Simply right-click the control and select Navigation Buttons. A fly-out menu appears. (See Figure 32.30.) The First, Previous, Next, and Last options allow you to designate whether the First, Previous, Next, and Last buttons appear on the record navigation control. Selecting the availability of these buttons determines how the user can move through records included in the data access page. You can determine the availability of each button individually. For example, you can opt to include the Previous and Next buttons, but not the First and Last buttons.
Selecting or deselecting the New option allows you to determine whether the new button appears on the record navigation control. If included, the user clicks this button to add a new record to the data underlying the data access page. If excluded, unless you provide your own custom add button, the user is unable to add new records from within the data access page.
Selecting or deselecting the Delete option allows you to determine whether the Delete button appears on the record navigation control. If included, the user clicks this button to delete the current record. If excluded, unless you provide your own custom delete button, the user is unable to delete records from within the data access page.
Selecting or deselecting the Save option allows you to determine whether the Save button appears on the record navigation control. If included, the user clicks this button to commit changes made to the controls on the data access page. If excluded, the user can save data by moving to another record after making her changes.
Selecting or deselecting the Undo option allows you to determine whether the Undo button appears on the record navigation control. If included, the user clicks this button to undo changes made to the current record. If excluded, the user can still undo changes to a record using his Escape key.
Selecting or deselecting the Sort Ascending and Sort Descending options allows you to determine whether the Sort Ascending and Sort Descending buttons appear on the record navigation control. If included, the user clicks within the field that she wants to sort on and then clicks the appropriate button to sort in ascending or descending order. The data sorts by the field that the user selected. If excluded, the user is unable to sort the data contained within the data access page.
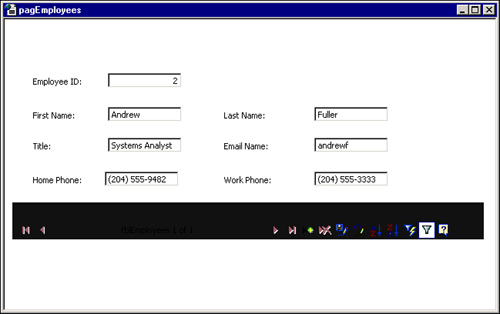
Selecting or deselecting the Filter By Selection and Filter Toggle options allow you to determine whether each of these filter-related buttons appears on the record navigation control. To use the Filter By Selection button, the user clicks within the field he wants to filter on and then clicks the Filter By Selection tool. The data underlying the data access page is filtered based on the contents of the current field for the current record. For example, in Figure 26.31, the data is filtered so that just the system analysts appear. The Filter Toggle button is used to remove the selected filter. If the Filter By Selection button is excluded from the record navigation control, the user is unable to filter the data underlying the data access page (unless you provide this functionality via a custom command button).
Grouping records on a data access page is similar to grouping records on a report. Grouped data access pages have the following advantages over grouped reports:
Current data is always displayed within the data access page.
Unlike reports, data access pages are interactive. This means that, using a grouped data access page, a user can filter, sort, and view just the records she wants.
When grouped data access pages are sent via e-mail, the recipient is presented with current data each time he opens the message.
To create a grouped data access page, follow these steps:
Click Pages in the list of objects in the Database window.
Double-click the Create Data Access Page by Using Wizard option. The Page Wizard appears.
Select the table or query on which you want to group the data (the “one” side).
Select the fields from the first table or query that you want to appear on the data access page.
Select the table or query on which you want to base the “many” side of the data access page.
Select the fields from the second table or query that you want to appear on the data access page. In Figure 26.32, the ProjectName field is selected from the tblProjects table (the one side of the relationship). The DateWorked, BillableHours, and BillingRate fields are selected from the tblTimeCardHours table. Click Next to continue.
Select the fields you want to group by. In Figure 26.33, the data is grouped by the ProjectName field. Click Next.
Select how you want the data to be sorted within the grouping. Click Next.
Enter the title for the page and click Finish.


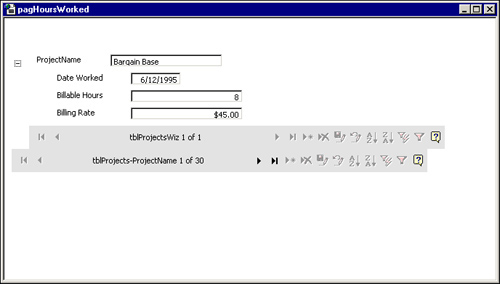
The resulting page appears in Figure 26.34. As you can see, the data automatically appears collapsed. Furthermore, only one project name (the one side of the relationship) appears at a time. Finally, because the data is derived from multiple tables, the resulting data access page is not editable. Fortunately, all these aspects of a grouped data access page are easily modified via properties of the group.

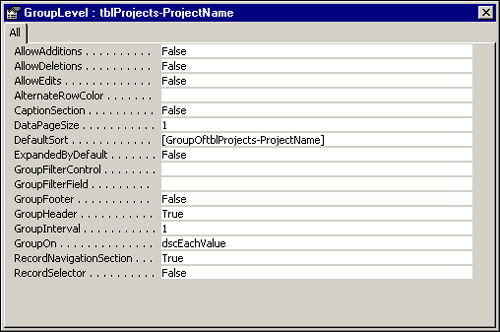
To access the properties of a group, you must right-click the group and select Group-Level properties. The properties of the group are shown in Figure 26.35. When the ExpandedByDefault property is set to Yes, it automatically displays the data within a grouping (see Figure 26.36). The DataPageSize property allows you to designate the maximum number of records to show at a time for a particular grouping level. In Figure 26.37, the DataPageSize property of the second-level grouping is set to 3. This means that up to three detail records appear within each grouping level.

The Unique Table property designates the editable table in a page based on multiple tables. The property is found in the Header properties for the detail section of the page. Enter the name of the table whose data you want to edit. In Figure 26.38, the tblTimeCardHours table is designated as the unique table.

One of the powers of data access pages is in the ability to customize them beyond what the data access page designer allows. The Microsoft Script Editor (MSE) allows you to create scripts that extend the functionality of your data access pages. Using the MSE, you create scripts behind the events of objects on the data access page.
To open the MSE and create script behind a data access page, follow these steps:
Create a data access page.
Use the Toolbox tool on the toolbar to display the toolbox. (See Figure 26.39.)
Add a control, such as a command button, to the data access page. Use the ID property to rename the control, if desired.
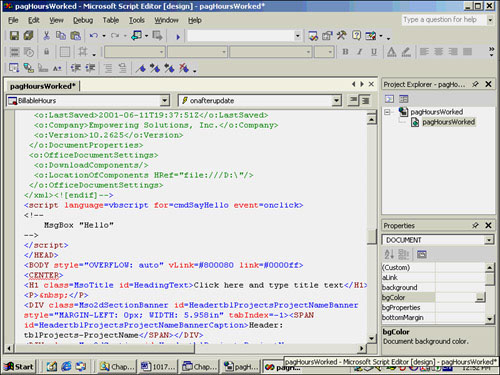
Right-click the control and select Microsoft Script Editor. The Microsoft Development Environment (MDE) appears. (See Figure 26.40.) If you did not install Web Scripting when you installed Microsoft Access, you will need to install it for this feature to be available.
Activate the HTML window. (See Figure 26.40.)
Use the object drop-down on the left of the HTML window to locate the object that you just added.
Use the event drop-down on the right of the HTML window to designate the event that you wish to write code for. A script block is created with a stub for the object and event. In Figure 26.41, a script block is inserted for the
onclickevent of the command button called cmdSayHello.Write code that executes in response to the event. In Figure 26.42, the
MsgBoxstatement is used to display the message"Hello"when someone clicks the cmdSayHello command button.


As you have seen, scripts included for data access pages are written in event handlers attached to objects on a page. As in an Access form, an event handler (or event routine) is a subroutine or function that is automatically triggered in response to something happening to an object. Some important events that you can code at the document (page) level include the following:
The
OnRowEnterevent of theDocumentobject fires after the current record changes but before fields are populated for the new record.The
OnRowExitevent of theDocumentobject occurs before the current record changes. This event is commonly used to perform record-level validations.The
BeforeCollapseevent of a section occurs before the section is collapsed.The
BeforeExpandevent of a section occurs before a section is expanded.The
BeforeNextPage,BeforePreviousPage,BeforeFirstPage, andBeforeLastPageevents of the page navigation control occur before the navigation control navigates to the next, previous, first, and last pages, respectively. All these events can be canceled by setting theinfo.returnvalue of the event toFalse.The
Currentevent fires after a section becomes the current section.The
DataPageCompleteevent fires when all data binding is completed after a page open, navigation, or expansion.
As with the events of a form or a report, it is important to explore and learn about the events of a page so that you know where to place your code.
Because Internet Explorer 5.0 cannot interpret VBA, scripts that you write must be in the VBScript language. VBScript is a subset of the VBA language. The following are important differences between VBA and VBScript that you should be aware of:
All variables are variants in VBScript. This means that
Dimstatements in VBScript cannot include types.Arguments (parameters) to subroutines and functions in VBScript cannot have types.
Many built-in functions available in VBA are not available in VBScript.
Intrinsic constants such as
vbYesNoare not available in VBScript. If you want to include constants in your code, you will have to declare them yourself.
Scripts that you write behind your data access pages can be written in either VBScript or in JavaScript. If you are accustomed to writing VBA code, you will probably find VBScript much easier to learn than JavaScript. On the other hand, if you are experienced at developing Web pages using JavaScript, you will probably want to continue writing your scripts in JavaScript. The following are some important differences between VBScript and JavaScript:
VBScript is better supported by the data access page object model. This means that certain page events are not recognized if coded in JavaScript.
JavaScript is case-sensitive, making it more difficult to write than VBScript.
It’s easy to integrate Access with the Internet or with an intranet. Access enables you to easily publish database objects to the Web and import HTML data from the Web. In fact, you can even create dynamic Web pages and build forms that display and update live data directly from a browser! Access 2002 helps bring your data to the continually evolving information superhighway—the possibilities are endless!