Chapter 5
Watching Live TV
IN THIS CHAPTER
![]() Getting live TV signals through an HDTV antenna
Getting live TV signals through an HDTV antenna
![]() Streaming live TV through third-party apps
Streaming live TV through third-party apps
![]() Managing live TV channels
Managing live TV channels
![]() Watching live TV on your Fire TV Edition device
Watching live TV on your Fire TV Edition device
Through free streaming services such as IMDb TV and YouTube, subscription streaming services such as Amazon Prime Video and Netflix, and web-based videos available through Fire TV browsers such as Amazon Silk and Firefox, you have a huge collection of movies, TV shows, and other video content at your disposal. Not, however, a complete collection. What’s missing? The biggest gap in your Fire TV video-watching toolkit is the absence of live TV, which refers to content that can only be watched at a time predetermined by the broadcaster. (In contrast to on-demand content, which you can watch any old time you feel like it.) Live TV generally refers to two types of programming:
- Prerecorded shows broadcast at specific times
- Live events, such as sports and breaking news
It’s quite possible you can exist happily without live TV. However, if you’re a sports nut, a news junkie, or someone who simply must watch Saturday Night Live when it’s actually live, then you need to augment your Fire TV system with live TV. There are two routes to live TV you can take:
- Connect an HDTV antenna to your Fire TV Edition device.
- Install a live TV app on any Fire TV device.
This chapter takes you through these live TV scenarios and shows you how to watch and manage your live TV channels.
 There’s a third live TV scenario: If you have an existing cable set-top box (or satellite receiver), connect that device to the appropriate input jack on your TV; then switch to that input.
There’s even a fourth live TV scenario: Add a Fire TV Recast to your network and connect an HDTV antenna to the Recast to both watch and record live over-the-air channels. It’s a sweet setup, and it’s the subject of Chapter 7.
Getting Live TV through an Antenna
Perhaps the simplest — and certainly the cheapest — way to do live TV is to purchase an HDTV antenna and connect it to your TV. This works because TV stations around the country — including network affiliates and independent stations — broadcast their live TV signals into the ether. These so-called over-the-air (OTA) signals can be picked up by an HDTV antenna.
The signals you can pick up depend on various factors, including your location (the closer you are to broadcasting stations, the more likely you are to pick up the signals) and your antenna (generally speaking, smaller indoor antennas have less range than larger outdoor antennas). See Chapter 10 for more details on signal pickup and how to determine what signals are available in your area.
If you want to access your antenna’s channels through the Fire TV interface, then you need to be using a Fire TV Edition device (such as a Fire TV Edition Smart TV) because only Fire TV Edition comes with a built-in TV tuner. Other Fire TV devices such as the Fire TV Stick 4K and the Fire TV Cube don’t come with a tuner, so they can’t do the live TV thing.
Connecting your antenna
Your antenna comes with a coaxial cable that you attach to the corresponding port on your TV, which is usually labelled Antenna (or just Ant) and/or Cable (or Cable In), as shown in Figure 5-1.
Now position the antenna. For a rooftop or attic antenna, you’re probably getting the antenna mounted by a professional. For a simpler indoor antenna, mount the device on or close to the nearest window and try to angle the antenna toward the broadcast signals you most want to pick up. (Again, see Chapter 10 to learn how to figure out which directions your available signals are coming from.)

FIGURE 5-1: Connect your antenna’s coaxial cable to your TV’s Antenna or Cable port.
Scanning for channels
With your antenna connected, your next chore is to ask Fire TV to scan for the available channels. Here are the steps to follow:
-
One your Fire TV Edition device, choose Settings ⇒ Live TV.
If you don’t see the Live TV setting, then it means you’re using a Fire TV device which, as I mention earlier, doesn’t support live TV. To see the Live TV setting, you must be using a Fire TV Edition device.
-
Choose Channel Scan.
Fire TV tells you to make sure your antenna is connected and positioned where you want it.
-
You’ve done all that, so say “Check!” and choose Next.
Fire TV begins scanning the antenna connection for signals and displays its progress, as shown in Figure 5-2.
When the scan is complete, Fire TV shows you how many channels it found, as shown in Figure 5-3.
 If Fire TV found far fewer channels than you expected, reposition the antenna and then choose Rescan to try again.
 -
Choose Done.
Your live TV channels are ready to view.
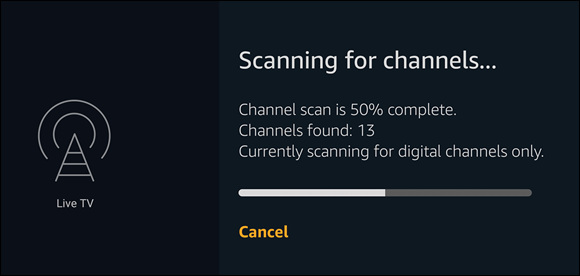
FIGURE 5-2: Fire TV shows you its progress during the channel scan.

FIGURE 5-3: When the scan is complete, Fire TV shows you how many channels it found.
Checking channel signal strength
As shown in Figure 5-3, when you scan for Live TV channels, Fire TV tells you how many channels it found, but it says nothing about the strength of each channel’s signal. Sure, you’re free to tweak the position of your antenna and rescan to get more channels, but all you’re doing is maxing out the number of channels. You may prefer to get the best signal you can for those channels you actually watch regularly.
Fortunately, Fire TV can tell you the signal strength of each channel that it found, which means you can check the signal for each channel that you’ll be watching frequently. Here are the steps to follow:
-
On your Fire TV Edition device, choose Settings ⇒ Live TV ⇒ Channel Management ⇒ Antenna Channels.
Fire TV displays the Antenna Channels screen and selects the All tab, which shows a list of the channels Fire TV found during the scan.
To navigate the All, Favorites, and Hidden tabs, press the Left and Right buttons on the Alexa Voice Remote navigation ring. -
Select the channel you want to check.
On the right side of the screen, Fire TV displays a preview of the channel and the Signal Strength value: good, poor, or unavailable. Figure 5-4 shows an example.
- If the channel preview is bad quality and/or the Signal Strength value is poor, try repositioning the HDTV antenna until you get a good signal.
- Repeat steps 2 and 3 for the other channels you want to check.

FIGURE 5-4: In the Antenna Channels list, select a channel to see its Signal Strength value.
If your antenna channels appear distorted or otherwise not as nice to look at as you’d like, Fire TV Edition offers several settings that can help. To adjust the picture, choose Settings ⇒ Display & Sounds ⇒ Picture Settings ⇒ Antenna. Fire TV switches to a live TV channel and displays the Picture settings, including Picture Mode, Contrast, and Brightness. To adjust the display, choose Settings ⇒ Display & Sounds ⇒ Display Settings ⇒ Antenna. Fire TV switches to a live TV channel and displays the Display settings, which include the display aspect ratio.
Getting Live TV Using a Third-Party App
Getting live TV through an HDTV antenna hookup is free, but you usually only get a few stations and you don’t get premium cable stations such as HBO and Showtime. If you want to improve your live TV experience with more channels and better content, and you don’t mind spending a few extra dollars each month, then you need to investigate the world of third-party Fire TV apps that offer so-called over-the-top (OTT) live TV feeds.
An over-the-top TV service is one that’s delivered via a broadband Internet connection. It’s called “over-the-top” because, in a sense, such services “jump over” your existing cable box or satellite receiver and give you content directly.
A few free services offer live TV, but in most cases you need a subscription (although almost all live TV app providers offer a free trial period). Here are a few third-party apps that provide live TV channels (among other offerings, in most cases):
- AT&T TV Now:
www.atttvnow.com - fuboTV:
www.fubo.tv - Hulu with Live TV:
www.hulu.com/start/live-tv - Philo:
https://try.philo.com/ - Pluto TV:
https://pluto.tv - Sling TV:
www.sling.com - YouTube TV:
https://tv.youtube.com
You need an account to use any of these options, so before installing a service’s Fire TV app, go to the service’s website to sign up for an account.
 Many of the services listed here are not available in all countries; most are available only in the United States. Frustrating! Use the Fire TV Search feature to search for “live” to see what apps are available in your area.
Managing Live TV channels
If you’re itching to watch something live, don’t let me stop you: Grab your favorite snack and head directly to this chapter’s “Watching Live TV” section.
When you’re done, come back here to learn some important Fire TV channel management features that will make watching Live TV an easier and more efficient experience.
Adding a live TV channel to your favorites
As I discuss later (see “Navigating the live TV channel guide”), Fire TV creates a channel guide to help you navigate all your live TV channels. That guide has a section for your antenna channels, as well as a section for each live TV app you’ve installed (plus yet another section for your Fire TV Recast channels; see Chapter 7). That’s a lot of sections, so locating the channel you want can be a hassle.
Yep, you can quickly tune directly to any channel using a voice instruction (see Chapter 9), but voice isn’t always convenient or possible. Another way to make the channel guide more efficient is to mark one or more channels as favorites, which then handily appear at the top of the channel guide (in a section labeled Favorite Channels; see Figure 5-5) for easy access.
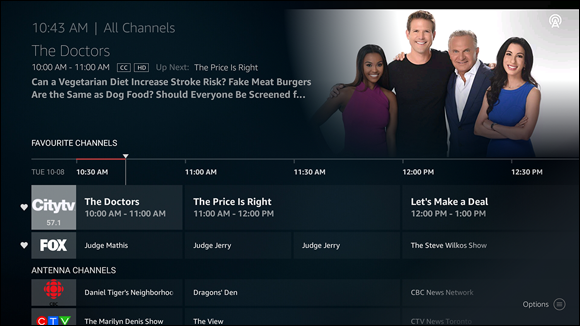
FIGURE 5-5: In the channel guide, live TV channels marked as favorites appear in the Favorite Channels section.
On your Fire TV Edition device, there are two methods you can use to mark a channel as a favorite:
-
Choose Settings ⇒ Live TV ⇒ Channel Management, choose your live TV source (such as Antenna Channels), highlight the channel you want to work with, and then press the Select button to add the channel to the favorites list.
To use Settings to remove a channel from Favorites, highlight it either on the All tab or on the Favorites tab (see Figure 5-4), and then press the Select button. -
Highlight the channel you want to work on the Home tab (in the Recent row or in the On Now row), the Live tab, or the channel guide, press the Menu button on your Alexa Voice Remote, and then choose Add to Favorite Channels in the shortcut menu that appears.
To remove a channel from Favorites, highlight it in the channel guide’s Favorite Channels section (or elsewhere in the Fire TV interface), press the Menu button, and then choose Remove from Favorite Channels in the shortcut menu.
Hiding a live TV channel or app
If there are live TV stations that you never watch, you can make the channel guide easier and quicker to navigate by hiding those unwatched stations. On your Fire TV Edition device, there are two methods you can use:
-
Choose Settings ⇒ Live TV ⇒ Channel Management, choose your live TV source (such as Antenna Channels), highlight the channel you want to work with, and then press the Play/Pause button.
To show a hidden channel, either highlight the channel in the All tab and press Play/Pause, or highlight the channel in the Hidden tab (see Figure 5-4) and press Select. - Highlight the channel you want to hide on the Home tab (in the Recent row or in the On Now row), the Live tab, or the channel guide, press the Menu button on your Alexa Voice Remote, and then choose Hide Channel in the shortcut menu that appears.
Filtering live TV channels
Depending on what you have connected to your TV and which live TV apps you have installed, your live TV lineup may be quite long, making the channel guide cumbersome to navigate. Chances are, there are lots of channels you never view, so one solution would be to hide those channels, as I describe in the preceding section.
Hiding channels works fine, but it can be a time-consuming chore if you have lots of channels you want to hide. An often better solution is to filter the channel guide to show only those channels from one of the following channel types:
- Sources: Shows only those channels that you receive from a particular live TV source, such as Antenna Channels or Fire TV Recast Channels.
- Apps: Shows only those channels that are available through a particular app.
- Favorites: Shows only those channels that you’ve added to your Favorites list.
Follow these steps on your Fire TV device to filter the channel guide:
-
Display the channel guide.
See “Navigating the live TV channel guide,” later in this chapter.
-
On your Fire TV remote, press Menu.
Fire TV displays the Options menu for the channel guide.
-
Choose Filter Channels.
Fire TV displays the Filter menu, which contains a list of possible filters. Figure 5-6 shows an example.
-
Choose the filter you want to use.
Fire TV updates the channel guide to show only the channels in the filter you chose.
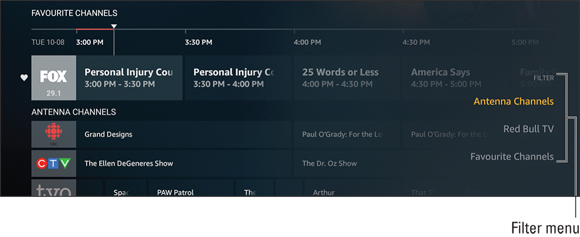
FIGURE 5-6: In the channel guide, choose Menu ⇒ Filter to see a list of filters you can apply.
Watching Live TV
With a source such as an HDTV antenna attached to your TV, or one or more third-party live TV apps installed, you’re ready to start watching live TV. The rest of this chapter takes you through several ways to watch live stuff on your Fire TV Edition device.
Seeing what’s on now
When your Fire TV device has one or more live TV services, the Home screen sprouts a new row titled On Now, shown in Figure 5-7. The On Now row shows thumbnail views of the current live TV shows. Use your Fire TV remote’s navigation ring to scroll right and left through the shows in the On Now list. For each show you land on, Fire TV displays the name, start and stop times, and a brief description. When you land on a show you want to watch, press the Select button.
To return to the On Now list, you have two ways to go:
- If you want to return to the Home screen’s On Now row, press the Back button on the Fire TV remote.
- If you want to keep watching the current show, press the Down button on your Fire TV remote’s navigation ring to display the On Now shows at the bottom of the screen. Press Up on the navigation ring to hide the On Now shows.

FIGURE 5-7: In the Home screen, the On Now row shows you what’s playing live right now.
Navigating the live TV channel guide
The On Now row that I discuss in the preceding section is handy, but what if you want to know not only what’s on right now, but also what’s coming up later today, tomorrow, or next week? To peer into the future of your live TV sources, you need to use Fire TV’s channel guide. To get there, you have three choices:
- On the Home screen, navigate down to the On Now row; then press the Left button on the navigation ring to reveal the Guide button, shown in Figure 5-8, and choose Guide.
- Highlight any show in the On Now row, press the Fire TV remote’s Menu button, and then choose Channel Guide.
- On your Fire TV Edition remote, press the Channel Guide button.
The channel guide (see Figure 5-9) is divided into sections. If you’ve added one or more channels to your Favorites list, you see the Favorite Channels section at the top of the guide. You also see sections for each live TV source (such as Antenna Channels), and for each live TV app.
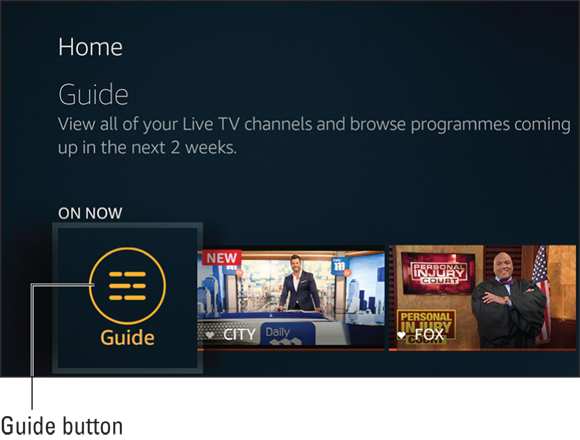
FIGURE 5-8: The Guide button resides to the left of the leftmost tile in the On Now row.
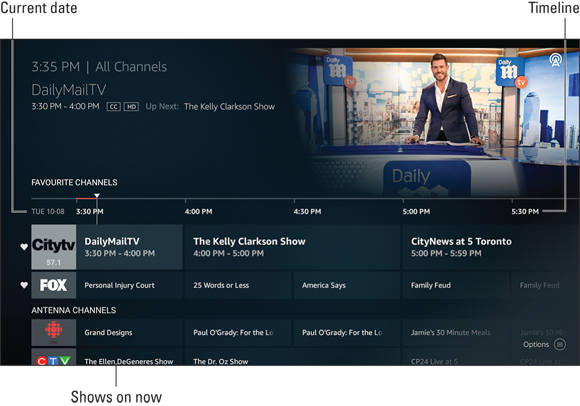
FIGURE 5-9: The channel guide is divided into sections.
The channel guide grid displays the current date and a timeline. The channels themselves display a name and a logo on the far left, followed by the currently airing show. Here are the techniques you can use to navigate the channel guide:
- Use your Fire TV remote’s Down and Up navigation buttons to scroll vertically through the live shows; then press Select to tune to the show you want to watch. To return to the channel guide, press the Back button on the Fire TV remote.
- Use your Fire TV remote’s Right and Left navigation buttons to scroll horizontally through the upcoming shows. You can press Select to learn more about any show. To return to the channel guide, press the Back button on the Fire TV remote.
On your Fire TV remote, press Fast Forward to skip ahead one day in the channel guide, and press Rewind to skip back one day.
Checking out the Live tab
As an alternative to the channel guide, you can select the Live tab in the Fire TV Home menu bar. The Live screen that appears (see Figure 5-10) contains a Recent Channels row, which is a list of the live TV channels you’ve viewed most recently. Below that you see a row with some suggested live TV apps and rows that integrate live events under the headings Live Sports and Breaking News. The rest of the Live screen contains rows for your live TV sources (such as Antenna Channels), Fire TV Recast OTA shows, and any live TV apps you’ve installed.
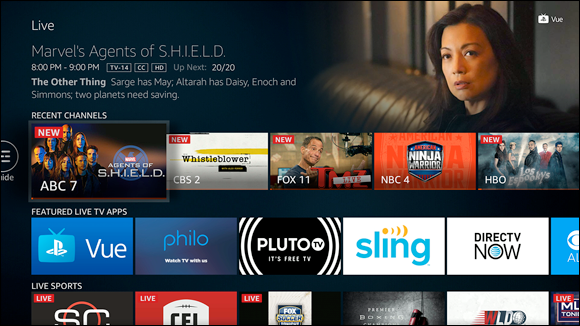
FIGURE 5-10: A typical Live screen.
As this book went to press, the Live tab was available only to Fire TV customers in the United States and Germany. When asked, Amazon said the Live tab will be coming to other countries in the near future.
Controlling live TV playback
Your Fire TV Edition Smart TV isn’t a digital video recorder (DVR), but it does offer several DVR-like features that can improve your live TV viewing experience:
- Pausing live TV: Press the Play/Pause button to pause the live playback. You can pause for up to two minutes before Fire TV Edition automatically resumes the show.
- Rewinding live TV: Press Rewind to go back ten seconds. Press and hold Rewind to go back up to two minutes at faster speeds.
-
Return to the earliest position: Fire TV Edition maintains a two-minute buffer, meaning you can jump back two minutes at any time during playback. To jump back, press Menu and then choose Watch from Earliest.
To get a larger rewind buffer, connect an external storage drive to your Fire TV Edition Smart TV (see Chapter 8). - Return to the live show: If you’ve paused or rewound the show or jumped back to the earliest position, you can return to the live feed by pressing Menu and then choosing Jump to Live.