
Chapter 9
Controlling Fire TV (And More) with Alexa
IN THIS CHAPTER
![]() Becoming fast friends with Alexa
Becoming fast friends with Alexa
![]() Learning the basics of Alexa
Learning the basics of Alexa
![]() Getting Alexa to control your Fire TV
Getting Alexa to control your Fire TV
![]() Asking Alexa for information, timers, reminders, and much more
Asking Alexa for information, timers, reminders, and much more
![]() Using Alexa to add the adjective smart to your home
Using Alexa to add the adjective smart to your home
Whatever Fire TV device you own, if you’re like most people, you probably think that what Fire TV brings to your home is an easily configured and navigable streaming media device. That’s certainly true, but Fire TV comes with a “bonus” feature that lots of people miss: It turns your TV into a smart speaker, which means it can listen for, understand, and carry out your voice instructions or questions. The magic behind this wondrous capability is Alexa, Amazon’s powerful and popular voice service. All Fire TV devices are Alexa-friendly, which means you get access to the world of voice control of Fire TV devices without needing to buy anything extra. Even better, you can also use your Alexa-enabled Fire TV device to dive into the fascinating realm of smart-home automation, which enables you to use voice instructions to control lights, turn devices on and off, and much more. In this chapter, you explore the connection between Fire TV and Alexa.
What Is Alexa?
The basic premise of Alexa couldn’t be simpler: You ask a question, Alexa provides the answer; you give a request, Alexa carries it out. However, this surface simplicity lies on top of a mind-bogglingly complex system that involves hardware, software, networking, artificial intelligence, and the cloud. Fortunately, that underlying complexity isn’t something you have to deal with.
Why is Alexa so popular? There are lots of reasons, but the one that really matters is that Alexa is (or tries hard to be) a “voice service.” Older voice-command tools were geared toward using a computer: running programs, pulling down menus, accessing settings, and so on. Alexa doesn’t do any of that. Instead, it’s focused on doing things for you in your real life, including (but by no means limited to) the following:
- Locating and playing movies and TV shows
- Playing music, podcasts, or audiobooks
- Setting timers and alarms
- Telling you the latest news, weather, or traffic
- Creating to-do lists and shopping lists
- Buying stuff from Amazon
- Controlling smart-home devices such as lights and thermostats
Alexa’s components
Throughout this chapter I talk about “Alexa” as though it’s a single object, but Alexa is really a large collection of objects that, together, create the full, seamless Alexa experience. For the purposes of this chapter, Alexa consists of the following four components:
- Name recognition: Although when you interact with Alexa it seems as though the device understands what you say, the only speech your Alexa device actually recognizes is the word Alexa, which Amazon calls the wake word. That is, it’s the word that lets Alexa know it should wake up and start listening for an incoming request or question.
- Speech recording: Your Alexa device (such as the Alexa Voice Remote or the Fire TV Cube) has a built-in microphone that captures the questions, requests, and other utterances that you direct to the device. There’s a simple computer inside that records what you say and then sends the recording over the Internet to the Alexa Voice Service (discussed next).
- Alexa Voice Service (AVS): Here’s where the real Alexa magic happens. This part of Alexa resides in Amazon’s cloud. AVS takes the recording that contains your voice request and uses some fancy-schmancy speech recognition to tease out the actual words you spoke. AVS then uses natural-language processing to analyze the meaning of your request, from which it produces a result.
- Speech synthesis: This component takes the results provided by AVS and renders them as speech, which is stored in an audio file. That file is returned and played through the Alexa device’s built-in or connected speakers.
How Alexa works
Given the various Alexa components that I outline in the preceding section, here’s the general procedure that happens when you interact with Alexa to get something done:
-
You say “Alexa” (if you have a Fire TV Cube or Echo smart speaker) or you press the Voice button on the Alexa Voice Remote.
Your Alexa device wakes up and begins hanging on your every word.
-
You state your business: a question, a request, or whatever.
The Alexa devices records what you say. When you’re done, the device uses your Internet-connected Wi-Fi network to send the recording to AVS in Amazon’s cloud.
 It may seem like Alexa “lives” inside whatever device you have, but Alexa is very much an Internet-based service. That means if you don’t have Internet access, you don’t have Alexa access either.
 - AVS uses its speech-recognition component to turn the recorded words into actual data that can be analyzed.
-
AVS uses its natural-language processing component to analyze the words in your request and then figure out exactly what you asked Alexa to do.
AVS doesn’t analyze every single word you say. Instead, it’s mostly looking for the telltale keywords that indicate what you’ve asked Alexa to provide. For example, if you said, “What’s the weather forecast for tomorrow?,” all AVS needs are the words weather, forecast, and tomorrow to deliver the correct info.
- If AVS can’t fulfill your request directly, it passes the request along to a third-party service (such as AccuWeather or Wikipedia), and then gathers the response.
-
AVS returns the response via the Internet to your Alexa device.
What AVS returns to your Alexa device depends on the result. If the result is just information for you, AVS converts the info to speech and stores the speech in an audio file that your Alexa device can play. If the result is a request (for example, to play a particular song), AVS passes that request back to the Alexa device.
-
The Alexa device either uses its built-in or connected speaker to broadcast the result of your request or carries out your request.
You also see the result on your Fire TV screen.
Installing the Alexa App
The Alexa app is a program that you download to your smartphone or tablet. With the Alexa app, you can connect your Alexa devices to your Wi-Fi network, provide Alexa with your location, connect to smart-home devices, provide the details of your Amazon account, and much more. You use Alexa by conversing with an Alexa-friendly device, but you configure Alexa using the app.
Okay, so what do you need to get the Alexa app? Either of the following:
-
A smartphone or tablet that meets one of these qualifications:
- An iPhone or iPad running iOS 11 or later
- An Android phone or tablet running Android 5.1 or later
- An Amazon Fire tablet or phone running Fire OS 5.5.3 or later
If you have one of these devices, go to your device’s app store, search for the Alexa app, and install it.
 If you have one of Amazon’s Fire devices and that tablet is capable of running Alexa, the Alexa app will be installed automatically on the device.
 - A Windows or Mac web browser: In this case, point your browser to
https://alexa.amazon.com. This takes you to the Amazon Alexa portal page.
When you first open the Alexa app or surf to the Amazon Alexa portal page, you’re prompted to sign in with your Amazon account credentials. Go ahead and sign in, and then follow the onscreen instructions to get the app configured. When you’re done, you see the Home screen, which will be similar to the one shown in Figure 9-1.
For best results, make sure you sign in to the Alexa app using the same Amazon account as you use with the Fire TV mobile app and your Fire TV device.

FIGURE 9-1: The Alexa app’s Home screen.
Taking a tour of the Alexa app
In Figure 9-1, I point out a few landmarks of the Alexa app screen. Here’s a summary:
- Menu: Tap this icon to access the main app menu, shown in Figure 9-2. You use the requests on this menu to configure various Alexa features (such as music and reminders), add and manage Alexa skills, and change the Alexa app’s settings.

FIGURE 9-2: Tap the Menu icon to see this menu of app requests.
- Home: Tap this icon to display the Home screen, which offers the Things to Try section (suggestions for getting started with Alexa) and (eventually) a series of sections — known as cards — that present in reverse chronological order (that is, the newest at the top) your most recent interactions with Alexa: your questions and Alexa’s answers, responses to your requests, recently played music and other media, and more.
- Communicate: Tap this icon to open the Communication screen. Here, you can set up and work with Alexa’s communications features, including starting a new call, sending a text message, and dropping in on someone.
- Alexa: Tap this icon to send questions and requests to Alexa via your smartphone or tablet microphone. See “Giving Alexa access to your device microphone,” next.
- Play: Tap this icon to see what media — such as a song, podcast, or audiobook — you’ve played recently on your Alexa device. You can also browse your Audible and Kindle libraries.
- Devices: Tap this icon to work with both your Alexa devices and Alexa’s smart-home features. You can add, configure, and operate devices, manage smart-home skills, create smart-home groups, and more.
Giving Alexa access to your device microphone
One of the nice features of the Alexa app is that you can use it to send voice requests to Alexa via your smartphone or tablet microphone. That’s the purpose of the Alexa button in the middle of the Alexa app toolbar at the bottom of the screen (refer to Figure 9-1). However, before you can send voice requests to Alexa, you need to give the Alexa app permission to use your device’s microphone. Here’s how it works:
-
In the Alexa app, tap the Alexa icon (refer to Figure 9-1).
You see some text telling you that you need to give the app permission to use the microphone.
-
Tap Allow.
Your device asks you to confirm.
-
Tap OK (iOS) or Allow (Android).
Your device gives the Alexa app permission to access the microphone and then displays some examples of things you can say to Alexa.
If you also see a prompt asking you to give the Alexa app permission to use your location, go ahead and tap Allow.
-
Tap Done.
You now hear a tone and see the regular Alexa screen, which is waiting for you to say something to Alexa. You’ll want to skip that for now, so either tap the X to close the screen or wait a few seconds for the screen to close by itself.
Connecting Your Alexa Device to Fire TV
To set up your Alexa device to control your Fire TV device, you have to introduce them to each other. Here’s how it’s done:
- In the Alexa app, tap Menu ⇒ Settings.
- Tap TV & Video.
- Tap Fire TV.
-
Tap Link Your Alexa Device.
The Alexa app displays a list of your Fire TV devices.
-
Select the Fire TV device you want to control (see Figure 9-3), and then tap Continue.
The Alexa app displays a list of your Alexa devices.

FIGURE 9-3: Tap the Fire TV device you want to control with Alexa.
-
Select the Alexa device you want to use to control the Fire TV device you chose in step 5.
If you have multiple Alexa devices, tap each device that you want to allow to control your Fire TV device.
-
Tap Link Devices.
The Alexa app connects your Alexa device and your Fire TV device.
Getting to Know Alexa
Alexa is designed to be as simple as possible and to have a very slight learning curve, especially at the start. That’s good news for anyone just beginning with Alexa because it means you have to learn only a few basics. The next few sections walk you through what you need to know.
Getting Alexa’s attention
It may seem as though, when it’s not in use, Alexa is just sitting there listening to you talk to yourself, but that’s not really the case. Instead, it’s more accurate to imagine Alexa spending its off time in a light, dreamless slumber where it has no idea what’s happening around it. Your job is to interrupt that slumber by gently tapping Alexa to rouse it and get its attention.
There are several ways to get Alexa’s attention, but here are the most common:
- On the Alexa Voice Remote, press and hold the Voice button.
- On the Fire TV mobile app, pull down and hold the Voice icon.
- For Fire TV Cube or an Alexa-enabled device, such as an Echo smart speaker, say, “Alexa.”
- For Fire TV Cube or an Alexa-enabled device, press the Action button.
- In the Alexa app, tap the Alexa button.
Keeping Alexa’s attention
Most of the time, you interact with Alexa by issuing intermittent voice requests: You ask for the time now, the temperature a minute later, and whether Dustin Hoffman was in Star Wars a few minutes after that. However, every now and then you may want to issue a series of requests, one after the other. That’s perfectly fine, but it gets a bit old having to say, “Alexa” at the start of each voice request.
Forget that. Instead, you can put Alexa into Follow-Up mode, which enables you to say the wake word once and then issue multiple requests without having to say the wake word again.
Follow-Up mode is slick, but I should warn you that it doesn’t always work. That is, Alexa won’t switch into Follow-Up mode in these situations:
- When you’ve forced Alexa to stop responding by issuing a request to end the conversation, which I describe in the next section
- When your Alexa device is playing media (such as a song or audiobook)
- When Alexa can’t be certain that you’re speaking to it and not to someone else nearby
Here are the steps to run through to enable Follow-Up mode:
-
In the Alexa app, choose Devices ⇒ Echo & Alexa.
The Echo & Alexa screen appears with a list of your Alexa devices.
-
Tap the device you want to work with.
The Device Settings screen appears.
- Tap Follow-Up Mode.
-
Tap the Follow-Up Mode setting to On, as shown in Figure 9-4.
The Alexa app updates the device with the new setting.
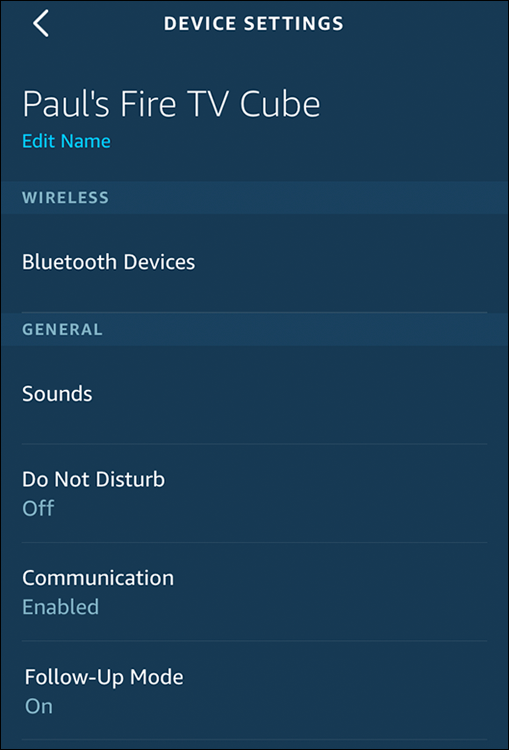
FIGURE 9-4: Tap the Follow-Up Mode switch to On to enable Follow-Up mode.
Ending the conversation
Alexa, bless its digital, cloud-based heart, can be very helpful, but sometimes it’s too helpful. That is, you can ask Alexa a question and still be listening to the answer a minute later! If you find that Alexa is going on and on about something, you can end the monologue (Amazon calls this “ending the conversation” — ha!) by interrupting Alexa with any of the following requests:
- “Stop.”
- “Enough.”
- “Shush.”
- “Cancel.”
- “Thank you.”
- “Sleep.”
Enabling Brief mode
Alexa’s infamous long-windedness has long been a complaint of users, so Amazon finally did something about it: It created a feature called Brief mode. In Brief mode, Alexa gives shorter answers than usual, and in situations where it usually gives a quick “Okay” or similarly useless response, it now just plays a sound. If that sounds like bliss to you, follow these steps to turn on Brief mode:
- In the Alexa App, choose Home ⇒ Menu ⇒ Settings.
- Tap Alexa Account.
- Tap Alexa Voice Responses.
-
Tap the Brief Mode switch to On, as shown in Figure 9-5.
The app configures Alexa to use Brief mode.

FIGURE 9-5: Tap the Brief Mode switch to On to enable Brief mode.
Enabling Whisper mode
If you have people nearby, the last thing they probably want to hear is both your Alexa utterances and Alexa’s responses at full volume. Does that mean you have to forgo Alexa until you’re alone? Not necessarily, you can enable Alexa’s Whisper mode, which means that when you whisper a request to Alexa, Alexa whispers its response back. (Yes, this is very weird at first, even a bit creepy. Perhaps you’ll get used to it!)
The easiest way to enable Whisper mode is with a voice request:
“Turn on Whisper mode.”
Inanely, Alexa responds at full volume to tell you that Whisper mode has been activated! Alternatively, you can enable Whisper mode more quietly by using the Alexa app:
- In the Alexa app, choose Home ⇒ Menu ⇒ Settings.
- Tap Alexa Account.
- Tap Alexa Voice Responses.
-
Tap the Whisper Mode switch to On, as shown in Figure 9-6.
The app configures Alexa to use Whisper mode.

FIGURE 9-6: Tap Whisper Mode to On to enable Whisper mode.
Watching Movies and TV Shows with Alexa
Alexa can do an amazing range of things, but as a Fire TV user I’m sure your main concern is using Alexa to locate, play, and control the playback of movies and TV shows on your Fire TV device. In the next few sections, I go through a few ways to use voice requests to interact with movies and TV shows.
With all the voice utterances I list in this chapter, remember that if you’re interacting with Alexa through a Fire TV Cube, an Echo smart speaker, or a similar Alexa-enabled device, then you need to precede each utterance with the wake word Alexa.
Navigating Fire TV tabs
To get around the Fire TV interface, you can use these voice requests:
- “Go Home.”
- “Go to Live.”
- “Go to Your Videos” (or “My Videos” or “Videos”).
- “Go to DVR” (only if you have Fire TV Recast installed).
- “Go to Movies.”
- “Go to TV Shows.”
- “Go to Apps.”
- “Go to Settings.”
Locating movies and TV shows
You can use any of the following voice requests to search for shows on Fire TV:
- “Show me the movie [movie title].”
- “Show me the TV show [series title].”
- “Show me [actor] movies.”
- “Show me [genre] movies.”
- “Show me [genre] TV shows.”
In each case, you can replace “Show me” with either “Search for” or “Find.”
Watching a movie trailer
If you want help deciding whether an upcoming or recently released movie is something you’d like to check out, or if you just get a kick out of previews, you can ask Alexa to play you the trailer for a movie. Use either of the following voice requests:
- “Play the trailer for [movie title].”
- “Show the trailer for [movie title].”
Playing movies and TV shows
After you have a movie or TV show playing, you can also use the following voice requests to control the playback:
- “Pause.”
- “Resume” (or “Play”).
- “Rewind” (rewinds 10 seconds).
- “Rewind X seconds.”
- “Fast-forward” (fast-forwards 10 seconds).
- “Fast-forward X seconds.”
- “Next episode.”
- “Previous episode.”
Watching live TV
If your Fire TV includes live TV channels via an HDTV antenna connection or other source, you can use the following voice requests to display the channel guide:
- “Channel guide.”
- “Open channel guide.”
- “Show me the channel guide.”
You can also use the following voice requests to tune to a station from anywhere in the Fire TV interface:
- “Change to [channel or network].”
- “Go to [channel or network].”
- “Tune to [channel or network].”
- “Watch [channel or network].”
In these requests, replace channel with the station’s channel number (for example, “Tune to 5.1”) or replace network with the station’s network name (for example, “Watch NBC”).
How do you know the station’s channel number? You have three ways to find out:
- Choose Settings ⇒ Live TV ⇒ Channel Management, and then choose your live TV source (such as Antenna Channels). In the list of channels that appears, each station displays its channel number.
- On your Fire TV Edition version of the Alexa Voice Remote, press the Guide button to display the channel guide. As you scroll vertically through the guide, you see the channel number for each station below the station logo.
- Use the TV Fool website (
www.tvfool.com) to search for broadcast stations in your area, as I describe in Chapter 10. In the TV Fool results, the channel numbers you want are listed in the Channel section’s (Virt) column.
Controlling the volume
To get the playback volume just right, here are some requests you can use:
- “Volume up.”
- “Increase the volume.”
- “Raise the volume.”
- “Louder.”
- “Volume down.”
- “Decrease the volume.”
- “Lower the volume.”
- “Softer.”
- “Set volume to X” (where X is the volume setting you want).
- “Volume X” (where X is the volume setting you want).
- “Mute.”
- “Unmute.”
Movie and TV show info requests
Here are a few useful requests related to getting information about TV shows and movies:
- “What is the IMDb rating for [TV show or movie title]?”
- “Tell me about the movie [movie title].”
- “When was movie [movie title] released?”
- “Who stars in [TV show or movie title]?”
- “What is [actor]’s latest movie?”
- “Which movie won the Best Picture Oscar in [year]?”
- “How many Oscars has [actor] won?”
Some movie Easter eggs
In the software world, an Easter egg is a whimsical program feature that’s hidden by default and must be discovered. Alexa, you’ll be delighted to know, contains hundreds of Easter eggs. You can get a random one using either of these requests:
- “Give me an Easter egg.”
- “Give me a hard-boiled Easter egg.”
For a more targeted Easter egg hunt, you can try specific topics such as TV shows, which I discuss in the next section. Movies are another great source for Alexa Easter eggs. There are dozens, perhaps even hundreds, so consider the following ten to be a mere appetizer:
- “Open the pod bay doors.” (2001: A Space Odyssey)
- “Who’s on first?” (Abbot and Costello)
- “Release the Kraken!” (Clash of the Titans)
- “Klattu barada nikto.” (The Day the Earth Stood Still)
- “E.T. phone home.” (E.T. the Extra-Terrestrial)
- “Define supercalifragilisticexpialidocious” (Mary Poppins)
- “Are we in the Matrix?” (The Matrix)
- “What is my mission?” (Mission: Impossible)
- “What is the airspeed velocity of an unladen swallow?” (Monty Python and the Holy Grail)
- “What is the Jedi code?” (Star Wars)
Some TV Easter eggs
Alexa doesn’t have a ton of TV Easter eggs, but here are a few to wet your whistle:
- “What is your cunning plan?” (Blackadder)
- “Who shot J.R.?” (Dallas)
- “Don’t mention the war.” (Fawlty Towers)
- “Winter is coming.” (Game of Thrones)
- “Who loves orange soda?” (Kenan & Kel)
- “Who loves ya baby?” (Kojak)
- “This is a dead parrot.” (Monty Python)
- “More cowbell.” (Saturday Night Live)
- “What is the Prime Directive?” (Star Trek)
- “Where’s the beef?” (Wendy’s commercial)
More Useful Alexa Requests
Besides controlling movies and TV shows on your Fire TV, you can also use Alexa for non-media stuff, such as getting the current time and weather. The next few sections take you through a few dozen of Alexa’s most common and most useful voice requests.
Everyday-info requests
Alexa excels at everyday requests for information related to the weather, news, and traffic. Here are the basic requests:
- “What time is it?”
- “What time is it in [city]?”
- “What is today’s date?”
- “When is [holiday] this year?”
- “What’s the weather like?”
- “What’s the temperature?”
- “Will it rain today?”
- “What will the weather be like [day]?” (For example, “what will the weather be like tomorrow?”)
- “Play my flash briefing.”
- “What’s in the news?”
- “How’s the traffic?”
- “What was the score of yesterday’s [team] game?”
- “When is the next [team] game?”
- “What movies are playing?”
- “Find me a nearby [cuisine] restaurant.” (For example, “Find me a nearby Mexican restaurant.”)
Information requests
Give these requests a whirl to get general information from Alexa:
- “What’s the definition of [word]?”
- “How do you spell [word]?”
- “What are some synonyms for [word]?”
- “Convert [number] [units1] to [units2].” (For example, “Convert 100 miles to kilometers.”)
- “What is [number] [operator] [number]?” (For example, “What is 123 times 456?”)
- Alexa, what is [number1] percent of [number2]?” (For example, “What is 15 percent of 78.53?”)
- “What is the population of [city or region]?”
Audio requests
Here are the basic voice requests to try out for controlling music, podcasts, and other audio:
- “Play [song or album].”
- “Play [music genre].”
- “Play [playlist].”
- “Play the latest [artist].”
- “Play Sunday morning music.”
- “Who sings this song?”
- “Shuffle mode [on or off].”
- “Turn this off in [number] minutes.”
- “Play [audiobook title].”
- “Read [Kindle book title].”
Alarm and timer requests
Here are the basic requests to use to set and work with alarms and timers:
- “Set alarm for [time].”
- “Wake me up every day at [time].”
- “Wake me up at [time] to [music or radio station].”
- “Snooze for [number] minutes.”
- “Set a timer for [number] minutes.”
- “Set a [name] timer for [number] minutes.” (For example, “Set a bread timer for 40 minutes.”)
- “How long is left on the timer?”
- “How long is left on the [name] timer?”
- “Stop the timer.”
Calendar, reminder, and list requests
Here are a few basic Alexa requests for controlling your calendar, creating reminders, and managing lists:
- “What’s on my calendar?”
- “What’s on my calendar on [date]?”
- “Add an event to my calendar.”
- “Create a new appointment.”
- “Add budget meeting to my calendar on [day] at [time].”
- “What am I doing tomorrow?”
- “How many days until [date]?”
- “How many days until [holiday]?”
- “What time does the sun rise on [date]?”
- “What time does the sun set on [date]?”
- “Remind me to [task] in [number] minutes.”
- “Add [task] to my to-do list.”
- “What’s on my to-do list?”
Communication requests
Here are the basic requests for placing calls and sending text messages:
- “Call [name].”
- “Call [phone number].”
- “Answer the call.”
- “Hang up.”
- “Drop in on the [room or location].”
- “Play messages.”
- “Message [name].”
- “Announce that [message].”
Shopping requests
Here are a few requests to place and track Amazon orders:
- “Add [item] to my shopping list.”
- “Buy more [item].”
- “Order [item].”
- “What’s on my shopping list?”
- “Where’s my stuff?”
- “What are your deals?”
Using Alexa to Control Smart-Home Devices
Unless you’re under 5 years old, you probably grew up in a home that was, well, dumb. You turned on lamps with a switch (or perhaps a clap), the thermostat told you only the current temperature, and the only task you could automate was setting your alarm clock. All that seemed perfectly normal at the time, but that dumb home is starting to look quaint when placed next to the modern idea of a smart home.
What, exactly, do people mean when they add the smart adjective to the word home? The simple — and not all that helpful — definition of a smart home is a home that contains one or more devices that enhance your home life in some way. That word enhance is vague, I know, but it’s really the key to everything. How does a smart-home device enhance your home life? It comes down to three things:
- Convenience: You operate most dumb-home devices manually, meaning you have to walk up to the device and then flip a switch or adjust a dial. If someone’s at the door, the only way to see who’s there is to open the door or peek through the peephole. By contrast, you operate smart-home devices from a distance using an app or a voice service such as Alexa. If someone’s at the door, your smart security camera lets you see who’s there using an app or an Alexa device with a screen.
- Information: Dumb-home devices tell you either nothing about themselves or just the bare minimum. A dumb dimmer tells you nothing about the current light level, while a dumb thermostat shows only the current temperature. By contrast, smart-home devices are bristling with information — such as current settings, status indicators, and power usage — that gets relayed to an app or device for easy reference.
- Automation: Dumb-home devices just sit there until you do something. A dumb lamp goes on when you flip the switch and will stay on until you flip the switch back. A dumb thermostat will keep the house at the temperature you set, no matter what the time of day. By contrast, smart-home devices can be programmed. You can program a smart lamp to turn on and off automatically at specified times. You can program a smart thermostat to use your preferred temperature during the day, and to use an energy-saving lower or higher temperature overnight.
Yes, some smart-home stuff is a solution in search of a problem. A smart water bottle that tells you when it’s time to take a drink and a smart hairbrush that lets you know when you’re not brushing correctly are among the dumber smart devices. On the other hand, even something as basic (in the smart-home world, anyway) as programming when your lights go on and off can both save you money by reducing energy costs and extending bulb life, and make your home more secure by making it look occupied even when you’re not there.
Installing a Wi-Fi smart-home device
If your smart-home device is Wi-Fi-friendly, go to your mobile device app store and install the manufacturer’s app. Then follow these steps to get your Wi-Fi smart-home device set up in the app:
- Plug in and, if required, turn on the smart-home device.
- Open the smart-home device manufacturer’s app.
-
Initiate the procedure for setting up a new device.
Look for a request named Add or Add [manufacturer] Device (where manufacturer is the name of the company), or just a big plus sign (+).
The setup routine will tell the device to broadcast its Wi-Fi network.
-
Open your mobile device’s Wi-Fi settings and look for the device’s Wi-Fi network.
Figure 9-7 shows a collection of Wi-Fi networks that includes WeMo.Insight.03C, which is a network broadcast by a WeMo Insight smart switch.
- Tap the device network to connect to it.
-
When the connection is complete, return to the device app.
The app automatically detects the new network and uses the connection to set up the device. This usually involves giving the device a name. You’ll often have to set up an account with the manufacturer, as well.
-
The app will usually ask for your Wi-Fi credentials, which enable the device to connect to and operate over your network.
Having the device on your network is also how Alexa discovers and operates the device, so this step is important.

FIGURE 9-7: Open your Wi-Fi settings and look for the smart-home device’s Wi-Fi network.
-
If you see a notice asking whether you want to upgrade the smart-home device firmware, by all means tap Yes or Allow or Update or whatever button answers in the affirmative.
The firmware is internal software that runs the device. Keeping all your smart-home devices updated with the latest firmware is highly recommended because new versions of the software are often needed to patch security holes and improve performance.
Making automatic network connections with Wi-Fi Simple Setup
The steps I outline in the preceding section mostly deal with getting a Wi-Fi-enabled smart-home device on your home network. The step where you need to connect your smartphone or tablet to the device’s temporary network always bothers me because it seems like an imposition. The Amazon engineers must have felt the same way, because they came up with a way to avoid that annoying extra step. It’s called Wi-Fi Simple Setup, and it requires two things:
- An Echo device compatible with Wi-Fi Simple Setup — that is, a second-generation or later Echo, Echo Plus, Echo Dot, or Echo Show — that’s already connected to your Wi-Fi network
- The password to your Wi-Fi network saved to Amazon
If you’ve checked off both items, then setting up a new device that’s compatible with Wi-Fi Simple Setup — such as the Amazon Smart Plug or the AmazonBasics Microwave — is either easy or ridiculously easy.
The ridiculously easy setup comes your way if you purchased your Wi-Fi Simple Setup device from Amazon. In that case, Amazon automatically associates the device with your Amazon account, which means that when you plug in the device, it will connect to your network automatically using your saved Wi-Fi password. Now that’s ridiculously easy!
If you purchased the Wi-Fi Simple Setup device from a retailer other than Amazon, then the device won’t be associated with your Amazon account, so it can’t connect to your network automatically. That’s okay, though, because you can still use the Alexa app to add the device: Choose Devices ⇒ Add (+) ⇒ Add Device.
Discovering smart-home devices using an Alexa skill
If you’re not using an Alexa device that includes a smart-home hub (such as the Echo Plus and second-generation Echo Show), then you usually need to upgrade Alexa to work with your smart-home device. You upgrade Alexa by enabling the device manufacturer’s Alexa skill. This not only lets Alexa discover the device, but also upgrades Alexa with the voice requests that let you operate the device.
Alexa can locate and connect to some smart-home devices without requiring a skill. For example, Alexa can work with a Philips Hue Bridge to control lights without needing a skill. Say, “Discover devices,” and then press the button on top of the Hue Bridge to put it into pairing mode.
Follow these steps to enable the manufacturer’s Alexa skill and discover the manufacturer’s smart-home device:
-
Install the manufacturer’s app and use it to get your smart-home device on your Wi-Fi network.
See “Installing a Wi-Fi smart-home device,” earlier in this chapter, for the details.
- In the Alexa app, tap Devices.
- Tap the Add button (+) that appears in the upper-right corner.
-
Tap Add Device.
The Alexa app displays icons for some popular brands and some device categories.
-
Tap the category that fits your device, and then tap the manufacturer.
The Alexa app prompts you to perform the duties I outline in Step 1. You’ve done all that, so proceed.
-
Tap Continue.
The Alexa app opens the information page for the manufacturer’s Alexa skill.
-
Tap Enable.
At this point, what happens next depends on the skill, but you’ll usually have to perform one or both of the following:
- Use the smart-home device app to give Alexa permission to access the device.
- Link Alexa to the user account associated with the smart-home device.
- When you’re done, tap Close (X) to return to the skill page.
-
Tap Discover Devices (see Figure 9-8).
The Alexa app uses the manufacturer’s Alexa skill to search for available devices. If one or more devices are found, you see a screen similar to the one shown in Figure 9-9.

FIGURE 9-8: When a skill is enabled, tap Discover Devices to see what’s available.
- Tap Done.
With a manufacturer’s Alexa skill enabled, you can discover new devices by following Steps 1 through 5 and then tapping Discover Devices, or you can ask Alexa to run the following voice request:
“Discover my devices.”
With your smart-home devices plugged in, turned on, and connected to Alexa, you’re ready to reap the harvest of all that labor: controlling those devices through Alexa using voice requests. Don’t let all that power go to your head!

FIGURE 9-9: You see a screen similar to this one if the Alexa app discovers any devices using the manufacturer’s Alexa skill.
In the sections that follow, I outline the Alexa voice requests that are generally available for each type of device. Keep in mind, however, that the ways you can control a smart-home device through Alexa are almost always only a subset of what you can do using the manufacturer’s app. With a smart plug, for example, Alexa can only turn the device on or off, but the manufacturer’s app will usually let you schedule on/off times, turn the plug off automatically after a set time, and more.
Controlling a smart-home device
Before getting to the meat of this section, you should know that there are actually three methods you can use to control a smart-home device:
- Voice requests: This is how you’ll operate most of your smart-home devices. The rest of this section takes you through the most common voice requests for a selection of smart-home devices.
- Alexa app: If you have your Alexa device microphone turned off, you can still use the Alexa app to control your smart-home devices. Tap Devices, tap the device type (or All Devices), and then tap the device you want to mess with. The screen that appears contains the controls you can use. For example, Figure 9-10 shows the device screen for a smart lightbulb, which includes two controls: a button for turning the device on and off and a slider for setting the brightness.

FIGURE 9-10: The device control screen for a smart lightbulb.
- Alexa device with a screen: Swipe down from the top of the screen to open the status bar, and then tap the icon for the device type (such as a bulb icon for your smart lights, plugs, and switches). Note, too, that after you issue a smart-home-device-related request to an Alexa device with a screen, you see some device controls on the screen for a few seconds.
Turning smart plugs on and off
If you’re curious about smart-home technology, but you don’t want to spend a ton of money or time, a smart outlet — most often called a smart plug — is the way to go. A smart plug is an electrical outlet that you can control with voice requests. The smart outlet plugs into a regular electrical outlet for power, and then you plug a non-smart device — such as a lamp or coffeemaker — into the smart outlet. Voilà! You now have voice control over the dumb device.
 Do you have a bunch of nearby dumb devices that you want to control via Alexa? In that case, instead of getting multiple smart plugs, buy a single smart power strip.
Note, however, that “control” here just means turning the device on and off using the following voice requests:
- “Turn [device name] on.”
- “Turn [device name] off.”
Replace device name with the name you gave to the smart plug using either the manufacturer’s app or the Alexa app.
Working with smart lights
Another easy and relatively inexpensive way to get your smart-home feet wet is with a smart lightbulb or two. You can buy a smart lightbulb for less than $20, and installing it is as easy as changing any regular lightbulb. You can also get smart lightbulbs that change brightness without a separate dimmer switch and that can display different colors.
What if you have a large collection of lights in, say, your kitchen or living room? Swapping out all those dumb bulbs for smart versions would cost a fortune, so a better choice is a smart light switch that you can turn on and off with Alexa. For more control, you can get a smart dimmer switch that enables you to control the brightness with voice requests.
Although a smart lightbulb is easy to install, a smart light switch is another matter because it needs to be wired to your home’s electrical system. Unless you really know what you’re doing, hire an electrician to do the installation for you.
Here are the voice requests to use to turn a smart lightbulb or light switch on or off:
- “Turn [device name] on.”
- “Turn [device name] off.”
For dimmable smart lights (or smart dimmer switches), use any of the following voice requests:
- “Brighten [device name].”
- “Dim [device name].”
- “Set [device name] brightness to [number] percent.”
For smart lights that support different colors, use these voice requests:
- “Set [device name] to warm white.”
- “Set [device name] to cool white.”
- “Set [device name] to [color].” (For example, “Set Chill Room to blue.”)