Chapter 3
Setting Up Fire TV
IN THIS CHAPTER
![]() Starting with the input source
Starting with the input source
![]() Getting a Fire TV Stick or Fire TV Stick 4K up and running
Getting a Fire TV Stick or Fire TV Stick 4K up and running
![]() Adding a Fire TV Cube to your home entertainment system
Adding a Fire TV Cube to your home entertainment system
![]() Getting Fire TV Edition on the job
Getting Fire TV Edition on the job
If you’re a certain age, you may remember when devices were advertised as being “plug-and-play,” which meant, at least in theory, that all you had to do was connect the device and it would configure itself automatically, meaning you could then “play” with the device (whatever that meant) after a minute or two. (Note I said “in theory”; in practice, such devices were better described as “plug-and-pray.”)
I’m sorry to report that your Fire TV device does not fall under the “plug-and-play” rubric. Instead, after you plug in your Fire TV device, there’s a nontrivial configuration process that you must run through before you can play with it. That process includes crucial steps such as connecting to your Wi-Fi network and signing in to your Amazon account. Lucky for you, the entire process takes only a few minutes, and this chapter takes you through every step.
Changing Your TV’s Input Source
As you learn in this chapter, if you have a Fire TV Stick, Fire TV Stick 4K, or Fire TV Cube, you must connect the device to an HDMI port on your TV. Here’s a question that stumps many people who are new to Fire TV: How does your TV “know” that Fire TV is connected to its HDMI port? That is, when you turn on your TV, you just see your regular TV channels — how do you see the Fire TV stuff, instead?
All modern TVs have a feature called the input source, which refers to the incoming connection that the TV uses to display a signal on its screen. By default, your TV uses the input source for your cable (or satellite or antenna) connection, so you see your regular channels. To see a different incoming signal — which might be for a connected device such as a Blu-ray player — you need to choose the appropriate input source. More to the point for this chapter, after you’ve connected your Fire TV device to an HDMI port on your TV (and to a power outlet), your next task is to turn on your TV and change the input source to the Fire TV device’s HDMI port.
How you change the input source depends on the TV, but in most cases you use the TV’s remote to press a button labelled Input (or, in some cases, Source), as shown in Figure 3-1. You then change the input source in one of two ways:
- Keep pressing the button until you’ve selected the input source you want to view.
- A menu of available input sources appears and you use the remote’s navigation ring or buttons to select the source you want.
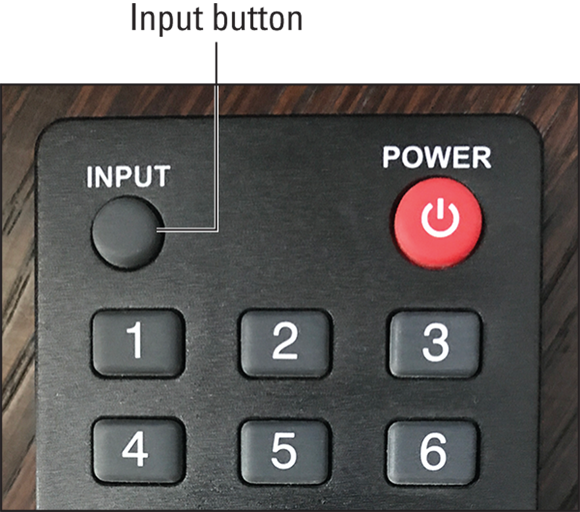
FIGURE 3-1: On most TV remotes, you change the input source by pressing the Input (or Source) button.
 If you don’t see a button named Input (or Source) on your remote, or if you don’t have a remote, look on the TV itself, which should have an Input (or Source) button.
Setting Up Fire TV Stick or Fire TV Stick 4K
If you have a Fire TV Stick or Fire TV Stick 4K, you need to connect the device to your TV and then run through the setup procedure. The next two sections take you through all the steps.
 In the rest of this section, instead of saying the long-winded phrase Fire TV Stick or Fire TV Stick 4K, I’m going to save wear-and-tear on my typing fingers (and your reading eyes) by shortening that phrase to Fire TV Stick.
Connecting Fire TV Stick to your TV
Your Fire TV Stick connects to your TV’s HDMI port, which on most TVs is labeled HDMI. If your TV has multiple HDMI ports (as most modern TVs do), then the ports are usually labeled HDMI 1, HDMI 2, and so on, as shown in Figure 3-2. Newer TVs usually have all their HDMI ports on one side of the TV’s back panel (refer to Figure 3-2), while on older TVs it’s common to have one HDMI port on the bottom of the TV’s back panel and a second HDMI port on the side of the back panel (see Figure 3-3).
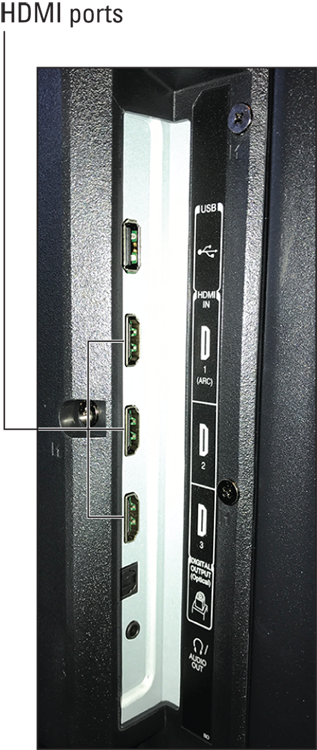
FIGURE 3-2: Modern TVs have all their HDMI ports together on the back panel.

FIGURE 3-3: Older TVs often have their HDMI ports in multiple locations on the back panel.
The location of the HDMI port is important because the length of the Fire TV Stick (especially the longer Fire TV Stick 4K) often means that there isn’t room between a bottom HDMI port and whatever surface the TV is sitting on for the Fire TV Stick to fit. If that’s the case for you, then you have three possible solutions:
- Plug the Fire TV Stick into a side HDMI port, if you have one available.
- Mount the TV on the wall (which gives the Fire TV Stick plenty of room because there’s no longer a surface immediately under the TV).
- Use the HDMI extender cable (see Figure 3-4) that came with your Fire TV Stick. In this case, insert the smaller end of the extender cable into the HDMI port on your TV; then connect your Fire TV Stick to the larger end of the extender cable (refer to Figure 3-4).
With your Fire TV Stick connected to your TV, grab the USB cable that came with your Fire TV Stick. Connect one end of the USB cable to the port on the side of the Fire TV Stick, plug the other end of the USB cable into the USB port on the power adapter that came with your Fire TV Stick, and then plug the power adapter into a power outlet.
Turn on your TV and change the input source (as I describe earlier in the “Changing Your TV’s Input Source” section) to the Fire TV Stick HDMI connection.
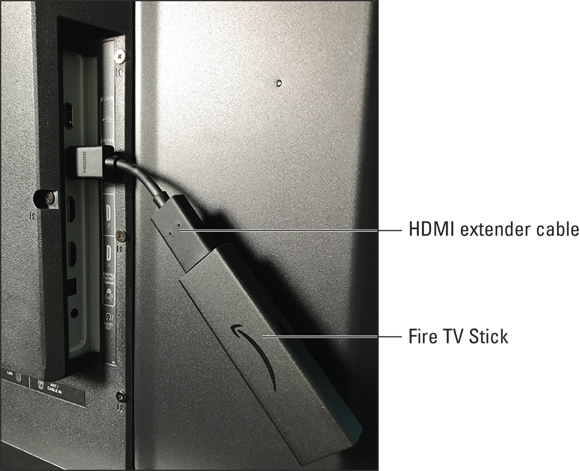
FIGURE 3-4: A Fire TV Stick with the HDMI extender cable attached.
Setting up Fire TV Stick
Your Fire TV Stick comes with an Alexa Voice Remote that you use to navigate the Fire TV interface (either by pressing buttons or by using voice commands). Before proceeding with the Fire TV Stick configuration, remove the back cover of the Alexa Voice Remote, insert the two batteries that came with Fire TV Stick, and then reattach the back cover.
When you tune to the Fire TV Stick HDMI port on your TV, the Fire TV Stick starts up for the first time and takes you through the following setup process:
-
When you see the Searching for Your Remote message, as shown in Figure 3-5, press the Home button on the Alexa Voice Remote.
Pressing the Home button enables the Fire TV Stick and the Alexa Voice Remote to connect (or pair) with each other.
If nothing happens when you press the Home button, you can force the Alexa Voice Remote into pairing mode by pressing and holding the Home button for ten seconds, or until you see the Alexa Voice Remote LED rapidly flashing amber.When the pairing is complete, you see the message shown in Figure 3-6.
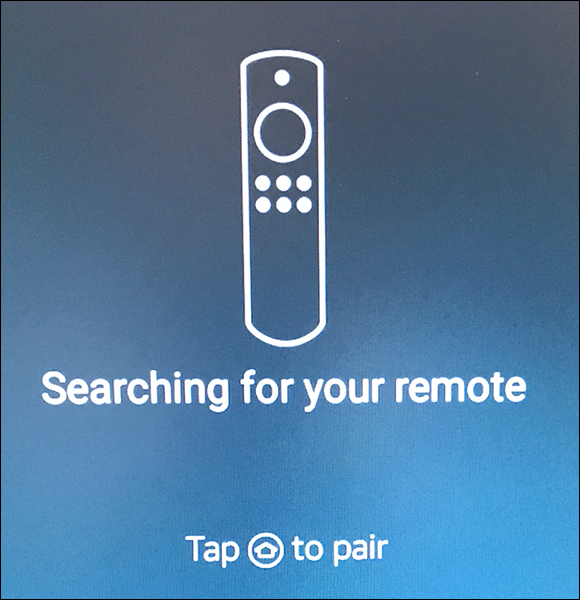
FIGURE 3-5: When you see this message, press the Home button on your Alexa Voice Remote.

FIGURE 3-6: You see this message when the pairing between the Fire TV Stick and the Alexa Voice Remote is complete.
-
On the Alexa Voice Remote, press the Play/Pause button.
Fire TV Stick asks you to choose your language.
-
Use the Alexa Voice Remote to choose the language you want to use.
I talk about how to use the Alexa Voice Remote in more detail in Chapter 4. For now, you use the Alexa Voice Remote to “choose” something by using the navigation ring to press Down (the bottom part of the ring), Up (the top part of the ring), Left (the left part of the ring), or Right (the right part of the ring) to highlight the item you want; then press Select (the circular area in the middle of the navigation ring).
After a few moments, Fire TV Stick displays a list of nearby Wi-Fi networks.
-
Choose your Wi-Fi network.
Fire TV Stick prompts you to enter the network password.
-
Use the Alexa Voice Remote navigation ring to enter each character in your network password, and then choose Connect (or press Play/Pause on the remote).
If your network password requires one or more uppercase letters, you can switch to uppercase characters by choosing the aA button or by pressing Menu on the Alexa Voice Remote.Fire TV Stick connects to your network and then checks to see if there is an available update to Fire OS, the operating system that runs Fire TV Stick. If an update is available, Fire TV Stick downloads and installs the software, which can take a few minutes. Note that Fire TV Stick may restart during this process.
Eventually, Fire TV Stick asks you to sign in to your Amazon account.
-
Choose I Already Have an Amazon Account.
Fire TV Stick displays the Enter Your Amazon Login ID screen.
What if you don’t have an Amazon account? No problem. Choose I Am New to Amazon; then use the Create Account screen to set up your account.
-
In the Email Address field, use the Alexa Voice Remote navigation ring to type your Amazon account’s email address, and then choose Next.
Fire TV Stick displays the Enter Your Amazon Account Password screen.
-
In the Password field, use the Alexa Voice Remote navigation ring to type your Amazon account’s password (see Figure 3-7), and then choose Sign In.
By default, Fire TV Stick hides the password by displaying each character as a dot, as shown in Figure 3-7. If you want to make sure you entered the password correctly, choose the Show Password button.
If you’ve enabled two-factor authentication on your Amazon account (as I describe in Chapter 12), Fire TV Stick will prompt you to enter a code to verify the sign-in. Type the code that was sent to you, and then choose the Next button.Fire TV Stick confirms your Amazon credentials, signs in to your account, and then registers your Fire TV Stick. Fire TV Stick then asks which Amazon account you want to use.
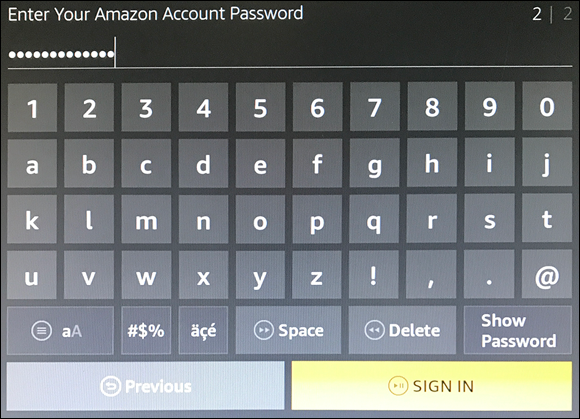
FIGURE 3-7: Enter your Amazon account password.
-
Choose Continue.
Fire TV Stick asks if you want to save your Wi-Fi password to Amazon. This is part of a feature that Amazon calls Wi-Fi Simple Setup, which enables other Amazon devices you own (such as Echo smart speakers) to automatically connect to your network. This feature really makes setting up those devices easier, so it’s a good idea to let Amazon save your password.
-
Choose Yes.
Fire TV Stick now prompts you to enable parental controls. I talk about parental controls in detail in Chapter 8, so you can skip this part of the setup for now.
-
Choose No Parental Controls.
Fire TV Stick next makes sure the volume buttons on the Alexa Voice Remote are working properly. Before continuing, make sure your TV’s volume is turned up.
-
Choose Next.
Fire TV Stick plays some music so that you can test the Alexa Voice Remote volume buttons.
-
On the Alexa Voice Remote, press the Volume Up (+) and Volume Down (–) buttons.
Fire TV Stick asks if the music volume changed when you pressed the Alexa Voice Remote volume buttons.
If the volume didn’t change, double-check that the TV volume is turned up loud enough that you can hear the music. Also, make sure you point the Alexa Voice Remote at your TV and that the TV’s output device (if any) is turned on and connected properly.
-
Choose Yes.
Fire TV Stick tells you that the Alexa Voice Remote is configured.
-
Choose OK.
Fire TV Stick asks if you want to set up your streaming services.
I cover streaming in Chapter 6, so you don’t need to set up streaming services right away.
-
Choose No Thanks.
If you do want to set up your services now, choose Get Started, and then follow the onscreen prompts.
Congratulations! Your Fire TV Stick is ready for action.
Setting Up Fire TV Cube
If you have a Fire TV Cube, you need to position the device optimally, connect the device to your TV, and then run through the setup procedure. The next few sections explain all.
Positioning your Fire TV Cube
After you’ve liberated your Fire TV Cube from its packaging, one obvious question arises: Where the heck do you put it? Somewhere near your TV seems like the obvious answer, but choosing the best location is a bit more complicated than that. Here are some things to consider:
- Your Fire TV Cube requires full-time power, so make sure there’s an outlet close enough to the device.
- Your Fire TV Cube connects to an HDMI port on your TV, so it needs to be close enough to your TV that your HDMI cable can reach.
- TV or sound system speakers can befuddle the Fire TV Cube built-in microphone, so make sure all speakers are at least 1 to 2 feet away from your Fire TV Cube.
- Make sure the Fire TV Cube is within range of your Wi-Fi network.
- Make sure the device is close enough that you can give your voice commands without having to yell. Depending on the ambient noise in your environment, this usually means being within 15 to 20 feet of the device.
- Don’t store the Fire TV Cube inside a cabinet or other enclosed location.
- Position the Fire TV Cube with the four buttons (see Figure 3-8) facing up, and the Amazon logo facing where you usually sit when you watch TV.

Photograph courtesy of Amazon
FIGURE 3-8: Your Fire TV Cube uses an array of microphones to hear what you’re saying.
Getting to know your Fire TV Cube device’s Alexa hardware
Fire TV Cube is a combination of a streaming media device and an Alexa-enabled smart speaker. The latter means that you can send voice commands to the Fire TV Cube to control your TV and Fire TV, and the Fire TV Cube also responds to questions and other utterances. I talk about Alexa in great detail in Chapter 9, but for now, before continuing with the Fire TV portion of the setup, it makes sense to first learn the basics of your Fire TV Cube device’s Alexa hardware.
Taking a closeup look at the far-field microphone
Computers have had either external or built-in microphones for a few decades, and, of course, smartphones and tablets have had internal microphones from day one. But the characteristic that all these microphones have in common is that they assume the speaker is relatively close — within a few inches or, at most, a foot or two. Move much farther away, and those microphones get notoriously unreliable because they have trouble distinguishing your voice from the background noise in your environment.
That sort of second-rate microphone performance just won’t do for the Fire TV Cube whenever you’re relying on voice commands to get things done because those commands could be coming from 10, 15, or even 20 feet away. To get accurate and clear voice recordings, your Fire TV Cube relies on a technology called the far-field microphone, which is optimized to distinguish a voice from the ambient room noise even when that voice is far away. The Fire TV Cube far-field microphone uses some fancy-schmancy technology to accomplish this difficult task:
- Microphone array: The Fire TV Cube “microphone” is actually an array of eight individual microphones, as shown by the circles in Figure 3-8. Note that these microphones are arranged somewhat narrowly from the front of the device to the back. The line created by this arrangement is the direction that Fire TV Cube expects your voice commands to come from. This is why, as I explain earlier (see “Positioning your Fire TV Cube”), you need to place your Fire TV Cube so that the front (where the Amazon logo resides) is pointing to where you sit when you watch TV.
- Noise reduction: Detects unwanted audio signals (known in the audio trade as noise) and reduces or eliminates them.
- Acoustic echo cancellation: Detects sounds coming from a nearby loudspeaker (such sounds are known as acoustic echo) — even if that loudspeaker is the Fire TV Cube itself — and reduces or cancels them to ensure accurate voice recordings.
- Beamforming: Uses the microphone array to determine the direction your voice is coming from and then uses that directional information to home in on your voice.
- Barge-in: The microphone ignores whatever media the Alexa device is currently playing — such as a song or podcast — so that the microphone can more easily detect and recognize a simultaneous voice command (thus enabling that command to “barge in” on the playing media).
- Speech recognition: Detects the audio patterns associated with speech and focuses on those patterns instead of any surrounding noises.
Pushing the Fire TV Cube buttons
Your Fire TV Cube is built to be a hands-free device, which is a welcome design choice when you have one hand in a bowl of popcorn and the other clutching your favorite beverage. However, hands-free doesn’t mean hands-off because the outer shell of your Fire TV Cube is festooned with four buttons that you can use to control certain aspects of the device.
Figure 3-9 shows the top of a Fire TV Cube and points out the four buttons.

Photograph courtesy of Amazon
FIGURE 3-9: The buttons that dot the top of the Fire TV Cube.
Here’s a summary of the available buttons:
- Action: Activates Alexa. That is, pressing the Action button is the same as saying Alexa’s wake word.
- Microphone Off: Turns the Fire TV Cube microphone off. When the microphone is off, this button glows red, as does the Fire TV Cube light ring. Press this button again to turn the microphone back on.
- Volume Up: Increases the volume (no surprise, there).
- Volume Down: You guessed it: decreases the volume.
Connecting Fire TV Cube to your TV
Your Fire TV Cube connects to your TV’s HDMI port (see Figure 3-10), which on most TVs is labeled HDMI. If your TV has multiple HDMI ports (as most modern TVs do), then the ports are usually labeled HDMI 1, HDMI 2, and so on (refer to Figure 3-2).
Your Fire TV Cube has a built-in infrared transmitter that enables you to use voice commands to control other devices in your home entertainment system, such as your TV (for example, to turn it on and off), audio receiver, Blu-ray player, cable set-top box, or satellite receiver. In other words, your Fire TV Cube, besides being a streaming media device and a smart speaker, is also a universal remote!

FIGURE 3-10: Use an HDMI cable to connect your Fire TV Cube to your TV.
The IR transmitter (some folks call it an IR blaster) is inside Fire TV Cube, but it may not work for some devices that you’ve stored inside a cabinet or other enclosed area. Are you out of the IR blaster game in that case? Not at all. Instead, you can connect the IR extender cable that comes with Fire TV Cube. Connect the IR extender cable’s jack to the corresponding port on the back of Fire TV Cube, and then position the cube end of the cable as close as you can to the enclosed device or devices you want to control.
With your Fire TV Cube connected to your TV, grab the power cable that came with your Fire TV Cube. Connect one end of the power cable to the power port on the back of the Fire TV Cube, and plug the other end of the cable into a power outlet.
Turn on your TV and change the input source (as I describe earlier in the “Changing Your TV’s Input Source” section) to the Fire TV Cube HDMI connection.
Setting up Fire TV Cube
Your Fire TV Cube comes with an Alexa Voice Remote that you can use to navigate the Fire TV interface. You may decide to opt only to use Alexa voice commands to control Fire TV, but you still need the remote to get through the initial configuration. So, before proceeding, remove the back cover of the Alexa Voice Remote, insert the two batteries that came with Fire TV Cube, and then reattach the back cover.
When you tune to the Fire TV Cube HDMI port on your TV, the Fire TV Cube starts up for the first time and takes you through the following setup process:
-
On the Alexa Voice Remote, press the Play/Pause button.
Fire TV Cube asks you to choose your language.
-
Use the Alexa Voice Remote to choose the language you want to use.
I talk about how to use the Alexa Voice Remote in more detail in Chapter 4. For now, you use the Alexa Voice Remote to “choose” something by using the navigation ring to press Down (the bottom part of the ring), Up (the top part of the ring), Left (the left part of the ring), or Right (the right part of the ring) to highlight the item you want; then press Select (the circular area in the middle of the navigation ring).
After a few moments, Fire TV Cube displays a list of nearby Wi-Fi networks.
-
Choose your Wi-Fi network.
Fire TV Cube prompts you to enter the network password.
-
Use the Alexa Voice Remote navigation ring to enter each character in your network password, and then choose Connect (or press Play/Pause on the remote).
If your network password requires one or more uppercase letters, you can switch to uppercase characters by choosing the aA button or by pressing Menu on the Alexa Voice Remote.Fire TV Cube connects to your network and then checks to see if there is an available update to Fire OS, the operating system that runs Fire TV Cube. If an update is available, Fire TV Cube downloads and installs the software, which can take a few minutes. Note that Fire TV Cube may restart during this process.
Eventually, Fire TV Cube asks you to sign in to your Amazon account.
-
Choose I Already Have an Amazon Account.
Fire TV Cube displays the Enter Your Amazon Login ID screen.
What if you don’t have an Amazon account? No problem. Choose I Am New to Amazon; then use the Create Account screen to set up your account.
-
In the Email Address field, use the Alexa Voice Remote navigation ring to type your Amazon account’s email address, and then choose Next.
Fire TV Cube displays the Enter Your Amazon Account Password screen.
-
In the Password field, use the Alexa Voice Remote navigation ring to type your Amazon account’s password, and then choose Sign In.
By default, Fire TV Cube hides the password by displaying each character as a dot. If you want to make sure you entered the password correctly, choose the Show Password button.
If you’ve enabled two-factor authentication on your Amazon account (as I describe in Chapter 12), Fire TV Cube will prompt you to enter a code to verify the sign-in. Type the code that was sent to you, and then choose the Next button.Fire TV Cube confirms your Amazon credentials, signs in to your account, and then registers your Fire TV Cube. Fire TV Cube then asks which Amazon account you want to use.
-
Choose Continue.
Fire TV Cube now asks if you want to save your Wi-Fi password to Amazon. This is part of a feature that Amazon calls Wi-Fi Simple Setup, which enables other Amazon devices you own (such as Echo smart speakers) to automatically connect to your network. This feature really makes setting up those devices easier, so it’s a good idea to let Amazon save your password.
-
Choose Yes.
Fire TV Cube now prompts you to enable parental controls. I talk about parental controls in detail in Chapter 8, so you can skip this part of the setup for now.
-
Choose No Parental Controls.
Fire TV Cube asks if you want to set up your streaming services.
I cover streaming in Chapter 6, so you don’t need to set up streaming services right away.
-
Choose No Thanks.
If you do want to set up your services now, choose Get Started, and then follow the onscreen prompts.
Fire TV Cube asks if you want Alexa to help you set up your TV and other equipment.
-
Choose Continue.
If you don’t want to bother with this, choose Do This Later, instead.
To actually do this later, choose Settings ⇒ Equipment Control ⇒ Set Up Equipment. -
Gather the remote controls for each device you want Fire TV Cube to control, and then choose Next.
You need the remotes both to confirm when Fire TV Cube has successfully controlled some aspect of the device (by pressing the Fast Forward button) and to perform certain tasks that Fire TV Cube wants to learn how to perform itself (such as changing the input source on your TV).
Fire TV Cube runs through your devices, trying each time to detect the device automatically. If Fire TV Cube detects an incorrect device, be sure to choose No and then select the correct device from the list that appears.
-
When the equipment setup is complete, choose Continue.
That’s it! Your Fire TV Cube is ready to roll.
Setting Up Fire TV Edition
Your Fire TV Edition comes with an Alexa Voice Remote that you use to navigate the Fire TV interface (either by pressing buttons or by using voice commands). Before proceeding with the Fire TV Edition configuration, remove the back cover of the Alexa Voice Remote, insert the two batteries that came with Fire TV Edition, and then reattach the back cover.
If your Fire TV Edition comes via a device other than a Smart TV (such as a soundbar), connect the device to your existing TV’s HDMI port, as follows:
- If your device and your TV support Audio Return Control (ARC), connect the device to your TV’s HDMI (ARC) port. Otherwise, just connect the device to a regular HDMI port. Either way, be sure to select the Fire TV source mode on the soundbar (on the Nebula soundbar, for example, this is the FTV source mode). Also, be sure to turn off your TV’s built-in speakers (see your TV manual for instructions).
- If you use other inputs on your TV, connect the device to an audio port on the TV, such as an optical or AUX port. In this case, when you switch to the other input, be sure to select the optical or AUX source mode on the soundbar (on the Nebula soundbar, for example, you’d select the OPTIC or AUX source mode).
When you power up the Fire TV Edition Smart TV for the first time, or when you switch to the Fire TV Edition input if you’re using a device such as a soundbar, Fire TV Edition takes you through the following setup procedure:
-
Use the Alexa Voice Remote to choose the language you want to use.
I talk about how to use the Alexa Voice Remote in more detail in Chapter 4. For now, you use the Alexa Voice Remote to “choose” something by using the navigation ring to press Down (the bottom part of the ring), Up (the top part of the ring), Left (the left part of the ring), or Right (the right part of the ring) to highlight the item you want; then press Select (the circular area in the middle of the navigation ring).
The TV should automatically pair with the Alexa Voice Remote. If nothing happens when you press the Alexa Voice Remote buttons, you can force the Alexa Voice Remote into pairing mode by pressing and holding the Home button for ten seconds, or until you see the Alexa Voice Remote LED rapidly flashing amber. -
Choose Continue.
After a short delay, Fire TV Edition displays a list of available Wi-Fi networks.
-
Choose your Wi-Fi network.
Fire TV Edition prompts you to enter the network password.
-
Use the Alexa Voice Remote navigation ring to enter each character in your network password, and then choose Connect.
If your network password requires one or more uppercase letters, you can switch to uppercase characters by choosing the aA button or by pressing Menu on the Alexa Voice Remote.Fire TV Edition connects to your network and then checks to see if there is an available update to Fire OS, the operating system that runs Fire TV Edition. If an update is available, Fire TV Edition downloads and installs the software, which can take a few minutes. Note that Fire TV Edition may restart during this process.
Eventually, Fire TV Edition asks which Fire TV experience you want to have.
-
Choose Full to get the most out of Fire TV.
Fire TV Edition asks you to sign in to your Amazon account.
-
Choose I Already Have an Amazon Account.
Fire TV Edition displays the Enter Your Amazon Login ID screen.
What if you don’t have an Amazon account? No problem. Choose I Am New to Amazon, and then use the Create Account screen to set up your account.
-
In the Email Address field, use the Alexa Voice Remote navigation ring to type your Amazon account’s email address, and then choose Next.
Fire TV Edition displays the Enter Your Amazon Account Password screen.
-
In the Password field, use the Alexa Voice Remote navigation ring to type your Amazon account’s password, and then choose Sign In.
By default, Fire TV Edition hides the password by displaying each character as a dot. If you want to make sure you entered the password correctly, choose the Show Password button.
If you’ve enabled two-factor authentication on your Amazon account (as I describe in Chapter 12), Fire TV Edition will prompt you to enter a code to verify the sign-in. Type the code that was sent to you, and then choose the Next button.Fire TV Edition confirms your Amazon credentials, signs in to your account, and then registers your Fire TV Edition device.