
Hour 18. Where Are We? Working with Location-Based Services
What You’ll Learn in This Hour
![]() Using geolocation
Using geolocation
![]() Mapping a location
Mapping a location
This hour covers what location-based services are and how to use them in Android. From Foursquare to GPS navigation to tagging places in Facebook posts, location can be a core feature for an app or a great enhancement. You’ll use several features for location-based support in Android. Most are included in the LocationManager class. Location-based services include determining your location with longitude and latitude, determining the address of your location, and mapping your location. In this hour, you learn to implement a location-based services solution using core Android libraries and using Google Play services.
Determining Location
An Android device can obtain your current location in several ways. A global positioning system (GPS) uses satellite data to determine location. The underlying technique is triangulation. If you know your distance from three points, then you can determine where you are. GPS relies on triangulating satellite data. If you are connected to a cellular network, the id of the cell tower that the device is connected to provides your location. The Wi-Fi network that the device is attached to can also be used as the source of location information. Multiple companies, including Google, can tie a specific Wi-Fi network to a specific location.
Each method has advantages and disadvantages. Generally, you must balance the accuracy of GPS with the lower power consumption of the other methods:
![]() GPS is very accurate but might not work inside or with an obstructed view of the sky. It consumes a significant amount of power and causes battery drain.
GPS is very accurate but might not work inside or with an obstructed view of the sky. It consumes a significant amount of power and causes battery drain.
![]() Cell id is less accurate than GPS but consumes little power.
Cell id is less accurate than GPS but consumes little power.
![]() Wi-Fi might be very accurate depending on whether a network is recognized. It also consumes little power.
Wi-Fi might be very accurate depending on whether a network is recognized. It also consumes little power.
Using cell tower and Wi-Fi data together gives a more accurate location than either method alone, and Android has built-in support for this technique.
Android permissions for location-based services include a coarse location and a fine location. You must set these permissions to use location in your app:
![]()
android.permission.ACCESS_FINE_LOCATION—The permission to use GPS.
![]()
android.permission.ACCESS_ COARSE_LOCATION—The permission to use the Android network provider. It uses both Wi-Fi and cell id for location.
Using LocationManager to Determine Location
LocationManager (android.location.LocationManager) is used to access to system location services on the device and to request location updates. Location-based services rely heavily on the use of LocationManager.
To begin using LocationManager, let’s start with a simple example that detects changes in location using GPS.
To do this, you need to:
![]() Set
Set android.permission.ACCESS_FINE_LOCATION
![]() Instantiate
Instantiate LocationManager
![]() Request location updates via GPS
Request location updates via GPS
![]() Listen for location changes
Listen for location changes
Listing 18.1 shows how to listen for location changes using GPS. It demonstrates several aspects of using the LocationManager. In Listing 18.1, changes in location are detected and acted on by an onLocationChanged() listener. By checking small distances and checking frequently, the current location is determined and made available to the app.
LISTING 18.1 Detecting Changes in Location Using GPS
1: public class MainActivity extends Activity {
2: TextView mDisplayTextView;
3: @Override
4: protected void onCreate(Bundle savedInstanceState) {
5: super.onCreate(savedInstanceState);
6: setContentView(R.layout.activity_main);
7: LocationManager locationManager = (LocationManager)
8: this.getSystemService(Context.LOCATION_SERVICE);
9: locationManager.requestLocationUpdates(LocationManager.GPS_PROVIDER,
10: 0, 0, locationListener);
11: mDisplayTextView = (TextView) findViewById(R.id.displayTextView);
12: }
13: LocationListener locationListener = new LocationListener() {
14: @Override
15: public void onLocationChanged(Location location) {
16: mDisplayTextView.setText(location.getLatitude() + ","
17: + location.getLongitude());
18: }
19: @Override
20: public void onProviderDisabled(String provider) {}
21: @Override
22: public void onProviderEnabled(String provider) {}
23: @Override
24: public void onStatusChanged(String provider, int status, Bundle
extras){}
25: };
26: }
In the onCreate() method on lines 7–8, the LocationManager is defined. Lines 9–10 make a request to begin receiving updates from the LocationManager.GPS_PROVIDER. Those updates will be sent to the LocationListener defined on lines 13–25.
You must implement four methods in the LocationListener, but you only have running code for the onLocationChanged() method that is on lines 15–17. When the location changes, you get the Location object that was passed as a parameter and display the latitude and longitude of the detected location. The parameters to onLocationChanged() include the minimum time in milliseconds between location updates and the minimum distance in meters between update changes. In this case, these are both set to 0. Figure 18.1 shows the result. Note the notification icon indicating location.

The Location Object
Listing 18.1 showed how to use the Location object that was passed the onLocationChanged() method to get the latitude and longitude of the location. Together, latitude and longitude provide a coordinate system for specifying any point on earth. Latitude describes the north-south position and is represented in degrees, ranging from the equator at zero degrees to the poles at 90 degrees. Longitude describes the east-west position. Greenwich, England is designated as the Prime Meridian with a longitude of zero degrees. The longitude for other locations is defined by the degree of difference east or west from the Prime Meridian, ranging from 180 degrees to –180 degrees.
Latitude and longitude specify a single point on earth. The Location object contains additional data including altitude, speed, accuracy, and the provider used. The Location object can also be used to determine the distance between two points or the distance to a specific location.
Using Criteria with Location Providers
Listing 18.1 used LocationManager.GPS_PROVIDER to detect changes in location. To use Wi-Fi and cell tower data, you can use LocationManager.NETWORK_PROVIDER in the same way.
An alternative to setting a specific provider is to set criteria for the provider to be used and request that the best provider be used. To do that, you use the Criteria class. You set the Criteria class to specific requirements for the location provider to get the best provider that meets the criteria. Listing 18.2 shows an example method for getting a provider by setting criteria. If no provider is available, the GPS_PROVIDER is used.
LISTING 18.2 Using Criteria to Set Location Providers
1: public String getProvider(){
2: Criteria criteria = new Criteria();
3: criteria.setAccuracy(Criteria.ACCURACY_FINE);
4: criteria.setSpeedRequired(true);
5: String providerName = mLocationManager.getBestProvider(criteria, true);
6: if (providerName != null) {
7: return providerName;
8: }else{
9: return LocationManager.GPS_PROVIDER;
10: }
11: }
To use the getProvider() method of Listing 18.2, the call to requestLocationUpdates() method would not specify a particular provider. Instead, it would call the getProvider() method:
mLocationManager.requestLocationUpdates(getProvider(), 0, 0, locationListener);
Getting the Last Known Location
Given a provider, you can use LocationManager to get the last known location specified by that provider. This is often the best starting point for determining location. To get the last known location specified by GPS, you would use the following:
mLocationManager.getLastKnownLocation(LocationManager.GPS_PROVIDER);
This method returns the last known location as a Location object. With the Location object, you can get the time that this location was specified as the last known location as well as the accuracy, provider, and other information.
Consider the case where GPS is disabled, but the user of the device is in a known Wi-Fi location. Getting the last known location for GPS is not helpful. To get the most accurate and up-to-date last known location, you can call getLastKnownLocation() for each location provider and check for the best results.
Listing 18.3 shows a basic example for this approach. In this case, all providers are retrieved on line 4. An iteration over the list of providers checks for the location that was used for the most recent update. A Location object is returned for the location that has the most recent date. The location.getTime() method used on line 8 returns the time as milliseconds since January 1, 1970 (UTC Time). A higher value returned by getTime() means a more recent update.
You can then check this location to see whether it was obtained within an acceptable time period. That is, the possibility exists that the last location time for all providers is more than an hour old, which might not meet your app’s criteria for being useful. The location might be stale.
If the location returned is fresh, you can use the provider for that location for updates. To get the provider, you use the Location method getProvider().
LISTING 18.3 Get Recent Locations for All Providers
1: public Location getRecentLocation() {
2: Location recentLocation = null;
3: long bestTime = 0;
4: List<String> matchingProviders = mLocationManager.getAllProviders();
5: for (String provider: matchingProviders) {
6: Location location = mLocationManager.getLastKnownLocation(provider);
7: if (location != null) {
8: long time = location.getTime();
9: if (time > bestTime) {
10: bestTime = time;
11: recentLocation = location;
12: }
13: }
14: }
15: return recentLocation;
16: }
The following is a sample result of logging the time of the last known GPS location and the most recent location update:
04-28 21:12:05.935: D/Location(23894): last: 41.255505247972906,-73.56329055503011
from gps at 18:49
04-28 21:12:05.943: D/Location(23894): last: 41.2553161,-73.5633479 from network at
21:12
The last GPS time was at 6:49 p.m. and the last network time was at 9:12 p.m. The log shows that 9:12 p.m. was the current time. Using the LocationManager.NETWORK_PROVIDER in this case gave more up-to-date locations.
Looking back at Listing 18.1, note the methods onProviderDisabled(), onProviderEnabled(), onStatusChanged() implemented in the onLocationChange() have to do with provider availability. To get the best location and to use the best available provider, you can implement these methods.
A post on the Android Developer blog called a “Deep Dive in Location” provides tips, code, and detailed techniques and examples on getting an up-to-date and accurate location for your app. Listing 18.3 is a simplified version of one of the techniques used in this post. See http://android-developers.blogspot.com/2011/06/deep-dive-into-location.html.
Taking Care of Loose Ends
You must take care to clean up some items when checking for location.
When you request location updates, you should stop listening when the updates are no longer needed. To do that, use the LocationManager removeUpdates() method and pass in the current listener:
protected void onStop() {
super.onStop();
mLocationManager.removeUpdates(locationListener);
}
The requestLocationUpdates() method takes time and distance parameters to determine the criteria for a location. Listing 18.1 used 0 time and 0 distance as examples. Define these parameters as appropriate for your app. For certain apps, 10 seconds and 10 meters might be accurate. One minute and 1000 meters might be appropriate for another app. The larger the numbers, the fewer system resources are used. If you are getting a location for a moment in time, then you can get the location using a high degree of time and accuracy, but then immediately stop listening for updates.
Before using a provider, you should check to see whether it is enabled. You do this using the isProviderEnabled() method in LocationManager. The provider is passed to this method and a boolean is returned:
if (mLocationManager.isProviderEnabled(LocationManager.GPS_PROVIDER)){
mLocationManager.requestLocationUpdates(LocationManager.GPS_PROVIDER, 0, 0,
locationListener);
}
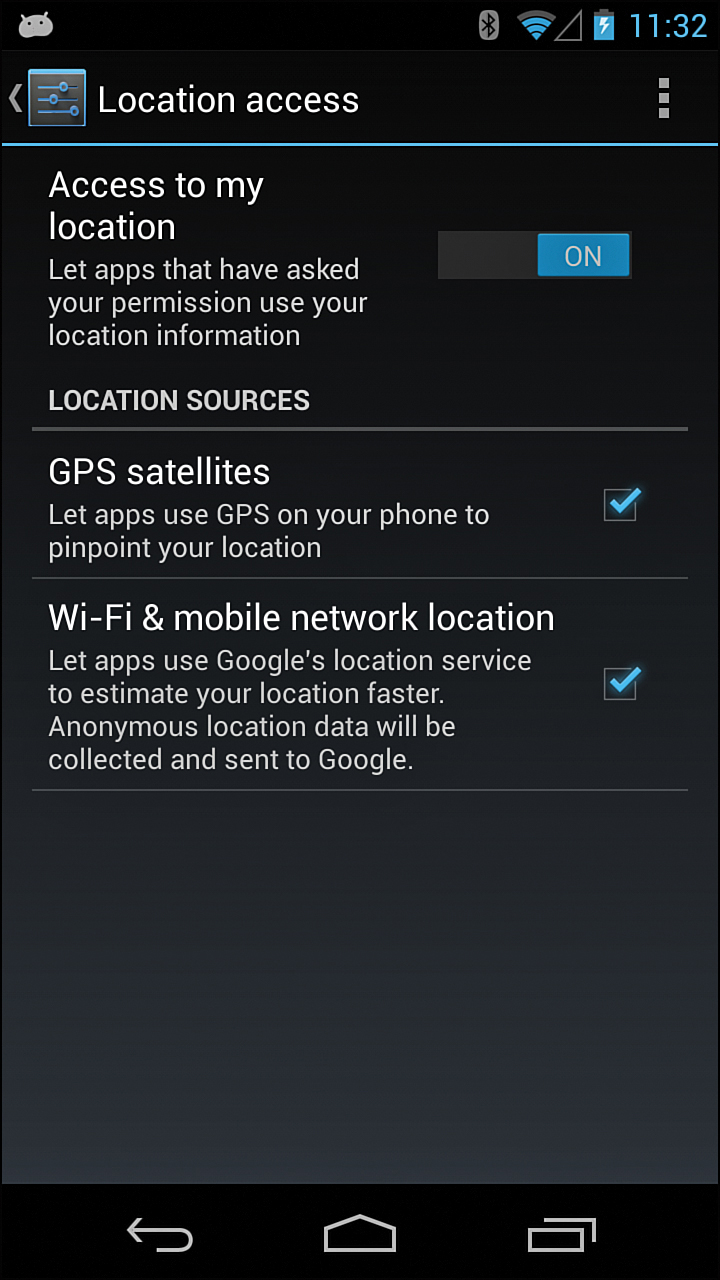
You enable and disable location providers in the Settings app, as shown in Figure 18.2.
Using Geocoding Services
Geocoding is the process of translating a description of a location into GPS coordinates (latitude, longitude, and sometimes altitude). Geocoding enables you to enter a place name, such as Eiffel Tower, into Google Maps (http://maps.google.com) and get the appropriate spot on the map. Many geocoding services also have reverse-geocoding abilities, which can translate raw coordinates into some form of address (usually a partial address).
Android devices might or might not have geocoding services available, and geocoding requires a back-end network service, so the device must have network connectivity to function. Different geocoding services support different types of descriptions, but the following are some of the most common ones:
![]() Names of towns, states, and countries
Names of towns, states, and countries
![]() Various forms of postal-style addresses (full and partial)
Various forms of postal-style addresses (full and partial)
![]() Postal codes
Postal codes
![]() Airport codes (for example, LAX, LHR, JFK)
Airport codes (for example, LAX, LHR, JFK)
![]() Famous landmarks
Famous landmarks
Many geocoding services also allow input of raw coordinates (latitude and longitude). Finally, geocoding services are often localized. An address in the United States will not follow the same format as an address in Canada or another country.
Geocoded addresses are often ambiguous, so a geocoding service might return multiple records. For example, if you were to try to resolve the address “Springfield,” you would likely get quite a few results because a town called Springfield is in 35 of the states in the United States and even more Springfields are outside of the U.S. You might also get results for places called “East Springfield” or “Springfield by the Sea,” for example. For the best results, choose a geocoding label, or address, that is the most specific. For example, use the zip code for your Springfield of choice instead of its name to resolve the coordinates.
Android Support for Geocoding
The Android SDK includes the Geocoder (android.location.Geocoder) class to provide geocoding and reverse-geocoding services. Instantiating the Geocoder class is a straightforward task:
Geocoder coder = new Geocoder(getApplicationContext());
Geocoding: Translating Addresses into Coordinates
You can use the getFromLocationName() method of the Geocoder class to resolve a location into coordinates. This method takes two parameters: the string containing the location information and the number of results you want returned. For example, the code in Listing 18.4 looks up a location for“White Plains, NY” and limits the number of results to 3.
LISTING 18.4 Get Recent Locations for All Providers
1: Geocoder coder = new Geocoder(getApplicationContext());
2: String locationToFind = "White Plains, NY";
3: List<Address> geocodeResults;
4: try {
5: geocodeResults = coder.getFromLocationName(locationToFind, 3);
6: for (Address address: geocodeResults){
7: Log.d("Location", locationToFind + " "
8: + address.getLatitude() +"," + address.getLongitude());
9: }
10: } catch (IOException e) {
11: // TODO Auto-generated catch block
12: e.printStackTrace();
13: }
Each resulting Address object (in this case, there are up to three) contains information about the location. You can use the getLatitude() and getLongitude() methods of the Address class to access the location’s coordinates. Depending on your implementation, you might want to give the user the option to choose the right location, or simply take the first Address and use it.
In this case, we just log all the results. The output in the log file for this snippet of code is as follows:
White Plains, NY 41.0339862,-73.7629097
Reverse-Geocoding: Translating Coordinates into Addresses
Using the Geocoder getFromLocation() method, you can translate raw latitude and longitude coordinates into address information. The parameters for the getFromLocation() method are the coordinates and the number of results to be returned. You can have some fun with this by enhancing the code in Listing 18.1. Rather than just displaying the latitude and longitude, you can pass that location data to the Geocoder getFromLocation() method. Listing 18.5 shows the modified onLocationChanged() for the LocationListener that was originally defined in Listing 18.1.
LISTING 18.5 Looking Up Locality by Coordinates
1: public void onLocationChanged(Location location) {
2: Geocoder coder = new Geocoder(getApplicationContext());
3: List<Address> geocodeResults;
4: try {
5: geocodeResults = coder.getFromLocation(location.getLatitude(),
6: location.getLongitude(), 1);
7: for (Address address: geocodeResults){
8: Log.d("Location", location.getLatitude()+"," + location.getLongitude()
9: +" : " +address.getLocality());
10: mDisplayTextView.setText(location.getLatitude()+"," + location.getLongitude()
11: +" : " +address.
getLocality());
12: }
13: } catch (IOException e) {
14: e.printStackTrace();
15: }
16: }
Listing 18.5 takes the latitude and longitude that was detected in the onLocationChanged() listener and uses those values to determine a locality. The Geocoder getFromLocation() method is used on line 5. The latitude, longitude, and number of results to retrieve are passed as parameters—in this case, one result. Lines 7–10 show to iterate through the results, log the data, and display it in the TextView in the activity. You can obtain additional data using the Address getLocality() method. Other Address data is available.
The result in the log is as follows:
41.2553163,-73.5633481 : Pound Ridge
Using the Geo Intent
Where are we? You have seen how to determine the location specified by latitude and longitude. You use that information to determine your locality by using reverse geocoding. The last location-based task to do is to map your location. Actually, you will use an ACTION_VIEW intent with location data. Any apps that handle a latitude and longitude will respond—typically a map application.
Location applications handle the ACTION_VIEW intent when supplied with a URI with geographic coordinates. This URI has a special format. You can launch the Maps application to a specific set of coordinates using the following URI format string:
geo:latitude,longitude
Here’s an example of how to create this URI string using the latitude and longitude from a location object:
String geoURI = "geo:" + location.getLatitude() +"," + location.getLongitude() ;
This special URI also includes a zoom level, which is a number between 1 and 23, where zoom level 1 shows the whole earth, level 2 shows a quarter of the earth, and each larger number shows a closer view. You use the following URI format string for zoom:
geo:latitude,longitude?z=level
Here’s how to format a URI string with the zoom level set to 8:
String geoURI = "geo:" + location.getLatitude() +"," + location.getLongitude() +
"?z="";
You use the String in this format and pass it to the parse() method of the Uri class to create the required Uri. You then use that Uri with the ACTION_VIEW intent, as follows:
Uri geo = Uri.parse(geoURI);
Intent geoMap = new Intent(Intent.ACTION_VIEW, geo);
startActivity(geoMap);
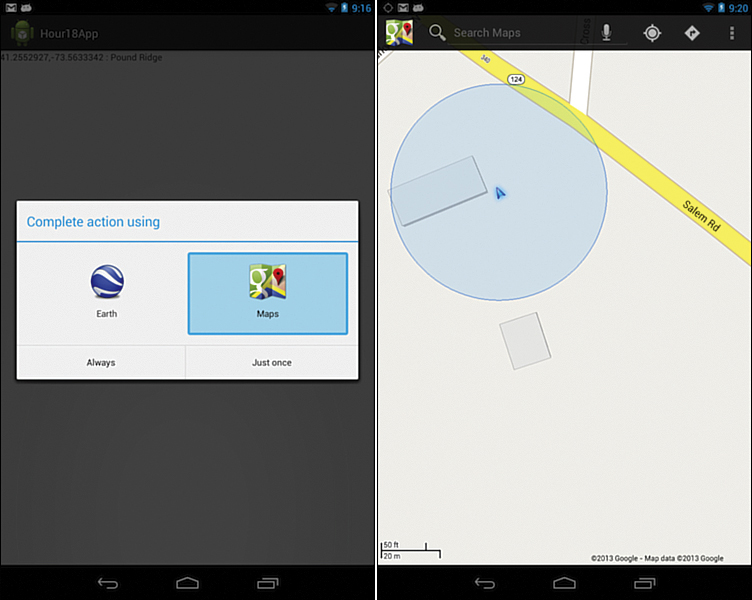
Any application that can handle URIs in this format will respond to the Intent. This will typically be the Google Maps implementation, but other apps might be available. Figures 18.3 and 18.4 show the user experience when both Google Maps and Google Earth are available. Both use the retrieved location data and display the appropriate location.

In addition using the geo URI, support for Google Street View is also available. The basic URI for Google Street View is as follows:
google.streetview:cbll=lat,lng
A number of additional parameters are available for Street View. For details, go to http://developer.android.com/guide/appendix/g-app-intents.htm.
Additional Location Features
You’ve seen how to use an ACTION_VIEW Intent to display a map. Another approach to maps is to use Google Maps Android API v2. The Maps API provides the ability to add icons, lines, and bitmaps to a map using a MapView or MapFragment objects. More information on how to download and use the API is available at https://developers.google.com/maps/documentation/android/.
The ProximityAlert that is available in the LocationManager class might also be useful for certain location-based services. It can help support the concept of geofencing, which is specifying a certain geographic location and having an app take an action when it is in that area. You add a ProximityAlert with the addProximityAlert() method of LocationManager. You specify a latitude, longitude, and radius to define the fenced-in area. The area is defined by a circle with the latitude and longitude as the center point. You can specify an expiration period. Using -1 indicates that there is no expiration. The final parameter to add is a PendingIntent, which fires an Intent when the device has entered or exited the specified area.
The Maps API and ProximityAlerts are additional tools to use in location-based services. The location features to use in an app are driven by the application needs. The ability to track a run or bike ride with GPS is different from the need to find a movie theater. Both apps might need location-based services, but the factors of accuracy, battery life, and the length that the location-based service is needed are different. If you have an app that tracks a bike ride, you don’t want it to miss part of the ride. If you need the address of the nearest movie theater, you don’t need to stay connected to GPS for that. The needs of your app determine the location-based services that are required.
Using Google Play Services
Google Play services allow your app to take advantage of Google services such as Maps, Google+, and now some location-based services. Google Play is not part of the Android OS. Google Play is a library that you can include in your project.
You can find more information on Google Play at http://developer.android.com/google/play-services/index.html.
The advantages of using Google Play location services are ease of use and accuracy. You do not need to specify Wi-Fi or GPS use or check all the providers for their last location. To use Google Play location services, you specify the desired accuracy of the location and frequency of the location checks.
The JellyBean release of Android 4.3 includes optimization for the Google Play location services. The API is the same, but if there is hardware support for geofencing, the Android 4.3 will use it. In addition, it is possible to scan a Wi-Fi network for location even if not connected to Wi-Fi. Both changes will extend the battery life of a device.
Not all devices have Google Play available, so checking is necessary. If Google Play services are not available, you can use the Android location features discussed earlier in this hour.
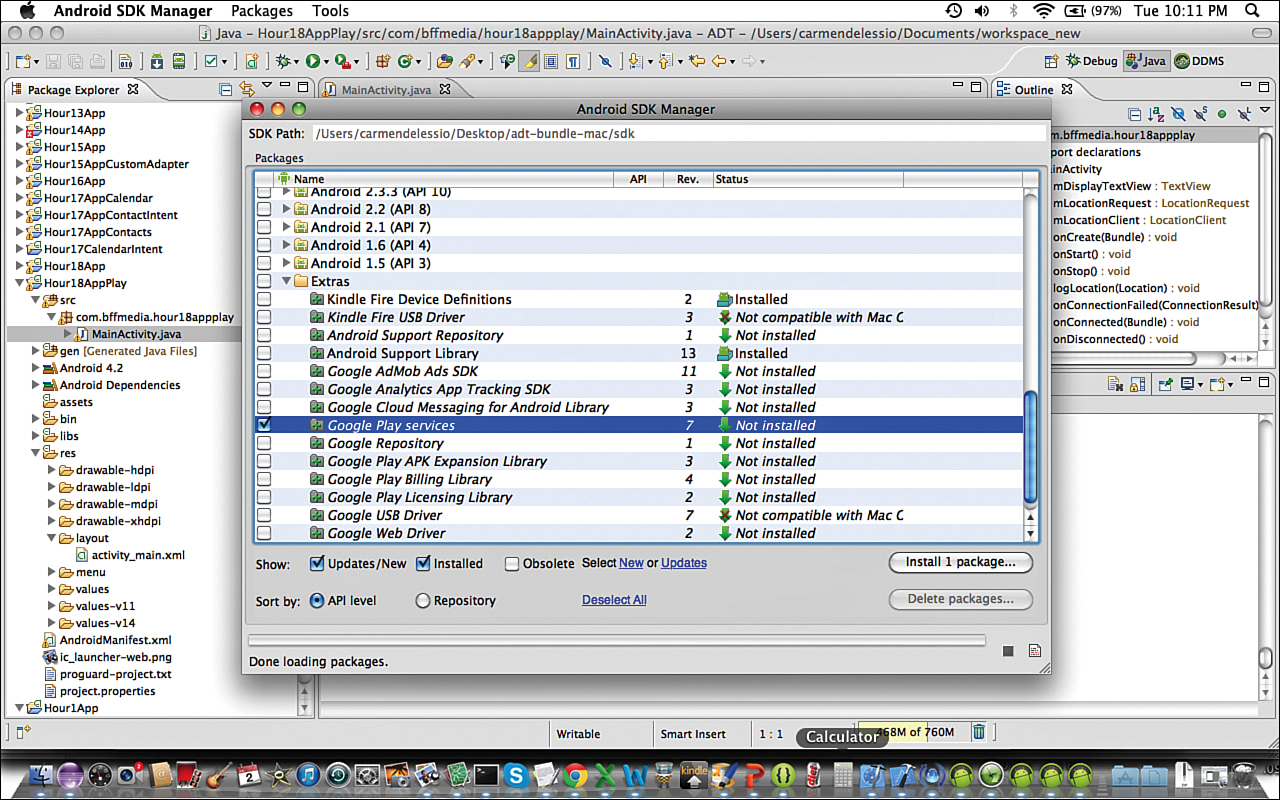
To install Google Play, use the SDK Manager in Eclipse. Choose Window, SDK Manager. Find the Google Play services package and install it. Figure 18.5 shows the SDK Manager with Google Play services selected.
After the Google Play installation, a library project is created in the directory where your android-sdk is installed. This is the directory that the Eclipse ADT installed to. In that directory is a subdirectory called sdk and another called eclipse. After installing Google Play services, the path in the sdk directory to the Google Play library is:
extras/google/google_play_services/libproject/google-play-services_lib/
Install this library project using Eclipse by choosing File, Import, Android, Existing Android Code into Workspace.
To use this library, you must refer to it from your current project. The Hour18AppPlay project that accompanies this hour contains the source code that uses this library.
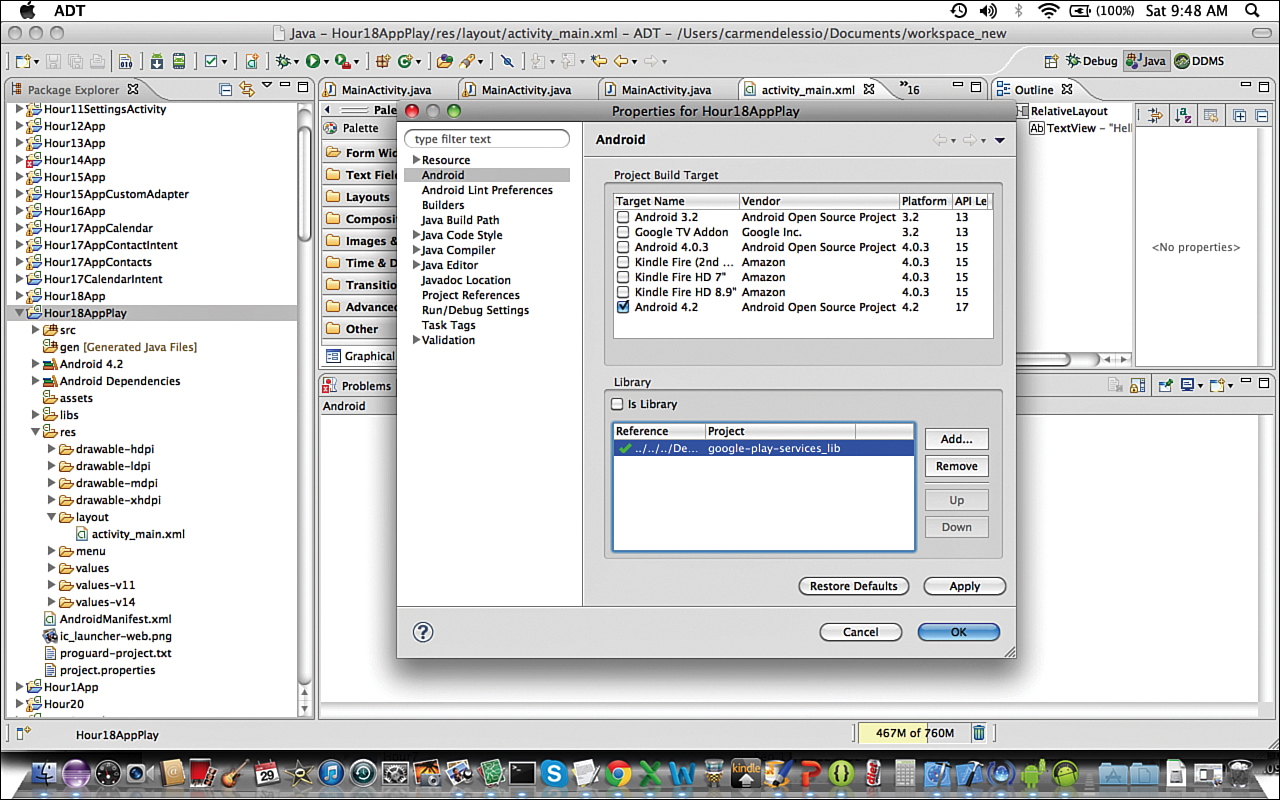
To add the library, choose Properties, Android and add the library as shown in Figure 18.6.
With the library set up, you can use the simplified location-based services. The Hour18AppPlay project includes MainActivity.java. The activity is similar to the earlier examples in this hour. The current location is determined and displayed.
To determine location, you use LocationListener, LocationRequest, and LocationClient classes. All are part of the Google Play library and are in the package com.google.android.gms.location. The full class name for LocationListener is com.google.android.gms.location.LocationListener.
In the onCreate() method in MainActivity, you instantiate a LocationClient and a LocationRequest. In the LocationRequest, set the priority to PRIORITY_HIGH_ACCURACY:
mLocationRequest = LocationRequest.create();
mLocationRequest.setPriority(LocationRequest.PRIORITY_HIGH_ACCURACY);
In the onStart() method, a check is made to see whether Google Play services are available. If they are available, then the LocationClient connects. If not, a Toast message appears:
int googlePayResult = GooglePlayServicesUtil.isGooglePlayServicesAvailable(this);
if (googlePayResult == ConnectionResult.SUCCESS ) {
mLocationClient.connect();
else{
Toast.makeText(this, "Google Play is not Available", Toast.LENGTH_LONG).show();
}
MainActivity implements LocationListener, at which time, one of the required methods, onLocationChanged(), is passed the current location. That location is used to update the display in the app.
Using Google Play services provides an accurate and easy-to-implement solution for location-based services. The result of the Hour18AppPlay project is the same as the Hour18App project. Both display the current location. Less code and complexity are involved when using Google Play services to implement location services.
Figure 18.7 shows a location being displayed in the Hour18AppPlay app.

Summary
In this hour, you learned the basics of how an Android device determines location. You saw how to build a simple app to demonstrate location features including getting the last known location and listening for location changes. This hour also discussed strategies for getting an accurate and current location. You saw how after determining a location, you can use reverse geocoding to retrieve information about the location and use an Intent to map the location.
Q&A
Q. What are some of the things that the Maps V2 API can do?
A. With the Maps API, you can place markers on a map to identify a location on a map. Markers respond to click events, so you can add more functionality. With the API, you can draw on the map and use map-specific UI features.
Q. What are some techniques for advanced location-based applications?
A. This hour covered listening for location changes and offered a basic strategy for getting the most recent known location. Additional techniques for getting accurate locations and using intent services and broadcast receivers for location changes are covered in the location Deep Dive blog post on the Android developers blog at http://android-developers.blogspot.com/2011/06/deep-dive-into-location.html.
Workshop
Quiz
1. Which is more accurate at determining location: LocationManager.NETWORK_PROVIDER or LocationManager.GPS_PROVIDER?
2. Given a latitude and longitude, what additional information can an app retrieve?
3. Is it true that when you retrieve the last known location for the GPS provider that you are guaranteed to receive up-to-the-minute information?
Answers
1. Typically, we would say that the LocationManager.GPS_PROVIDER is more accurate, but that just means if both the NETWORK_PROVIDER and GPS_PROVIDER are available, the GPS_PROVIDER will likely give a more accurate result. The problem is that the GPS_PROVIDER might not be available in certain situations in which case the NETWORK_PROVIDER will give better results.
2. Given a latitude and longitude, an Address object can be retrieved using reverse geocoding. The Address object gives us locale, country, and address information.
3. No; the last known location for any provider might be stale and out of date.
Exercise
Modify the app in this hour to retrieve data at 5-minute intervals with an accuracy of 100 meters. Display the full address of the location that you receive.
Optionally, create a ProximityAlert to detect that you are entering or leaving a specific area.