Chapter 1
Android Activities
In This Chapter
![]() Launching an activity
Launching an activity
![]() Going through an activity’s lifecycle
Going through an activity’s lifecycle
![]() Getting information from an activity
Getting information from an activity
On a desktop computer, everything starts with a window. Open a window, and run a word processor. Open another window, and read your email. Move a window, minimize a window, resize a window. It’s a very familiar story.
But mobile devices aren’t desktop computers. A smartphone has a relatively small screen, and if by chance you could open several windows at once, the phone’s processor would fall over from exhaustion. On a mobile phone, the “window” metaphor would lead to nothing but trouble.
Tablet devices have larger screens and better processors than their telephone cousins. You can probably squeeze a few windows on a tablet screen, but the power that you would allocate to window-handling could be put to better use.
So where does that leave you? The earliest computers had no windows and no multitasking. You can’t have that. Without some kind of multitasking, “smartphones” wouldn’t be smart.
Android’s first and foremost answer to all windowing questions is the activity. In other chapters, I refer to an activity as “one screenful of components.” I liken activities to online forms, such as “a form for entering information to make a purchase on a website.” I write, “Unlike most online forms, Android activities don’t necessarily have text boxes — places for the user to type credit card numbers and such. But Android activities have a lot in common with online forms.” I love quoting myself.
All about Activities
Here’s what the official Android docs say about an activity:
An activity is a single, focused thing that the user can do. Almost all activities interact with the user, so the Activity class takes care of creating a window for you in which you can place your UI with setContentView(View). While activities are often presented to the user as full-screen windows …
The android.app.Activity class’s code is a complete, official definition describing what an activity is and what an activity isn’t. But from an app designer’s point of view, no formal definition of activity paints the complete picture. So maybe the way to describe an activity is behaviorally. Here’s my informal description:
At some point during the run of an app, an app designer fills up the screen with stuff. At that point, the designer thinks, “I have to move all this stuff out of the way so the user can deal sensibly with whatever has become most important.” So the designer creates a new screen layout, codes the layout’s behavior, and refers to the whole business (the layout and its behavior) as a new activity.
At that (newer) point, the designer has two different activities — the original activity that filled up the screen with stuff and the new activity that deals with whatever has become most important. On a smaller device (a smartphone as opposed to a tablet), each activity fills the entire screen. The original activity invokes the new activity and then the new activity covers the original activity.
Under normal circumstances, the two activities form part of a stack — a first in, last out structure. Imagine that Activity A invokes Activity B, which in turn invokes Activity C. Then the activities A, B, and C form a stack, with Activity C being on top of the stack (and visible to the user). When the user presses the Back button, Activity C pops off the stack to reveal Activity B. When the user presses the Back button again, Activity B pops off the stack to reveal Activity A.
A stack of Android activities is called a task. So now you have apps, activities, and tasks. Unfortunately, these words have different meanings for Android developers than they have for the rest of the world.
An application is a collection of things meant to accomplish a particular user goal. Some of the things belonging to an app are activities.
 The other things belonging to an app are services, broadcast receivers, and content providers. I cover these things in Chapters 3, 4, and 5 of this minibook.
Each application runs in its own Android Linux process, with its own user ID. This is one of Android’s security strengths. Separate processes don’t share memory. So in effect, each application is sandboxed from the rest of the system, with very narrowly defined (tightly guarded) paths of communication between one application and another. If an application does something wrong (either maliciously or unintentionally), the chance of that wrongdoing affecting the rest of the system is limited. As a developer, you create an application using the XML <application> element in the app’s AndroidManifest.xml file.
An activity can (and frequently does) invoke activities belonging to other apps. (For example, an email message might contain a link. So an email app’s activity might invoke a web browser app’s activity.) That means that a particular task might contain activities from several applications. (See Figure 1-1.)

Figure 1-1: Activities, apps, and tasks.
The scenario often works this way:
-
The user starts an app. (Call it Application 1.)
Android creates a new process for the app, creates an instance of the app’s main activity, and puts the main activity onto a brand-new task stack. (Call it Task 1.)
-
From the app’s main activity, the user invokes another activity (say, a secondary activity belonging to the same app).
Android creates a new instance of the secondary activity. Android pushes the secondary activity onto the task stack. (See Figure 1-2.) The device’s screen displays only the secondary activity. (Think of the app’s main activity as being hidden underneath the secondary activity. Call the main activity Activity 1; call the secondary activity Activity 2.)
-
The user presses Home.
Android moves Task 1 off the screen and displays the Home screen, as shown in Figure 1-3.
-
The user starts a second app. (How about calling it Application 2?)
With Task 1 still waiting in the wings, Android creates a second task (Task 2) with the second app’s main activity.
-
The user presses Home again and presses the icon for Application 1.
See Figure 1-4. Android displays the top of the Task 1 stack. Activity 2 is still at the top of Task 1. So the user sees Activity 2. Happily, Activity 2 is in the same state as it was when the user first pressed Home. Text fields still have whatever text the user previously entered, and so on.
-
The user presses the Back button.
Android pops Activity 2 off the Task 1 stack and destroys this instance of Activity 2. The user sees Activity 1, which is in the same state as it was immediately before Android covered up Activity 1 with Activity 2.
-
From Activity 1, the user again invokes the secondary activity belonging to Application 1.
Android creates a brand-new instance of the secondary activity. Android pushes the secondary activity onto the task stack. The device’s screen displays only the secondary activity. This new instance is not in the same state that Activity 2 was in when Activity 2 was destroyed. This new instance is initialized with new values (which is normal for brand-new objects).

Figure 1-2: The user launches Activities 1 and 2.

Figure 1-3: After invoking Application 2, the user returns home.

Figure 1-4: The user dismisses Activity 2 and then invokes Activity 2.
The scenario in these steps can have many variations. For starters, the user doesn’t necessarily press buttons and icons in the order described in the steps. For another thing, a developer can change the way in which activities pile onto tasks. (See Chapter 2 in this minibook.) And Android has fragments, which are like activities but take up only part of a tablet device’s screen. (See Chapter 1 in Book V for more on fragments.)
State your intention
The Android programming model is based on the use of scarce resources. Compared to a desktop or laptop computer, a smartphone has a small screen, limited memory, and a wimpy processor. With that in mind, the original creators of Android focused on reuse.
Imagine that my app includes a link to my website. When the user clicks the link, Android opens a web browser. But which browser does Android open? Android comes with its own browser (a close cousin of Google’s Chrome browser). But the user might have also installed Firefox for Android, Opera Mini, or any number of other web browsers.
In the Windows and Mac operating systems, the choice of browser depends on filename extensions and protocol associations. For example, if I double-click the icon for a file named something
.html, the Chrome browser opens. But if I double-click the icon for a somethingElse
.torrent file, the Opera browser opens.
In Android, the developer invokes a browser by issuing an intent.
In Android development, an intent is like an open-ended method call. Instead of coding something like
firefox("http://www.google.com");
or
android_built_in_browser("http://allmycode.com/android");
you code the following:
String url = "http://allmycode.com/android";
Intent intent = new Intent(Intent.ACTION_VIEW);
intent.setData(Uri.parse(url));
startActivity(intent);
In this example, calling startActivity(intent) is like throwing an I-want-to-browse ball into the air and expecting another app’s activity to catch it. Another app announces its intentions to catch the I-want-to-browse ball by putting an element of the following kind in the app’s AndroidManifest.xml file:
<activity android:name=".Catcher"
android:label="Catcher">
<intent-filter>
<action
android:name="android.intent.action.VIEW" />
<category
android:name="android.intent.category.DEFAULT" />
<category
android:name="android.intent.category.BROWSABLE" />
<data android:scheme="http" />
</intent-filter>
</activity>
Again, I quote Android’s official documentation:
An intent is an abstract description of an operation to be performed. It can be used withstartActivityto launch anActivity… . An Intent provides a facility for performing late runtime binding between the code in different applications. Its most significant use is in the launching of activities, where it can be thought of as the glue between activities. It is basically a passive data structure holding an abstract description of an action to be performed.
In truth, Android has two kinds of intents — implicit and explicit intents.
-
The kind of intent that I describe in the previous paragraphs (to start any activity claiming to be a web browser) is an implicit intent. An implicit intent doesn’t call for a particular activity to be launched. Instead, an implicit intent names an action to be taken, along with other information required to fulfill the intent.
The intent
Intent intent = new Intent(Intent.ACTION_VIEW);intent.setData(Uri.parse(url));is an implicit intent.
I cover implicit intents in Chapter 2 of this minibook. -
An explicit intent actually names an activity class whose instance is to be launched.
In this chapter’s examples, I use explicit intents to launch activities. So the next section covers explicit intents.
The explicit intent
To use an explicit intent, you can write something like the code in Listing 1-1.
Listing 1-1: Calling Your Own App’s Activity Using an Explicit Intent
package my.pack;
import android.app.Activity;
import android.os.Bundle;
public class SomeActivity extends Activity {
// … code of some sort belongs here
Intent intent = new Intent();
intent.setClassName("my.pack", "my.pack.OtherActivity");
startActivity(intent);
}
In Listing 1-1, the intent’s setClassName method takes two String parameters. The first parameter is the name of the package containing the target activity, and the second parameter is the activity’s fully qualified class name. So in Listing 1-1, the call to setClassName has two strings containing "my.pack". (There may be a reasonable way to avoid repetition, where you’d write something like setClassName("my.pack", "OtherActivity"). But if there is one, no one’s told me about it.)
To invoke another app’s activity, you can write something like the code in Listing 1-2.
Listing 1-2: Calling Another App’s Activity Using an Explicit Intent
package my.pack;
import android.app.Activity;
import android.os.Bundle;
public class SomeActivity extends Activity {
// … code of some sort belongs here
intent = new Intent();
intent.setClassName("other.pack",
"other.pack.OtherAppActivity");
startActivity(intent);
}
Listing 1-2 is almost exactly like Listing 1-1. The only difference is that in Listing 1-2, the two activities (the invoking and the invoked activities) belong to two different applications. Different applications means different packages. So Listing 1-1 has "my.pack", and Listing 1-2 has "other.pack".
 If one project’s activity invokes another project’s activity, you must install both apps on your emulator or test device. If you forget to do so, your app crashes with the message Unable to find explicit activity in the Logcat panel. And when you see such a message, screaming “Whadaya mean, Unable to Find Activity?” won’t solve the problem.
 If one project’s activity invokes a second project’s activity, that second activity isn’t necessarily a main activity. (In technical terms, that second activity’s element in the
 AndroidManifest.xml file might not contain the <action android:name="android.intent.action.MAIN” /> element.) In many scenarios, the second project doesn’t even have a main activity of its own. When you choose Run ⇒ Run ‘app' for a project with no main activity, you see an Edit Configuration dialog box. In that case, select the Do Not Launch Activity option, and then click the Run button.
Using a context
Another way to start a specific activity is with a context. A context is an “interface to global information about an application environment.” (Again, I’m quoting the Android docs.) Informally, a context is the background information that you might want to know about the things that are actually happening. For an Android app, the Context Java object might include the app’s package name, the theme, the wallpaper, the names of files associated with the app, and pointers to location services, to user account services, and to other info. All this stuff is available programmatically by way of a Java Context object.
 The word programmatically describes something that you can access (and maybe even modify) in your project’s Java code.
An Android activity runs in a certain context. That makes sense. But here’s an idea that’s always been difficult for me to embrace: An activity is a context. It’s a context for two reasons (one being technical; the other being somewhat intuitive):
- In the Android SDK, the class
android.app.Activityis a subclass ofandroid.content.Context. - An activity has all the things that any context has — namely, the app’s package name, the theme, the wallpaper, the names of files associated with the app, and pointers to location services, to user account services, and other info.
In Listing 1-3, an activity calls another activity within the same application.
Listing 1-3: Calling Your Own App’s Activity Using an Explicit Intent with a Context
package my.pack;
import android.app.Activity;
import android.os.Bundle;
public class SomeActivity extends Activity {
// … code of some sort belongs here
Intent intent =
new Intent(this, OtherActivity.class);
startActivity(intent);
}
In Listing 1-3, the last two statements are really saying, “With this activity’s own context, start running an instance of OtherActivity.” (If all goes well, the class OtherActivity extends Android’s Activity class, and you’re good to go.)
In Listing 1-3, the Intent class’s constructor takes two parameters — a context and a Java class. The word this represents the enclosing SomeActivity instance. That’s good, because the constructor’s first parameter is of type Context, and Android’s Activity class is a subclass of the abstract Context class.
Compare Listings 1-2 and 1-3. In Listing 1-2, the intent learns the OtherActivity's package name from a call to intent.setClassName. But in Listing 1-3, the Intent constructor gets the OtherActivity's package name from this — the SomeActivity object’s context.
Each activity is part of an application, and an Application instance is also a context. So in many programs, you can use any of the following method calls (instead of this) to obtain a Context instance:
getContext()
getApplicationContext()
getBaseContext()
The getApplicationContext and getBaseContext methods have limited, specialized uses in Android programs. In this book’s examples, you’ll never need to call getApplicationContext or getBaseContext.
In Listing 1-4, an activity from one app uses a context to call another app’s activity.
Listing 1-4: Calling Another App’s Activity Using an Explicit Intent with a Context
package my.pack;
import android.app.Activity;
import android.os.Bundle;
public class SomeActivity extends Activity {
// … code of some sort belongs here
try {
otherContext =
createPackageContext("other.pack",
Context.CONTEXT_IGNORE_SECURITY |
Context.CONTEXT_INCLUDE_CODE);
} catch (NameNotFoundException e) {
e.printStackTrace();
}
Class<?> otherClass = null;
try {
otherClass = otherContext.getClassLoader().
loadClass("other.pack.OtherAppActivity");
} catch (ClassNotFoundException e) {
e.printStackTrace();
}
Intent intent = new Intent(otherContext, otherClass);
startActivity(intent);
}
Listing 1-4 is more complicated than Listing 1-3. But most of the complexity comes from the way Java loads classes. One way or another, Listing 1-4 creates an intent from a context and a class name, and then starts the intent’s activity.
The Activity Lifecycle
“And one man in his time plays many parts, His acts being seven ages.”
— from As You Like It, by William Shakespeare
The human lifecycle is infancy, childhood, adolescence, young adulthood, middle age, old age, and finally, the end.
Android activities have a lifecycle, too. Here are the stages:
- Active (or Running): The activity is in the foreground on the device’s screen at the top of a task stack. The user can interact with the activity.
- Stopped: The activity is on a task stack, but the activity isn’t visible. Maybe the activity isn’t at the top of its stack and other activities on the stack are covering up that activity. Alternatively, the activity isn’t visible because the device’s screen displays something that’s not part of this activity’s stack.
-
Paused: The Paused state is a kind of limbo between Active and Stopped. Officially, an activity is paused if it’s on the currently active stack but it’s partially obscured by another activity (such as a transparent activity or a non-full-screen activity that’s at the top of the stack).
In practice, an activity that’s transitioning from Active to Stopped goes through a brief period of being Paused, even if the user doesn’t see a “partially obscured” phase.
- Destroyed: How sad! But wait! Destroyed doesn’t mean “dead and gone forever.” Android might destroy an activity in order to revive it with a different configuration. Or Android might temporarily clobber an activity while the user isn’t actively using that activity.
Lifecycle methods
Most cultures have rites of passage. A rite of passage is something that you do when you transition from one life stage to another. For example, where I come from, a child does the following when transitioning to adolescence: “Ye shall stand at the highest point in all of thy land (which is normally the Dauphin Street station of the Frankford El train) and swing a raw fish thrice over thy head. All the while, thou shalt exclaim, ‘I shall be a troublesome, raving lunatic for the next few years.'”
Android activities have their own rites of passage, dubbed lifecycle methods. Figure 1-5 illustrates the methods.

Figure 1-5: The life, death, and rebirth of an Android activity.
Unlike people, activities don’t step predictably from one stage to the next. For example, a typical activity goes back and forth from being Active to Stopped and back to Active again, with several interludes of being Paused. And when Destroyed, an activity can unceremoniously be revived. For an activity, destruction and reconstruction are parts of the normal course of events.
An Android activity has seven lifecycle methods — namely, onCreate, onRestart, onStart, onResume, onPause, onStop, and onDestroy. In addition, an activity has a few onSomething
methods (such as onSaveInstanceState) that aren’t formally part of the lifecycle and aren’t guaranteed to be called. Anyway, Listing 1-5 contains a bunch of these methods.
Listing 1-5: Add Some Logging to Your Activity
package com.allmycode.demo1;
import android.app.Activity;
import android.content.res.Configuration;
import android.os.Bundle;
import android.view.View;
public abstract class MyActivity extends Activity {
abstract void logStuff(String message);
public void addBreak(View view) {
logStuff("------");
}
/** Called when the activity is created (either
* for the first time or after having been
* Destroyed. */
@Override
public void onCreate(Bundle savedInstanceState) {
super.onCreate(savedInstanceState);
logStuff("onCreate");
}
/** Called when the activity transitions to
* Paused (on its way to Active) after having
* been Stopped.
*/
@Override
public void onRestart() {
super.onRestart();
logStuff("onRestart");
}
/** Called when the activity transitions to
* Paused (on its way to Active), either for
* the first time or after the activity has
* been Stopped.
*/
@Override
public void onStart() {
super.onStart();
logStuff("onStart");
}
/** Called when the activity transitions
* from Paused to Active.
*/
@Override
public void onResume() {
super.onResume();
logStuff("onResume");
}
/** Never called unless you set
* android:configChanges in the
* AndroidManifest.xml file.
*/
@Override
public void onConfigurationChanged
(Configuration config) {
super.onConfigurationChanged(config);
logStuff("onConfigurationChanged");
}
/** Usually (but not always) called during the
* transition from Active to Paused, or during
* the transition from Paused to Stopped.
*/
@Override
public void onSaveInstanceState(Bundle state) {
super.onSaveInstanceState(state);
logStuff("onSaveInstanceState");
}
/** Called when the activity transitions from
* Active to Paused.
*/
@Override
public void onPause() {
super.onPause();
logStuff("onPause");
}
/** Called when the activity transitions from
* Paused to Stopped.
*/
@Override
public void onStop() {
super.onStop();
logStuff("onStop");
}
/** Called when the activity transitions from
* Stopped to Destroyed.
*/
@Override
public void onDestroy() {
super.onDestroy();
logStuff("onDestroy");
}
}
My goal in creating Listing 1-5 is to provide logging that helps you see the lifecycle methods in action. You can drop Listing 1-5 into almost any app to get a Burd’s-eye view of your activities and their transitions. To this end, I’ve created an app that lets you bounce back and forth among different kinds of activities. Listings 1-6, 1-7, and 1-8 describe the app’s main activity, and Figure 1-6 shows the main activity’s screen.

Figure 1-6: The main activity’s screen.
Listing 1-6: The com.allmycode.demo1.Demo1Activity Class
package com.allmycode.demo1;
import android.content.Intent;
import android.os.Bundle;
import android.util.Log;
import android.view.View;
public class Demo1Activity extends MyActivity {
@Override
public void onCreate(Bundle savedInstanceState) {
super.onCreate(savedInstanceState);
setContentView(R.layout.main);
}
@Override
void logStuff(String message) {
Log.i("Demo1Activity", message);
}
public void startOtherActivity(View view) {
Intent intent = new Intent();
intent.setClassName("com.allmycode.demo1",
"com.allmycode.demo1.OtherActivity");
startActivity(intent);
}
public void startOtherAppActivity(View view) {
Intent intent = new Intent();
intent.setClassName("com.allmycode.demo1A",
"com.allmycode.demo1A.OtherAppActivity");
startActivity(intent);
}
public void startTransparentActivity(View view) {
Intent intent = new Intent();
intent.setClassName("com.allmycode.demo1",
"com.allmycode.demo1.TranslucentActivity");
startActivity(intent);
}
}
Listing 1-7: The Activity’s Layout File
<?xml version="1.0" encoding="utf-8"?>
<LinearLayout xmlns:android=
"http://schemas.android.com/apk/res/android"
android:orientation="vertical"
android:layout_width="fill_parent"
android:layout_height="fill_parent">
<TextView android:layout_width="fill_parent"
android:layout_height="wrap_content"
android:text="@string/hello" />
<Button android:layout_width="wrap_content"
android:id="@+id/button1"
android:onClick="startOtherActivity"
android:layout_height="wrap_content"
android:text="@string/start_this_app_other">
</Button>
<EditText android:layout_height="wrap_content"
android:id="@+id/editText"
android:layout_width="match_parent"
android:hint="Type anything here">
<requestFocus></requestFocus>
</EditText>
<include android:id="@+id/include1"
android:layout_width="wrap_content"
layout="@layout/add_break"
android:layout_height="wrap_content">
</include>
<Button android:id="@+id/button2"
android:layout_width="wrap_content"
android:layout_height="wrap_content"
android:onClick="startOtherAppActivity"
android:text="@string/start_other_app">
</Button>
<Button android:id="@+id/button3"
android:layout_width="wrap_content"
android:layout_height="wrap_content"
android:onClick="startTransparentActivity"
android:text="@string/start_translucent">
</Button>
</LinearLayout>
Listing 1-8: The add_break.xml File
<?xml version="1.0" encoding="utf-8"?>
<LinearLayout xmlns:android=
"http://schemas.android.com/apk/res/android"
android:orientation="vertical"
android:layout_width="match_parent"
android:layout_height="match_parent"
android:gravity="center">
<Button android:id="@+id/button1"
android:layout_width="wrap_content"
android:layout_height="wrap_content"
android:onClick="addBreak"
android:text="@string/add_break">
</Button>
</LinearLayout>
I cover most of the Android coding tricks from Listings 1-6, 1-7, and 1-8 in Book I, Chapters 4 through 6. But these listings form the basis for an app that lets you experiment with the activity lifecycle. The next section describes what the widgets in Figure 1-6 (and a few other buttons) do.
 The next section describes a number of experiments involving the code in Listings 1-6, 1-7, 1-8, and 1-9, and some other Android code. To try the experiments yourself, download all the code from this book’s website (
www.allmycode.com/android
).
Taking an activity lifecycle through its paces
No two lives are the same, so it would make sense that there is an infinite variety as well to the lifecycles of individual activities. If you dutifully followed my advice about downloading the code from Listings 1-6, 1-7, 1-8, and 1-9 from this book’s website, you can follow along as I demonstrate the kinds of curveballs I can throw at an activity lifecycle.
Starting another activity in the same app
In Figure 1-6, you can click the Start This App’s Other Activity button to cover up the main activity with another activity from the same application. When you click the button, Android Studio’s Logcat panel displays the following entries:
1416-1416/com.allmycode.demo1 I/Demo1Activity: onPause
1416-1416/com.allmycode.demo1 W/OtherActivity: onCreate
1416-1416/com.allmycode.demo1 W/OtherActivity: onStart
1416-1416/com.allmycode.demo1 W/OtherActivity: onResume
1416-1416/com.allmycode.demo1 I/Demo1Activity:
onSaveInstanceState
1416-1416/com.allmycode.demo1 I/Demo1Activity: onStop
An OtherActivity instance goes from not existing to being Active, and the Demo1Activity instance goes from being Active to being Stopped.
In Listing 1-6, I code Demo1Activity's logStuff method with an i for INFO. And in the OtherActivity (which you can download from this book’s website), I code logStuff with a w for WARN. I don’t mean to imply that OtherActivity's methods are more important than Demo1Activity's methods. I use INFO and WARN because Android Studio’s Logcat panel displays different levels (such as INFO and WARN) with different colors. So, on your computer screen, you can distinguish one activity’s entries from another with a casual glance. In this book, instead of asking for four-color printing, I set some of the entries in boldface type.
By default, Android Studio filters entries in the Logcat panel so you see only your own app’s entries. To change or remove this filter, see Book I, Chapter 5.
Taking a break
In Figure 1-6, you can click the Add Break in Log File button to add an entry whose message is a dashed line. Press this button to help keep track of the parts in a long log file.
The Back button
Your device’s Back button pops an activity off the task stack.
Imagine that with Demo1Activity and OtherActivity on the stack, you press the Back button. As a result, Android Studio’s Logcat panel displays the following entries:
1416-1416/com.allmycode.demo1 W/OtherActivity: onPause
1416-1416/com.allmycode.demo1 I/Demo1Activity: onRestart
1416-1416/com.allmycode.demo1 I/Demo1Activity: onStart
1416-1416/com.allmycode.demo1 I/Demo1Activity: onResume
1416-1416/com.allmycode.demo1 W/OtherActivity: onStop
1416-1416/com.allmycode.demo1 W/OtherActivity: onDestroy
Notice that pressing the Back button destroys the OtherActivity instance.
Saving (and not saving) an activity’s state
In Figure 1-6, the Type Anything Here text field helps you understand when an activity’s state is preserved (and when it’s not).
Try this experiment:
-
Type something in the text field and then click the Start This App’s Other Activity button.
OtherActivityobscuresDemo1Activity, andDemo1Activityis Stopped. -
Dismiss
OtherActivitywith the Back button.The
Demo1Activityreappears with your typed characters still in the text field. In spite ofDemo1Activity's being stopped, Android has preserved the state ofDemo1Activity.
Try another experiment:
-
Type something in the text field and then click the Home button.
The Home screen appears, and
Demo1Activityis Stopped. -
Find the Demo1 icon and touch the icon to invoke
Demo1Activity.The
Demo1Activityreappears with your typed characters still in the text field. Android has preserved the state of theDemo1Activity.Pressing Home is like telling Android, “I want to do something else while the current activity goes into ‘suspended animation.'”
Here’s another experiment:
-
Type something in the text field and then click the Back button.
The
Demo1Activity's screen goes away. In the Logcat panel, you seeDemo1Activityexecute itsonPause,onStop, andonDestroymethods. -
Find the Demo1 icon and touch the icon to invoke
Demo1Activity.The
Demo1Activityreappears, but the Type Anything Here text field has been reinitialized. Android hasn’t preserved theDemo1Activity's state.Pressing Back is like saying to Android, “I’m done with this activity. Get me out ‘a' here!”
In the next experiment, you create a workaround for the behavior of Android’s Back button.
- Modify the first several lines of the
Demo1Activityas follows:
package com.allmycode.demo1;
import android.content.Intent;
import android.content.SharedPreferences;
import android.os.Bundle;
import android.util.Log;
import android.view.View;
import android.widget.EditText;
public class Demo1Activity extends MyActivity {
EditText editText;
@Override
public void onCreate(Bundle savedInstanceState) {
super.onCreate(savedInstanceState);
setContentView(R.layout.main);
editText = (EditText) findViewById(R.id.editText);
}
@Override
public void onPause() {
super.onPause();
SharedPreferences prefs =
getPreferences(MODE_PRIVATE);
SharedPreferences.Editor editor = prefs.edit();
editor.putString("EditTextString",
editText.getText().toString());
editor.commit();
}
@Override
public void onResume() {
super.onResume();
SharedPreferences prefs =
getPreferences(MODE_PRIVATE);
String str = prefs.getString("EditTextString", "");
editText.setText(str);
}
// You don’t have to add any code below this point
@Override
void logStuff(String message) {
// … Et cetera
-
Choose Run ⇒ Run ‘app'.
The app starts running with your modified
Demo1Activitycode. -
Type something in the text field and then click the Back button.
The
Demo1Activity's screen goes away. In the Logcat panel, you seeDemo1Activityexecute itsonPause,onStop, andonDestroymethods. -
Find the Demo1 icon and touch the icon to invoke
Demo1Activity.The
Demo1Activityreappears with your typed characters still in the text field. Android didn’t automatically preserve theDemo1Activity's state, but you usedSharedPreferencesto save the state and then to restore the state.
To save an activity’s relevant information, put your SharedPreferences code in the onPause method. Don’t wait to save the information in the onStop or onDestroy method.
The code in this experiment uses SharedPreferences. For more about SharedPreferences, see Chapter 3 in this minibook.
Here’s your next experiment:
-
If you followed the previous set of instructions and added
SharedPreferencescode, remove that code.You can remove the entire
onPausemethod. Remove theonResumemethod, too. - Choose Run ⇒ Run ‘app' to get the app running again.
- When the app starts running, type something in the text field.
-
Turn your device sideways.
If you’re running an emulator, you can do a virtual turn by pressing Ctrl+F11. Your activity’s screen adjusts (from portrait to landscape or vice versa), and your typed characters are still in the text field.
But when you look at Android Studio’s Logcat panel, you see the following entries:
1437-1437/com.allmycode.demo1 I/Demo1Activity: onPause
1437-1437/com.allmycode.demo1 I/Demo1Activity:
onSaveInstanceState
1437-1437/com.allmycode.demo1 I/Demo1Activity: onStop
1437-1437/com.allmycode.demo1 I/Demo1Activity:
onDestroy
1437-1437/com.allmycode.demo1 I/Demo1Activity: onCreate
1437-1437/com.allmycode.demo1 I/Demo1Activity: onStart
1437-1437/com.allmycode.demo1 I/Demo1Activity: onResume
Surprise! In order to rotate your activity’s screen, Android destroys and then re-creates the activity. And between destruction and subsequent creation, Android preserves your activity instance’s state. The text field’s content is restored.
This leads you to another experiment:
- Add the following attribute to the
Demo1Activity's<activity>element in theAndroidManifest.xmlfile:android:configChanges="orientation|screenSize" -
Run the app and change the orientation of the emulator or the device.
You see the following entry in Android Studio’s Logcat panel:
8556-8556/com.allmycode.demo1 I/Demo1Activity﹕onConfigurationChangedThe
android:configChanges="orientation|screenSize"attribute tells Android to notify the activity about changes in the device’s orientation or the size of the screen. So, if you tilt the device sideways, Android doesn’t do the usual routine of destroying and re-creating the activity. Instead, Android calls the activity’sonConfigurationChangedmethod. In Listing 1-5, a call to theonConfigurationChangedmethod creates a log entry to record the event.
In the expression orientation|screenSize, the character between the words orientation and screenSize is your keyboard’s pipe symbol. When used this way, the pipe symbol stands for the word or. That is, Android calls the activity’s onConfigurationChanged method if either the device’s orientation changes or the size of the screen changes. Starting with API Level 13, Android considers a tilt of the device to be a change in screen size. So, if you want your activity to handle its own orientation changes, you must put both orientation and screenSize in the activity’s android:configChanges attribute.
Using the android:configChanges attribute, you intercept Android’s default actions when the user tilts the device. You can then handle the orientation change with your own onConfigurationChanged method. But the official documentation recommends against doing this. And, in giving this advice, the Android docs are probably correct. Here’s one reason why:
With very little tinkering, you can specify two different layouts for your activity — a portrait mode layout and a landscape mode layout. (For details, see Book IV, Chapter 1.) When the user tilts the device, Android can automatically switch from one layout to the other. This ensures that your app looks good no matter how the user holds the device. The trouble is, if you override the default behavior using the android:configChanges attribute, the system doesn’t automatically switch layouts. You have to remember to switch layouts in your activity’s onConfigurationChanged method. At best, this means more coding work for you. At worst, you forget to modify the onConfigurationChanged method, and your app looks crummy when the user tilts the device.
Here’s one more experiment:
-
If you followed the previous set of instructions and added an
android:configChangesattribute in theAndroidManifest.xmlfile, remove that attribute.Actually, any newly created Android project will do just fine.
- Add the following method to your
MainActivitycode.@Overridepublic void onDestroy() {super.onDestroy();Log.i("MainActivity", Boolean.toString(isFinishing()));} - Run the app.
-
On the emulator or the physical device, tap the Back button.
When you do, you see
I/MainActivity: truein the Logcat panel. Android calls your activity’sonDestroymethod, and a call to theonFinishingmethod returnstrue. - Run the app again.
-
Tilt the emulator sideways (by pressing Ctrl+F11) or tilt the physical device sideways.
When you do, you see
I/MainActivity: falsein the Logcat panel. Android calls your activity’s onDestroy method, but a call to theonFinishingmethod returnsfalse.By calling the
onFinishingmethod, you can distinguish a device-tiltonDestroycall from a Back buttononDestroycall. That’s nice.
Starting another app’s activity
In Figure 1-6, you can click the Start Other App’s Activity button to cover up the main activity — you essentially cover the main activity with an activity from a different application. When you click the button, Android Studio’s Logcat panel displays the following entries:
4150-4150/com.allmycode.demo1 I/Demo1Activity: onPause
4150-4150/com.allmycode.demo1 I/Demo1Activity:
onSaveInstanceState
4150-4150/com.allmycode.demo1 I/Demo1Activity: onStop
4471-4497/com.allmycode.demo1A V/OtherAppActivity: onCreate
4471-4497/com.allmycode.demo1A V/OtherAppActivity: onStart
4471-4497/com.allmycode.demo1A V/OtherAppActivity: onResume
To see the OtherActivity lines in the Logcat panel, look for a drop-down list displaying a package name (probably com.allmycode.demo1) just above that panel. In that drop-down list, select the package containing OtherActivity (most likely, the package com.allmycode.demo1A). And, by the way, if you see No Debuggable Applications in the drop-down list, choose Tools ⇒ Android ⇒ Enable ADB Integration in Android Studio’s main menu.
One difference between these entries and the entries in previous examples is that these entries use two PID numbers. In this example, the Demo1Activity has PID 4150, and the OtherAppActivity has PID 4471. As promised, two different apps run in two different operating system processes, and each process has its own PID. You can get independent verification of this fact by examining the Devices panel in the Android Device Monitor.
To see the Devices panel, do the following:
- Choose Tools ⇒ Android ⇒ Android Device Monitor.
-
In the Android Device Monitor’s menu, choose Window ⇒ Open Perspective ⇒ DDMS (default).
With the DDMS perspective open, the Devices panel is on the right side of the Android Device Monitor.
Figure 1-7 shows you the Devices panel.

Figure 1-7: The Devices panel.
In Figure 1-7, the process running Demo1Activity (in package com.allmycode.demo1) has PID 4150. And the process running OtherAppActivity (in package com.allmycode.demo1A) has PID 4471.
Overloading the system
As the sun sets on the “Starting another app’s activity” section, you’re running two com.allmycode processes. (Refer to Figure 1-7.) On your emulator’s screen, the com.allmycode.demo1.Demo1Activity is obscured by the com.allmycode.demo1A.OtherAppActivity.
So you can conduct another experiment:
-
Get your emulator (or device) in the state described at the end of the “Starting another app’s activity” section.
To do so, start the app whose main activity is in Listing 1-6. Then click the Start Other App’s Activity button.
-
Press the emulator’s Home button.
See Figure 1-8. You’re not pressing the Back button, so you’re not backing out of the
OtherAppActivityor theDemo1Activity. Those two activities are Stopped, not Destroyed. (You can verify this by looking at the Android Studio’s Logcat panel.) -
In Android Studio, open the Hog app that I’ve included in the download for this book. Run that Hog app in the same emulator or device that you used in Step 1.
My Hog app’s sole purpose is to inundate your emulator with processes. The Hog app displays a button with a number on it. (See Figure 1-9.) The button’s number tells you how many processes the Hog has launched. When you click the button, the app starts a new process running on your emulator and increments the number on the button.
-
Keep an eye on Android Studio’s Devices panel as you repeatedly click the Hog app’s button.
You can see a list of Hog processes in the Devices panel. (See Figure 1-10.)
To flood the emulator with processes, my Hog app adds an android:processattribute to each of the app’s activities. I also use some really messed-up, repetitive code.At some point, you see the
com.allmycode.demo1process disappear from the Devices pane. (For me, this happens when I start the 16th process, but your mileage may vary. See Figure 1-11.) Android has reclaimed memory by killing off a process. After all, thecom.allmycode.demo1.Demo1Activityinstance is Stopped, so Android figures it can destroy that activity. Thecom.allmycode.demo1A.OtherAppActivityis also Stopped. But the last time you sawOtherAppActivity, that activity was at the top of a task stack.Android kills a process in order to reclaim space, and the user has no clue that the process has been killed. This is business as usual for the Android operating system.
At this point in the experiment, the
Demo1Activityis Stopped, the activity’s process has been killed, and the activity isn’t on top of its current task. -
Press Home and then the Apps button to return to the emulator’s Apps screen, and click the Demo1 icon (the icon for the
com.allmycode.demo1.Demo1Activityinstance).The
OtherAppActivityreappears on the screen. (See Figure 1-12.) Android interprets your click as a wish to return to the top of the task stack containingDemo1Activity, and not toDemo1Activityitself. In the Logcat panel,OtherAppActivityhas been created, started, and resumed.1796-1796/com.allmycode.demo1A V/OtherAppActivity:onCreate1796-1796/com.allmycode.demo1A V/OtherAppActivity:onStart1796-1796/com.allmycode.demo1A V/OtherAppActivity:onResumeIn Android Studio’s Devices pane, you still don’t see
com.allmycode.demo1. The Logcat panel might be filtering for the com.allmycode.hogapp, in which case, you don’t seecom.allmycode.demo1orcom.allmycode.demo1Aentries. If this is the case, select No Filters in the drop-down box in the upper-right corner of the Logcat panel. Then, to filter fordemo1anddemo1Aentries, typedemoin the search field immediately above the Logcat panel. -
Press the emulator’s Back button.
Android remembers that
com.allmycode.demo1.Demo1Activitywas hidden (conceptually) underneathOtherAppActivityon the task stack. Because thecom.allmycode.demo1process no longer exists, Android creates a new process with a new PID to run thecom.allmycode.demo1.Demo1Activitycode.As a result,
Demo1Activityappears on your emulator’s screen,com.allmycode.demo1reappears in Android Studio’s Devices panel with a new PID, and the following entries appear in Android Studio’s Logcat panel:1796-1796/com.allmycode.demo1A V/OtherAppActivity:onPause1819-1819/: V/Demo1App: onCreate1819-1819/: I/Demo1Activity: onCreate1819-1819/: I/Demo1Activity: onStart1819-1819/: I/Demo1Activity: onResume1796-1796/com.allmycode.demo1A V/OtherAppActivity:onStop1796-1796/com.allmycode.demo1A V/OtherAppActivity:onDestroyUnbeknownst to the user, Android has restored the
Demo1Activityin a new process.

Figure 1-8: As the user browses, a task hides in the shadows.

Figure 1-9: The Hog app.

Figure 1-10: The Devices panel shows you some Hog processes.

Figure 1-11: The package com.allmycode.demo1 has disappeared.

Figure 1-12: Returning to a task.
Partially covering an activity
In Figure 1-6, clicking the Start Translucent Activity button does what you think it should do. The button makes Android invoke a see-through activity. (App development terminology tends to blur the difference between “translucent” and “transparent.” Get it? “Blur” the difference?) Of course, you can’t invoke a translucent activity unless you have a translucent activity to invoke. So Listing 1-9 shows you how to create a translucent activity.
Listing 1-9: The AndroidManifest.xml File for One of This Chapter’s Big Projects
<?xml version="1.0" encoding="utf-8"?>
<manifest xmlns:android=
"http://schemas.android.com/apk/res/android"
package="com.allmycode.demo1"
android:versionCode="1"
android:versionName="1.0">
<uses-sdk android:minSdkVersion="8" />
<application android:icon="@drawable/icon"
android:label="@string/app_name"
android:name=".Demo1App">
<activity android:name=".Demo1Activity"
android:label="@string/app_name" >
<intent-filter>
<action android:name=
"android.intent.action.MAIN" />
<category android:name=
"android.intent.category.LAUNCHER" />
</intent-filter>
</activity>
<activity android:name=".OtherActivity" />
<activity android:name=".TranslucentActivity"
android:theme=
"@android:style/Theme.Translucent" />
</application>
</manifest>
To create a translucent activity, create a Java class that extends Android’s Activity class. Then, in your AndroidManifest.xml file, declare the activity’s theme to be Android’s predefined Theme.Translucent style.
My TranslucentActivity class has only one button — an Add Break in Log File button in the center of the activity. So, after pressing the Start Translucent Activity button in Figure 1-6, I see the stuff in Figure 1-13. True to its word, Android superimposes the Translucent Activity’s button on top of the next activity on the stack.

Figure 1-13: A translucent activity on top of another activity.
Referring to the list of activity states described at the beginning of this section, one of the Paused state’s duties is to house activities that are partially obscured. So, if you look at Android Studio’s Logcat panel after clicking the Start Translucent Activity button, you see the following entries:
1419-1419/com.allmycode.demo1 I/Demo1Activity: onPause
1419-1419/com.allmycode.demo1 W/TranslucentActivity: onCreate
1419-1419/com.allmycode.demo1 W/TranslucentActivity: onStart
1419-1419/com.allmycode.demo1 W/TranslucentActivity: onResume
1419-1419/com.allmycode.demo1 I/Demo1Activity:
onSaveInstanceState
Demo1Activity pauses but doesn’t stop.
Getting Results Back from an Activity
In Book I, Chapter 6, I compare an intent to a method call. To start an activity, you don’t call a method. Instead, you fire up an intent.
So far, so good. But what feature of an intent takes the place of a method call’s return value? Listings 1-10 and 1-11 have the answer.
Listing 1-10: An Activity Asks for a Result
package com.allmycode.results;
import android.app.Activity;
import android.content.Intent;
import android.os.Bundle;
import android.view.View;
import android.widget.TextView;
public class GetResultActivity extends Activity {
final int MY_REQUEST_CODE = 42;
TextView textView;
@Override
public void onCreate(Bundle savedInstanceState) {
super.onCreate(savedInstanceState);
setContentView(R.layout.main);
textView = (TextView) findViewById(R.id.textView);
}
public void onButtonClick(View v) {
Intent intent = new Intent();
intent.setClassName("com.allmycode.results",
"com.allmycode.results.GiveResultActivity");
startActivityForResult(intent, MY_REQUEST_CODE);
}
@Override
protected void onActivityResult(int requestCode,
int resultCode,
Intent intent) {
if (requestCode == MY_REQUEST_CODE &&
resultCode == RESULT_OK) {
textView.setText(intent.getStringExtra("text"));
}
}
}
Listing 1-11: An Activity Provides a Result
package com.allmycode.results;
import android.app.Activity;
import android.content.Intent;
import android.os.Bundle;
import android.view.View;
import android.widget.EditText;
public class GiveResultActivity extends Activity {
EditText editText;
@Override
public void onCreate(Bundle state) {
super.onCreate(state);
setContentView(R.layout.giver);
editText = (EditText) findViewById(R.id.editText);
}
public void onButtonClick(View arg0) {
Intent intent = new Intent();
intent.putExtra
("text", editText.getText().toString());
setResult(RESULT_OK, intent);
finish();
}
}
The actions of Listings 1-10 and 1-11 take place in three stages. First, the user sees the GetResultActivity in Listing 1-10. (See Figure 1-14.)

Figure 1-14: The activity in Listing 1-10.
When the user clicks the Get A Result button, Android calls startActivityForResult(intent, MY_REQUEST_CODE).
The startActivityForResult method takes an intent and a request code. In Listing 1-10, the intent points explicitly to the activity being started. The request code is any int value. The request code identifies the return result when the result arrives. (You can call startActivityForResult more than once before you get any results. When results arrive, you use the request code to distinguish one result from another.)
After clicking the button in Figure 1-14, the user sees the GiveResultActivity in Listing 1-11. (See Figure 1-15.)
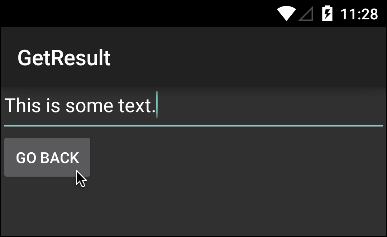
Figure 1-15: The activity in Listing 1-11.
The user types text into the text field in Figure 1-15 and then clicks the Go Back button. The button click causes the code in Listing 1-11 to create an intent. The intent has extra information — namely, the user’s text input.
The call to setResult sends a result code (RESULT_OK, RESULT_CANCELED, or any positive int value that’s meaningful to the receiver) along with the intent full of useful information.
At the end of Listing 1-11, the finish method call ends the run of the activity shown in Figure 1-15. The screen returns to the GetResultActivity. (See Figure 1-16.)

Figure 1-16: The activity in Listing 1-10 after getting a result.
At this point, Android calls the onActivityResult method in Listing 1-10. The method uses the result in some way or other. (In this example, the onActivityResult method simply displays the result in a TextView element.)
Applications Don’t Feel Left Out
In any operating system, things come and things go. Users log on and log off, and activities are created and destroyed. But what about applications? Applications are created and terminated.
If you check Listing 1-9, you see an application element with an android:name=".Demo1App” attribute. An app doesn’t need an android:name attribute, but if it has one, you must create a class with the name that you specify. You can keep track of an app’s global values (values that transcend the app’s individual activities) with this class. Listing 1-12 sheds light on the situation.
Listing 1-12: An Android Application
package com.allmycode.demo1;
import android.app.Application;
import android.content.res.Configuration;
import android.util.Log;
public class Demo1App extends Application {
private static final String CLASSNAME = "Demo1App";
@Override
public void onCreate() {
Log.v(CLASSNAME, "onCreate");
}
@Override
public void onConfigurationChanged
(Configuration config) {
Log.v(CLASSNAME, "onConfigurationChanged");
}
@Override
public void onLowMemory() {
Log.v(CLASSNAME, "onLowMemory");
}
@Override
public void onTerminate() {
Log.v(CLASSNAME, "onTerminate");
}
}
Android’s Application class has only four of its own methods — the methods declared in Listing 1-12. In previous sections, I didn’t draw attention to the log entries from Listing 1-12. But in this section, you can watch for the name “Demo1App” as you follow these instructions:
-
Open this chapter’s example project (the project from this chapter’s “Lifecycle methods” section).
Even if you stopped working with this project a while ago, the project might still be consuming part of your emulator’s memory. In this section, you want to start afresh. So, if the project is still in memory, you want to remove it. Here’s how:
-
In the Devices panel, look for
com.allmycode.demo1andcom.allmycode.demo1A.If you don’t see
com.allmycode.demo1orcom.allmycode.demo1Ain the Devices panel, that’s okay. In fact, the reason you’re looking for them is to get rid of them if they’re there. The Devices panel is part of the Android Device Monitor. For help finding the Devices panel, refer to the section “Starting another app’s activity,” earlier in this chapter. - If you see
com.allmycode.demo1in the Devices panel, select that entry. Look to the left of the Devices panel for an icon displaying a Stop sign. (See Figure 1-17.) Click that icon to terminate thecom.allmycode.demo1process. -
Repeat Step 3, this time looking for a
com.allmycode.demo1Aentry.Be ruthless if you must.
-
In Android Studio’s main menu, choose Run ⇒ Run ‘app' to run the project anew.
When the app starts running, you see the following entry in the Logcat panel:
1701-1701/com.allmycode.demo1 V/Demo1App﹕ onCreateThe entry appears because Android calls the
onCreatemethod in Listing 1-12. Android calls the onCreatemethod in Listing 1-12 only if yourAndroidManfest.xmlfile’s application tag has anandroid:nameattribute.<application…android:name=".Demo1App"… Etc. If you have trouble finding a Demo1Appentry in the Logcat panel, you can quickly filter the entries. To do so, type Demo1App in the text field immediately above the Logcat panel. -
Change your emulator’s orientation (from portrait to landscape, for example).
As a result, you see the following entry in the Logcat panel:
1701-1701/com.allmycode.demo1 V/Demo1App﹕onConfigurationChangedAndroid has notified your app about the device’s configuration change.
-
Press the emulator’s Home button. Then start a new app (the Phone app, for example).
Your app’s activity is Stopped, so you don’t see evidence of the app’s run on your emulator’s screen. But if you check Android Studio’s Devices panel, you still see a
com.allmycode.demo1entry. The application is still alive. -
Change your emulator’s orientation (from landscape to portrait, for example).
Again, you see the following
onConfigurationChangedentry in the Logcat panel:1701-1701/com.allmycode.demo1 V/Demo1App﹕onConfigurationChangedAndroid has notified all running apps about the device’s configuration change.
-
Restart or return to the Hog app (the app from this chapter’s section “Overloading the system” ).
If the Hog app is still running in your emulator, use the emulator’s Recents button to return to the Hog app. Otherwise, choose Run ⇒ Run ‘app' in Android Studio’s main menu.
-
Click the Hog app’s button until
com.allmycode.demo1disappears from Android Studio’s Devices panel.If you don’t do too much filtering in the Logcat panel, you see messages from Android about the termination of
com.allmycode.demo1.553-947/system_process I/ActivityManager:Killing 1365:com.allmycode.demo1/u0a70 (adj 14):cached #17553-605/system_process W/InputDispatcher:channel '2c2e3292com.allmycode.demo1/com.allmycode.demo1.Demo1Activity(server)' ~ Consumer closed input channel or an erroroccurred. events=0x9553-605/system_process E/InputDispatcher:channel '2c2e3292com.allmycode.demo1/com.allmycode.demo1.Demo1Activity(server)' ~ Channel is unrecoverably broken and willbe disposed!553-941/system_process I/WindowState: WIN DEATH:Window{2c2e3292 u0com.allmycode.demo1/com.allmycode.demo1.Demo1Activity}But here’s a surprise. You see none of the log messages from Listing 1-12 (not even when Android kills your apps' processes). If you read the fine print in Android’s docs, you see the following:
While the exact point at which this [
onLowMemorymethod] will be called is not defined, generally it will happen around the time all background process have [sic] been killed… . [TheonTerminatemethod] will never be called on a production Android device, where processes are removed by simply killing them; no user code (including this callback) is executed when doing so.During my run of this chapter’s apps, Android never calls either
onLowMemoryoronTerminate. Some of Android’s doc entries are concisely worded. This makes the docs easy to misinterpret. Your confidence in a doc entry’s interpretation should be proportional to your experience using and testing that entry’s claims. -
Return to your original app’s task (as in Step 5 of the earlier section “Overloading the system” ).
You see the
OtherAppstartup entries:1899-1899/com.allmycode.demo1 V/Demo1App: onCreate1899-1899/com.allmycode.demo1 I/Demo1Activity: onCreate1899-1899/com.allmycode.demo1 I/Demo1Activity: onStart1899-1899/com.allmycode.demo1 I/Demo1Activity: onResumeOne of your “other” app’s activities is on top of the stack. So Android creates a new process (with a new PID) for your other app.

Figure 1-17: Using the Devices panel to terminate a process.