
An Intent is an object that describes to the OS something that you want it to do. With the explicit intents that you have created thus far, you explicitly name the activity that you want the OS to start, like:
    val intent = Intent(this, CheatActivity::class.java)
    startActivity(intent)
With an implicit intent, you describe to the OS the job that you want done. The OS then starts the activity that has advertised itself as capable of doing that job. If the OS finds more than one capable activity, then the user is offered a choice.
Here are the critical parts of an intent that you can use to define the job you want done:
- the action that you are trying to perform
-
These are typically constants from the Intent class. For example, if you want to view a URL, you can use
Intent.ACTION_VIEWfor your action. To send something, you useIntent.ACTION_SEND. - the location of any data
-
This can be something outside the device, like the URL of a web page, but it can also be a URI to a file or a content URI pointing to a record in a ContentProvider.
- the type of data that the action is for
-
This is a MIME type, like
text/htmloraudio/mpeg3. If an intent includes a location for data, then the type can usually be inferred from that data. - optional categories
-
If the action is used to describe what to do, the category usually describes where, when, or how you are trying to use an activity. Android uses the category
android.intent.category.LAUNCHERto indicate that an activity should be displayed in the top-level app launcher. Theandroid.intent.category.INFOcategory, on the other hand, indicates an activity that shows information about a package to the user but should not show up in the launcher.
So, for example, a simple implicit intent for viewing a website would include an action of Intent.ACTION_VIEW and a data Uri that is the URL of a website.
Based on this information, the OS will launch the appropriate activity of an appropriate application. (If it finds more than one candidate, the user gets a choice.)
An activity would advertise itself as an appropriate activity for ACTION_VIEW via an intent filter in the manifest.
If you wanted to write a browser app, for instance, you would include the following intent filter in the declaration of the activity that should respond to ACTION_VIEW:
    <activity
        android:name=".BrowserActivity"
        android:label="@string/app_name" >
        <intent-filter>
            <action android:name="android.intent.action.VIEW" />
            <category android:name="android.intent.category.DEFAULT" />
            <data android:scheme="http" android:host="www.bignerdranch.com" />
        </intent-filter>
    </activity>
To respond to implicit intents, an activity must have the DEFAULT category explicitly set in an intent filter.
The action element in the intent filter tells the OS that the activity is capable of performing the job, and the DEFAULT category tells the OS that this activity should be considered for the job when the OS is asking for volunteers.
This DEFAULT category is implicitly added to every implicit intent. (In Chapter 23, you will see that this is not the case when Android is not asking for a volunteer.)
Implicit intents can also include extras, just like explicit intents. But any extras on an implicit intent are not used by the OS to find an appropriate activity.
Note that the action and data parts of an intent can also be used in conjunction with an explicit intent. That would be the equivalent of telling a particular activity to do something specific.
Let’s see how this works by creating an implicit intent to send a crime report in CriminalIntent.
The job you want done is sending plain text; the crime report is a string.
So the implicit intent’s action will be ACTION_SEND.
It will not point to any data or have any categories, but it will specify a type of text/plain.
In CrimeFragment’s onCreateView(…), get a reference to the SEND CRIME REPORT button, then set a listener on it in CrimeFragment’s onStart(). Within the listener’s implementation, create an implicit intent and pass it into startActivity(Intent).
Listing 15.8 Sending a crime report (CrimeFragment.kt)
class CrimeFragment : Fragment(), DatePickerFragment.Callbacks {
    ...
    private lateinit var solvedCheckBox: CheckBox
    private lateinit var reportButton: Button
    ...
    override fun onCreateView(
        ...
    ): View? {
        ...
        dateButton = view.findViewById(R.id.crime_date) as Button
        solvedCheckBox = view.findViewById(R.id.crime_solved) as CheckBox
        reportButton = view.findViewById(R.id.crime_report) as Button

        return view
    }
    ...
    override fun onStart() {
        ...
        dateButton.setOnClickListener {
            ...
        }

        reportButton.setOnClickListener {
            Intent(Intent.ACTION_SEND).apply {
                type = "text/plain"
                putExtra(Intent.EXTRA_TEXT, getCrimeReport())
                putExtra(
                    Intent.EXTRA_SUBJECT,
                    getString(R.string.crime_report_subject))
            }.also { intent ->
                startActivity(intent)
            }
        }
    }
    ...
}
Here you use the Intent constructor that accepts a string that is a constant defining the action. There are other constructors that you can use depending on what kind of implicit intent you need to create. You can find them all on the Intent reference page in the documentation. There is no constructor that accepts a type, so you set it explicitly.
You include the text of the report and the string for the subject of the report as extras. Note that these extras use constants defined in the Intent class. Any activity responding to this intent will know these constants and what to do with the associated values.
Starting an activity from a fragment works nearly the same as starting an activity from another activity. You call Fragment’s startActivity(Intent) function, which calls the corresponding Activity function behind the scenes.
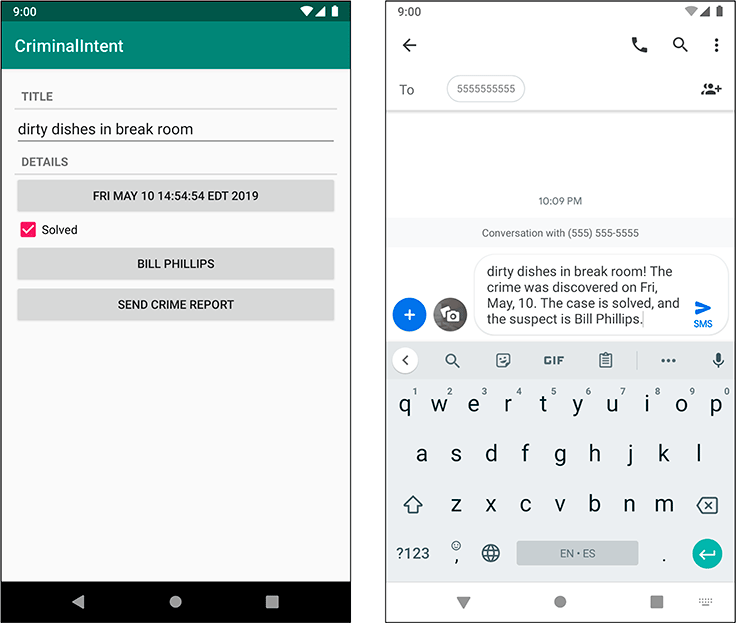
Run CriminalIntent and press the SEND CRIME REPORT button. Because this intent will likely match many activities on the device, you will probably see a list of activities presented in a chooser (Figure 15.2). You may need to scroll down in the list to see all of the activities.
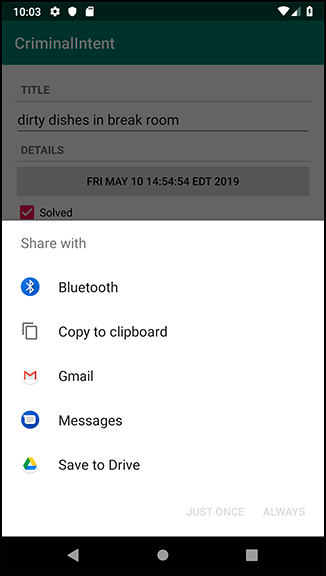
If you are offered a choice, make a selection. You will see your crime report loaded into the app that you chose. All you have to do is address and send it.
Note that apps like Gmail and Google Drive require you to log in with a Google account.
It is simpler to choose the Messages app, which does not require you to log in.
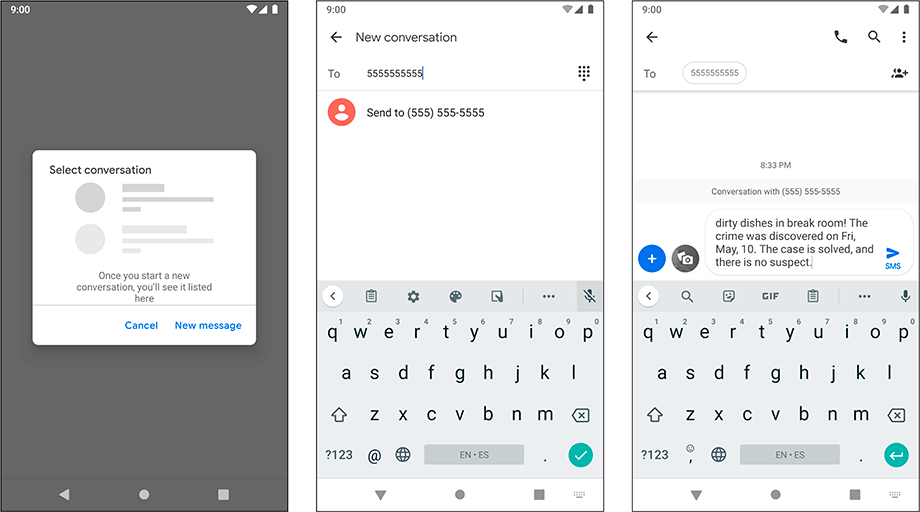
Press New message in the Select conversation dialog window, type any phone number in the To field, and press the Send to phone number label that appears (Figure 15.3).
You will see the crime report in the body of the message.
If, on the other hand, you do not see a chooser, that means one of two things. Either you have already set a default app for an identical implicit intent, or your device has only a single activity that can respond to this intent.
Often, it is best to go with the user’s default app for an action. In CriminalIntent, however, you always want the user to have a choice for ACTION_SEND. Today a user might want to be discreet and email the crime report, but tomorrow they may prefer public shaming via Twitter.
You can create a chooser to be shown every time an implicit intent is used to start an activity. After you create your implicit intent as before, you call the Intent.createChooser(Intent, String) function and pass in the implicit intent and a string for the chooser’s title.
Then you pass the intent returned from createChooser(…) into startActivity(…).
In CrimeFragment.kt, create a chooser to display the activities that respond to your implicit intent.
Listing 15.9 Using a chooser (CrimeFragment.kt)
reportButton.setOnClickListener {
    Intent(Intent.ACTION_SEND).apply {
        type = "text/plain"
        putExtra(Intent.EXTRA_TEXT, getCrimeReport())
        putExtra(
            Intent.EXTRA_SUBJECT,
            getString(R.string.crime_report_subject))
    }.also { intent ->
        startActivity(intent)
        val chooserIntent =
                Intent.createChooser(intent, getString(R.string.send_report))
        startActivity(chooserIntent)
    }
}
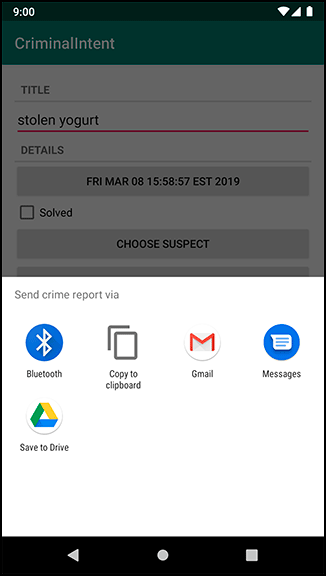
Run CriminalIntent again and press the SEND CRIME REPORT button. As long as you have more than one activity that can handle your intent, you will be offered a list to choose from (Figure 15.4).
Now you are going to create another implicit intent that enables users to choose a suspect from their contacts.
This implicit intent will have an action and a location where the relevant data can be found.
The action will be Intent.ACTION_PICK. The data for contacts is at ContactsContract.Contacts.CONTENT_URI.
In short, you are asking Android to help pick an item in the contacts database.
You expect a result back from the started activity, so you will pass the intent via startActivityForResult(…) along with a request code. In CrimeFragment.kt, add a constant for the request code and a member variable for the CHOOSE SUSPECT button.
Listing 15.10 Adding a field for the CHOOSE SUSPECT button (CrimeFragment.kt)
private const val REQUEST_DATE = 0
private const val REQUEST_CONTACT = 1
private const val DATE_FORMAT = "EEE, MMM, dd"

class CrimeFragment : Fragment(), DatePickerFragment.Callbacks {
    ...
    private lateinit var reportButton: Button
    private lateinit var suspectButton: Button
    ...
}
At the end of onCreateView(…), get a reference to the button. Then, in onStart(), set a click listener on the button. Pass the implicit intent into startActivityForResult(…) in the click listener implementation. Create an implicit intent for requesting a contact. Also, if a suspect is assigned, show the name on the CHOOSE SUSPECT button.
Listing 15.11 Sending an implicit intent (CrimeFragment.kt)
class CrimeFragment : Fragment(), DatePickerFragment.Callbacks {
    ...
    override fun onCreateView(
        ...
    ): View? {
        ...
        reportButton = view.findViewById(R.id.crime_report) as Button
        suspectButton = view.findViewById(R.id.crime_suspect) as Button

        return view
    }
    ...
    override fun onStart() {
        ...
        reportButton.setOnClickListener {
            ...
        }

        suspectButton.apply {
            val pickContactIntent =
                    Intent(Intent.ACTION_PICK, ContactsContract.Contacts.CONTENT_URI)

            setOnClickListener {
                startActivityForResult(pickContactIntent, REQUEST_CONTACT)
            }
        }
    }
    ...
}
You will be using pickContactIntent one more time in a bit, which is why you declared it outside the OnClickListener.
Next, modify updateUI() to set the text on the CHOOSE SUSPECT button if the crime has a suspect.
Listing 15.12 Setting CHOOSE SUSPECT button text (CrimeFragment.kt)
private fun updateUI() {
    titleField.setText(crime.title)
    dateButton.text = crime.date.toString()
    solvedCheckBox.apply {
        isChecked = crime.isSolved
        jumpDrawablesToCurrentState()
    }
    if (crime.suspect.isNotEmpty()) {
        suspectButton.text = crime.suspect
    }
}
Run CriminalIntent and press the CHOOSE SUSPECT button. You should see a list of contacts (Figure 15.5).
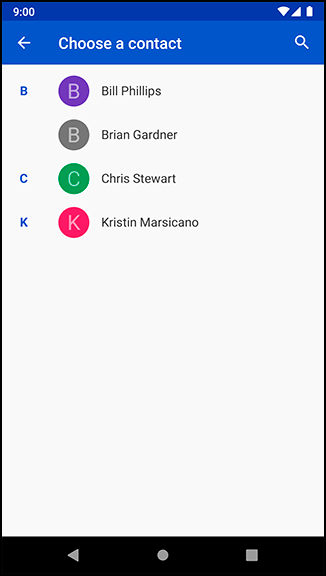
If you have a different contacts app installed, your screen will look different. Again, this is one of the benefits of implicit intents. You do not have to know the name of the contacts application to use it from your app. Users can install whatever app they like best, and the OS will find and launch it.
Now you need to get a result back from the contacts application. Contacts information is shared by many applications, so Android provides an in-depth API for working with contacts information through a ContentProvider. Instances of this class wrap databases and make the data available to other applications. You can access a ContentProvider through a ContentResolver. (The contacts database is a large topic in itself. We will not cover it here. If you would like to know more, read the Content Provider API guide at developer.android.com/guide/topics/providers/content-provider-basics.)
Because you started the activity for a result with ACTION_PICK, you will receive an intent via onActivityResult(…).
This intent includes a data URI.
The URI is a locator that points at the single contact the user picked.
In CrimeFragment.kt, implement onActivityResult(…) to retrieve the contact’s name from the contacts application. This is a large block of new code; we will explain it step by step after you enter it.
Listing 15.13 Pulling the contact’s name out (CrimeFragment.kt)
class CrimeFragment : Fragment(), DatePickerFragment.Callbacks {
    ...
    private fun updateUI() {
        ...
    }

    override fun onActivityResult(requestCode: Int, resultCode: Int, data: Intent?) {
        when {
            resultCode != Activity.RESULT_OK -> return

            requestCode == REQUEST_CONTACT && data != null -> {
                val contactUri: Uri? = data.data
                // Specify which fields you want your query to return values for
                val queryFields = arrayOf(ContactsContract.Contacts.DISPLAY_NAME)
                // Perform your query - the contactUri is like a "where" clause here
                val cursor = requireActivity().contentResolver
                    .query(contactUri, queryFields, null, null, null)
                cursor?.use {
                    // Verify cursor contains at least one result
                    if (it.count == 0) {
                        return
                    }

                    // Pull out the first column of the first row of data -
                    // that is your suspect's name
                    it.moveToFirst()
                    val suspect = it.getString(0)
                    crime.suspect = suspect
                    crimeDetailViewModel.saveCrime(crime)
                    suspectButton.text = suspect
                }
            }
        }
    }
    ...
}
In Listing 15.13, you create a query that asks for all the display names of the contacts in the returned data. Then you query the contacts database and get a Cursor object to work with. Once you verify that the cursor returned contains at least one row, you call Cursor.moveToFirst() to move the cursor to the first row. Finally, you call Cursor.getString(Int) to pull the contents of the first column in that first row as a string. This string will be the name of the suspect, and you use it to set the Crime’s suspect and the text of the CHOOSE SUSPECT button.
You also save the crime to the database as soon as you receive the suspect data. The reason you need to do this is subtle. When CrimeFragment is resumed, your onViewCreated(…) function will be called, and you will query the crime from the database. But onActivityResult(…) is called before onViewCreated(…), so when the database crime is received it will overwrite the crime with the suspect information. To avoid losing the suspect data, you write the crime with the suspect as soon as it is ready.
Now the information will be persisted in the database. CrimeFragment will still receive the old database crime first, but the LiveData will quickly be notified of the new crime information once the update completes.
In a moment, you are going to run your app. Be sure to run it on a device that has a contacts app – use the emulator if your Android device does not have one. If you are using the emulator, add a few contacts using its Contacts app before you run CriminalIntent. Then run your app.
Pick a suspect. The name of the suspect you chose should appear on the CHOOSE SUSPECT button. Then send a crime report. The suspect’s name should appear in the crime report (Figure 15.6).
How are you getting permission to read from the contacts database?
The contacts app is extending its permissions to you.
The contacts app has full permissions to the contacts database.
When the contacts app returns a data URI in an Intent to the parent activity, it also adds the flag Intent.FLAG_GRANT_READ_URI_PERMISSION.
This flag signals to Android that the parent activity in CriminalIntent should be allowed to use this data one time.
This works well because you do not really need access to the entire contacts database. You only need access to one contact inside that database.
The first implicit intent you created in this chapter will always be responded to in some way – there may be no way to send a report, but the chooser will still display properly. However, that is not the case for the second example: Some devices or users may not have a contacts app. This is a problem, because if the OS cannot find a matching activity, then the app will crash.
The fix is to check with part of the OS called the PackageManager first. Do this in onStart().
Listing 15.14 Guarding against no contacts app (CrimeFragment.kt)
override fun onStart() {
    ...
    suspectButton.apply {
        val pickContactIntent =
            Intent(Intent.ACTION_PICK, ContactsContract.Contacts.CONTENT_URI)

        setOnClickListener {
            startActivityForResult(pickContactIntent, REQUEST_CONTACT)
        }

        val packageManager: PackageManager = requireActivity().packageManager
        val resolvedActivity: ResolveInfo? =
            packageManager.resolveActivity(pickContactIntent,
                PackageManager.MATCH_DEFAULT_ONLY)
        if (resolvedActivity == null) {
            isEnabled = false
        }
    }
}
PackageManager knows about all the components installed on your Android device, including all of its activities. (You will run into the other components later on in this book.) By calling resolveActivity(Intent, Int), you ask it to find an activity that matches the Intent you gave it. The MATCH_DEFAULT_ONLY flag restricts this search to activities with the CATEGORY_DEFAULT flag, just like startActivity(Intent) does.
If this search is successful, it will return an instance of ResolveInfo telling you all about which activity it found.
On the other hand, if the search returns null, the game is up – no contacts app.
So you disable the useless CHOOSE SUSPECT button.
If you would like to verify that your filter works but you do not have a device without a contacts application, temporarily add an additional category to your intent. This category does nothing, but it will prevent any contacts applications from matching your intent.
Listing 15.15 Adding dummy code to verify filter (CrimeFragment.kt)
override fun onStart() {
    ...
    suspectButton.apply {
        ...
        pickContactIntent.addCategory(Intent.CATEGORY_HOME)
        val packageManager: PackageManager = requireActivity().packageManager
        ...
    }
}
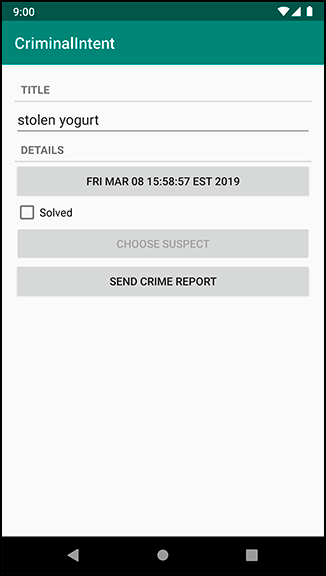
Run CriminalIntent again, and you should see the CHOOSE SUSPECT button disabled (Figure 15.7).
Delete the dummy code once you are done verifying this behavior.