
When displaying a DatePickerDialog, it is a good idea to wrap it in an instance of DialogFragment, a subclass of Fragment. It is possible to display a DatePickerDialog without a DialogFragment, but it is not recommended. Having the DatePickerDialog managed by the FragmentManager gives you more options for presenting the dialog.
In addition, a bare DatePickerDialog will vanish if the device is rotated. If the DatePickerDialog is wrapped in a fragment, then the dialog will be re-created and put back onscreen after rotation.
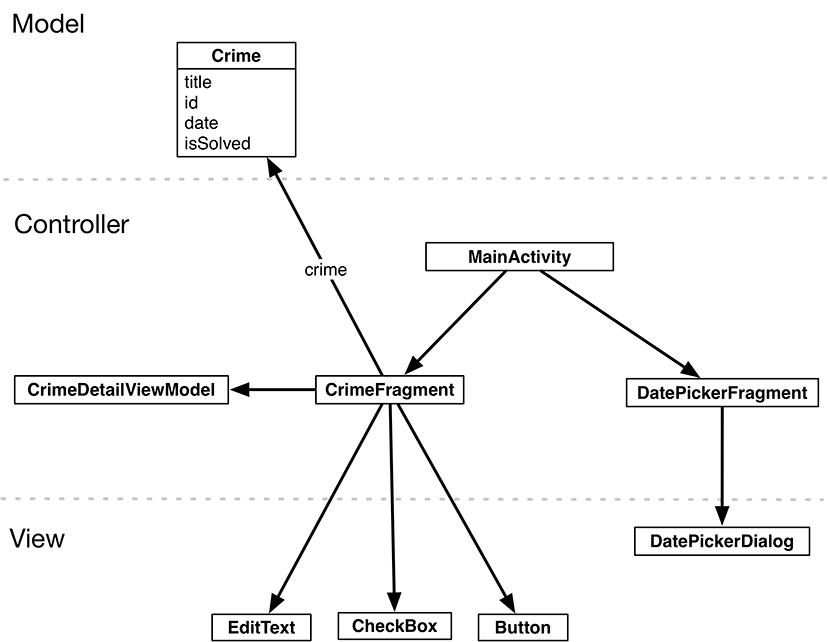
For CriminalIntent, you are going to create a DialogFragment subclass named DatePickerFragment. Within DatePickerFragment, you will create and configure an instance of DatePickerDialog. DatePickerFragment will be hosted by MainActivity.
Figure 13.2 shows you an overview of these relationships.
Your first tasks are:
-
creating the DatePickerFragment class
-
building a DatePickerFragment
-
getting the dialog onscreen via the FragmentManager
Later in this chapter, you will pass the necessary data between CrimeFragment and DatePickerFragment.
Create a new class named DatePickerFragment and make its superclass DialogFragment. Be sure to choose the Jetpack version of DialogFragment: androidx.fragment.app.DialogFragment.
DialogFragment includes the following function:
onCreateDialog(savedInstanceState: Bundle?): Dialog
The FragmentManager of the hosting activity calls this function as part of putting the DialogFragment onscreen.
In DatePickerFragment.kt, add an implementation of onCreateDialog(Bundle?) that builds a DatePickerDialog initialized with the current date (Listing 13.1).
Listing 13.1 Creating a DialogFragment (DatePickerFragment.kt)
class DatePickerFragment : DialogFragment() {

    override fun onCreateDialog(savedInstanceState: Bundle?): Dialog {
        val calendar = Calendar.getInstance()
        val initialYear = calendar.get(Calendar.YEAR)
        val initialMonth = calendar.get(Calendar.MONTH)
        val initialDay = calendar.get(Calendar.DAY_OF_MONTH)

        return DatePickerDialog(
            requireContext(),
            null,
            initialYear,
            initialMonth,
            initialDay
        )
    }
}
The DatePickerDialog constructor takes in several parameters. The first is a context object, which is required to access the necessary resources for the view. The second parameter is for the date listener, which you will add later in this chapter. The last three parameters are the year, month, and day that the date picker should be initialized to. Until you know the date of the crime, you can just initialize it to the current date.
Like all fragments, instances of DialogFragment are managed by the FragmentManager of the hosting activity.
To get a DialogFragment added to the FragmentManager and put onscreen, you can call either of the following functions on the fragment instance:
    show(manager: FragmentManager, tag: String)
    show(transaction: FragmentTransaction, tag: String)
The string parameter uniquely identifies the DialogFragment in the FragmentManager’s list. Whether you use the FragmentManager or FragmentTransaction version is up to you. If you pass in a FragmentTransaction, you are responsible for creating and committing that transaction. If you pass in a FragmentManager, a transaction will automatically be created and committed for you.
Here, you will pass in a FragmentManager.
In CrimeFragment, add a constant for the DatePickerFragment’s tag.
Then, in onCreateView(…), remove the code that disables the date button. Set a View.OnClickListener that shows a DatePickerFragment when the date button is pressed in onStart().
Listing 13.2 Showing your DialogFragment (CrimeFragment.kt)
private const val TAG = "CrimeFragment"
private const val ARG_CRIME_ID = "crime_id"
private const val DIALOG_DATE = "DialogDate"

class CrimeFragment : Fragment() {
    ...
    override fun onCreateView(inflater: LayoutInflater,
                              container: ViewGroup?,
                              savedInstanceState: Bundle?): View? {
        ...
        solvedCheckBox = view.findViewById(R.id.crime_solved) as CheckBox

        dateButton.apply {
            text = crime.date.toString()
            isEnabled = false
        }

        return view
    }
    ...
    override fun onStart() {
        ...
        solvedCheckBox.apply {
            ...
        }

        dateButton.setOnClickListener {
            DatePickerFragment().apply {
                show([email protected](), DIALOG_DATE)
            }
        }
    }
    ...
}
this@CrimeFragment is needed to call requireFragmentManager() from the CrimeFragment instead of the DatePickerFragment.
this references the DatePickerFragment inside the apply block, so you need to specify the this from the outer scope.
DialogFragment’s show(FragmentManager, String) requires a non-null value for the fragment manager argument. The Fragment.fragmentManager property is nullable, so you cannot pass it directly to show(…). Instead, you use Fragment’s requireFragmentManager() function, whose return type is a non-null FragmentManager. If the fragment’s fragmentManager property is null when Fragment.requireFragmentManager() is called, the function will throw an IllegalStateException stating that the fragment is not currently associated with a fragment manager.
Run CriminalIntent and press the date button to see the dialog (Figure 13.3).
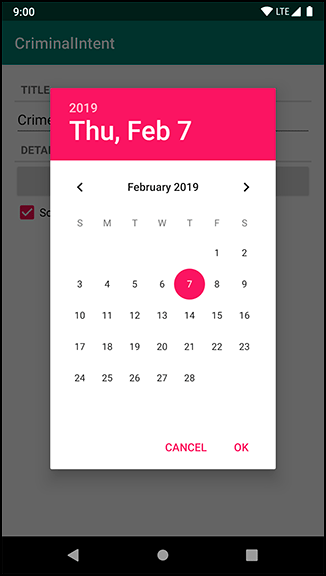
Your dialog is onscreen and looks good. In the next section, you will wire it up to present the Crime’s date and allow the user to change it.