
With the New Crime button selected, double-tap anywhere on the screen to launch the crime details screen.
On the crime details screen, press the image capture button to give it accessibility focus (Figure 18.8). TalkBack announces, “Unlabeled button. Double-tap to activate.” (You may get slightly different results depending on the version of Android you are using.)
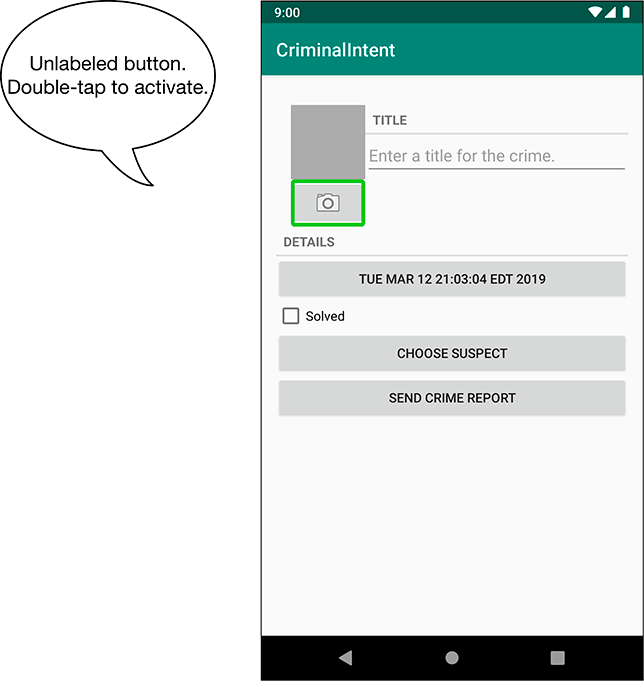
The camera button does not display any text, so TalkBack describes the button as well as it can. While this is TalkBack’s best effort, the information is not very helpful to a user with a vision impairment.
Luckily, this problem is very easy to fix. You are going to specify details for TalkBack to read by adding a content description to the ImageButton. A content description is a piece of text that describes the widget and is read by TalkBack. (While you are at it, you are going to add a content description for the ImageView that displays the selected picture, too.)
You can set a widget’s content description in the XML layout file by setting a value for the attribute android:contentDescription.
That is what you are going to do next.
You can also set it in your UI setup code, using someView.setContentDescription(someString), which you will do later in this chapter.
The text you set should be meaningful without being overly wordy. Remember, TalkBack users will be listening to the audio, which is linear. They can speed up the pace of TalkBack’s speech output, but even so you want to avoid adding extraneous information and wasting users’ time. For example, if you are setting the description for a framework widget, avoid including information about what kind of widget it is (like “a button”), because TalkBack already knows and includes that information.
First, some housekeeping. Add the content description strings to the unqualified res/values/strings.xml.
Listing 18.1 Adding content description strings (res/values/strings.xml)
<resources>
    ...
    <string name="crime_details_label">Details</string>
    <string name="crime_solved_label">Solved</string>
    <string name="crime_photo_button_description">Take photo of crime scene</string>
    <string name="crime_photo_no_image_description">
        Crime scene photo (not set)
    </string>
    <string name="crime_photo_image_description">Crime scene photo (set)</string>
    ...
</resources>
Android Studio will underline the newly added strings in red, warning you that you have not defined the Spanish version of these new strings. To fix this, add the content description strings to res/values-es/strings.xml.
Listing 18.2 Adding Spanish content description strings (res/values-es/strings.xml)
<resources>
    ...
    <string name="crime_details_label">Detalles</string>
    <string name="crime_solved_label">Solucionado</string>
    <string name="crime_photo_button_description">
        Tomar foto de la escena del crimen
    </string>
    <string name="crime_photo_no_image_description">
        Foto de la escena del crimen (no establecida)
    </string>
    <string name="crime_photo_image_description">
        Foto de la escena del crimen (establecida)
    </string>
    ...
</resources>
Next, open res/layout/fragment_crime.xml and set the content description for the ImageButton.
Listing 18.3 Setting the content description for ImageButton (res/layout/fragment_crime.xml)
<ImageButton
    android:id="@+id/crime_camera"
    android:layout_width="match_parent"
    android:layout_height="wrap_content"
    android:src="@android:drawable/ic_menu_camera"
    android:contentDescription="@string/crime_photo_button_description"/>
Run CriminalIntent and press the camera button. TalkBack helpfully announces, “Take photo of crime scene button. Double-tap to activate.” This spoken information is much more helpful than “unlabeled button.”
Next, press the crime scene image (which at the moment is just the gray placeholder). You might expect the accessibility focus to move to the ImageView, but the green border does not appear. TalkBack remains silent rather than announcing information about the ImageView. What gives?
The problem is that the ImageView is not registered to receive focus.
Some widgets, such as Buttons, are focusable by default.
Other widgets, such ImageViews, are not.
You can make a view focusable by setting its android:focusable attribute to true or by adding a click listener.
You can also make a view focusable by adding an android:contentDescription.
Make the crime photo’s ImageView focusable by giving it a content description.
Listing 18.4 Making the photo ImageView focusable with a content description (res/layout/fragment_crime.xml)
<ImageView
  android:id="@+id/crime_photo"
  ...
  android:background="@android:color/darker_gray"
  android:contentDescription="@string/crime_photo_no_image_description" />
Run CriminalIntent again and press on the crime photo. The ImageView now accepts focus, and TalkBack announces, “Crime scene photo (not set)” (Figure 18.9).
