
So far, you have created layouts by typing XML. In this section, you will use Android Studio’s graphical layout tool.
Open layout/list_item_crime.xml and select the Design tab at the bottom of the file (Figure 10.4).
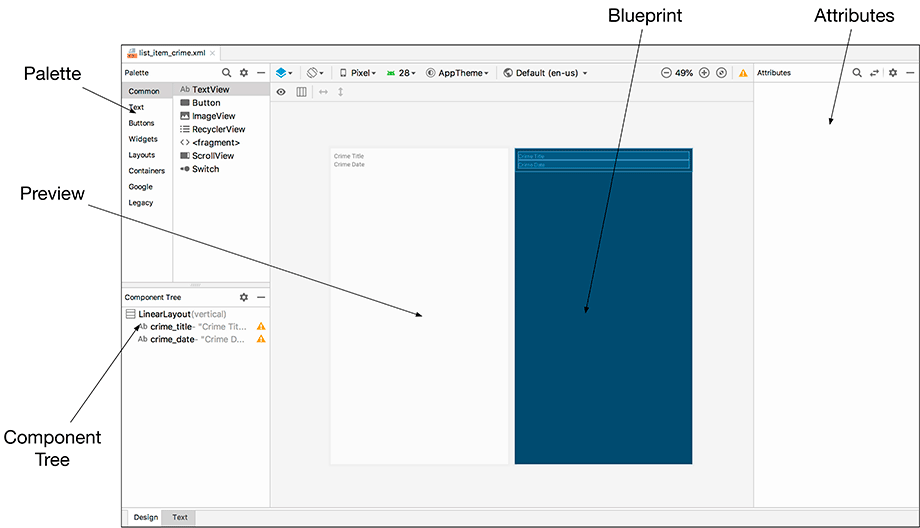
In the middle of the graphical layout editor is the preview you have seen before. To the right of the preview is the Blueprint, which, as you saw in Chapter 1, is like the preview but shows an outline of each of your views. This can be useful when you need to see how big each view is, not just what it is displaying.
On the lefthand side of the screen is the palette, which contains all the widgets you could wish for, organized by category. The component tree is in the bottom left. The tree shows how the widgets are organized in the layout. If you do not see the palette or component tree, click on the tabs on the left side of the preview to open the windows.
On the right side of the screen is the attributes view. Here, you can view and edit the attributes of the widget selected in the component tree.
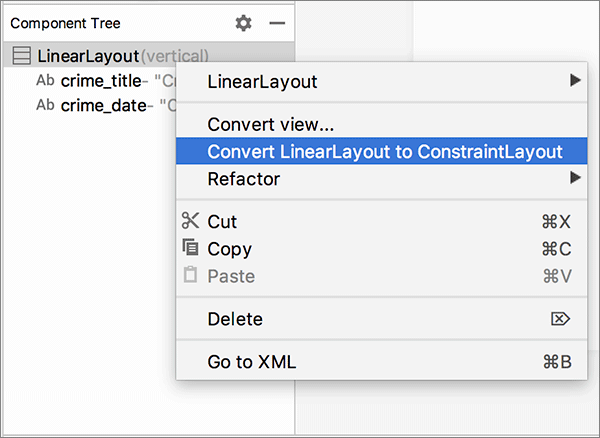
The first thing you need to do is convert list_item_crime.xml to use a ConstraintLayout. Right-click on your root LinearLayout in the component tree and select Convert LinearLayout to ConstraintLayout (Figure 10.5).
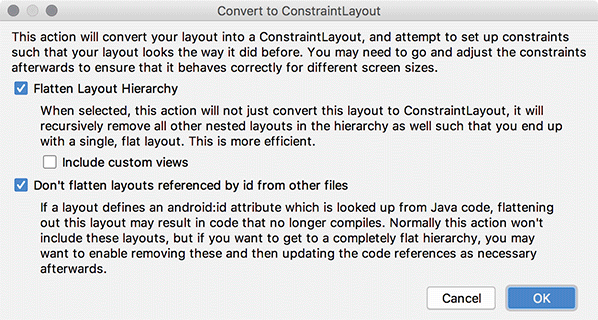
Android Studio will ask you in a pop-up how aggressive you would like this conversion process to be (Figure 10.6). Since list_item_crime.xml is a simple layout file, there is not much that Android Studio can optimize. Leave the default values checked and select OK.
Be patient. The conversion process might take a little while. But when it is complete, you will have a fine, new ConstraintLayout to work with (Figure 10.7).

(Wondering why the component tree says you have a linearLayout? We will get to that in a moment.)
The toolbar above the preview has a few editing controls (Figure 10.8). You may need to click into the preview to see all the controls.

|
View Options |
View Options → Show All Constraints reveals the constraints that are set up in the preview and Blueprint views. You will find this option helpful at times and unhelpful at others. If you have many constraints, this setting will trigger an overwhelming amount of information. View Options includes other useful options, such as Show Layout Decorations. Selecting Show Layout Decorations displays the app bar as well as some system UI (such as the status bar) the user sees at runtime. You will learn more about the app bar in Chapter 14. |
|
Toggle Autoconnect |
When autoconnect is enabled, constraints will be automatically configured as you drag views into the preview. Android Studio will guess the constraints that you want a view to have and make those connections on demand. |
|
Clear All Constraints |
This button removes all existing constraints in the layout file. You will use this shortly. |
|
Infer Constraints |
This option is similar to autoconnect in that Android Studio will automatically create constraints for you, but it is only triggered when you select this button. Autoconnect is active any time you add a view to your layout file. |