
Although it is not developed by Google, Retrofit is the de facto official way to communicate with an HTTP API on Android. Retrofit is an open-source library created and maintained by Square (square.github.io/retrofit). It is highly configurable and extendable, allowing you to easily and safely communicate with a remote web server. It is organized into components that serve a specific purpose, and you can swap out individual components as you need.
Retrofit is meant to define the contracts for many different types of network requests. Similar to using the Room database library, you write an interface with annotated instance methods, and Retrofit creates the implementation. Under the hood, Retrofit’s implementation uses OkHttp, another library by Square, to handle making an HTTP request and parsing the HTTP response.
Head back to your app/build.gradle file and add the Retrofit and OkHttp dependencies. Retrofit integrates seamlessly with Kotlin coroutines, so add those dependencies as well. Sync your Gradle file after you make these changes.
Listing 20.5 Adding the Retrofit dependency (app/build.gradle)
dependencies {
    ...
    implementation 'androidx.lifecycle:lifecycle-runtime-ktx:2.4.1'
    implementation 'com.squareup.retrofit2:retrofit:2.9.0'
    implementation 'com.squareup.okhttp3:okhttp:4.9.3'
    implementation 'org.jetbrains.kotlinx:kotlinx-coroutines-core:1.6.0'
    implementation 'org.jetbrains.kotlinx:kotlinx-coroutines-android:1.6.0'
    ...
}
Before implementing the Flickr REST API, you need to configure Retrofit to fetch and log the contents of a web page URL – specifically, Flickr’s home page.
Using Retrofit involves a bunch of moving parts. Starting simple will allow you to see the foundations. Later, you will build on this basic implementation to create your Flickr requests and deserialize the responses – meaning convert the linear, serialized data into non-serial pieces of data. That non-serial data will be your model objects.
It is time to define the API calls you want your app to make. First, create a new package for your API-specific code. In the project tool window, right-click the com.bignerdranch.android.photogallery package and choose New → Package. Name your new package api.
Next, add a Retrofit API interface to your new package. A Retrofit API interface is a standard Kotlin interface that uses Retrofit annotations to define API calls. Right-click the api package in the project tool window. Choose New → Kotlin Class/File and name the file FlickrApi. In the new file, define an interface named FlickrApi and add a single function representing a GET request.
Listing 20.6 Adding a Retrofit API interface (api/FlickrApi.kt)
interface FlickrApi {
    @GET("/")
    suspend fun fetchContents(): String
}
Since network requests are inherently asynchronous operations, Retrofit naturally supports Kotlin coroutines.
If you mark a function with the suspend modifier, Retrofit will be able to perform networking requests within a coroutine scope and suspend while waiting for a server response.
It has support for many other asynchronous libraries, but in this book we focus on using coroutines for network requests.
Each function in the interface maps to a specific HTTP request and must be annotated with an HTTP request method annotation.
This annotation tells Retrofit the HTTP request type (also known as an “HTTP verb”) that the function in your API interface maps to.
The most common request types are @GET, @POST, @PUT, @DELETE, and @HEAD.
(For an exhaustive list of available types, see the API docs at square.github.io/retrofit/2.x/retrofit.)
The @GET("/") annotation in the code above configures the HTTP request used by fetchContents() to perform a GET request.
The "/" is the relative path – a path string representing the relative URL from the base URL of your API endpoint.
Most HTTP request method annotations include a relative path.
In this case, the relative path of "/" means the request will be sent to the base URL, which you will provide shortly.
The type you use as the return type specifies the data type you would like Retrofit to deserialize the HTTP response into. Every API request you define in your Retrofit API should include a return type. A general response type called OkHttp.ResponseBody is provided with Retrofit, which you can use to get the raw response from the server. Specifying String tells Retrofit that you want the response parsed into a String object instead.
The Retrofit instance is responsible for implementing and creating instances of your API interface. To make web requests based on the API interface you defined, you need Retrofit to implement and instantiate your FlickrApi interface.
First, build and configure a Retrofit instance. Open PhotoGalleryFragment.kt. In onViewCreated(…), build a Retrofit object and use it to create a concrete implementation of your FlickrApi interface.
Listing 20.7 Using the Retrofit object to create an instance of the API (PhotoGalleryFragment.kt)
class PhotoGalleryFragment : Fragment() {
    ...
    override fun onCreateView(
        inflater: LayoutInflater,
        container: ViewGroup?,
        savedInstanceState: Bundle?
    ): View {
        ...
    }

    override fun onViewCreated(view: View, savedInstanceState: Bundle?) {
        super.onViewCreated(view, savedInstanceState)

        val retrofit: Retrofit = Retrofit.Builder()
            .baseUrl("https://www.flickr.com/")
            .build()

        val flickrApi: FlickrApi = retrofit.create<FlickrApi>()
    }
    ...
}
Retrofit.Builder() is a fluent interface that makes it easy to configure and build your Retrofit instance.
You provide a base URL for your endpoint using the baseUrl(…) function.
Here, you provide the Flickr home page: "https://www.flickr.com/".
Make sure to include the appropriate protocol with the URL (here, https://).
Also, always include a trailing / to ensure Retrofit correctly appends the relative paths you provide in your API interface onto the base URL.
Calling build() returns a Retrofit instance, configured based on the settings you specified using the builder object. Once you have a Retrofit object, you use it to create an instance of your API interface.
Unlike the Room library, Retrofit does not generate any code at compile time – instead, it does all the work at runtime. When you call retrofit.create(), Retrofit uses the information in the API interface you specify, along with the information you specified when building the Retrofit instance, to create and instantiate an anonymous class that implements the interface on the fly.
Retrofit is not actually handling the nitty-gritty aspects of performing network requests for you. Under the hood, it uses the OkHttp library as its HTTP client (square.github.io/okhttp). When getting a response back from the server, by default, Retrofit deserializes web responses into okhttp3.ResponseBody objects. But for logging the contents of a web page, it is much easier to work with a plain ol’ String.
To get Retrofit to deserialize the response into strings instead, you will specify a converter when building your Retrofit object.
A converter knows how to decode a ResponseBody object into some other object type. You could create a custom converter, but you do not have to. Lucky for you, Square created an open-source converter, called the scalars converter, that can convert the response into a string. You will use it to deserialize Flickr responses into string objects.
To use the scalars converter, first add the dependency to your app/build.gradle file.
Listing 20.8 Adding the scalars converter dependency (app/build.gradle)
dependencies {
    ...
    implementation 'org.jetbrains.kotlinx:kotlinx-coroutines-android:1.6.0'
    implementation 'com.squareup.retrofit2:converter-scalars:2.9.0'
    ...
}
Once your Gradle files sync, create an instance of the scalars converter factory and add it to your Retrofit object.
Listing 20.9 Adding the converter to the Retrofit object (PhotoGalleryFragment.kt)
class PhotoGalleryFragment : Fragment() {
    ...
    override fun onViewCreated(view: View, savedInstanceState: Bundle?) {
        super.onViewCreated(view, savedInstanceState)

        val retrofit: Retrofit = Retrofit.Builder()
            .baseUrl("https://www.flickr.com/")
            .addConverterFactory(ScalarsConverterFactory.create())
            .build()

        val flickrApi: FlickrApi = retrofit.create<FlickrApi>()
    }
    ...
}
Retrofit.Builder’s addConverterFactory(…) function expects an instance of Converter.Factory. A converter factory knows how to create and return instances of a particular converter. ScalarsConverterFactory.create() returns an instance of the scalars converter factory (retrofit2.converter.scalars.ScalarsConverterFactory), which in turn will provide instances of a scalars converter when Retrofit needs it.
More specifically, since you specified String as the return type for FlickrApi.fetchContents(), the scalars converter factory will provide an instance of the string converter (retrofit2.converter.scalars.StringResponseBodyConverter). Your Retrofit object will use the string converter to convert the ResponseBody object into a String before returning the result.
Square provides other handy open-source converters for Retrofit. Later in this chapter, you will use the Moshi converter. You can see the other available converters, and information about creating your own custom converter, at square.github.io/retrofit.
Up to this point, you have been writing code to configure your network request. You are very close to the moment you have been waiting for: executing a web request and logging the result. Your next step is to launch a coroutine using the viewLifecycleOwner.lifecycleScope property and then call your fetchContents() function. Do that and log out the result.
Listing 20.10 Making a network request (PhotoGalleryFragment.kt)
private const val TAG = "PhotoGalleryFragment"

class PhotoGalleryFragment : Fragment() {
    ...
    override fun onViewCreated(view: View, savedInstanceState: Bundle?) {
        super.onViewCreated(view, savedInstanceState)

        val retrofit: Retrofit = Retrofit.Builder()
            .baseUrl("https://www.flickr.com/")
            .addConverterFactory(ScalarsConverterFactory.create())
            .build()

        val flickrApi: FlickrApi = retrofit.create<FlickrApi>()

        viewLifecycleOwner.lifecycleScope.launch {
            val response = flickrApi.fetchContents()
            Log.d(TAG, "Response received: $response")
        }
    }
    ...
}
Retrofit makes it easy to respect the two most important Android threading rules:
-
Execute long-running operations only on a background thread, never on the main thread.
-
Update the UI only from the main thread, never from a background thread.
When you call fetchContents(), Retrofit automatically executes the request on a background thread. Retrofit manages the background thread for you, so you do not have to worry about it. When it receives a response, thanks to coroutines, it will pass the result back on the thread where it was first invoked, which in this case is the UI thread.
The last thing that is required to get networking up and running is to ask permission. Just as users would not want you secretly taking their pictures, they also would not want you secretly downloading ASCII pictures of cats.
To ask permission to network, add the following permission to your manifests/AndroidManifest.xml file.
Listing 20.11 Adding networking permission to the manifest (manifests/AndroidManifest.xml)
<manifest xmlns:android="http://schemas.android.com/apk/res/android"
          package="com.bignerdranch.android.photogallery" >

    <uses-permission android:name="android.permission.INTERNET" />

    <application>
        ...
    </application>

</manifest>
Android treats the INTERNET permission as “normal,” since so many apps require it.
As a result, all you need to do to use this permission is declare it in your manifest.
More dangerous permissions (like the one allowing you to know the device’s location) also require a runtime request.
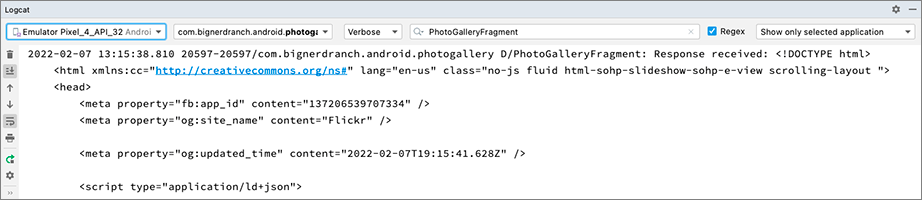
Run your code, and you should see the amazing Flickr home page HTML in Logcat, as shown in Figure 20.4. (Use your TAG constant to search or filter Logcat for PhotoGalleryFragment, as shown.)
Right now, your networking code is embedded in your fragment. It would be better if the Retrofit configuration code and API direct access were in a separate class.
Create a new Kotlin file named PhotoRepository.kt.
Add a property to stash a FlickrApi instance.
Cut the Retrofit configuration code and API interface instantiation code from PhotoGalleryFragment and paste it into an init block in the new class. (These are the two lines that start with val retrofit: Retrofit = ... and val flickrApi = ... in Listing 20.12.)
Split the flickrApi declaration and assignment onto two lines to declare flickrApi as a private property on PhotoRepository.
This will allow you to access it elsewhere in the class (outside the init block) – but not outside the class.
When you are done, PhotoRepository should match Listing 20.12.
Listing 20.12 Creating PhotoRepository (PhotoRepository.kt)
class PhotoRepository {
  private val flickrApi: FlickrApi

  init {
      val retrofit: Retrofit = Retrofit.Builder()
          .baseUrl("https://www.flickr.com/")
          .addConverterFactory(ScalarsConverterFactory.create())
          .build()
      flickrApi = retrofit.create()
  }
}
If you have not already, cut the redundant Retrofit configuration code from PhotoGalleryFragment (Listing 20.13). This will cause an error, which you will fix once you finish fleshing out PhotoRepository.
Listing 20.13 Cutting Retrofit setup from the fragment (PhotoGalleryFragment.kt)
class PhotoGalleryFragment : Fragment() {
    ...
    override fun onViewCreated(view: View, savedInstanceState: Bundle?) {
        super.onViewCreated(view, savedInstanceState)

        val retrofit: Retrofit = Retrofit.Builder()
            .baseUrl("https://www.flickr.com/")
            .addConverterFactory(ScalarsConverterFactory.create())
            .build()

        val flickrApi: FlickrApi = retrofit.create<FlickrApi>()

        viewLifecycleOwner.lifecycleScope.launch {
            val response = flickrApi.fetchContents()
            Log.d(TAG, "Response received: $response")
        }
    }
    ...
}
Next, add a function named fetchContents() to PhotoRepository to wrap the Retrofit API function you defined for fetching the Flickr home page.
Listing 20.14 Adding fetchContents() to PhotoRepository (PhotoRepository.kt)
class PhotoRepository {

    private val flickrApi: FlickrApi

    init {
        ...
    }

    suspend fun fetchContents() = flickrApi.fetchContents()
}
PhotoRepository will wrap most of the networking code in PhotoGallery (right now it is small and simple, but it will grow over the next several chapters). Now other components in your app, such as PhotoGalleryFragment (or some ViewModel, activity, or other component), can create an instance of PhotoRepository and request photo data without having to know about Retrofit or the source the data is coming from.
Update PhotoGalleryFragment to use PhotoRepository to see this magic in action (Listing 20.15).
Listing 20.15 Using PhotoRepository in PhotoGalleryFragment (PhotoGalleryFragment.kt)
class PhotoGalleryFragment : Fragment() {
    ...
    override fun onViewCreated(view: View, savedInstanceState: Bundle?) {
        super.onViewCreated(view, savedInstanceState)

        viewLifecycleOwner.lifecycleScope.launch {
            val response = flickrApi PhotoRepository().fetchContents()
            Log.d(TAG, "Response received: $response")
        }
    }
    ...
}
This refactor moves your app closer to following the repository pattern you learned about in Chapter 12. PhotoRepository serves as a very basic repository, encapsulating the logic for accessing data from a single source. It determines how to fetch and store a particular set of data – currently HTML, but later photos. Your UI code will request all the data from the repository, because the UI does not care how the data is actually stored or fetched. Those are implementation details of the repository itself.
Right now, all of your app’s data comes directly from the Flickr web server. However, in the future you might decide to cache that data in a local database. In that case, the repository would manage getting the data from the right place. Other components in your app can use the repository to get data without having to know where the data is coming from.
Take a moment to run your app and verify that it still works correctly. You should see the contents of the Flickr home page print to Logcat again, as shown in Figure 20.4.