
There is a lot to do in this chapter. Fortunately, some of the grunt work can be done for you by Android Studio’s New Android Activity wizard.
Before you invoke the magic, open res/values/strings.xml and add all the strings you will need for this chapter.
Listing 7.1 Adding strings (res/values/strings.xml)
<resources>
    ...
    <string name="incorrect_toast">Incorrect!</string>
    <string name="warning_text">Are you sure you want to do this?</string>
    <string name="show_answer_button">Show Answer</string>
    <string name="cheat_button">Cheat!</string>
    <string name="judgment_toast">Cheating is wrong.</string>
</resources>
Creating an activity typically involves touching at least three files: the Kotlin class file, an XML layout file, and the application manifest. If you touch those files in the wrong ways, Android can get mad. To ensure that you do it right, you can use Android Studio’s New Android Activity wizard.
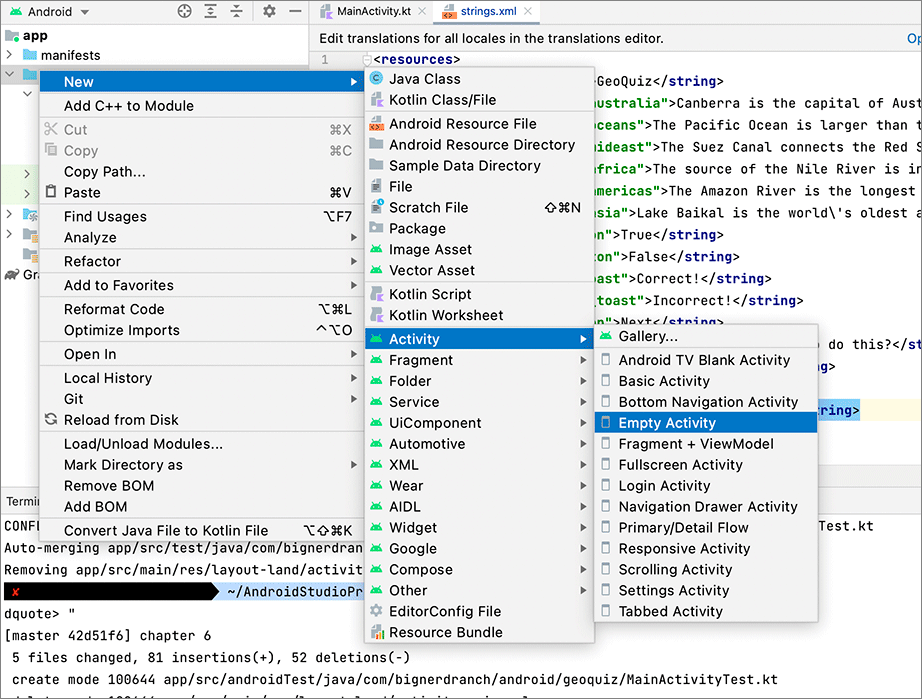
Launch the New Android Activity wizard by right-clicking the app/java folder in the project tool window. Choose New → Activity → Empty Activity, as shown in Figure 7.3.
You should see a dialog like Figure 7.4. Set Activity Name to CheatActivity. This is the name of your Activity subclass. Layout Name will be automatically set to activity_cheat. This is the base name of the layout file the wizard creates.
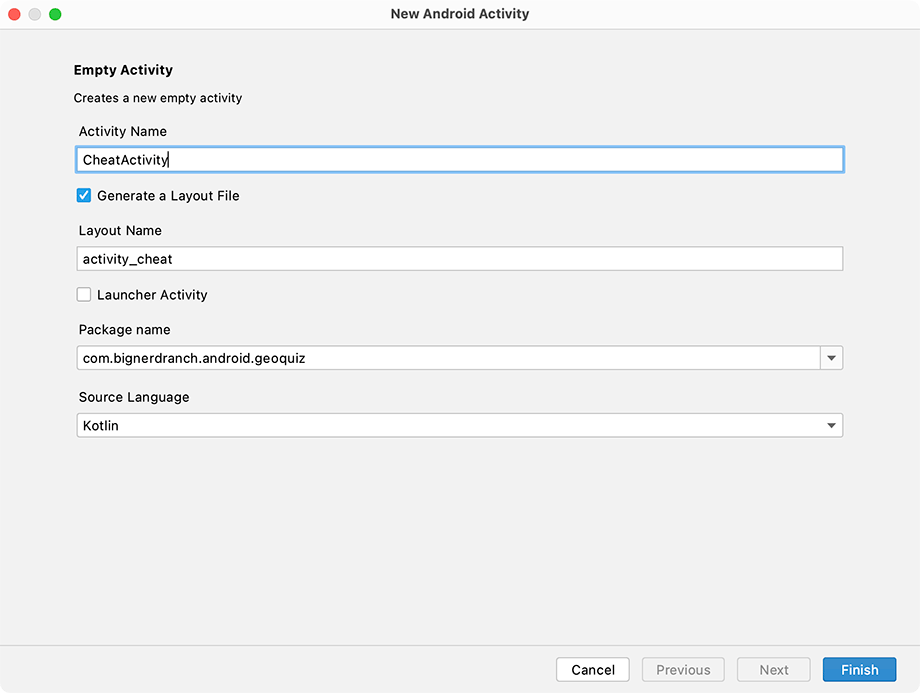
Check that the package name is com.bignerdranch.android.geoquiz.
This determines where CheatActivity.kt will live on the filesystem.
The defaults for the remaining fields are fine.
Click the Finish button to make the magic happen.
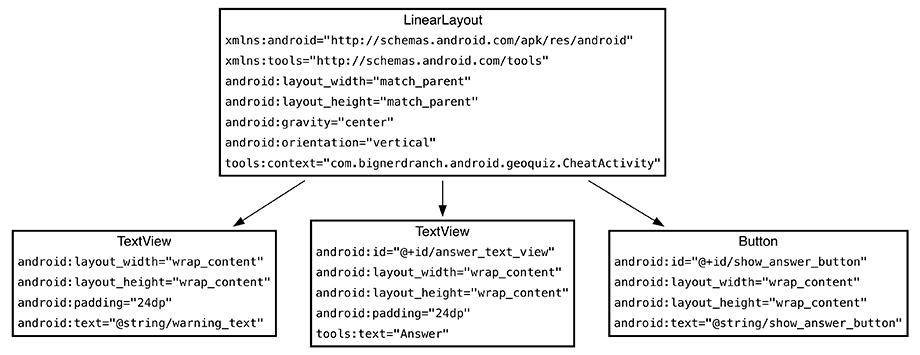
Now it is time to make the UI look good. The screenshot at the beginning of the chapter shows you what CheatActivity’s view should look like. Figure 7.5 shows the view definitions.
Open res/layout/activity_cheat.xml and switch to the Code view.
Try creating the XML for the layout using Figure 7.5 as a guide. Replace the sample layout with a new LinearLayout and so on down the tree. You can check your work against Listing 7.2.
Listing 7.2 Filling out the second activity’s layout (res/layout/activity_cheat.xml)
<LinearLayout xmlns:android="http://schemas.android.com/apk/res/android"
    xmlns:tools="http://schemas.android.com/tools"
    android:layout_width="match_parent"
    android:layout_height="match_parent"
    android:gravity="center"
    android:orientation="vertical"
    tools:context="com.bignerdranch.android.geoquiz.CheatActivity">

    <TextView
        android:layout_width="wrap_content"
        android:layout_height="wrap_content"
        android:padding="24dp"
        android:text="@string/warning_text"/>

    <TextView
        android:id="@+id/answer_text_view"
        android:layout_width="wrap_content"
        android:layout_height="wrap_content"
        android:padding="24dp"
        tools:text="Answer"/>

    <Button
        android:id="@+id/show_answer_button"
        android:layout_width="wrap_content"
        android:layout_height="wrap_content"
        android:text="@string/show_answer_button"/>

</LinearLayout>
Switch to the Design tab of the editor tool window to preview the layout. If it looks like Figure 7.5, you are ready to move on.
CheatActivity.kt may have opened automatically in the editor tool window. If it did not, open it from the project tool window.
The CheatActivity class already includes a basic implementation of onCreate(Bundle?) that passes the resource ID of the layout defined in activity_cheat.xml to setContentView(…). To match your first activity, update your new activity to use View Binding. Since your layout for CheatActivity is named activity_cheat.xml, View Binding will generate a class named ActivityCheatBinding.
Listing 7.3 Using View Binding in CheatActivity (CheatActivity.kt)
class CheatActivity : AppCompatActivity() {
    private lateinit var binding: ActivityCheatBinding

    override fun onCreate(savedInstanceState: Bundle?) {
        super.onCreate(savedInstanceState)
        setContentView(R.layout.activity_cheat)
        binding = ActivityCheatBinding.inflate(layoutInflater)
        setContentView(binding.root)
    }
}
CheatActivity will eventually do more in its onCreate(Bundle?) function. For now, let’s take a look at another thing the New Android Activity wizard did for you: declaring CheatActivity in the application’s manifest.
The manifest is an XML file containing metadata that describes your application to the Android OS. The file is always named AndroidManifest.xml, and it lives in the app/manifests directory of your project.
In the project tool window, find and open manifests/AndroidManifest.xml. You can also use Android Studio’s Find File dialog by pressing Command-Shift-O (Ctrl-Shift-N) and starting to type the filename. Once it has guessed the right file, press Return to open it.
Every activity in an application must be declared in the manifest so that the OS can access it.
When you used the New Project wizard to create MainActivity, the wizard declared the activity for you. Likewise, the New Android Activity wizard declared CheatActivity by adding the XML highlighted below:
    <manifest xmlns:android="http://schemas.android.com/apk/res/android"
        package="com.bignerdranch.android.geoquiz">

        <application
            android:allowBackup="true"
            android:icon="@mipmap/ic_launcher"
            android:label="@string/app_name"
            android:roundIcon="@mipmap/ic_launcher_round"
            android:supportsRtl="true"
            android:theme="@style/Theme.GeoQuiz">
            <activity
                android:name=".CheatActivity"
                android:exported="false" />
            <activity
                android:name=".MainActivity"
                android:exported="true">
                <intent-filter>
                    <action android:name="android.intent.action.MAIN" />

                    <category android:name="android.intent.category.LAUNCHER" />
                </intent-filter>
            </activity>
        </application>

    </manifest>
The android:name attribute is required, and the dot at the start of this attribute’s
value tells the OS that this activity’s class is in the package specified in the package
attribute in the manifest element at the top of the file.
You will sometimes see a fully qualified android:name attribute, like android:name="com.bignerdranch.android.geoquiz.CheatActivity". The long-form notation is identical to the version above.
There are many interesting things in the manifest, but for now, let’s stay focused on getting CheatActivity up and running. You will learn about the different parts of the manifest as you work through this book.
The plan is for the user to press a button in MainActivity to get an instance of CheatActivity onscreen. So you need a new button in res/layout/activity_main.xml.
You can see in Figure 7.2 that the new CHEAT! button is positioned above the NEXT button. In the layout, define the new button as a direct child of the root LinearLayout, right before the definition of the NEXT button.
Listing 7.4 Adding a cheat button to the layout (res/layout/activity_main.xml)
        ...
    </LinearLayout>

    <Button
        android:id="@+id/cheat_button"
        android:layout_width="wrap_content"
        android:layout_height="wrap_content"
        android:layout_marginTop="24dp"
        android:text="@string/cheat_button" />

    <Button
        android:id="@+id/next_button"
        .../>

</LinearLayout>
Now, in MainActivity.kt, set a View.OnClickListener stub for the CHEAT! button.
Listing 7.5 Wiring up the cheat button (MainActivity.kt)
class MainActivity : AppCompatActivity() {

    private lateinit var binding: ActivityMainBinding

    private val quizViewModel: QuizViewModel by viewModels()

    override fun onCreate(savedInstanceState: Bundle?) {
        ...
        binding.nextButton.setOnClickListener {
            quizViewModel.moveToNext()
            updateQuestion()
        }

        binding.cheatButton.setOnClickListener {
            // Start CheatActivity
        }

        updateQuestion()
    }
    ...
}
Now you can get to the business of starting CheatActivity.