
With your schema defined, you are ready to create the database itself. Android provides some low-level methods on Context to open a database file into an instance of SQLiteDatabase: openOrCreateDatabase(…) and databaseList().
However, in practice you will always need to follow a few basic steps:
-
Check to see whether the database already exists.
-
If it does not, create it and create the tables and initial data it needs.
-
If it does, open it up and see what version of your CrimeDbSchema it has. (You may want to add or remove things in future versions of CriminalIntent.)
-
If it is an old version, upgrade it to a newer version.
Android provides the SQLiteOpenHelper class to handle all of this for you.
Create a class called CrimeBaseHelper in your database package.
Listing 14.3 Creating CrimeBaseHelper (CrimeBaseHelper.java)
public class CrimeBaseHelper extends SQLiteOpenHelper {
    private static final int VERSION = 1;
    private static final String DATABASE_NAME = "crimeBase.db";

    public CrimeBaseHelper(Context context) {
        super(context, DATABASE_NAME, null, VERSION);
    }


    @Override
    public void onCreate(SQLiteDatabase db) {

    }

    @Override
    public void onUpgrade(SQLiteDatabase db, int oldVersion, int newVersion) {

    }
}
A SQLiteOpenHelper is a class designed to get rid of the grunt work of opening a SQLiteDatabase. Use it inside of CrimeLab to create your crime database.
Listing 14.4 Opening a SQLiteDatabase (CrimeLab.java)
public class CrimeLab {
    private static CrimeLab sCrimeLab;

    private List<Crime> mCrimes;
    private Context mContext;
    private SQLiteDatabase mDatabase;
    ...
    private CrimeLab(Context context) {
      mContext = context.getApplicationContext();
      mDatabase = new CrimeBaseHelper(mContext)
              .getWritableDatabase();
      mCrimes = new ArrayList<>();
    }
(Wondering why the context is stored in an instance variable? CrimeLab will use it in Chapter 16.)
When you call getWritableDatabase() here, CrimeBaseHelper will do the following:
-
Open up /data/data/com.bignerdranch.android.criminalintent/databases/crimeBase.db, creating a new database file if it does not already exist.
-
If this is the first time the database has been created, call onCreate(SQLiteDatabase), then save out the latest version number.
-
If this is not the first time, check the version number in the database. If the version number in CrimeBaseHelper is higher, call onUpgrade(SQLiteDatabase, int, int).
The upshot is this: You put your code to create the initial database in onCreate(SQLiteDatabase), your code to handle any upgrades in onUpgrade(SQLiteDatabase, int, int), and it just works.
For now, CriminalIntent will only have one version, so you can ignore onUpgrade(…). You only need to create your database tables in onCreate(SQLiteDatabase). To do that, you will refer to the CrimeTable inner class of CrimeDbSchema.
The import is a two-step process. First, write the initial part of your SQL creation code.
Listing 14.5 Writing first part of onCreate(SQLiteDatabase) (CrimeBaseHelper.java)
@Override
public void onCreate(SQLiteDatabase db) {
    db.execSQL("create table " + CrimeDbSchema.CrimeTable.NAME);
}
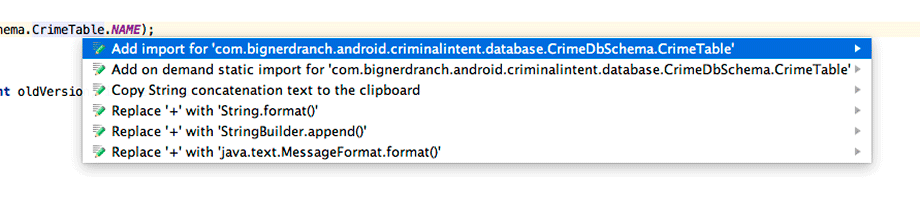
Put your cursor on the word CrimeTable and key in Option+Return (Alt+Enter). Then select the first item, Add import for 'com.bignerdranch.android.criminalintent.database.CrimeDbSchema.CrimeTable', as shown in Figure 14.2.
Android Studio will generate an import like this for you:
import com.bignerdranch.android.criminalintent.database.CrimeDbSchema.CrimeTable;

public class CrimeBaseHelper extends SQLiteOpenHelper {
That will let you refer to the String constants in CrimeDbSchema.CrimeTable by typing in CrimeTable.Cols.UUID, rather than typing out the entirety of CrimeDbSchema.CrimeTable.Cols.UUID. Use that to finish filling out your table definition code.
Listing 14.6 Creating crime table (CrimeBaseHelper.java)
@Override
public void onCreate(SQLiteDatabase db) {
    db.execSQL("create table " + CrimeTable.NAME + "(" +
            " _id integer primary key autoincrement, " +
            CrimeTable.Cols.UUID + ", " +
            CrimeTable.Cols.TITLE + ", " +
            CrimeTable.Cols.DATE + ", " +
            CrimeTable.Cols.SOLVED +
            ")"
    );
}
Creating a table in SQLite requires less ceremony than in other databases: You do not have to specify the type of a column at creation time. It is a good idea to do that, but here you will save a bit of labor by doing without it.
Run CriminalIntent, and your database will be created. If you are running on an emulator or a rooted device, you can look at it directly. (Not on an unrooted device, though – it is saved in private storage, which is secret.)
As of this writing, the emulator images for Nougat (API 24 and 25) do not cooperate with the Android Device Monitor’s file explorer. To see your files, you will need to install your app on an emulator running an older version of Android. To remind yourself how to set up an emulator, see the section called Running on the Emulator in Chapter 1.
Once you have an emulator running API 23 or earlier, pull up the Android Device Monitor. Select Tools → Android → Android Device Monitor from the main menu.
If you see a dialog that asks to disable ADB integration, click Yes (Figure 14.3).

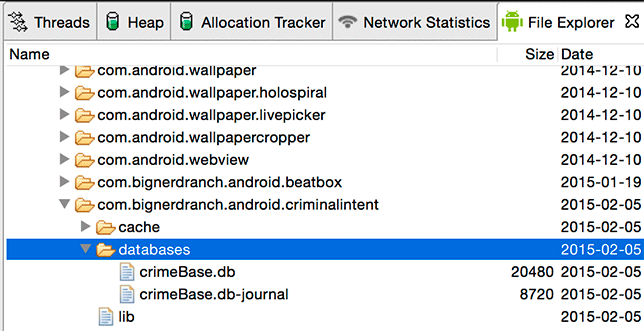
When the Android Device Monitor screen appears, click on the File Explorer tab. To see the database files CriminalIntent created, look in /data/data/com.bignerdranch.android.criminalintent/databases/ (Figure 14.4).
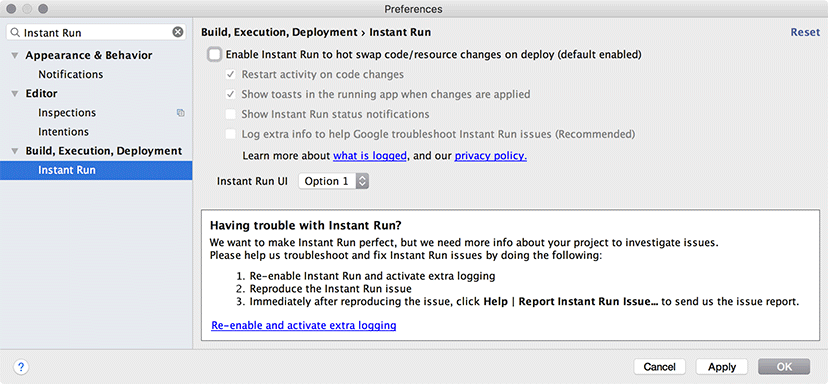
(If you try to run the app once you have disabled ADB integration, you may see the following error: Instant Run requires 'Tools | Android | Enable ADB integration' to be enabled. To fix this problem, select Android Studio → Preferences from the main menu. In the screen that appears, enter “Instant Run” in the search box on the top left (Figure 14.5). Uncheck the top checkbox that reads Enable Instant Run to hot swap code/resource changes on deploy (default enabled). Click the Apply button. Then click OK to dismiss the dialog.)
When writing code dealing with a SQLite database, you will sometimes need to tweak the layout of the database. For example, in an upcoming chapter you will add a suspect for each crime. This will require an additional column on the crime table. The “right” way to do this is to write code in your SQLiteOpenHelper to bump the version number, and then update the tables inside onUpgrade(…).
Well, the “right” way involves a fair amount of code – code that is ridiculous to write when you are only trying to get version 1 or 2 of the database right.
In practice, the best thing to do is destroy the database and start over, so that SQLiteOpenHelper.onCreate(…) is called again.
The easiest way to destroy your database is to delete the app off your device. And the easiest way to delete the app on stock Android is to go to the application browser and drag CriminalIntent’s icon up to where it says Uninstall at the top of screen. (The process may be different if your version of Android is different from stock Android.) Then you will see a screen similar to the one shown in Figure 14.6.

Remember this trick if you run into any issues with your database tables in this chapter.