
Time to create your interface. First, add a string for your search button in res/values/strings.xml.
Listing 33.1 Adding search button text (res/values/strings.xml)
<resources>
    <string name="app_name">Locatr</string>

    <string name="search">Find an image near you</string>
</resources>
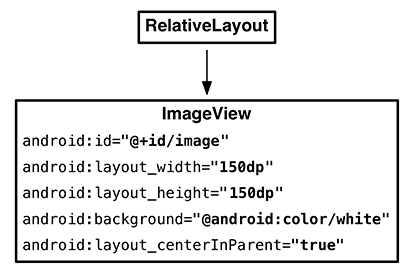
You will be using a fragment, as usual, so rename activity_locatr.xml to fragment_locatr.xml. Change out the insides of its RelativeLayout to have an ImageView to display the image you find (Figure 33.7). (There are padding attribute values that come from the template code as of this writing. They are not important, so feel free to leave them or delete them.)
You also need a button to trigger the search. You can use your toolbar for that. Create res/menu/fragment_locatr.xml and add a menu item to display a location icon. (Yes, this is the same filename as res/layout/fragment_locatr.xml. This is no problem at all: Menu resources live in a different namespace.)
Listing 33.2 Setting up Locatr’s menu (res/menu/fragment_locatr.xml)
<menu xmlns:android="http://schemas.android.com/apk/res/android"
    xmlns:app="http://schemas.android.com/apk/res-auto">
    <item android:id="@+id/action_locate"
        android:icon="@android:drawable/ic_menu_compass"
        android:title="@string/search"
        android:enabled="false"
        app:showAsAction="ifRoom"/>
</menu>
The button is disabled in XML by default. Later on, you will enable it once you are connected to Play Services.
Now create a Fragment subclass called LocatrFragment that hooks up your layout and pulls out that ImageView.
Listing 33.3 Creating LocatrFragment (LocatrFragment.java)
public class LocatrFragment extends Fragment {
    private ImageView mImageView;

    public static LocatrFragment newInstance() {
        return new LocatrFragment();
    }

    @Override
    public View onCreateView(LayoutInflater inflater, ViewGroup container,
            Bundle savedInstanceState) {
        View v = inflater.inflate(R.layout.fragment_locatr, container, false);

        mImageView = (ImageView) v.findViewById(R.id.image);

        return v;
    }
}
Hook up your menu item, too. Pull it out into its own instance variable so that you can enable it later on.
Listing 33.4 Adding menu to fragment (LocatrFragment.java)
public class LocatrFragment extends Fragment {
    private ImageView mImageView;

    public static LocatrFragment newInstance() {
        return new LocatrFragment();
    }

    @Override
    public void onCreate(Bundle savedInstanceState) {
        super.onCreate(savedInstanceState);
        setHasOptionsMenu(true);
    }

    @Override
    public View onCreateView(LayoutInflater inflater, ViewGroup container,
            Bundle savedInstanceState) {
        ...
    }

    @Override
    public void onCreateOptionsMenu(Menu menu, MenuInflater inflater) {
        super.onCreateOptionsMenu(menu, inflater);
        inflater.inflate(R.menu.fragment_locatr, menu);
    }
}
Now hook it up in LocatrActivity. Delete everything inside this class and replace it, like so:
Listing 33.5 Hooking up Locatr fragment (LocatrActivity.java)
public class LocatrActivity extends SingleFragmentActivity {
    @Override
    protected Fragment createFragment() {
        return LocatrFragment.newInstance();
    }
}
With that, you should be ready to get into some trouble.