
In this chapter, you are going to start on the detail part of CriminalIntent. Figure 7.4 shows you what CriminalIntent will look like at the end of this chapter.
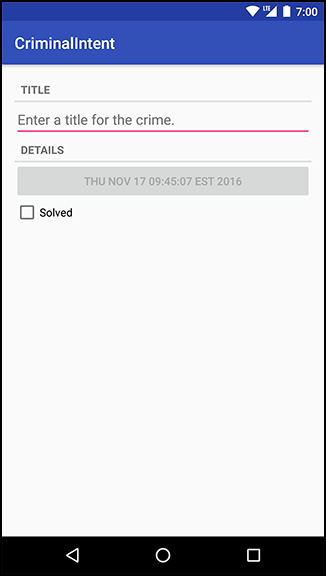
The screen shown in Figure 7.4 will be managed by a UI fragment named CrimeFragment. An instance of CrimeFragment will be hosted by an activity named CrimeActivity.
For now, think of hosting as the activity providing a spot in its view hierarchy where the fragment can place its view (Figure 7.5). A fragment is incapable of getting a view on screen itself. Only when it is placed in an activity’s hierarchy will its view appear.
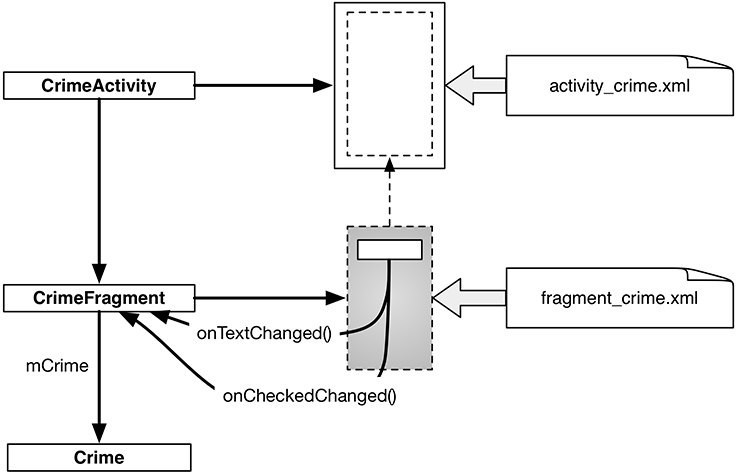
CriminalIntent will be a large project, and one way to keep your head wrapped around a project is with an object diagram. Figure 7.6 gives you the big picture of CriminalIntent. You do not have to memorize these objects and their relationships, but it is good to have an idea of where you are heading before you start.
You can see that CrimeFragment will do the sort of work that your activities did in GeoQuiz: create and manage the UI and interact with the model objects.

Three of the classes shown in Figure 7.6 are classes that you will write: Crime, CrimeFragment, and CrimeActivity.
An instance of Crime will represent a single office crime.
In this chapter, a crime will have a title, an ID, a date, and a boolean that indicates whether the crime has been solved.
The title is a descriptive name, like “Toxic sink dump” or “Someone stole my yogurt!”
The ID will uniquely identify an instance of Crime.
For this chapter, you will keep things very simple and use a single instance of Crime. CrimeFragment will have a member variable (mCrime) to hold this isolated incident.
CrimeActivity’s view will consist of a FrameLayout that defines the spot where the CrimeFragment’s view will appear.
CrimeFragment’s view will consist of a LinearLayout with a few child views inside of it, including an EditText, a Button, and a CheckBox. CrimeFragment will have member variables for each of these views and will set listeners on them to update the model layer when there are changes.
Enough talk; time to build a new app.
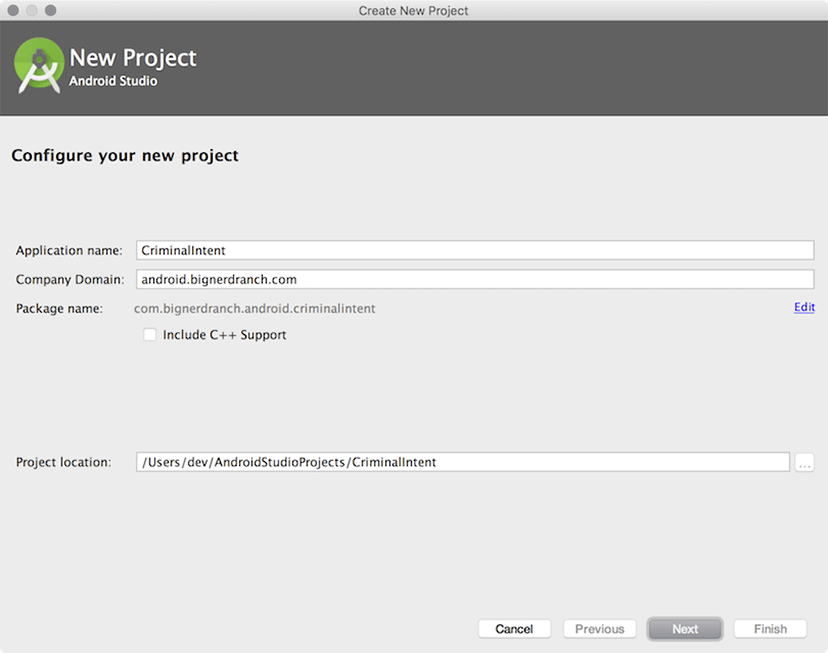
Create a new Android application (File → New Project...).
Name the application CriminalIntent and make sure the company domain is android.bignerdranch.com, as shown in Figure 7.7.
Click Next and specify a minimum SDK of API 19: Android 4.4. Also ensure that only the Phone and Tablet application type is checked.
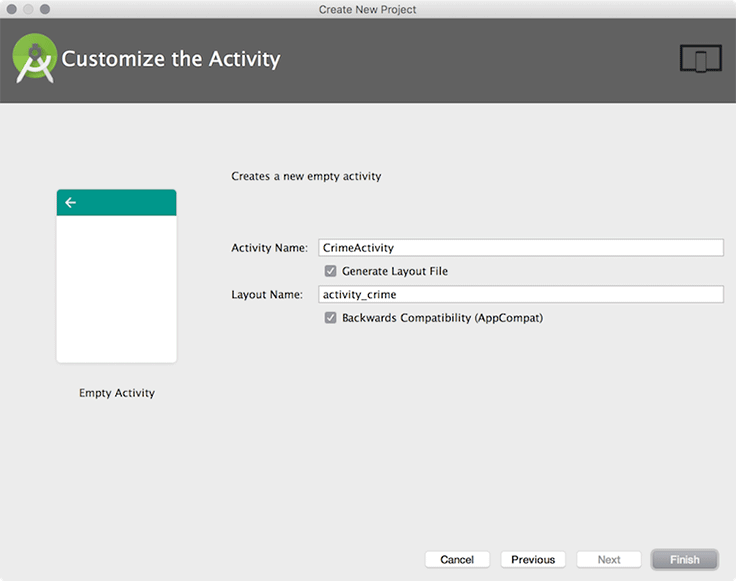
Click Next again to select the type of activity to add. Choose Empty Activity and continue along in the wizard.
In the final step of the New Project wizard, name the activity CrimeActivity and click Finish (Figure 7.8).
Fragments were introduced in API level 11 along with the first Android tablets and the sudden need for UI flexibility. You must choose which implementation of fragments that you want use: native fragments or support fragments.
The native implementation of fragments is built into the device that the user runs your app on. If you support many different versions of Android, each of those Android versions could have a slightly different implementation of fragments (for example, a bug could be fixed in one version and not the versions prior to it). The support implementation of fragments is built into a library that you include in your application. This means that each device you run your app on will depend on the same implementation of fragments no matter the Android version.
In CriminalIntent, you will use the support implementation of fragments. Detailed reasoning for this decision is laid out at the end of the chapter in the section called For the More Curious: Why Support Fragments Are Superior.
You will use the implementation of fragments that comes with the AppCompat library. The AppCompat library is one of Google’s many compatibility libraries that you will use throughout this book. You will learn much more about the AppCompat library in Chapter 13.
To use the AppCompat library, it must be included in your list of dependencies. Your project comes with two build.gradle files, one for the project as a whole and one for your app module. Open the build.gradle file located in your app module.
Listing 7.1 Gradle dependencies (app/build.gradle)
apply plugin: 'com.android.application'

android {
    ...
}

dependencies {
    compile fileTree(dir: 'libs', include: ['*.jar'])
    ...
    compile 'com.android.support:appcompat-v7:25.0.1'
    ...
}
In the current dependencies section of your build.gradle file, you should see something similar to Listing 7.1 that specifies that the project depends on all of the .jar files in its libs directory. You will also see dependencies for other libraries that are automatically included when projects are created with Android Studio, most likely including the AppCompat library.
Gradle allows for the specification of dependencies that you have not copied into your project. When your app is compiled, Gradle will find, download, and include the dependencies for you. All you have to do is specify an exact string incantation and Gradle will do the rest.
If you do not have the AppCompat library listed in your dependencies, Android Studio has a tool to help you add the library and come up with this string incantation. Navigate to the project structure for your project (File → Project Structure...).
Select the app module on the left and the Dependencies tab in the app module. The dependencies for the app module are listed here (Figure 7.9).

(You may have additional dependencies specified. If you do, do not remove them.)
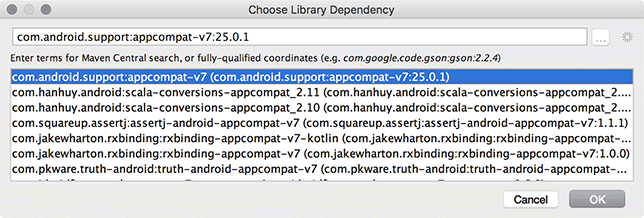
You should see the AppCompat dependency listed. If you do not, add it with the + button and choose Library dependency. Choose the appcompat-v7 library from the list and click OK (Figure 7.10).
Navigate back to the editor window showing app/build.gradle, and you should now see AppCompat included, as shown in Listing 7.1.
(If you modify this file manually, outside of the project structure window, you will need to sync your project with the Gradle file to reflect any updates that you have made. This sync asks Gradle to update the build based on your changes by either downloading or removing dependencies. Changes within the project structure window will trigger this sync automatically. To manually perform this sync, navigate to Tools → Android → Sync Project with Gradle Files.)
The dependency string compile 'com.android.support:appcompat-v7:25.0.0' uses the Maven coordinates format groupId:artifactId:version.
(Maven is a dependency management tool.
You can learn more about it at maven.apache.org/.)
The groupId is the unique identifier for a set of libraries available on the Maven repository.
Often the library’s base package name is used as the groupId, which is com.android.support for the AppCompat library.
The artifactId is the name of a specific library within the package.
In this case, the name of the library you are referring to is appcompat-v7.
Last but not least, the version represents the revision number of the library.
CriminalIntent depends on the 25.0.0 version of the appcompat-v7 library.
Version 25.0.0 is the latest version as of this writing, but any version newer than that should also work for this project.
In fact, it is a good idea to use the latest version of the support library so that you can use newer APIs and receive the latest bug fixes.
If Android Studio added a newer version of the library for you, do not roll it back to the version shown above.
Now that the AppCompat library is a dependency in the project, make sure that your project uses it. In the project tool window, find and open CrimeActivity.java. Verify that CrimeActivity’s superclass is AppCompatActivity.
Listing 7.2 Tweaking template code (CrimeActivity.java)
public class CrimeActivity extends AppCompatActivity {

    @Override
    protected void onCreate(Bundle savedInstanceState) {
        super.onCreate(savedInstanceState);
        setContentView(R.layout.activity_crime);
    }

}
Before proceeding with CrimeActivity, let’s create the model layer for CriminalIntent by writing the Crime class.
In the project tool window, right-click the com.bignerdranch.android.criminalintent package and select New → Java Class. Name the class Crime and click OK.
In Crime.java, add fields to represent the crime’s ID, title, date, and status and a constructor that initializes the ID and date fields (Listing 7.3).
Listing 7.3 Adding to Crime class (Crime.java)
public class Crime {

    private UUID mId;
    private String mTitle;
    private Date mDate;
    private boolean mSolved;

    public Crime() {
        mId = UUID.randomUUID();
        mDate = new Date();
    }
}
UUID is a Java utility class included in the Android framework.
It provides an easy way to generate universally unique ID values.
In the constructor you generate a random unique ID by calling UUID.randomUUID().
Android Studio may find two classes with the name Date. Use the Option+Return (or Alt+Enter) shortcut to manually import the class. When asked which version of the Date class to import, choose the java.util.Date version.
Initializing the Date variable using the default Date constructor sets mDate to the current date. This will be the default date for a crime.
Next, you want to generate a getter for the read-only mId and both a getter and setter for mTitle, mDate, and mSolved. Right-click after the constructor and select Generate... → Getter and select the mId variable. Then, generate the getter and setter for mTitle, mDate, and mSolved by repeating the process, but selecting Getter and Setter in the Generate... menu.
Listing 7.4 Generated getters and setters (Crime.java)
public class Crime {

    private UUID mId;
    private String mTitle;
    private Date mDate;
    private boolean mSolved;

    public Crime() {
        mId = UUID.randomUUID();
        mDate = new Date();
    }

    public UUID getId() {
        return mId;
    }

    public String getTitle() {
        return mTitle;
    }

    public void setTitle(String title) {
        mTitle = title;
    }

    public Date getDate() {
        return mDate;
    }

    public void setDate(Date date) {
        mDate = date;
    }

    public boolean isSolved() {
        return mSolved;
    }

    public void setSolved(boolean solved) {
        mSolved = solved;
    }
}
That is all you need for the Crime class and for CriminalIntent’s model layer in this chapter.
At this point, you have created the model layer and an activity that is capable of hosting a support fragment. Now you will get into the details of how the activity performs its duties as host.