20. Working with ConstraintLayout Chains and Ratios in Android Studio
The previous chapters have introduced the key features of the ConstraintLayout class and outlined the best practices for ConstraintLayout-based user interface design within the Android Studio Layout Editor. Although the concepts of ConstraintLayout chains and ratios were outlined in the chapter entitled “A Guide to the Android ConstraintLayout”, we have not yet addressed how to make use of these features within the Layout Editor. The focus of this chapter, therefore, is to provide practical steps on how to create and manage chains and ratios when using the ConstraintLayout class.
Chains may be implemented either by adding a few lines to the XML layout resource file of an activity or by using some chain specific features of the Layout Editor.
Consider a layout consisting of three Button widgets constrained so as to be positioned in the top-left, top-center and top-right of the ConstraintLayout parent as illustrated in Figure 20-1:

To represent such a layout, the XML resource layout file might contain the following entries for the button widgets:
<Button
android:id="@+id/button1"
android:layout_width="wrap_content"
android:layout_height="wrap_content"
android:layout_marginStart="8dp"
android:layout_marginTop="16dp"
android:text="Button"
app:layout_constraintHorizontal_bias="0.5"
app:layout_constraintStart_toStartOf="parent"
app:layout_constraintTop_toTopOf="parent" />
<Button
android:id="@+id/button2"
android:layout_width="wrap_content"
android:layout_height="wrap_content"
android:layout_marginEnd="8dp"
android:layout_marginStart="8dp"
android:layout_marginTop="16dp"
android:text="Button"
app:layout_constraintHorizontal_bias="0.5"
app:layout_constraintEnd_toStartOf="@+id/button3"
app:layout_constraintStart_toEndOf="@+id/button1"
app:layout_constraintTop_toTopOf="parent" />
<Button
android:id="@+id/button3"
android:layout_width="wrap_content"
android:layout_height="wrap_content"
android:layout_marginEnd="8dp"
android:layout_marginTop="16dp"
android:text="Button"
app:layout_constraintHorizontal_bias="0.5"
app:layout_constraintEnd_toEndOf="parent"
app:layout_constraintTop_toTopOf="parent" />
As currently configured, there are no bi-directional constraints to group these widgets into a chain. To address this, additional constraints need to be added from the right-hand side of button1 to the left side of button2, and from the left side of button3 to the right side of button2 as follows:
<Button
android:id="@+id/button1"
android:layout_width="wrap_content"
android:layout_height="wrap_content"
android:layout_marginStart="8dp"
android:layout_marginTop="16dp"
android:text="Button"
app:layout_constraintHorizontal_bias="0.5"
app:layout_constraintStart_toStartOf="parent"
app:layout_constraintTop_toTopOf="parent"
app:layout_constraintEnd_toStartOf="@+id/button2" />
<Button
android:id="@+id/button2"
android:layout_width="wrap_content"
android:layout_height="wrap_content"
android:layout_marginEnd="8dp"
android:layout_marginStart="8dp"
android:layout_marginTop="16dp"
android:text="Button"
app:layout_constraintHorizontal_bias="0.5"
app:layout_constraintEnd_toStartOf="@+id/button3"
app:layout_constraintStart_toEndOf="@+id/button1"
app:layout_constraintTop_toTopOf="parent" />
<Button
android:id="@+id/button3"
android:layout_width="wrap_content"
android:layout_height="wrap_content"
android:layout_marginEnd="8dp"
android:layout_marginTop="16dp"
android:text="Button"
app:layout_constraintHorizontal_bias="0.5"
app:layout_constraintEnd_toEndOf="parent"
app:layout_constraintTop_toTopOf="parent"
app:layout_constraintStart_toEndOf="@+id/button2" />
With these changes, the widgets now have bi-directional horizontal constraints configured. This essentially constitutes a ConstraintLayout chain which is represented visually within the Layout Editor by chain connections as shown in Figure 20-2 below. Note that in this configuration the chain has defaulted to the spread chain style.

A chain may also be created by right-clicking on one of the views and selecting the Chains -> Create Horizontal Chain or Chains -> Create Vertical Chain menu options.
If no chain style is configured, the ConstraintLayout will default to the spread chain style. The chain style can be altered by right-clicking any of the widgets in the chain and selecting the Cycle Chain Mode menu option. Each time the menu option is clicked the style will switch to another setting in the order of spread, spread inside and packed.
Alternatively, the style may be specified in the Attributes tool window unfolding the layout_constraints property and changing either the horizontal_chainStyle or vertical_chainStyle property depending on the orientation of the chain:

Figure 20-3
20.3 Spread Inside Chain Style
Figure 20-4 illustrates the effect of changing the chain style to the spread inside chain style using the above techniques:

Using the same technique, changing the chain style property to packed causes the layout to change as shown in Figure 20-5:

20.5 Packed Chain Style with Bias
The positioning of the packed chain may be influenced by applying a bias value. The bias can be any value between 0.0 and 1.0, with 0.5 representing the center of the parent. Bias is controlled by selecting the chain head widget and assigning a value to the layout_constraintHorizontal_bias or layout_constraintVertical_bias attribute in the Attributes panel. Figure 20-6 shows a packed chain with a horizontal bias setting of 0.2:

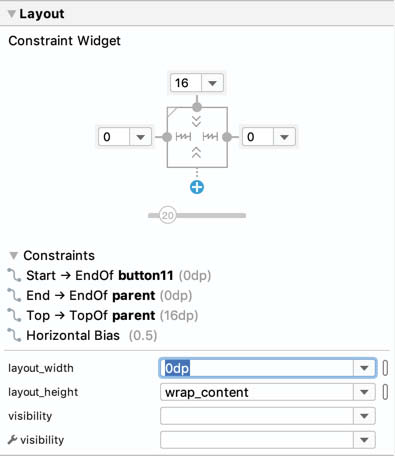
The final area of chains to explore involves weighting of the individual widgets to control how much space each widget in the chain occupies within the available space. A weighted chain may only be implemented using the spread chain style and any widget within the chain that is to respond to the weight property must have the corresponding dimension property (height for a vertical chain and width for a horizontal chain) configured for match constraint mode. Match constraint mode for a widget dimension may be configured by selecting the widget, displaying the Attributes panel and changing the dimension to match_constraint (equivalent to 0dp). In Figure 20-7, for example, the layout_width constraint for a button has been set to match_constraint (0dp) to indicate that the width of the widget is to be determined based on the prevailing constraint settings:
Assuming that the spread chain style has been selected, and all three buttons have been configured such that the width dimension is set to match the constraints, the widgets in the chain will expand equally to fill the available space:

Figure 20-8
The amount of space occupied by each widget relative to the other widgets in the chain can be controlled by adding weight properties to the widgets. Figure 20-9 shows the effect of setting the layout_constraintHorizontal_weight property to 4 on button1, and to 2 on both button2 and button3:

As a result of these weighting values, button1 occupies half of the space (4/8), while button2 and button3 each occupy one quarter (2/8) of the space.
ConstraintLayout ratios allow one dimension of a widget to be sized relative to the widget’s other dimension (otherwise known as aspect ratio). An aspect ratio setting could, for example, be applied to an ImageView to ensure that its width is always twice its height.
A dimension ratio constraint is configured by setting the constrained dimension to match constraint mode and configuring the layout_constraintDimensionRatio attribute on that widget to the required ratio. This ratio value may be specified either as a float value or a width:height ratio setting. The following XML excerpt, for example, configures a ratio of 2:1 on an ImageView widget:
<ImageView
android:layout_width="0dp"
android:layout_height="100dp"
android:id="@+id/imageView"
app:layout_constraintDimensionRatio="2:1" />
The above example demonstrates how to configure a ratio when only one dimension is set to match constraint. A ratio may also be applied when both dimensions are set to match constraint mode. This involves specifying the ratio preceded with either an H or a W to indicate which of the dimensions is constrained relative to the other.
Consider, for example, the following XML excerpt for an ImageView object:
<ImageView
android:layout_width="0dp"
android:layout_height="0dp"
android:id="@+id/imageView"
app:layout_constraintBottom_toBottomOf="parent"
app:layout_constraintRight_toRightOf="parent"
app:layout_constraintLeft_toLeftOf="parent"
app:layout_constraintTop_toTopOf="parent"
app:layout_constraintDimensionRatio="W,1:3" />
In the above example the height will be defined subject to the constraints applied to it. In this case constraints have been configured such that it is attached to the top and bottom of the parent view, essentially stretching the widget to fill the entire height of the parent. The width dimension, on the other hand, has been constrained to be one third of the ImageView’s height dimension. Consequently, whatever size screen or orientation the layout appears on, the ImageView will always be the same height as the parent and the width one third of that height.
The same results may also be achieved without the need to manually edit the XML resource file. Whenever a widget dimension is set to match constraint mode, a ratio control toggle appears in the Inspector area of the property panel. Figure 20-10, for example, shows the layout width and height attributes of a button widget set to match constraint mode and 100dp respectively, and highlights the ratio control toggle in the widget sizing preview:

By default the ratio sizing control is toggled off. Clicking on the control enables the ratio constraint and displays an additional field where the ratio may be changed:

Figure 20-11
Both chains and ratios are powerful features of the ConstraintLayout class intended to provide additional options for designing flexible and responsive user interface layouts within Android applications. As outlined in this chapter, the Android Studio Layout Editor has been enhanced to make it easier to use these features during the user interface design process.