
21. An Android Studio Layout Editor ConstraintLayout Tutorial
By far the easiest and most productive way to design a user interface for an Android application is to make use of the Android Studio Layout Editor tool. The goal of this chapter is to provide an overview of how to create a ConstraintLayout-based user interface using this approach. The exercise included in this chapter will also be used as an opportunity to outline the creation of an activity starting with a “bare-bones” Android Studio project.
Having covered the use of the Android Studio Layout Editor, the chapter will also introduce the Layout Inspector tool.
21.1 An Android Studio Layout Editor Tool Example
The first step in this phase of the example is to create a new Android Studio project. Begin, therefore, by launching Android Studio and closing any previously opened projects by selecting the File -> Close Project menu option.
Select the Create New Project quick start option from the welcome screen. In previous examples, we have requested that Android Studio create a template activity for the project. We will, however, be using this tutorial to learn how to create an entirely new activity and corresponding layout resource file manually, so make sure that the No Activity option is selected before clicking on the Next button
Enter LayoutSample into the Name field and specify com.ebookfrenzy.layoutsample as the package name. Before clicking on the Finish button, change the Minimum API level setting to API 26: Android 8.0 (Oreo) and the Language menu to Java.
Once the project creation process is complete, the Android Studio main window should appear. The first step in the project is to create a new activity. This will be a valuable learning exercise since there are many instances in the course of developing Android applications where new activities need to be created from the ground up.
Begin by displaying the Project tool window if it is not already visible using the Alt-1/Cmd-1 keyboard shortcut. Once the Android hierarchy is displayed, unfold it by clicking on the right facing arrows next to the entries in the Project window. The objective here is to gain access to the app -> java -> com.ebookfrenzy.layoutsample folder in the project hierarchy. Once the package name is visible, right-click on it and select the New -> Activity -> Empty Activity menu option as illustrated in Figure 21-1. Alternatively, select the New -> Activity -> Gallery... option to browse the available templates and make a selection using the New Android Activity dialog.

In the resulting New Android Activity dialog, name the new activity MainActivity and the layout activity_main. The activity will, of course, need a layout resource file so make sure that the Generate a Layout File option is enabled.
In order for an application to be able to run on a device it needs to have an activity designated as the launcher activity. Without a launcher activity, the operating system will not know which activity to start up when the application first launches and the application will fail to start. Since this example only has one activity, it needs to be designated as the launcher activity for the application so make sure that the Launcher Activity option is enabled before clicking on the Finish button.
At this point Android Studio should have added two files to the project. The Java source code file for the activity should be located in the app -> java -> com.ebookfrenzy.layoutsample folder.
In addition, the XML layout file for the user interface should have been created in the app -> res -> layout folder. Note that the Empty Activity template was chosen for this activity so the layout is contained entirely within the activity_main.xml file and there is no separate content layout file. Also, since we will not be writing any code to access views in the user interface layout, it is not necessary to convert the project to support view binding.
Finally, the new activity should have been added to the AndroidManifest.xml file and designated as the launcher activity. The manifest file can be found in the project window under the app -> manifests folder and should contain the following XML:
<?xml version="1.0" encoding="utf-8"?>
<manifest xmlns:android="http://schemas.android.com/apk/res/android"
package="com.ebookfrenzy.layoutsample">
<application
android:allowBackup="true"
android:icon="@mipmap/ic_launcher"
android:label="@string/app_name"
android:roundIcon="@mipmap/ic_launcher_round"
android:supportsRtl="true"
android:theme="@style/AppTheme">
<activity android:name=".MainActivity">
<intent-filter>
<action android:name="android.intent.action.MAIN" />
<category
android:name="android.intent.category.LAUNCHER" />
</intent-filter>
</activity>
</application>
</manifest>
21.3 Preparing the Layout Editor Environment
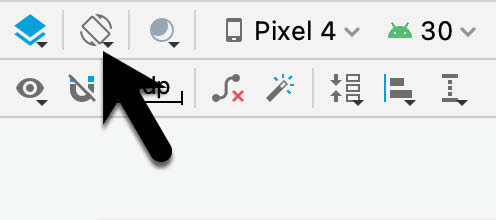
Locate and double-click on the activity_main.xml layout file located in the app -> res -> layout folder to load it into the Layout Editor tool. Since the purpose of this tutorial is to gain experience with the use of constraints, turn off the Autoconnect feature using the button located in the Layout Editor toolbar. Once disabled, the button will appear with a line through it as is the case in Figure 21-2:

If the default margin value to the right of the Autoconnect button is not set to 8dp, click on it and select 8dp from the resulting panel.
The user interface design will also make use of the ImageView object to display an image. Before proceeding, this image should be added to the project ready for use later in the chapter. This file is named galaxys6.png and can be found in the project_icons folder of the sample code download available from the following URL:
https://www.ebookfrenzy.com/retail/androidstudio42/index.php
Within Android Studio, display the Resource Manager tool window (View -> Tool Windows -> Resource Manager). Locate the galaxy6s.png image in the file system navigator for your operating system and drag and drop the image onto the Resource Manager tool window. In the resulting dialog, click Next followed by the Import button to add the image to project. The image should now appear in the Resource Manager as shown in Figure 21-3 below:

The image will also appear in the res -> drawables section of the Project tool window:

Figure 21-4
21.4 Adding the Widgets to the User Interface
From within the Common palette category, drag an ImageView object into the center of the display view. Note that horizontal and vertical dashed lines appear indicating the center axes of the display. When centered, release the mouse button to drop the view into position. Once placed within the layout, the Resources dialog will appear seeking the image to be displayed within the view. In the search bar located at the top of the dialog, enter “galaxy” to locate the galaxys6.png resource as illustrated in Figure 21-5.

Select the image and click on OK to assign it to the ImageView object. If necessary, adjust the size of the ImageView using the resize handles and reposition it in the center of the layout. At this point the layout should match Figure 21-6:

Click and drag a TextView object from the Common section of the palette and position it so that it appears above the ImageView as illustrated in Figure 21-7.
Using the Attributes panel, unfold the textAppearance attribute entry in the Common Attributes section, change the textSize property to 24sp, the textAlignment setting to center and the text to “Samsung Galaxy S6”.

Next, add three Button widgets along the bottom of the layout and set the text attributes of these views to “Buy Now”, “Pricing” and “Details”. The completed layout should now match Figure 21-8:

At this point, the widgets are not sufficiently constrained for the layout engine to be able to position and size the widgets at runtime. Were the app to run now, all of the widgets would be positioned in the top left-hand corner of the display.
With the widgets added to the layout, use the device rotation button located in the Layout Editor toolbar (indicated by the arrow in Figure 21-9) to view the user interface in landscape orientation:
The absence of constraints results in a layout that fails to adapt to the change in device orientation, leaving the content off center and with part of the image and all three buttons positioned beyond the viewable area of the screen. Clearly some work still needs to be done to make this into a responsive user interface.
Constraints are the key to creating layouts that can adapt to device orientation changes and different screen sizes. Begin by rotating the layout back to portrait orientation and selecting the TextView widget located above the ImageView. With the widget selected, establish constraints from the left, right and top sides of the TextView to the corresponding sides of the parent ConstraintLayout as shown in Figure 21-10:

With the TextView widget constrained, select the ImageView instance and establish opposing constraints on the left and right-hand sides with each connected to the corresponding sides of the parent layout. Next, establish a constraint connection from the top of the ImageView to the bottom of the TextView and from the bottom of the ImageView to the top of the center Button widget. If necessary, click and drag the ImageView so that it is still positioned in the vertical center of the layout.
With the ImageView still selected, use the Inspector in the attributes panel to change the top and bottom margins on the ImageView to 24 and 8 respectively and to change both the widget height and width dimension properties to match_constraint so that the widget will resize to match the constraints. These settings will allow the layout engine to enlarge and reduce the size of the ImageView when necessary to accommodate layout changes:

Figure 21-11
Figure 21-12, shows the currently implemented constraints for the ImageView in relation to the other elements in the layout:

The final task is to add constraints to the three Button widgets. For this example, the buttons will be placed in a chain. Begin by turning on Autoconnect within the Layout Editor by clicking the toolbar button highlighted in Figure 21-2.
Next, click on the Buy Now button and then shift-click on the other two buttons so that all three are selected. Right-click on the Buy Now button and select the Chains -> Create Horizontal Chain menu option from the resulting menu. By default, the chain will be displayed using the spread style which is the correct behavior for this example.
Finally, establish a constraint between the bottom of the Buy Now button and the bottom of the layout. Repeat this step for the remaining buttons.
On completion of these steps the buttons should be constrained as outlined in Figure 21-13:

With the constraints added to the layout, rotate the screen into landscape orientation and verify that the layout adapts to accommodate the new screen dimensions.
While the Layout Editor tool provides a useful visual environment in which to design user interface layouts, when it comes to testing there is no substitute for testing the running app. Launch the app on a physical Android device or emulator session and verify that the user interface reflects the layout created in the Layout Editor. Figure 21-14, for example, shows the running app in landscape orientation:

The user interface design is now complete. Designing a more complex user interface layout is a continuation of the steps outlined above. Simply drag and drop views onto the display, position, constrain and set properties as needed.
21.7 Using the Layout Inspector
The hierarchy of components that make up a user interface layout may be viewed at any time using the Layout Inspector tool. In order to access this information the app must be running on a device or emulator running Android API 29 or later. Once the app is running, select the Tools -> Layout Inspector menu option followed by the process to be inspected using the menu marked A in Figure 21-15 below).
Once the inspector loads, the left most panel (B) shows the hierarchy of components that make up the user interface layout. The center panel (C) shows a visual representation of the layout design. Clicking on a widget in the visual layout will cause that item to highlight in the hierarchy list making it easy to find where a visual component is situated relative to the overall layout hierarchy.
Finally, the rightmost panel (marked D in Figure 21-15) contains all of the property settings for the currently selected component, allowing for in-depth analysis of the component’s internal configuration. Where appropriate, the value cell will contain a link to the location of the property setting within the project source code.

To view the layout in 3D, click and drag anywhere on the layout preview area. This displays an “exploded” representation of the hierarchy so that it can be rotated and inspected. This can be useful for tasks such as identifying obscured views:

Figure 21-16
Click and drag the rendering to rotate it in three dimensions, using the slider indicated by the arrow in the above figure to increase the spacing between the layers. Click the button marked E in Figure 21-15 reset the rendering to the original position.
The Layout Editor tool in Android Studio has been tightly integrated with the ConstraintLayout class. This chapter has worked through the creation of an example user interface intended to outline the ways in which a ConstraintLayout-based user interface can be implemented using the Layout Editor tool in terms of adding widgets and setting constraints. This chapter also introduced the Live Layout Inspector tool which is useful for analyzing the structural composition of a user interface layout.