70. Video Playback on Android using the VideoView and MediaController Classes
One of the primary uses for smartphones and tablets is to provide access to online content. One key form of content widely used, especially in the case of tablet devices, is video.
The Android SDK includes two classes that make the implementation of video playback on Android devices extremely easy to implement when developing applications. This chapter will provide an overview of these two classes, VideoView and MediaController, before working through the creation of a video playback application.
70.1 Introducing the Android VideoView Class
By far the simplest way to display video within an Android application is to use the VideoView class. This is a visual component which, when added to the layout of an activity, provides a surface onto which a video may be played. Android currently supports the following video formats:
•H.263
•H.264 AVC
•H.265 HEVC
•MPEG-4 SP
•VP8
•VP9
The VideoView class has a wide range of methods that may be called in order to manage the playback of video. Some of the more commonly used methods are as follows:
•setVideoPath(String path) – Specifies the path (as a string) of the video media to be played. This can be either the URL of a remote video file or a video file local to the device.
•setVideoUri(Uri uri) – Performs the same task as the setVideoPath() method but takes a Uri object as an argument instead of a string.
•start() – Starts video playback.
•stopPlayback() – Stops the video playback.
•pause() – Pauses video playback.
•isPlaying() – Returns a Boolean value indicating whether a video is currently playing.
•setOnPreparedListener(MediaPlayer.OnPreparedListener) – Allows a callback method to be called when the video is ready to play.
•setOnErrorListener(MediaPlayer.OnErrorListener) - Allows a callback method to be called when an error occurs during the video playback.
•setOnCompletionListener(MediaPlayer.OnCompletionListener) - Allows a callback method to be called when the end of the video is reached.
•getDuration() – Returns the duration of the video. Will typically return -1 unless called from within the OnPreparedListener() callback method.
•getCurrentPosition() – Returns an integer value indicating the current position of playback.
•setMediaController(MediaController) – Designates a MediaController instance allowing playback controls to be displayed to the user.
70.2 Introducing the Android MediaController Class
If a video is simply played using the VideoView class, the user will not be given any control over the playback, which will run until the end of the video is reached. This issue can be addressed by attaching an instance of the MediaController class to the VideoView instance. The MediaController will then provide a set of controls allowing the user to manage the playback (such as pausing and seeking backwards/forwards in the video time-line).
The position of the controls is designated by anchoring the controller instance to a specific view in the user interface layout. Once attached and anchored, the controls will appear briefly when playback starts and may subsequently be restored at any point by the user tapping on the view to which the instance is anchored.
Some of the key methods of this class are as follows:
•setAnchorView(View view) – Designates the view to which the controller is to be anchored. This designates the location of the controls on the screen.
•show() – Displays the controls.
•show(int timeout) – Controls are displayed for the designated duration (in milliseconds).
•hide() – Hides the controller from the user.
•isShowing() – Returns a Boolean value indicating whether the controls are currently visible to the user.
70.3 Creating the Video Playback Example
The remainder of this chapter will create an example application intended to use the VideoView and MediaController classes to play an MPEG-4 video file.
Select the Create New Project quick start option from the welcome screen and, within the resulting new project dialog, choose the Empty Activity template before clicking on the Next button.
Enter VideoPlayer into the Name field and specify com.ebookfrenzy.videoplayer as the package name. Before clicking on the Finish button, change the Minimum API level setting to API 26: Android 8.0 (Oreo) and the Language menu to Java. Use the steps in section 11.8 Migrating a Project to View Binding to enable view binding for the project.
70.4 Designing the VideoPlayer Layout
The user interface for the main activity will consist solely of an instance of the VideoView class. Use the Project tool window to locate the app -> res -> layout -> activity_main.xml file, double-click on it, switch the Layout Editor tool to Design mode and delete the default TextView widget.
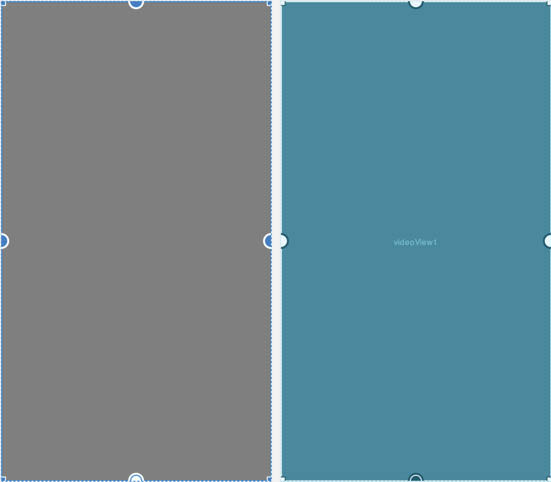
From the Widgets category of the Palette panel, drag and drop a VideoView instance onto the layout so that it fills the available canvas area as shown in Figure 70-1. Using the Attributes panel, change the layout_width and layout_height attributes to match_constraint and wrap_content respectively. Also, remove the constraint connecting the bottom of the VideoView to the bottom of the parent ConstraintLayout. Finally, change the ID of the component to videoView1.
70.5 Downloading the Video File
The video that will be played by the VideoPlayer app is a short animated movie clip encoded in MPEG-4 format. Using a web browser, navigate to the following URL to play the video:
https://www.ebookfrenzy.com/android_book/movie.mp4
Staying within the browser window, right-click on the video playback and select the option to save or download the video to a local file and choose a suitable temporary filesystem location, naming the file movie.mp4.
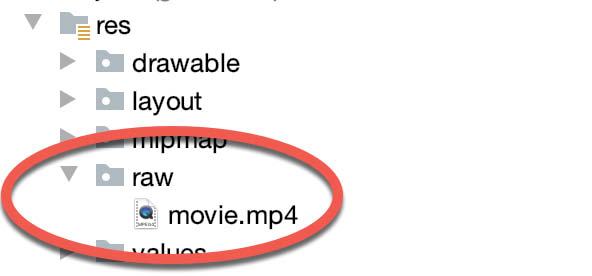
Within Android Studio, locate the res folder in the Project tool window, right-click on it and select the New -> Directory menu option and enter raw into the name field before clicking on the OK button. Using the filesystem navigator for your operating system, locate the movie.mp4 file downloaded above and copy it. Returning to Android Studio, right-click on the newly created raw directory and select the Paste option to copy the video file into the project. Once added, the raw folder should match Figure 70-2 within the Project tool window:
70.6 Configuring the VideoView
The next step is to configure the VideoView with the path of the video to be played and then start the playback. This will be performed when the main activity has initialized, so load the MainActivity.java file into the editor and modify it as outlined in the following listing:
package com.ebookfrenzy.videoplayer;
.
.
import android.widget.VideoView;
import android.net.Uri;
.
.
public class MainActivity extends AppCompatActivity {
private ActivityMainBinding binding;
private VideoView videoView;
@Override
protected void onCreate(Bundle savedInstanceState) {
super.onCreate(savedInstanceState);
binding = ActivityMainBinding.inflate(getLayoutInflater());
View view = binding.getRoot();
setContentView(view);
configureVideoView();
}
private void configureVideoView() {
binding.videoView1.setVideoURI(Uri.parse("android.resource://"
+ getPackageName() + "/" + R.raw.movie));
binding.videoView1.start();
}
}
All that this code does is obtain a reference to the VideoView instance in the layout, assigns to it a URI object referencing the movie file located in the raw resource directory and then starts the video playing.
Test the application by running it on a physical Android device. After the application launches there may be a short delay while video content is buffered before the playback begins (Figure 70-3).

This provides an indication of how easy it can be to integrate video playback into an Android application. Everything so far in this example has been achieved using a VideoView instance and three lines of code.
70.7 Adding the MediaController to the Video View
As the VideoPlayer application currently stands, there is no way for the user to control playback. As previously outlined, this can be achieved using the MediaController class. To add a controller to the VideoView, modify the configureVideoView() method once again:
package com.ebookfrenzy.videoplayer;
.
.
import android.widget.MediaController;
public class MainActivity extends AppCompatActivity {
private ActivityMainBinding binding;
private VideoView videoView;
private MediaController mediaController;
.
.
private void configureVideoView() {
binding.videoView1.setVideoURI(Uri.parse("android.resource://"
+ getPackageName() + "/" + R.raw.movie));
mediaController = new MediaController(this);
mediaController.setAnchorView(videoView);
binding.videoView1.setMediaController(mediaController);
binding.videoView.start();
}
}
When the application is launched with these changes implemented, tapping the VideoView canvas will cause the media controls to appear over the video playback. These controls should include a seekbar together with fast forward, rewind and play/pause buttons. After the controls recede from view, they can be restored at any time by tapping on the VideoView canvas once again. With just three more lines of code, our video player application now has media controls as shown in Figure 70-4:

70.8 Setting up the onPreparedListener
As a final example of working with video based media, the activity will now be extended further to demonstrate the mechanism for configuring a listener. In this case, a listener will be implemented that is intended to output the duration of the video as a message in the Android Studio Logcat panel. The listener will also configure video playback to loop continuously:
package com.ebookfrenzy.videoplayer;
.
.
import android.util.Log;
import android.media.MediaPlayer;
public class MainActivity extends AppCompatActivity {
private ActivityMainBinding binding;
private VideoView videoView;
private MediaController mediaController;
String TAG = "VideoPlayer";
private void configureVideoView() {
binding.videoView1.setVideoURI(Uri.parse("android.resource://"
+ getPackageName() + "/" + R.raw.movie));
MediaController mediaController = new
MediaController(this);
mediaController.setAnchorView(videoView);
binding.videoView1.setMediaController(mediaController);
binding.videoView1.setOnPreparedListener(new
MediaPlayer.OnPreparedListener() {
@Override
public void onPrepared(MediaPlayer mp) {
mp.setLooping(true);
Log.i(TAG, "Duration = " +
binding.videoView1.getDuration());
}
});
videoView.start();
}
}
Now just before the video playback begins, a message will appear in the Android Studio Logcat panel that reads along the lines of the following and the video will restart after playback ends:
11-05 10:27:52.256 12542-12542/com.ebookfrenzy.videoplayer I/VideoPlayer: Duration = 13504
Android devices make excellent platforms for the delivery of content to users, particularly in the form of video media. As outlined in this chapter, the Android SDK provides two classes, namely VideoView and MediaController, which combine to make the integration of video playback into Android applications quick and easy, often involving just a few lines of Java code.