
58. An Android Studio Primary/Detail Flow Tutorial
This chapter will explain the concept of the Primary/Detail user interface design before exploring, in detail, the elements that make up the Primary/Detail Flow template included with Android Studio. An example application will then be created that demonstrates the steps involved in modifying the template to meet the specific needs of the application developer.
A primary/detail flow is an interface design concept whereby a list of items (referred to as the primary list) is displayed to the user. On selecting an item from the list, additional information relating to that item is then presented to the user within a detail pane. An email application might, for example, consist of a primary list of received messages consisting of the address of the sender and the subject of the message. Upon selection of a message from the primary list, the body of the email message would appear within the detail pane.
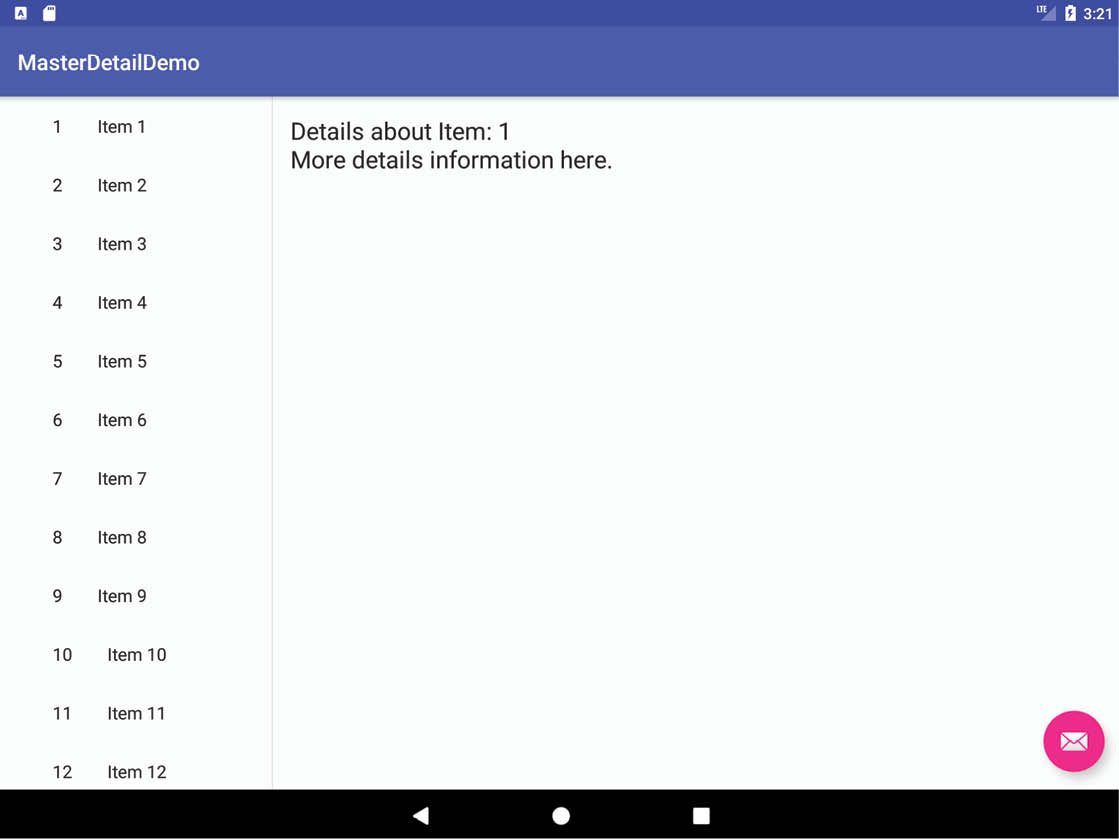
On tablet sized Android device displays in landscape orientation, the primary list appears in a narrow vertical panel along the left-hand edge of the screen. The remainder of the display is devoted to the detail pane in an arrangement referred to as two-pane mode. Figure 58-1, for example, shows the primary/detail, two-pane arrangement with primary items listed and the content of item one displayed in the detail pane:
On smaller, phone sized Android devices, the primary list takes up the entire screen and the detail pane appears on a separate screen which appears when a selection is made from the primary list. In this mode, the detail screen includes an action bar entry to return to the primary list. Figure 58-2 for example, illustrates both the primary and detail screens for the same item list on a 4” phone screen:

58.2 Creating a Primary/Detail Flow Activity
In the next section of this chapter, the different elements that comprise the Primary/Detail Flow template will be covered in some detail. This is best achieved by creating a project using the Primary/Detail Flow template to use while working through the information. This project will subsequently be used as the basis for the tutorial at the end of the chapter.
Although the project creation wizard includes the option to select the Primary/Detail Flow template, greater flexibility in terms of configuring the template is available by adding the activity after the project has been created.
Select the Create New Project quick start option from the welcome screen and, within the resulting new project dialog, choose the No Activity template before clicking on the Next button.
Enter PrimaryDetailFlow into the Name field and specify com.ebookfrenzy.PrimaryDetailFlow as the package name. Before clicking on the Finish button, change the Minimum API level setting to API 26: Android 8.0 (Oreo) and the Language menu to Kotlin.
Once the project has been created, right-click on the app -> java -> com.ebookfrenzy.PrimaryDetailFlow entry in the Project tool window and select the New -> Activity -> Primary/Detail Flow menu option.
The New Android Activity screen (Figure 58-3) provides the opportunity to configure the objects that will be displayed within the Primary/Detail activity. In the tutorial later in this chapter, the primary list will contain a number of web site names which, when selected, will load the chosen web site into a web view within the detail pane. With these requirements in mind, set the Object Kind field to “Website”, and the Object Kind Plural setting to “Websites”.

Be sure to enable the Launcher Activity option and set the Source Language menu to Kotlin before clicking on the Finish button.
58.3 Modifying the Primary/Detail Flow Template
While the structure of the Primary/Detail Flow template can appear confusing at first, as will become evident, much of the functionality provided by the template can remain unchanged for many primary/detail implementation requirements.
In the rest of this chapter, the PrimaryDetailFlow project will be modified such that the primary list displays a list of web site names and the detail pane altered to contain a WebView object instead of the current TextView. When a web site is selected by the user, the corresponding web page will subsequently load and display in the detail pane.
58.4 Changing the Content Model
The content for the example as it currently stands is defined by the PlaceholderContent class file. Begin, therefore, by selecting the PlaceholderContent.kt file (located in the Project tool window in the app -> java -> com.ebookfrenzy.PrimaryDetailflow -> placeholder folder) and reviewing the code. At the bottom of the file is a declaration for a class named PlaceholderItem which is currently able to store three String objects representing content and details strings and an ID. The updated project, on the other hand, will need each item object to contain an ID string, a string for the web site name, and a string for the corresponding URL of the web site. To add these features, modify the PlaceholderItem class so that it reads as follows:
data class PlaceholderItem(val id: String, val website_name: String,
val website_url: String) {
override fun toString(): String = website_name
}
Note that the encapsulating PlaceholderContent class currently contains a for loop that adds 25 items by making multiple calls to methods named createPlaceholderItem() and makeDetails(). Much of this code will no longer be required and should be deleted from the class as follows:
object PlaceholderContent {
/**
* An array of sample (placeholder) items.
*/
val ITEMS: MutableList<PlaceholderItem> = ArrayList()
/**
* A map of sample (placeholder) items, by ID.
*/
val ITEM_MAP: MutableMap<String, PlaceholderItem> = HashMap()
private fun addItem(item: PlaceholderItem) {
ITEMS.add(item)
ITEM_MAP.put(item.id, item)
}
/**
* A placeholder item representing a piece of content.
*/
data class PlaceholderItem(val id: String, val website_name: String,
val website_url: String) {
override fun toString(): String = website_name
}
}
This code needs to be modified to initialize the data model with the required web site data:
val ITEM_MAP: MutableMap<String, PlaceholderItem> = HashMap()
init {
// Add 3 sample items.
addItem(PlaceholderItem("1", "eBookFrenzy",
"https://www.ebookfrenzy.com"))
addItem(PlaceholderItem("2", "Amazon",
"https://www.amazon.com"))
addItem(PlaceholderItem("3", "New York Times",
"https://www.nytimes.com"))
}
The code now takes advantage of the modified PlaceholderItem class to store an ID, web site name and URL for each item.
The layout for the detail pane (the screen that is displayed when the user selects an item from the primary list) is contained within the activity_website_detail.xml file which, in turn, contains a FrameContainerView instance which is used to display the actual detail pane content. If the app is displaying in single-pane mode, the frame container will display the layout contained in the fragment_website_detail.xml file, while multi-pane mode will display the fragment_website_detail.xml (sw600dp) layout.
The template layout provided by Android Studio for the fragment_website_detail.xml comprises a Coordinator layout containing an app bar, toolbar, floating action button, and a text view. For this example, all we need to display is a WebView, so open this file and delete all of the views from the layout with the exception of the website_detail_container view. The easiest way to do this is to select all of the unwanted views in the Component Tree as shown in below before tapping the keyboard delete key:

Drag a WebView object from the Widgets section of the Palette and drop it onto the center of the layout canvas and change the id to website_detail.
Next, edit the fragment_website_detail.xml (sw600dp) file and delete the default TextView instance before dragging and dropping a WebView onto the layout, once again changing the id to website_detail. The layout for both files should now resemble Figure 58-5:

58.6 Modifying the WebsiteDetailFragment Class
At this point the user interface detail pane has been modified but the corresponding Kotlin class is still designed for working with a TextView object instead of a WebView. Load the source code for this class by double-clicking on the WebsiteDetailFragment.kt file in the Project tool window.
In order to load the web page URL corresponding to the currently selected item only a few lines of code need to be changed. Once this change has been made, the code should read as follows:
package com.ebookfrenzy.PrimaryDetailflow
.
.
import android.webkit.WebResourceRequest
import android.webkit.WebView
import android.webkit.WebViewClient
.
.
class WebsiteDetailFragment : Fragment() {
.
.
override fun onCreateView(
inflater: LayoutInflater, container: ViewGroup?,
savedInstanceState: Bundle?
): View? {
_binding = FragmentWebsiteDetailBinding.inflate(inflater, container, false)
val rootView = binding.root
item?.let {
binding.websiteDetail.webViewClient = object : WebViewClient() {
override fun shouldOverrideUrlLoading(
view: WebView, request: WebResourceRequest): Boolean {
return super.shouldOverrideUrlLoading(
view, request)
}
}
binding.websiteDetail.loadUrl(it.website_url)
}
return rootView
}
.
.
}
In the above code, the onCreateView() method is modified to access the website_detail view (this was formally the TextView but is now a WebView) and extract the URL of the web site from the selected item. An instance of the WebViewClient class is created and assigned the shouldOverrideUrlLoading() callback method. This method is implemented so as to force the system to use the WebView instance to load the page instead of the Chrome browser.
58.7 Modifying the WebsiteListFragment Class
A minor change also needs to be made to the WebsiteListFragment.kt file to make sure that the web site names appear in the primary list. Edit this file, locate the onBindViewHolder() method and modify the setText() method call to reference the web site name as follows:
override fun onBindViewHolder(holder: ViewHolder, position: Int) {
val item = mValues[position]
holder.mIdView.text = item.id
holder.mContentView.text = item.website_name
.
.
}
58.8 Adding Manifest Permissions
The final step is to add internet permission to the application via the manifest file. This will enable the WebView object to access the internet and download web pages. Navigate to, and load the AndroidManifest.xml file in the Project tool window (app -> manifests), and double-click on it to load it into the editor. Once loaded, add the appropriate permission line to the file:
<?xml version="1.0" encoding="utf-8"?>
<manifest xmlns:android="http://schemas.android.com/apk/res/android"
package="com.ebookfrenzy.PrimaryDetailflow" >
<uses-permission android:name="android.permission.INTERNET" />
<application
android:allowBackup="true"
android:icon="@mipmap/ic_launcher"
android:label="@string/app_name"
android:theme="@style/AppTheme" >
.
.
Compile and run the application on a suitably configured emulator or an attached Android device. Depending on the size of the display, the application will appear either in small screen or two-pane mode. Regardless, the primary list should appear primed with the names of the three web sites defined in the content model. Selecting an item should cause the corresponding web site to appear in the detail pane as illustrated in two-pane mode in Figure 58-6:

A primary/detail user interface consists of a primary list of items which, when selected, displays additional information about that selection within a detail pane. The Primary/Detail Flow is a template provided with Android Studio that allows a primary/detail arrangement to be created quickly and with relative ease. As demonstrated in this chapter, with minor modifications to the default template files, a wide range of primary/detail based functionality can be implemented with minimal coding and design effort.