
Chapter 6: Reactive State Management with NgRx
Angular and Reactive programming are best buddies, and handling an app's state reactively is one of the best things you can do with your app. NgRx is a framework that provides a set of libraries as reactive extensions for Angular. In this chapter, you'll learn how to use the NgRx ecosystem to manage your app's state reactively, and you'll also learn a couple of cool things the NgRx ecosystem will help you with.
Here are the recipes we're going to cover in this chapter:
- Creating your first NgRx store with actions and reducer
- Using @ngrx/store-devtools to debug the state changes
- Creating an effect to fetch third-party application programming interface (API) data
- Using selectors to fetch data from stores in multiple components
- Using @ngrx/component-store for local state management within a component
- Using @ngrx/router-store to work with route changes reactively
Technical requirements
For the recipes in this chapter, make sure you have Git and Node.js installed on your machine. You also need to have the @angular/cli package installed, which you can do with npm install -g @angular/cli from your terminal. The code for this chapter can be found at https://github.com/PacktPublishing/Angular-Cookbook/tree/master/chapter06.
Creating your first NgRx store with actions and reducer
In this recipe, you'll work your way through understanding NgRx's basics by setting up your first NgRx store. You'll also create some actions along with a reducer, and to see the changes in the reducer, we'll be putting in appropriate console logs.
Getting ready
The project that we are going to work with resides in chapter06/start_here/ngrx-actions-reducer, inside the cloned repositor:
- Open the project in Visual Studio Code (VS Code).
- Open the terminal and run npm install to install the dependencies of the project.
- Once done, run ng serve -o.
This should open the app in a new browser tab. Tap the Login as Admin button and you should see the following screen:

Figure 6.1 – ngrx-actions-reducers app running on http://localhost:4200
Now that we have the app running, we'll move on to the steps for the recipe.
How to do it…
We have an existing Angular app that we used in the prior recipes as well. If you log in as an Admin user, you can add and remove items from the bucket. However, if you log in as an Employee, you can only add items and not remove them. We'll now start integrating NgRx into the app and create a reducer and some actions:
- Begin by installing the @ngrx/store package via Node Package Manager (npm) in your project. Open Terminal (Mac/Linux) or Command Prompt (Windows), navigate to the project root, and run the following command:
npm install @ngrx/[email protected] --save
Make sure to rerun the ng-serve command if you already have it running.
- Update the app.module.ts file to include StoreModule, as follows:
...
import { StoreModule } from '@ngrx/store';
@NgModule({
declarations: [
AppComponent
],
imports: [
BrowserModule,
AppRoutingModule,
FormsModule,
BrowserAnimationsModule,
StoreModule.forRoot({})
],
providers: [],
bootstrap: [AppComponent]
})
export class AppModule { }
Notice that we've passed an empty object {} to the forRoot method; we'll change that going forward.
- Now, we'll create some actions. Create a folder named store inside the app folder. Then, create a file named app.actions.ts inside the store folder, and finally, add the following code to the newly created file:
import { createAction, props } from '@ngrx/store';
import { IFruit } from '../interfaces/fruit.interface';
export const addItemToBucket = createAction(
'[Bucket] Add Item',
props<IFruit>()
);
export const removeItemFromBucket = createAction(
'[Bucket] Remove Item',
props<IFruit>()
);
Since we have the actions in place now, we have to create a reducer.
- Create a new file inside the store folder, name it app.reducer.ts, and add the following code to it to define the necessary imports:
import { Action, createReducer, on } from '@ngrx/store';
import { IFruit } from '../interfaces/fruit.interface';
import * as AppActions from './app.actions';
- Now, define an AppState interface to reflect the app's state, and an initialState variable to reflect what the app's state will look like when the app starts. Add the following code to the app.reducer.ts file:
import { Action, createReducer, on } from '@ngrx/store';
import { IFruit } from '../interfaces/fruit.interface';
import * as AppActions from './app.actions';
export interface AppState {
bucket: IFruit[];
}
const initialState: AppState = {
bucket: []
}
- It's time to actually create a reducer now. Add the following code to the app.reducer.ts file to create a reducer:
...
const initialState: AppState = {
bucket: []
}
const appReducer = createReducer(
initialState,
on(AppActions.addItemToBucket, (state, fruit) => ({ ...state, bucket: [fruit, ...state.bucket] })),
on(AppActions.removeItemFromBucket, (state, fruit) => {
return {
...state,
bucket: state.bucket.filter(bucketItem => {
return bucketItem.id !== fruit.id;
}) }
}),
);
export function reducer(state: AppState = initialState, action: Action) {
return appReducer(state, action);
}
- We'll also add some sweet little console.logs calls into the reducer method to see all the actions firing up on our console. Add a log as follows to the app.reducer.ts file:
export function reducer(state: AppState = initialState, action: Action) {
console.log('state', state);
console.log('action', action);
return appReducer(state, action);
}
- Finally, let's register this reducer in the app.module.ts file using the StoreModule.forRoot() method as follows so that we can see things working:
...
import { StoreModule } from '@ngrx/store';
import * as appStore from './store/app.reducer';
@NgModule({
declarations: [
AppComponent
],
imports: [
...
StoreModule.forRoot({app: appStore.reducer})
],
providers: [],
bootstrap: [AppComponent]
})
export class AppModule { }
If you refresh the app now, you should see the following logs on the console as soon as the app starts:
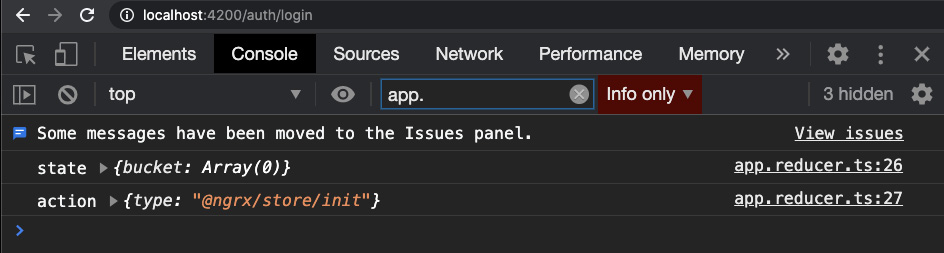
Figure 6.2 – Logs showing initial state and @ngrx/store/init action on app start
- Now that we can see that the reducer works, let's dispatch our actions on adding and removing items from the basket. For that, dispatch the actions as follows in the shared/components/bucket/bucket.component.ts file:
...
import { Store } from '@ngrx/store';
import { AppState } from 'src/app/store/app.reducer';
import { addItemToBucket, removeItemFromBucket } from 'src/app/store/app.actions';
export class BucketComponent implements OnInit {
...
constructor(
private bucketService: BucketService,
private store: Store<AppState>
) { }
ngOnInit(): void {...}
addSelectedFruitToBucket() {
const newItem: IFruit = {
id: Date.now(),
name: this.selectedFruit
}
this.bucketService.addItem(newItem);
this.store.dispatch(addItemToBucket(newItem));
}
deleteFromBucket(fruit: IFruit) {
this.bucketService.removeItem(fruit);
this.store.dispatch(removeItemFromBucket(fruit));
}
}
- Log in to the app as Admin, add a few items to the bucket, and then remove some items. You'll see something like this on the console:
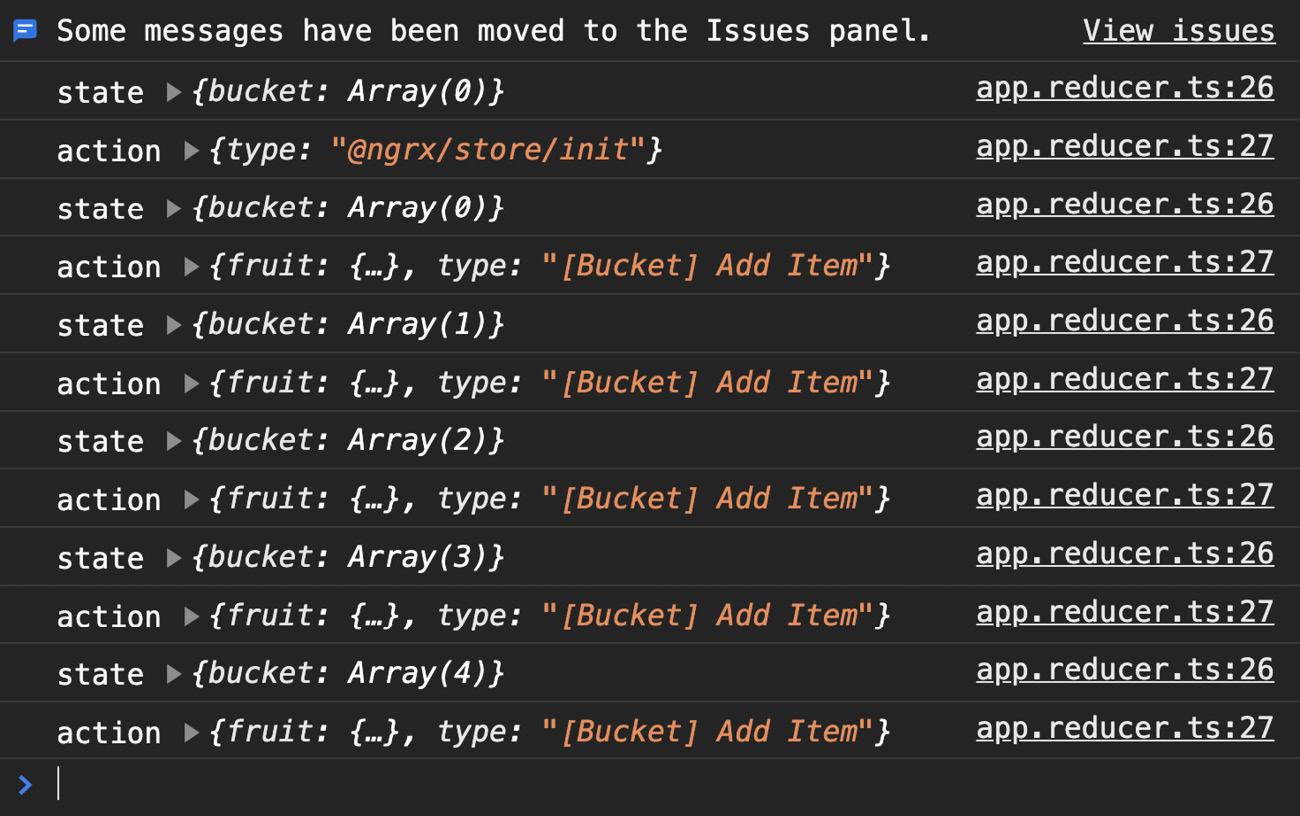
Figure 6.3 – Logs showing the actions for adding and removing items from a bucket
And that covers it all for this recipe! You now know how to integrate an NgRx store into an Angular app and how to create NgRx actions and dispatch them. You also know how to create a reducer, define its state, and listen to the actions to act on the ones dispatched.
See also
- NgRx reducers documentation (https://ngrx.io/guide/store/reducers)
- NgRx actions documentation (https://ngrx.io/guide/store/actions)
- RxJS merge operator documentation (https://www.learnrxjs.io/learn-rxjs/operators/combination/merge)
Using @ngrx/store-devtools to debug the state changes
In this recipe, you'll learn how to set up and use @ngrx/store-devtools to debug your app's state, the actions dispatch, and the difference in the state when the actions dispatch. We'll be using an existing app we're familiar with to learn about the process.
Getting ready
The project for this recipe resides in chapter06/start_here/using-ngrx-store-devtool:
- Open the project in VS Code.
- Open the terminal and run npm install to install the dependencies of the project.
- Once done, run ng serve -o.
This should open the app in a new browser tab.
- Login as an Admin user, and you should see a screen like this:
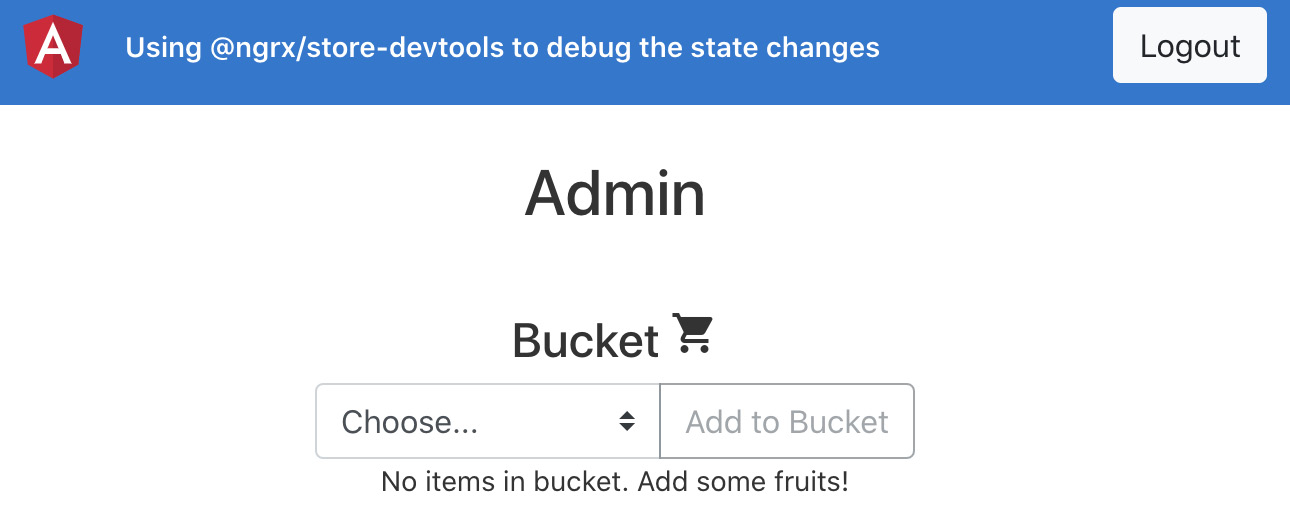
Figure 6.4 – Using ngrx-store-devtools app running on http://localhost:4200
Now that we have the app set up, let's see the steps of the recipe in the next section.
How to do it…
We have an Angular app that already has the @ngrx/store package integrated. We also have a reducer set up and some actions in place that are logged on the console as soon as you add or remove an item. Let's move toward configuring the store dev tools for our ap:
- Begin with installing the @ngrx/store-devtools package in the project, as follows:
npm install @ngrx/[email protected] --save
- Now, update your app.module.ts file to include a StoreDevtoolsModule.instrument entry, as follows:
...
import * as appStore from './store/app.reducer';
import { StoreDevtoolsModule } from '@ngrx/store-devtools';
@NgModule({
declarations: [
AppComponent
],
imports: [
...
StoreModule.forRoot({app: appStore.reducer}),
StoreDevtoolsModule.instrument({
maxAge: 25, // Retains last 25 states
}),
],
providers: [],
bootstrap: [AppComponent]
})
export class AppModule { }
- And now, download the Redux DevTools extension from https://github.com/zalmoxisus/redux-devtools-extension/ for your particular browser and install it. I'll be consistently using the Chrome browser in this book.
- Open Chrome DevTools. There should be a new tab named Redux. Tap it and refresh the page. You'll see something like this:
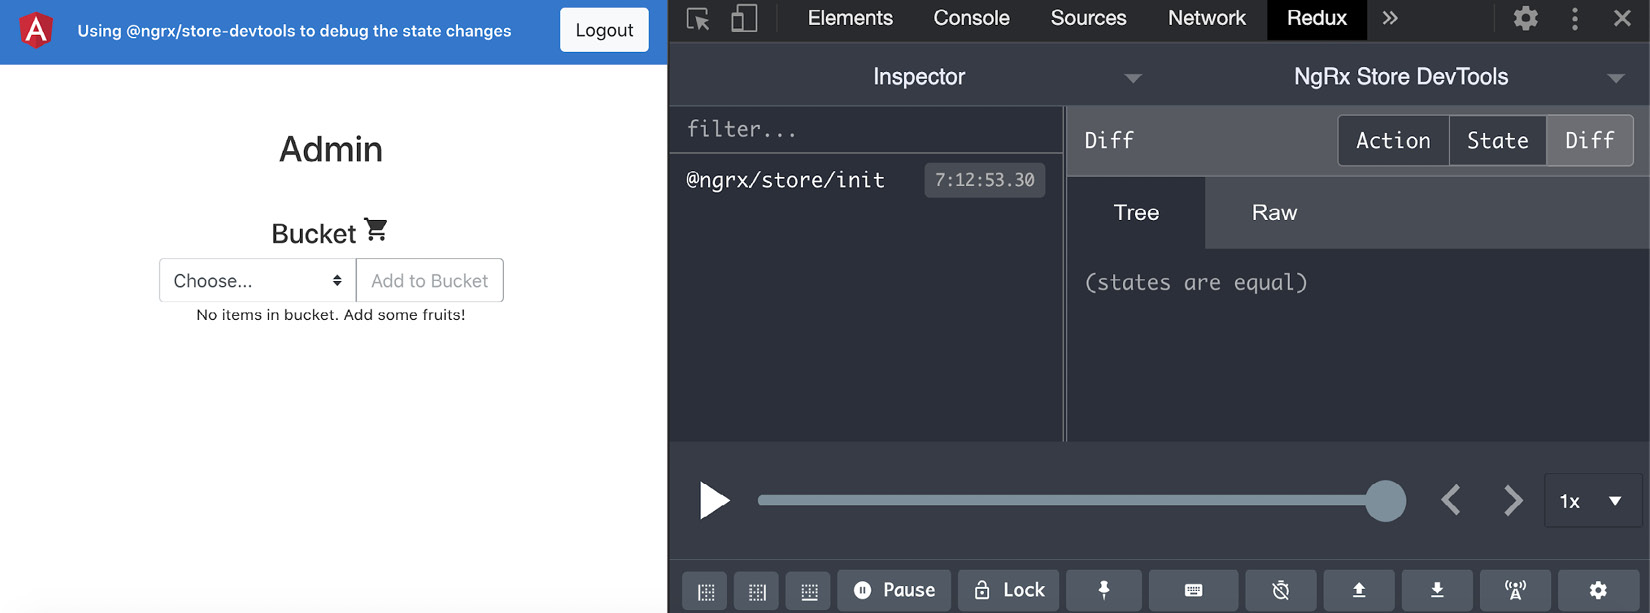
Figure 6.5 – Redux DevTools showing the initial Redux action dispatched
- To see the state of the app right now, tap the State button, as shown in the following screenshot, and you should see that we have app > bucket: [] as the current state:

Figure 6.6 – Viewing current state in the Redux DevTools extension
- Now, add a cherry ? and a banana ? to the bucket, and then remove the banana ? from the bucket. You should see all the relevant actions being dispatched, as follows:
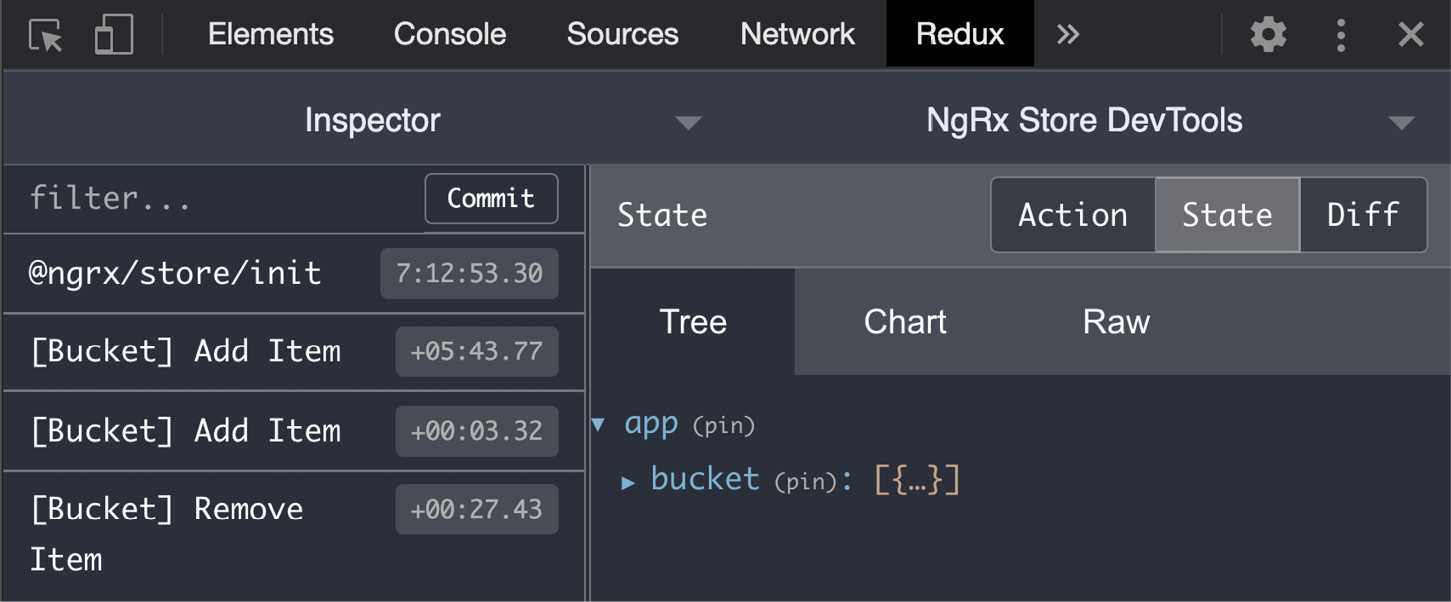
Figure 6.7 – Redux DevTools showing addItemToBucket and removeItemFromBucket actions
If you expand the bucket array from the state, you'll see that it reflects the current state of the bucket, as we can see in the following screenshot:

Figure 6.8 – Redux DevTools showing bucket's current state
Great! You've just learned how to use the Redux DevTools extension to see your NgRx state and the actions being dispatched.
How it works…
It is important to understand that NgRx is a combination of Angular and Redux (using RxJS). By using the Store Devtools package and the Redux DevTools extension, we're able to debug the app really easily, which helps us find potential bugs, predict state changes, and be more transparent about what's happening behind the scenes in the @ngrx/store package.
There's more…
You can also see the difference that an action caused within an app's state. That is, we have an addition of an item in the bucket when we dispatch the addItemToBucket action with the fruit, and we have an item removed from the bucket when we dispatch the removeItemFromBucket action. See the following screenshot and Figure 6.10 for each cases:

Figure 6.9 – addItemToBucket action causing the addition of an item to the bucket
Notice the green background around the data {id:1605205728586,name:'Banana ?'} in Figure 6.9. This represents an addition to the state. You can see the removeItemFromBucket action depicted here:
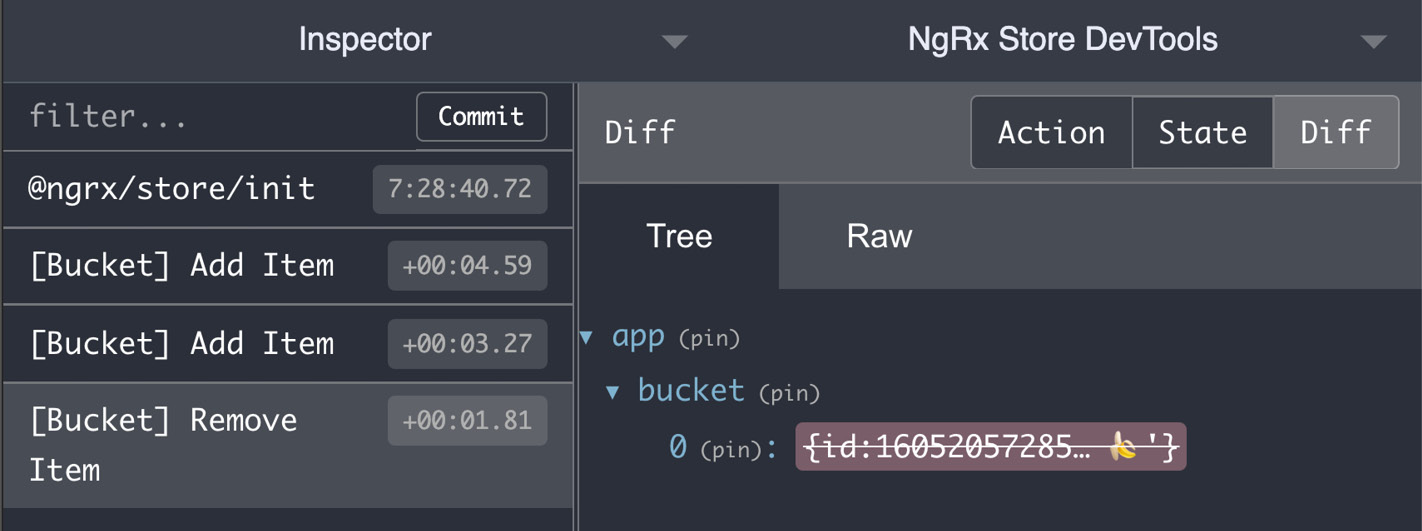
Figure 6.10 – removeItemFromBucket action causing the removal of an item from the bucket
Similarly, notice the red background and a strikethrough around the data {id:16052057285… ?'} in Figure 6.10. This represents removal from the state.
See also
- NgRx Store Devtools documentation (https://ngrx.io/guide/store-devtools)
Creating an effect to fetch third-party API data
In this recipe, you'll learn how to use NgRx effects using the @ngrx/effects package. You'll create and register an effect, and that effect will be listening for an event. Then, we'll react to that action to fetch third-party API data, and in response, we'll either dispatch a success or a failure action. This is gonna be fun.
Getting ready
The project for this recipe resides in chapter06/start_here/using-ngrx-effect:
- Open the project in VS Code.
- Open the terminal and run npm install to install the dependencies of the project.
- Once done, run ng serve -o.
This should open the app in a new browser tab, and you should see the app, as follows:

Figure 6.11 – Using ngrx-effects app running on http://localhost:4200
Now that we have the app running locally, let's see the steps of the recipe in the next section.
How to do it…
We have an app with a single route named Home page. In the HomeComponent class, we're using the UserService to send a HyperText Transfer Protocol (HTTP) call to get users and are then showing that on the browser. We already have the @ngrx/store and @ngrx/store-devtools packages integrated, as you can see in Figure 6.1:
- Install the @ngrx/effects package in the project, as follows:
npm install --save @ngrx/[email protected]
- We'll now create actions to get the users from the HTTP call. We'll have one action to get the users, one to dispatch on successfully getting the users, and one action to dispatch in case we get an error. Add the following code to the store/app.actions.ts file:
import { createAction, props } from '@ngrx/store';
import { IUser } from '../core/interfaces/user.interface';
export const APP_ACTIONS = {
GET_USERS: '[Users] Get Users',
GET_USERS_SUCCESS: '[Users] Get Users Success',
GET_USERS_FAILURE: '[Users] Get Users Failure',
}
export const getUsers = createAction(
APP_ACTIONS.GET_USERS,
);
export const getUsersSuccess = createAction(
APP_ACTIONS.GET_USERS_SUCCESS,
props<{users: IUser[]}>()
);
export const getUsersFailure = createAction(
APP_ACTIONS.GET_USERS_FAILURE,
props<{error: string}>()
);
Let's create an effect now so that we can listen to the GET_USERS action, perform the API call, and dispatch the success action in case of successful data fetch.
- Create a file in the store folder named app.effects.ts and add the following code to it:
import { Injectable } from '@angular/core';
import { Actions, createEffect, ofType } from '@ngrx/effects';
import { of } from 'rxjs';
import { map, mergeMap, catchError } from 'rxjs/operators';
import { UserService } from '../core/services/user.service';
import { APP_ACTIONS, getUsersFailure, getUsersSuccess } from './app.actions';
@Injectable()
export class AppEffects {
constructor(
private actions$: Actions,
private userService: UserService
) {}
}
- We'll create a new effect in the app.effects.ts file now to register a listener for the GET_USERS action, as follows:
...
@Injectable()
export class AppEffects {
getUsers$ = createEffect(() =>
this.actions$.pipe(
ofType(APP_ACTIONS.GET_USERS),
mergeMap(() => this.userService.getUsers()
.pipe(
map(users => {
return getUsersSuccess({
users
})
}),
catchError((error) => of(getUsersFailure({
error
})))
)
)
)
);
...
}
- We'll now register our effect as the root effects for the app in the app.module.ts file, as follows:
...
import { EffectsModule } from '@ngrx/effects';
import { AppEffects } from './store/app.effects';
@NgModule({
declarations: [...],
imports: [
...
StoreDevtoolsModule.instrument({
maxAge: 25, // Retains last 25 states
}),
EffectsModule.forRoot([AppEffects])
],
providers: [],
bootstrap: [AppComponent]
})
export class AppModule { }
As soon as we've registered the effects, you should see an additional action named @ngrx/effects/init firing in the Redux DevTools extension, as follows:
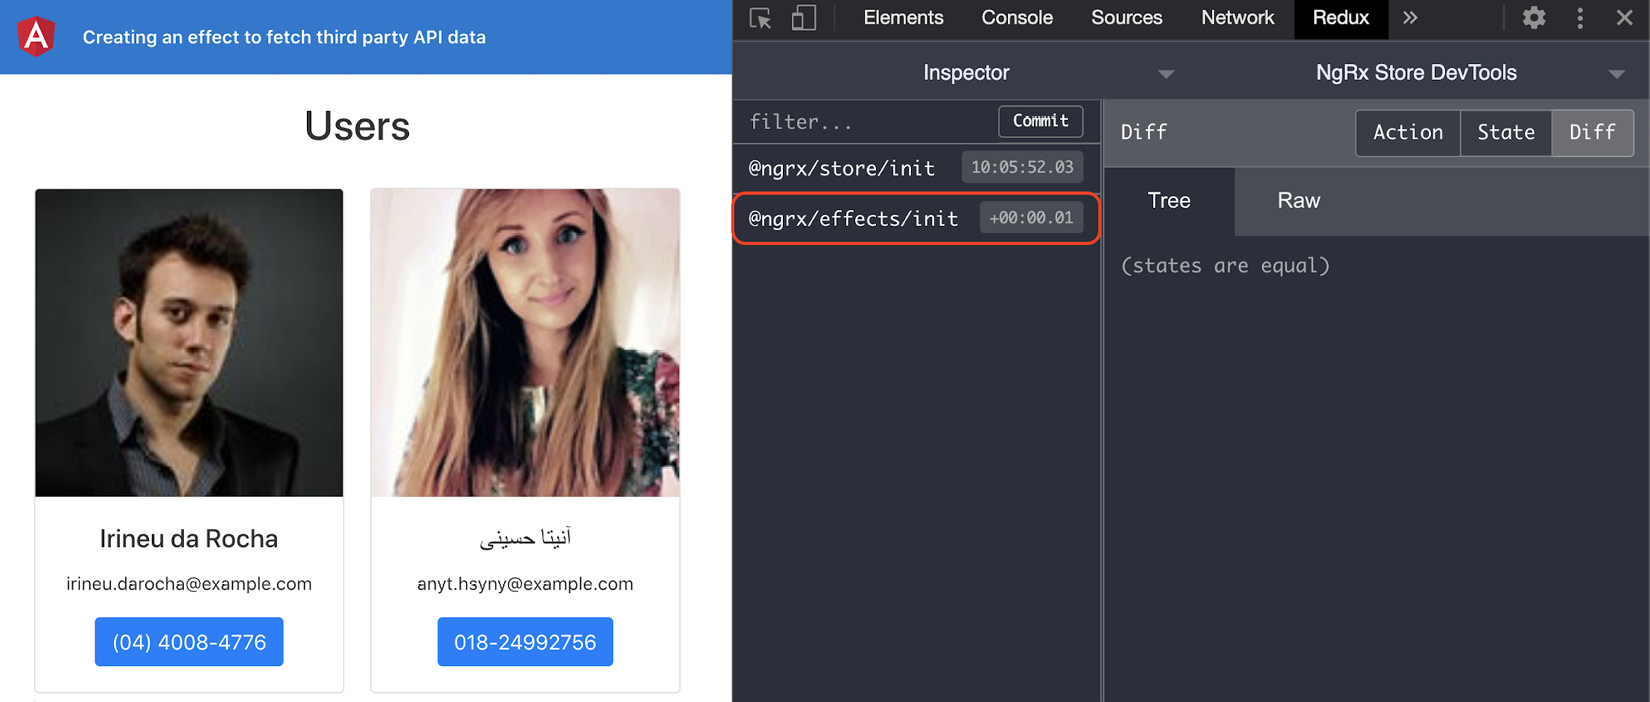
Figure 6.12 – @ngrx/effects/init action fired on app launch
- Now that we have the effects listening to the actions, let's dispatch the GET_USERS action from the HomeComponent class, and we should see the GET_USERS_SUCCESS action fired in return on the successful call fetch. Add the following code to dispatch the action from home/home.component.ts:
...
import { AppState } from '../store/app.reducer';
import { Store } from '@ngrx/store';
import { getUsers } from '../store/app.actions';
@Component({...})
export class HomeComponent implements OnInit, OnDestroy {
users$: Observable<IUser[]>;
constructor(
private userService: UserService,
private store: Store<AppState>
) {}
ngOnInit() {
this.store.dispatch(getUsers())
this.users$ = this.userService.getUsers();
}
ngOnDestroy() {}
}
If you refresh the app now, you should see the [Users] Get Users action dispatched, and in return, the [Users] Get Users Success action dispatches on the successful HTTP call:
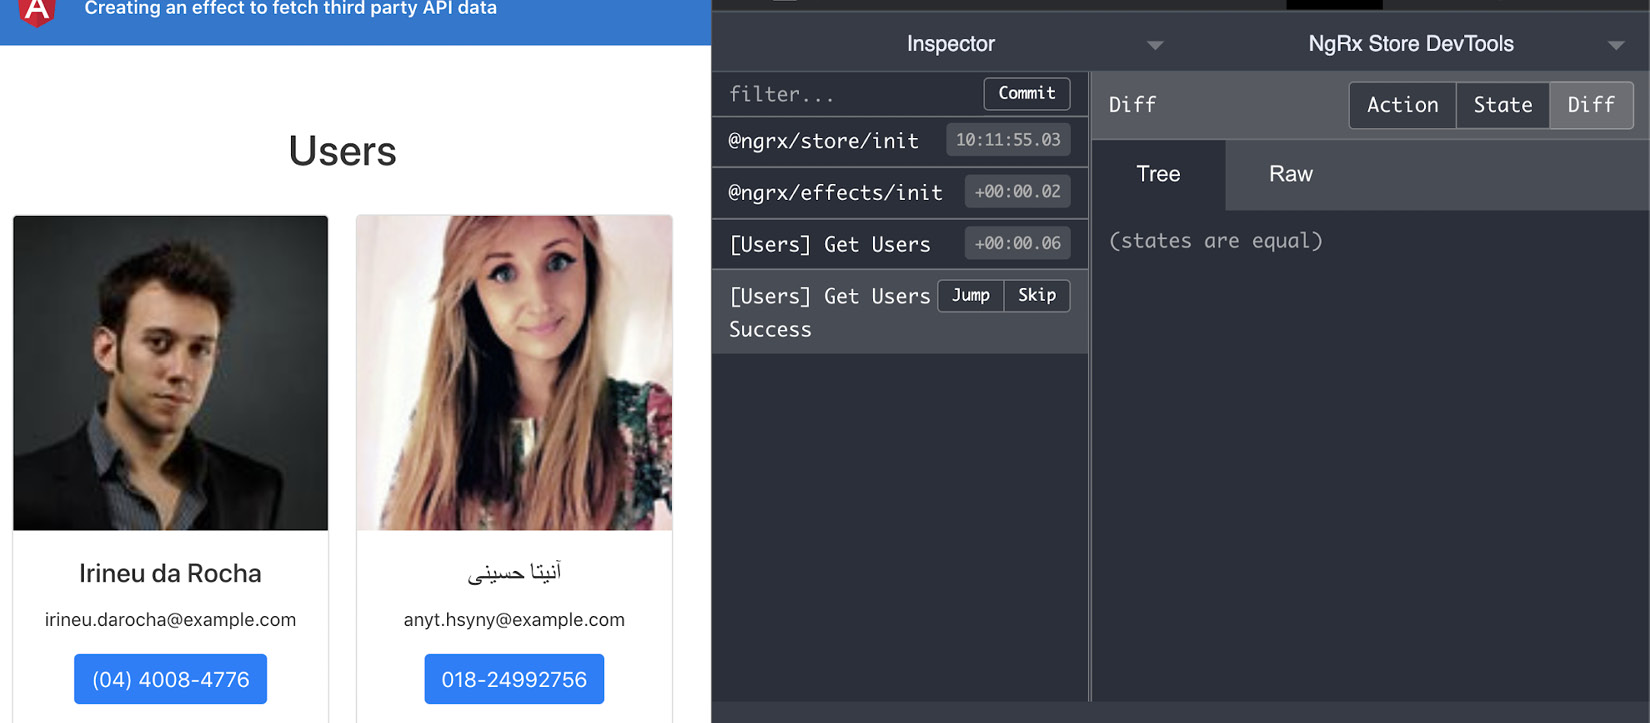
Figure 6.13 – GET_USERS and GET_USERS_SUCCESS actions being dispatched
Notice in Figure 6.13 that the Diff is nothing after the GET_USERS_SUCCESS action is dispatched. This is because we haven't updated the state using the reducer so far.
- Let's update the state in the app.reducer.ts file to listen to the GET_USERS_SUCCESS action and assign the users to the state accordingly. The code should look like this:
import { Action, createReducer, on } from '@ngrx/store';
import { IUser } from '../core/interfaces/user.interface';
import { getUsersSuccess } from './app.actions';
export interface AppState {
users: IUser[];
}
const initialState: AppState = {
users: []
}
const appReducer = createReducer(
initialState,
on(getUsersSuccess, (state, action) => ({
...state,
users: action.users
}))
);
export function reducer(state: AppState = initialState, action: Action) {
return appReducer(state, action);
}
If you refresh the app now, you should see the users being assigned to the state, as follows:
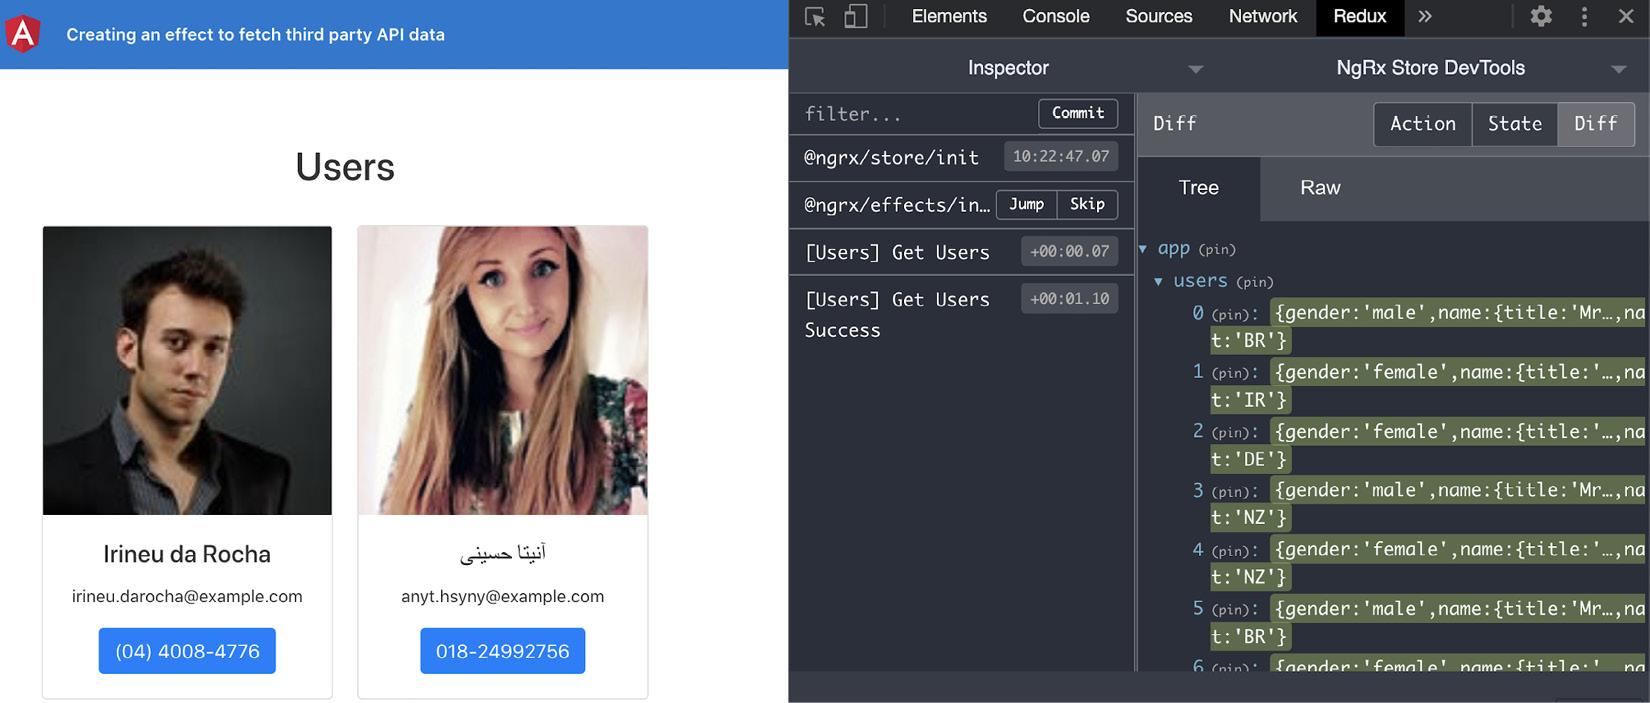
Figure 6.14 – GET_USERS_SUCCESS action adding users to the state
If you look at the app's state right now, you should see something like this:
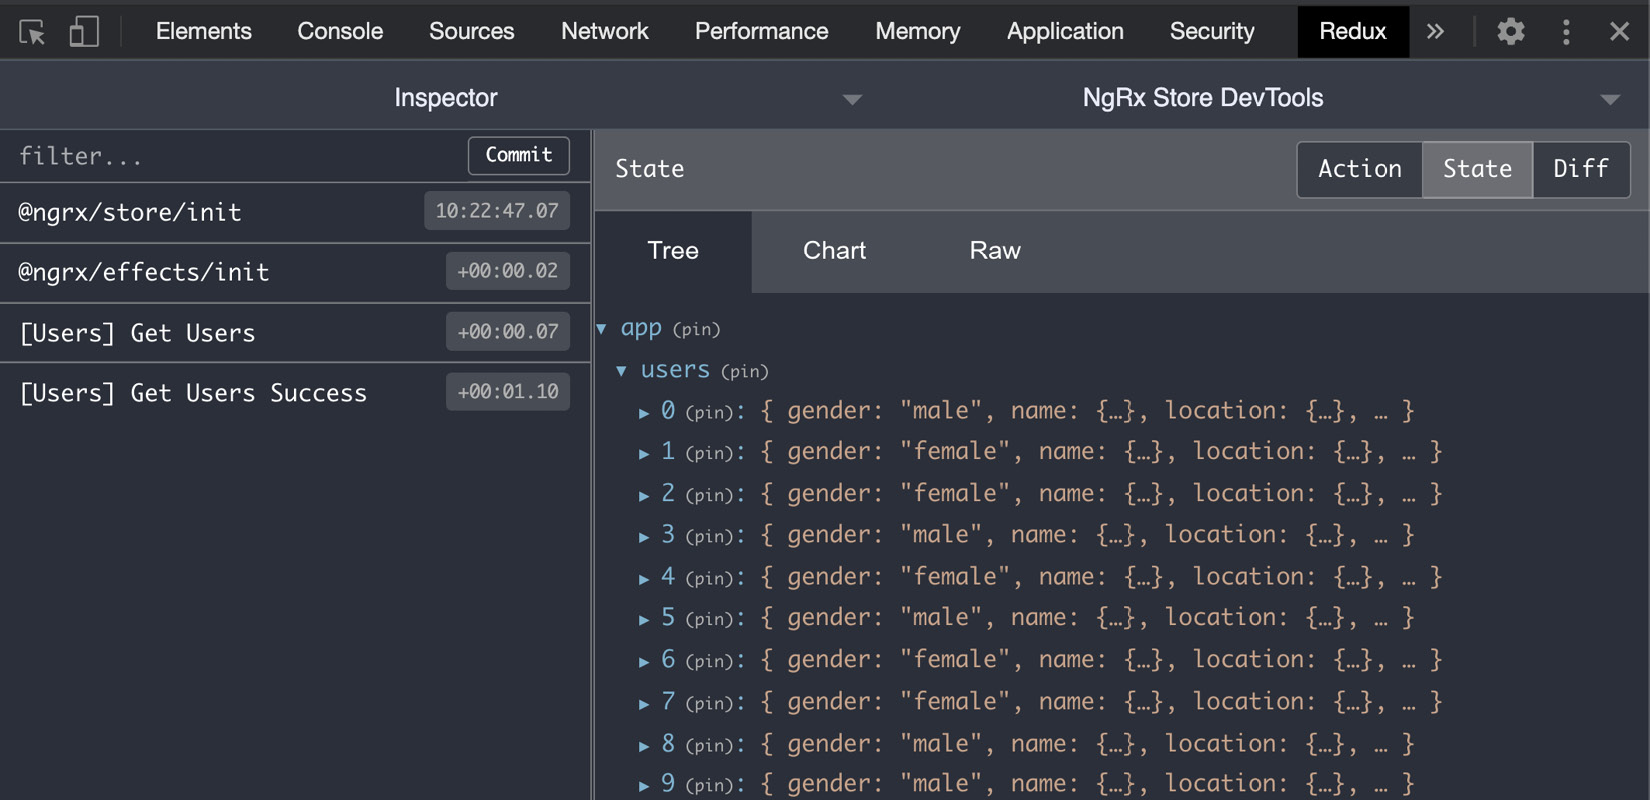
Figure 6.15 – App state containing users after the GET_USERS_SUCCESS action
Right now, we're sending two calls to the server—one through the effect, and one through the ngOnInit method of the HomeComponent class using the UserService instance directly. Let's remove the UserService from the HomeComponent class. We won't see any data right now, but that's what we're going to do in the next recipe.
- Remove the UserService from the HomeComponent class and your home.component.ts file should now look like this:
...
@Component({...})
export class HomeComponent implements OnInit, OnDestroy {
users$: Observable<IUser[]>;
constructor(
private userService: UserService, ← Remove this
private store: Store<AppState>
) {}
ngOnInit() {
this.store.dispatch(getUsers());
this.users$ = this.userService.getUsers(); ← Remove this
}
ngOnDestroy() {}
}
Great! You now know how to use NgRx effects in your Angular apps. See the next section to understand how NgRx effects work.
Important note
We now have an output, as shown in Figure 6.15—that is, we keep showing the loader even after the users' data has been set in the store. The recipe's main purpose is to use @ngrx/effects, and that has been done. We'll show the appropriate data in the next recipe, Using selectors to fetch data from stores in multiple components.
How it works…
In order for the NgRx effects to work, we needed to install the @ngrx/effects package, create an effect, and register it as an array of effects (root effects) in the AppModule class. When you create an effect, it has to listen to an action. When an action is dispatched to the store from any component or even from another effect, the registered effect triggers, does the job you want it to do, and is supposed to dispatch another action in return. For API calls, we usually have three actions—that is, the main action, and the following success and failure actions. Ideally, on the success action (and perhaps on the failure action too), you would want to update some of your state variables.
See also
- NgRx effects documentation (https://ngrx.io/guide/effects)
Using selectors to fetch data from stores in multiple components
In the previous recipe, we created an NgRx effect to fetch third-party API data as users, and we saved it in the Redux store. That's what we have as a starting point in this recipe. We have an effect that fetches the users from api.randomuser.me and stores it in the state, and we don't currently show anything on the user interface (UI). In this recipe, you'll create some NgRx selectors to show users on the Home page as well as on the User Detail page with similar users.
Getting ready
The project for this recipe resides in chapter06/start_here/using-ngrx-selector:
- Open the project in VS Code.
- Open the terminal and run npm install to install the dependencies of the project.
- Once done, run ng serve -o.
This should open the app in a new browser tab. As soon as the page is opened, you should see the app, as follows:
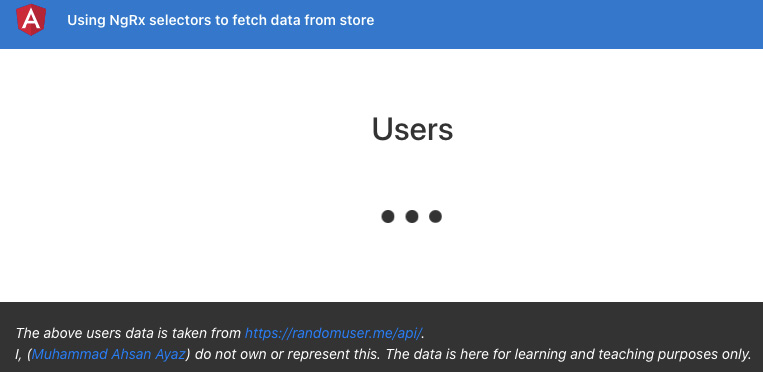
Figure 6.16 – Using ngrx-selectors app running on http://localhost:4200
Now that we have the app running locally, let's see the steps of the recipe in the next section.
How to do it…
All we have to do in this recipe is to work with NgRx selectors, the reducer we have, and the Redux state in general. Easy peasy. Let's get started!
We'll first show the users on the Home page and, in order to do that, we have to create our first NgRx selecto:
- Create a new file inside the store folder. Name it app.selectors.ts and add the following code to it:
import { createSelector, createFeatureSelector } from '@ngrx/store';
import { AppState } from './app.reducer';
export const selectApp = createFeatureSelector<AppState>('app');
export const selectUsers = createSelector(
selectApp,
(state: AppState) => state.users
);
Now that we have the selector in place, let's use it in the HomeComponent class.
- Modify the ngOnInit method in the home.component.ts file. It should look like this:
...
import { getUsers } from '../store/app.actions';
import { selectUsers } from '../store/app.selectors';
@Component({...})
export class HomeComponent implements OnInit, OnDestroy {
...
ngOnInit() {
this.users$ = this.store.select(selectUsers);
this.store.dispatch(getUsers())
}
ngOnDestroy() {}
}
As soon as you refresh the app now, you should be able to see the users. And if you click on any one of the users, you'll navigate to the user details, but won't see any valuable date. The page should look like this:
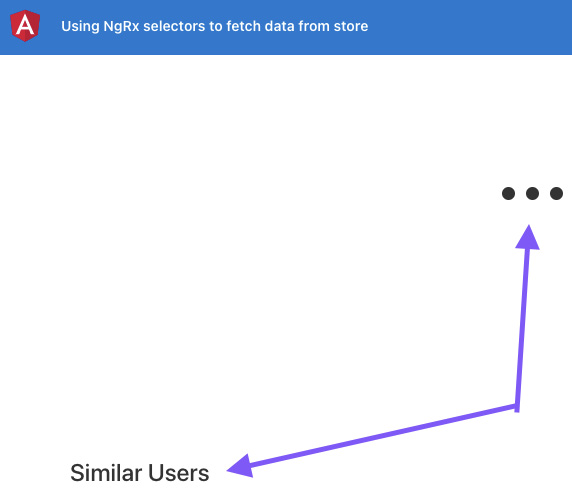
Figure 6.17 – Unable to display the current user and similar users
- In order to see the current user and similar users, we'll first create two Observables in the UserDetailComponent class so that we can subscribe to their respective store selectors later on. Add the Observables to the user-detail.component.ts file, as follows:
...
import { ActivatedRoute } from '@angular/router';
import { Observable } from 'rxjs/internal/Observable';
@Component({...})
export class UserDetailComponent implements OnInit, OnDestroy {
user: IUser = null; ← Remove this
similarUsers: IUser[] = []; ← Remove this
user$: Observable<IUser> = null; ← Add this
similarUsers$: Observable<IUser[]> = null; ← Add this
isComponentAlive: boolean;
constructor( ) {}
ngOnInit() {
this.isComponentAlive = true;
}
ngOnDestroy() {
this.isComponentAlive = false;
}
}
- Update the user-detail.component.html template to use the new Observable properties, as follows:
<div class="user-detail">
<div class="main-content user-card">
<app-user-card *ngIf="user$ | async as user; else loader" [user]="user"></app-user-card>
</div>
<div class="secondary-container">
<h4>Similar Users</h4>
<div class="similar-users">
<ng-container *ngIf="similarUsers$ | async as similarUsers; else loader">
<app-user-card class="user-card" *ngFor="let user of similarUsers" [user]="user"></app-user-card>
</ng-container>
</div>
</div>
</div>
...
- Update the app.selectors.ts file to add both the selectors, as follows:
...
import { IUser } from '../core/interfaces/user.interface';
export const selectUsers = createSelector(...);
export const selectCurrentUser = (uuid) => createSelector(
selectUsers,
(users: IUser[]) => users ? users.find(user => {
return user.login.uuid === uuid;
}) : null
);
export const selectSimilarUsers = (uuid) => createSelector(
selectUsers,
(users: IUser[]) => users ? users.filter(user => {
return user.login.uuid !== uuid;
}): null
);
Since we navigated to the User Detail page with the user's universally unique identifier (UUID), we will listen to the active route's paramsMap and assign the appropriate selectors.
- First, add the correct imports to the user-detail.component.ts file, as follows:
...
import { takeWhile } from 'rxjs/operators';
import { Store } from '@ngrx/store';
import { AppState } from '../store/app.reducer';
import { selectCurrentUser, selectSimilarUsers } from '../store/app.selectors';
import { ActivatedRoute } from '@angular/router';
- Now, in the same user-detail.component.ts file, use the Store service and update the ngOnInit method, as follows:
@Component({...})
export class UserDetailComponent implements OnInit, OnDestroy {
...
constructor(
private route: ActivatedRoute,
private store: Store<AppState>
) {}
ngOnInit() {
this.isComponentAlive = true;
this.route.paramMap.pipe(
takeWhile(() => !!this.isComponentAlive)
)
.subscribe(params => {
const uuid = params.get('uuid');
this.user$ = this.store. select(selectCurrentUser(uuid))
this.similarUsers$ = this.store. select(selectSimilarUsers(uuid))
});
}
...
}
We'll add another method to the UserDetailComponent class that'll fetch the users if they haven't been fetched already in the app.
- Add the getUsersIfNecessary method to the user-detail.component.ts file, as follows:
...
import { first, takeWhile } from 'rxjs/operators';
import { Store } from '@ngrx/store';
import { AppState } from '../store/app.reducer';
import { selectCurrentUser, selectSimilarUsers, selectUsers } from '../store/app.selectors';
import { getUsers } from '../store/app.actions';
@Component({...})
export class UserDetailComponent implements OnInit, OnDestroy {
...
ngOnInit() {
…
this.getUsersIfNecessary();
}
getUsersIfNecessary() {
this.store.select(selectUsers)
.pipe(
first ()
)
.subscribe((users) => {
if (users === null) {
this.store.dispatch(getUsers())
}
})
}
}
Refresh the app… and boom! You now see the current user and similar users as well. See the next section to understand how it all works.
How it works…
In this recipe, we already had a reducer and an effect that fetches the third-party API data as users. We started by creating a selector for the users for the home screen. That was easy—we just needed to create a simple selector. Note that the reducer's state is in the following form:
app: {
users: []
}
That's why we first used createFeatureSelector to fetch the app state, and then we used createSelector to get the users state.
The hard part was getting the current users and similar users. For that, we created selectors that could take the uuid as input. Then, we listened to the paramMap in the UserDetailComponent class for the uuid, and as soon as it changed, we fetched it. We then used it with the selectors by passing the uuid into them so that the selectors could filter the current user and similar users.
Finally, we had the issue that if someone lands directly on the User Detail page with the uuid, they won't see anything because we wouldn't have fetched the users. This is due to the fact that we only fetch the users on the home page, so anyone landing directly on a user's detail page wouldn't cause the effect to be triggered. That's why we created a method named getUsersIfNecessary so that it can check the state and fetch the users if they're not already fetched.
See also
- NgRx selectors documentation (https://ngrx.io/guide/store/selectors)
Using @ngrx/component-store for local state management within a component
In this recipe, you'll learn how to use the NgRx Component Store and how to use it instead of the push-based Subject/BehaviorSubject pattern with services for maintaining a component's state locally.
Remember that @ngrx/component-store is a stand-alone library and doesn't correlate with Redux or @ngrx/store, and so on.
Getting ready
The project that we are going to work with resides in chapter06/start_here/ngrx-component-store, inside the cloned repositor:
- Open the project in VS Code.
- Open the terminal and run npm install to install the dependencies of the project.
- Once done, run ng serve -o.
This should open the app in a new browser tab. Log in as Admin and you should see it, as follows:

Figure 6.18 – ngrx-component-store app running on http://localhost:4200
Now that we have the app running locally, let's see the steps of the recipe in the next section.
How to do it…
We have our favorite bucket app that we've used in a lot of recipes so far. The state of the buckets right now is stored in the BucketService, which uses a BehaviorSubject pattern. We're going to replace it with the NgRx Component Store. Let's begin:
- Add the @ngrx/component-store package to the project's dependencies by running the following command in the project root:
npm install @ngrx/[email protected] --save
- We first have to make our BucketService compatible with a ComponentStore. In order to do that, we'll create an interface for the bucket state, extend the BucketService from ComponentStore, and initialize the service by calling the super method. Update the file services/bucket.service.ts file, as follows:
...
import { IBucketService } from '../interfaces/bucket-service';
import { ComponentStore } from '@ngrx/component-store';
export interface BucketState {
bucket: IFruit[]
}
@Injectable({
providedIn: 'root'
})
export class BucketService extends ComponentStore<BucketState> implements IBucketService {
bucketSource = new BehaviorSubject([]);
bucket$: Observable<IFruit[]> = this.bucketSource.asObservable();
constructor() {
super({
bucket: []
})
}
...
}
None of this will make sense until we actually show the data from the ComponentStore. Let's work on that now.
- Modify the bucket$ Observable to use the ComponentStore state rather than relying on the BehaviorSubject pattern, as follows:
...
export class BucketService extends ComponentStore<BucketState> implements IBucketService {
bucketSource = new BehaviorSubject([]);
readonly bucket$: Observable<IFruit[]> = this.select(state => state.bucket);
constructor() {
super({
bucket: []
})
}
...
}
You should potentially see that none of the bucket items show anymore, or that even if you add an item, it won't show. That's because it still requires some work.
- First, let's make sure that instead of initializing the bucket from the Component Store with an empty array, we initialize it with the values from localStorage. Just try adding a few items, even if they don't show up yet. Then, modify the loadItems() method to use the setState method on BucketService. The code should look like this:
loadItems() {
const bucket = JSON.parse(window.localStorage. getItem('bucket') || '[]');
this.bucketSource.next(bucket); ← Remove this
this.setState({ ← Add this
bucket
})
}
Notice that we've removed the this.bucketSource.next(bucket); line from the code. This is because we're not going to work with the bucketSource property anymore, which is a BehaviorSubject pattern. We'll do the same for the next set of functions.
Also, you should now see the items that you added previously and that weren't shown.
- Let's replace the addItem method in the BucketService now so that it updates the state correctly and shows the new items on view, as intended. For this, we'll use the updater method of the ComponentStore and modify our addItem method to be an updater, as follows:
readonly addItem = this.updater((state, fruit: IFruit) => {
const bucket = [fruit, ...state.bucket]
window.localStorage.setItem('bucket', JSON.stringify(bucket));
return ({
bucket
})
});
If you add an item now, you should see it appearing on the view.
- We can now replace the removeItem method as well to be an updater method in the BucketService as well. The code should look like this:
readonly removeItem = this.updater((state, fruit: IFruit) => {
const bucket = state.bucket.filter(item => item.id !== fruit.id);
window.localStorage.setItem('bucket', JSON.stringify(bucket));
return ({
bucket
})
});
With this change, you should see the app working. But we do have an issue to fix, and that is that the EmployeeService also needs to be updated to make the removeItem method an updater method.
- Let's replace the removeItem method in the EmployeeBucketService to be an updater method as well. Modify the employee/services/employee-bucket.service.ts file, as follows:
import { Injectable } from '@angular/core';
import { IFruit } from 'src/app/interfaces/fruit.interface';
import { BucketService } from 'src/app/services/bucket.service';
...
export class EmployeeBucketService extends BucketService {
constructor() {
super();
}
readonly removeItem = this.updater((state, _: IFruit) => {
alert('Employees can not delete items');
return state;
});
}
And voilà! Everything should actually be fine right now, and you shouldn't see any errors.
- Since we've got rid of all usages of the BehaviorSubject pattern in the BucketService property named bucketSource, we can remove the property itself from the BucketService. The final code should look like this:
import { Injectable } from '@angular/core';
import { BehaviorSubject ← Remove this, Observable } from 'rxjs';
...
export class BucketService extends ComponentStore<BucketState> implements IBucketService {
bucketSource = new BehaviorSubject([]); ← Remove
readonly bucket$: Observable<IFruit[]> = this.select((state) => state.bucket);
constructor() {
super({
bucket: []
})
}
...
}
Congratulations! You finished the recipe. See the next section to understand how it works.
How it works…
As mentioned earlier, @ngrx/component-store is a standalone package that can easily be installed in your Angular apps without having to use @ngrx/store, @ngrx/effects, and so on. It is supposed to replace the usage of BehaviorSubject in Angular services, and that's what we did in this recipe. We covered how to initialize a ComponentStore and how to set the initial state using the setState method when we already had the values without accessing the state, and we learned how to create updater methods that can be used to update the state, as they can access the state and allow us to even pass arguments for our own use cases.
See also
- @ngrx/component-store documentation (https://ngrx.io/guide/component-store)
- Effects in @ngrx/component-store documentation (https://ngrx.io/guide/component-store/effect)
Using @ngrx/router-store to work with route changes reactively
NgRx is awesome because it allows you to have your data stored in a centralized place. However, listening to route changes is still something that is out of the NgRx scope for what we've covered so far. We did rely on the ActivatedRoute service to watch for route changes, and when we want to test such components, the ActivatedRoute service becomes a dependency. In this recipe, you'll install the @ngrx/router-store package and will learn how to listen to the route changes using some actions built into the package.
Getting ready
The project that we are going to work with resides in chapter06/start_here/ngrx-router-store, inside the cloned repositor:
- Open the project in VS Code.
- Open the terminal and run npm install to install the dependencies of the project.
- Once done, run ng serve -o.
This should open the app in a new browser tab, and you should see something like this:
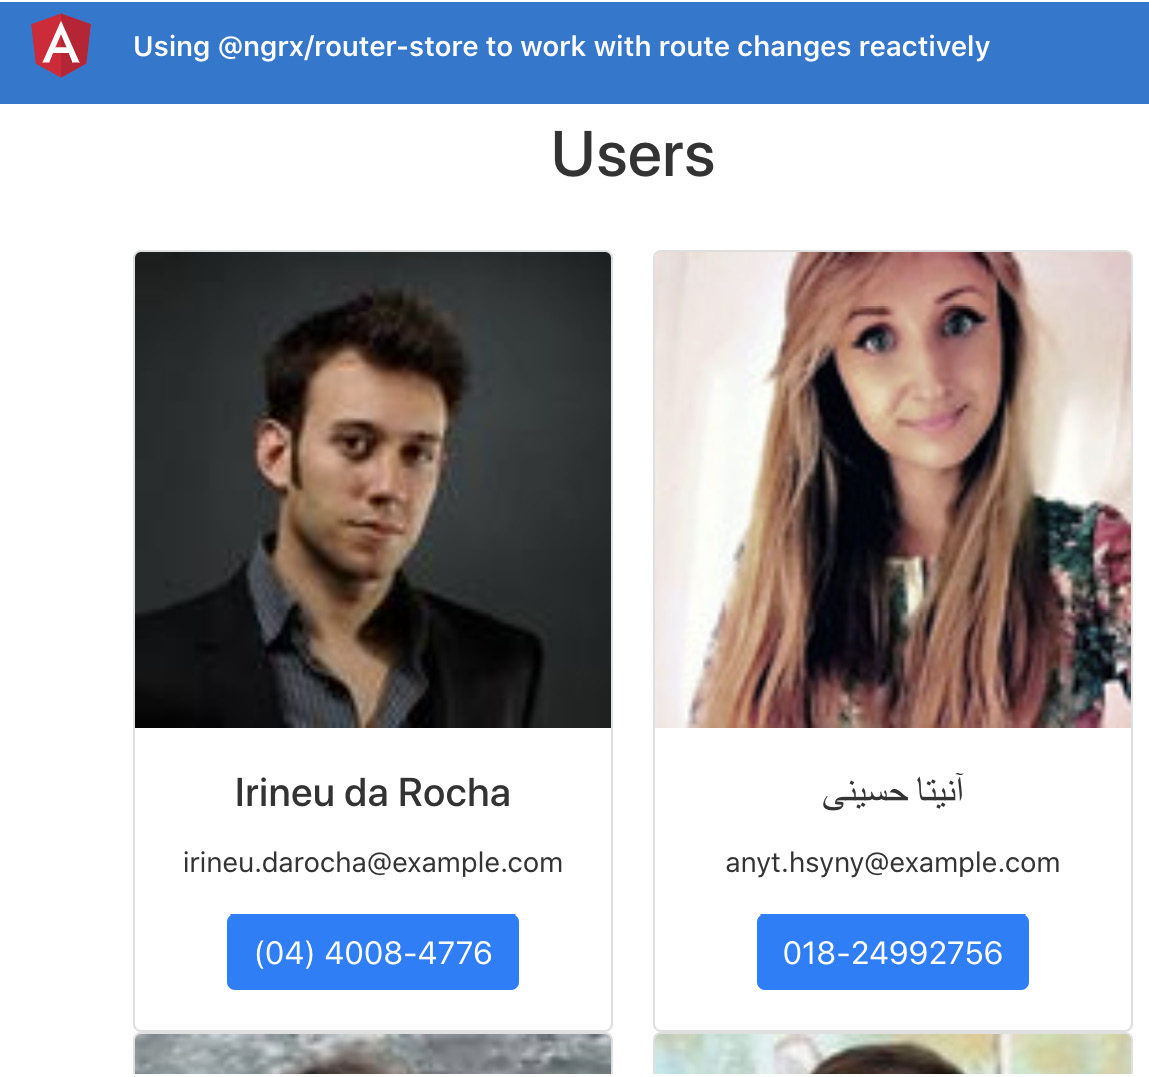
Figure 6.19 – ngrx-router-store app running on http://localhost:4200
Now that the app is running, see the next section for the steps of the recipe.
How to do it…
In order to utilize the power of NgRx even for route changes, we'll utilize the @ngrx/router-store package to listen to route changes. Let's begin!
- First, install the @ngrx/router-store package by running the following command in your project root:
npm install @ngrx/[email protected] --save
- Now, import StoreRouterConnectingModule and routerReducer from the @ngrx/router-store package in your app.module.ts file and set up the imports, as follows:
...
import { StoreRouterConnectingModule, routerReducer } from '@ngrx/router-store';
@NgModule({
declarations: [...],
imports: [
BrowserModule,
AppRoutingModule,
HttpClientModule,
StoreModule.forRoot({
app: appStore.reducer,
router: routerReducer
}),
StoreRouterConnectingModule.forRoot(),
StoreDevtoolsModule.instrument({
maxAge: 25, // Retains last 25 states
}),
EffectsModule.forRoot([AppEffects])
],
providers: [],
bootstrap: [AppComponent]
})
export class AppModule { }
As soon as you refresh the app now and inspect it via the Redux DevTools extension, you should see some additional actions named @ngrx/router-store/* being dispatched as well. You should also see that the router property in the state has the current routes' information, as depicted in the following screenshot:

Figure 6.20 – @ngrx/router-store actions and the router state reflected in the NgRx store
- We now have to modify our reducer—or, more precisely, the AppState interface—to reflect that we have the router property as well from the @ngrx/router-store package. To do so, modify the store/app.reducer.ts file, as follows:
...
import { getUsersSuccess } from './app.actions';
import { RouterReducerState } from '@ngrx/router-store'
export interface AppState {
users: IUser[];
router: RouterReducerState<any>;
}
const initialState: AppState = {
users: null,
router: null
}
...
- Essentially, we have to get rid of the ActivatedRoute service's usage from our UserDetailComponent class. In order to do so, we'll first modify our selectors to get the params from the router state directly. Modify the app.selectors.ts file, as follows:
...
import { getSelectors, RouterReducerState } from '@ngrx/router-store';
export const selectApp = createFeatureSelector<AppState>('app');
export const selectUsers = createSelector(
selectApp,
(state: AppState) => state.users
);
...
export const selectRouter = createFeatureSelector<
AppState,
RouterReducerState<any>
>('router');
const { selectRouteParam } = getSelectors(selectRouter);
export const selectUserUUID = selectRouteParam('uuid');
export const selectCurrentUser = createSelector(
selectUserUUID,
selectUsers,
(uuid, users: IUser[]) => users ? users.find(user => {
return user.login.uuid === uuid;
}) : null
);
export const selectSimilarUsers = createSelector(
selectUserUUID,
selectUsers,
(uuid, users: IUser[]) => users ? users.filter(user => {
return user.login.uuid !== uuid;
}): null
);
You should see some errors on the console right now. That's because we changed the signature of the selectSimilarUsers and selectCurrentUser selectors, but it'll be fixed in the next step.
- Modify the user-detail/user-detail.component.ts file to use the updated selectors correctly, as follows:
...
export class UserDetailComponent implements OnInit, OnDestroy {
...
ngOnInit() {
...
this.route.paramMap.pipe(
takeWhile(() => !!this.isComponentAlive)
)
.subscribe(params => {
const uuid = params.get('uuid');
this.user$ = this.store.select(selectCurrentUser)
this.similarUsers$ = this.store. select(selectSimilarUsers)
})
}
...
}
This change should have resolved the errors on the console, and you should actually see the app working perfectly fine, even though we're not passing any uuid from the UserDetailComponent class anymore.
- With the changes from the previous step, we can now safely remove the usage of the ActivatedRoute service from the UserDetailComponent class, and the code should now look like this:
...
import { Observable } from 'rxjs/internal/Observable';
import { first } from 'rxjs/operators';
import { Store } from '@ngrx/store';
...
export class UserDetailComponent implements OnInit, OnDestroy {
...
constructor(
private store: Store<AppState>
) {}
ngOnInit() {
this.isComponentAlive = true;
this.getUsersIfNecessary();
this.user$ = this.store.select(selectCurrentUser)
this.similarUsers$ = this.store. select(selectSimilarUsers)
}
...
}
Woohoo! You've finished the recipe now. See the next section to find out how this works.
How it works…
@ngrx/router-store is an amazing package that does a lot of magic to make our development a lot easier with NgRx. You saw how we could remove the ActivatedRoute service completely from the UserDetailComponent class by using the selectors from the package. Essentially, this helped us get the route params right in the selectors, and we could use it in our selectors to get and filter out the appropriate data. Behind the scenes, the package listens to the route changes in the entire Angular app and fetches from the route itself. It then stores the respective information in the NgRx Store so that it remains in the Redux state and can be selected via the package-provided selectors easily. In my opinion, it's freaking awesome! I say this because the package is doing all the heavy lifting that we would have to do otherwise. As a result, our UserDetailComponent class now relies only on the Store service, which makes it even easier to test because of fewer dependencies.
See also
- @ngrx/router-store documentation (https://ngrx.io/guide/router-store/)