
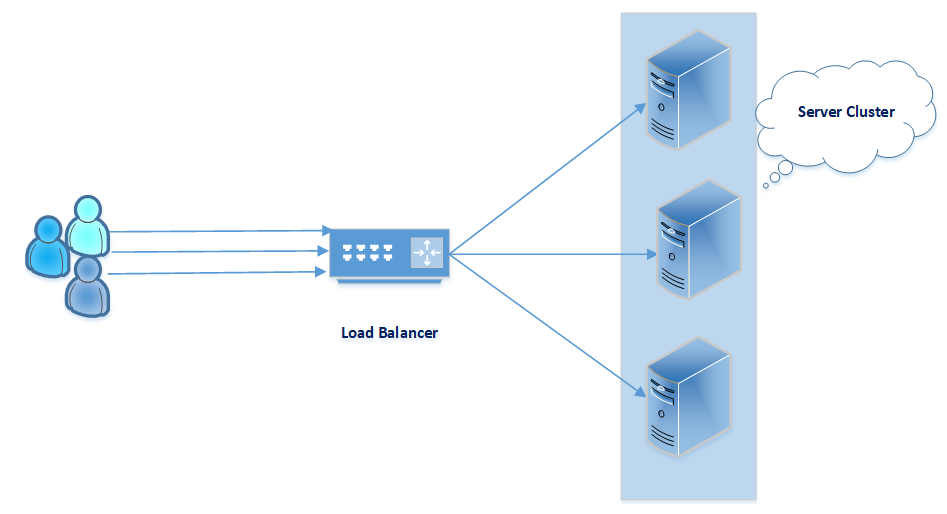
Traditional web applications can scale out and handle user loads using a load balancer. A load balancer can be configured to route the user requests to the next available server. Various algorithms are there to route the user requests, such as by busyness, round robin, and so on.
The following diagram depicts the traditional web application topology with a load balancer. The user requests are intercepted by a router/load balancer, the balancer knows which web server can handle the user request, and it routes the user to that server. The user loads are evenly distributed across the cluster nodes, so if you add more servers, then the cluster can handle more user requests:
However, this introduces a new problem for stateful applications that store web sessions. The user sessions are stored in a web/app server, so the Load Balancer must ensure that requests from the same user are handled by the same web server instance, so that the user state is always available. This load balancing pattern is known as sticky session, but this is not scalable; it doesn't distribute the load evenly. Another issues is that, if a server goes down, then all user sessions of that server will be lost, as the load balancer will route all user requests of that server to a new web server, but the new server doesn't know about the user state/data.
The following diagram demonstrates the user session problem:

To handle this user session issue, commercial application servers provide session replication options, but session replication has its own performance and scalability problems.
Some of the known patterns to solve this problem are as follows:
- Stateless services pattern (SSP): The services are stateless; user data is not stored in sessions or services. SSP is hard to implement.
- Session datastore pattern (SDP): The user session is stored in a datastore. The datastore can create a single point of failure, slowness, or bottleneck for the application. Not a recommended pattern to handle user sessions.
- Session clustering pattern (SCP): The user session is stored in a distributed cache cluster. This is the recommend pattern to handle user sessions.
The following diagram shows session clustering with an Ignite cluster. All user sessions are stored in a distributed Ignite cluster, and the load balancer can route user requests to any server based on the availability of the servers. This approach is highly scalable (user loads are distributed evenly) and highly available (any server can process the user requests, no session stickiness is required): .

Let's create a Spring web application and store the user sessions in an Ignite cache. You don't have to write a client or call a RESTful API to store the sessions in a cache; your application only needs to add few lines of Apache Ignite configuration code in web.xml. We'll launch two Tomcat instances with our code and crash one server, but still the other server will respond to our requests. No need to set up a load balancer to route our requests; rather, we'll just change the web app URL ports to simulate the load balancing.
When you type a web URL into a browser, the following activities are performed by the server:
- It creates a new HTTP session object.
- It builds a http response and sets a cookie with a name = JSESSIONID and value = unique identifier of the newly created session.
- It stores the session object in the server's RAM; the session remains active while the user is interacting with the web app, and expires after the predefined session timeout. The JSESSIONID cookie is shared among all requests in the same session.
- After session expiration, either by timeout or log off (session.invalidate()), the web server removes the session object from its memory and any subsequent request from the same browser creates a new session.
The default value of session timeout is 30 minutes on most containers, though you can configure it in web.xml using the following syntax:
<session-config>
 <session-timeout>10</session-timeout>
 </session-config>
First, create a web app using Gradle and edit the build.gradle. The following code snippet will tell Eclipse that this is going to be a web application:
apply plugin: 'java-library'
apply plugin: 'war'
apply plugin: 'eclipse'

repositories {
 jcenter()
}
war {
 baseName = 'session-clustering'
 version = '1.0.0-BUILD-SNAPSHOT'
}
Add spring and ignite dependencies:
dependencies {
 // This dependency is exported to consumers, that is to say found on their compile classpath.
 api 'org.apache.commons:commons-math3:3.6.1'

// This dependency is used internally, and not exposed to consumers on their own compile classpath.
 implementation 'com.google.guava:guava:21.0'

// Use JUnit test framework
 testImplementation 'junit:junit:4.12'

 compile "org.springframework:spring-webmvc:4.3.2.RELEASE"
 compile "javax.servlet:javax.servlet-api:3.1.0"
 compile "javax.servlet.jsp:javax.servlet.jsp-api:2.3.1"
 compile "javax.servlet:jstl:1.2"
 compile "org.apache.ignite:ignite-core:2.5.0"
 compile "org.apache.ignite:ignite-web:2.5.0"
 compile "org.apache.ignite:ignite-log4j:*"
 compile "org.apache.ignite:ignite-spring:2.5.0"
 compile "com.h2database:h2:1.4.196"
}
Create a Player.java class with getters, setters, and a toString method. Here, we ignore the getter/setters for brevity:
public class Player implements Serializable{
 private static final long serialVersionUID = 1L;
 private Long id;
 private String name;
 private double wages;
 //add getters & settes here ...

 public String toString() {
     return "Player[ id="+ id+", name=" + name + ", wages=" + wages + "]";
 }
}
Create a spring controller with three endpoints:
@Controller
@RequestMapping("/")
public class PlayerController {
 AtomicLong idGenerator = new AtomicLong(100);
The /player
POST endpoint request mapping accepts a player
's details, generates a unique player identifier, and stores the player
object in sessions with key = playerId and value = player object. The following code snippet doesn't contain any ignite framework/API code; It simply stores the newPlayer in session and opens the player.jsp page to show the newly created player
's id:
    @PostMapping("/player")
    public String createPlayer(HttpSession session, Model model, Player
     newPlayer) {
         Long playerId = idGenerator.incrementAndGet();
         newPlayer.setId(playerId);
         session.setAttribute(playerId.toString(), newPlayer);
         model.addAttribute("model", String.format("Player ID= %s
         added", playerId));
         return "player";
    }
The /player
GET request endpoint accepts a playerId as a request parameter, such as /player?id=101. If the playerId is found in session, the endpoint returns an HTML response with the player's details, but otherwise returns an error message explaining that the playerId is not found in session. Each response contains the server response time and the message:
@GetMapping(value = "/player")
 public String showDetails(@RequestParam("id") String playerId, Model model,HttpSession session ) {
     Object player = session.getAttribute(playerId);
     String response = "[@%s] %s";
     if(player == null) {
        response = String.format(response, new Date(), "<font color='red'>Player Not found</font>");
     }else {
        response = String.format(response, new Date(), player);
     }
     model.addAttribute("model", response);
     return "player";
 }
The initial '/' mapping creates a brand new session and routes users to a page (index.jsp) to enter player details:
 @GetMapping(value = "/")
 public String showForm(Model model, HttpServletRequest request) {
   request.getSession(true);
   model.addAttribute("player", new Player());
   return "index";
  }
}
Under src/main, create a directory, webapp, and create a sub-directory, WEB-INF. Inside WEB_INF, create a directory, views. In the src/main/resources directory, create a folder, META-INF. The project structure will look as follows:

The src/webapp/WEB-INF/views folder contain the JSP files. The index.jsp shows the player entry form and maps the details to a player object. When the form is submitted, the HTTP method is POST, and the /session-clustering/player URL maps the request to the createPlayer method of the PlayerController:
<%@ taglib prefix="form" uri="http://www.springframework.org/tags/form"%>
<html>
<body>
 <h3>Welcome, Enter Player Details</h3>
     <form:form method="POST"
         action="/session-clustering/player" modelAttribute="player">
         <table>
             <tr>
                 <td><form:label path="name">Name</form:label></td>
                 <td><form:input path="name"/></td>
             </tr>
             <tr>
                 <td><form:label path="wages">Wages</form:label></td>
                 <td><form:input path="wages"/></td>
             </tr>
            <tr>
             <td><input type="submit" value="Submit"/></td>
            </tr>
      </table>
 </form:form>
</body>
</html>
The player.jsp just renders the model set by the PlayerController methods showDetails(... ) and createPlayer(..):
<%@ page language="java" contentType="text/html; charset=ISO-8859-1"
 pageEncoding="ISO-8859-1"%>
<html>
<head>
<meta http-equiv="Content-Type" content="text/html; charset=UTF-8">
<title>Web session clustering</title>
</head>
<body>
 ${model}
</body>
</html>
The interesting part of storing sessions in Apache Ignite is the web.xml file. The web.xml file needs to be configured with Apache Ignite filters and spring. Define a spring dispatcher servlet to handle the web requests; spring configuration should be loaded from WEB-INF/spring-servlet.xml. It intercepts all web requests:
<servlet>
 <servlet-name>dispatcher</servlet-name>
 <servlet-class> org.springframework.web.servlet.DispatcherServlet </servlet-class>
 <init-param>
   <param-name>contextConfigLocation</param-name>
   <param-value>/WEB-INF/spring-servlet.xml</param-value>
 </init-param>
     <load-on-startup>1</load-on-startup>
 </servlet>

 <servlet-mapping>
 <servlet-name>dispatcher</servlet-name>
 <url-pattern>/</url-pattern>
 </servlet-mapping>
This section boots up the Ignite session filtering. First, define a org.apache.ignite.cache.websession.WebSessionFilter filter and configure it to handle all requests (url-patter = /*). This filter performs all the magic:
<filter>
 <filter-name>IgniteWebSessionsFilter</filter-name>
 <filter-class>org.apache.ignite.cache.websession.WebSessionFilter</filter-class>
 </filter>
 <filter-mapping>
 <filter-name>IgniteWebSessionsFilter</filter-name>
 <url-pattern>/*</url-pattern>
 </filter-mapping>
Define an Ignite servlet context listener to start a node during JVM startup and communicate with the Ignite cluster. The context parameters are used to configure Ignite. We are going to set two context parameters and a context listener:
- IgniteConfigurationFilePath: The spring configuration file path relative to the Ignite home or the META-INF folder. We created cache-config.xml under META-INF. It contains the IgniteConfiguratio
n
spring bean. - IgniteWebSessionsCacheName: The name of the Ignite cache where the HTTP sessions will be stored. Our sessions will be stored in web-session-cache.
- Additionally, you can configure a parameter, WebSessionsGridName. This is the name of the Ignite instance where the IgniteWebSessionsCacheName will be stored. We don't need this for our example:
<listener>
<listener-class>org.apache.ignite.startup.servlet.ServletContextListenerStartup</listener-class>
</listener>

<context-param>
 <param-name>IgniteConfigurationFilePath</param-name>
 <param-value>cache-config.xml</param-value>
 </context-param>

 <context-param>
 <param-name>IgniteWebSessionsCacheName</param-name>
 <param-value>web-session-cache</param-value>
 </context-param>
Let's take a look at the spring configuration. It instructs spring to load all annotated beans from the com.datagrid.controller package and resolve the views from the /WEB-INF/views folder with a default prefix of .jsp. It means when a controller method returns x, then spring resolves its corresponding view as /WEB-INF/views/x.jsp:
<context:component-scan base-package="com.datagrid.controller" />
<mvc:annotation-driven />

 <bean class="org.springframework.web.servlet.view.InternalResourceViewResolver">
     <property name="prefix">
         <value>/WEB-INF/views/</value>
     </property>
     <property name="suffix">
         <value>.jsp</value>
     </property>
 </bean>
The META-INF/cache-config.xml needs to enable peerClassLoading, start the Ignite node as a client, and configure the web session cache as the REPLICATED cache. Also, it defines the eviction policy as LRU with the max session objects to store as 5555. The 5555 doesn't have any significance, you can configure it based on the user load:
 <bean id="ignite.cfg" class="org.apache.ignite.configuration.IgniteConfiguration">
   <property name="peerClassLoadingEnabled" value="true"/>
   <property name="clientMode" value="true"/>
   <property name="cacheConfiguration">
    <list>
     <bean class="org.apache.ignite.configuration.CacheConfiguration">
         <property name="cacheMode" value="REPLICATED"/>
         <property name="onheapCacheEnabled"><value>true</value>
         </property>
         <!-- Cache name. -->
         <property name="name" value="web-session-cache"/>
         <property name="evictionPolicy">
            <bean
        class="org.apache.ignite.cache.eviction.lru.LruEvictionPolicy">
             <property name="maxSize" value="5555"/>
           </bean>
         </property>
     </bean>
   </list>
 </property>
 </bean>
Configure two Tomcat instances to run on ports 8888 and 9999. Server 8888 should be configured as shown in the following screenshot. The start (in seconds) is set to 60000 as Ignite startup may take a while:

Similarly, configure server 9999. In your Eclipse editor, right-click on the project, it will open a popup menu. Click on the Run As sub menu and then select the "Run On Server
" option. In Run On Server popup, select the server-9999. The following figure represents the Run On Server popup

It will start the server and start an ignite server instance from the IGNITE-HOME/bin folder. Launch Chrome, open devtools, and hit the URL at http://localhost:9999/session-clustering/:

You can see a JSESSIONID cookie is sent back.
Enter player details to create a player:

It will show you player 101 added; remember the Id=101:

Try to find a player by hitting the URL at http://localhost:9999/session-clustering/player?id=101:

Stop server 9999. Now, if you try to access the URL at http://localhost:9999/session-clustering/player?id=101,
it will fail:

Start the 8888server. Once the 8888 server gets started, we can mock the load balancer behavior by routing our browser requests to server 8888. Had that been a normal web app, we would not have found user 101 as server 9999 is down and our session is lost. Modify the port in a web browser, and change it from 9999 to 8888:
