
There are several ways we can configure our Struts 2 applications. These include using everybody's favorite, XML, annotations, and some agile convention-over -configuration methods.
In this chapter we'll cover the minimum necessary to get an application up and running, deferring more complex topics until they're necessary. We'll also begin our journey into lightweight application specification capture by introducing the "user story" concept. Along the way, we'll also begin coding our sample application.
Our first task is to get a minimal Struts 2 application running. We're not concerned with application functionality at this point. Our goal is to make sure our builds and deploys are working properly, and to sanity-check our Struts 2 configuration.
We won't cover any IDE-specific setup requirements, or discuss application-server -specific deployment issues. We'll assume an environment including Java 1.5, Servlet 2.4, and JSP 2+.0.
Note
Struts 2.0 is shipped with a set of JAR files usable under Java 1.4. Struts 2.1 no longer ships those libraries. The build process, however, still supports their creation. Struts 2 states a requirement of Servlet 2.4; however, full applications have been run under Servlet 2.3. Again, this capability may not always exist.
The sample applications are available in both a Maven-based distribution and a typical non-Maven directory layout. When we refer to source code, it will almost always be obvious where the directories and files belong (if you're not very familiar with Maven and wish to do things the "Maven way", there's an introduction to the Maven directory layout on the Maven website). The book text assumes that we're already able to get a Java web application compiled and deployed.
Note
Being dependent on an IDE's build process is, in general, a bad idea. Creating a build file allows our build process to be replicated across developers, IDEs, and tools. For example, a build file might be used by a Continuous Integration server to automate compilation, testing, and deployment. We won't delve deeply into the various build process options. Therefor, you may build the book source code in whatever manner you're most accustomed to, including relying on only an IDE.
Our sanity-checking application will be as simple as possible. It will consist of only the minimum libraries necessary to get:
A Struts 2 application running
The Struts 2 Configuration Browser Plug-in
Apache Log4J for logging
The Struts 2 Configuration Browser Plug-in lets us check out what Struts 2 thinks our configuration is. (Believe it or not, we do occasionally make mistakes. And ultimately it's the framework that decides what works, not us!)
Log4J is the ubiquitous logging framework. We'll discuss logging later in the book; however, we will use logging before then. Logging statements in the code can be safely ignored until then. The following is the table listing the minimum jar files to get a Struts 2 application running:
|
Required JAR file(s) |
The Struts 2 application |
|---|---|
|
|
Struts 2 framework. |
|
|
XWork framework. |
|
|
OGNL, an expression language similar to JSP's EL, used by the Struts 2 tags. |
|
|
FreeMarker, a templating library used to implement Struts 2's UI custom tags. |
|
|
FileUpload and IO are used for Struts 2's file uploading capabilities. Logging is used as a logging library wrapper. |
|
|
Struts 2 Config Browser Plug-in, used to examine application configuration. |
|
|
Ubiquitous logging library. |
The dependency on the Commons FileUpload package and IO libraries is required, even if we're not uploading files in our application (not having them will cause the application to fail on startup). Note that we can decide to use other file upload libraries.
Note
Including a Struts 2 plug-in may introduce additional dependencies. For example, if we were using the Spring or JasperReports plug-ins, we would need to include their dependencies as well. Otherwise, our application may fail on startup. This is one area in which Maven is particularly handy. (There are dependency managers for Apache Ant as well. However, if we're gluttons for punishment, we can figure out the dependencies on our own.)
Struts 2 dispatches requests with a filter (Struts 1 used a servlet). By default, Struts 2 expects to have a look at all requests. This allows Struts 2 to serve static content from the classpath. This includes JavaScript files for Dojo/Ajax support and FreeMarker templates for Struts 2's custom tags.
The default filter configuration defines the filter and its mapping.
<filter>
<filter-name>struts2</filter-name>
<filter-class>
org.apache.struts2.dispatcher.ng.filter.StrutsPrepareAndExecuteFilter

</filter-class>
</filter>
<filter-mapping>
<filter-name>struts2</filter-name>
<url-pattern>/*</url-pattern>
</filter-mapping>
Note that we map the Struts 2 filter to /*, and not to /*.action (the default Struts 2 extension). We can check whether our server and environment are correctly configured or not. If we visit any URL ending with .action, such as /sanity/foo.action, we should see an error message along the lines of: There is no Action mapped for namespace / and action name foo. This lets us know that Struts 2 at least attempted to process our request, but it couldn't.
If we don't see a similar error message, we have to troubleshoot our build and deploy environment. We can place a simple JSP file in our web context root to determine if we're able to process any request, and to determine whether we're processing JSP files correctly. (The URLs shown in the text won't include host or port information, and assume the root context.)
The specifics of troubleshooting are environment, IDE, and server-specific. These won't be covered here. The usual suspects include classpath and deployment issues.
We'll start by writing one of the simplest actions possible:
package com.packt.s2wad.ch02.sanity;
public class VerySimpleAction {
public String execute() {
return "success";
}
}
As could be seen from above, the action doesn't extend or implement anything—it just has a method named execute() that returns a String. The execute() method is the method Struts 2 will call by default (we'll see how to call others a bit later on).
Struts 2 configuration files are expected to be on the classpath (in Struts 1 they were typically located under /WEB-INF). By default, Struts 2 will look for a file named struts.xml in the root of the classpath. The top-level elements of our Struts 2 configuration file are shown here:
<struts>
<constant name="struts.devMode" value="true"/>
<package name="default" namespace="/" extends="struts-default">
<!-- Action configurations... -->
</package>
</struts>
The constant element defining struts.devMode puts Struts 2 into "developer mode", increasing the variety and quantity of error messages, reloading Struts 2 configuration files when they change, and so on.
Note
It's also possible to define constants in our web.xml file; this is useful when we don't need an XML-based configuration. Either is acceptable: which is used depends on our needs and preferences. We can also define constants in a file named struts.properties, also on the classpath, but this is not preferred.
The<package> element defines a unit of configuration that our actions will live in. We'll learn more about packages later on. For now, it's enough to know that Struts 2 packages are a way of dividing up an application's functionality and configuration. The namespace attribute defines the URL prefix used for all actions in the package, and should begin with a slash (/).
We configure our simple action by placing an action element inside our package and giving our action a result—a JSP in this case.
<action name="verysimple"
class="com.packt.s2wad.ch02.sanity.VerySimpleAction">
<result>/WEB-INF/jsps/verysimple.jsp</result>
</action>
For the most part, every action will have name and class attributes. The name attribute is used to map a URL to the action class, specified by the class attribute.
Visiting /verysimple.action should display the contents of our JSP file. If it doesn't, we need to troubleshoot our deployment.
Results determine what gets returned to the browser after an action is executed. The string returned from the action should be the name of a result. Results are configured per-action as above, or as a "global" result, available to every action in a package.
Results have optional name and type attributes. The default name value is success. In the previous example, we didn't give our result a name. This is because we're returning success from the execute() method, so we don't need to provide the name explicitly.
We also did not define the type attribute of the result. However, we can surmise that as we provided the pathname of a JSP file and we end up seeing the JSP contents in the browser, it's some sort of dispatching process. In fact, the default result type is dispatcher, which dispatches to our JSP using the normal JEE mechanism.
We could have specified both the name and the type attributes as seen here:
<action name="verysimple"
class="com.packt.s2wad.ch02.sanity.VerySimpleAction">
<result name="success" type="dispatcher">
/WEB-INF/jsps/verysimple.jsp
</result>
</action>
If we have a JSP that needs no additional processing, we can omit the action's class attribute. Struts 2 will forward to the JSP (similar to Struts 1's ForwardAction).
<action name="verysimple">
<result>/WEB-INF/jsps/verysimple.jsp</result>
</action>
This keeps our JSP files hidden from direct access, and normalizes our application to use only action-based URLs. If we later modified the action to use an action class, the URL wouldn't need to be changed.
Our very simple action had a single method, execute(), which will be called by default. Consider an action with multiple action methods:
package com.packt.s2wad.ch02.sanity;
public class MethodSelectionAction {
public String method1() { return "success"; }
public String method2() { return "success"; }
}
We can define which method to call using the method attribute as seen here:
<action name="method1" method="method1"
class="com.packt.s2wad.ch02.sanity.MethodSelectionAction">
<result>/WEB-INF/jsps/method1.jsp</result>
</action>
<action name="method2" method="method2"
class="com.packt.s2wad.ch02.sanity.MethodSelectionAction">
<result>/WEB-INF/jsps/method2.jsp</result>
</action>
Some people prefer creating separate classes for every action, rather than filling an action with several methods. Which route to take can depend on several factors, including personal preference. In some cases it makes perfect sense to keep related functionality in a single class, in other cases it may not.
This last example seems repetitive—the method and result names are the same and the JSPs have similar naming conventions. Struts 2 allows wildcard mapping in several ways, which we'll use now to help lay out our application flow.
The traditional model of application development generally starts with the gathering of requirements, followed by separate design, implementation, verification, and maintenance phases. This is called the waterfall method and has been around for many years.
In contrast, more agile models of development focus on the user experience, rapid turnaround of functionalities, and iterative development. This allows our clients to provide feedback in parallel with development, requesting changes in functionality, detecting usability and application flow issues, and so on, early in the process. In many circumstances, this lightweight development cycle can greatly speed up the development time, and deliver an application that more accurately meets the client's needs.
Our client is building a recipe swapping website, which allows us to build a shopping list from a set of selected recipes. Even without any further requirements, we know we'll need at least five pages—home, recipe search, recipe list, recipe entry, and shopping list.
The first tool we'll explore for capturing application functionality are user stories. User stories are very short descriptions of functionalities (often captured on index cards) that represent a user experience.
User stories do not contain implementation or specification details. A simple example might be: "A user can search for recipes." This might even be expanded to read: "A user can search for recipes by name, ingredients, and so on." Anything significantly more detailed than that is (usually) better expressed as additional, equally short stories.
At this stage in our application requirements gathering, we have five user stories; a couple of them with some minor reminders of expected functionality:
Users see an informational homepage
Users can enter recipes to share
Users can list recipes
Users can list either their own recipes or recipes from all users
Users can mark recipes to create a shopping list
Users can search recipes
Users can search by the recipe's name, ethnicity, ingredients, and so on
Users can see a shopping list of ingredients needed for their selected recipes
Obviously, this isn't a complete application specification. However, it is enough to get started on coding the most basic website pages, organizing our development effort, and defining a tangible set of deliverables for the client. Even at this stage, the client might identify some missing functionalities, poor application flow, and so on.
We already know enough to define our action mappings to create skeletons of these pages, although they're a bit heavy considering our simple needs. Struts 2 provides handy wildcard configuration mechanisms making early prototyping really simple.
Wildcard action definitions are a quick way to create the skeleton of an application. The following configuration, along with the required JSP files, is enough:
<action name="*">
<result>/WEB-INF/jsps/{1}.jsp</result>
</action>
The {1} refers to the first (in this case only) wildcard in the action's name attribute. In this case, visiting /foo.action would return the /WEB-INF/jsps/foo.jsp file.
Supplying a JSP page for each story creates an outline of the application. We might use the previously shown wildcard technique and create home.jsp, recipesearch.jsp, recipelist.jsp, recipenew.jsp, and shoppinglist.jsp. Visiting /home.action would give us /WEB-INF/jsps/home.jsp. We're not actually going to do it this way: the URLs are ugly, and we suspect there must be a better way.
We have at least two different major divisions in our application—recipes and shopping lists. In the examples above we had pages such as /recipenew.action, rather than the more natural and hierarchical /recipe/new.action.
One solution would be to use multiple wildcards. Multiple wildcards allow us to map individual portions of the URL to action names, JSPs, directories, and so on. For example, see the following:
<action name="*/*">
<result>/WEB-INF/jsps/{1}/{2}.jsp</result>
</action>
Here, we use the first wildcard as a directory (like /WEB-INF/jsps/recipe). The second defines the page (JSP) to be shown, such as list.jsp, new.jsp, and so on. Now the cleaner /recipe/list.action URL would return /WEB-INF/jsps/recipe/list.jsp.
We can also use wildcards to define action methods and/or action classes. Class names, of course, must still be legal Java class names. If we're using a wildcard to create a Java class name, we'll have mixed-case URLs, and they are case-sensitive. The following definition demonstrates a possible configuration that differentiates between class names and methods within those classes:
<action name="*/*"
class="com.packt.s2wad.ch02.examples.{1}Action"
method="{2}">
<result>/WEB-INF/jsps/{1}/{2}.jsp</result>
</action>
Assume UserAction and GroupAction classes, both with list() and create() methods. Visiting /User/list.action would call the UserAction.list() method then dispatch to /WEB-INF/jsps/User/list.jsp as the result.
Just to reiterate, the case of the word User in the URL is significant. The class name created by appending the wildcard contents to the package name is the class that Struts 2 will attempt to instantiate.
Using wildcards is a flexible way to break up our application. However, for large and complex applications, it can lead to a brittle configuration, bizarre URLs, and more trouble than they're worth. Naturally, there's another way, which can be used alone or in combination with wildcards.
Packages and namespaces help group and classify various configuration elements, delineate areas of responsibility, provide package-specific resources, and so on. In our recipe application, we do not yet have much functionality. However, we can still draw a "line in the sand" between our two obvious sections, recipes and shopping, and intuit that each of these might deserve their own package.
Packages can declare a namespace, which is effectively a portion of the URL. Adding to our original default package, our first look at defining some packages looks like this:
<package name="default" namespace="/" extends="struts-default">
<action name="*">
<result>/WEB-INF/jsps/{1}.jsp</result>
</action>
</package>
<package name="recipe" namespace="/recipe" extends="struts-default">
<action name="*">
<result>/WEB-INF/jsps/recipe/{1}.jsp</result>
</action>
</package>
Visiting /recipe/list.action puts us in the recipe package, whereas visiting /home.action leads us to our default package.
We'll use<jsp:include> tags as our templating mechanism to keep things simple. Our pages will have a navigation bar at the top, and contents underneath.
We'll peek ahead at our first Struts 2 custom tag—<s:url>. This tag is used to create URLs. We could also use JSTL's<c:url> tag, but we'll discover some reasons for sticking with<s:url> in a bit.
Full documentation for the<s:url> tag (and all the other tags) is available on the Struts 2 wiki, which is also exported in the distribution. For now we'll only concern ourselves with the action and the namespace attributes. However, I always encourage people to read the documentation and consider it a necessary resource.
The action attribute specifies the Struts 2 action of the link (without the .action suffix, which is added by the tag). The namespace attribute defines the namespace the action is in. Our simple navigation page, /WEB-INF/jsps/shared/nav.jsp, contains links to each of our story pages:
<%@ taglib prefix="s" uri="/struts-tags" %>
<a href="<s:url namespace="/" action="home"/>">Home</a>
<a href="<s:url namespace="/recipe" action="list"/>">
List Recipes</a>
<a href="<s:url namespace="/recipe" action="search"/>">
Search Recipes</a>
<a href="<s:url namespace="/recipe" action="new"/>">
Create Recipe</a>
<a href="<s:url namespace="/shopping" action="list"/>">
Shopping List</a>
Why specify the namespace as a separate attribute as opposed to just including it in the action name or URL? The<s:url> tag is namespace-aware: creating links within a namespace doesn't require the namespace attribute. Actions within other namespaces require the namespace to be specified. Navigation links, which must work no matter what namespace we're in, can just use it all the time.
The slash (/) in a namespace is not optional. Without it, Struts 2 will not know that we're in a namespace and will prefix an additional namespace to the URL, thereby breaking it.
Namespaces allow us to use common sense links within a package. For example, if we were administering a large number of simple data models (users, groups, and so on), we could split them in to packages, each getting a namespace, and each with a list action.
On a page in the "users" package,<s:url action="list"/> would refer to the "users" package's list action. To link to the "groups" package list action, we specify the namespace:<s:url action="list" namespace="groups"/>.
Struts 2 configuration files can include additional configuration files with the<include> element. For example, we might configure our shopping list package in its own file and include it after our other packages were defined as seen here.
<!-- ... existing config file ... -->
</package>
<include file="com/packt/s2wad/ch02/shopping/shopping.xml"/> </struts>
The shopping.xml file is placed in our shopping package and referred to by a classpath-relative path, like any other classpath resource. We can put the configuration files wherever we want—we could just as easily keep it at the root level.
This is a simple way to break up areas of responsibility, delineate application functionality, reduce potential edit conflicts, and keep configuration as local to the implementation as possible.
To complete our wireframe application, which is just enough to show our user stories, we need to create several JSP files to match our story URLs. The / namespace holds the home action, so we create /WEB-INF/jsps/home.jsp. The /recipe namespace holds the recipe list, new recipes, and recipe search pages. Each JSP is named as we'd expect, and in /WEB-INF/jsps/recipe/. The /shopping namespace contains only the shopping list action with its JSP in /WEB-INF/jsps/shopping/list.jsp.
Each of these skeletal JSP files contains our navigation JSP and a header letting us know which page we're on. For example, our home.jsp file is mostly HTML.
<html>
<head>
<title>Home</title>
</head>
<body>
<div id="nav">
<jsp:include page="/WEB-INF/jsps/shared/nav.jsp"/>
</div>
<div id="content">
<h1>Home</h1>
<p>Home page.</p>
</div>
</body>
</html>
When we visit /home.action, we'll see the navigation links at the top and a big "Home" headline. Visiting /recipe/list.action is the same, but with a big "Recipes" headline. Not terribly exciting, but we already see the beginnings of the functionality.
We can use the Configuration Browser Plug-in to examine what Struts 2 believes our configuration is. (Struts 2 doesn't always agree with us, but is nice enough to tell us when we're wrong.) We just add the library to our classpath.
To browse our configuration, we visit /config-browser/index.action, where we'll see something similar to the following:
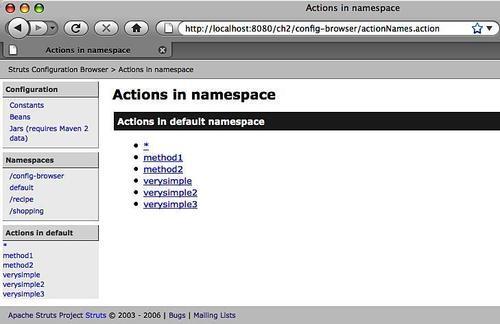
From here, we can examine our action configurations, result attributes, and so on. It's a handy way to compare what we think our configuration is with what Struts 2 thinks it is. Struts 2 is running the show, and its version wins even if we think it's wrong.
Hate XML? The Convention Plug-in allows us to operate completely configuration-free, and to use annotations when the defaults aren't quite what we need. The Convention Plug-in is also used by the REST Plug-in (discussed later in the book).
Using the plug-in is almost as simple as dropping its JAR file into our classpath, but not quite easy. The Convention Plug-in has its own library dependencies. Maven makes this trivial. Without Maven, it's easiest to grab the libraries from the REST Plug-in showcase application.
In this example, we won't use a Struts 2 configuration file. We'll set all of our constants in our web.xml file. For example, we'll still set struts.devMode to true.
<filter>
<filter-name>struts2</filter-name>
<filter-class>
org.apache.struts2.dispatcher.ng.filter.StrutsPrepareAndExecuteFilter
</filter-class>
<init-param>
<param-name>struts.devMode</param-name>
<param-value>true</param-value>
</init-param>
</filter>
When we make a request for which there is no mapping and no action, the Convention Plug-in will attempt to locate a reasonable result. For example, if we request /sanity or /sanity.action (the ".action" extension is optional), the plug-in will look for a result in /WEB-INF/content/sanity.*, checking for .jsp, .ftl, and .vm files.
The Convention Plug-in has many configuration parameters, including one to set the root location for result files. We'll add another filter parameter:
<init-param>
<param-name>struts.convention.result.path</param-name>
<param-value>/WEB-INF/jsps</param-value>
</init-param>
Now the Convention Plug-in will search for files under /WEB-INF/jsps. Our previous request would look for /WEB-INF/jsps/sanity.jsp (and .ftl and .vm). If no file is found, we'll get an error message in our browser (or a 404 if development mode isn't activated) saying that there's no action mapped for our request.
The Convention Plug-in allows us to create a skeletal application with no XML configuration whatsoever—we need only create the necessary JSP files.
The Convention Plug-in can detect and configure our action classes on application startup as well. The plug-in will scan for implementations of com.opensymphony.xwork2.Action (as the ActionSupport superclass does) in Java packages whose names contain "struts", "struts2", "action", and "actions", and whose classname ends in "Action".
Note
There are several parameters we can set to fine-tune the Convention Plug-in. Set the packages to scan via the struts.convention.package.locators constant. Set struts.convention.package.locators.disable to true to disable scanning. Exclude a list of packages from scanning with the struts.convention.exclude.packages constant. However, be aware that the Convention Plug-in already sets this to a default value. We must set the default, as well as our own value, for this to work well. To change the suffix of action classnames, set the struts.convention.action.suffix constant (for example, the REST Plug-in changes the suffix to Controller).
Our first Convention-based action has an execute()method returning success—that's it. The Convention Plug-in will search for results in the same way as with action-less requests, but will use the action class name as part of the file name to search for. Our first result test action contains the following (imports elided):
package com.packt.s2wad.ch02.convention.actions;
public class SanityAction extends ActionSupport {
public String execute() {
System.out.println("***** Hello from SanityAction!");
return "success";
}
}
We're getting a sneak peek at the ActionSupport class. If we request /sanity, we'll see our println() call on the console, and our JSP displayed in the browser.
The Convention plug-in will also search for action-named JSPs with the result string appended; we could also have named our sanity.jsp file sanity-success.jsp. The Convention Plug-in will use files with appended result codes first. In other words, if our action returns success, the file named sanity-success.jsp will be rendered, even if there's a file named sanity.jsp.
To demonstrate, consider an action returning odd or even based on the current time:
package com.packt.s2wad.ch02.convention.actions;
public class WhichresultAction extends ActionSupport {
private long ctm;
public String execute() {
ctm = System.currentTimeMillis();
return ((ctm & 1L) == 1L) ? "odd" : "even";
}
public long getCtm() { return ctm; }
}
We'll create two JSP files under /WEB-INF/jsps—whichresult-odd.jsp and whichresult-even.jsp. Here's the meat of whichresult-odd.jsp:
<h1><s:property value="ctm"/> is odd!</h1>
It's not a coincidence that our action class has a property named ctm and we're using the<s:property> tag to access something named ctm in the JSP. Remember setting values into request scope, or ActionForm? No more of that! We'll get to this magic soon!
When we request /whichresult, we'll see either the odd or the even page. After a few clicks, we'll likely see both results, letting us know the magic of Convention is working.
If Convention's defaults don't suit us, we can use its annotations to configure the action. For example, the @Action annotation can change or add action mappings beyond what Convention automatically provides. Complete documentation, along with many examples, is available on the Struts 2 documentation wiki.
We can also configure results with Convention's annotations. We don't have to rely on the Convention plug-in's idea of what our result JSP files should be named. We can define results manually using the @Result annotation, and the @Results annotation if we need multiple results. (We can use the @Results annotation only at the class level, while the @Action and @Actions annotations are available at the method level. We can define multiple results at the action level via the @Action annotation's results property.)
We'll create MoreresultsAction to demonstrate some of this. Its execute() method is the same as in WhichresultAction, and accessible through /moreresults. We'll add a tristate() method and configure it to respond to the /tristate URL:
@Action(value = "/tristate")
public String tristate() {
ctm = System.currentTimeMillis();
long tmp = ctm - ((ctm / 10L) * 10L);
if (tmp <= 3) return "three";
if (tmp <= 6) return "six";
return "nine";
}
The JSP pages are located under /WEB-INF/jsps, and are named tristate-three.jsp, tristate-six.jsp, and tristate-nine.jsp. Let's say we want the JSPs to live under /WEB-INF/jsps/tristate, we can add to the following to the tristate()'s @Action annotation:
@Action(value = "/tristate",
results = {
@Result(name="three",
location="/WEB-INF/jsps/tristate/tristate-three.jsp"),
@Result(name="six",
location="/WEB-INF/jsps/tristate/tristate-six.jsp"),
@Result(name="nine",
location="/WEB-INF/jsps/tristate/tristate-nine.jsp")
})
We can also configure results at the class level. We'll modify MoreresultsAction, so both execute() and tristate() use a result defined at the action level.
@Results({
@Result(name="nine",
location="/WEB-INF/jsps/tristate/tristate-nine.jsp")
})
public class MoreresultsAction extends ActionSupport {
@Action(value = "/tristate",
results = {
@Result(name="three",
location="/WEB-INF/jsps/tristate/tristate-three.jsp"),
@Result(name="six",
location="/WEB-INF/jsps/tristate/tristate-six.jsp")
})
public String tristate() {
// ...
}
}
The nine result is now defined at the class level, and is accessible to both execute() and tristate(). Only tristate() may use the three and six results.
If we stick with Convention's naming patterns, we can remove a fair amount of annotations, but we know we can override the defaults if they don't work for us.
There are a few more games we can play with Convention's annotations—set an action's namespace using the @Namespace annotation (only at the class level), define an action's parent package, configure interceptors, and more.
This chapter gives us an overview of Struts 2 configuration, covering the very basics of action configuration, and a bit about the Convention Plug-in. The chapter introduces some basic Struts 2 concepts at a foundational level, along with certain ways to break up application functionalities into logical or functional portions. We also see our first Struts 2 custom tag.
The chapter quickly covers user stories as a way to capture functional requirements in a high-level, abstract way. Even with minimal specifications, we can create enough functionality to begin creating the code, design, layout, and flow.
In the next chapter, we'll explore Struts 2 actions in more depth and discover some of the functionalities that Struts 2 gives us for free through the ActionSupport class.
References
A reader can refer to the followingreader can refer to the following:
XML-based configuration elements:
http://struts.apache.org/2.x/docs/configuration-elements.html
Struts 2 and XWork API Javadocs:
http://struts.apache.org/2.x/struts2-core/apidocs/index.html
Convention Plug-in (and its annotations):
Struts 2 tags (link to
<s:url>and all the rest):User Stories:
Java Web Application Basics:
http://www.onjava.com/lpt/a/671(oldie but a goodie)
http://java.sun.com/javaee/technologies/webapps/(all the best from Sun)