
Lesson Files | FCP4 Book Files > Lessons > Lesson 7 Project |
Media | Titanic folder |
Time | This lesson takes approximately 1 hour to complete. |
Goals | Work with master clips Reveal master clips Duplicate master clips Make clips independent Create subclips Remove subclip limits Add and name markers Edit with markers Use markers to create subclips |
Up to this point, you have been working with clips that are referred to as master clips. But not all clips are master clips. In this lesson, you will learn about master clips, how to identify them, how to reveal them in the Browser, and how to duplicate them. You will also learn how to create additional clips, called subclips, from master clips, and you will add markers to identify key locations within a clip or sequence that you will use in editing.
You are going to work with two open projects. One is the Lesson 7 Project file, and the other is one you will create. To get started in Lesson 7, you will launch Final Cut Pro and open the project for this lesson. You will then edit three clips into the Starting sequence to prepare for the next section.
Choose File > Open, or press Cmd-O, and choose the Lesson 7 Project file from the Lessons folder on your hard drive.
In the Timeline, there is only one sequence: Starting. This sequence is currently empty.
Close any other projects that may be open from a previous session by Ctrl-clicking their name tabs in the Browser and selecting Close Tab from the contextual menu.
To create a new project, choose File > New Project, or press Cmd-Shift-N.
When a new project is created, it is given the default name of Untitled Project 1, unless Untitled Project 1 has already been created, in which case a higher number is automatically assigned. In the Browser, a new default sequence named Sequence 1 (or higher) appears. This empty sequence automatically opens in the Timeline.
To save the untitled project with a new name, choose File > Save Project As. In the Save window, name the project Copy Exercise. Select a folder where you would like to save this project, perhaps with your other Final Cut Pro project files, and click Save.
In the Copy Exercise project, rename the sequence Copy and Paste.
You will work first with the Starting sequence and the Lesson 7 Project, so click the Starting tab in the Timeline and the Lesson 7 Project tab in the Browser.
As you already know, after source material has been captured and converted into digital media files, you access the media files by clicking on the clip icon in a project. A clip in a project represents a specific media file captured on your hard drive. The first representation of a media clip in the project is referred to as the master clip. Any use or duplication of that clip in the sequence or Browser creates clips that are affiliated with the master clip, but are not themselves master clips. In this section, you will work with master clips in different ways.
The first time a clip is either captured or imported into a project, it is given master clip status. A master clip icon doesn't look any different from other clip icons. But there are ways to find out whether or not a clip is a master clip. One way is to refer to the Master Clips column in the Browser window.
In the Lesson 7 Project tab in the Browser, click the triangle to display the contents of the Titanic Clips bin and double-click the titanic windows clip to open it in the Viewer. Play the clip.
This clip is a master clip because it is the first representation of this material in this project. At this point, no other clips have been created from this clip, and it has not been used in any sequences.
In the Viewer, mark an In point at 2:07:21;21 and an Out point at 2:07:26;00.
Edit the marked portion of the clip into the Starting sequence as an Overwrite edit.
In the same master clip in the Viewer, mark another In point at 2:07:37;00 and an Out point at 2:07:41;12. Edit the marked portion of the clip to the Timeline as an Overwrite edit following the first clip.
Although you have two separate clips in the Timeline, they both refer back to the same master clip in the Browser. These clips are referred to as sequence clips. They are affiliated with the master clip, but they are not master clips.
Now open the titanic and sub clip and mark an In point before the man on the radio mic speaks and an Out point when he stops speaking.
Insert this clip between the two clips in the Timeline and play the clips.
Drag the first titanic windows clip back to the Browser and release the mouse.
A copy of the sequence clip appears in the Browser.
In the Browser, drag the bottom scroll bar to the right until you see a column head named Master Clips appear next to the Name column. It appears near the end after the Comments columns.
TIP
Move the pointer to one of the Master Clip checkmarks. Whatever line of information the pointer is on in the Browser columns will appear darker. This is a helpful way to follow information across the window for a specific clip.
The original titanic windows clip has a check in the Master Clip column. But the sequence clip you dragged from the Timeline does not—it is not a master clip.
Sometimes, you may not be certain which sequence clip is affiliated with which master clip in the Browser. A menu function and shortcut will help you reveal the matching master clip.
In the Timeline, place the playhead in the middle of the first clip and choose View > Match Frame > Master Clip, or press F.
In the Viewer, the master clip is automatically opened, and the playhead is placed on the frame that matches the sequence frame you identified. The In and Out points match the edit points of the sequence clip.
With the playhead parked in the same position, choose View > Reveal Master Clip, or press Shift-F.
In the Browser, the master clip is automatically selected to identify itself. If the Titanic Clips bin is closed, it will open the bin and display the master clip.
When a clip is copied from one project and pasted into another, it becomes a master clip if it is the first use of that clip in the new project.
In the Timeline, select the first titanic windows clip and press Cmd-C to copy it. Click in the Browser gray area and press Cmd-V to paste this clip into this area.
Looking at the Master Clip column, note that the clip you just pasted from the Timeline is not a master clip because it's not the first time it appears in the project.
Now click the Copy Exercise project tab and press Cmd-V to paste the same clip into this project.
Drag the Browser scroll bar to the right until you see the Master Clip column for this project.
Even though this clip copy is not a master clip in the Lesson 7 Project file, it is a master clip in the Copy Exercise project because it is the first time it's been used in that project.
Click back on the Lesson 7 Project tab and delete the copied titanic windows clips that are not master clips.
When a clip is affiliated with a master clip, such as the two titanic windows clips in the Lesson 7 Project tab, changing the name (or other clip properties) of either clip will also change the other. This helps preserve the connection between the master clips and other affiliated clips. However, if you want to rename an affiliated clip or change other properties for just that clip, you can make the affiliated clip an independent clip. When a clip is independent, making changes to it will have no effect on any other clips in the project.
In the Browser, click the name area of the titanic and sub clip, press the right arrow key, and add CU (for close-up) to the end of the name. Press Return.
In the Timeline, the name of the sequence clip that is affiliated with this master clip has also changed to reflect the new name.
Press Cmd-Z to undo the last renaming step.
Select the titanic and sub clip in the Timeline.
Choose Modify > Make Independent Clip.
Drag this clip from the Timeline into the Browser and release the mouse.
Look at the Master Clip column to see the clip's status.
Making a clip independent also makes it a separate master clip.
Add the CU to the end of this clip's name and press Return.
In the Timeline, the clip name changes, but the original master clip in the Browser does not change.
Press Delete to delete this master clip.
A warning appears reminding you that you will break the relationship to any clip associated with this one.
NOTE
Breaking the relationship to a master clip will also have an impact on reconnecting clips if you transfer media from one computer or FireWire drive to another. When clips are affiliated with a master clip, you only have to reconnect to the master clips. All affiliated clips will automatically become reconnected.
When you capture source material, which you will do in Lesson 9, the duration of each clip is up to you. You might capture everything from your tape in one very long clip. Or you might start and stop a few times to create several shorter clips.
In the previous exercise, the titanic windows clip was long enough to use different parts of it. But as you saw, each time the clip was used in the sequence it was named after the master clip. When you start editing, working with one long clip may not be as convenient as working with shorter clips.
Rather than going through the renaming process, another solution to working with longer clips is to break up the master clip into subclips of specific shots you want to use. When you create a subclip of a master clip, you can create just the length of the shot you want to work with and give it its own unique name. This subclip becomes a separate clip icon you can name and work with in the Browser. Subclips are their own master clips.
Making a subclip begins with marking In and Out points on a clip in the Viewer to identify the material you want to use. But since this clip will stand alone, you might want to give yourself a little extra space, or handles, on either side to be able to make editing adjustments or add transitions in the future.
In the Browser, click the right ocean sot clip and choose Modify > Duplicate as New Master Clip.
The duplicate master clip is placed next to the original master in the Browser.
Click in the name area of the lower right ocean sot clip, press the right arrow, and type –long to add it to the end of the name.
Drag the right ocean sot–long clip into the Long Clips bins and when it becomes highlighted, release the mouse. Click the triangle to display the contents of this bin.
Both of the clips in this bin are long clips, each with several possible shots that could be used in a sequence. You will create subclips from the right ocean sot–long clip.
Double-click the right ocean sot–long clip to open it in the Viewer. Play the clip.
Mark an In point at the head of the clip and an Out point about a second after the man says, “Over.”
Choose Modify > Make Subclip, or press Cmd-U.

The Browser window becomes active, and a new icon appears under the master clip in the Long Clips bin. The subclip icon has jagged edges as if it had been torn or cut from the original clip. It also shares the master clip's name for the moment, but the text box is highlighted, awaiting a name change.
Rename the subclip checking in.
Double-click this new subclip to open it in the Viewer, and play it.
The clip is only as long as the distance between the In and Out points you marked earlier.
Open the right ocean sot-long master clip again, and mark In and Out points around the offscreen voice speaking on the radio.
Choose Modify > Make Subclip in the Browser and enter off screen voice as the new subclip name.
Repeat steps 8 and 9 to create another subclip of the last 5 seconds of the master clip. Name this clip sign off.
You edit with subclips just as you would master clips. You open them in the Viewer, mark them, and edit them into the Timeline. But when you edit subclips into a sequence, you are not working with the full length of the master clip. You are working with just the length of the new subclip, whatever that may be. However, you can remove the limits of a subclip if you need to make editing changes. Removing subclip limits takes the subclip back to the full length of the master clip.
In the Browser, press Cmd-N to create a new sequence and name it Subclips. Double-click it to open it in the Timeline.
Drag the checking in clip to the Timeline and release it in the middle of the Timeline as an Overwrite edit.
Click in the Timeline and zoom out so you have room on both sides of the clip to lengthen it.
Drag the checking in Out point to the left and then to the right.
Shortening the clip is no problem, but you can't drag any further to the right because this is the end of this clip.
In the Canvas, you see the end-of-clip indicator at the Out point.
If you change your mind and decide to include the off screen sound that follows in the original master clip, you have to remove the limits of this subclip.
In the Timeline, select the checking in clip and choose choose Modify > Remove Subclip Limits.
In the Browser, the subclip icon changes to a normal clip icon.
In the Timeline, drag the Out point of the checking in clip to make it longer.
Practice making subclips from the other clip in the Long Clips bin.
NOTE
After you select Make Subclip, the Browser is automatically selected and you can begin entering a new name. To mark the next subclip, you have to click in the Viewer window to make it active again. You can also use the keyboard shortcut Cmd-1 to select the Viewer from the Browser or from another window.
Press Cmd-S to save the project.
Markers are location indicators that you can place on a clip or in the Timeline to help find a specific frame or area while you edit. You can use markers to identify a beat of music, a sound bite in an interview, a reference in a narration track, or to identify any specific visual action, such as a flick of a feathered ear. Like the playhead, markers create a snapping point in a clip or sequence, giving you a specific location you can use to trim, adjust, or even match with another clip marker.
A marker can be placed on a clip or in a sequence. If a marker is attached to a clip, the marker will stay at that location in that clip even if the clip is moved elsewhere in the sequence. If no clip is selected, a marker will be added in the ruler area of the Timeline and become a reference to that specific location in the sequence.
One way to use markers is when you have one long audio/video clip that needs to be broken up with some cutaways. Here you can add a marker wherever you want to place the cutaway. In this exercise, you will add markers to identify places in dialogue tracks that have no video. This will allow you to experiment with ways to use one marker to align with another.
Markers are added at the playhead location. There are several ways to add a marker once the playhead is correctly positioned:
Choose Mark > Markers > Add.
Press the M key.
Click the Add Marker button in the Viewer or Canvas.
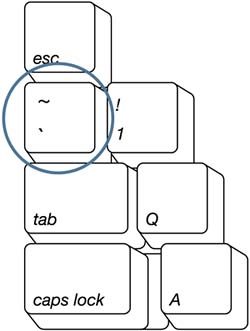
Press the grave key (located to the left of the number 1 key and above the Tab key—it shares the tilde key and looks like a backward accent).
NOTE
This key is also used to delete markers, which is covered in the “Deleting Markers” section later in this lesson.
In the Browser, double-click the Marking Titanic sequence to open it in the Timeline. Play the clips.
This sequence contains three audio clips. They are spaced apart to give you room to move clips. You will create three markers in the sequence based on what the crew members are saying in each clip. In a later exercise, you will use those sequence markers to align the sound bites with specific video action points.
Play the first clip again, cam rolling sot, and stop after the first time you hear “the video camera is on.”
To add a marker in the Timeline at this location, press M.

A green marker appears in the ruler area of the Timeline and also in the Canvas scrubber bar.
Make sure the playhead is on the marker you set and press M again to open the Edit Marker window. Type video camera on (referring to the sound bite) in the Name field. Take a look at the Edit Marker window.
The Edit Marker window has options to set a marker at a specific timecode location, to create a duration for a marker, or to delete a marker. You can also add other types of markers here. You will add Scoring markers in Lesson 14 when you work with the Soundtrack program. Compression and Chapter markers are added when a Final Cut Pro sequence is used in a DVD Studio Pro project. Click OK.
Play the second clip, debris vis bad sot, and stop after you hear someone say “debris field” for the second time.
Press M to add a marker at this location and press M again to open the Edit Marker window. Name this marker debris.
Play the third clip, right ocean sot, and stop after you hear someone finish saying “This is Emory.” To add a marker this time, click the Add Marker button in the Canvas. Press M to open the Edit Marker window and name this marker on radio.
In the Timeline, Ctrl-click the on radio marker in the ruler area.

A list of all the markers in the sequence appears at the bottom of the menu.
Select video camera on and release the mouse.
The playhead jumps to the video camera on marker in the Timeline.
You can also use menu options and keyboard shortcuts to move from one marker to another. These shortcuts follow the Final Cut Pro protocol of using the up and down arrow keys or the Shift and Option modifiers to move forward and backward in the Timeline.
In the Timeline, press Home to move the playhead to the head of the sequence.
Press Shift-M to move the playhead forward to the first marker.
In the Canvas, the current marker name appears over the image. The marker in the Canvas scrubber appears yellow to help you identify which marker is currently being viewed.
Continue to press Shift-M until you reach the end of the sequence.
Press Option-M to jump backward through each marker until you reach the first marker.
NOTE
The Shift and Option modifier keys, along with a shortcut letter such as M, are used throughout Final Cut Pro to move forward and backward to specific points in the Timeline.
There are other ways to move to markers. You can choose Mark > Next > Marker and Mark > Previous > Marker to see these options.
You can also place a marker directly on a clip. Sometimes this is preferable because the marker will always be marking the same point of reference on that clip no matter where the clip is positioned in the Timeline. The marker could be identifying a beat of music or video action point. You can place a marker on a clip either in the Viewer or in the Timeline when the clip is selected. And you can use either the shortcut M or the Add Marker button.
From the Browser, open the camera light cu clip and play it.
Park the playhead on the frame where the camera light first turns on. Use the left and right arrow keys to locate the frame.
Press M to place a marker on this source clip. You will use the default marker name for now.

Like the Canvas marker, the Viewer marker is yellow because the playhead is on the marker itself. If you move the playhead away, the Viewer marker is pink, as opposed to the green sequence marker.
In the Browser, find the camera light cu clip and click the disclosure triangle next to it.

When you add a marker to a clip in the Viewer, it is attached to the clip and appears as an entry in the Browser. You can name or rename a clip marker here by clicking the marker name.
Click the marker name and type light on.
Target just the V1 destination track and drag this clip to the Timeline. Let it go as an Overwrite edit anywhere over the first clip, cam rolling sot.

Marking on the fly is another way to mark a clip. You simply press M or the Add Marker button as the clip is playing.
Open the cam stirs debris clip and look for three possible marker locations in the video. Play the clip from the beginning and press M at three locations as the clip plays. Here are three possible locations:
When the camera first hits debris
When you can't see the camera any more
When the image is dark with debris
Drag this clip into the Timeline and let it go as an Overwrite edit anywhere over the second clip, debris vis bad sot.
Open the titanic winch clip and drag it to the Timeline. Release the clip as an Overwrite edit on the V1 track above the third clip, right ocean sot.
To add a marker to a clip when it's already in the Timeline, the clip must first be selected.
Select the titanic winch clip and press M or click the Add Marker button when you see the light hit directly on the winch.
You can use markers as reference points when you edit. Instead of parking the playhead to adjust an edit point to a specific location, you can add a marker. Trimming and adjusting tools will snap to markers. You can also align one marker in a clip with another in the sequence or another clip. In this exercise, you will move clips to align with markers.
In the Timeline, make sure snapping is on, then drag the playhead through the sequence and see how it snaps to all the markers, both sequence markers and clip markers. Leave the playhead at the end of the sequence.
Drag the camera light cu clip left to the head of the sequence.
If you want to align a clip marker with a sequence marker, you have to click on (or just above) the clip marker itself when you start to drag it. Otherwise, you'll just be aligning In or Out edit points with a sequence marker rather than aligning one marker with another marker. Let's try moving this clip two ways.
Click the right portion of the camera light cu clip and drag it right past the video on sequence marker. Zoom in if necessary.
The Out point and In point of the clip snap to the marker, but not the clip marker.
Now click directly above the marker in the camera light cu clip and drag it over the first sequence marker in the ruler area.
The clip marker snaps to the sequence marker. A vertical line appears that connects the two markers.
To see this even more clearly, click above the third marker in the cam stirs debris clip and drag it to align with the sequence marker above.

The third clip marker snaps to the sequence marker, but the first two do not.
Now click above the first clip marker and drag right to align the clip at that location. Play the clip.
Align the third video clip with its corresponding sequence marker and play the clip.
This clip could be better aligned. This time, you will add a marker directly to the audio clip.
Select the right ocean sot clip and play it. Press M when you hear someone say “…any of the pieces.”
Now drag the video clip above it, from its marker, to align with the new marker you just placed in the right ocean sot clip. Play the clips again.
You can delete markers in different ways. You can click the Delete button in the Edit Marker window, you can choose the Delete option from the Mark menu, or you can use a keyboard shortcut. You can delete a single marker or all the markers in your sequence.
Using the shortcuts shown in the “Moving to Markers” exercise, move the playhead to the first marker in the second video clip, cam stirs debris. Select this clip.
Unlike sequence marker names that appear in the Canvas, clip marker names appear only in the Viewer.
Press M to open the Edit Marker window.
Click the Delete button.
The clip marker is deleted from the clip.
Deselect that clip. Ctrl-click on one of the sequence markers and select video camera on from the marker list in the contextual menu.
The playhead moves to this marker.
To delete this marker, choose Mark > Markers > Delete.
Move the playhead to the next marker in the sequence.
To delete all sequence markers, press Ctrl-`.
Subclips are created from In and Out points in a source clip. But you can use a marker to create a subclip since it too identifies a specific location in a clip. You can also give a marker a duration, which can then be used to create a subclip of that length. The concept of creating clips from markers will be revisited in Lesson 9 when you log and capture new footage.
In this exercise, you will add three markers to one source clip and create subclips from those markers.
From the Browser, open the right ocean sot clip in the Viewer and play the clip.
Add a marker just before the man on camera begins speaking and name it checking in.
Add a second marker a few seconds before the radio voice begins speaking and name it radio voice.
Add a third marker before the man on camera begins speaking again. Name that marker right ocean.
Go to the Browser and, if necessary, click the arrow next to the right ocean sot master clip to see the markers attached to this clip.
To create a subclip from the first to second marker, select the checking in marker in the Browser, then choose Modify > Make Subclip.

In the Browser, a new subclip has been created using the marker name followed by the master clip name as a reference.
Double-click this new subclip to open it in the Viewer. Play the clip.
NOTE
If you set a duration in the marker window, the subclip will be created starting at the marker for the length of the marker duration. If you have no other markers and make a subclip, the subclip will be created from the selected marker to the end of the clip.
You can also add markers to a clip when you first capture it. If you add markers during the log and capture process, you can use the preceding steps to convert those markers into subclips when you edit. This will be covered in Lesson 9.
Repeat step 6 from the preceding section to make a subclip from the other two markers in the right ocean sot clip.
Open the right ocean sot master clip again and move the playhead to the first marker.
Press M to open the Edit Marker window and enter a duration of 7 seconds.

In the Viewer scrubber bar, the marker is extended to identify the 7-second duration.
Play and stop this clip several times in this new marker area.
Whenever you stop the clip, the name appears in the Viewer image area.
In the Browser, select this marker and choose Modify > Make Subclip.
Open the new subclip and look at its duration. It should match the marker duration.
How to identify master clips
How to reveal master clips
How to make sequence clips independent
How to duplicate master clips
How to make subclips of master clips
How to add, name, navigate, and delete markers
How to edit using markers
How to create subclips from markers
F | Finds a match frame |
Shift-F | Reveals the master clip in the Browser |
M | Adds a marker |
Shift-M | Moves forward between markers |
Shift-down arrow | Moves forward between markers |
Option-M | Moves backward between markers |
Shift-up arrow | Moves backward between markers |
Cmd-` | Deletes selected marker in clip or sequence |
Ctrl-` | Deletes all markers in clip or sequence |
Cmd-U | Makes a subclip |
Shift-` | Moves a marker forward to playhead position |