
Lesson Files | FCP4 Book Files > Lessons > Lesson 11 Project |
Media | Titanic folder |
Time | This lesson takes approximately 75 minutes to complete. |
Goals | Scrub audio |
Use the Audio Meters | |
View audio waveforms | |
Adjust audio levels | |
Select linked audio clips | |
Create linked clips | |
Work with stereo pairs | |
Work with clip sync | |
Work with playhead sync options |
You may think that video is the more important aspect of editing and may even spend most of your time selecting, placing, and finessing your video clips. But when there is something wrong with the audio, the problem will seem glaring. The sound levels could be too low or too high or the sync may be off by just a frame or two. In this lesson, you will work with different ways to see and hear the audio portion of a clip, adjust audio levels, make audio-only edits, keep audio in sync, and work with stereo pairs. In addition, the lesson covers a few related video functions.
To get started, you will open the Lesson 11 Project file.
As you work on a sequence in Final Cut Pro, there will be times when you want to make a precise mark or trim a clip based on what's happening in the audio rather than in the video track. Maybe you want to isolate a specific vowel sound, edit out a breath, or edit one beat of music to another from a different part of the music track. To do this, there are audio controls that allow you to hear your audio and also to see a visual representation of the sound of each clip.
Sometimes, hearing the audio as you scrub through a clip in the Viewer, Canvas, or Timeline is helpful, allowing you to find or trim a particular edit point. At other times, if you're focusing on just the video, it may be distracting. In this case, you can turn off the sound as you scrub. In addition to scrubbing, shuttling through the audio in a clip or sequence may allow you to mark a precise point. In this exercise, you will work with a few ways to hear audio as you prepare to trim an sot clip.
From the Browser Sound Bites bin, double-click the ready for titanic sot clip to open it in the Viewer. Play the clip.
Choose View > Audio Scrubbing and make sure Audio Scrubbing is selected.
Drag or scrub the playhead through the Viewer scrubber bar.
When you scrub through a clip, you hear a fractured version of the clip's audio, which isn't always understandable enough to mark an audio edit.
To compare working with scrubbing off or on, drag through the sequence with scrubbing on.
Press Shift-S to toggle Audio Scrubbing off. Drag through the sequence again.
Press Shift-S to toggle scrubbing back on and scrub through the beginning of the first ready for titanic sot clip in the Timeline. Try to isolate the space just before Al says, “And all the time he's looking…”
It's very difficult to use the scrubbing approach to find a specific audio edit point.
In the Viewer, drag the shuttle control to find this sentence more clearly.
TIP
Try clicking and holding the pointer just to the left of the shuttle slider knob to move backward slowly. Click and hold on the right to shuttle forward slowly. Click closer to the slider outer edges to shuttle at a faster speed through the clip.
Mark an In point before Al says, “ And all the time he's looking….”
You will come back to this clip in a moment.
When you edit in Final Cut Pro, you have the ability to see audio as you're editing (or at least a representation of it). This representation occurs in two ways: as a volume level on the Audio Meters in the Final Cut Pro interface and as a visual display, called an audio waveform, of the audio signal. The audio waveform appears in the Audio tab or tabs of the Viewer. It can also appear in the clips in the Timeline as well.
In the Browser, click the disclosure triangle of the Sound Effects bin. Double-click the waterphone mono clip to open it in the Viewer.
When a clip has only sound, no Video tab appears, just the audio tab or tabs that represent that clip. Here, the sound effect is a single mono track represented as an audio waveform with a pink sound level line over it.
Parts of the Viewer still display the duration and location fields, and transport and edit controls. The area specific to audio contains controls for pan and volume levels in addition to a zoom slider and zoom control below the waveform.
Play this clip and watch the waveform as it plays.
The height of the waveform represents the volume level. This clip is louder at the beginning and then tapers off to fade away.
From the Browser, open the fan blades mono clip and play it.
This sound has a steady rhythm, and you see an even level of waveform peaks where the blade sound is the loudest.
From the Browser, open the camera flash mono clip and play it. Look at the duration for this clip and the width of the playhead.
Drag the Viewer zoom control to the left to expand the width of the audio signal.
As you zoom into a location in the audio, the playhead grows wider to represent the length a single frame at that position.
Press Shift-Z to bring the sound effect into full view.
From the Browser, open the ready for titanic mono clip and click the Mono (a2) tab. Play the clip.
In the Viewer, there are two Mono tabs. This clip was originally captured with the dialogue on one track. The original recording probably was made with a single mic input.
There is no audio waveform displayed for this track.
From the Browser, open the ready for titanic sot clip again and click the Stereo (a1a2) tab.
In the Stereo tab, there are two audio waveforms representing this clip's audio. When both tracks of audio are combined as a stereo pair, both waveforms appear in the same tab together.
Play the clip from the In point you marked earlier on this clip and look at the waveform. Reposition the In point or make a new mark with as much pad as possible before Al begins saying, “And all the time he's looking….” Use the waveform as a guide.
NOTE
You will see two playheads in the window. The playhead in the scrubber bar represents the playhead's location within the entire clip. The playhead in the audio Timeline ruler area is at the same location, but the Timeline view may be zoomed in or out to see the waveform and edit point more clearly.
Another way to view audio is by watching the volume level on the Audio Meters. But there are some considerations to keep in mind. Like analog audio, digital uses the dB, or decibel, to measure the audio sound level. But unlike analog audio where peaks in the audio can go slightly above 0 dB, in digital audio, no part of the audio signal can ever go above 0 dB, or the sound will be clipped off and distorted.
This means that the overall volume range for digital audio should fall much lower than 0 dB, generally between –18 and –12 dB. This allows for some levels to fall within the –12 and –6 dB range. Occasional peaks at –3 dB are acceptable, but you wouldn't want that to be the consistent upper range of the volume. In Lesson 13, you will learn to mix and balance multiple audio tracks together at an appropriate output level.
NOTE
If the sound level peaks at 0 dB, the sound may have been recorded too high during the original shoot, and the audio may be distorted. Changing the level as outlined in this lesson may help but may not completely correct the problem.
If Audio Meters are not showing in your interface, choose Window > Audio Meters, or press Option-4.
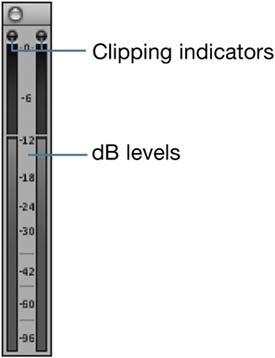
The small numbers in the middle of the meters are the dB levels. The two red clipping indicators at the top of the window will light up when the audio from a clip peaks at 0 dB. The Audio Meters reflect a clip's volume level whether it is being played from the Viewer or Timeline.
In the Timeline, play from the head of the Audio Finished sequence and watch the Audio Meters.
In the Timeline, click the Audio Starting sequence tab, and make sure the v1, a1, and a2 Source controls are patched to the V1, A1, and A2 destination tracks. Edit the ready for titanic sot clip at the head of the sequence.
In the Browser, open the bubbles mono clip and play it in the Viewer. Look at its audio levels in the Audio Meters.
As a background sound effect, this volume is a little high, but you will change its level in the Timeline.
Mark five seconds of this sound effect. In the Timeline, make sure the playhead is at the end of the first clip in the sequence and the a1 Source control is patched to the A1 Destination control.
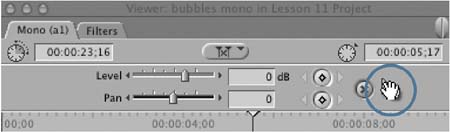
To edit an audio-only clip to the Timeline, you can click the Overwrite edit button in the Canvas. You can also drag the Drag Hand tool in the Viewer window to the Edit Overlay in the Canvas and drop it into the Overwrite section, as you did in an earlier lesson.
In the Timeline, move the playhead over the bubbles mono clip and press X to mark an In and Out the length of this clip.
In the Browser, find the diver kneels clip in the Titanic Underwater bin and open it in the Viewer.
Make sure only the v1 source is patched to the V1 Destination control to edit just the video of this clip.

Drag this clip into the Canvas and drop it into the Overwrite section of the Edit Overlay.
Play the diver kneels clip and press Cmd-S to save your changes.
As you watch the Audio Meters, if you see that the volume of a clip is too low or high, you can adjust it in either the Viewer or the Timeline. Adjusting the audio level of a clip is a very simple process. Again, the most important factor to keep in mind is consistency. If you are working with several different sound bites, determine a good level for that type of sound and try to make those clips fall within a consistent range. Determine a range for your background sounds, such as sound effects, and be consistent about those levels as well.
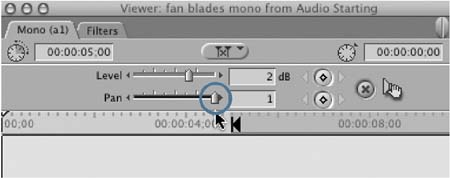
You can adjust audio volume levels in the Viewer by dragging a volume level overlay line. You can also use the Level slider or enter a dB level in the numerical entry box. In addition to volume changes, you can adjust audio in the Viewer in another way, by making a clip's sound pan from one channel to the other.
In the Timeline, play the ready for titanic sot and watch the level in the Audio Meters.
The audio level could be raised slightly to hit around –12 dB on the Audio Meters.
Double-click this clip to open it in the Viewer, and click the Stereo tab.
Move the pointer over the pink overlay line in the waveform display area.
This line represents the sound level of the clip. Dragging it up or down will raise or lower the volume of the clip.
Drag the sound level line up until you see 6 dB in the information box or the Level box next to the slider.
NOTE
Here you are adjusting the level of the clip by a relative amount from its current level. You are not setting its level to be 6 dB on the Audio Meters, but raising it by 6 dB.
As you drag, the Level slider moves, and the numbers change in the numerical entry box.
Play the clip and look at the Audio Meters. It's a little high, so lower the volume down to 2 dB. This time use the Level slider or enter the number.
From the Timeline, open the bubbles mono clip in the Viewer and play it. Make its volume appear around –18 dB in the Audio Meters.
The volume may go up to –12 dB or down to –20 dB, but try to make the overall or average level around –18 dB.
You can also adjust the pan of a clip in the Viewer. When you pan the sound of a clip, you can direct the sound to play through the left or right channel.
In the bubbles mono clip in the Viewer, drag the Pan slider all the way to the left. Play the clip and watch the Audio Meter.

This places the sound of this effect in the left channel or speaker.
Open the fan blades mono clip from the Browser and play the clip. Mark a five-second duration.
Drag the Pan slider for this clip to the far right.
In the Timeline, move the playhead to the head of the diver kneels clip and patch the a1 Source control to the A2 Destination control.
Edit the clip as an Overwrite edit at this location beneath the bubbles mono clip and play the clips. Look at the Audio Meters as it plays.
You should see the bubbles mono sound level in the left channel and the fan blades mono in the right. You should also hear the bubbles in the left speaker or headphones, and the fan blades in the right.
You can also adjust the sound level of a clip directly in the Timeline. However, you must first toggle on the Clip Overlays in the Timeline.
Move the pointer over the Clip Overlays control in the Timeline.
Click the Clip Overlays control. You can also press Option-W.

A thin sound level line appears in each audio clip representing the overall sound level of that clip. There is also a black overlay line that adjusts the video opacity, but you will work with that in a later lesson.
Move the pointer over either one of the sound level lines in the first clip, ready for titanic sot. Begin to drag.
The audio level for this clip is still set to the 2 dB level you set earlier in the Viewer.
Play the fan blades mono clip.
If you don't want to hear the bubbles mono clip while you adjust the fan blades mono clip, you can turn off the sound for the entire track, or you can turn off the sound of this one clip only.
In the Timeline, Ctrl-click the bubbles mono clip and select Clip Enable to deselect this option. Play the fan blades clip again.
The bubbles mono clip appears dim, and you do not hear it.
Lower the sound level of the fan blades mono clip so it is a good background level, around –18 dB in the Audio Meters.
Ctrl-click the bubbles mono clip and select Clip Enable to hear that sound effect again.
To see the waveform display on the clips in the Timeline, press Option-Cmd-W.
To make just the audio tracks taller so you can see more waveform, Option-drag the A1 boundary line down to the size you want and release the mouse.
Play the sequence. Press Cmd-S to save your changes.
To prepare for the next exercise, do the following:
Press Option-Cmd-W to turn off the Timeline waveform display.
Press Option-W, or click the Clip Overlays control, to turn off the sound level overlay lines.
Click the second column in the Track Height control, or whichever track height you prefer.
When you capture media, you can capture just video or audio or both. When a clip's video and audio are captured together, they become part of the same media file, represented by one clip in your project. There may be times when you want to select just the audio tracks of a linked clip without selecting the video, or vice versa. Sometimes, you may want to unlink a stereo pair to edit the audio tracks separately, or you may want to create a stereo pair where there wasn't one before. Final Cut Pro allows you to make these changes.
When a linked clip is edited into the Timeline, it is displayed with a line under all the track names that are linked to that clip. Selecting any one of those tracks will automatically select the other tracks that are linked to this clip. However, there are ways to break that link. There are also ways to link clips that were not originally linked during capture.
In the Timeline, click the video track of the ready for titanic sot clip.
The clip name on each track is underlined, indicating that they are linked. When one track is selected, they are all selected.
This clip is not linked to the audio clips beneath it so it can be selected independently.
In the button bar of the Timeline, click the Linked Selection control, next to the Snapping control, to deselect it.
Select the video track of the ready for titanic sot.
Though still linked, just the video track can be selected.
Select just the A1 track of this clip.
Both audio tracks are selected now because they are a stereo pair.
Turn Linked Selection back on and select the bubbles mono clip.
Since this clip is not paired with another clip, it can be selected independently.
There may be times when you place the perfect video clip over the perfect audio track. Maybe it's a sound effect under a specific action, such as in this sequence with the bubbles and fan blade sound effects under the diver. In this situation, if you link these clips together, you can move and edit them as though they were one single clip, as long as Linked Selection is active.
Select the diver kneels, bubbles mono, and fan blades mono clips.
Choose Modify > Link, or press Cmd-L.
Click the divers kneel clip and drag it to the right.
This clip can now be treated as any other linked clip. You can select, move, or trim any one track and, with Linked Selection active, all tracks will be selected, moved, or trimmed.
Return the divers kneel trio of clips back to its original position.
Depending on how you capture the audio portion of your clips, you will either see a single stereo, single mono, or two mono tabs when you open the clip in the Viewer. If audio is recorded from a source such as a DV camera, you will most likely be working with audio as stereo pairs. In some situations, a single microphone is used to record sound. This may result in a clip with only one usable track. But you can turn mono tracks into a stereo pair after you've already captured the audio, or even break down a stereo pair into mono tracks if needed.
From the Browser, open the ready for titanic mono clip in the Viewer and mark an In point at the head of the clip before Al says, “And all the time….”
Click the Mono (a1) tab. Click the Mono (a2) tab. There is no audio on the a1 track, only on the a2 track.
In this exercise, you will turn this mono audio clip into a stereo pair by deleting the empty a1 track and doubling the good a2 track.
Make sure that the v1, a1, and a2 source tracks are patched to the V1, A1, and A2 destination tracks and edit this clip to the Timeline after the diver kneels clip.
NOTE
Because you patched the a1 source to the A2 destination in a previous edit, you will find a2 still patched to A1. To restore a1 and a2 to their proper tracks, Ctrl-click the a1 source and in the contextual menu choose A1.
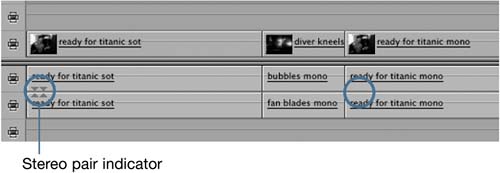
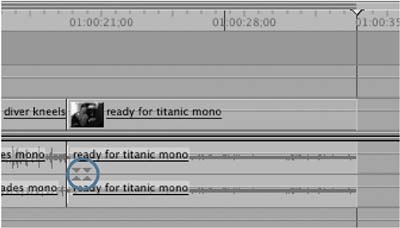
In the Timeline, the ready for titanic sot clip has a stereo pair indicator that appears to bind the two audio tracks together. In the ready for titanic mono clip, there is no stereo pair indicator.
In the Timeline, press Option-Cmd-W to turn on the audio waveforms, and click the Linked Selection control to toggle off selecting linked items.
Click the A1 track of this clip. Press Delete to delete it.
To copy the A2 track into the A1 slot, select the clip and press Cmd-C.
Move the playhead to the head of this clip and press Cmd-V to paste it into the A1 track.
Select the two audio tracks for this clip and choose Modify > Stereo Pair, or press Option-L.

In the Timeline, the audio tracks for this clip now have a stereo pair indicator reflecting the new status of this clip.
Press Shift-L to toggle Linked Selection back on and double-click the ready for titanic mono clip to open it from the Timeline into the Viewer. In the Viewer, click the Stereo (a1a2) tab.
With the original track doubled and stereo pair applied to these tracks, they now appear and can be treated together as a stereo pair.
Click in the Timeline and press Option-Cmd-W to turn off the audio waveforms.
In a previous lesson, you used the Razor Blade tool to cut off or trim a portion of a clip you no longer wanted to use in the sequence. You can also use it to create separate edits out of one clip in the Timeline. This is helpful when you want to work with different parts of a clip as separate individual clips. In the current ready for titanic mono clip, there are several individual sound bites within the one clip. You will add or create new clips for each sound bite by using the Razor Blade tool.
In the Timeline, select the first clip and press Shift-Delete to delete it and pull the other clips up to the head of the sequence.
Play the ready for titanic mono clip, and position the playhead after Al says, “Real interesting to watch him, Joe.”
In the Tool palette, select the Razor Blade tool, or press B.
Move the razor blade into the sequence and snap it to the playhead. Click the razor blade at the playhead location.
Play from the new edit point and click again with the Razor Blade tool to add another edit after Al says, “Like playing a musical instrument, you know.”
One way to use these sound bites as separate clips is to edit B-roll or cutaway footage over just the middle section.
Move the playhead to the middle section of the ready for titanic mono clip and press X to mark the length of this clip.
From the Browser, open the moving camera lights cu clip and edit just the video to the V1 track of the Timeline. Play the clip in the Timeline.
Press A to restore the default Selection tool.
When audio and video tracks are combined together as a linked clip, there is a sync relationship between them. Final Cut Pro keeps track of whether you get out of sync between clip tracks, and offers two ways to get back into sync. But there are other ways to think about and work with sync. For example, you can sync the positions of the Viewer playhead with the Canvas playhead and watch a source move in tandem with the sequence. And using the Match Frame function, you can replace footage with sync video or audio to restore a clip back to its original state.
With Linked Selection on, the video and audio portions of a clip can be moved, trimmed, or slipped together. But if Linked Selection is deselected, or you have locked one of the tracks in the clip, making an editing adjust ment to just one track may throw it out of sync with the other tracks. In some situations, such as in the diver kneels clip where sound effects were linked to the video, changing the sync relationship may be desired, in which case you can simply create a new sync relationship. Otherwise you have to take steps to get back into sync with the other tracks.
Turn off Linked Selection in the Timeline and play the diver kneels clip.
Although the sound effect of bubbles is strong at the beginning of the clip, the diver's bubbles in the video aren't as strong as they are later in the clip. You will slip the diver kneels clip to begin where the first burst of bubbles occurs.
Double-click the diver kneels clip to open it in the Viewer.
In the Viewer, hold down Shift and drag either edit point to the right until you see the burst of bubbles come out of the diver's air tank in the Viewer image area.
In the Timeline, red out-of-sync indicators appear on each linked track, letting you know that the original sync relationship is out of sync by the amount in the red boxes.
In this situation, you purposely wanted to change the sync relation ship between the diver kneels clip and the sound effects. Now you want Final Cut Pro to accept this current configuration of clips as being in sync.
Select the diver kneels, bubbles mono, and fan blade mono clips and choose Modify > Mark in Sync.
The red out-of-sync indicators disappear, and these linked clips have a new sync relationship.
Select the last ready for titanic mono clip and drag it to the right. Since Linked Selection is off, you must marquee all three tracks or Shift-click to select them.
Deselect the clips and select just the video track. Drag it to the right.
If you change the location or selection of one track of a linked clip, as you did earlier in this exercise, the red out-of-sync indicators appear.
If moving just the video track alone was an oversight, you can simply press Cmd-Z to undo the move, turn Linked Selection back on, and move the entire clip at one time. However, you have other choices as well.
Leave the audio where it is, and it will remain out of sync.
Move the audio's position in the Timeline to be in position with the video again and back into sync.
Slip the audio so the portion that overlaps with the video clip is in its original sync.
Ctrl-click the red sync indicator in the A1 track of this clip and select Move into Sync.

The audio tracks are moved in the Timeline to appear in sync under the video clip.
To view another sync option, select the video track, type 25, and press Return to move the video 25 frames to the right.
Ctrl-click one of the sync indicators on the audio tracks and select Slip into Sync. Play the clip.
The audio tracks were not moved but slipped so that the tracks still overlap, but the sound is now in sync.
So far, you have worked with the Viewer and Canvas playheads independently as you would normally do. But there are some situations where syncing the Viewer playhead with the Canvas playhead to move together can be helpful. Using this particular sync function is very specific to the type of work you do. In this exercise, you will explore a few of the uses.
Look at the Playhead Sync pop-up menu in the Canvas.
If this is in the default position, the icon will display two playheads with an X between them, indicating that playhead sync is currently off.
Click the Canvas Playhead Sync pop-up menu and select Open.
Drag the playhead through the Timeline and watch the Viewer as you drag.
As the playhead drags through a clip in the Timeline, that clip opens in the Viewer. The current In and Out points of each clip appear in the scrubber bar along with the double dotted lines to indicate that the clip is open from the Timeline. If you wanted to go through your sequence and make changes to your clips, this is one way to systematically open each clip.
From the Browser, open the diver directs sub clip and make sure the playhead is at the head of the clip.
In the Timeline, move the playhead to the head of the sequence.
In the Viewer, click the Playhead Sync pop-up menu and choose Gang. Drag the Timeline playhead to the right.
As you drag the Timeline playhead, the Viewer playhead automatically moves through the diver clip. You can use this particular playhead sync option to preview how a clip might look in the Timeline before editing it or to see how you like the placement or selection of clip material.
Move the Timeline playhead back to the head of the sequence and click the Playhead Sync pop-up menu and select Off.
To reset the sync relationship between the Viewer playhead and the Timeline playhead, move the Viewer playhead to the middle of the scrubber bar and click Gang from the Playhead Sync pop-up menu. Drag either the Viewer or Timeline playhead from this position.
As you scrub through the Timeline, the clip in the Viewer plays along, but from a different location.
Click the Follow playhead sync option, double-click a clip in the Timeline to open it in the Viewer, and drag either playhead.
Both playheads follow in tandem. If the Timeline playhead is on frame 20 of the clip, the Viewer playhead will also be on frame 20 as well. You will see the same frame in both the Viewer and Canvas. Also, when you drag the playhead past the Out point of the clip in the Timeline, the clip in the Viewer will continue to update, showing you what it would look like at that point in the Timeline if the clip were extended.
The playhead sync options can be applied to other situations, such as when you color correct a clip. Spend some time experimenting with it so you can apply it to your own projects.
In a previous exercise, you edited the video of the moving camera lights cu clip over the middle of the ready for titanic mono audio tracks. During the course of editing your sequence, you may decide to restore the original sync portion of the clip that was covered. In this case, you would be restoring the sync video of the ready for titanic mono clip. To do this, you will use the Match Frame function.
Move the playhead to the first frame of the moving camera lights cu clip in the Timeline.
You will replace this clip with the original sync video.
To find the match frame for the audio tracks at this location, and not the video of the sub, click the Auto Select control on the V1 track so the current video clip will not be considered while finding the match.
Press the F key, for match frame, or click the Match Frame button in the Canvas window.
In the Viewer, the master ready for titanic mono clip is opened, and the playhead is parked on the frame that matches the audio in the Timeline.
To edit just the video of this clip, click the a1 and a2 Source controls to disconnect them from the A1 and A2 destination tracks.
Click the video tab and drag the clip from the Viewer to the Canvas and drop it in the Overwrite section of the Edit Overlay. Play the clip.
In the Timeline, the video is restored and in sync. However, because it was added as a separate edit, it is no longer linked to the audio clips below it.
Marquee the video and audio for this clip and choose Modify > Link, or press Cmd-L.
You can edit Titanic Underwater shots between each sound bite in two ways. You can either insert a clip in between two sound bites, or you can move the sound bites apart to create a specific amount of space in-between.
Use Insert if the clips are unspaced, or use a Replace edit to fill a gap in between the sound bite clips. Draw from clips in the Titanic Underwater bin.
Edit an appropriate sound effect under each of the cutaways and adjust their audio levels and pan.
Add a music track under the entire sequence and lower the sound level so the sound bites can be heard over it.
Return the last ready for titanic mono clip to its original sync configuration.
How to scrub and shuttle audio
How to use the Audio Meter
How to make tracks visible and view the audio waveform
How to select linked clips
How to turn on and adjust clip overlays
How to create a stereo pair
How to keep your clips in sync
How to adjust audio in the Viewer
How to mark and make audio-only edits