
Lesson Files | FCP4 Book Files > Lessons > Lesson 1 Project |
Media | Sahara folder, Music folder |
Time | This lesson takes approximately 50 minutes to complete. |
Goals | Launch Final Cut Pro Open and close a project Work with menus, keyboard shortcuts, and the mouse Understand the Final Cut Pro workflow Work with projects in the Browser Work with the Timeline and Canvas Play a sequence Zoom the Timeline Quit and hide Final Cut Pro |
The Final Cut Pro interface is flexible and dynamic. You can choose preset options within the interface or customize your own. In this lesson, you will work with the Final Cut Pro interface, learn about the workflow of a project, organize project elements, work with the transport controls in the interface, and zoom and adjust the Timeline. You will also learn about Final Cut Pro menus and shortcuts, as well as added features available using a two-button mouse.
Before you get started, you will need to load the Final Cut Pro application onto your hard drive. You will also need to copy the lessons and media from the DVD in this book onto your hard drive as well. There are steps for doing this in the Getting Started chapter of this book. Once those two steps are complete, you can move forward with this lesson.
You will open Final Cut Pro by opening, or launching, the program. You can do that one of three ways:
Click twice on the Final Cut Pro application icon on your hard drive
Click once on the Final Cut Pro icon in the Dock
Double-click on a Final Cut Pro project file
Clicking the program icon in the Dock is a convenient way of starting the program.
If the Final Cut Pro icon does not already appear on your Dock, find the icon in your hard drive Applications folder, drag it into the Dock, and release the mouse.
Single-click the Final Cut Pro icon in the Dock to launch the program.

NOTE
If an External A/V window appears with a warning that it can't locate the external video drive, click Continue. You do not need an external video drive for these lessons.
The program interface opens with a default project titled Untitled Project 1 in the Browser window. If you have worked on other projects, they may appear here as well.
Four primary windows make up the Final Cut Pro interface: the Browser, Viewer, Canvas, and Timeline. The most basic functions of these windows can be broken down into two areas. The Browser and Viewer windows are where you organize and view your unedited material, and the Canvas and Timeline are where you view your edited material.
There are two secondary windows. The Tool palette contains an assortment of editing tools, and the audio meters allow you to monitor audio levels.
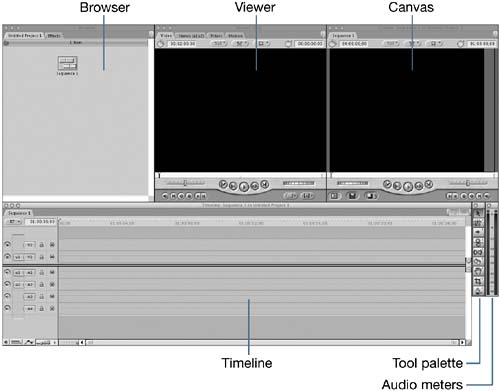
Each window fulfills a unique purpose in the editing process.
The Browser is where you organize all of the project elements you use when editing. You can view the different elements as a list or as icons. The previous image is the View as Medium Icon option.
The Viewer is where you view your source material and choose edit points. But you can also edit audio, modify transitions and effects, and build titles here.
The Timeline is a graphical representation of all the editing decisions you make. This is your workbench area, where you edit your material, trim it, move it, stack it, and adjust it. Here you can see all your edits at a glance.
The Canvas and Timeline windows are different sides of the same coin. Both display your edited project, but whereas the Timeline shows your editing choices graphically, the Canvas displays those edits visually like a movie.
The Tool palette is a collection of Final Cut Pro editing tools. Each tool has a shortcut key, so it's possible to access each one directly from the keyboard.
The Audio Meters window displays two audio meters that reflect the volume level of whatever audio is playing. It could be a source clip in the Viewer you screen before editing or the final edited piece you view in the Canvas.
These interface windows share similar properties with other OS X windows. They can be opened, closed, minimized, hidden, and repositioned using the OS X Close, Minimize, and Zoom buttons in the upper-left corner of the window. Each window displays its name in the title bar area.
Click the Browser to make it the active window.

Active Browser window

Inactive Browser window
Only one window can be active at a time. Making a window active in the interface is an important part of the editing process because some editing functions will only be available to you if a specific window is active.
Click the Viewer window to make it active and then click the Close button in the upper-left corner.

In most OS X windows, this button is red. In Final Cut Pro, this set of buttons takes on the gray of the interface. But these buttons still perform the same functions as they do in other OS X windows.
To restore the Viewer window, choose Window > Viewer, or press Cmd-1.
Each of the interface windows can be opened and closed by choosing the window name in the Window menu or with a keyboard shortcut.
Final Cut Pro's editing functions can be selected in three ways: by choosing a menu selection, pressing a keyboard shortcut, or clicking a button. Most functions have keyboard shortcuts but those that don't can easily be assigned one using the customizable keyboard, which will be covered in a later lesson.
Final Cut Pro's menu bar organizes editing functions by category, such as View, Modify, Effects, and so on. Within each menu, specific functions are grouped together if they share a similar purpose or topic.
Choose the Edit menu in the menu bar of the interface.
The Undo and Redo functions are grouped together, as are the Cut, Copy, and Paste functions, the Find functions, the Select functions, and so on. Like all Apple menus, black menu options can be selected, but grayed-out options cannot.
Choose the Window menu and slide down to select Arrange.
To choose an option from a submenu, you slide the cursor into the submenu and select the option. Slide the cursor off the menu for now.
Keyboard shortcuts appear in menus and submenus to the right of the listed function. Similar functions often share the same shortcut letter.
Choose Window and look at the Arrange submenu again.
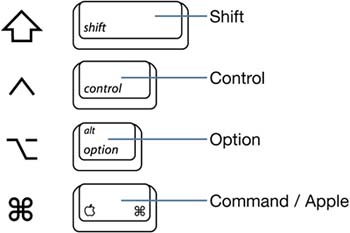
The shortcuts in this submenu all use the letter U with one or more modifier keys. There are four modifier keys: Shift, Control, Option, and Command (the Apple key).
Close the Menu window by clicking elsewhere in the interface.
In the Tool palette, move the cursor over the icon that looks like a magnifying glass.
Shortcuts also appear with tooltips when you hover over buttons, tools, and other areas in the interface.
Move the cursor over the first tool in the Tool palette.
The Selection tool is the default tool you use most frequently. Its shortcut is the letter A.
Move the cursor over the audio/video dividing line in the Timeline.
Final Cut Pro has a position-sensitive mouse cursor. When you move the cursor over certain parts of the interface, the cursor will automatically change to allow you to perform a specific function in that location.
Hold down the Control key and click in the gray area in the Browser window.
A menu appears with a list of options for that specific area. This menu is called a contextual menu. Ctrl-clicking in different areas of the Final Cut Pro interface will produce different contextual menus from which you can select or change your editing options.
Final Cut Pro follows the normal conventions of the nonlinear editing process. That process usually begins with capturing material from the original source tape, thereby converting it into digital media files called clips. The clips are actually QuickTime movies that play like any other QuickTime movie on your computer. One clip is created for each portion of source footage you choose to capture. Every media clip may be a different length as measured in minutes, seconds, and frames.
Throughout the nonlinear editing process, you make editing decisions about the portion of a clip you want to use and the effects you want to apply to it. You then combine that clip with other edited clips to form a sequence. Remember, when you edit the sequence of shots together, you are not actually making changes to your original media. You are only specifying what portions and in what order you want Final Cut Pro to show you the original media. You can change your mind over and over again about the placement or length of a shot without affecting the original captured media clips.
The initial captured clips can also be saved to a separate hard drive connected through FireWire, or to a CD or DVD. The material in the accompanying DVD in this book has already been captured for the purposes of preparing these lessons. You will learn to capture your own source footage and export it in different ways in later chapters.
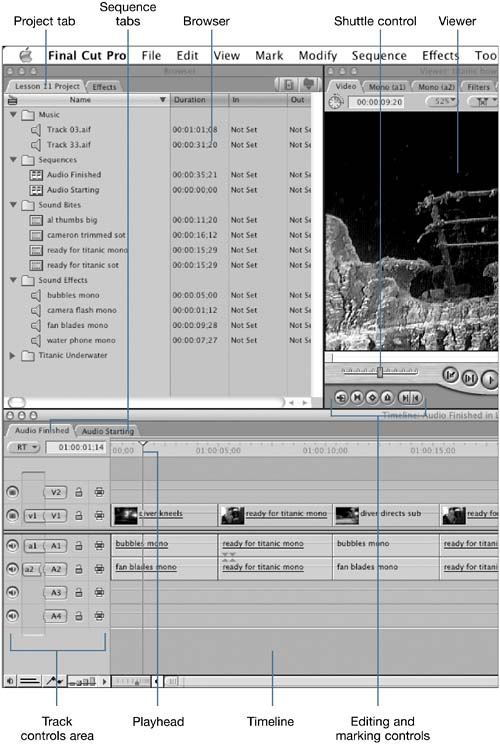
Every time you begin editing a new body of material, you create a new project file to contain that material. Each project may have several kinds of elements, such as QuickTime clips, music, sound effects, and graphics, which you will combine to form an edited version of the material. Project elements are displayed in the Browser window under a project tab.
When you launch Final Cut Pro, it will open the last project you worked on or a new untitled project. In the Browser, there is a tab with the project name on it. You will open the project that was created for this lesson and close any other open projects.
Choose File > Open.
In the Choose a File window, drag the horizontal blue scroll bar to the far left.
Click the Macintosh HD icon in the first column, the FCP4 Book Files folder in the second column, and the Lessons folder in the third column.
Select the Lesson 1 Project file and click Choose.
In the Browser window, Lesson 1 Project appears as a separate tab next to the Effects tab. (If you worked on another project before starting these lessons, that project's tab may appear here as well.)

Click the Effects tab in the Browser window.
This is where you select effects such as video and audio transitions and filters. Effects will be covered in a later lesson.
If there are any open projects other than Lesson 1 Project, click that project's tab to make it the active project.
To close that project, choose File > Close Project from the menu.
Lesson 1 Project has four different types of project elements. Each is represented by a unique icon, which can appear larger or smaller depending on what view you select. Views are discussed in the next exercise, but here two views are displayed for each icon.

Each clip in your project represents some portion of your original captured source footage. It links back to a digital media file on your hard drive. You can duplicate a clip and use it in a different project, and you won't be duplicating the media. You will only be creating a second link back to it. This type of clip icon can represent video-only or video and audio combined. The clip icon in List View resembles a piece of film.
An audio clip represents sound clips or files such as music tracks, sound effects, narration, and so on. Like the video clips, these audio clips link back to the original audio files stored on your hard drive. Audio clips contain no video. The icon is an audio speaker.
A sequence is a group of audio and video clips that have been edited together. A sequence might also contain effects and transitions you may have applied to the edited clips. When you view a sequence in the Canvas or work with it in the Timeline, Final Cut Pro links back to the media clips on the hard drive and plays just the selected portions of the clips you have identified and marked. The sequence icon resembles two pieces of film overlapping.
A bin is a folder used to store and organize clips and sequences in the project. The term bin comes from the days of film editing when pieces of cut film hung on hooks over large canvas containers called bins. These pieces of film, or film clips, would hang in a bin until the film editor selected them to use in a sequence.
There are different ways to view project elements in the Browser as well as the contents of any bin. You can view elements as image icons or as an alphabetized list. With the View as Icons option, you see a visual reference or thumbnail image of each video clip. Seeing a clip's image can be helpful during clip selection, but it's often easier to view them as an alphabetized list.
To see what view is currently selected, hold down the Control key and click in the empty gray space in the Browser window, or right-click a two-button mouse.
In this contextual menu, there are three View as Icons options, each with a different-sized icon or image, and a View as List option. The check next to View as List indicates that it is the current view.
Slide down the contextual menu and select View as Large Icons.
Each video clip is now represented by a large thumbnail image of the first frame of that clip. In this view, you may have to drag the blue scroll bar in the Browser to see all of the elements.
Ctrl-click again in the Browser gray area, and this time select View as Medium Icons.
Ctrl-click again and select View as List.
In this view, elements can be sorted and listed by name, making it easier to see and organize a larger group of project elements.
Just as you would organize computer documents by placing them in folders, the key to organizing a Final Cut Pro project is to sort clips and elements into bins. You can also place bins within bins, just as you would place folders within folders.
The first step to organizing your project is to create new bins to sort your elements. You will create three new bins to organize the current project, one each for Clips, Audio, and Sequences. Typically with Final Cut Pro, there are several ways to accomplish the same task. To serve as an introduction to the different ways you can work within Final Cut Pro, you will create three bins using three different methods.
Click in the Browser window to make it active.
Choose File > New > Bin.
A new bin appears in the Browser with the default name Bin 2. If other bins have been created, a different number may appear.

Since the bin name is already highlighted, just type the word Clips.
Press Enter or the Tab key to accept the name. If you need to correct it, click on the text of the name itself, not the bin icon, to highlight the name again.
To create the second bin folder, click the keyboard shortcut, Cmd-B.
Type Audio in the name area.
To create the third bin, Ctrl-click on the Browser gray area under the Name column and select New Bin.
Name this bin Sequences.
This bin, like the others, is placed in alphabetical order along with the other clips and sequences.
To remove the bin labeled Bin 1, single-click to select it and press Delete.
Three bins have been created to organize the different elements in this project. Now you will select the elements and drag them into their appropriate bins. All the standard methods of selecting, such as Shift, Command, or dragging a marquee, can be used for this process.
Drag the intro narration audio clip (speaker icon) to the Audio bin. When the Audio bin becomes highlighted, release the mouse. Do the same with intro music.

To select items next to each other (contiguous), such as the three sequences, click the first sequence, Sahara Intro – Finished, and Shift-click the third sequence, Sahara Intro – Starting.
Drag one of the selected sequences to the Sequences bin.
When you drag these sequences together, the sequence you clicked to drag is named, and the number of other items you are dragging is displayed.
When the Sequences bin becomes highlighted, release the mouse.
To select the remaining clips, you will use two approaches. First drag a marquee around the largest group of contiguous clips.
Hold down the Command key as you single-click the remaining clips to add them to the current selection. Drag them into the Clips bin.
All the project elements are now neatly tucked away in their bins.
To save these organizational changes, press Cmd-S.
Although this arrangement looks neat and organized, you can't see or access your clips or sequences. Let's look at different ways to display the contents of a bin so you can get to your material easily.
Click the small triangle next to the Audio bin to display its contents. Click the small triangle next to the Sequences bin to display the sequences in that bin.

Click the small triangle next to the Audio bin to hide the contents of that bin again.
Double-click the Clips bin.
This opens the bin as a separate window, which can be moved anywhere in the interface.
Drag the window by its title bar and position it away from the Browser.
In the Browser, the Clips bin icon changes to an open folder, indicating that the bin is open as a separate window or tab.

In the Clips bin, click the Close button in the upper-left corner to close this bin window, or press Cmd-W.
In the Browser, the Clips bin icon changes back to a closed folder.
To view the contents of the Clips bin a different way, hold down the Option key and double-click the Clips bin.

This opens the bin as a separate tab next to the Lesson 1 Project tab.
To change the view of the Clips bin, Ctrl-click in the gray area under the first column and select View as Medium Icons.
Ctrl-click on the Clips tab, or use the right mouse button to click the tab if you're using a two-button mouse. Select Close tab from the contextual pop-up menu.

This returns the Clips bin to its closed bin configuration in the Lesson 1 Project tab area.
Now display the contents of the Clips bin by clicking the triangle next to it.
Click the Zoom button in the upper-left corner of the Browser window.
When viewing bin contents as a list, you have access to over 50 columns of information in the Browser window. This may include information Final Cut Pro knows about an item (number of audio tracks, frame size, frame rate, and so on) or descriptive information you enter for further clarification or reference to an item, such as scene and take numbers. These columns will be covered in more depth in a later lesson.
Click again on the Browser Zoom button to return to its default layout.
Another way to resize the Browser is to do it dynamically. Move the cursor between the Browser and Viewer windows until you see the vertical resize arrow. Drag right to expand the Browser.
Browser Viewer
As the Browser expands, the Viewer and Canvas become smaller to allow for the change in Browser size. The windows in the interface can all be dynamically resized by dragging the resize arrow left and right or up or down (between the Timeline and upper windows).
Typically in the editing process, you view source clips in the Viewer, mark edit points, and edit those clips into the Timeline. This is how you build a sequence. These steps, along with the Viewer window, will be covered in the next lesson. Before you begin the editing process, let's focus on playing a sequence already in the Timeline and viewing it in the Canvas to get to know these windows.
Whereas the Browser is a container for all your project elements, the Timeline is a container for only the specific items that make up a sequence. The Canvas is where you see the sequence in the Timeline play. The name of the current sequence appears on a tab and also at the top of both the Timeline and Canvas windows.


In the Timeline, blue video and green audio clips sit on horizontal tracks. These tracks are a linear representation of time proceeding from left to right.
In the middle of the current sequence is a thin vertical bar with a yellow triangle at the top. This is the playhead. It indicates what frame is playing in the sequence.
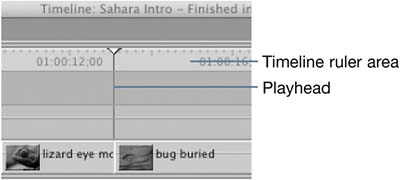
When the playhead is still, the frame at that location is displayed in the Canvas. When the playhead is moving, you see that portion of the sequence playing in the Canvas. There are different ways you can reposition the playhead.
Click in several different places in the number or ruler area of the Timeline.
The playhead jumps to where you click, and you see that frame in the sequence displayed in the Canvas image area.
NOTE
The Timeline ruler numbers identify the location of clips in the sequence. This number is called timecode, which is a video labeling system that records a unique eight-digit number onto each frame of a clip or sequence, representing hours, minutes, seconds, and frames.

Drag the yellow triangle of the playhead across the Timeline ruler area.
Dragging through the sequence this way is called scrubbing. You are viewing your sequence, but not at normal play speed.
Drag the playhead through the bug buried clip, and watch in the Canvas window until the antlers appear, then stop dragging and release the mouse.
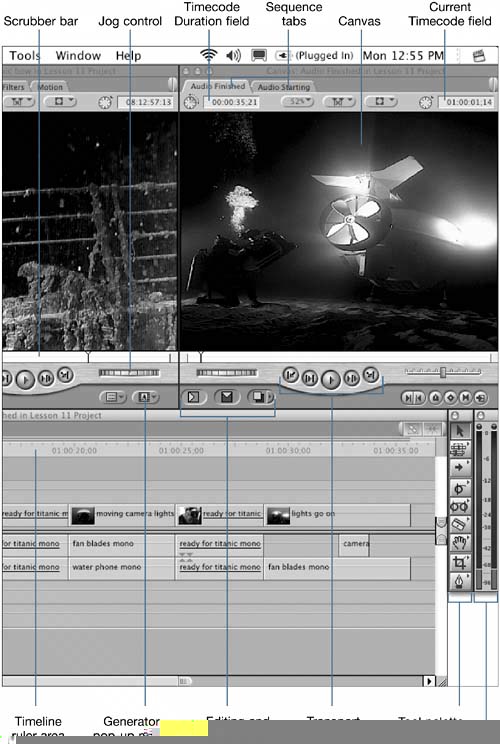
Under the Canvas image area is a scrubber bar. This bar represents the length of the entire sequence. A tiny playhead in the Canvas scrubber bar tracks with the movement of the Timeline playhead.

In the Timeline, click several times in the ruler area and watch the playhead in the Canvas scrubber bar track with the Timeline playhead.
Click in several places in the Canvas scrubber bar to view other frames of the sequence. Notice that the playhead in the Timeline now tracks with the movement of the Canvas playhead.
Drag the playhead through the Canvas scrubber bar toward the end of the sequence and stop after the feathered ear creature twitches its ear.
In both situations, you are viewing frames from your edited sequence. In the Timeline, you have the added advantage of seeing a clip's name and location.
Moving the playhead to precise locations in the Timeline is an important part of the screening and editing process. There are shortcuts to do this and visual clues that help you identify specific frames within the sequence. These visual clues appear in the Canvas as an overlay on top of the image area.
With the Timeline window active, press the End key to position the playhead at the end of the sequence.
NOTE
If you are working on a laptop, the End key may share a position with the right arrow key and require an additional key to access it, such as the fn (function) key in the lower left of the keyboard.
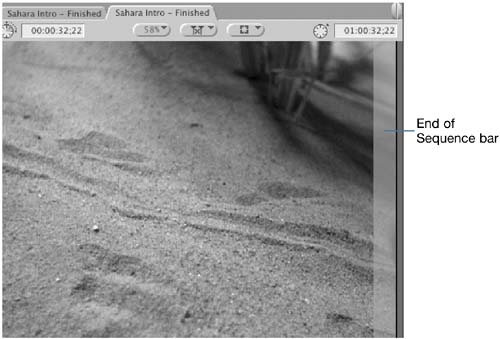
A blue vertical bar appears on the right side of the Canvas window, indicating that you are looking at the end or very last frame of the sequence.
Press the up arrow key to move the playhead back to the start of the last clip in the Timeline.

An L-shaped mark appears in the lower-left corner of the Canvas image area, indicating that the playhead is positioned on the first frame of a clip in the sequence.
Press the up arrow key four times, and look for the L-shaped first-frame indicator on the bug buried clip in the Canvas window.
Press the down arrow key to move the playhead forward to the first frame of the feathered ears clip.
Under the sequence name tab, there is a Current Timecode field that displays the exact timecode position of the playhead in the sequence. Most sequences begin with 01:00:00;00 timecode as a starting point.
NOTE
The semicolon between seconds and frames in this timecode number indicates that drop-frame timecode is being used for this sequence. The glossary explains drop-frame and non-drop-frame timecode in more depth.

There is also a Current Timecode field in the Canvas. Both of these fields display the same number identifying the playhead location in the sequence.
To move the playhead to a specific timecode location in the sequence, such as 01:00:02;07, click in the Current Timecode field and type that number. Press Return. You don't have to type the colons or semicolons.
Press the down arrow key.
Press the left arrow key to move one frame backward.
In the Canvas, the reverse L in the lower-right corner of the image area indicates that you are on the last frame of that clip. Look at the Current Timecode field to note the current sequence location.
Press the right arrow key to move the playhead forward one frame to the first frame of the following clip.
Look at the Current Timecode field again. It has changed by one frame.
Press Shift-left arrow or Shift-right arrow to move the playhead 1 second (30 frames) in either direction. Look at the Current Timecode fields to see the timecode location change.
Press End again and look at the Timecode Duration field in the Canvas.

This displays the duration or length of the sequence.
Press the Home key to position the playhead at the beginning of the sequence.
There are two approaches to playing a sequence: either using specific buttons and controls on the interface or using keyboard shortcuts. When you play a sequence, the playhead automatically follows along and stops when you stop.
Press the spacebar to begin playing the sequence.
In the Timeline, the playhead moves across the clips and ruler area and the sequence is displayed in the Canvas.
Press the spacebar again to stop playing the sequence. Press it again to play and again to stop. Press Home to return to the beginning of the sequence.
Press the L key to play forward, then press J to reverse and play backward. Press K to stop.
To double the forward play speed, press L twice. Press it again to play even faster. Press J, and the speed slows down a notch. Press K to stop. Press J twice to play in reverse 2x speed. Press K to stop.
TIP
Practicing with the J, K, and L keys when editing will help you build speed as an editor. You can also use them in the Canvas and Viewer.
The Canvas has a set of transport controls along with shuttle and jog controls you can use to play and view your sequence.
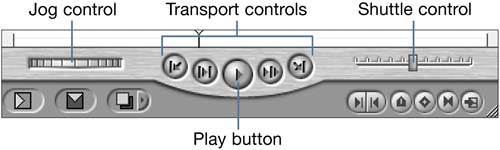
In the Canvas window, click the Play button once to play the sequence. Click it again to stop the sequence.
Press L to play forward, J to play in reverse, and K to stop.
Press the Home key to go to the beginning of the sequence, and then the End key to go to the end.
Drag the jog control to the left to move backward a frame at a time or right to move forward. Drag the shuttle control left to go backward through the sequence at a variable speed.
When you work in the Timeline, you can control the height of the tracks and the magnification of the sequence. Each of these adjustments simply changes how the clips are displayed in the Timeline.
In the bottom of the Timeline, move the pointer over the fourth control from the left, the Track Height control. Select different columns to see the track height options. Click the second column to return to that option.
From the menu, choose Sequence > Settings, or press Cmd-0 (zero). Click the Timeline Options tab.
Click the Thumbnail Display pop-up menu and make sure Name Plus Thumbnail is selected.
In this pop-up menu, you can choose whether you want to view the clips in your Timeline with thumbnail images, just by name, or as a visual filmstrip.
Click OK to close the window.
Beneath the tracks of the Timeline are a zoom control and zoom slider used to adjust the horizontal scale of the tracks and the position of the sequence within the Timeline.

Move the playhead to the middle of the sequence.
In the zoom control box, drag the zoom control to the left to magnify or zoom into the sequence.

Notice in the ruler area the timecode numbers also expand and contract to reflect the zoom change.
Drag the zoom slider left and right to change the portion of the sequence that is in view.
NOTE
If the playhead is not visible in the current zoom, click the tiny purple line in the zoom slider area. This line represents the playhead location. Clicking it will bring that area of the sequence into view.

Press Shift-Z to place the entire sequence in the Timeline view.
You quit Final Cut Pro just as you would any OS X program: from the menu or using the keyboard shortcut. You can also hide the interface if you want to work on your Desktop or in another program.
To hide the interface, choose Final Cut Pro > Hide Final Cut Pro, or press Cmd-H.
The interface disappears, and you see your Desktop or any other programs you may have open in the background.
Restore the Final Cut Pro interface by going to the Dock and clicking once on the program icon.
If you are finished working, quit the program altogether by choosing Final Cut Pro > Quit Final Cut Pro, or pressing Cmd-Q. If you are not finished working, continue with the next lesson.
How to launch Final Cut Pro
How to open and close projects
How to select different windows, tool palette options, menus, and keyboard shortcuts
How to identify project icons
How to create and name bin folders
How to organize clips into a bin and view the bin contents
How to play a sequence in the Timeline and Canvas
How to hide and quit Final Cut Pro
Table . Keyboard Shortcuts
Cmd-B | Creates a new bin |
Ctrl-click | Brings up different pop-up menus throughout Final Cut Pro |
Cmd-H | Hides the Final Cut Pro interface |
Cmd-Q | Quits Final Cut Pro |
L key | Plays sequence forward |
Stops playing | |
J key | Plays sequence backwards |
Home key | Takes playhead to head of the sequence |
End key | Takes playhead to end of the sequence |
Up arrow | Moves backward to the first frame of the previous clip in the Timeline |
Down arrow | Moves forward to the first frame of the next clip in the Timeline |
Left arrow | Moves one frame to the left |
Right arrow | Moves one frame to the right |