
Lesson 1. Working with a GarageBand Project
Lesson Files
APTS GarageBand Book Files > Lesson 01 > 1-1 Scales Starting, 1-2 Cycle and Horns, 1-3 Scales Tasks, 1-4 Scales Finished
Time
This lesson takes approximately 60 minutes to complete.
Goals
Explore the GarageBand window
Navigate in the timeline
Understand tracks and regions
Explore the Library and change a patch
Explore the Smart Controls pane and add reverb to a track
Explore the editors
Create a cycle area
Show the loop browser
Audition a loop and add it to the project
Change a track name and icon
GarageBand has been completely reimagined, reengineered, and remixed into an (even more powerful and still user-friendly) personal music workshop and recording studio.
Whether you’re an accomplished musician, a hobbyist, or simply someone who’s always wanted to try your hand at making music, GarageBand can help you take your musical aspirations to the next level—no experience or additional equipment required!
In this lesson, you’ll take a guided tour of the GarageBand basic interface and learn how to use the transport controls, navigate in the timeline, audition Apple Loops, add a loop region, and show and hide the browser, editors, and Library. Along the way you’ll also learn some valuable tips for advanced navigation and managing your workspace.
Downloading GarageBand Projects for This Book
The downloadable content for Apple Pro Training Series: GarageBand includes the project files you will use for each lesson, as well as media files that contain additional audio, video, or text you will need for each exercise. After you save the files to your hard disk, each lesson will instruct you in their use.
This book is written as project-based, step-by-step instruction manual. It is designed using specific prebuilt GarageBand projects and media. Throughout the book you will be encouraged to try what you’ve learned on your own projects.
The Apple Pro Training Series: GarageBand lesson files download includes all the projects and media files you’ll need to complete the lessons in this book.
To install the GarageBand lesson files:
1. Connect to the Internet, navigate to www.peachpit.com/redeem, and enter your access code.
If you are working with a printed edition of the book, the access code is provided on the card at the back of the book.
If you are working with an electronic version of the book, the access code number is on the “Where Are the Lesson Files?” page.
![]() Note
Note
If you purchase or redeem a code for the electronic version directly from Peachpit, the lesson file link will automatically appear on the Lesson & Update Files tab without the need to redeem an additional code.
2. Click Redeem Code, and sign in or create a Peachpit.com account.
3. Locate the downloadable files on your Account Page under the Lesson & Update Files tab.
4. Click the lessons file link and download the APTS GarageBand Lessons.zip to your Downloads folder.
![]() Note
Note
Once you enter the redeem code, you can download the APTS GarageBand Lessons.zip as many times as you like for your account.
5. After downloading the file, open your Downloads folder, and double click APTS GarageBand Lessons.zip to unzip it.
Following these steps will copy the APTS GarageBand Book Files folder to your desktop. This folder contains the lesson files used in this book; each lesson has its own folder.
Opening and Saving a GarageBand Project
For this lesson about the GarageBand Interface, you’ll need to open the 1-1 Scales Starting project and save it to a new folder where you will save all of your work throughout this book.
You can open GarageBand projects from your computer or within GarageBand. Since you just downloaded and installed the projects to your computer, let’s open this first project from the lessons folder on your desktop.
1. Quit GarageBand, if it is still open from the previous lesson.

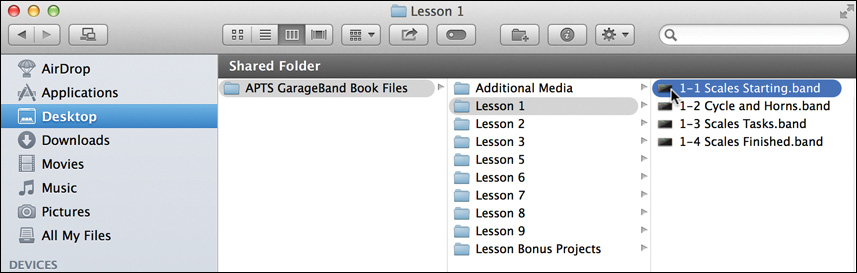
2. On your computer’s desktop, locate the APTS GarageBand Book Files folder, and double-click the folder to open it in the Finder. There you will see a folder for each lesson, as well as the Additional Media and Lesson Bonus Projects folders.
![]() Note
Note
Your Finder view may differ from the view shown in the screenshot, but the contents of the APTS GarageBand Book Files folder should be the same.
3. Double-click the Lesson 1 folder to see all of the projects for this lesson. Double-click the project 1-1 Scales Starting to open it in GarageBand.
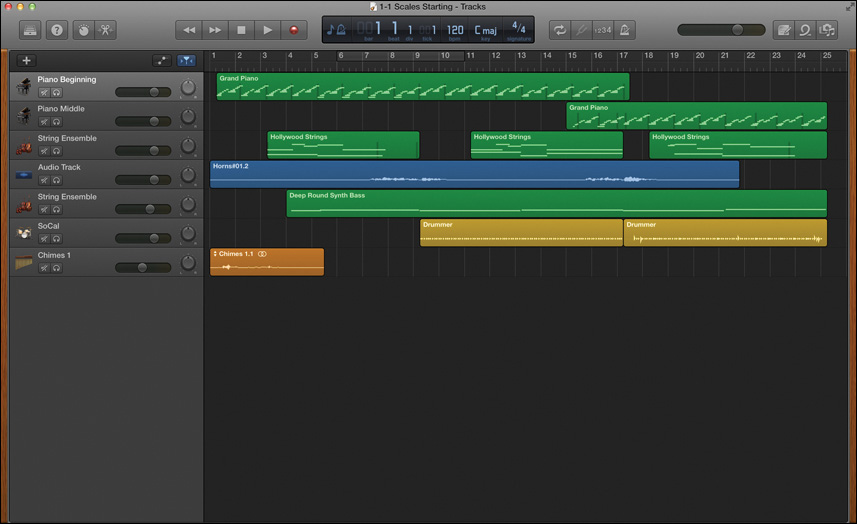
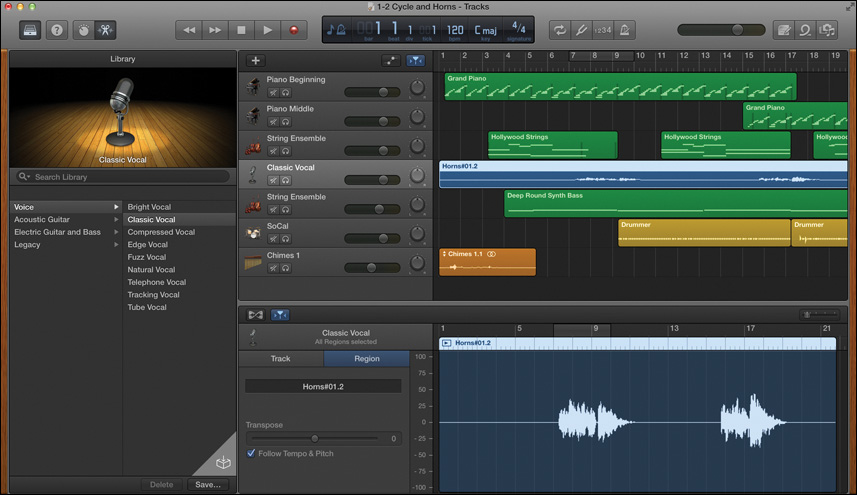
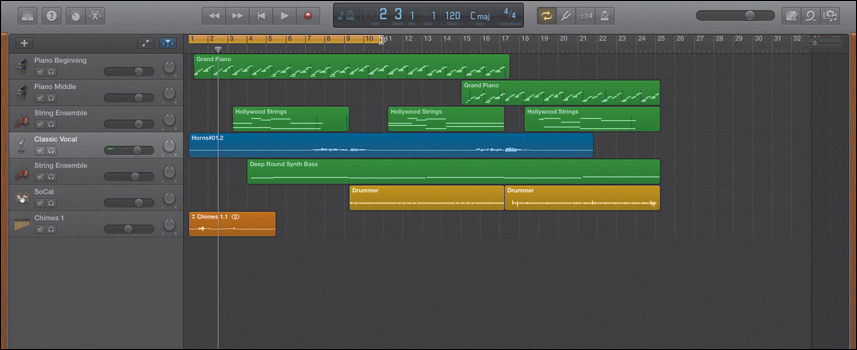
When GarageBand opens, you will see a large window containing all the elements for the 1-1 Scales Starting project.
Before we play the song, or make any changes to the interface, let’s save the project.
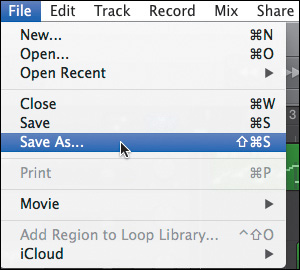
4. Choose File > Save As to open the Save As dialog.
![]() Note
Note
To expand the Save As dialog, click the down arrow at the right side of the Save As field.
5. Click the Desktop icon in the sidebar (left side) of the Save As dialog to select the desktop as the location to save your project.
6. In the lower-left corner of the dialog, click the New Folder button. A New Folder dialog opens.
7. In the “Name of new folder” field, enter My GarageBand Projects. Click Create. The new folder appears on your desktop.
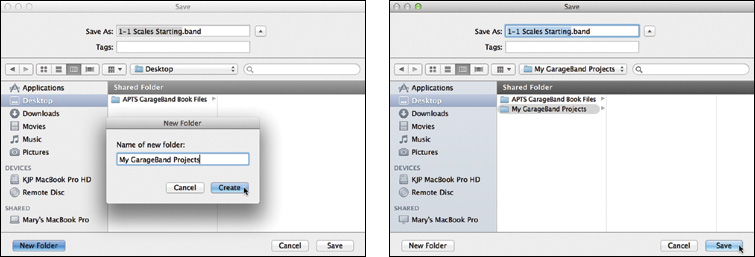
8. In the Save As dialog, click Save.
That’s it. You saved a copy of the project that you can freely modify throughout the lesson, while retaining the original version in the lesson folder.
Exploring the GarageBand Window
Among the many advantages of GarageBand is the simplicity of its interface. GarageBand uses one window as the base of operations. This window is your recording studio and music workshop.
Hidden within this window are various multipurpose areas (panes) and tools that you will work with later. For now, it’s a good idea to get familiar with the basic GarageBand window areas.
The basic areas of the GarageBand window are as follows:
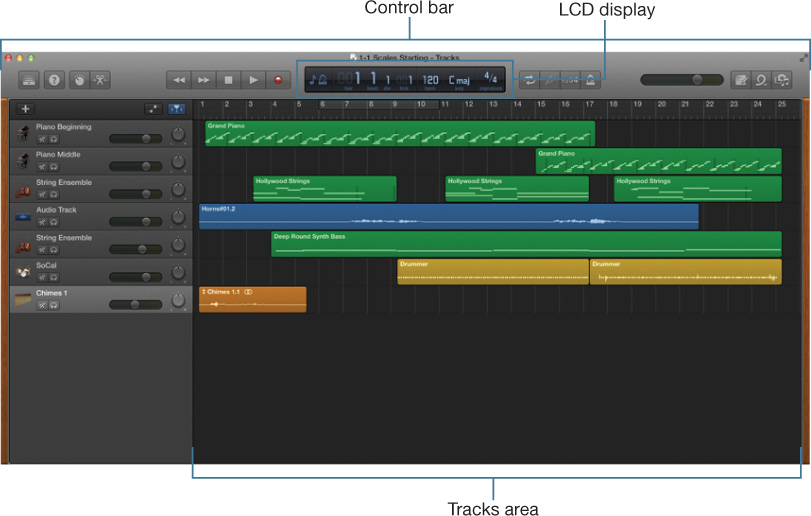
![]() Control bar—The light gray area at the top of the GarageBand window that includes the transport controls for controlling playback of the project, an LCD (liquid crystal display) showing project properties and time format, buttons to show and hide the various areas of GarageBand, and buttons for frequently used tools and commands
Control bar—The light gray area at the top of the GarageBand window that includes the transport controls for controlling playback of the project, an LCD (liquid crystal display) showing project properties and time format, buttons to show and hide the various areas of GarageBand, and buttons for frequently used tools and commands
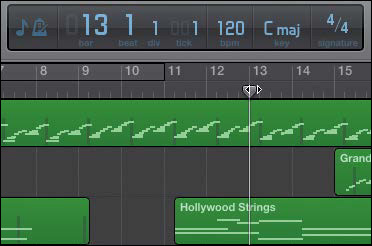
![]() LCD Display—The black display in the center of the control bar showing project properties, time format, and playhead position
LCD Display—The black display in the center of the control bar showing project properties, time format, and playhead position
![]() Tracks area—The workspace where you record audio and MIDI regions, as well as add and arrange Apple Loops and other media files to build a project
Tracks area—The workspace where you record audio and MIDI regions, as well as add and arrange Apple Loops and other media files to build a project
Understanding the Tracks Area
The Tracks area is your primary workspace, so you will be learning it more in depth with each lesson. For now, it is important to understand the elements of the Tracks area so you will know how it works.
![]() Tracks—Horizontal lanes that are aligned to time positions on a ruler and grid. These lanes (tracks) contain individual musical parts, or regions, as performed by a particular instrument. All audio, MIDI, and drummer regions for a project are contained in tracks.
Tracks—Horizontal lanes that are aligned to time positions on a ruler and grid. These lanes (tracks) contain individual musical parts, or regions, as performed by a particular instrument. All audio, MIDI, and drummer regions for a project are contained in tracks.
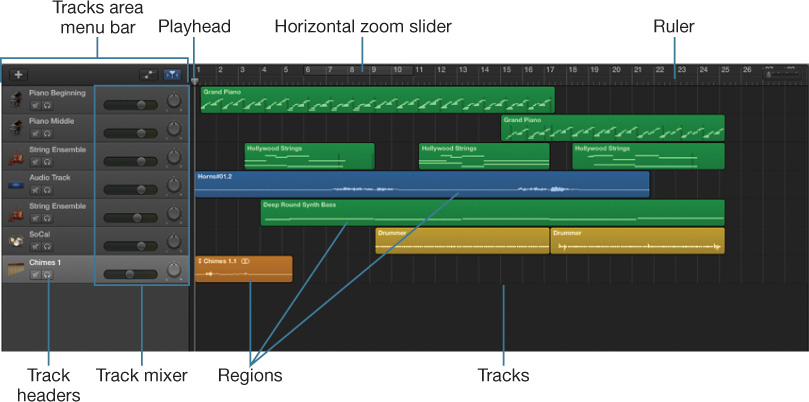
![]() Regions—These are the building blocks of a project and contain individual musical parts (regions) from a particular instrument. An instrument track may contain only one region, or it may contain many smaller regions—individual takes and retakes, often called overdubs.
Regions—These are the building blocks of a project and contain individual musical parts (regions) from a particular instrument. An instrument track may contain only one region, or it may contain many smaller regions—individual takes and retakes, often called overdubs.
![]() Track headers—A header shows the instrument icon and name to the left of each instrument track. The track headers also include a Mute button to silence a track, a Solo button to silence all other tracks, and other functions that can be shown or hidden, such as arming the track for recording.
Track headers—A header shows the instrument icon and name to the left of each instrument track. The track headers also include a Mute button to silence a track, a Solo button to silence all other tracks, and other functions that can be shown or hidden, such as arming the track for recording.
![]() Track mixer—This includes a volume slider for adjusting the track volume and a pan wheel to adjust the position of the track in the left-to-right stereo field.
Track mixer—This includes a volume slider for adjusting the track volume and a pan wheel to adjust the position of the track in the left-to-right stereo field.
![]() Ruler—This runs horizontally along the top of the tracks area/timeline. It shows musical time in bars (measures) and beats or standard time in minutes and seconds for nonmusical projects.
Ruler—This runs horizontally along the top of the tracks area/timeline. It shows musical time in bars (measures) and beats or standard time in minutes and seconds for nonmusical projects.
![]() Timeline—This is another name for your music recording and arranging workspace. The timeline consists of a horizontal track for each instrument. It graphically represents linear time from left to right using a beat ruler at the top of the window. The far-left edge of the timeline represents the beginning of a song.
Timeline—This is another name for your music recording and arranging workspace. The timeline consists of a horizontal track for each instrument. It graphically represents linear time from left to right using a beat ruler at the top of the window. The far-left edge of the timeline represents the beginning of a song.
![]() Playhead—This shows exactly what part of the song is currently playing. The playhead is a triangle (with a long vertical line underneath) on the beat ruler. During playback the playhead moves from left to right along the timeline, playing the regions that it touches. In addition to playing the regions, it can be used as a position indicator for the LCD display, as well as a tool to determine where to record, cut, copy, and paste music regions with the timeline.
Playhead—This shows exactly what part of the song is currently playing. The playhead is a triangle (with a long vertical line underneath) on the beat ruler. During playback the playhead moves from left to right along the timeline, playing the regions that it touches. In addition to playing the regions, it can be used as a position indicator for the LCD display, as well as a tool to determine where to record, cut, copy, and paste music regions with the timeline.
![]() Tracks area menu bar—This is a dark gray bar running across the top of the tracks area that includes controls for adding tracks and showing track automation, as well as a Catch button and horizontal zoom slider.
Tracks area menu bar—This is a dark gray bar running across the top of the tracks area that includes controls for adding tracks and showing track automation, as well as a Catch button and horizontal zoom slider.
![]() Horizontal zoom slider—This slider is handy for adjusting the horizontal zoom of the timeline workspace.
Horizontal zoom slider—This slider is handy for adjusting the horizontal zoom of the timeline workspace.
You’ll work with each area in the next few lessons. For now, let’s start with the transport controls in the control bar and play the project.
Navigating and Controlling Playback
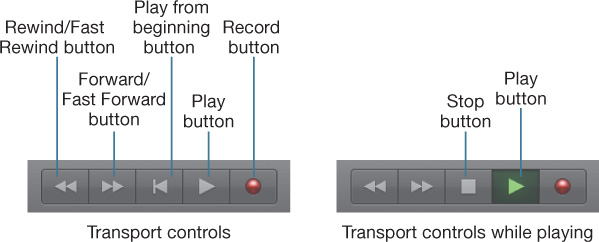
There are several ways to play a project. In fact, many GarageBand features can be accessed by menu, button, or keyboard shortcut. The transport control buttons are located in the control bar next to the LCD display.
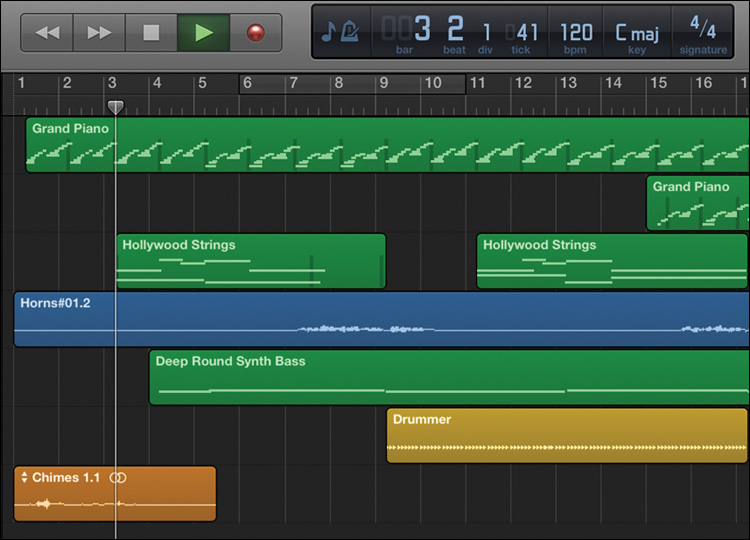
1. Press the Spacebar, or click the Play button in the control bar to play the song. Notice that the Play button turns green during playback.
As the music plays, you will see the playhead move from left to right along the timeline.
This project is part of a routine piano scales exercise that was partially orchestrated to demonstrate the simplicity of the orchestration process in GarageBand. Nearly every music student has at one time or another (perhaps daily) had to practice fingering by playing major scales (regardless of the instrument). Therefore, it seems fitting that your first project to learn the basic GarageBand interface involves scales as well. However, instead of using this project to hone your musical skills, you will use it to become more proficient in playing GarageBand projects and navigating the interface.
2. When the music is over, click the Stop button or press the Spacebar to stop playback.
3. Press Return to return the playhead to the beginning of the song.
That’s all there is to playing a project straight through.
Positioning the Playhead in the Ruler
What if you want to start playback from a specific point in the timeline? No problem. You can simply drag the playhead to a new position or click the ruler to move it to that position. Just be sure to click the lower part of the ruler in the playhead area to move the playhead. Clicking the upper part of the ruler (marked with numbers) will turn on Cycle mode (which you will use when working with a cycle region later in the lesson). For now, stick to clicking the lower part of the ruler.

1. Click anywhere on the lower part of the ruler to move the playhead to that position.

2. Drag the top of the playhead left and right in the playhead area of the ruler. As you drag, you can see the LCD display change based on the current playhead position.
![]() Note
Note
If you see a yellow cycle area in the upper part of the ruler, or the yellow Cycle button in the Control bar is turned on, click the Cycle button to turn it off before proceeding with the exercise.
3. Double-click the ruler just before the first Hollywood Strings region in the Hollywood Strings track to begin playback at that position.

4. Stop playback. Press Return to move the playhead back to the beginning of the song.
Well done. In just a few clicks you’ve mastered the art of GarageBand playback.
Exploring the Workspace, Tracks, and Regions
Now that you’ve played the project, let’s take a closer look at the different musical parts and tracks that make up the song.

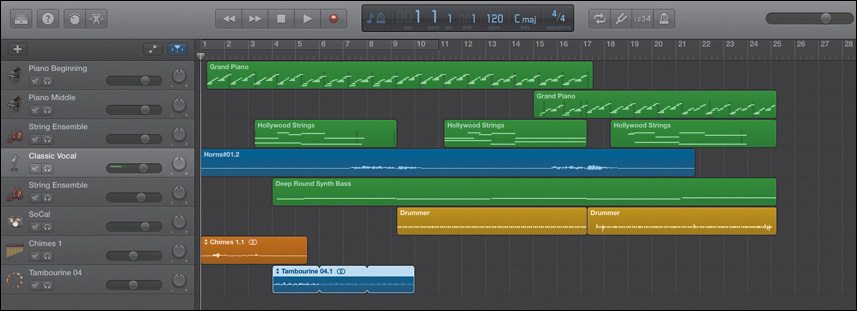
The project 1-1 Scales Starting includes seven tracks, each containing a different musical instrument part. The color of a region indicates the type of region and instrument recording. You can usually figure out at a glance which instrument parts are in each track based on the icon and instrument name in the track headers.
1. Look at the track headers for each track. Chances are they are all obvious except the track in the middle (the fourth track from the top) called Audio Track.
2. Click the empty space in the header of the track called Audio Track to select that track.
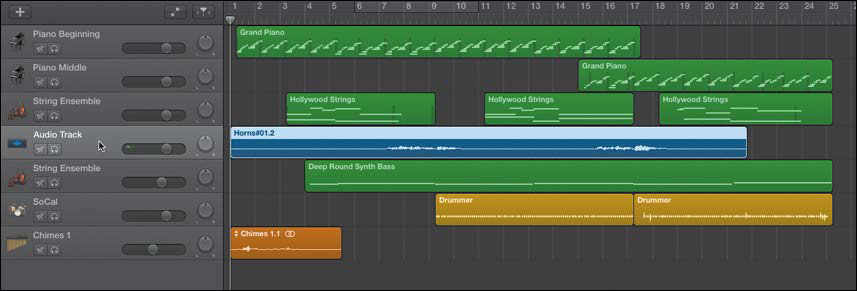
The selected track header brightens to indicate it has been selected. Also, all of the regions within that track (in this case one region) are automatically selected. You can easily identify a selected region because it brightens as well.
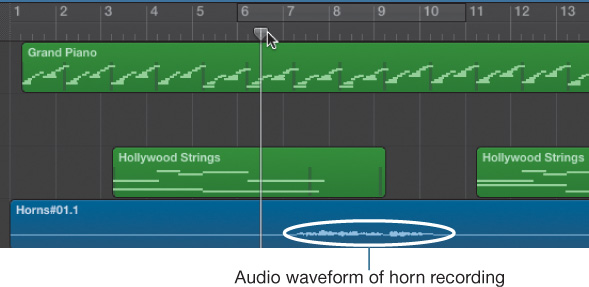
3. While the region is selected, look for the region’s name in the illuminated bar at the top of the region.
As you can see the region is named Horns#01.2.
![]() Note
Note
The #01.2 in the name Horns#01.2 is a GarageBand naming convention to indicate it is the second instance (.2) that the Horns#01 recording has been used in this project. From now on in this book I’ll just use the region name without the information followed by a # sign or decimal pont—unless it is significant to the lesson.
Aha. It must be a horns track. Technically it is a recording of a horns part, though it was actually a sampled horn sound played by an external keyboard and recorded with a microphone into GarageBand as an audio track as though it were an acoustic instrument. What is an audio track? Read on; you’ll find out in the next section.
4. Click anywhere in the empty workspace (the dark gray area) to deselect the region.
Tip
It is a good idea to always deselect regions when they don’t need to be selected. Otherwise, selected items can be accidentally cut, copied, pasted, moved, or deleted. Don’t worry; you’ll learn how to work with all of these features in time, including advanced selecting and editing.
Identifying Regions and Tracks
A track can include audio regions, MIDI regions called Software Instruments or Drummer regions, and can be easily identified by the color of the regions within the track.
Regions come in a variety of sizes and colors (according to type):
![]() Audio regions—Appear as purple, blue, yellow, or orange regions depending on how the audio files were recorded or added to the project. You can record live audio parts into GarageBand using the built-in microphone on your Mac, or a microphone, guitar, or keyboard that’s plugged into the audio-in port on your Mac. You can also record audio parts through other input devices that you connect to your computer. Imported audio files appear as orange regions. Regardless of the color of the region, all audio track regions include a visual audio waveform to illustrate the recorded sound.
Audio regions—Appear as purple, blue, yellow, or orange regions depending on how the audio files were recorded or added to the project. You can record live audio parts into GarageBand using the built-in microphone on your Mac, or a microphone, guitar, or keyboard that’s plugged into the audio-in port on your Mac. You can also record audio parts through other input devices that you connect to your computer. Imported audio files appear as orange regions. Regardless of the color of the region, all audio track regions include a visual audio waveform to illustrate the recorded sound.

Recorded guitar or bass (purple)

Recorded instrument through microphone, or audio Apple Loop (blue)

Drummer track (yellow)

Imported audio file (orange)
![]() MIDI regions (Software Instruments)—Appear as green regions and are recorded using a USB music keyboard, a MIDI synthesizer–type keyboard, the GarageBand onscreen keyboard, or Musical Typing with the GarageBand software and your computer’s keyboard as the MIDI instrument. All Software Instrument regions include visual MIDI note events to illustrate the recorded notes.
MIDI regions (Software Instruments)—Appear as green regions and are recorded using a USB music keyboard, a MIDI synthesizer–type keyboard, the GarageBand onscreen keyboard, or Musical Typing with the GarageBand software and your computer’s keyboard as the MIDI instrument. All Software Instrument regions include visual MIDI note events to illustrate the recorded notes.

Exploring the Library
So far you have only been working with the basic GarageBand window areas. In the next series of exercises you will look at the Library to become familiar with using it for identifying and changing the sound of a track. You will also learn to show or hide the Library as needed while you learn the GarageBand interface.
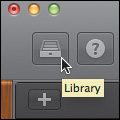
The Library button is located at the far-left of the toolbar and looks like a library bookshelf.
Let’s start by showing the Library, and rather than use the button you will try the most intuitive method and double-click the region.
1. Double-click the empty space in the Piano Beginning header (Track 1). The Library appears in the left side of the GarageBand window.
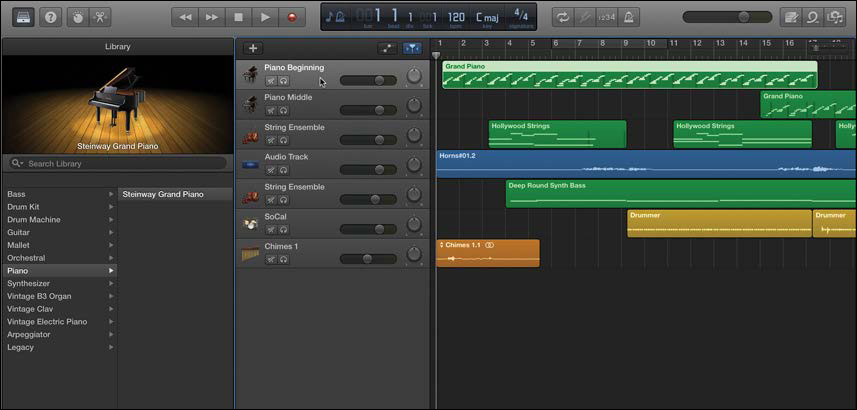
The Library shows the Track icon (in this case a Steinway Grand Piano) that represents the current instrument (patch) assigned to the selected track.
2. Click the empty space in the Audio Track header to show that track in the Library. This time, there is no instrument picture because no patch (instrument sound preset) has been added to the original horn recording.
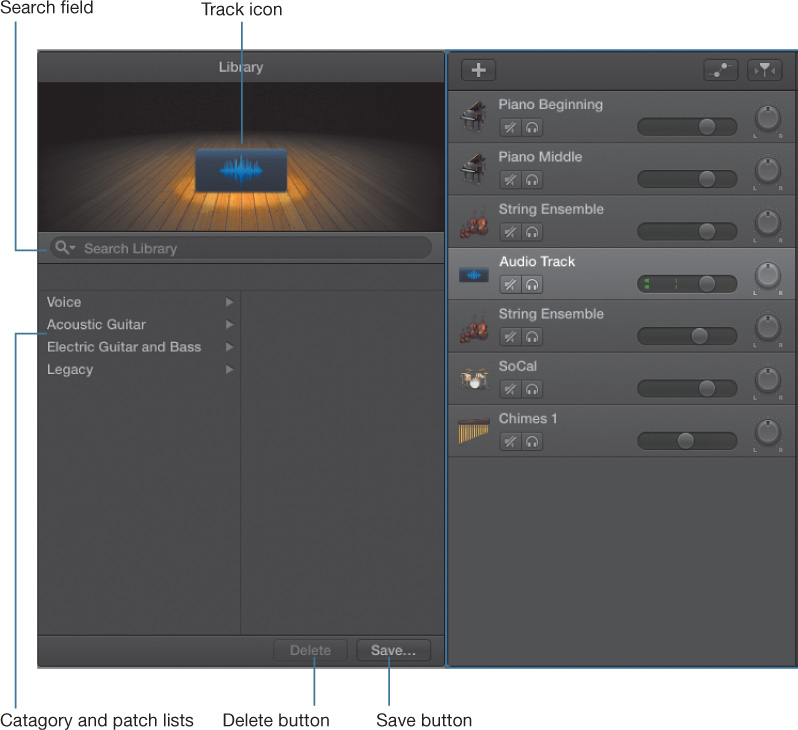
You can use the Library to change a patch, save a patch, or search for different available patches and then change a patch. You will work with this in depth in other lessons. For now let’s just change the patch to a Classic Vocal to enhance the sound. Why would you apply a vocal patch to a horn sound? Because the patches for audio tracks are limited to Voice, Acoustic Guitar, and Electric Guitar and Bass. Since vocal patches are based on types of microphones and basic effects commonly applied to vocals, they can also be applied to any acoustic instrument.
If you had a previous version of GarageBand installed on your computer before installing this version, you will see a Legacy category in your Instrument list that includes patches from previous versions.
3. Move the playhead in the timeline to the middle of the sixth measure (bar 6)—right before the waveform of the horn begins within the Horns region. Otherwise you’ll have to wait for playback to reach that part of the song to hear the new patch.
4. In the Library patch list, click the Voice category and the Classic Vocal patch. Instantly the track name and icon changes accordingly.
![]() Note
Note
If you select the name field, or type a new track name, the track name will not change according to the selected patch.

5. Play the song starting at bar 6 to hear the Classic Vocal patch. If you were expecting the horn recording to sound like vocals, it doesn’t. In fact, you may or may not hear the difference right away. The best way to do that is to compare the patches by playing one, then the other.
6. Click the Natural Vocal patch and play that section of the song again. Stop playback.
Of course, manually moving the playhead each time you want to play a section of a song over and over would be tedious and frustrating. Luckily, you can use something called a cycle area to accomplish the same feat without the repetitive clicking.
Using a Cycle Area
There are many uses for a cycle area in GarageBand. For this exercise you’ll turn on Cycle mode and create a cycle area over the first horn waveform to make it easier to compare the various vocal patches while it plays.
1. Press C, or click the Cycle mode button to turn on the cycle area.

The cycle area is displayed as a yellow strip in the upper part of the ruler. You can drag the center of the cycle area to move it horizontally, or drag the edges to resize it.
2. Drag the edges of the current cycle area so that it starts at bar 7 and ends at bar 10 to create a cycle area over the first horn part in the song.
3. Start playback. Only the part of the song within the cycle area plays—over and over.
4. In the Library, click the Bright Vocal patch to hear it. Next try the Classic Vocal patch. Feel free to experiment with any of the Vocal patches in the Voice category to hear how they sound. No matter which patch you select, the track still sounds like a horn and not a vocal recording. That’s because changing the patch of an audio track doesn’t change the instrument; it only changes the effects applied to that track to enhance the sound.
To me, all of the Vocal patches sound good for this track (except Telephone Vocal and Fuzz Vocal). The Bright Vocal patch is very bright and present, whereas the Classic Vocal sounds warmer and somehow seems more balanced with the strings and piano. Keep in mind that everybody’s musical taste is different.
5. Click the Classic Vocal patch if it is not already selected and stop playback.
So now you know how to show and use the Library patches as well as create and play a cycle area. What this track could really use is some reverb, to make the horns sound more distant and in a larger space instead of right behind you, blaring in your ear. To add reverb you’ll need the Smart Controls pane.
Exploring the Smart Controls Pane
The bottom of the GarageBand window is reserved for the Smart Controls pane and the editors used to make precision changes to regions and their contents. In this exercise we’ll take a quick look at the Smart Controls pane and use it to add reverb to the Horns audio region. You’ll work more with the Smart Controls pane in later lessons.
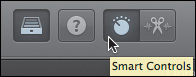
To show the Smart Controls pane, you can click the Smart Controls button, press B, or choose View > Show Smart Controls. For this exercise you’ll use the Smart Controls button. Keep in mind that Smart Controls are track-based, so make sure you have the right track selected before you make any changes to the controls.
1. Select the Classic Vocal track header, if it is not already selected. Remember, this is the audio track containing the horns region.
2. Click the Smart Controls button to show the Smart Controls pane at the bottom of the window.
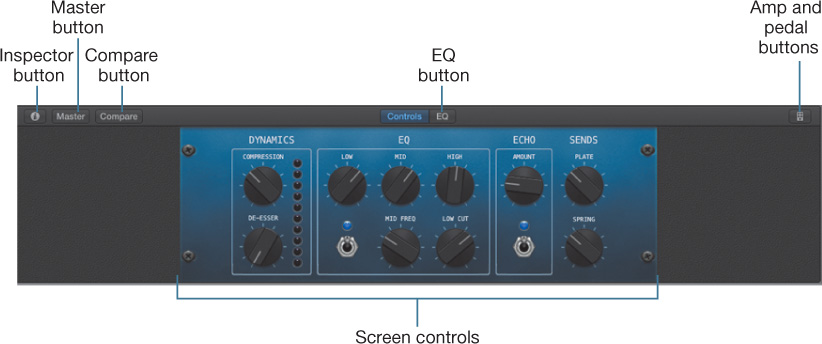
![]() Inspector button—Displays the Smart Controls inspector.
Inspector button—Displays the Smart Controls inspector.
![]() Screen controls—Let you modify the sound of the track. Not only do they look like physical controls on actual devices in a real music studio environment, they respond like them as well. Labels on each control make the functions easy to understand.
Screen controls—Let you modify the sound of the track. Not only do they look like physical controls on actual devices in a real music studio environment, they respond like them as well. Labels on each control make the functions easy to understand.
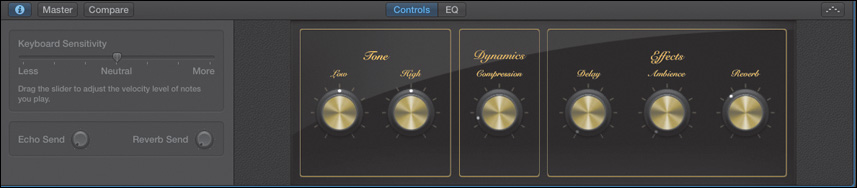
![]() Smart Control inspector—Shows monitoring and input controls for audio tracks, and a keyboard sensitivity control for Software Instrument tracks.
Smart Control inspector—Shows monitoring and input controls for audio tracks, and a keyboard sensitivity control for Software Instrument tracks.
![]() Master button—Displays Smart Controls for the master track. Any changes applied to the master track modify the sound of the entire song.
Master button—Displays Smart Controls for the master track. Any changes applied to the master track modify the sound of the entire song.
![]() Compare button—Click this button to see a before-and-after comparison between your edits to the Smart Controls and the saved Smart Control settings to hear how your changes affect the sound.
Compare button—Click this button to see a before-and-after comparison between your edits to the Smart Controls and the saved Smart Control settings to hear how your changes affect the sound.
![]() EQ button—Opens the EQ (Equalizer) effect for the selected track.
EQ button—Opens the EQ (Equalizer) effect for the selected track.
![]() Amp and pedal buttons—Open the Amp Designer and Pedalboard plug-ins for electric guitar audio tracks.
Amp and pedal buttons—Open the Amp Designer and Pedalboard plug-ins for electric guitar audio tracks.
For this exercise, you’ll work with the Reverb Send control in the Smart Controls inspector.
1. Click the Smart Controls inspector button (i) in the upper-left corner of the Smart Controls pane.
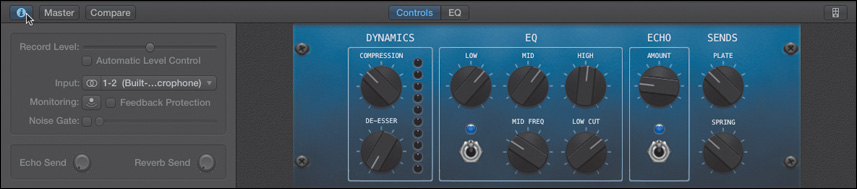
The Smart Controls inspector appears on the left side of the pane. Because this is an audio track, most of the controls in the inspector involve recording controls for the track.
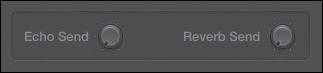
At the bottom of the inspector you’ll see the Echo Send and Reverb Send controls.
2. Make sure the audio track with the Horns region is still selected and that the cycle area is still on. Start playback.
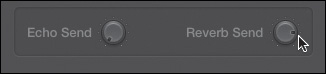
3. Click the Reverb Send knob and drag upward until it points to the 3 o’clock position. You should be able to hear the reverb, which gives the horns a more distant but resonating sound.
4. For fun, and to annoy anyone listening to your project including yourself, drag the Echo Send control to about the same position. Okay, so maybe echo isn’t for this track or this song.
5. Option-click the Echo Send control to reset it to the default position.
Tip
You can Option-click any audio control to reset it to the default position. This includes the volume and pan controls in the track headers.
6. Press the Up Arrow key once to select the track above the Classic Vocal (horns) track. The Smart Controls pane updates to show controls for the selected track.
7. Press the Up Arrow key again to select the Strings Ensemble track. The Smart Controls pane now reflects the controls for that type of track.
8. Press B, or click the Smart Controls button, to hide the Smart Controls pane.
9. Press C to turn off Cycle mode.
![]() Note
Note
The Up Arrow and Down Arrow keys select the next higher, or lower, track.
Mission accomplished. The unnamed audio track containing the Horns region now has a reverb effect to enhance the sound. The horns part is a bit too loud at the moment, but you’ll fix that at the end of the lesson when you give the track a proper name and icon. The next stop on this interface tour is the editors.
Exploring the Editors
There are four editors based on the type of track instrument: Audio Editor (for Audio tracks with audio regions), Piano Roll Editor and Score Editor (both for Software Instrument regions), and finally the Drummer Editor (for drummer tracks). You’ll work with the Drummer Editor in the next lesson. For this exercise, you’ll focus on the other editors.
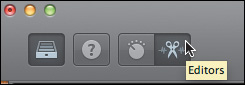
To display an editor, you can click the Editors button, press E, or double-click a region in the timeline. For this exercise you’ll use the manual double-click method. Since you’ve been working with the Horns region, let’s go ahead and open it in the Audio Editor.
![]() Note
Note
If you didn’t complete all of the previous exercises in this lesson, open the project (1-2 Cycle and Horns and save it to your projects folder on the desktop. If you have been following along, please continue working with the same project you’ve been using 1-1 Scales Starting.)
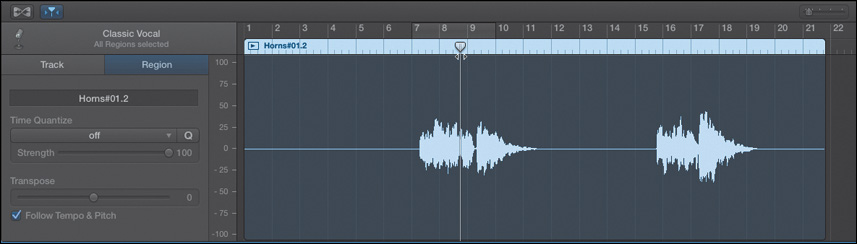
1. Double-click the Horns region in the Classic Vocal track to open the Audio Editor.
Now you can clearly see the audio waveforms in the Horns region. Notice that the Real Instrument region in the Audio Editor is also blue to indicate the type of instrument region. Though the editor is a separate area of the window, it includes a ruler with a playhead and a cycle area that correspond to the same elements in the timeline.
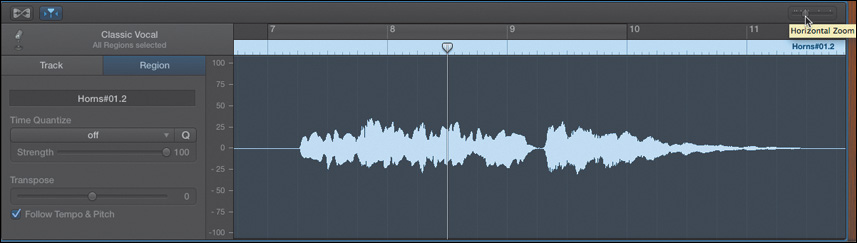
Let’s expand the waveform even further with the horizontal zoom slider. You’ll want to move the playhead over the waveform first so you don’t zoom in to an empty space in the region. You’ll find the horizontal zoom slider in the top-right corner of the Audio Editor.
2. In the editor, drag the playhead until it is over the center of the first waveform in the Horns region. Then drag the horizontal zoom slider in the editor toward the right until the audio waveform fills the editor.
![]() Note
Note
Swipe your trackpad or mouse left or right over a region in the editor to show a different portion.
Now that you’ve seen a Real Instrument region in the Audio Editor, let’s take a look at a Software Instrument region in the Piano Roll and Score Editors.
3. In the timeline, click the Grand Piano region in the Piano Beginning track. The region appears in the Piano Roll Editor. Swipe your track pad or mouse up or down over the Piano Roll editor to show notes played at higher or lower octaves.
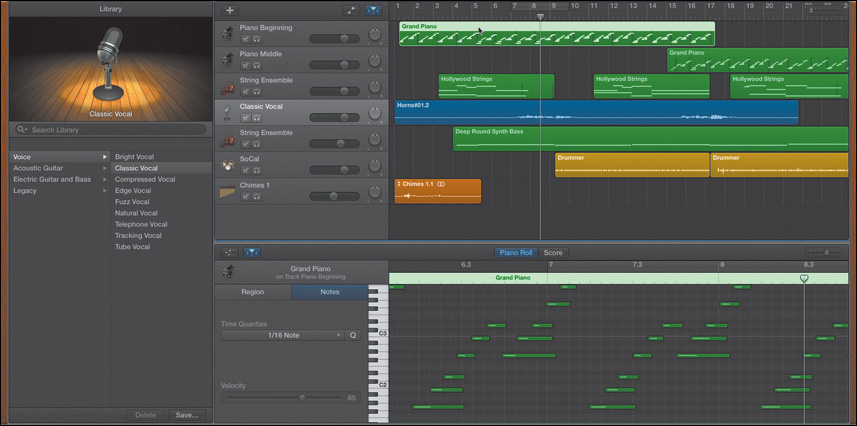
MIDI note events appear as dashes on a grid in the Piano Roll view. Each horizontal line of the grid represents a white or black note on the corresponding keyboard.
4. Click the Score button at the top of the Piano Roll Editor to change to the Score (Musical Notation) Editor.
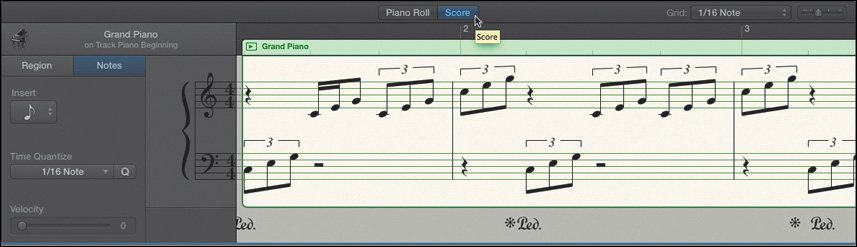
5. Drag the horizontal zoom slider in the editor right and left to see a few larger notes or the score for the entire region.
Tip
Whether you are in Piano Roll or Score view, you can click and hold a note in the editor to hear the note and see an overlay with the name of the note. This is useful in orchestrating additional musical parts based on Software Instrument regions. It is also great for learning musical notation. Be careful not to move the note or you will change its pitch (which note is played).
Whichever editor you use to modify Software Instrument regions you have the option of Piano Roll or Score as well as modifying an entire region or individual notes. Oh, and you can print your score as well! With GarageBand you can compose and orchestrate a musical masterpiece and never have to worry about writing down the notation. Speaking of notation, wouldn’t it be great if GarageBand included a built-in note pad?
Showing the Project Note Pad
A musician’s workshop/recording studio would not be complete without a note pad to jot down ideas and notes to yourself—or others—as you create. GarageBand includes a handy onscreen note pad for each project.
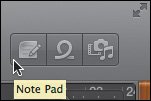
1. Choose View > Note Pad, press Command-Option-P, or click the Note Pad button (which looks like a pad of paper and a pencil) in the far-right side of the toolbar.
The Note Pad is a long gray area that fills the right side of the GarageBand window. You can change the font, size, and color of the text using the Control Fonts button in the upper-left corner of the Note Pad.
![]() Note
Note
For this project, I used the Note Pad to keep a breakdown of which chords/notes are played during which measures (bars). This type of guide is handy for orchestrating a piece.
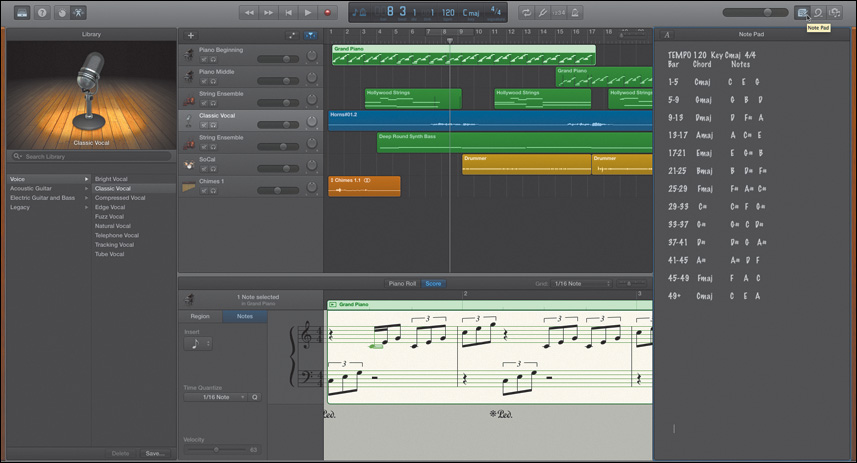
2. Play the project. As the project plays you can see the regions in the Tracks area, the written notes in the Note Pad, as well as the notation for the selected track in the Score Editor. Don’t forget the Track Instrument patch and track icon that you can see or change in the Library.
Now that’s a music workshop! Then again, sometimes less is more, especially when all you really need to see at the moment is the Tracks area and toolbar.
Project Tasks
Before you move on to the last section of this lesson, let’s review some of the things you’ve already learned. Your goals in this exercise are to simplify the window by hiding the Library, editors, and Note Pad. Then turn on Cycle mode and create a cycle area between bar 1 and bar 11. If you feel confident in doing these things, go ahead without instruction. If you need help, here are a few hints:
1. Click the Library button or press Y to hide the Library.
2. Click the Editors button or press E to hide the Score Editor.
3. Click the Note Pad button or press Command-Option-P to hide the Note Pad.
4. Click the Cycle button or press C to turn on Cycle mode.
5. Drag the cycle area of the ruler from bar 1 to bar 11.
Well done. Now you are ready to move on to the last section and explore the loop browser.
![]() Note
Note
If you didn’t complete the project tasks, or any of the previous exercises, please open the project 1-3 Scales Tasks to jump in to the lesson at this point.
Working with Apple Loops
Loops—musical parts that can be looped over and over to build a song—are foundational elements of GarageBand. In fact, GarageBand includes 2000 professional-quality Apple Loops.
Apple Loops are prerecorded music files that can be used to add drum beats, rhythm elements, and other repeating musical parts to a project. Loops contain musical patterns that can be repeated seamlessly and combined into new musical arrangements. You can extend a loop to fill any length of time in a project. These loops can be accessed in the loop browser.
In the next series of exercises, you’ll audition tambourine loops with the song and add one to the project to create a new track. You’ll then add a new percussion part near the beginning of the song.
![]() Note
Note
If this is the first time that you have used the loop browser in GarageBand, you may be prompted to download the additional Apple Loops and instruments. This may take a few minutes. If you would like to skip the download, you can move ahead to the next lesson. Otherwise, follow the download prompt when it appears.
1. Start playback and listen to the first 10 measures (bars) of the song. Make sure you have Cycle mode turned on.
The song works okay, but it feels like it could use a hint of percussion—perhaps a tambourine part—somewhere around the fifth or sixth measure.
It’s always nice for a song to build gradually. So a light percussion part before the drummer part kicks in around the ninth measure should work well.
Don’t worry if you don’t have a tambourine and microphone handy. For this project, an Apple Loop will do the trick.
2. Choose View > Show Apple Loops, Press O, or click the Apple Loops button (which looks like a loop) on the far right side of the toolbar. The loop browser opens on the right side of the window, in the same area that the Note Pad used to be.
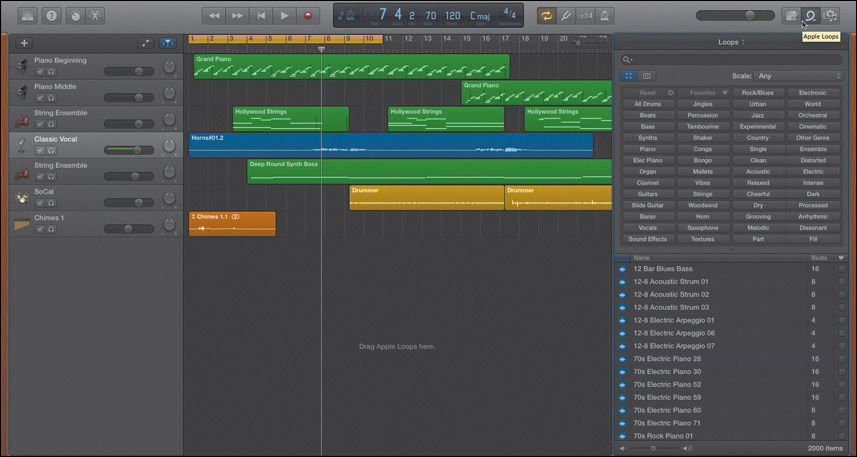
The top of the loop browser includes a search field and keyword buttons for sorting through the loops to find ones that work for your project. The lower half of the browser shows the results list based on how the loops were sorted. For this exercise you’re looking for a tambourine part; there happens to be a Tambourine button, so that makes the search a click away.
3. In the loop browser, click the Tambourine button to narrow your choices from thousands of Apple Loops to 10.

4. Click the first Apple Loop in the list, Tambourine 01, to preview it.
5. Press the Down Arrow to preview the next loop in the list. Feel free to continue previewing the remaining tambourine loops.
6. Click the selected Apple Loop in the list to stop the preview.
So now you’ve found the tambourine parts. The next step is to audition them with the song to see which fits best.
![]() Note
Note
There are two types of Apple Loops: Audio loops (blue) and Software Instrument loops (green). The color of a loop’s icon indicates which type of loop it is.
Auditioning and Adding Loops to the Project
To audition (play) an Apple Loop along with the project, you first need to start playback of the project. Then you click the loop you would like to hear in the loop browser to hear them at the same time—in musical time.
1. Click the Play button in the toolbar, or click the workspace and then press the Spacebar to begin playback of the cycle area.
2. Click the Tambourine 01 Apple Loop in the list to audition it. There may be a hesitation before it starts as it waits to come in at the beginning of a measure to match musical time. This one sounds too busy. Next.
3. Audition the remaining tambourine loops to find which one you like best with this song. What do you think? For me, Tambourine 04 works best because it isn’t too distracting and fits well with the drummer region that starts at bar 9.
4. Click the Stop button in the toolbar to stop playback and the audition.
![]() Note
Note
The transport controls and shortcuts for playback work only if the workspace is selected. You can tell which area of the interfaces is selected because it will have a thin blue outline around the edges. To select an area of the interface, click inside that area.
To add a loop to the project, you can drag a loop to an existing track with the same type of instrument, or you can drag a loop to the empty space below the tracks. By dragging the loop below the existing tracks, you’ll automatically create a new track named after the loop instrument. Let’s try it.
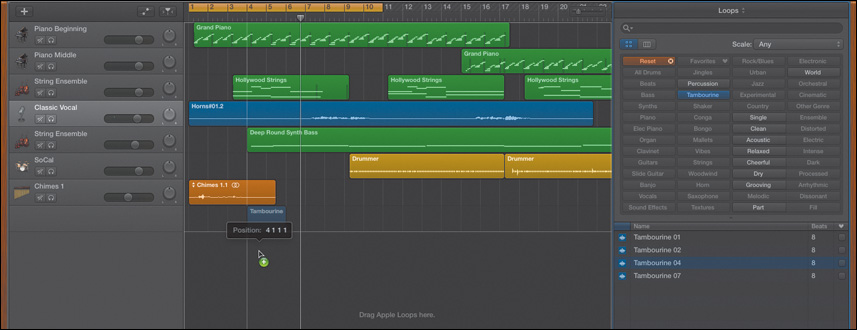
5. Drag the Tambourine 04 loop from the loop browser to the empty space below the Chimes track in the timeline. Place the loop so that it starts at the beginning of bar 4. The handy position guide overlay will guide you as you move your loop into position (4 1 1 1). The numbers indicated by the position guide overlay correspond with the ruler and the musical time in the LCD display: bar (4) beat (1) division (1) tick (1). In most cases you’ll just need to pay attention to the bar (measure) and beat.
A new Tambourine 04 track appears in the Tracks area containing the loop you just added with the same name.
6. Click the Tambourine button in the loop browser to deselect it and clear the search. Then, click the Loop Browser button to hide the browser.
7. Play the cycle area and listen to the song with the new loop. It sounds great, except that it ends too early so there is an abrupt gap in the percussion between the tambourine part and the incoming Drummer section.
![]() Note
Note
Feel free to drag the horizontal zoom slider in the upper-right corner of the Tracks area to zoom in or out of the timeline as needed.
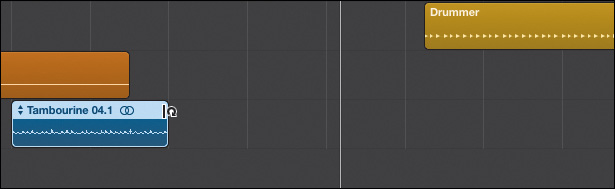
8. Click the tambourine region in the timeline to select it, if it is not already selected. Move your pointer to the top-right edge of the region. The pointer becomes the Loop tool. With the Loop tool you can extend a loop so that it repeats for a longer period of time. Notches indicate each time a loop repeats.
9. With the Loop tool, drag the right edge of the loop to the beginning of bar 10.

10. Press C to turn off Cycle mode and play the project one last time to hear it with the tambourine track.
The tambourine Apple Loop works great. Trouble is, it is a little loud in the mix. Let’s take a moment to turn down the tambourine and horn tracks.
Adjusting a Track’s Volume
Each track header contains a Volume slider that can be used to lower the volume of the track. Mixing and balancing the volume levels between tracks is an important part of finishing a song. You’ll learn much more about mixing in Lesson 8, “Mixing Music and Adding EQ Effects.” For now, you just need to know how to adjust a single track’s volume level if it is distracting while you build your song.
1. In the Tambourine 04 track header, drag the Volume slider to the left to –16.0 dB.

This is significantly lower than the original volume but still loud enough to be a subtle percussive accent, instead of sounding like an annoying backup percussionist trying to outshine the other musicians.
2. Play the beginning of the song to hear the lower tambourine part. Much better, but it could use a fade-in. You’ll learn how to do that in Lesson 8 as well.
3. Lower the volume level of the Classic Vocal (horns) track to –9.0 dB. Play the horns section of the song to hear the difference.
Again, a huge improvement. Finally, a lovely distant but regal-sounding horn solo that adds depth and beauty to this simple scales project.
Changing a Track’s Name and Icon
Before you save and close this project and move on to the next lesson, let’s fix the Classic Vocal track header so that the name and icon match the instrument part within the track. These may seem like insignificant details now, but labeling tracks is like labeling audio tapes and loose CDs. Taking the time to do it now is much easier than wasting hours down the road trying to organize your projects—especially in front of clients.
1. Double-click the track name (Classic Vocal) to open the track name field.
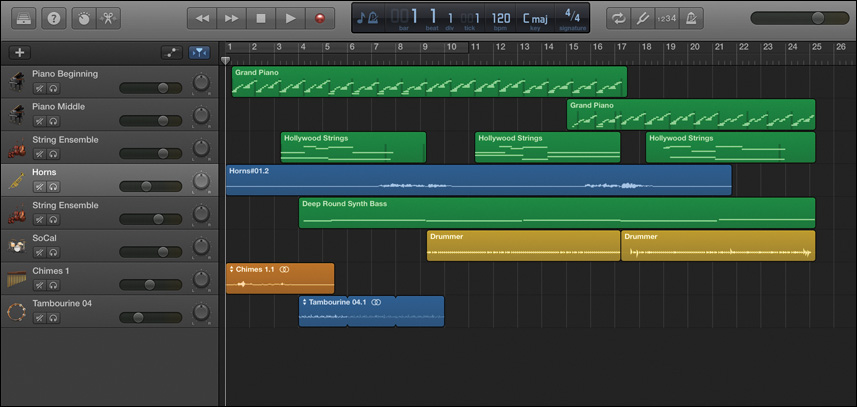
2. Type Horns, and press Return. The name of the track changes to Horns.

Track icons match the icons for the selected patch for that track by default. You can change the icon for a track any time using the icon shortcut menu.
3. Control-click (or right-click) the icon (microphone) on the Horns track header.
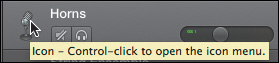

The icon shortcut menu appears.
4. From the shortcut menu, choose Wind, and then select the trumpet icon.
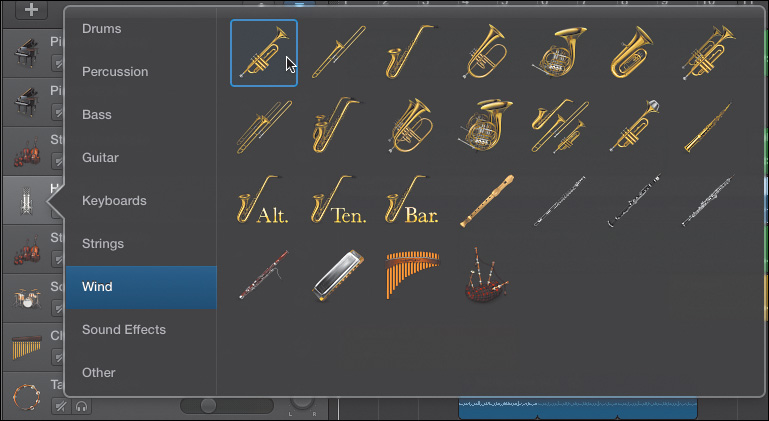
The shortcut menu closes automatically after you select a new icon. Finally, we have a horns track with a useful name and icon.
5. Choose File > Save, or press Command-S to save your progress.
Bravo! You completed the lesson and learned your way around the interface.
![]() Note
Note
If you didn’t complete the project tasks, or any of the previous exercises, please open the project 1-4 Scales Finished to hear the project with the new tambourine track.
Lesson Review
1. You can find the transport controls for playing a project in which area of the GarageBand window?
2. What is the difference between tracks and regions?
3. What are the four types of musical tracks represented by different-colored regions?
4. Which area of the GarageBand window contains the patches for changing a track’s instrument?
5. Where can you find Apple Loops to audition and add to a project?
6. Which part of the interface allows you to change the name, volume level, and icon for a track?
Answers
1. The transport controls are in the toolbar at the top of the GarageBand window.
2. Tracks are the horizontal lanes in the tracks area that contain individual musical parts (regions). Each track is a separate instrument sound. The regions are the individual musical parts—building blocks within a track.
3. The four different types of musical tracks are Software Instrument (green), Real Instrument (blue), Real Instrument Guitar or Bass (purple), and Imported audio file (orange).
4. You can change track instruments in the Library.
5. Apple Loops are located in the loop browser.
6. You can change all of these things in the track’s header. The Volume slider adjusts the track’s volume. Control-click the track’s icon to access the Track Icon menu. Double-click the track name to show the Name field and change the track’s name.