Lesson 1. Make Music with Logic Now!
Lesson Files
None
Time
This lesson takes approximately 150 minutes to complete.
Goals
Produce a one-minute instrumental piece using prerecorded media
Explore the Logic Pro X main window interface
Navigate and zoom the workspace
Move, copy, loop, and trim regions in the workspace
Mix down the project and apply effect plug-ins
Export the project to an MP3 file
Let’s get right to the heart of the matter and start producing music immediately. In this lesson, we’ll go straight to the fun part of using Logic Pro X. You will create a one-minute hip-hop instrumental while gaining familiarity with Logic Pro X, its main window, and many of its features.
You will take an entire Logic project from start to finish. You’ll use the Loop Browser to preview and add loops, and then you’ll navigate and zoom the workspace to efficiently move, copy, loop, or trim regions. Finally, you will hone your newly learned skills to build an arrangement, mix down the song, and export it.
Creating a Logic Pro X Project
In most cases, Logic should automatically open after you install it. To open Logic Pro X manually, you can use the Launchpad.
1. In the Dock, click the Launchpad icon.
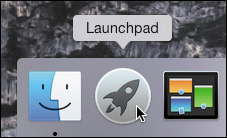
The Launchpad opens, displaying your applications.
Tip
To search an application by name in the Launchpad, start typing the first few letters of the application’s name.
2. Click the Logic Pro X icon.
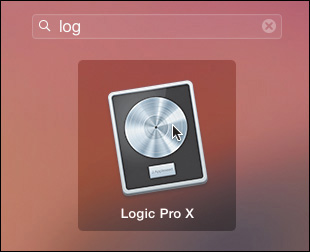
Logic Pro X opens, and after a moment, the Project Chooser opens. (If the Project Chooser does not open, choose File > New from Template.)
Tip
To add Logic Pro X to the Dock, drag its icon from the Launchpad into the Dock. The next time you want to open Logic Pro X, you can click its icon in the Dock.
3. In the Project Chooser, double-click the Empty Project template.
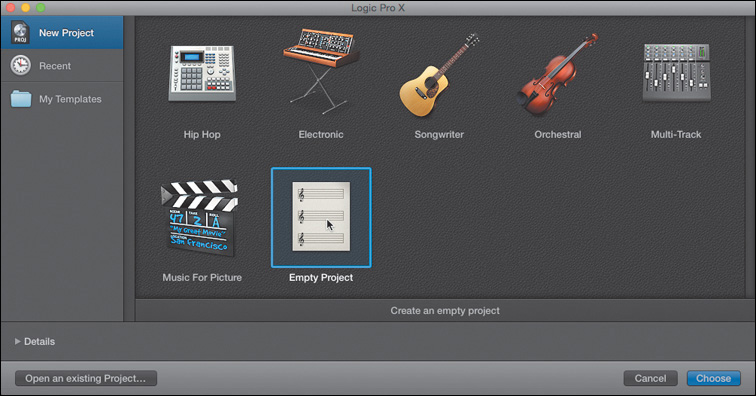
A new empty project is created, and the New Tracks dialog opens.
4. In the New Tracks dialog, select Audio. Make sure that all checkboxes below the Input and Output menus are unselected, and then click Create (or press Return).
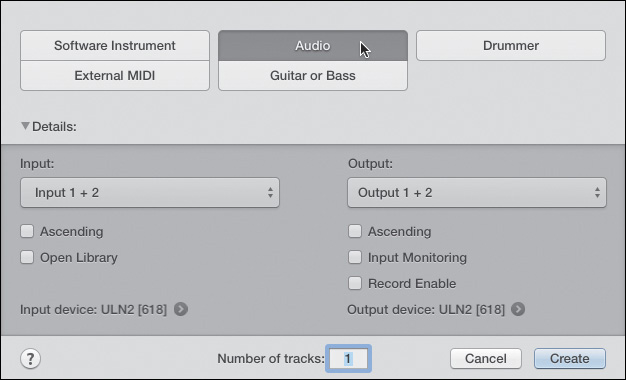
A new audio track is created in your project.
In Logic Pro X, some advanced tools are not available by default. Before you continue, let’s make sure that you select all the advanced tools in your preferences to enable all of Logic Pro X’s features.
5. Choose Logic Pro X > Preferences > Advanced Tools to open the Preferences window.
6. In the Preferences window, make sure that all Additional Options are selected.
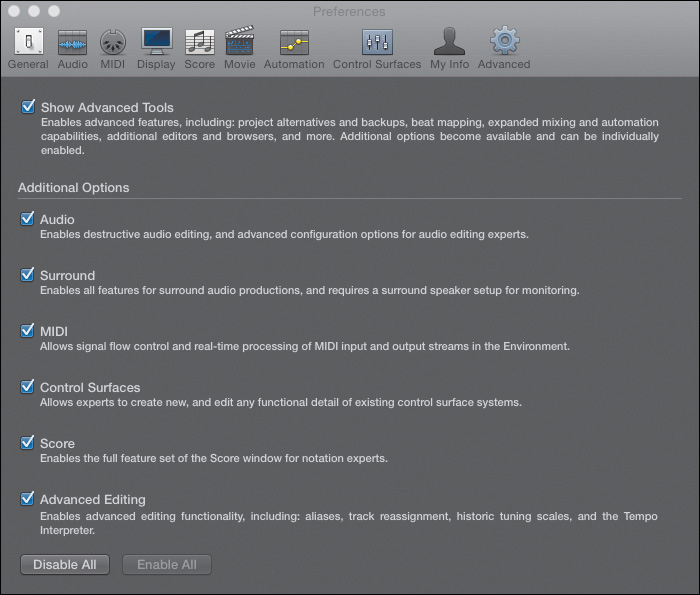
You’ll have to select all the Additional Options on any Mac you use to work with this book, or you may not be able to access some of the features discussed in this book.
Saving your project before you start working on it is always a good idea. That way you won’t have to worry later about picking a name and a location when inspiration strikes.
7. Choose File > Save (or press Command-S).
You’re saving this project for the first time, so a Save dialog appears. The first time you save a file, you have to provide:
![]() A filename
A filename
![]() A location on the hard drive where you want to save the file
A location on the hard drive where you want to save the file
8. In the Save As field, type your project name, Get Dancing. From the Where pop-up menu, choose Desktop (or press Command-D).
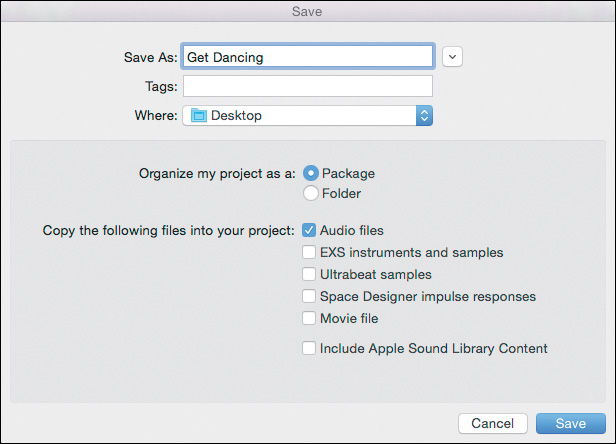
9. Click Save (or press Return).
The project is now saved on your desktop, and its name is displayed at the top of the Logic Pro X window. To avoid losing your work, save your project often.
Note
Logic Pro X automatically saves your project while you’re working on it. If the application unexpectedly quits, the next time you reopen the project, a dialog prompts you to reopen the most recent manually saved version or the most recent auto-saved version.
You’ve now set up your new project. With a blank canvas ready, you can start being creative.
Creating a new project in Logic opens the main window, which will be your main work area. In the next exercise, you will examine the panes of the main window.
Exploring the Interface
When working with Logic Pro X, you will spend most of your time in the main window. To customize the main window, you can toggle and resize its various panes to access all the media, tools, and features you need for your project.
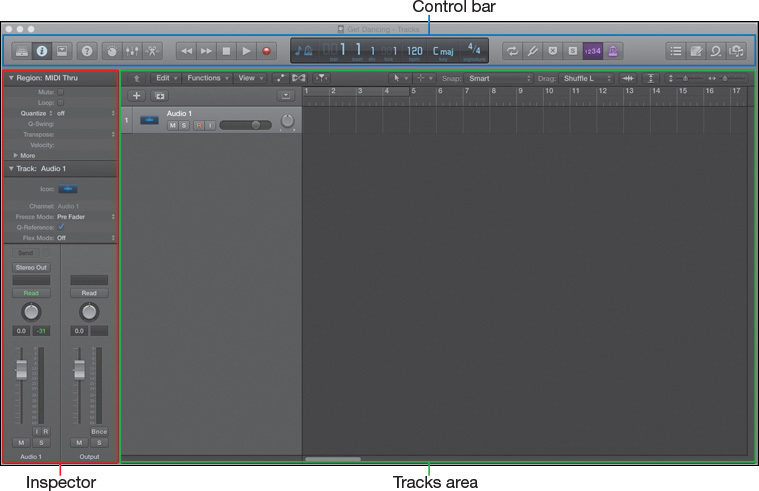
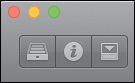
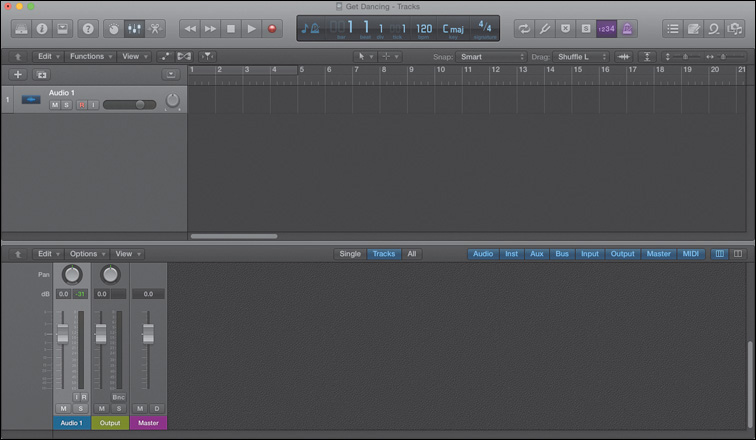
In its default configuration, the main window has three areas:
![]() Control bar—The control bar contains buttons to toggle areas on and off; transport buttons to control playback operations (such as play, stop, rewind, and forward); information displays to indicate the playhead position, project tempo, key, and time signatures; and mode buttons such as Count-in and Metronome.
Control bar—The control bar contains buttons to toggle areas on and off; transport buttons to control playback operations (such as play, stop, rewind, and forward); information displays to indicate the playhead position, project tempo, key, and time signatures; and mode buttons such as Count-in and Metronome.
![]() Inspector—The inspector provides access to a contextual set of parameters. The specific parameters displayed depend on the selected track or region, or the area in key focus.
Inspector—The inspector provides access to a contextual set of parameters. The specific parameters displayed depend on the selected track or region, or the area in key focus.
![]() Tracks area—In the Tracks area you build your song by arranging regions on tracks located below a ruler.
Tracks area—In the Tracks area you build your song by arranging regions on tracks located below a ruler.
Customizing your main window layout to display the tools you need allows you to work faster and more comfortably, thereby giving you more time to focus on your music.
1. In the control bar, click the Inspector button (or press I).
The inspector is hidden, which allows you to see more of the Tracks area.
2. Click the Toolbar button (or press Control-Option-Command-T).
The toolbar opens below the control bar. It displays buttons for easy access to the most-used features.
Tip
To customize the control bar, Control-click it, and from the shortcut menu, choose “Customize Control Bar and Display.” To customize the toolbar, Control-click it and choose Customize Toolbar.
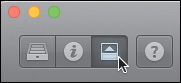
3. Click the Quick Help button.
A Quick Help floating window appears. As you hover the mouse pointer over elements of the Logic Pro X interface, the Quick Help window describes that element.
4. In the toolbar, position the mouse pointer over the Track Zoom button.
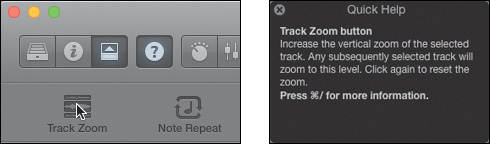
The Quick Help window displays the function’s name, defines what it does, and sometimes offers extra information. Whenever you’re not sure what an interface element does, use Quick Help.
More Info
To go further, read the Logic Pro Help documentation within the free Logic Remote iPad app. The documentation automatically displays the section relevant to the Logic Pro X area where you place the mouse pointer. You will learn more about Logic Remote in Lesson 5.
5. Click the Quick Help button to close the Quick Help window.
6. Click the Toolbar button to close the toolbar.
7. Click the Mixer button (or press X).

The Mixer opens below the Tracks area.
8. After viewing the tools in the Mixer, click the Mixer button (or press X) again to close it.
9. In the control bar, click the Apple Loops button (or press O).
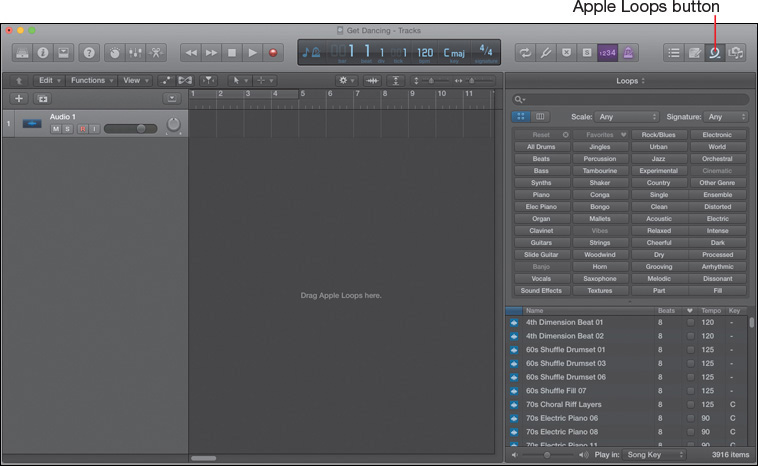
The Loop Browser opens to the right of the Tracks area.
Note
The first time you open the Loop Browser, you have to wait for Logic to index the loops before you can use it.
You now have the control bar at the top, the Tracks area to the left, and the Loop Browser to the right, which is the perfect layout for the next exercise.
You’re already gaining familiarity with the Logic Pro X interface. By showing only those panes needed for the task at hand, you make your work easier and faster, allowing you to focus on the creative side. And talking about creative side, let’s make some music!
Adding Apple Loops
You will now start building your project using Apple Loops, which are prerecorded music snippets that automatically match the tempo of your project and are designed to be repeated seamlessly.
Professional producers use Apple Loops all the time for video soundtracks, to add texture to a beat, to create unexpected effects, and so on. At least one major hit song was produced entirely around a single Apple Loop. The Apple Loops included with Logic Pro X (and earlier versions of Logic) are royalty free, so you can use them in professional projects without worrying about licensing rights.
Browsing and Previewing Loops
To start building this song, you need to preview loops and choose which ones to use. The Loop Browser is the perfect tool for this job. It allows you to browse loops by instrument, genre, mood, and other attributes.
1. In the Loop Browser, click the All Drums, Acoustic, and Distorted keyword buttons.
Note
The lessons in this book assume you begin with a default installation of Logic Pro X 10.1, as described in “Getting Started,” along with the additional media provided with the book—but not including the Legacy and Compatibility content. You may not realize the results described in the exercises if you are using earlier versions of Logic, or if you’ve installed the Legacy and Compatibility content.
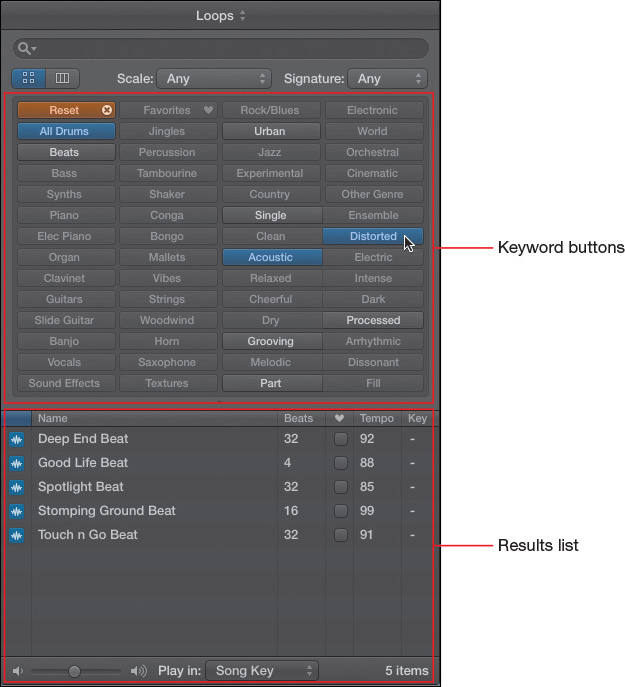
Each time you click a keyword button, the results list is shortened because fewer loops match the narrowing keyword search.
You can preview loops by clicking them.
2. In the results list, click the first loop, Deep End Beat.

The loop is selected, its blue loop icon turns into a speaker, and the loop plays. At any time you can click another loop to preview it, or click the currently playing loop to stop playback.
Apple Loops are previewed at the project’s tempo. In the control bar, the information display shows the default project tempo of 120 bpm (beats per minute). You are currently previewing the loop at that default tempo.

In the results list, you can see that Deep End Beat was produced at a tempo of 92 bpm. Loops usually work best when used at or near their original tempos, so let’s change the project tempo.
Tip
You can change numerical values in Logic Pro X two ways: Drag the value up or down to increase or decrease it, or double-click the value and enter the desired number.
3. In the control bar’s LCD display, drag the tempo value down to 92 bpm.
Tip
You can get more precision by dragging a specific number in the tempo value. For example, if you dragged down the 2 of a 120 bpm tempo, the tempo would change from 120 to 110 to 100 to 90. In this exercise, you could drag the 0 of 120 to go from 120 to 119 to 118, all the way down to 92.
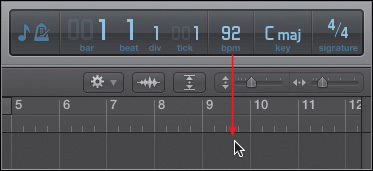
The loop plays back at the 92 bpm project tempo. The loop does seem to groove better at the slower tempo.
4. Click the next loop, Good Life Beat, to preview it at the project tempo of 92 bpm.
This loop has a nice funky feel, and you are going to use it as the beat for your music project.
5. Drag Good Life Beat from the results list to track 1 in the workspace, making sure the help tag reads Position: 1 1 1 1.
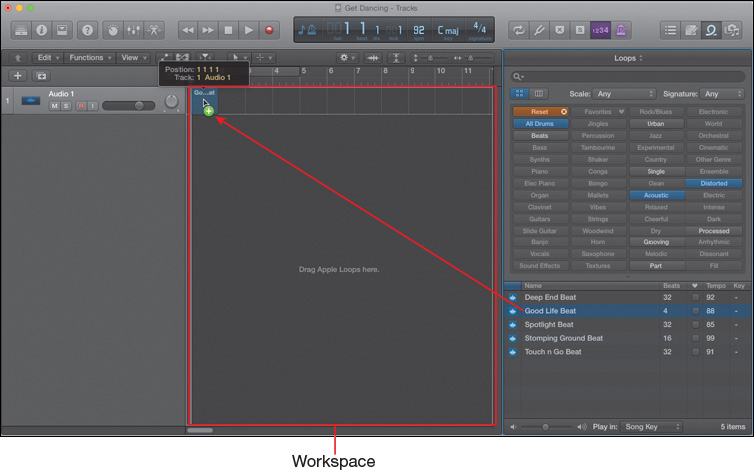
The workspace is the area below the ruler and to the right of the track headers, where regions are arranged to build a song.
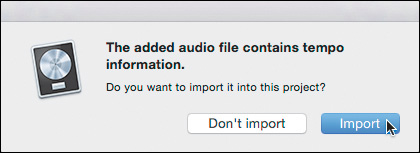
The loop is imported, and an audio region is placed on the audio track at the very beginning of the project. An alert asks if you would like to use the tempo information embedded in the loop. The Loop Browser shows that the Good Life Beat original tempo is 88 bpm, a little slower than your current 92 bpm tempo. You will use that new tempo.
6. Click Import (or press Return).
In the control bar’s LCD display, the project tempo changes to the tempo of the loop. (The displayed tempo may be rounded off by 1 bpm).
7. Choose File > Save (or press Command-S).
Your project now contains a single drum loop on a single track that plays only during bar 1. It’s the most basic project, just enough for you to dive into the basic tasks of positioning the playhead, and starting and stopping playback. Later you will use those navigation chops to preview bass lines while listening to your new drum region, and add more loops.
Navigating the Project
One of the big advantages to producing music with a computer is that the whole song is laid out right before your eyes. This representation makes it extremely easy to jump to a particular part of the song, start playback, quickly return to the beginning, or continuously repeat a section.
Logic offers many ways to navigate your project. In the following two exercises, you will use the transport buttons and their key commands; and you will learn how to continuously repeat a section of the project, which will allow you to keep playing the drum loop while you preview bass loops.
Using Transport Buttons and Key Commands
When you’re producing music, time is of the essence. Because many producing tasks are repetitive, you may find yourself playing, stopping, and positioning the playhead every few seconds. Minimizing the time it takes to perform these basic operations will greatly improve your workflow and save valuable time.
While you may initially find it easier to click transport buttons with the mouse, moving a mouse with your hand while keeping your eyes on the screen is actually a time-consuming task. Using key commands to control playback can significantly reduce that time, increasing your workflow efficiency as your fingers build up muscle memory.
To fully master key commands, you first need to understand key focus. To start this next exercise, you will preview an Apple Loop to make sure your Loop Browser has key focus.
1. In the Loop Browser results list, click any loop to preview it.
2. Click that same loop again to stop it.
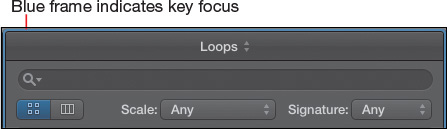
Notice the blue frame around the Loop Browser. It indicates that the Loop Browser has key focus and is ready to respond to all Loop Browser key commands. Only one area at a time can have key focus.
3. Press Control-Spacebar (the Play/Stop Selection key command).
In the Loop Browser, the selected loop starts playing.
4. Press Control-Spacebar again to stop playing the loop.
Now let’s give key focus to the Tracks area.
5. Click the background of the workspace (or press Tab).
The blue frame appears around the Tracks area to show that the Tracks area has key focus.
Tip
When multiple panes are open in the main window, you can press Tab and Shift-Tab to cycle the key focus forward and backward through the panes.
6. Press Control-Spacebar.
In the Tracks area, the playhead starts moving, playback begins, and you can hear the drum region on your track. When the playhead reaches bar 2, the drum region stops. Because the track contains no other regions, there’s nothing else to play.
To navigate your project, you can also click the transport buttons in the control bar.
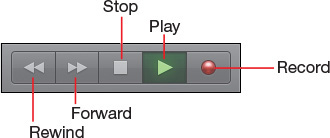
7. In the control bar, click the Stop button (or press the Spacebar).
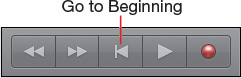
The playhead stops, and the Stop button is replaced with a Go to Beginning button.
8. Click the Go to Beginning button (or press Return) to return the playhead to the beginning of the project.
9. Click the Forward button (or press . [period]) a few times.
The playhead jumps one bar forward each time.
10. Click the Rewind button (or press , [comma]) a few times.
The playhead jumps one bar backward each time.
Tip
To fast forward eight bars at a time, press Shift-. (period); to fast rewind eight bars at a time, press Shift-, (comma).
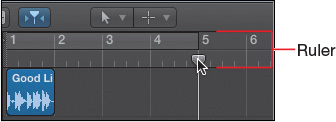
You can also position the playhead precisely where you want it by clicking in the ruler.
11. In the lower half of the ruler, click bar 5 to move the playhead to that location.
To start or stop playback at a specific location, you can double-click the lower half of the ruler.
12. Double-click the lower half of the ruler at bar 3.
Playback starts from bar 3. You can also position the playhead without interrupting playback.
13. Without stopping playback, click the lower half of the ruler at bar 1.
You can again hear your drum loop.
14. Double-click in the lower-half of the ruler.
Playback stops and the playhead moves to the location you clicked.
Continuously Repeating a Section
Sometimes when you are working on a specific section of your project, you may want to repeat a section multiple times without stopping playback. As you’re working, the beat keeps going, and you no longer have to manually relocate the playhead.
You will continue building your project by adding a bass track. To determine which bass loop works best with your drums, you will use Cycle mode to continuously repeat bar 1 as you preview bass loops in the Loop Browser.
1. In the control bar, click the Cycle button.
In the ruler, the cycle area turns yellow, indicating that Cycle mode is enabled.
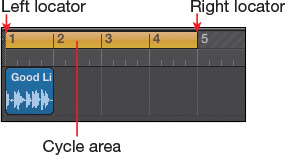
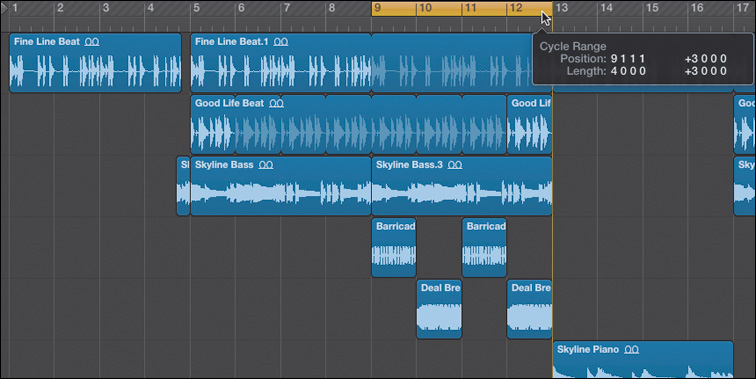
The cycle area shows the section of the song that will repeat. The start and end positions of the cycle area are called left and right locators. Currently the cycle area extends from bar 1 to bar 5, but our drum loop is only one bar long.
You need to adjust the locators so that the cycle area spans the same length as the drum region. To do so, you will first select the drum region, which was deselected in the previous exercise when you clicked the background of the workspace.
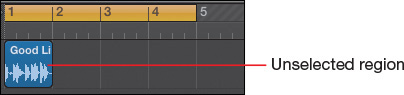
2. Click the drum region.
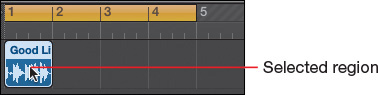
The region is highlighted to indicate that it is selected.
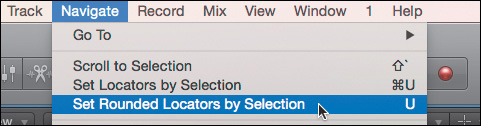
3. Choose Navigate > Set Rounded Locators by Selection (or press U).
Tip
When choosing a menu command, the corresponding key command usually appears to the right.
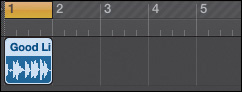
The cycle area now goes from bar 1 to bar 2 like the drum region. When you choose “Set Rounded Locators by Selection,” the locators are always rounded to the nearest bar, so repeating the cycle area keeps the groove going.
4. Press the Spacebar to start playback.
The playhead starts moving, and your drums play. When the playhead reaches bar 2, it immediately jumps back to the beginning of bar 1 and continues playback.
While your drums continue playing, you can preview some bass loops.
5. In the Loop Browser, click the Reset button.
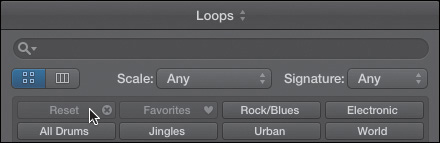
All keyword buttons are disabled.
For the bass loops, let’s limit the search to a specific musical genre.
6. At the top of the Loop Browser, from the Loops pop-up menu, choose Hip Hop.

Only loops from the Hip Hop collection are displayed in the results list.
7. Below the All Drums keyword button, click the Bass button.
Since we know loops typically work better when played close to their original tempos, let’s sort the results list by tempo and look for loops that were produced at or around 88 bpm.
8. At the top of the results list, click the Tempo column name.
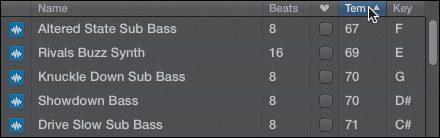
The loops in the results list are sorted by increasing tempo.
9. Scroll down to see loops with a tempo of 88 bpm.
10. Click the first loop with a tempo of 88 bpm.
After a moment, Logic syncs the loop with the project and you can hear it playing, grooving along with the drums in your project.
11. Continue clicking the following loops to preview them one by one.
Most of them are too synthetic for this project, but Skyline Bass seems to have the right sound and it works with your drums. With an original tempo of 90 bpm, it’s still very close to your project tempo, which means it should work great.
Skyline Bass is listed in the results list as a 16 beats loop, but right now your cycle area is playing only one bar (at the current 4/4 time signature, 1 bar = 4 beats), so you’re hearing only a portion of the bass loop. Let’s add it to the project to audition the entire loop.
12. In the control bar, click the Stop button (or give key focus to the Tracks area and press the Spacebar) to stop playback.
13. Drag Skyline Bass to the workspace below the drum loop, making sure the help tag reads 1 1 1 1.
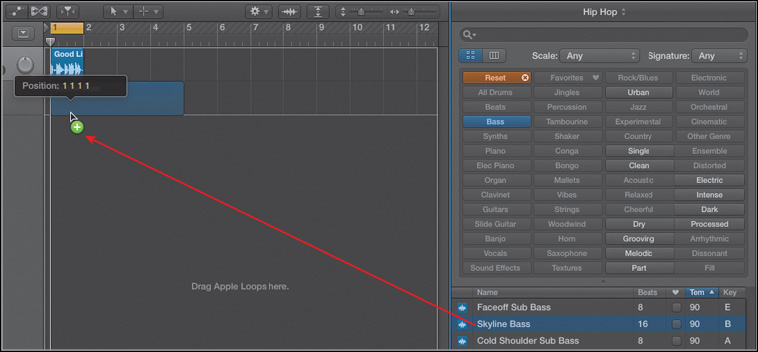
A new track is automatically created for the new Skyline Bass region.
14. In the ruler, click the yellow cycle area to turn off Cycle mode (or press C).
15. In the control bar, click the Go to Beginning button (or press Return).
16. Press the Spacebar to start playback.
In the first bar, you can hear both the drum loop and the bass loop, then the drums drop off while the bass continues playing for three more bars. You can now hear the entire bass line, which is even more melodic than the limited preview you heard previously.
17. Press the Spacebar again to stop playback.
18. Choose File > Save (or press Command-S).
As you work in Logic, keep saving your project at regular intervals to avoid losing any of your work.
Setting locators to adjust the cycle area is a technique you’ll use often throughout your production to focus on part of a project. And if you work with other musicians in your studio, they will love you for not interrupting the playback (and ruining their creative flow) every few bars!
Building Up the Rhythm Section
All the material you use for a project is contained in regions that are on tracks in the workspace. Creating an arrangement is a little like playing with building blocks—moving, copying, or repeating regions as needed to determine at which points specific instruments start and stop playing.
In this exercise, you will start building an arrangement with the drum and bass loops, and later add more loops to complete your project. First, you will loop both regions so they play continuously.
1. In the control bar, click the Inspector button (or press I).
The inspector appears. Region parameters for the selected region(s) are displayed in the Region inspector near the top.
2. In the workspace, click the Good Life Beat region in track 1 to select it.
The Region inspector shows the parameters of the Good Life Beat region.
3. In the Region inspector, select the Loop checkbox (or press L).
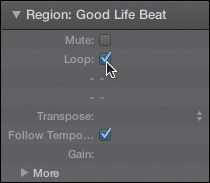
In the workspace, Good Life Beat is now looping until the end of the project.
4. In the workspace, click the bass region in track 2 to select it.
5. In the Region inspector, select the Loop checkbox.
In the workspace, both the drum and the bass regions are now looping.
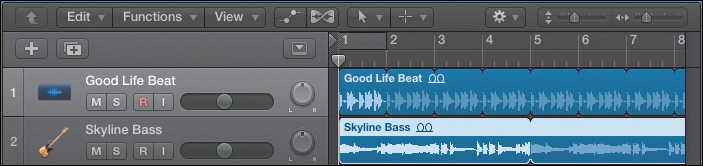
6. Listen to a few bars of the project.
The drums and bass are grooving together perfectly. You’re going to layer the drums with an urban percussion loop that will also help create a nice little intro.
Tip
To work more efficiently, remember to hide those areas you don’t need to see. For the next few exercises, in the control bar, click the Inspector button (or press I) and click the Apple Loops button (or press O) to turn those two areas on and off as needed.
7. At the top of the Loop Browser, from the Loops pop-up menu, choose Loops.
All keyword buttons are reset.
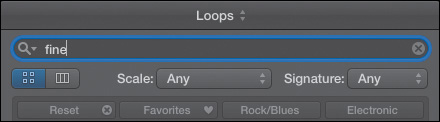
8. In the Loop Browser, click the search box and type fine.
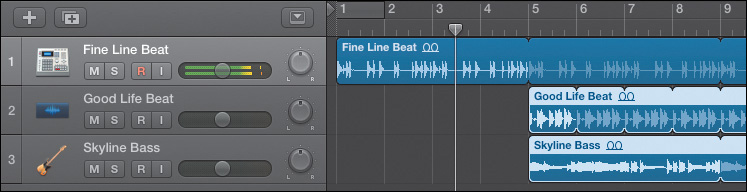
9. From the results list, drag Fine Line Beat to bar 1 below the two tracks in the workspace.
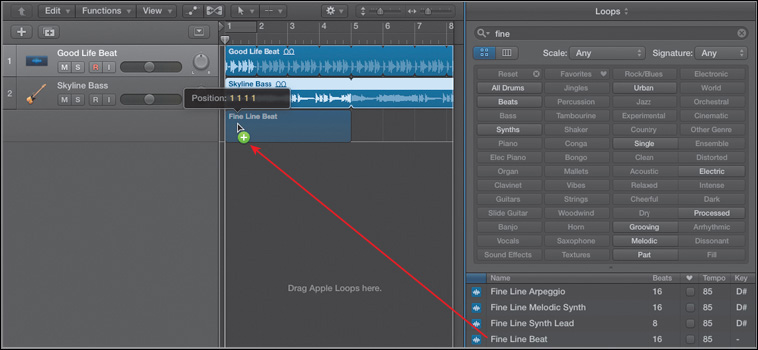
A new track is created for the Fine Line Beat region. Since Fine Line Beat is still selected, you can access its region parameters at the top of the inspector.
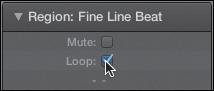
10. In the Fine Line Beat region parameters, select the Loop checkbox (or press L).
The Fine Line Beat region is now looping in the workspace. Since Fine Line Beat will be used for the intro, you can move it to the top of the workspace.
11. In the Fine Line Beat track header, click-hold the track icon and drag up until the two other tracks move down.
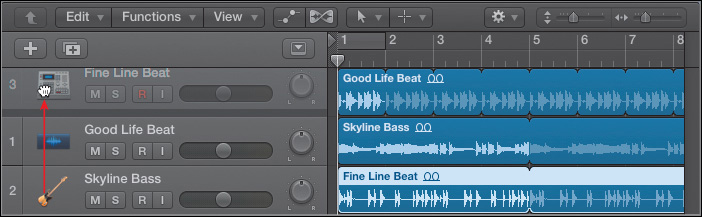
The tracks are reordered with the new Fine Line Beat track at the top.
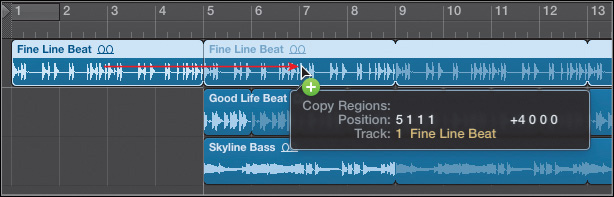
To create an intro in which only Fine Line Beat is playing, you’ll move the two other regions farther to the right. To select multiple regions at once, you can click in the workspace background and drag the pointer over the regions.
12. In the workspace, click the background, and drag up to select both the Good Life Beat and the Skyline Bass regions.
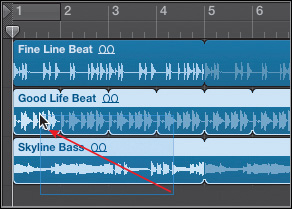
Both regions are highlighted to indicate that they’re selected. You can now move them both at the same time.
13. Make sure you click one of the selected regions (don’t click one of the loops to their right), and drag to bar 5.
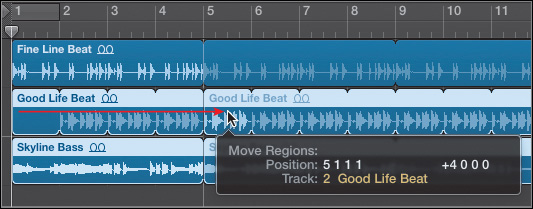
If you clicked Good Life Beat, the help tag shows:
![]() Move Regions—The action you’re performing.
Move Regions—The action you’re performing.
![]() Position: 5 1 1 1—Where the regions are moved.
Position: 5 1 1 1—Where the regions are moved.
![]() +4 0 0 0—The regions are moved exactly 4 bars later.
+4 0 0 0—The regions are moved exactly 4 bars later.
![]() Track: 2 Good Life Beat—Track number and name of the clicked region.
Track: 2 Good Life Beat—Track number and name of the clicked region.
The help tag displays positions and lengths in bars, beats, divisions, and ticks. You will often refer to a position or a length with those four numbers.
![]() The bar consists of several beats (four beats in the 4/4 time signature here).
The bar consists of several beats (four beats in the 4/4 time signature here).
![]() The beat is the denominator in the time signature (quarter note here).
The beat is the denominator in the time signature (quarter note here).
![]() The division determines how the grid is subdivided in the ruler when zoomed in horizontally (sixteenth note here).
The division determines how the grid is subdivided in the ruler when zoomed in horizontally (sixteenth note here).
![]() A clock tick is 1/960 of a quarter note. A sixteenth note contains 240 ticks.
A clock tick is 1/960 of a quarter note. A sixteenth note contains 240 ticks.
Note that in the control bar, the LCD displays the position of the playhead using the same four units.
14. Listen to your project from the beginning.
It’s time to practice your navigation chops! You can click the Play and Stop/Go to Beginning buttons in the control bar, click and double-click the lower half of the ruler, or use the following key commands:
![]() Spacebar = Play/Stop
Spacebar = Play/Stop
![]() Return = Go to Beginning
Return = Go to Beginning
![]() . (period) = Forward
. (period) = Forward
![]() , (comma) = Rewind
, (comma) = Rewind
The intro sounds good, and the layered drum loops work great together. However, Good Life Beat is a bit too loud.
15. In the Good Life Beat track header (track 2), drag the volume slider to the left to turn down the volume to about –8.0 dB.
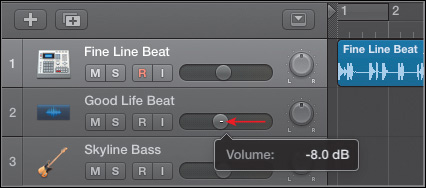
Now the two drum loops blend together.
Near the end of this lesson, you will spend more time mixing the song, but for now let’s continue editing regions and adding more loops to continue the arrangement.
Zooming In to Edit the Intro
Your project starts with a 4-bar intro in which only the Fine Line Beat region on track 1 plays the beat. It feels sparse, but the beat is original enough to capture attention, which is the role of an intro. Then at bar 5 both the Good Life Beat and Skyline Bass regions on tracks 2 and 3 come in, making the beat sound complete and introducing the melody.
To accentuate the starting impact of the two new regions, you will create a couple of unexpected edits at the end of the intro that are bound to make the listener’s head turn. To be able to edit the Fine Line Beat region in the intro without affecting its loops to the right, you first have to copy the region to bar 5.
1. Option-drag the Fine Line Beat region to bar 5.
When Option-dragging to copy regions, always make sure you release the mouse button first and the Option key last. If you try to release both at the same time, you may sometimes release the Option key slightly before the mouse button without noticing, and then the region is moved instead of copied.
If you copied the Fine Line Beat region successfully, your workspace will look like this:
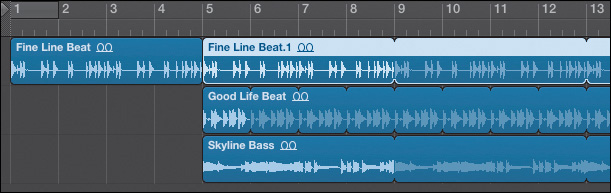
If you don’t see a Fine Line Beat region between bars 1 and 5, you’ve moved the region rather than copying it. To reverse your last action, choose Edit > Undo Drag, and then try again.
The new Fine Line Beat.1 region at bar 5 currently stops the original Fine Line Beat region at bar 1 from looping. However the region’s Loop parameter is still on, so its loops reappear if there’s room for them on the track. To create a break, you need to stop the region from looping.
2. Click the Fine Line Beat region at bar 1 to select it.
3. In the inspector, deselect the Loop checkbox (or press L).
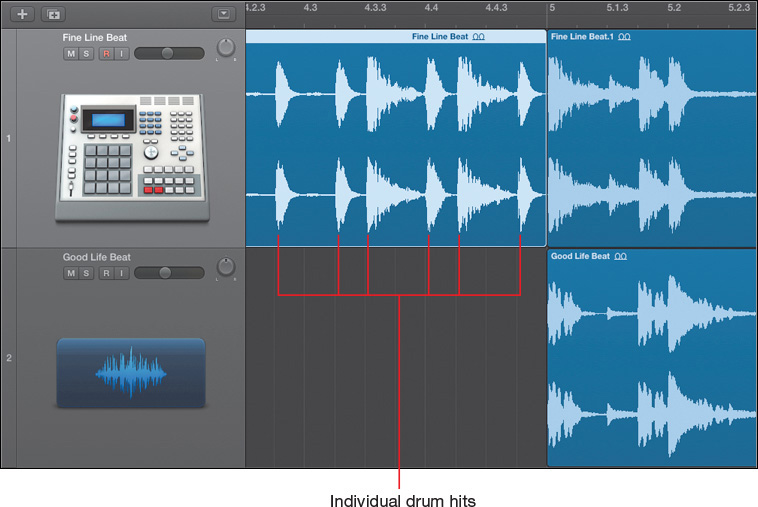
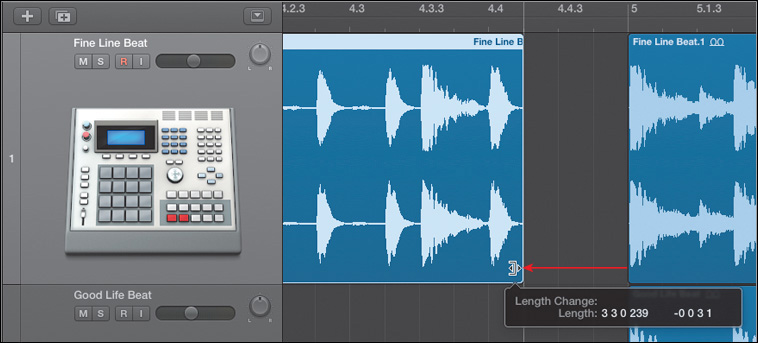
To create a break in the beat at the end of the intro, you will shorten the Fine Line Beat region so that it doesn’t play the last two notes of the region. To resize the region comfortably, you need to zoom in until you can clearly see the individual drum hits on the waveform.
To use the zoom tool, you hold down Control and Option and then drag the area you want to magnify. The size of the area you drag determines how far you will zoom in: the smaller the area that you drag, the closer you’ll zoom in.
4. Control-Option-drag a small blue highlight rectangle about one bar wide, but straddling the junction of the two regions on track 1 at bar 5.
The area you highlighted expands to fill the workspace, and you can clearly see individual drum hits on the waveform.
Zooming in and out efficiently to see exactly what you need takes practice. If you’re not happy with what you’re seeing in your workspace, Control-Option-click the workspace to zoom back out, and try again.
If you’re happy with your workspace view but feel that you should zoom in even closer, zoom in again. You can Control-Option-drag to zoom in multiple times and Control-Option-click the workspace multiple times to zoom back out through the same zoom levels.
To create the break at the end of the Fine Line Beat region, you will drag its lower-right corner to the left until the final two drum hits are hidden.
5. Move the mouse pointer over the lower-right corner of the Fine Line Beat region (the mouse pointer should be located just before bar 5).
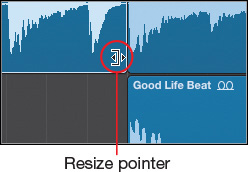
The mouse pointer turns into a Resize pointer you can drag to determine where the region stops playing.
6. Drag the Resize pointer to the left to hide the final two drum hits.
7. Control-Option-click the workspace to zoom out.
8. Listen to the song from the beginning.
The drum break creates a sudden void at the end of the intro, which reinforces the impact of the drums and bass. But a void calls out to be filled! That break in the drum loop is the perfect time to capture the attention of the listener by introducing the bass a few notes earlier.
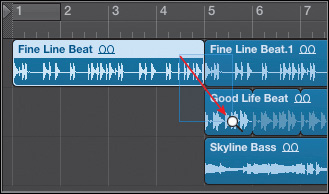
This time you will copy the bass region from bar 5 to bar 1, and resize the bass region in the intro from the left so it plays only the final few notes.
9. On track 3, Option-drag the Skyline Bass region to bar 1.
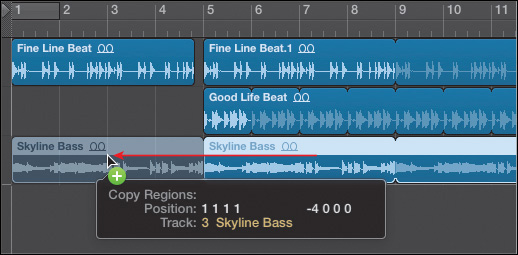
10. In the new Skyline Bass.1 Region inspector, deselect the Loop checkbox (or press L).
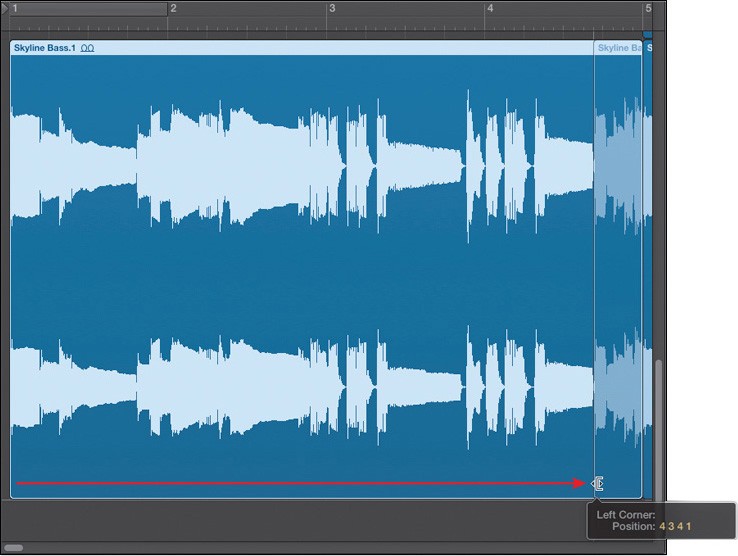
This time you will use the Z key to zoom in and out of the selection.
11. Press Z.
The Skyline Bass.1 region expands to fill the workspace.
12. Move the mouse pointer over the lower-left corner of the region, and drag the Resize pointer to the right, leaving only the last group of five notes.
13. Click the background of the workspace to deselect all regions.
When there’s no selection, pressing the Z key shows you all the regions in your workspace.
14. Press Z.
The workspace zooms out to display all the regions. It doesn’t allow for the region’s loops. You can use zoom sliders or key commands to fine-tune the zoom level.
15. At the top of the workspace, drag the horizontal zoom slider to the left (or press Command-Left Arrow).
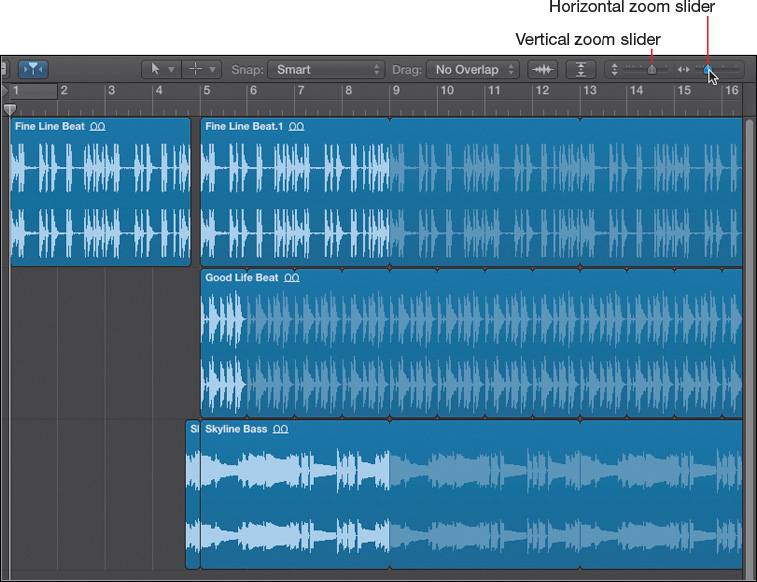
The workspace zooms out horizontally, and you can see a few more bars in your ruler.
Note
When zooming horizontally using the zoom sliders or Command-Arrow key combinations, the playhead stays at the same position on your screen, unless a region is selected and the playhead is not within that region’s borders. In that case the left edge of the region stays at the same position on your screen.
When zooming vertically with the zoom sliders or Command-Arrow keys, the selected region stays at the same position on your screen. If no regions are selected, the selected track stays at the same position on your screen.
16. Play your new intro.
It works! You start with an original but commanding beat with kicks and handclaps, then all of a sudden, the bass announces the melody with a few pickup notes while the beat drops. On the first beat of the next bar, all three tracks play the entire groove together. That little break at the end of the intro really helps call attention to the layered drum and bass groove that starts after the intro.
Remember your newly acquired navigation and zooming skills. You will continue using them to finish this arrangement, and throughout the rest of this book (and long after).
Build Up the Arrangement
Now that you have the rhythmic foundation of your project (the drums and bass), you can continue building up the arrangement and avoid monotony by adding melodic elements.
Adding Lead Synths
In the next exercise, you will add a couple of synth arpeggio loops. And rather than let them loop throughout the song, you will keep things moving by alternating between the two synth melodies.
1. In the Loop Browser, click the X symbol in the search field to clear the previous search.
You already have a solid rhythmic section with bass and low kick drums, so now you are looking for rather clean and high-pitched sounds.
2. Click the Synths and Clean keyword buttons.
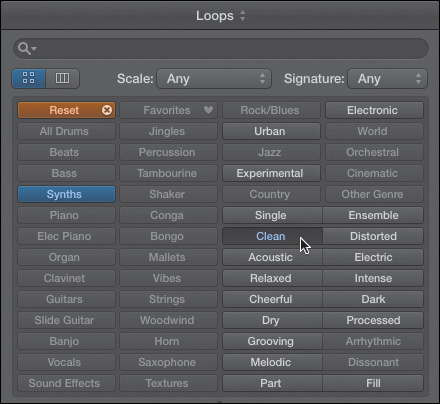
3. In the search field, type arpeggio.
4. In the results list, click the Name column title to reorder the results by loop name.

5. In the results list, click the first six or seven loops to preview them.
Two loops fit the bill perfectly: Barricade Arpeggio and Deal Breaker Arpeggio. If necessary, adjust the zoom level in the workspace so you can comfortably drag both loops to two new tracks.
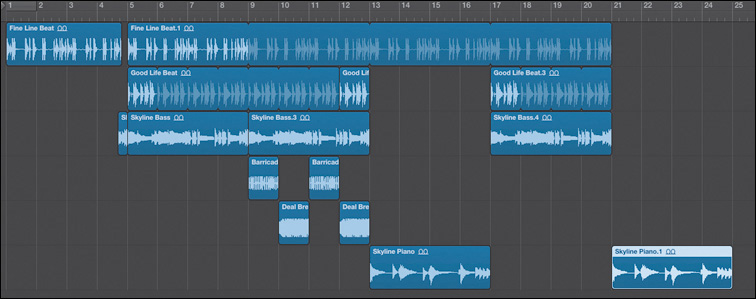
6. Drag the Barricade Arpeggio loop to the bottom of the workspace at bar 9.
7. Drag the Deal Breaker Arpeggio loop to the bottom of the workspace at bar 10.
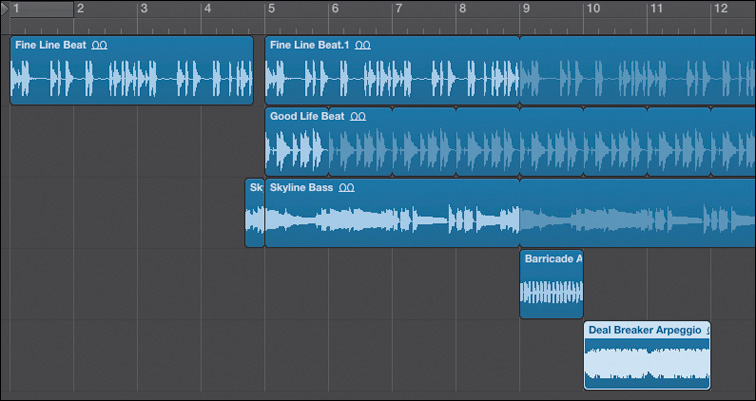
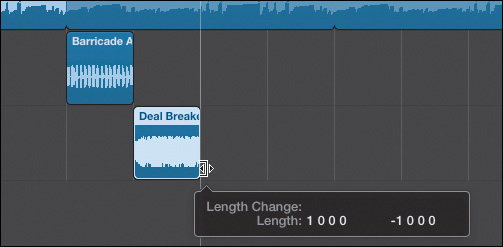
You will resize the Deal Breaker Arpeggio region to make it one bar long, the same length as the Barricade Arpeggio region.
8. Drag the lower-right corner of the Deal Breaker Arpeggio region to make it one bar long.
You will now copy both regions so they play alternatively.
9. Click the background, and drag a rectangle around both regions to select them.
10. Choose Edit > Repeat.

11. Play the new synth section.
The two synths bring much-needed melody and movement to the song, and they work well in answering each other, each one successively playing its melody.
Currently, both synths sound as if they are coming from the center of the stereo field. To give them a little space, you can spread them apart acoustically by positioning them to either side of the stereo field.
12. On the Barricade Arpeggio track header, click the Pan knob and drag down to turn the knob to the left.
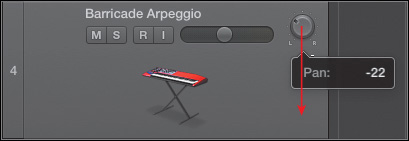
13. On the Deal Breaker Arpeggio track, click the Pan knob and drag up to turn it to the right.
14. Play the synth section again.
You can now hear the two synths playing from opposite sides of the stereo field, which adds dimension to the music and helps separate the two instruments.
Creating a Break
Until now, you have kept your project interesting by introducing new elements on a regular basis: the bass at the end of the intro, the drums at bar 5, a synth at bar 9, and another synth at bar 10. But if you keep building your song by adding more elements, at some point those additions may backfire. The song can become bloated, with the arrangement losing focus, the mix becoming muddy, and the listeners tuning out. Who wants that?
So if you can’t add any more to your song, subtract! By the end of the new synth section, the listeners are so used to hearing the drums and the bass that they may no longer pay attention to them. If you remove them, you can create a big impact. So let’s add a piano loop after the synth section, and then delete the drums and bass while the piano plays.
At the top of the Tracks area, look at the tool menus:
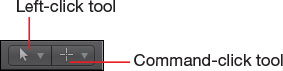
The menu to the left corresponds to the tool assigned to the mouse pointer.
The menu to the right corresponds to the tool assigned to the mouse pointer when holding down Command.
Currently the Left-click tool is assigned to the Pointer tool (arrow icon) and the Command-click tool is assigned to the Marquee tool (crosshair icon). You don’t need to change those assignments, but if you’re curious, feel free to click one of the tool menus to open it and see what’s available. Click it again to close it.
The Loop Browser sometimes shows multiple loops with similar names, and that usually means that the loops all follow the same groove, all follow the same chord progression, or are otherwise meant to work together. Let’s see if we have any other Skyline Apple Loops meant to work with our Skyline Bass loop.
1. In the Loop Browser, click the Reset button to clear all keyword buttons.
2. In the search field, type Skyline.
The results list shows four loops containing Skyline in their names.
3. Preview the four loops.
The loops sound like they would all work great together because they all follow the same harmony and rhythm.
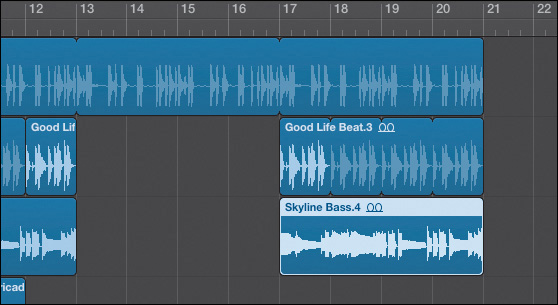
4. Drag the Skyline Piano loop to the bottom of the workspace at bar 13.
You will now create the break by deleting the drums in track 2 and the bass in track 3 for the entire time the piano is playing.
5. Hold down the Command key to turn the mouse pointer into a Marquee tool.
6. Command-drag around tracks 2 and 3 from bar 13 to bar 17.
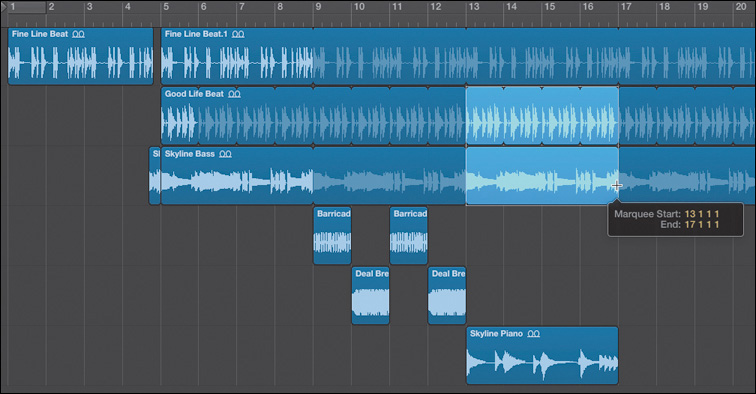
The Marquee tool places a white highlight rectangle around the selected section of the loops.
7. Choose Edit > Delete (or press Delete).
The section of the loops selected by the Marquee tool is deleted. Some loops are turned into regions before and after the empty space so the tracks stop and resume playing at the beginning and end of the removed section.
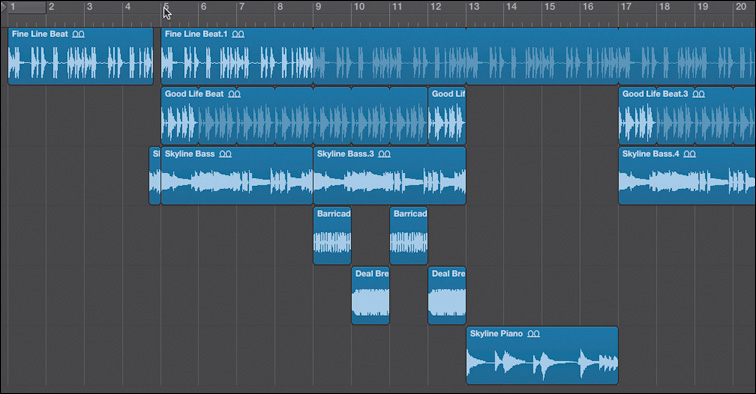
Let’s finish the song. You will let the rhythm section play four bars after the piano stops, and you’ll end the song at bar 21.
8. Move the mouse pointer to the upper part of the loops on track 1.
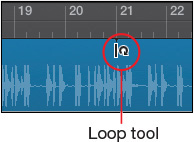
The mouse pointer turns into a Loop tool. You can click or drag the Loop tool where you want a region’s loops to end. Dragging offers the advantage of seeing the exact position in a help tag.
9. Drag the Loop tool to bar 21.
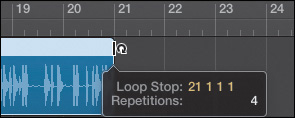
The Fine Line Beat.1 region stops looping at bar 21.
10. Repeat the same process to stop the drums on track 2 and the bass on track 3 at bar 21.
11. Move the playhead to bar 11 and press the Spacebar to play through the break and ending.
The break brings much needed space and silence, interrupts the flow of the rhythmic section, and automatically shines a light on the two remaining elements: the drum loop and the piano. After the break, the rhythmic section resumes, but the ending at bar 21 is too abrupt. Let’s bring back the piano by itself to create a quick outro.
12. On track 6, Option-drag the Skyline Piano region to bar 21.
You will finally shorten the new copy of the piano region so it ends with a sustaining note, which will work better for an ending.
13. Control-Option-drag around the Skyline Piano.1 region to zoom in on it.
14. Drag the lower-right corner of the Skyline Piano.1 region to the left so that it ends with the long sustaining note in bar 23.
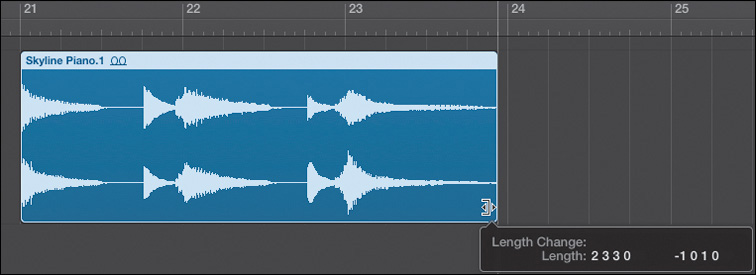
15. Control-Option-click the workspace to zoom out.
16. Play the entire project.
You have arranged your first song. Using only six Apple Loops, you’ve built a simple one-minute song that evolves from an original intro into a solid bass and drums groove. Then two synths share the lead melody for a few bars before the bass and drums abruptly stop to leave room for a piano break. Finally, the bass and drums groove returns, and the song finishes with a few sustained piano notes. Really nice! You will now quickly mix the song and later export it to share it.
Mixing the Song
Now that you have arranged your regions in the workspace, you can focus on the sound of each instrument and how they sound as an ensemble. You can adjust each instrument’s loudness and its position in the stereo field, and even modify its timbre so all the instruments blend harmoniously.
You will open the Mixer, and name your channel strips so you can easily determine which instrument they control. You will then adjust the Volume faders and Pan knobs to change levels and stereo positions, and apply patches and plug-ins to process some of the instruments.
Choosing Names and Icons for Tracks and Channel Strips
1. In the control bar, click the Mixer button (or press X).
At the bottom of the main window, the Mixer opens.
The channel strips are named after the Apple Loops that you previously dragged to the workplace. To more quickly locate instruments, you can assign the channel strips more descriptive names.
To edit the name on a track header and on its corresponding channel strip, you can double-click either and type the new name.
2. At the bottom of the first channel strip, double-click the Fine Line Beat name.
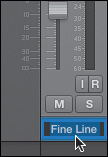
A text entry box appears, and the current name—Fine Line Beat—is selected.
3. Type Beat Loop, and press Return.
Both the first channel strip in the Mixer and track 1 in the Tracks area are renamed Beat Loop. Renaming tracks in the track header is often easier because you can quickly identify instruments by looking at the regions you’ve been arranging.
4. In the control bar, click the Mixer button again (or press X) to close the Mixer.
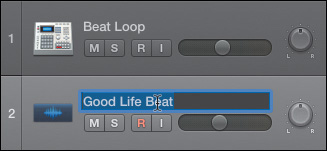
5. In track 2’s track header, double-click the Good Life Beat name.
A text entry box opens. This time you will enter a name and open the text entry box of the next track with a single key command.
6. Type Drums, and press Tab.
Track 2 is renamed Drums. A text entry box opens on track 3’s name, ready to be edited.
Track 3 is renamed Bass, and track 4 is ready to be renamed. Continue this process to change the name of the three remaining tracks as follows:
![]() Track 4 to Synth 1
Track 4 to Synth 1
![]() Track 5 to Synth 2
Track 5 to Synth 2
![]() Track 6 to Piano
Track 6 to Piano
Tip
In the Mixer, you can also press Tab to enter a name and open the text entry box of the next channel strip. Should you enter a name incorrectly, press Shift-Tab to open the text entry box of the previous track or channel strip.
Notice that track 2 has only a generic audio waveform icon. That’s because the track was created before you dragged the Good Life Beat loop to it at the very beginning of this lesson.
8. In the Tracks area, Control-click the icon in track 2’s track header.
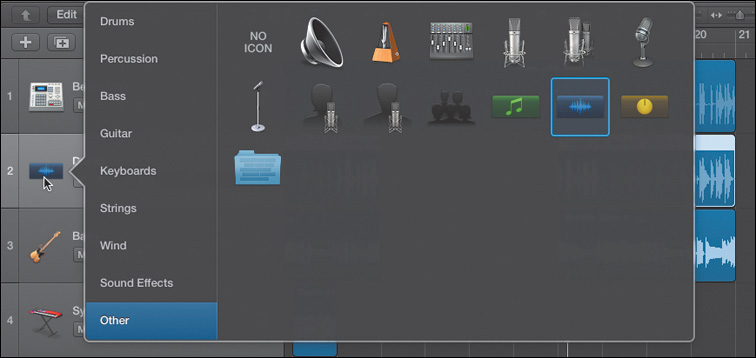
A shortcut menu displays icons organized in categories.
9. In the shortcut menu, click the Drums category.
A collection of various drum icons appears.
10. Click an icon representing a drum kit.
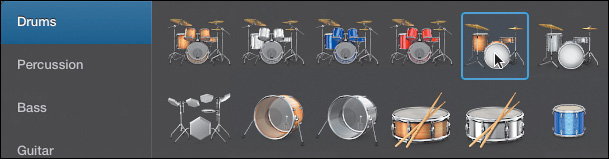
The icon is now visible in the track header. The same icon is also assigned to the corresponding channel strip in the Mixer, as you will see in a moment.
When your creative juices are flowing and you just want to make a quick adjustment to the sound of an instrument, wasting time looking for the correct track or channel strip can be frustrating. Or worse, you could become a victim of the classic mistake: turning knobs and faders but not hearing the sound reacting to your adjustments, until you realize you were adjusting the wrong instrument!
Taking a minute to assign your tracks and channel strips descriptive names and appropriate icons can accelerate your workflow and avoid potentially costly mistakes.
Adjusting Volume and Stereo Position
With new names and icons assigned, your Mixer is ready. You will now open it and adjust some of the instruments’ volume levels and stereo positions.
1. In the control bar, click the Mixer button (or press X) to open the Mixer.
You can see your new names at the bottom of the channel strips. You can resize the Mixer area to see more of the channel strips.
2. Place the mouse pointer between the Tracks area and the Mixer area.

3. Drag the Resize pointer up as far up as it will go.
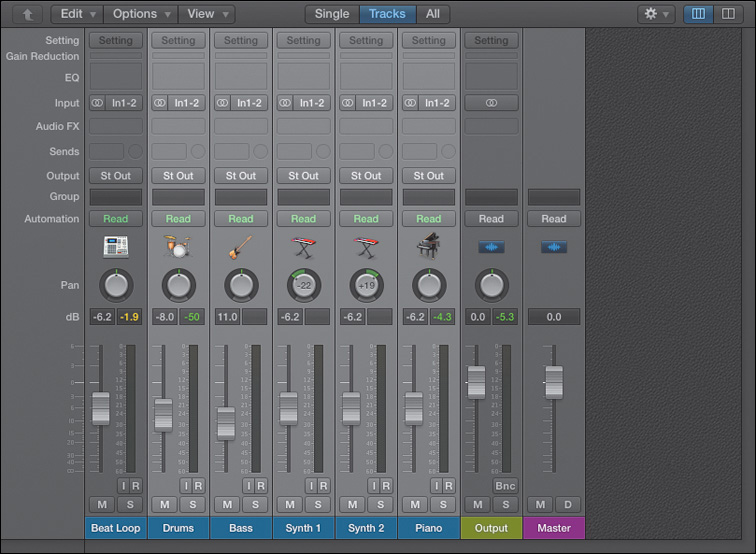
The Mixer is now taller, and you can see more options at the top of the channel strips. There are a lot of options, but don’t worry. Just because you have many tools available doesn’t mean you have to use them all. You will learn about those options as needed.
Note
Depending on the size of your display, you may not be able to open up the Mixer all the way. In that case, you can drag the vertical scrollbar to the right of the Mixer to scroll up and see all the options.
4. Play your song.
With the Mixer open and occupying most of the main window, the workspace is much smaller. Depending on your display resolution, navigating your song efficiently may prove challenging (or nearly impossible). To remedy that, you will now adjust the locators in the Tracks area ruler, and use Cycle mode to continuously repeat a part of the song that contains all the instruments.
5. Click the Mixer button (or press X) to close the Mixer.
If necessary, scroll or zoom out in the workspace so you can see your entire arrangement. Remember: To see all your regions, click the background of the workspace and press Z.
6. Drag the upper half of the ruler from bar 9 to bar 13.
Cycle mode is turned on, and a cycle area appears where you dragged. The cycle area spans the part of the song in which the two synths, the drums, and the bass play, so you can focus on adjusting the sounds of those instruments. Later, when you’re ready to work with the piano, you will just drag the cycle area to the following four bars, where the piano plays.
7. Press the Spacebar.
Playback starts at the beginning of the cycle area, and the playhead keeps repeating bars 9 through 13, where the two synths are playing.
8. Click the Mixer button (or press X) to open the Mixer.
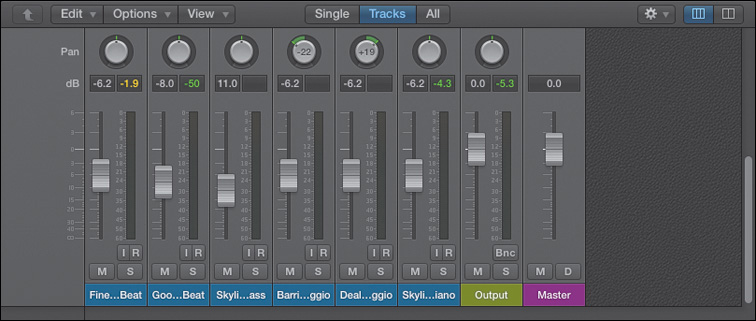
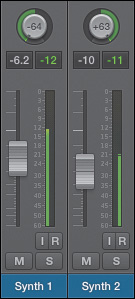
Synth 2 is significantly louder than Synth 1. Let’s bring its level down so that both synths are equally loud.
9. In the Mixer, click the background to deselect the channel strips, and on the Synth 2 channel strip, drag down the Volume fader.
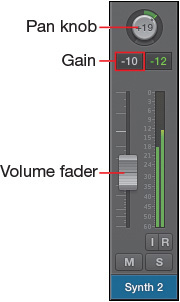
Continue adjusting the Volume fader until the Gain display reads –10. The Volume fader affects how much gain is applied to the audio signal flowing through the channel strip and, therefore, controls how loudly that instrument plays. Synth 2 is now quieter and closer to the level of Synth 1.
You will now adjust the Pan knobs on the two synth tracks to spread them farther apart in the stereo image.
10. On the Synth 1 channel strip, drag the Pan knob all the way down to –64.
11. On the Synth 2 channel strip, drag the Pan knob all the way up to +63.
The synths sound too far apart now and seem disconnected from the rhythm section. The effect is even more pronounced if you listen to the song through headphones.
Let’s bring the two synths back toward the center of the mix.
12. Adjust the Synth 1 and Synth 2 pan knobs to values of about –35 and +35, respectively.
The two synths come back closer to the center of the stereo field. Now they sound like they belong in the mix.
Processing Instruments with Plug-Ins
There’s more to mixing than adjusting each instrument’s volume and stereo position. Now you will apply effect plug-ins to process the audio signal flowing through the channel strip, thereby changing the tone of your instruments.
In this exercise you will use a bass amp plug-in to add an edgier character to the bass, and a reverberation plug-in to bring warmth and dimension to the piano.
1. On the Bass channel strip, click the Audio FX slot to open the plug-in menu.
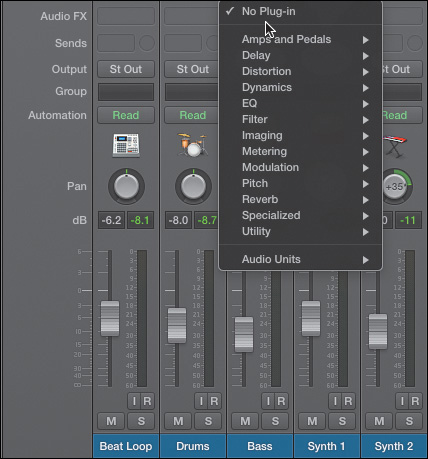
2. From the menu, choose Amps and Pedals > Bass Amp Designer.
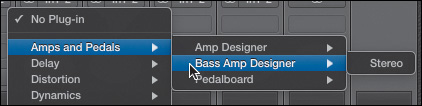
Tip
When choosing a plug-in from a pop-up menu, you need to navigate to the name of the plug-in, but you don’t have to select a plug-in format such as stereo or mono. When multiple formats are available in the menu, if you navigate to only the name of the plug-in, the most likely plug-in format is automatically used.

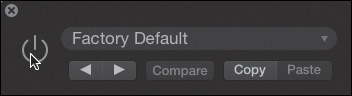
The Bass Amp Designer plug-in is inserted in the Audio FX slot on the channel strip, and its interface opens. Let’s compare the sound of the bass with and without the plug-in applied.
3. Click the Power button.
The Power button dims to indicate that the plug-in is off. You can hear what the bass sounds like without the plug-in. It sounds a bit muffled and vaguely distant.
4. Click the Power button again.
The attacks of the bass notes sound brighter and have a little grit to them, giving the bass character. You could experiment with different amp models, but right now the Factory Default setting works great, so let’s move on.
The bass amp also made the bass a bit louder. In fact, it is a little too loud now.
5. Close the plug-in window by clicking the close button in the upper-left corner.
6. In the Mixer, drag down the Bass Volume fader until the Gain display reads about –11.0.
Note
When space does not permit, negative Level and Gain values are displayed without the – (minus sign).
You will now add a plug-in to the Piano channel strip. But first you need to move the cycle area so you can hear the piano.
7. Stop playback.
8. In the Tracks area, in the ruler, drag the cycle area 4 bars to the right, so it goes from bar 13 to 17.

9. Start playback.
10. In the Mixer, click the Audio FX slot on the Piano channel strip.
11. From the pop-up menu, choose Reverb > Space Designer.
Now change the plug-in setting.
12. At the top of the plug-in interface, from the Setting pop-up menu, choose Medium Spaces > Rooms > 1.5s Piano Warmth.
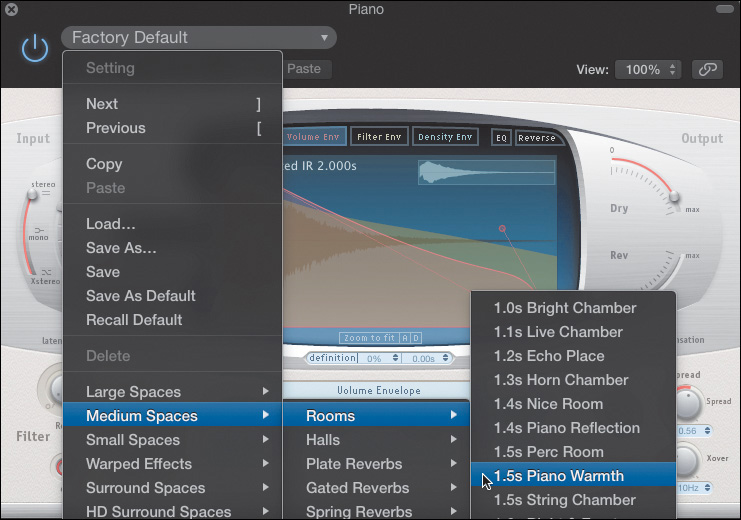
The piano immediately occupies more space and has more body. And in your arrangement, whenever the piano plays, not many other instruments are playing, so this setting works great.
13. Click the close button to close the Space Designer plug-in window.
14. Click the Mixer button (or press X) to close it.
15. In the ruler, click the cycle area (or press C) to turn off Cycle mode.
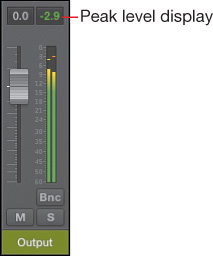
In the inspector, look at the peak level display on the Output channel strip. When a part of the song is too loud, the Output channel strip peak level display shows a positive value and turns red, indicating that the audio signal is distorted. In this project, the highest peak in the song is under 0 dB FS, and no distortion is created.
In a relatively short time, you have produced a one-minute instrumental song with six tracks, edited the regions in the workspace to build an arrangement, mixed the instruments in the Mixer, and added plug-ins to process their sounds. You now have a piece of music that would work fine, for example, during the credits of a radio or TV show or as a music bed for a TV ad.
Mixing Down to a Stereo File
The last step is to mix down the music to a single stereo audio file so that anyone can play it on consumer-level audio software or hardware. In this exercise, you will bounce the project to a stereo audio file. By first selecting all your regions, you can avoid the need to manually adjust the bounce start and end positions.
1. In the Tracks area, choose Edit > Select > All (or press Command-A) to select all regions.
2. In the main menu bar, choose File > Bounce > Project or Section (or press Command-B) to open the Bounce dialog.
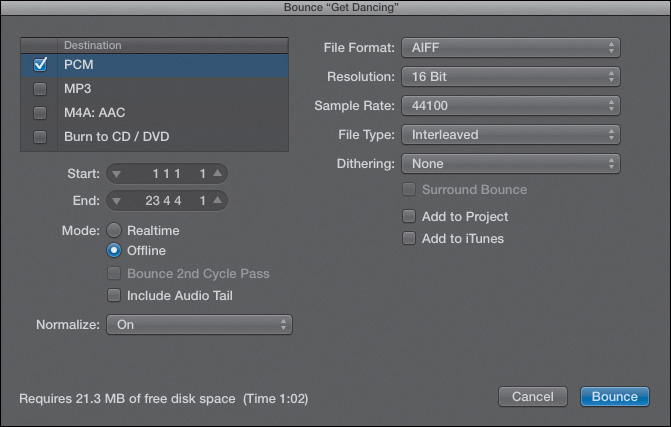
You can choose one or more Destination formats and adjust parameters for each format. You will learn more about the available file types in Lesson 10.
You will bounce an MP3 format file that you can easily email or upload to a website.
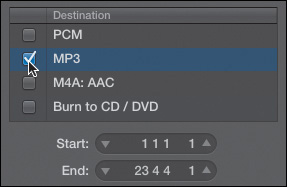
3. Deselect PCM and select the MP3 checkbox.
Below the Destination box, notice that the End position is correctly adjusted to the end of bar 23, when the last piano note finishes sustaining. That’s because you selected all the regions in your workspace at the beginning of this exercise.
4. In the Bounce dialog, click the Bounce button (or press Return).
A Bounce Output 1-2 dialog opens. Bouncing creates a new stereo audio file on your hard drive, and the Save As field is populated with the project name.
You will save the new MP3 file to your desktop.
5. From the Where pop-up menu, choose Desktop (or press Command-D).
6. Click Bounce (or press Return).
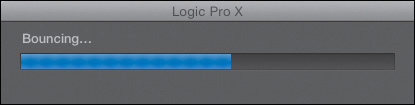
A Bouncing progress bar opens, and toward the end of the operation, an additional progress bar indicates the preparation of the MP3 file.
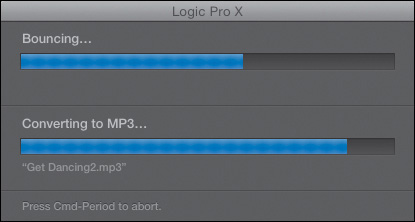
When the progress bars disappear, your MP3 file is ready on your desktop.
7. Choose Logic Pro X > Hide Logic Pro X (or press Command-H).
Logic Pro X is hidden, and you can see your desktop.
If you have multiple apps open and you want to hide them all in order to see your desktop, first click the Finder icon in the Dock (or press Command-Tab to select the Finder) and choose Finder > Hide Others (or press Command-Option-H). To unhide an app, press Command-Tab to select it.
8. On your desktop, click Get Dancing.mp3 to select it.
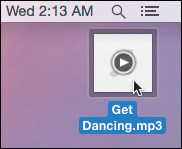
9. Press the Spacebar to play your song.
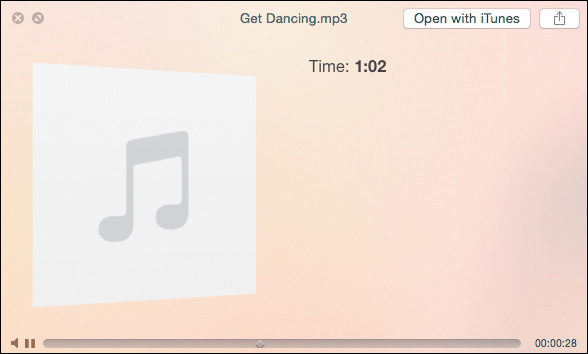
A Quick Look window opens, and your file starts playing. You can now share that MP3 file with all your friends and family!
Lesson Review
1. Where is the inspector and what are its uses?
2. Where is the Tracks area and what does it contain?
3. Where is the control bar and what does it contain?
4. Where is the workspace and what does it contain?
5. When multiple panes are open, how do you make sure the desired pane reacts to key commands?
6. Describe two ways to adjust a numerical value in Logic.
7. How do you copy a region?
8. How do you resize a region?
9. How do you loop a region?
10. In the Mixer, where do you add effect plug-ins?
11. In the help tag, what are the units of the four numeric values used to determine the length and position of a region?
12. How many ticks are there in a sixteenth note?
13. How do you mix down your project to a stereo audio file?
Answers
1. The inspector opens to the left of the Tracks area. Its contextual parameters adapt depending on which area has key focus, and what is selected.
2. The Tracks area is in the center of the main window. It contains the track headers to the left, the ruler at the top, and the workspace where you edit regions.
3. The control bar is the row of buttons and displays at the top of your display. It contains transport buttons, information LCD displays, and mode buttons.
4. The workspace is in the Tracks area, to the right of the track headers and below the ruler, and it contains the regions used in your project.
5. Click the area’s background, or press the Tab key, to give it key focus.
6. Drag the value vertically, or double-click it and enter a new value.
7. Option-drag the region and always release the mouse button first, followed by the Option key.
8. Place the mouse pointer over one of the two lower corners so it changes to a Resize pointer, and then drag horizontally.
9. Select the region and press L, or select the Loop checkbox in the inspector.
10. In the Audio FX slots of the channel strips.
11. Bars, beats, divisions, and ticks
12. There are 240 ticks in a sixteenth note.
13. Choose File > Bounce > Project or Section (or press Command-B) to open the Bounce dialog.