Lesson 10. Upgrading an iMac
Reference Files
Mac (Late 2006) service manual (iMac_Intel-based_Late2006.pdf)
Time
This lesson takes approximately 1 hour to complete.
Goals
Given an iMac (24-inch) and Apple resources, locate any DIY (Do-It-Yourself) service options on the Apple Support site
Identify any requirements to perform the upgrade or use the system
Given User Guide instructions, practice performing a memory installation on the system
Increase your understanding of Apple resources
Although the ever-popular iMac line of consumer desktop computers may not be as expandable as the Mac Pro line, users can perform worthwhile upgrades to increase the performance of an iMac.
This lesson begins by exploring Apple resources, focusing on those available for the iMac (24-inch). After locating the Do-It-Yourself (DIY) section of the Apple Support site, you will then investigate if any DIY service options are available for this model. Finally, you will practice upgrading RAM on the iMac using the DIY references you have located, taking note of any requirements to use the system and perform the upgrade.
Identifying the System
Apple maintains many resources in support of its products. As part of learning to become a proficient technician, you will need to identify the most relevant Apple references for any particular procedure. One of the keys to Apple’s success is in creating interfaces that are extremely intuitive. Whether it is their latest operating system or in the design of Apple online references, you will find that there are usually two or more paths to locate what you are looking for. Everyone learns in a different way, and Apple has incorporated this concept in their products. Learn the different ways to locate information on the Apple Support website, www.apple.com/support.
Note
Screenshots in this lesson reflect the appearance of various resources at the time this material was written. As you go through the lesson and do its lesson review, you may find that some online resources differ in appearance from what is shown in this text.
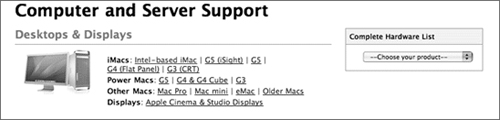
To find all relevant support material for an iMac (24-inch):
- Go to www.apple.com/support. In the Get Help section, select Computer + Server.

- Peruse the different iMac support areas and become familiar with the types of information available.
In this list, the iMac (24-inch) is not listed specifically, and you do not currently know if the system is a G5 (iSight), a G4 (Flat-Panel), or any of the other iMac families listed.
- If you have a serial number available, you can retrieve detailed information from the Find By Serial Number search field on http://support.apple.com/specs.
To locate your product’s serial number, consult Apple Knowledge Base document 303372, “How to find the serial number of your Apple Hardware.”
- Return to the Apple Support main page and perform a search using the search tool for the iMac (24-inch).

The Search Results page lists memory specifications for this system, which indicate many important memory criteria. It also offers several documents, such as “How to identify your iMac,” (Late 2006) - Technical Specifications,” and “Mac (Late 2006): Memory Specifications.” You now know that the iMac (Late 2006) was produced in four models: two 17-inch screen versions, a 20-inch screen version, and a 24-inch screen version, known as the iMac (24-inch). The model you will repair, according to “Technical Specifications for the iMac (Late 2006),” has a 2.16 GHz Intel-based, Core Duo processor. You now have additional information regarding the computer you are about to upgrade.
- Return to the Apple Support main page and visit the Do-It-Yourself (DIY) section (www.apple.com/support/diy) to prepare for the next section.
Do-It-Yourself (DIY)
Apple maintains an extensive online collection of instructions and videos for each Macintosh model. Some models have replaceable Do-It-Yourself (DIY) service parts. Users can install these replacement parts and upgrades; they require only a moderate amount of technical ability and common tools.

Apple DIY parts include everything you need to complete many replacement tasks. Each DIY package includes genuine Apple-certified parts, simple step-by-step instructions, a list of tools you’ll need to have on-hand, and the estimated time that it’ll take for you to complete the installation.
Keep in mind that not every part found in an Apple system or product is available through DIY. Some typical parts that you can order include replacement keyboards, mice, power cables, modem cables, ear buds, and internal batteries. Apple doesn’t offer parts that are generally difficult to access or replace by users. Available upgrades vary by model.
Under the section Installing DIY Parts, use the pull-down menu to explore the models available. As you have discovered, the iMac (24-inch) is not listed as an option. Choose iMac (Core Duo) from the pull-down menu to explore DIY. The DIY parts page for the iMac (Core Duo) lists several options to consider.

Before proceeding, select “Replace a part in my Intel-based iMac” and investigate the DIY repair options available for this model.
Although you will not be replacing a part for this lesson, Apple recommends that, before you order a part, you first try to determine if a DIY part is the right solution for the issue. Many problems that seem to be hardware-related are actually software issues. Updating the software or simply changing its configuration can often quickly resolve the issue.
By reading all relevant troubleshooting documents on the Apple Support page, Knowledge Base, and the discussion forums, you may also resolve the problem at hand.
The DIY options available for this model include many customer installable parts that are simple to replace. The Ordering DIY Parts page also provides several resources and links about memory installation.
![]()
Select iMac User Guides and find the correct User Guide for the iMac (Late 2006).
Tip
Never use non-Apple resources as a guide for performing procedures. Although informational, these resources may not be reliable and could cause damage to the computer under repair or to the technician themselves.
Required Tools and Equipment
To complete this lesson, you need the following:
• Soft cloth
• Phillips #2 screwdriver
• 667 MHz, PC2-5300, DDR2-compliant memory module (also referred to as DDR2 667)
Upgrading RAM on an iMac
Whether you are adding memory or repairing your system, your first step should be to carefully read the reference materials you will be using. Pay particular attention to safety precautions and any hardware or software requirements to use the system or perform the upgrade.

Note
Be sure to follow the ESD guidelines spelled out in Lesson 4, “Safe Working Procedures and General Maintenance.” Remember, Apple recommends to its customers that they use an Apple-certified technician—which would be you, once certified—to install memory. If you attempt to install memory and damage the equipment, that damage isn’t covered by the limited warranty.
The iMac (24-inch) comes with at least 1 GB of Double Data Rate 2 (DDR2) Synchronous Dynamic Random Access (SDRAM) memory installed. You can add 1 GB or 2 GB memory modules for a maximum of 3 GB of memory. Memory modules must meet the following specifications:
• Small Outline Dual Inline Memory Module (SO-DIMM) format
• 667 MHz, PC2-5300, DDR2-compliant (also referred to as DDR2 667)
• Unbuffered and unregistered
The iMac (Late 2006) has two memory slots. You can add a memory module to the bottom slot and remove the memory module in the top slot to replace the installed memory.
To practice upgrading the memory, find the “Installing Memory” chapter of the User Guide or follow along here. To install or replace memory:
- Turn the iMac off by choosing Apple > Shut Down.
- Disconnect all cables and the power cord from the iMac.
Note
You must unplug the AC power cord to prevent the iMac from turning on during the upgrade procedure.
- Place a soft, clean towel or cloth on your work surface. Hold the sides of the iMac and lay it down so that the screen is against the surface and the bottom is facing you.
Note
Always discharge static electricity before you touch any parts or components inside the computer. To avoid generating static electricity, do not walk around the room or allow others to make contact with you until you have finished installing the part and closed the computer.
- Raise the stand and use a Phillips #2 screwdriver to loosen the two captive screws on the memory access door by turning them counterclockwise.
- Remove the memory access door and set it aside.
Tip
Successful technicians use a light touch with sensitive parts. Never force a memory module in place. Ensure that the memory module is facing the correct way and apply pressure evenly when inserting the module. Memory slot levers can also break if you don’t take proper care. Never use the levers to seat the memory in the compartment.
- Pull the two levers in the memory compartment to eject any installed memory modules you want to replace.
- Remove the memory modules from the iMac.
- Insert the new memory modules into the slots, with the notches facing left, as shown in the illustration.
- Press the memory modules firmly and evenly into the compartment. You’ll hear a slight click when the memory modules are seated correctly.

- Push the levers toward the center of the compartment until they are fully closed.
- Replace the memory access door and use a Phillips #2 screwdriver to tighten the screws.
The iMac will not function properly without the memory access door.
- Holding each side of the iMac, turn it right-side up and then reconnect and power cord.
- Press the power button on the back of the iMac to turn it on.
You will need to verify that the iMac recognizes the new memory.
- Start up the iMac.
- When you see the Mac OS desktop, choose Apple > About This Mac.
You’ll see the total amount of memory installed in the iMac. For additional details regarding the memory installed, open System Profiler by clicking More Info.
More Info
For additional information on Apple System Profiler, consult www.apple.com/support and perform a search using keywords khelp ksp.
Lesson Review
1. True or false: Users may filter Apple Support search results to narrow the results returned.
2. What tool do you need to open the memory access door on an iMac (24-inch)?
a. Phillips #2 screwdriver
b. Flat-blade screwdriver
c. 2.5 mm hex
d. None of the above
3. What memory module may be installed in an iMac (24-inch)?
a. 667 MHz, PC2-5300, DDR2-compliant, buffered and unregistered
b. 667 MHz, PC2-3500, DDR2-compliant, unbuffered and unregistered
c. 667 MHz, PC2-5300, DDR2-compliant, unbuffered and unregistered
d. Any of the above
4. What type of memory slots are in an iMac (24-inch)?
a. VRAM
b. SO-DIMM
c. DIMM
5. True or false: The iMac (24-inch) can use either PC3200 or PC5300 memory modules.
6. True or false: Up to a 3 GB memory module may be installed in the iMac (24-inch).
7. True or false: Do-It-Yourself service options are simple upgrades and repairs that may be performed by users.
8. Which way does a memory module insert into the memory compartment in an iMac (24-inch) in the procedure as described?
a. Notches to the right.
b. Notches to the left.
c. It doesn’t matter because the memory is SO-DIMM.
9. True or false: The memory replacement procedure requires ESD precautions.
10. True or false: For detailed information about the memory installed on an iMac, users should use “About This Mac.”
Answer Key
5. False, only PC5300 modules work
6. False, a combination of 1 GB and 2 GB modules can be installed for a total of 3 GB of memory
10. False, System Profiler provides detailed memory information.