Lesson 12. Troubleshooting an iMac (24-inch)
Reference Files
iMac (24-inch) service manual (c15_imac_24in.pdf)
Time
This lesson takes approximately 45 minutes to complete.
Goals
Identify the Intel-based Mac startup key combinations
Identify changes made to the startup management screens
Locate and describe known issues and solutions for the system
Given the symptom of “No Video,” return the product to normal operation
Describe the types of symptoms that resetting the SMC would likely resolve
Identify the diagnostic LED used to determine a “No Power” condition
Identify the diagnostic LED used to determine a “No Video” condition
In this lesson, we’ll review general troubleshooting procedures and symptom charts, providing an overview that will help you better troubleshoot and repair iMac computers. Developing an understanding about the iMac computer’s underlying operations can help you recognize problems more easily.
Trying to track down and resolve technical problems on a computer can be a challenge. By following the troubleshooting procedures step by step, you will more efficiently reach a cure and save a great deal of time. These procedures are designed to focus on simple solutions first, progressing to more complex and invasive cures if required.
It is important to remember that there are slight differences between the iMac models presented in this lesson and other iMac models. When working with a particular model, always refer to the most specific resource material available before proceeding.
The troubleshooting procedures will serve as a demonstration to accompany the service manual. Only AppleCare Desktop Technicians (ACDTs) should perform any of the outlined procedures.
Our scenario in Lesson 11, “Taking Apart an iMac (24-inch),” focused on the “No Video” symptom for an iMac (24-inch). Keep this symptom in mind as you go through the lesson to better understand what led to your replacing the LCD panel. We will explore several symptoms while learning about troubleshooting an iMac (24-inch).
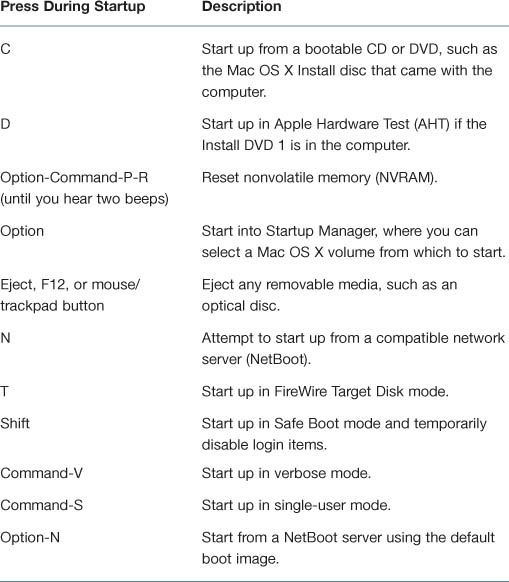
Startup Key Combinations
These are startup key combinations you can use to modify startup on all Intel-based Macs. It’s important to know them well, as they will be used frequently throughout the book.
Diagnostic LEDs
The iMac (24-inch) has four internal diagnostic LEDs and one external LED on the main logic board that can help you to troubleshoot the computer. The internal LEDs are located to the right of the memory slot, under the front bezel. The external LED is in front, located in an opening at the center of the right speaker.
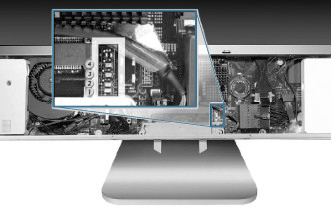
Accessing the Internal LEDs
- Follow the Take Apart instructions in the service manual to remove the memory access door and front bezel.
- The four internal diagnostic LEDs—1, 2, 3, and 4 (numbered bottom to top)—are in a column located to the right of the memory slot. Peel back the tape to view the LEDs.
Interpreting the LEDs
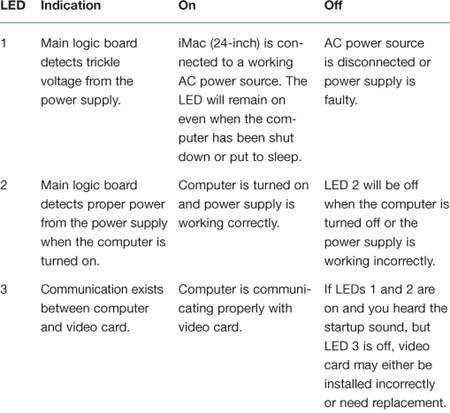
To interpret the LED indications, refer to the following table:
SMC Reset
If the computer shows symptoms of power-related issues, resetting the system management controller (SMC) may solve the problem. The SMC controls several functions, including:
• Telling the computer when to turn on, turn off, sleep, wake, idle, and so forth
• Handling system resets from various commands
• Controlling the fans
Unlike the iMac G5, the iMac (24-inch) does not have a button on the main logic board for resetting the SMC. This eliminates the need to remove the computer’s cover to reset it (as required for some other models).
To reset the SMC on an iMac (24-inch):
- From the Apple menu, choose Shut Down (or, if the computer is not responding, hold the power button until it turns off).
- Unplug all cables from the computer, including the power cord.
- Wait at least 15 seconds.
- Plug the power cord back in, making sure to not press the power button at the time.
- Reconnect the keyboard and mouse to the computer.
- Press the power button to start up the computer.
Note
Resetting the SMC does not reset the parameter random-access memory (PRAM), nor does it help when the computer is unresponsive. In these cases, restarting the computer may resolve the issue. To do so, either perform a force quit (Option-Command-Esc [Escape]) to exit the unresponsive application, restart the computer (Control-Command-power), or a manual shutdown (press and hold the power button for 10 seconds).
Symptom Charts
The symptom charts included in the accompanying Apple Service Source manual will help you diagnose specific symptoms and follow the guidelines set forth in the Apple General Troubleshooting Flowchart. Not all sections are contained in this lesson. Because cures are listed on the charts in the order of most likely solution to least likely, try the cures in the order presented. Verify whether or not the product continues to exhibit the symptom. If the symptom persists, try the next cure.
You’ll learn to diagnose more accurately as you go. Over time, you will be able to diagnose the issue quickly and efficiently, select the correct part the first time (if a part is needed), and be sure the computer won’t return for the same issue. Meeting these goals, coupled with outstanding customer service on your part, will likely result in very happy and loyal customers.
Note
If a cure instructs you to replace a module, and the symptom persists with the new module, reinstall the original module before you proceed to the next cure.
No Power
The computer will not turn on. The display remains black and there are no sounds from the fans or drives. Let’s review the chart. You may use the service manual on the companion website (www.peachpit.com/ats.deskport3) along with this text.
- Verify the power outlet is good. Plug a different device into the socket to ensure there is power, or plug the iMac into another outlet. Does the iMac power on now?
Yes: Resolved. Bad outlet.
No: Go to step 2.
- Check the power cord. Use a known-good power cord. Does the iMac power on now?
Yes: The power cord has failed. Replace the AC power cord.
No: Go to step 3.
- Check the connection of the power cord on both ends. Verify that the power cord is securely plugged into both the AC outlet and back of the computer. Does the iMac power on now?
Yes: You may have a loose fit to the power cord. Replace the AC power cord and test.
No: Go to step 4.
- Follow instructions in the General Information section in the service manual to reset the SMC. Does the iMac power on now?
Yes: Issue resolved.
No: Go to step 5.
- Remove the memory access door and front bezel to gain access to the four diagnostic LEDs. (See “Diagnostic LEDs” in this lesson.)
- Plug the power cord into the iMac and an AC outlet. Is LED 1 on or off?
On: The power supply is getting good power from the AC outlet. Go to step 7.
Off: The computer is not detecting AC power. If both the AC outlet and the power cord are good, replace the power supply. If the issue persists, replace the AC line filter.
- Press the power button. Does LED 2 come on, come on momentarily, or stay off?
On: The power supply is functioning. Go to step 8.
Momentarily on or stays off: Replace the power supply.
- At this point in the power-on process, you should hear a boot chime and see that LEDs 1 and 2 are on. Do you hear a boot chime?
Yes: The power systems of the computer are working correctly. See “No Video, Boot Chime Heard,” later in this lesson.
No: The logic board is not passing the power-on self test (POST). Replace the synchronous dynamic random-access memory (SDRAM) with known-good memory and test. If the issue persists with known-good SDRAM, replace the logic board.
POST
Intel-based Macintosh computers such as the iMac (24-inch) rely on a combination of tones and blinking LEDs to display POST error codes.
If the computer detects no RAM or the RAM installed does not meet the appropriate specifications, the screen will remain black but the power LED on the front of the computer will blink once per second to signal the error. This error condition may be due to physically damaged RAM as well.
Some RAM may appear to pass the POST but still cannot be used by the operating system. In this case, the computer will display a gray screen, sound three tones, blink the power LED on the front of the computer three times, pause, and repeat the blinking until the computer is turned off.
The solution to both of these situations is to reseat the memory and test again. If the memory fails the POST test again, try known-good memory or order new memory.
Video
It’s pretty easy to tell when the issue you’re facing is associated with the video on your computer. Here are the initial clues you will get and some steps for troubleshooting.
No Video, No Boot Chime
The computer will turn on (indicated by the front LED being on), but there is no boot chime and no video on the display. The faint sound of the fans, hard drive, and optical drive may also be heard.
- Follow instructions in the General Information section in the service manual to reset the SMC. Does the computer display video after successfully resetting the SMC?
Yes: Problem solved.
No: Go to step 2.
- Verify that only supported SDRAM memory has been installed and that it has been installed correctly. Unsupported and/or defective memory can prevent the computer from booting. It may be necessary to install known-good memory for testing purposes and replace any unsupported or defective small outline dual inline memory modules (SO-DIMMs) identified during this process. Does the computer display video after verifying and/or replacing the memory with known-good memory?
Yes: Problem solved. Verify full system functionality before returning the system to the customer.
No: Replace the logic board.
No Video, Boot Chime Heard
The computer will turn on, the boot chime can be heard, the front LED is on, and sounds from the fan or drive activity are audible, but the display has no picture or color.
- Check if the computer is sleeping. Press the spacebar to wake the computer from sleep mode. Did the computer wake from sleep?
Yes: Put the computer to sleep from the Apple menu and wake the computer again to test. Check Energy Saver settings to see when the computer has been designated to sleep.
No: Go to step 2.
- Reset the PRAM.
a. If the iMac is on, turn it off by holding the power button until it powers off. The fans should go quiet.
b. Hold down the Command-Option-P-R keys and press the power button. When you hear the computer’s start up chime for the second time, you can release the keys.
c. If you didn’t hear at least two startup chimes, go to the top of this section and begin again. It’s important that you hear two startup chimes when performing this procedure. This indicates that you have successfully reset the computer’s PRAM.
Does the computer display video after successfully resetting the computer’s PRAM?
Yes: Restart the computer from the Apple menu and make sure the computer is now working correctly.
No: Go to step 3.
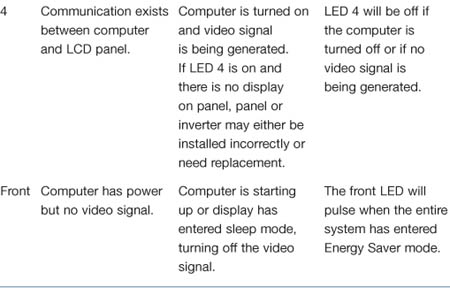
- Turn off the computer. Remove the access door and front bezel to access the diagnostic LEDs. Plug in and start up the computer to observe the diagnostic LEDs. At this point in the power-on process, you should hear a boot chime, and LEDs 1 and 2 are on. Is LED 3 on or off?
On: The video card and logic board are communicating properly. Go to step 4.
Off: The video card and logic board are not communicating. Replace the video card. If the issue persists, replace the main logic board.
- LED 4 should be on when the video card and LCD display have communicated properly to produce a video image. Is LED 4 on or off?
On: The video card has communicated properly with the LCD panel. In this case, there is a problem with the backlights in the panel or the inverter. Replace the LCD panel, which replaces both the backlights and the inverter.
Note
This is the cure for our scenario. In Lesson 11 you learned how to replace an LCD panel. The above symptom chart step would have directed your lead technician to ask you to replace the module indicated.
Off: The video card and logic board are unable to communicate to generate video. Replace the video card. If the issue persists, replace the LCD panel. Does the system function now?
Yes: Test the system and return the computer to the customer.
No: Go on to step 5.
- Unplug the iMac and remove the SDRAM. Replace with known-good SDRAM. Plug the iMac back in and power on the unit. Does the front LED go off after a few moments?
Yes: Replace the original SDRAM and test again. If the front LED does not go off with only the original SDRAM installed, replace the SDRAM. If the LED is now reliably going off after a moment, but you still do not have any video, go to step 6.
No: If the LED remained on, the main logic board is not communicating with the LCD panel to generate video. Replace the main logic board.
- If video is displayed normally on an external display but not on the iMac internal display panel, replace the LCD.
Display Is Tinted Another Color
- Reset the PRAM. Press and hold the Command-Option-P-R keys and press the power button. After you hear the second startup chime, release the keys.
Does the computer display properly tinted video after successfully resetting the computer’s PRAM?
Yes: Problem resolved. Restart the computer from the Apple menu and make sure the computer display is no longer tinted another color.
No: Go to step 2.
- Connect an external monitor to the mini-DVI port. Does the external display exhibit the same color tinting?
Yes: Replace the video card.
No: Go to step 3.
- Check the low voltage differential signaling (LVDS) cable connections. If connected properly and the same color tinting persists, replace the LVDS cable. Does color tinting persist after changing the LVDS cable?
Yes: Replace the LCD panel.
No: Problem solved. Restart the computer from the Apple menu and make sure the computer display is no longer tinted another color.
Hard Drive
If you suspect that the hard drive is to blame, here are a number of scenarios you might need to work through in order to solve the issue.
Hard Drive Failure
In a hard drive failure, the computer fails to start up to the desktop and may display a flashing question mark, or an alternating question mark and Mac OS (face or a folder).
Note
Before troubleshooting hard drive problems, it is a good idea to back up any important data. Some troubleshooting steps may require erasing the contents of the hard drive.
- Boot from the Install DVD that came with the computer and open Disk Utility. Does the hard drive show in Disk Utility?
Yes: Run Repair Disk and Repair Permissions to correct any directory and permissions issues. Go to step 2.
No: Go to step 4.
- Did Disk Utility successfully repair directory or permissions?
Yes: Restart the computer, booting from the hard drive. Go to step 3.
No: Go to step 4.
- Did the computer successfully start to the internal hard drive?
Yes: Run Apple Hardware Test version 3A108 or later for this machine and return to the customer if it passes.
No: Go to step 4.
- Boot the machine to AHT, version 3A108 or later, or to Apple Service Diagnostic (ASD) for iMac (Mid-2006), version 3S106 or later. Did the machine successfully boot to AHT or the diagnostic?
Yes: Run the test suites.
No: Make sure you’re using the correct version of the diagnostic and that the disc is able to boot another machine that it supports. If so, then try booting from an external optical drive. If this is successful, you should replace the optical drive and retest the machine booting to the diagnostic disc.
- Did the tests pass?
Yes: Reinstall the system software that came with the computer and test.
No: Replace the component(s) that the test results indicate.
To ensure Intel-based and Power-PC (PPC) Macintosh drive compatibility, drives to be used in booting Intel-based Macintosh hardware should be formatted and partitioned with an Intel-based Macintosh disk utility running on Intel-based Macintosh hardware. That should ensure you get the correct default partition map and structure for reliable booting. Intel-based Macintosh CPUs in target disk mode will mount only on PPC machines running Mac OS X 10.4 or later, and may show one contiguous partition rather than separate partitions on the host machine. Always make sure to use the OS that came with the machine if you need to reinstall software (ask the customer for the discs if necessary) and the diagnostics designated specifically for that hardware.
System Hangs During Normal Startup Process
- Boot from the Install DVD that came with the computer. Use Disk Utility to verify the hard drive.
- Using Disk Utility, reformat the hard drive.
- Check all cable connections to and from the hard drive.
- Replace the hard drive.
- Replace the main logic board.
Optical Drive
If the issue you’re facing has to do with the optical drive, you might encounter one of the following clues.
CDs or DVDs Do Not Show Up on the Desktop
- Choose Preferences from the Finder menu. Make sure the checkbox to show CDs, DVDs, and iPods is selected in the General window.
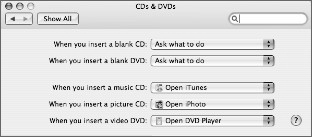
- Choose System Preferences from the Apple menu and open the CDs & DVDs preferences window. Make sure that audio CDs are set to launch iTunes and movie DVDs set to launch DVD Player when those media are inserted.
- Check that the drive can read discs normally. Insert an audio CD and check whether it shows up on the desktop or launches iTunes. Does the audio CD mount on the desktop or in iTunes?
Yes: The drive seems to read CD discs well. Go to step 4.
No: Make sure that other computers can read the disc. Try other CD discs. If none mounts or no audio CDs launch iTunes, replace the optical drive.
- Eject the audio CD and insert the iMac Software Install and Restore DVD that came with the customer’s computer, or insert a DVD movie. Does this disc show up on the desktop, or does the movie launch DVD Player?
Yes: The computer is reading CD and DVD media. This may be related to a specific disc or discs the customer is using; you should examine those discs.
No: The optical disc is reading CD media, but not DVD media. Try other DVD discs. If none mounts or movie DVDs do not launch DVD Player, replace the optical drive adapter board.
- If after replacing the optical drive adapter board the drive still won’t mount any optical media, replace the optical drive. If the issue persists, replace the logic board.
Computer Will Not Burn Discs
- Check whether the drive can read CDs and DVDs normally. Perform the steps in the preceding section, “CDs or DVDs Do Not Show Up on the Desktop.”
- Try a test burn by creating a Burn folder:
a. In the Finder, choose File > New Burn Folder.
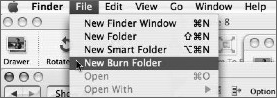
b. Open the Burn folder, drag an item into it for testing, and click Burn in the upper-right corner of the window.
- If the disc fails to burn with an error, check for these error messages.
• Unknown Error -2147352480. See Apple Knowledge Base documents 25480, “Mac OS X: ‘Unknown Error -2147352480’” when burning CD-R, CD-RW, or DVD-R media,” and 25750, “You see a ‘buffer underrun’ error when burning a disc in Finder or iTunes,” for more information.
• Buffer underrun error. See Knowledge Base documents 25480 and 25750 for more information.
• Unknown Error. See Knowledge Base document 152224, “Mac OS X 10.3 Help: I got an ‘unknown error’ message while burning a CD or DVD disc,” for more information.
- If the blank disc is ejected, try another blank disc. If the issue persists, try another brand and speed of blank media; if you’re using blank CD media, see if this happens with blank DVD media. If the drive consistently rejects all blank media, or rejects only blank CD media while accepting blank DVD media or vice versa, replace the optical drive adapter board and test. Does the drive successfully burn to disc after replacing the optical drive adapter board?
Yes: Problem solved.
No: Go to step 5.
- Replace the optical drive. Does the new optical drive burn correctly?
Yes: Problem solved.
No: Replace the logic board.
Discs Won’t Insert
- Is there a disc already in the drive?
Yes: Eject the disc before inserting another. Refer to Knowledge Base document 51008, “iMac: If You Can’t Eject a CD or DVD, or Open the Drive Tray.” If none of these options ejects the disc, you may have to disassemble the drive to recover the disc. See Knowledge Base document 86382, “Macintosh: How to Remove a Stuck Disc from a Slot-Loading Drive.”
No: Reseat the optical drive. Perform the optical drive procedure in Take Apart to reseat the drive in the mounting aperture and reconnect the optical drive to the logic board.
- After reinstalling the optical drive, can you now insert a disc?
Yes: Issue resolved. Run diagnostics and return the system to the customer.
No: Replace the optical drive adapter board.
- After replacing the optical drive adapter board, can you insert a disc now?
Yes: Issue resolved. Run diagnostics and return the system to the customer.
No: Replace the optical drive.
Tip
When you become more experienced as a technician, you will see customers present some interesting issues. Take the opportunity to kindly educate customers and help them be more knowledgeable users. Keep your eyes open for cases where the customer has attempted to use the unit in a manner for which it was not intended. For example, you might find multiple discs inserted at the same time or loose change inside the optical drive. These cases are easily solved.
Optical Disc Constantly Ejects
- Disconnect all peripheral devices, especially the mouse in cases where the disc is constantly ejecting. Retest. If the issue is resolved, reconnect peripherals one at a time until you identify the faulty peripheral.
- Try cleaning the disc. If the disc is dirty or scratched, it may not mount. Is the issue resolved?
Yes: Problem solved.
No: Try a different disc. If the issue persists, go to step 3.
- Boot from AHT (hold down the D key at startup). If you can boot to this volume, run the Quick and Extended tests. Does the unit pass the tests?
Yes: Restart to the internal hard drive and test again.
No: Replace the component(s) that the test results indicated. If you cannot boot to AHT because it ejects, go to step 4.
- Boot from the Install DVD (to use Startup Manager, hold down the Option key at startup). If you can boot from this volume, perform an Archive and Install with the Install DVD that came with the computer and test. Is the issue resolved?
Yes: Problem solved.
No: If you cannot boot to AHT or to the Install DVD because they eject, reseat the optical drive adapter board to the logic board and retest.
- Replace the optical drive adapter board.
- Replace the optical drive.
- Replace the logic board.
Fans and Noise
When the customer complains of whirring fans or other noises, these are the troubleshooting steps you should take.
Fans Running at Full Speed After Computer Turns On
The customer may have entered the computer into a diagnostic mode that causes the fans to run at full speed. Restarting the system will not restore normal fan operation. To solve the problem, the user or technician should do the following:
- Shut down the system.
- Disconnect the power cord and wait 15 seconds.
- Reconnect the power cord and wait 5 seconds.
- Power on the system.
Note
Customers reporting this symptom should be told to press the power button after the power cord has been fully inserted. Inserting the power cord while pressing the power button will cause the fans to run at full speed.
Loud Fan Noise
The iMac (24-inch) has a trio of fans that circulate air throughout the system. It also includes temperature sensors and advanced thermal software that spins the fans fast or slowly, as needed. As the system usage increases, the fans will adjust their speed to meet the cooling needs of the system.
Under normal conditions, rotating fans will make a slight hum that varies in relationship with rotational speed and the amount of air that they are moving. In addition, the normal functioning of the hard drive and optical drive will generate additional whirring and scratching sounds that may be audible. All of these sounds are normal and do not indicate a computer failure.
To begin troubleshooting a possible fan issue, you need to qualify the sound that you’re experiencing.
- Does the sound occur only under specific light or heavy usage conditions?
Yes: CPU-intensive applications such as iTunes, GarageBand, and DVD Player—or having two or more applications open at once—will cause the fans to run at an increased rate, making them more noticeable. If the sound occurs only when one or more of these applications is running, this is normal.
No: If the sound isn’t affected by CPU-intensive application, it may be due to other factors. Go to step 2.
- Is the sound always present, or does the sound vary?
The sound is always present: The normal functioning of the hard drive and optical drive will generate additional whirring and scratching noises that may be audible. Check whether this sound is related to one of the components. Go to step 4.
The sound varies: Under normal conditions, rotating blowers will make a slight hum that varies in relationship with their rotational speed and the amount of air that they are moving. To see if this is indeed the case, go to step 3.
- Are the fans making a normal humming sound that increases or decreases in relation to processor usage as to cool the system?
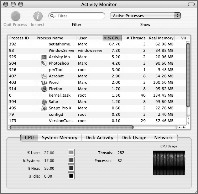
Launch the Activity Monitor application included with Mac OS X in the Utilities folder to determine whether the noise corresponds with heavy usage of the CPU. Does fan activity increase and decrease with the CPU Usage graph in Activity Monitor? Check by running CPU-intensive applications such as iTunes.
Note
In the “old” days, a good lead technician might run Graphing Calculator to place a “load” on a system in OS 9. Along the same lines, playing music in iTunes with Visualizer on is a good method. Intensive applications with graphics and sound will increase CPU usage and the need for fan cooling.
Yes: This is normal operation and none of the fans requires replacement.
No: If the fan activity does not coincide with CPU usage, the sound you’re hearing may not be fan activity. Go to step 4.
- The normal functioning of the hard drive and optical drive will generate additional whirring and scratching noises that may be audible. You can isolate these noises by booting the computer to the Install DVD.
a. Place the disc in the drive and restart the machine while holding down the C key.
b. At the Installer window, choose Open Disk Utility from the Installer menu.
c. Once Disk Utility is open, select the system’s hard drive and click Unmount on the toolbar. If the drive has multiple partitions, unmount each of these partitions.
This will spin down the hard drive. The optical drive will also be busy at this time; wait a moment for the optical drive to spin down also and then listen to the machine. Is the sound still present?
Yes: With the hard drive and optical drive inactive, all you should be hearing are the fans in the machine. While booted to the DVD, these fans should be running at a lower level since CPU activity is low with both drives inactive. Fan sound that includes objectionable ticking, whistling, or squealing may require further investigation and/or replacement of the particular fan. Go to step 5.
No: The normal functioning of the hard drive and optical drive will generate additional whirring and scratching sounds that may be audible. All of these sounds are normal and do not indicate a failure with the machine. If you want to check the health of the hard drive, see Knowledge Base document 152349, “Replacing a disk before it fails.”
- Shut down the computer, remove the power cord and any other connected cables, and remove the access door, front bezel, and EMI shield. Stand up the computer, plug it in, and start it up by pressing the external power button.
As the machine starts up, listen carefully to each of the three fans, and see if you can locate the fan from which the objectionable ticking, whistling, or squealing sound is coming. The CPU fan is the left-most fan, the hard drive fan is in the center, and the optical fan is on the right.
Can you pinpoint the fan making the sound?
Yes: Replace the noisy fan.
No: If you can hear an objectionable ticking, whistling, or squealing sound, but you cannot identify the source of the sound, contact Apple Technical Support.
Audible Buzzing, Whining, or Ticking Noise
The iMac (24-inch) contains several mechanical devices such as motors and fans that may make audible buzzing, ticking, or whining noises when they are operating in a normal manner. The sounds will vary depending on how the system is used.
To troubleshoot abnormal noises:
- Follow the previous steps to eject any media in the optical drive and quit all applications and test the computer again.
The optical drive will make a variety of normal sounds when accessing optical media. Processor-intensive applications may cause the fans to run at a higher speed and therefore be more audible.
- Boot to the latest version of ASD for iMac (24-inch) and select the Extended Firmware Interface (EFI) test suite by holding down the D key during startup. The diagnostic tests fan speeds and thermal sensor functionality. Should tests fail, replace any parts that the diagnostic indicates.
- Reboot the computer and check the computer again. If the noise persists and is unusually loud, contact Apple Technical Support.
Tip
Verify that the computer is running a supported version of the Mac OS X operating system. If an earlier version of the operating system has been installed, the fans may run at excessive speeds.
Tip
Determine that the noise you hear is related to the computer by removing and shutting down all other devices in the vicinity that could be causing a sound.
Fans Running at a Constant High Speed
If the fans on the system are running at a constant high speed, or ramp very quickly to high speed and do not vary once this speed is reached, the fans are most likely receiving incorrect thermal input. Follow these steps:
- Reset the SMC and then test to see if the fans still exhibit the issue.
- Boot to the EFI tests of the latest version of ASD for iMac (24-inch). This will test the fans and thermal input of the sensors. If the tests fail, replace the component(s) that the test indicates.
AirPort
If the issue relates to the AirPort, here are some troubleshooting scenarios you may encounter.
Computer Cannot Connect Wirelessly with AirPort
- From the Apple menu, choose About this Mac.
- Click More Info to open System Profiler.
- In the left column of System Profiler, under Network, select AirPort Card. Does the section to the right say “No Information Found”?
Yes: The computer does not realize it has an AirPort Card installed. Go to step 4.
No: The iMac recognizes that it has an AirPort Card installed. Go to step 5.
- Remove the access door, front bezel, right speaker, and two card mounting screws, and reseat the AirPort Card. Reinstall the two card mounting screws and check System Profiler again. Does to the computer see the AirPort Card now?
Yes: Problem solved. Replace the lower EMI shield and front bezel, and retest the system to verify that the original symptom is resolved.
No: Replace the AirPort Card. Refer to the Take Apart section for AirPort Card. If the issue persists, replace the logic board.
- Check the antenna cables. If the antennas are not plugged in all the way, you may have a very short AirPort range. Remove the access door, front bezel, right speaker, and two card mounting screws. Disconnect the card and reconnect the antenna cable connectors to it. Make sure the antenna connectors are firmly seated. Reconnect the card and other components, and retest.
- If the antennas are plugged in properly and the AirPort Card is recognized but the problem persists, there are a number of other things that could cause issues with wireless networking. Refer to Knowledge Base document 106858, “AirPort troubleshooting guide,” for more networking information.
- Replace the AirPort Card.
- Replace the AirPort antennas.
- Replace the logic board.
Bluetooth
If you believe that the issue relates to the Bluetooth device, follow these clues and solutions.
Bluetooth Devices Won’t Sync with Computer
- Make sure the computer has a Bluetooth board installed. Open System Preferences, then verify that Bluetooth appears in the Hardware section of the window.
- Locate the Bluetooth board inside the computer. Reseat the Bluetooth board and the Bluetooth antenna.
- Turn on Bluetooth. In System Preferences, click Bluetooth and then click the Settings tab. If you don’t see “Bluetooth Power: On,” click the Turn Bluetooth On button. Make sure that you also enable Bluetooth on your device (refer to your device’s documentation for instructions).
- Set up a new device. To set up a Bluetooth cellular phone or PDA, click the Devices tab in Bluetooth preferences and then click Set Up New Device to open the Bluetooth Setup Assistant. Follow the onscreen instructions to set up the device. To set up an Apple Wireless Keyboard and Mouse, open System Preferences, click Keyboard & Mouse, click the Bluetooth tab, and then click Set Up New Device to open the Bluetooth Setup Assistant. Follow the onscreen instructions to set up the keyboard and mouse.
- Recharge or replace the Bluetooth device’s battery. If the battery is low, you may experience connection issues.
- Download and install the latest software for the device.
- Check for a Bluetooth update. Choose Software Update from the Apple menu (make sure the computer is connected to the Internet). If newer Apple Bluetooth software exists, Software Update will find it.
- Check for signal spoilers. Avoid situations in which metal objects come between the device and the computer. Don’t put the computer under a metal desk or locked away behind a metal cabinet. Keep away cordless telephone base stations, microwave ovens, and other electrical devices that operate on a 2.4 GHz bandwidth. Make sure that the device and the computer aren’t more than 30 feet apart from each other.
- Restart the computer. Try resetting the computer’s PRAM and NVRAM.
- Turn the Bluetooth device off and then on again. If that doesn’t work, see if you can reset the device.
- Replace the Bluetooth board and test the computer again.
- Refer to the Bluetooth Support site, www.apple.com/support/bluetooth.
- Replace the logic board.
Speakers
If the customer complains about a lack of sound coming from the speakers, first you’ll need to figure out exactly where the sound is not coming from. There are basically just two possibilities.
Sound Does Not Come from the Speakers
- Disconnect any external microphones, speakers, or headphones.
- Open System Preferences, then click Sound. In the Sound window, click Output and make sure the internal speakers are selected as the device for sound output, the output volume is adequate, and that Mute is not selected. Do you have sound now?
Yes: Problem resolved.
No: Go to step 3.
- Reset PRAM. Hold down Command-Option-P-R and press the power button. Listen for two startup chimes and then release the keys. Do you have sound now?
Yes: Problem resolved.
No: Go to step 4.
- Plug headphones or external speakers into the line out/headphone port. Do you have sound through these devices when plugged in?
Yes: Go to step 5.
No: Replace the logic board.
- Verify that the speaker cable connector is securely attached to the logic board. Do you have sound now?
Yes: Problem resolved.
No: Replace the speakers.
Sound Comes from Only One Speaker
- Disconnect any external microphones, speakers, or headphones. Do you hear audio from both of the built-in speakers on the iMac?
Yes: It looks like the built-in speakers are working properly. This may be an issue with the microphone, speakers, or headphones that were plugged into your iMac. Work with the manufacturer to troubleshoot this issue.
No: Go to step 2.
- Check the speaker balance. From the Apple menu, open System Preferences. Click the sound icon and then the Output tab. Make sure the balance setting is in the middle. After adjusting the audio balance, does audio come from both speakers?
Yes: It looks like balance was not set properly.
No: Replace the speakers.
- If the new speakers did not solve the problem, replace the logic board.
Mouse
When the issue seems to be related to the mouse, you can follow through these troubleshooting scenarios.
Mouse Does Not Work at All
- Turn over the mouse. Is the red LED on the underside of the mouse lit?
Yes: The mouse has power. Try using the mouse on another surface. Nonreflective, opaque surfaces without repetitive patterns work best. The surface should be clean but not shiny. Optical mice won’t work on glass, mirrored surfaces, glossy materials, or mousepads with pictures.
No: The mouse does not have power. Try plugging the mouse into one of the USB ports on the machine. If the mouse won’t power on from any USB port, try it on a known-good machine. If the mouse fails to power on with a known-good machine, replace the mouse. If the mouse will power on with a known-good machine, replace the main logic board.
- If the underside LED is lit, the surface is good, and the mouse still does not track, try plugging the mouse into another USB port on the machine. Does the mouse track now?
Yes: Issue resolved. Try the other USB ports on the system to make sure you don’t have a bad port, which would require the logic board to be replaced.
No: Try using a known-good mouse. If a known-good mouse resolves the issue, replace the mouse. If a known-good mouse does not resolve the issue, replace the main logic board.
Mouse Works Intermittently (Cursor Stops Responding Randomly) or Responds Slowly
- Try using the mouse on another surface. Nonreflective, opaque surfaces without repetitive patterns work best. The surface should be clean but not shiny. Optical mice won’t work on glass, mirrored surfaces, glossy materials, or mousepads with pictures. Does the mouse track on a proper surface?
Yes: Issue resolved.
No: Check the Mouse Tracking setting in the Mouse window of Keyboard & Mouse preferences.
- Boot to another volume (like the Install DVD). Does the mouse track properly now?
Yes: Reinstall the system software that came with the computer and test.
No: Try using a known-good mouse. If a known-good mouse resolves the issue, replace the mouse. If the issue persists with a known-good mouse, replace the main logic board.
Apple Wireless Mouse Is Slow or Not Tracking Smoothly
Refer to Knowledge Base document 93369, “Apple Wireless Mouse is slow or not tracking smoothly.”
Keyboard
If the customer’s complaint has to do with the keyboard, follow these clues and solutions.
None or Only Some of the Keys Function
- Unplug all devices from the computer, including the mouse, keyboard, printer, scanner, external hard drives, and hubs.
Note
Some devices such as external storage devices may require you to perform steps before it is safe to unplug them.
- Plug the keyboard, then the mouse, into the back of the computer firmly and securely. Take special care to make sure the connectors are completely in the sockets. Does your keyboard work now?
Yes: Problem solved.
No: Go to step 3.
- Unplug the keyboard and plug it into another USB slot on the back of the computer. Does it work now?
Yes: This means that the ports are not functioning and the mouse and keyboard are known-good, so you must replace the logic board.
No: Go to step 4.
- Unplug the keyboard and plug the mouse into the port the keyboard just occupied. Does the mouse work now?
Yes: Replace the keyboard.
No: Replace the logic board.
Keys Are Sticky or Slow to Respond
- Try a known-good keyboard.
- Open System Preferences, click Keyboard & Mouse, and adjust the Key Repeat Speed and Delay Until Repeat rates.
- Replace the keyboard.
Unfamiliar Characters Appear on the Screen When Typing
Depending on the iMac settings, a simple keystroke can change a keyboard from English to Japanese. This can result in unfamiliar characters showing up when you type. To switch to the US keyboard:
- Open System Preferences.
- Click the International icon.
- Click the Input tab.
- Scroll down the list and deselect any non-US keyboard layouts.
- Close System Preferences and type a few characters. Did this solve the problem?
Yes: Problem solved.
No: Replace the keyboard.
USB Port on the Keyboard Doesn’t Work
- Unplug all devices from the keyboard.
- Plug the Apple mouse into the left USB port on the keyboard. Does the mouse work?
Yes: Go to step 3.
No: Try a known-good mouse or keyboard and go to step 3.
- Plug the mouse into the right port. Does it work?
Yes: Try a known-good keyboard.
No: Try a known-good mouse to rule out the mouse. Go to step 4.
- Unplug the keyboard from the USB port on the back of the iMac, and plug the mouse into the port the keyboard had been in. Does the mouse work now?
Yes: Replace the keyboard.
No: It appears that the USB port on the iMac isn’t functioning properly. Replace the logic board.
Apple Wireless Keyboard Is Not Responding Correctly
Refer to Knowledge Base document 86496, “Apple Wireless Keyboard and Mouse: Troubleshooting Connection Issues.”
Lesson Review
1. How many LEDs that can be used for troubleshooting are present on the iMac (24-inch)?
a. Two
b. Three
c. Four
d. Five
2. True or false: The diagnostic LEDs can indicate that the optical drive is malfunctioning.
3. True or false: The diagnostic LEDs can help you troubleshoot a faulty power supply.
4. LED 4 is off: What is the cause?
a. Power is off.
b. No video is being generated.
c. Both of the above.
5. True or false: If LED 1 is on, the power supply is getting good power from the AC outlet.
6. If you reset the SMC, which of the following is not affected?
a. Sleep issues
b. Fans
c. PRAM
7. True or false: Apple System Profiler is the first tool used to troubleshoot an AirPort Card.