Lesson 16. Troubleshooting a Mac mini
Reference Files
Mac mini Service Source manual (mac_mini_early_late_06.pdf)
Time
This lesson takes approximately 1 hour to complete.
Goals
Given a Mac mini, locate service procedures, symptom charts, and service issues
Given a problem scenario, return a Mac mini to normal operation using the Apple General Troubleshooting Flowchart and Service Manual
In this lesson, you’ll find overview information about general troubleshooting procedures as well as detailed symptom charts, both of which should help you troubleshoot and repair Mac mini computers. Being familiar with some of the basic operations can help you recognize and resolve problems more easily.
It’s important to follow the troubleshooting procedures in order; they are presented to address the simplest and least invasive cures first, moving on to more radical solutions only when needed. It’s also important to remember that there are slight differences between the models presented here and other models in the same family. When you’re working with a particular model, always refer to the most specific resource material available before proceeding.
In Lesson 15, “Taking Apart a Mac mini,” we explored the replacement of a faulty logic board. In this lesson consider the troubleshooting steps you would pursue to resolve a Mac mini that won’t turn on, has no startup chime, no drive or fan sound, and maybe no power-on LED, as you learn about troubleshooting a Mac mini (Early 2006). Open the Service Manual on this book’s companion website (www.peachpit.com/ats.deskport3) and continue with this lesson.
Let’s first review some background information that will help in many troubleshooting situations.
Status LED
The Mac mini has a LED power light located on the front of the computer in the lower-right corner, below the optical drive slot. Depending on the computer’s status, the LED displays a steady light, no light, or pulsing light.
If the Mac mini is turned off, the LED is off, too. The LED displays a steady white light during startup, normal operation, and when the display is in sleep mode. If the Mac mini itself is in sleep mode, the LED pulses.
Resetting PRAM and NVRAM
Resetting parameter RAM (PRAM) is a possible cure for several symptoms.
- Shut down the computer.
- Turn on the computer.
- Before the gray screen appears, you must simultaneously press and hold all four of these keys: Command, Option, P, and R.
- Hold down the keys until the computer restarts and you hear the startup chime for the second time.
- Release the keys.
The computer’s PRAM and the NVRAM are reset to the default values. On some models, the clock settings may be reset to a default date.
Resetting the SMC
The System Management Controller (SMC) is an integrated circuit (computer chip) typically found on the logic board of Macintosh computers. As its name implies, the SMC is responsible for managing all aspects of the computer’s power. If the computer is experiencing any power issue, resetting the SMC may resolve it.
The SMC controls several functions, including the following:
• Telling the computer when to turn on, turn off, sleep, wake, idle, and so on
• Handling system resets from various commands
• Controlling the fans
Resetting the SMC can resolve some computer issues, such as the following:
• Not starting up
• Not displaying video
• Sleep issues
• Fan noise issues
Resetting the SMC will not resolve issues in which your computer is unresponsive—in these situations, restarting your computer will generally suffice.
Before you reset the SMC, try restarting the computer instead, which may resolve the issue. If the computer has stopped responding, try these steps, in order, until the computer responds:
- Force quit (Command-Option-Escape).
- Restart (Command-Control-Power).
- Force shut down (press the power button for 10 seconds).
If none of these steps resolves the situation, reset the SMC. Users can reset the SMC with the top housing on without voiding the warranty; Apple Authorized Service Providers (AASPs) also have the option of resetting the SMC with the top housing off.
More Info
Refer to Apple Knowledge Base document 303446, “Intel-based iMac, Intel-based Mac mini: How to reset the System Management Controller.”
Resetting the SMC with the Top Housing On
- Turn off the computer by choosing Shut Down from the Apple menu, or by holding the power button until the computer turns off.
- Unplug all cables from the computer, including the power cord.
- Wait 15 seconds.
- Plug the power cord back in, making sure the power button is not being pressed at the same time. Reconnect the keyboard and mouse to the computer.
- Press the power button on the back to start up the computer.
Note
This procedure does not reset the computer’s PRAM.
If these steps do not resolve the situation, reset the SMC with the top housing off as instructed in the following section.
Resetting the SMC with the Top Housing Removed
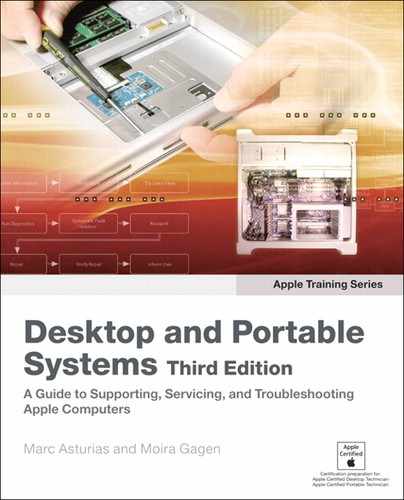
AASPs can also reset the SMC by directly pressing the SMC reset switch located on the logic board. Follow these steps to access the SMC reset switch on the logic board:
- Unplug all cables from the computer, including the power cable.
- Remove the top housing.
- If necessary, remove the internal frame to access the battery.
- Measure the voltage of the battery in the battery holder.
The battery should measure +2.6 V to +3.0 V. If the battery voltage is good, proceed to step 5. If the battery does not have minimum voltage, replace the battery, wait 10 seconds, and then proceed to step 5.
- Using a nylon probe tool, press the SMC switch on the logic board once.
Do not press the SMC reset button a second time—it could crash the SMC chip.
Note
This procedure does not reset the computer’s PRAM.
SMC reset switch (circled in blue)
Symptom Charts
The symptom charts included in this lesson will help you diagnose specific symptoms and follow the guidelines set forth in the Apple General Troubleshooting Flowchart. Because cures are listed on the charts in the order of most likely solution to least likely, try the cures in the order presented. Verify whether or not the product continues to exhibit the symptom. If the symptom persists, try the next cure. If a cure instructs you to replace a module, and the symptom persists with the new module, reinstall the original module before you proceed to the next cure.
In Lesson 15 we explored the replacement of a faulty logic board. In this lesson, consider the troubleshooting steps you would pursue to resolve a Mac mini that won’t turn on, has no startup chime, has no drive or fan sound, and maybe an unlit power-on LED, as you learn about troubleshooting a Mac mini (Early 2006). Open the Service Source Manual on the companion website and continue with this lesson.
Note
These symptom charts are taken from the service manual that was current at the time of publication and which appears on the companion website. AASPs should download and refer to the latest service manual from AppleCare Service Source before servicing any Apple product.
No Power
The Mac mini won’t turn on, no startup chime, no drive or fan sound, power LED may be unlit
In the previous lesson, you replaced the logic board in a computer exhibiting these symptoms. You can imagine following these troubleshooting steps to arrive at that conclusion.
- Make sure that the power cord is plugged into a working wall outlet and that it’s properly connected to the power adapter.
Tip
To check if the wall socket is working, plug in a lamp or other electrical device.
- Make sure that the power adapter is properly connected to the power port on the back of the computer.
- Disconnect all accessories that are plugged into the computer, such as a printer, hub, or iPod.
- Reset the SMC.
- Try plugging a different power cord into the computer. If the computer starts up, replace the old power cord.
- Try connecting a different power adapter to the computer (if you have a working one available). If the computer starts up, replace the old power adapter.
- Replace the logic board.
Our scenario would end here, in the replacement of the logic board that was demonstrated in the preceding lesson. Let’s continue on to learn about troubleshooting other symptoms.
No Video
Computer starts up, but no video on display, there is a startup chime, fans and drive spin up, and the power LED is on
- Make sure that the display is turned on and has power. Make sure that the display’s power cord is plugged into a working wall outlet, and that it’s properly connected to the power adapter.
- Check that all video cable connections to the computer video port and to the display are properly connected.
- Examine the pins on the video cable connector to make sure they are not bent or damaged in any way.
- Connect a known-good display (if you have an extra one available). If you see no video after doing so, proceed to the next symptom, “No video on the display.” If you do not see video, go on to step 5.
- Reset the computer’s NVRAM. (Refer to the “Resetting PRAM and NVRAM” section earlier in this lesson.)
- Reset the computer’s SMC.
- Reseat the Mac mini’s memory.
- Remove the DIMM and try replacing it with a known-good DIMM to test.
- Reset the SMC on the logic board.
- Replace the logic board.
No Video: Other displays work with the Mac mini, but the display shows a black screen or “Out of Range” message
- Verify that the display used in testing is known-good and is supported by this computer. Refer to Knowledge Base document 300652, “Mac mini: Compatible Apple Displays.”
- If your display is not listed in the document cited above, try using the steps in Knowledge Base document 301345, “Mac mini: Troubleshooting ‘Out of Range’ alert message.”
- If you still have no video on your display when connected to a Mac mini, try another display of the same type (either same model or same connector and native resolution).
- Contact Tech Assist through AppleCare Service Source if you require further assistance.
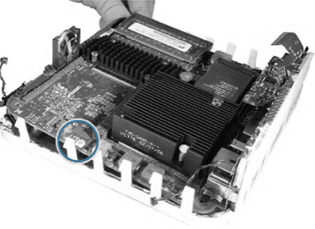
Display Shows Ghosting (Signal Reflection)
- Verify that the display used in testing is known-good and is supported by this computer.
- Verify that the cables are correctly installed and firmly seated.
- Connect a known-good display (if you have an extra one available). If it solves the issue, replace your display.
- Try a known-good DVI to VGA adapter.
- Replace the adapter cable.
- Replace the logic board.
AirPort Extreme Issues
Card Not Recognized
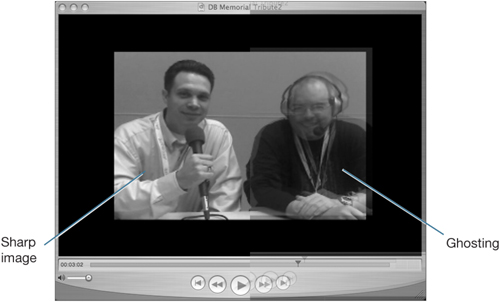
If the Mac mini does not recognize an AirPort Extreme Card, the card may be seated incorrectly or may be inoperable.
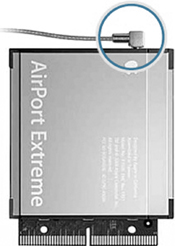
- Reseat the AirPort Extreme Card, making sure it is connected securely into the AirPort slot on the logic board.
Reseat the AirPort Extreme Card as shown.
- Make sure the AirPort cable is connected to the AirPort card.
- Reassemble the computer and test. If the AirPort Extreme Card is still not recognized, test with a known-good AirPort Extreme Card. If the known-good card is recognized, replace the AirPort Extreme Card.
- If a known-good AirPort Extreme Card is still not recognized, replace the logic board and test the computer again.
Poor AirPort Reception: Mac mini is able to connect to the network, but the signal strength is poor
- Don’t put anything on top of your Mac mini, including another Mac mini. Doing so could hamper the signal strength, because the antennas are located in the top of the computer.
- If the Mac mini is still experiencing poor AirPort reception, refer to Knowledge Base document 58543, “AirPort: Potential sources of interference.”
- Remove the top housing and test the reception. If the reception is good with the top housing removed, check to make sure that the antenna cable and receptors are not damaged or hindered when installing the top housing.
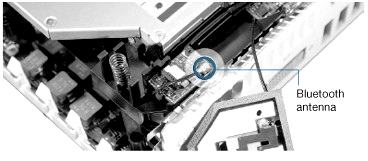
- Check that the AirPort antenna is securely connected to the AirPort Extreme Card.
- If a known-good AirPort antenna is still not recognized, replace the AirPort and Bluetooth antennas and test the computer again.
- Try a known-good AirPort Extreme Card.
- Replace the AirPort Extreme Card.
- Replace the logic board.
Note
If you replace the AirPort antenna, you must replace the Bluetooth antenna at the same time, and vice versa. The AirPort and Bluetooth antennas must be installed by pairing under the same manufacturer (for example, Tyco’s Airport antenna with Tyco’s Bluetooth antenna). Do not mix different vendors’ antennas, or they may interfere with each other.
Can’t Connect to the Internet Over AirPort
In this situation, the Mac mini recognizes that an AirPort Extreme Card is installed, but it cannot connect to the Internet over AirPort.
- Refer to Knowledge Base document 106858, “AirPort troubleshooting guide.”
- If the Knowledge Base document does not resolve the issue, reseat and replace the AirPort antenna.
- Make sure that the AirPort antenna is seated correctly to the AirPort Extreme Card. Refer to Knowledge Base document 108039, “Properly attaching the antenna on an AirPort Extreme Card.”
The boxy part of the connector should be almost flush with the card.
- Make sure that the AirPort antenna is not damaged or warped on the receiver end of the cable. Make sure that this end is properly seated to the internal frame.
- Replace the AirPort antenna and test the connection.
- If the issue persists, replace the AirPort Extreme Card.
Bluetooth issues
The Mac mini does not recognize the Bluetooth board
If the Mac mini does not recognize Bluetooth, the board may not be seated correctly or is inoperable.
- Reseat the Bluetooth board (located near the AirPort antenna).
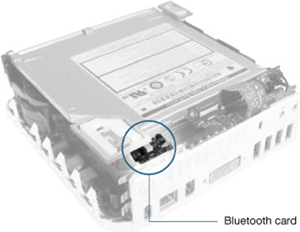
- Check that the Bluetooth cable is securely connected to both the Bluetooth board and the interconnect board.
- Check that the Bluetooth antenna is securely connected to the Bluetooth board.
- Reassemble the computer and test. If the Bluetooth board is still not recognized, test with a known-good Bluetooth board. If the known-good board is recognized, replace the Bluetooth board.
- Replace the logic board.
The Mac mini recognizes the Bluetooth board but cannot pair with wireless devices
If the Mac mini recognizes the Bluetooth board, but you are unable to pair your Apple Wireless Keyboard and Wireless Apple Mouse, try the steps outlined in Knowledge Base document 86496, “Apple Wireless Keyboard and Mouse: Troubleshooting Connection Issues.”
- Make sure that the Bluetooth antenna is connected firmly to the Bluetooth board.
- With the top housing removed, make sure that the Bluetooth antenna is not damaged or warped on the receiver end of the cable. Make sure that this end is seated properly to the internal frame of the Mac mini.
- Check to make sure that the antenna cable and receptors are not damaged or hindered when installing the top housing.
- Replace the Bluetooth antenna and test the computer.
- If the issue persists, replace the Bluetooth board.
- Replace the cable connecting the Bluetooth and interconnect boards.
- Replace the interconnect board.
- Replace the logic board.
IR Remote
Remote won’t communicate with system applications such as iTunes or iPhoto, or with the optical drive.
Make sure of the following when using the Apple Remote:
• You are within 30 feet of the front of the computer.
• You have an unobstructed line-of-sight to the front of the computer.
• You are pointing the lens end of the Apple Remote directly at the front of the computer.
• The computer is powered on and awake.
• The “Disable remote control infrared receiver” checkbox in the Security pane of System Preferences is not selected.
• Make sure the active application works with Apple Remote. Apple Remote uses Front Row, and from Front Row it can access DVD Player, iPhoto, iTunes, and QuickTime Player.
• Make sure this particular remote is paired with the computer. Access Security preferences and select “Unpair” if available. Close Security preferences and re-pair the Apple Remote with the computer.
Note
For additional information on the Apple Remote, consult Knowledge Base document 302545, “Pairing your Apple Remote with your computer.”
The following steps will help troubleshoot the issue.
- Use a digital camera to test your Apple Remote.
If you have a digital camera or DV camera with an LCD screen, you can use it to see if your Apple Remote is emitting a signal. Infrared beams are invisible to the human eye, but most digital cameras and video cameras use Charged-Coupled Device (CCD) chips or image sensors that are sensitive to infrared light.
To use a camera to test your Apple Remote, follow these steps:
- Turn on your digital camera or DV camera and remove any lens cover.
- Point your Apple Remote toward the camera lens.
- Press and hold the Menu button on the remote while looking at your camera’s LCD screen.
- If you see a faint blinking light coming from the Apple Remote in the camera’s LCD, then the remote is working properly.
- If you don’t see any blinking light in the camera’s LCD, replace the battery in your Apple Remote and then test it again with your computer.
- Does the IR Remote now communicate with an active application that works with Apple Remote?
Yes: IR Remote is functioning correctly.
No: Replace Apple Remote.
IR (Infrared) Sensor/Receiver
Supported applications do not respond to input from the remote control
- Check the IR Remote with supported applications to verify that Apple Remote is functioning correctly. Do supported applications now respond to input from the IR Remote? If not, continue to the next step.
More Info
For additional information on the Apple Remote, consult Knowledge Base documents 302504, “About the Apple Remote Control,” 303377, “Mac mini (Early 2006): About the IR Sensor,” and 302543, “How to replace the Apple Remote battery.”
- Verify that the IR Sensor can be seen in System Profiler. Open System Profiler and click on the USB section. You should see the following listed:
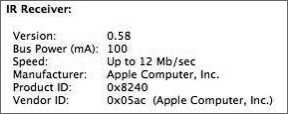
Do you see the IR Receiver listed under the USB section of System Profiler?
Yes: Go on to step 3.
No: Replace the IR board and retest. Refer to the IR Board procedure in Take Apart.
Do supported applications now respond to input from the IR remote?
Yes: Problem resolved.
No: Replace the IR board and retest. Refer to the IR Board procedure in Take Apart. If the issue persists after replacing these parts, replace the logic board.
- Access System Preferences and click Security. In the Security pane, check the following:
• Make sure the “Disable remote control infrared receiver” checkbox is not selected.
• If Unpair is available in Security preferences, another Apple Remote may be paired to the computer (pairing allows only one Apple Remote to control the computer). To delete a pairing between the remote and the Mac mini, click Unpair. (You may have to enter an administrator password to make changes in Security preferences.)
After making sure these features are disabled, does the Apple Remote control the machine now?
Yes: Problem resolved.
No: Replace the IR board and retest. Refer to the IR Board procedure in Take Apart.
Battery
If the computer won’t keep date and time, or if the date and time reset when the computer is powered off or unplugged, the problem may be the battery.
- Make sure the electrical outlet works by plugging in a different device, or plug the computer into a different outlet.
- Try a known-good power cord.
- Check the connection of the power cord on both ends. Make sure that the plug is securely plugged into both the electrical outlet and the back of the computer.
- Disconnect the keyboard, mouse, and all other peripherals such as speakers.
- Remove the top housing and, if necessary, remove the internal frame.
- Measure the voltage of the battery in the battery holder.
The battery should measure +2.6 V to +3.0 V. If the battery voltage is good, go on to step 7. If the battery does not have minimum voltage, replace the battery, wait 10 seconds, then go on to the next step.
- Using a nylon probe tool, press the SMC switch on the logic board once.
Do not press the SMC reset button a second time—it could crash the SMC chip.
- If the issue continues after resetting the SMC, replace the logic board.
Error Beeps
The computer automatically performs a power-on self test (POST) when it is turned on after being fully shut down (not a restart). This section describes what to do if you hear beeps during startup.
Computer Beeps at Startup
- Check that the memory DIMM is compliant.
- Reseat the memory into the slot.
- Replace the memory.
- Replace the logic board.
Note
The maximum amount of SDRAM supported by the Mac mini (Early/Late 2006) is 2 GB (one 1 GB SO-DIMM in each slot) with the following specifications: PC2-5300, unbuffered, nonparity, 200-pin, 667 MHz DDR2 SDRAM.
Optical Drive
Optical Drive Does Not Accept Discs (Mechanical Failure)
- Verify the disc is not warped.
- Try another known-good disc.
- Reseat the optical drive to the interconnect board.
- Replace the optical drive.
- Replace the interconnect board.
- Replace the logic board.
Disc Icon Does Not Show Up on the Desktop, or a Dialog Appears to Initialize the Disc
- Verify that you are using the correct type of disc for the type of drive (a CD-ROM or CD-RW drive reads CD discs only; a DVD-ROM or Combo drive reads CD or DVD discs).
- Try cleaning the disc. If it is dirty or scratched, it may not mount.
- Try a known-good disc.
- Reseat the optical drive to the interconnect board.
- Replace the optical drive.
- Replace the interconnect board.
- Replace the logic board.
Optical Drive Does Not Eject the Disc
- Check the disc. Nonstandard discs should not be used with the Mac mini. Refer to Knowledge Base document 58641, “Using nonstandard discs in optical drives.”
- Verify the disc is not in use by quitting any applications that may be using it.
- Press and hold the Media Eject key at the upper-right corner of Apple keyboard. If that does not work, hold down the Function (fn) key and the Media Eject key.
- Drag the disc icon to the Trash or select it and press Command-E.
- Choose Restart from the Apple menu, then immediately hold down the mouse button to eject the disc.
- Refer to Take Apart to remove the stuck disc and replace the optical drive.
More Info
For additional information, refer to Knowledge Base document 106752, “Macintosh: How to Eject a Disc When Other Options Do Not Work.”
Hard Drive
Hard Drive Fails to Boot to the Desktop
- Boot from the Mac mini Mac OS X Install DVD and see if the hard drive is available in the installer.
- Run Apple Hardware Test (AHT), located on the install DVD.
- Run Disk Utility, and repair any directory and permissions issues.
- Verify that the hard drive is connected firmly to the interconnect board.
- Try a known-good hard drive.
- Back up the original hard drive, erase it, then restore from backup or reinstall Mac OS and applications from original discs.
- Try a known-good interconnect board.
- Replace the hard drive.
- Replace the interconnect board.
- Replace the logic board.
Internal Hard Drive Does Not Spin
- Disconnect any connected peripherals.
- Try a known-good power outlet.
- Try a known-good power cord.
- Boot from the Mac mini Mac OS X Install DVD and see if the hard drive is available in the installer.
- Run AHT, located on the install DVD.
- Run Disk Utility, and repair any directory and permissions issues.
- Verify that the hard drive is connected to the interconnect board.
- Try a known-good hard drive.
- Back up the original hard drive, erase it, then restore from backup or reinstall Mac OS and applications from original discs.
- Try a known-good interconnect board.
- Replace the hard drive.
- Replace the interconnect board.
- Replace the logic board.
System Hangs During Normal Startup Process
- Boot from the Mac mini Mac OS X Install DVD and see if the hard drive is available in the installer.
- Run Apple Hardware Test (AHT), located on the install DVD.
- Run Disk Utility, and repair any directory and permissions issues.
- Verify that the hard drive is connected to the interconnect board.
- Try a known-good hard drive.
- Back up the original hard drive, erase it, then restore from backup or reinstall Mac OS and applications from original discs.
- Try a known-good interconnect board.
- Replace the hard drive.
- Replace the interconnect board.
- Replace the logic board.
Flashing Question Mark Appears on the Screen

Flashing question mark
- Boot from the Mac mini Mac OS X Install DVD and see if the hard drive is available in the installer.
- Run AHT, located on the install DVD.
- Run Disk Utility, and repair any directory and permissions issues.
- Verify that the hard drive is connected to the interconnect board.
- Try a known-good hard drive.
- Try a known-good interconnect board.
- Replace the hard drive.
- Replace the interconnect board.
- Replace the logic board.
Keyboard
No Response from Any Key on the USB Keyboard
- Check that the mouse and keyboard are compliant with the USB specification.
The Mac mini has two USB 2.0 ports, which can be used with any USB 1.1 or USB 2.0 keyboard and mouse.
- Remove any connected peripherals.
- Boot from the Mac mini Mac OS X Install DVD to verify that it is not a software problem.
- Disconnect the keyboard connector and inspect connectors.
- Replace the keyboard.
- Replace the logic board.
No Response from the Wireless Keyboard
- Run System Profiler to determine if Bluetooth is present.
- Try a known-good wireless keyboard.
- Replace the batteries in the wireless keyboard.
- Replace the keyboard.
- Remove the top housing.
- Check for kinks in the Bluetooth antenna cable. Test the reception before replacing the top housing.
- If the reception goes away when the top housing is replaced, remove the top housing and reseat the Bluetooth antenna on the internal frame. Test the reception again.
- Make sure that the Bluetooth antenna is connected firmly to the Bluetooth board.
- Make sure that the Bluetooth antenna is not damaged or warped on the receiver end of the cable. Make sure that the antenna is seated properly to the internal frame of the Mac mini.
- Replace the Bluetooth antenna and test the computer.
- If the issue persists, replace the Bluetooth board.
- Replace the logic board.
Ports
FireWire or USB Port Is Not Recognizing Devices
- Choose Shut Down from the Apple menu, then press the power button to restart the computer.
- Choose Software Update from the Apple menu to verify that the latest software is installed.
- Run System Profiler to verify that the computer recognizes the bus.
- For USB, test the port with a compliant keyboard or mouse.
- For FireWire, test the port by connecting another computer in FireWire Target Disk Mode.
More Info
Refer to Knowledge Base document 58583, “How to Use FireWire target disk mode.”
- Verify that drivers are installed properly for third-party hardware, if needed.
- Try a different cable.
- Try a known-good device.
- If the device is self-powered, make sure that the power supply is connected and the device’s LED indicates that it is getting power.
- Replace the logic board.
Sound
Distorted Sound from Speakers
- Check the balance setting in the Output pane of Sound preferences.
- Check to see if the sound is the same from the internal speaker as compared to the external speakers.
- Check that speakers are inserted correctly, and check cables for damage.
- Compare the same sound with two different computers to make sure that sound is actually distorted.
- Remove the top housing and internal frame.
- Check that the speaker is seated correctly and screwed to the internal frame.
- Check for speaker cable damage and that the cable is connected securely to the interconnect board.
- Replace the speaker.
- Replace the interconnect board.
- Replace the logic board.
No Sound from Speakers
- Check the balance setting in the Output pane of Sound preferences.
- Check to see if the sound is the same from the internal speaker as compared to the external speakers.
- Verify that no external speakers or headphones are plugged in.
- Choose Restart from the Apple menu.
- Reset NVRAM. (Press the power button, then hold down the Option-Command-P-R keys until you hear the startup chime at least one additional time after the initial startup chime.)
- Remove the top housing and internal frame.
- Check that the speaker is seated correctly and screwed to the internal frame.
- Check for speaker cable damage and that the cable is securely connected to the interconnect board.
- Replace the speaker.
- Replace the interconnect board.
- Replace the logic board.
Display
Display Is Dim But Computer Appears to Operate Correctly
- Check that the display is compatible with the Mac mini. Refer to Knowledge Base document 300652, “Mac mini: compatible Apple displays.”
- Check the brightness level in Display preferences.
- Make sure that the display is turned on and has power. Make sure that the display’s power cord is plugged into a working wall outlet, and that it’s properly connected to the power adapter. (To check if the wall socket is working, plug in a known-good lamp or other electrical device.)
- Check that all video cable connections to the computer video port and to the display are connected properly.
- Examine the pins on the video cable connector to make sure they are not bent or damaged in any way.
- Connect a known-good display (if you have an extra one available). If you see video after doing so, replace the old display.
- If the known-good display shows the same issue, replace the logic board.
Scrambled or Distorted Video
- Check that the display is compatible with the Mac mini. Refer to Knowledge Base document 300652, “Mac mini: compatible Apple displays.”
- Check connections on the back of the Mac mini.
- Check that you are using the correct adapter (if necessary).
- Try a known-good display. If the known-good display solves the issue, replace the old display.
- If the known-good display shows the same issue, replace the logic board.
Fan
Fan Failure
- Remove the top housing and the internal frame.
- Check the fan cable connection to the interconnect board, and check the cable for damage.
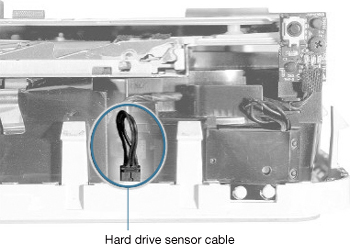
- Check that the hard drive sensor cable is connected to the logic board.
- Replace the fan.
- Replace the interconnect board.
- Replace the logic board.
Lesson Review
1. How many status LEDs are present on the Mac mini?
a. One
b. Two
c. Three
2. True or false: The LED pulses when the Mac mini computer’s display is in sleep mode.
3. True or false: You can reset the Mac mini computer’s SMC with the top housing either on or off.
4. True or false: Resetting the Mac mini computer’s SMC also resets PRAM.
5. What is the first thing to check if the Mac mini refuses to turn on?
a. All accessories are unplugged from the Mac mini.
b. The power adapter connector on the Mac mini is not bent.
c. The power cord is plugged into a working wall outlet.
6. When you hear an error beep upon startup, what is the usual cause?
a. Power issue
b. Memory issue
c. Hard drive failure
Answer Key
2. False, the LED pulses when the computer is asleep and is steady when only the display is asleep