Lesson 18. Upgrading a Mac Pro
Reference Files
Mac Pro Service Source Manual (macpro.pdf)
Mac Pro User Guide (Mac_Pro_User_Guide.pdf)
Time
This lesson takes approximately 1 hour to complete.
Goals
Install additional memory in a Mac Pro
Install an additional hard drive in a Mac Pro
Install a PCI Express Card in a Mac Pro
The Mac Pro is similar to its predecessor, the Power Mac G5, in its external appearance. Both designs incorporate the convenience of easy expansion and accessibility. Components and expansion options are easily reached through the removal of a side access panel.
However, the Mac Pro features many new hardware enhancements that are improvements over the Power Mac G5, including two dual-core Intel processors, higher performance memory, capacity for four internal drives in easy-to-install drive carriers, and space for two optical drives.
This lesson explains how to upgrade the Mac Pro. We’ll explore the installation of additional random-access memory (RAM) to increase performance, an additional hard drive to increase storage capacity, and the installation of a Peripheral Component Interconnect (PCI) Express card to expand its capabilities.
Required Tools and Equipment
To complete this lesson, you need the following:
• Electrostatic discharge (ESD) wrist strap and mat
• Phillips #1 screwdriver
• 667 MHz fully buffered dual inline memory modules (FB-DIMMs) (see specifications)
• PCI Express card
• Serial ATA hard drive
• Apple Hardware Test (AHT)
Before You Do Anything
Follow the normal antistatic procedures discussed in Lesson 4, “Safe Working Procedures and General Maintenance.” It is vital that you follow these instructions and that you do so in the order presented. Disconnecting some peripherals while in use can damage them or the computer, and stray electrostatic discharges (from something even as innocent as a dry day) can do permanent harm to the computer.
Opening a Mac Pro
Prior to opening the Mac Pro, open the service manual on this book’s companion website, www.peachpit.com/ats.deskport3, and familiarize yourself with its precautions and procedures. Always use the latest service manual or user’s guide if actually performing an upgrade.
Whenever opening a Mac Pro, follow these simple procedures:
- Shut down the computer.
Warning
Always shut down the computer before opening it to avoid damaging its internal components or the components you are installing. Do not open the computer or attempt to install items inside it while it is on.
- Wait 5 to 10 minutes to allow the computer’s internal components to cool down.
Warning
After you shut down the system, the internal components can be very hot. You must let the computer cool down before continuing.
- Touch the metal on the outside of the computer to discharge any static electricity from your body.
Note
Always discharge static before you touch any parts or install any components inside the computer. To avoid generating static electricity, do not walk around the room until you have finished working and closed the computer. For additional information on ESD, visit http://en.wikipedia.org/wiki/Electrostatic_discharge.
- Unplug all external cables and peripherals from the computer.
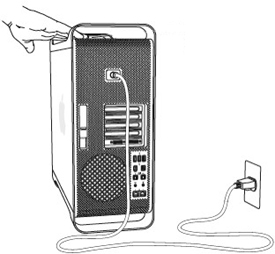
- Unplug the power cord from the outlet and computer.
Warning
To avoid damaging the computer’s internal components or the components you want to install, always unplug the computer before attempting any upgrade procedure.
- Put on your ESD wrist strap.
- Hold the side access panel and lift the latch on the back of the computer.
Warning
The edges of the access panel and the enclosure can be sharp. Be very careful when handling them.
- Remove the access panel and place it on a flat surface covered by a soft, clean cloth.
Note
Make sure the latch is in the up position before you replace the access panel. If the latch is down, the access panel will not seat correctly in the enclosure.
Installing RAM
The Mac Pro has two memory riser cards with a total of eight memory slots. On each card, the slots are arranged as two banks of two slots each. The computer comes with a minimum of 1 GB of memory, installed as a pair of 512 MB FB-DIMMs in two of the DIMM slots. Additional DIMMs can be installed in the open DIMM slots.
DIMMs must be installed in equal-sized pairs from the same vendor and fit these specifications:
• 667 MHz FB-DIMMS
• 72-bit–wide 240-pin modules
• Maximum 36 devices per DIMM
• Error-correcting code (ECC)
Note
When purchasing DIMMs for use in Mac computers, make sure that the memory vendor conforms to the Joint Electron Device Engineering Council (JEDEC) specification. Check with the memory vendor to ensure that the DIMMs support the correct timing modes and that the Serial Presence Detect (SPD) feature has been programmed properly, as described in the JEDEC specification.
Install DIMMs in the sequence illustrated by the numbers in the following image. DIMMs in one numbered pair do not need to match DIMMs in a different numbered pair.

Memory configuration chart
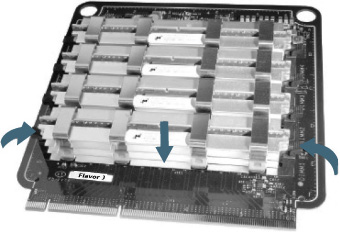
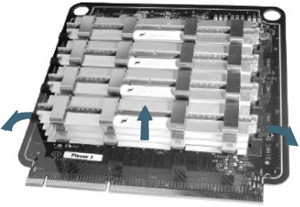
- Before you begin, lay the open computer on its side with the access side facing up.
- Holding the memory riser card by the two finger holes, pull it out of the memory cage and place the card on the ESD mat.
- If you need to move a memory module or upgrade the module to a larger one, open the ejectors on the DIMM slot by pushing them out to the sides, and remove the DIMM from the riser card.
- Repeat to remove the second DIMM, if needed. If you are simply adding additional DIMMs, no removal is required and you may proceed to step 5.
Note
If you have one pair of DIMMs installed, they are usually in slots 1 and 2 on the top riser card.
- Following the memory configuration chart, align the first FB-DIMM in the correct slot, making sure that the notches line up with the ribs inside the slot.
- Push down on both ends of the FB-DIMM until the tabs are vertical and the ejectors snap into place. Repeat to install the second FB-DIMM. Don’t touch the gold connectors.
Note
FB-DIMMs carry heatsinks on both sides. Never attempt to remove the heatsinks. Doing so could damage the memory modules.
- Repeat steps 2 through 6 to install additional memory as needed.
- Replace the access panel, reconnect the power cord and remaining cables, and power on the computer.
- After logging in, choose About This Mac from the Apple menu to verify that the computer recognizes the newly installed memory.
Installing a Hard Drive
The Mac Pro has room for six internal drives: two optical drives and four hard disk drives. In most configurations, a single hard disk drive occupies the first hard drive bay and an optical drive is located in the top optical drive bay.
You can add up to three additional Serial ATA (SATA) 3 Gbps hard disk drives to the empty hard drive bays. The drives must meet these specifications:
• Type: SATA 3 Gbps
• Width: 3.9 inches (102 mm)
• Depth: 5.7 inches (147 mm)
• Height: 1.0 inch
Note
When you install ATA or optical drives, use the original Apple cables that came with the Macintosh.
The following installation process is extremely simple. It assumes you have already removed the Mac Pro computer’s access panel and grounded yourself following the steps on the previous pages.
- Make sure the latch on the back panel is up. When the latch is down, the drive and carriers are locked in the drive bays and cannot be removed.
Note
If the printed circuit board (PCB) is exposed on the bottom of the hard drive, hold the drive by its sides. To avoid damaging the drive, take care not to touch the PCB during installation.
- Pull the hard drive carrier out of the drive bay.
- Use the four screws on the carrier to attach the hard disk drive to the carrier.
- Lift the latch, and slide the carrier over the guides and into the drive bay, until it is seated in the bay and snaps into place.
- Replace the side access panel and push the latch down to secure it.
- Reconnect the power cord and remaining cables, and power on the computer.
- After logging in, double-click Disk Utility (Applications/Utilities). If you have installed the additional hard drive successfully, Disk Utility will display information about the drive.
- You may proceed to partition and format the drive, if it is new. If the drive will be a bootable drive, select GUID Partition Table in the partition options.

- Run System Profiler and, in the left column under Hardware, select Serial-ATA. Hard disk drive details including capacity and available space will be available for review.

Adding a PCI Express Card
You can expand the capabilities of the Mac Pro by installing cards in the PCI Express slots. The Mac Pro has one double-wide PCI Express graphics slot and three PCI Express expansion slots.
The Mac Pro comes with a high-performance PCI Express graphics card in slot one. This card contains the graphics processor unit (GPU) and provides the computer’s display ports.
Note
Graphics cards from previous Power Mac G5 models are not compatible with Mac Pro. In addition, Mac Pro graphics cards are not compatible with Power Mac G5 models.
Each PCI Express slot has a 3.3 V and a 12 V power rail. On the 3.3 V rail, each slot may use a maximum of 10 W. On the 12 V rail, each slot may use a maximum of 65 W, (not including auxiliary power through a booster cable), subject to the total wattage rules listed below.
When populating the four PCI Express slots, follow these total wattage rules:
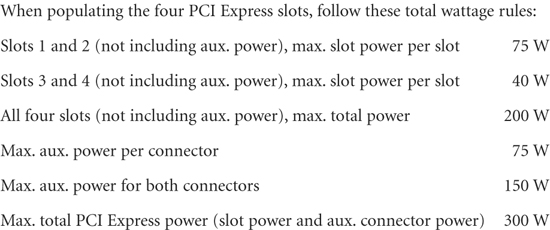
Note
The combined maximum power consumption for all four PCI Express slots must not exceed 300 watts (slot and aux. power) or 200 watts total (slot power only). Before installing a card, check the manufacturer’s specifications to make sure that it can operate in the Mac Pro, and obtain the wattage of the device.
Before we begin, we will assume you have already removed the Mac Pro computer’s side access panel, grounded yourself following the steps on the previous pages, and taken any precautions noted.
- Lay the Mac Pro on its side on a soft, clean cloth to avoid scratching the work surface and the computer itself.
- Unscrew the two captive screws in the PCI bracket and remove the bracket.
- Remove the port access cover from the slot in which you plan to install the card. If you remove a card and don’t install a replacement, place a port access cover over the empty slot to keep foreign objects out of the enclosure. An uncovered slot affects the airflow that cools the internal components and may cause damage.
Tip
It may be easier to install a PCI card if you remove the hard disk drives and carriers, and remove adjacent cards. If you have a full-length card, install the end of the card in the card guide first, and then align the card with the PCI slot to finish installing it.
- Remove the new PCI Express card from its static-proof bag and hold it by its corners. Don’t touch the gold connector or the component on the card. If the card has a booster cable, connect it to the card.
- Align the card’s connector with the expansion slot and press the card into the slot.
- Press the card gently but firmly until the connector is fully inserted. Press only on the bare areas of the card to avoid damaging the components.

- Pull the card gently to see if it is properly connected. If it stays in place and its gold connectors are barely visible, the card is connected. If the card has a booster cable, connect it to the logic board.
Note
There are two logic board connectors for booster cables. Connect the booster cable for a card in PCI slot 1 to the connector that is closest to the heatsink cover. Connect the booster cable for a card in PCI slot 2 to the connector closest to the media shelf.
- Replace the PCI bracket and tighten the captive screws to secure the card.
- Replace the side access panel and push the latch down to secure it.
You will need to configure the PCI Express expansion slot for multiple cards. As indicated earlier, the Mac Pro features four PCI Express slots on the main logic board. PCI Express uses dedicated, unidirectional, point-to-point connections known as lanes to communicate with PCI Express devices. In PCI Express, these are known as x16 slots. PCI Express cards will work in slots that are at least as large as the card is. In other words, the x16 slots in the Mac Pro computer also support x1 and x4 cards. However, all four slots cannot simultaneously support four cards that use the same lane configuration.
Note
For additional information on PCI-E slots, refer to Apple Knowledge Base document 304122, “Mac Pro: About the PCI-E slots.”
To configure the PCI Express expansion slots and lanes:
- Open the Expansion Slot Utility, located in System/Library/Core Services.
The example below shows a x16 graphics card occupying the first slot, and the other slots are configured to support an x1 card in slot two and x4 cards in slots three and four. The example shows the other options available.
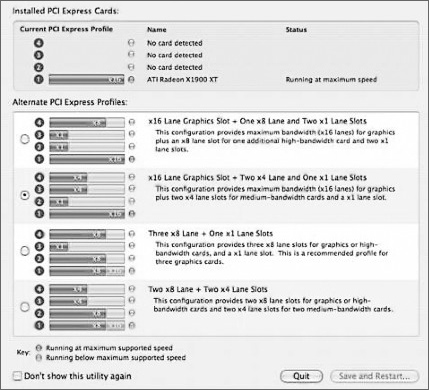
- When you have picked the appropriate configuration of slots to support your PCI Express cards, click the Save and Restart button to implement the configuration.
- Open System Profiler and select PCI Cards. The PCI Express card you installed should be visible.
If there is a problem with the installation, you may see a screen similar to the picture below.
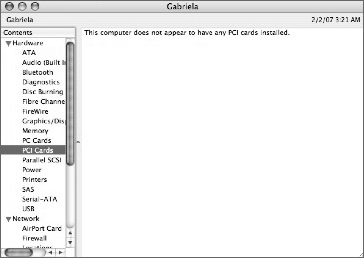
Note
The PCI Express card manufacturer may include additional instructions to follow. These instructions may include additional software that needs to be installed for the card to be detected and function properly.
Lesson Review
1. True or false: There is no need to allow the Mac Pro to cool down before opening.
2. True or false: DIMMs must be installed in pairs of equal size from the same vendor.
3. For how many internal hard drives does the Mac Pro have the capacity?
a. 2
b. 4
c. 6
4. True or false: The Mac Pro in its typical configuration has room for three additional SATA drives of the correct size.
5. True or false: Once the access panel on the Mac Pro has been removed, the hard drive carrier is free to be removed.
6. True or false: PCI Express power in the Mac Pro is rated for a total of 300 watts.
7. True or false: Leaving port access covers off on unused PCI Express slots on the Mac Pro is advised, as it adds additional ventilation to the unit.
8. The Mac Pro accepts only which types PCI Express cards?
a. 1x and 4x
b. Up to x16
c. Any one type
Answer Key
1. False, the Mac Pro should cool down for 5 to 10 minutes before opening
5. False, the access latch must be raised to unlock the carriers
7. False, unused PCI Express slots should be covered to maintain proper ventilation and protect from foreign objects