Lesson 28. Troubleshooting a MacBook Pro
Reference Files
MacBook Pro service manual (macbook-pro.pdf)
Time
This lesson takes approximately 1 hour to complete.
Goals
Given a MacBook Pro, locate service procedures, symptom charts, and service issues
Given a problem scenario or malfunctioning MacBook Pro and the Apple General Troubleshooting Flowchart, return the computer to normal operation
In this lesson, you’ll find overview information about general troubleshooting procedures and detailed symptom charts, both of which will help you troubleshoot and repair MacBook Pro computers. Being familiar with Apple technical resources and some of the underlying operations can help you troubleshoot and restore the computer to normal operation more quickly.
Note
For more detailed information, refer to the Service Source manual for this unit, which can be found on this book’s companion website, www.peachpit.com/ats.deskport3.
Servicing a MacBook Pro requires a light touch and precision. Be careful with sharp tools that can easily damage its components.
As you read this lesson, consider the symptoms (discussed in Lesson 27, “Taking Apart a MacBook Pro”) that would lead you to conclude that a logic board replacement is necessary. Use best practices and Apple resources to set the example for others, because eventually, you will be the lead technician!
General Information
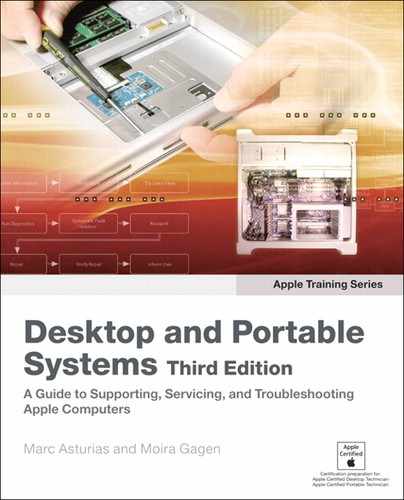
Wire and Flex Cables
Because of its extremely thin enclosure design and dispersed circuit board, the MacBook Pro utilizes a large number and variety of flex cables and wire cable harnesses. Many of these cables carry multiple types of signals.
The following is a list of the cables and the signals that run through them. If you notice a group of functions not working, it is likely that the cable is not properly inserted or the connector is damaged.

Many of the MacBook Pro components are connected to each other by thin ribbon cables that can be easily creased, cracked, or torn, and they must be handled in a deliberate and cautious manner. Because ribbon cables are often wrapped around or threaded through parts in a specific path, carefully note the cable’s path, so that you can reinstall it in exactly the same way.
In the MacBook and MacBook Pro systems, the case is very tightly packed with components, which means that cable routing can sometimes be complicated. Misrouting a cable during parts replacement can render the system defective.
Like the cables they connect, cable connectors are also fragile and can be broken easily. When a connector is inadvertently broken, the part containing the connector must be replaced. Some MacBook Pro connectors are not keyed, making it possible to install the connector backwards. Forcing an improperly connected cable can also short out other components. When repairing MacBook Pro computers, avoid costly errors by taking time to carefully and accurately attach each connector.
It is highly recommended that you trace cable routing inside the unit using a marker pen prior to removing a cable. This will enable you to put the cable back where it belongs with a minimum of guesswork.
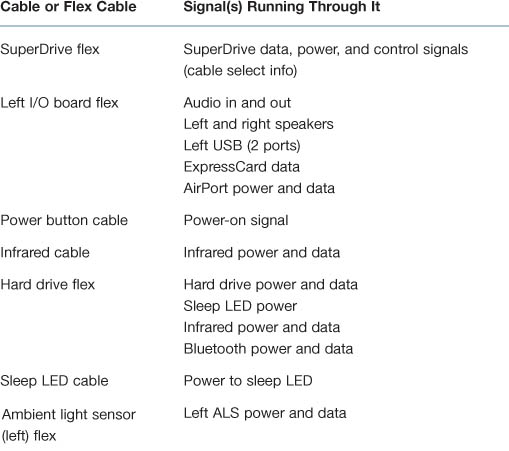
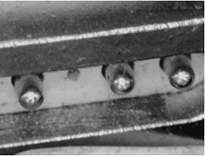
Power Button Pads on Logic Board
With the top case removed, the power button is disconnected. Instead of having to reconnect the top case to turn on the system, there are two pads on the logic board that can be very carefully shorted across (with a metal tool like a flathead screwdriver) to act as the power button.
These pads are located near the edge of the logic board, just above the center of the hard drive. The pads are marked “PWR BTN” and are outlined and separated by a white line.
Resetting the Power Manager (SMC)
In Lesson 3, “General Troubleshooting Theory,” resetting the power management unit, now called the System Management Controller (SMC), is a quick fix. The SMC reset sequence for the MacBook Pro is as follows:
- If the computer is on, turn it off.
- Disconnect the power adapter and remove the main battery.
- Hold down the power button for five seconds, then release.
- Install the main battery and connect the power adapter.
- Press the power button to restart the computer.
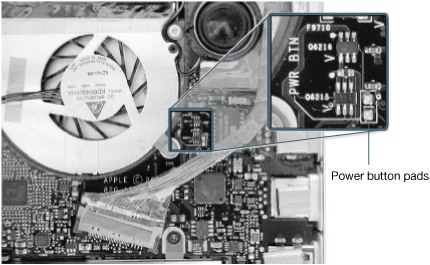
Using Caps Lock LED to Check for Power
There are situations, after a system crash for instance, when the computer may seem to be shut down (no sleep light, no hard drive access, screen is dark, no fan, and so on), but the logic board is actually still running—drawing power and generating heat.
Warning
In this situation, if the computer is put in an enclosed environment like a carrying bag, the computer can overheat.
In this situation, press the Caps Lock key. If the LED glows, the power manager is running on the logic board. If pressing the Caps Lock key and other methods of waking it up fail (closing the lid to make it sleep and trying to wake it again, for example), hold down the power button for a full six seconds to force a shutdown of the computer. Restart the system to check if it boots up normally.
Note
In previous PowerBook models, the keyboard was connected directly to the power manager, and this method worked under all conditions. However, the keyboard is now a USB device, and if the OS hangs, the keyboard may not be able to respond. So if the Caps Lock light does not come on, the computer still may be drawing power. If in doubt, hold down the power button for six seconds to force a shutdown of the computer.
Symptom Charts
The symptom charts included in this lesson will help you diagnose specific symptoms by following the guidelines set forth in the Apple General Troubleshooting Flowchart. The steps listed to solve a particular problem are listed sequentially, in the order to be performed. Perform each step until the symptom is resolved. If a cure instructs you to replace a module, and the symptom continues to persist with the new module, reinstall the original module before you proceed to the next cure.
Note
These symptom charts are taken from the service manual that was current at the time of publication and which appears on this book’s accompanying website. AASPs should always refer to the latest service manual before servicing any Apple product.
Startup
Startup sequence
The Intel-based MacBook Pro starts up very much like the previous professional Macintosh portable computers. If power is available to the system, pushing the power-on button will boot the system.
• As the system boots, it performs a power-on self test (POST).
Note
For a full description of POST error codes, kernel panic dialog, or flashing question mark, consult the startup symptom charts in the Service Source manual for this unit.
• Initially, the screen stays dark, and the sleep LED glows solid.
• Soon after, the boot chime sounds (if the sound is not muted), the backlight lights up a gray screen, and the sleep LED turns off.
• The Apple logo appears, and the turning gear animates below it.
• After that, the screen turns blue, and a system login dialog containing a progress bar appears.
• Finally, either a login dialog appears, or if auto-login is active, the user’s desktop background appears, followed by Finder features such as the menu bar, the Dock, and desktop icons, some of which populate incrementally depending on how many startup items are loading.
The computer will not start up (no fan movement, no hard drive spin up, and display is not lit)
- Remove any connected peripherals and eject any ExpressCard.
- Press the button next to the LEDs on the battery to check whether the battery has enough charge to start the computer.
At least one LED must light solid (not flashing).
- Connect a known-good 85W power adapter and power cord or plug to a known-good power outlet; make sure the DC plug is properly inserted. The MagSafe connector LED should light up. If it does not light up, consult the Power Adapter troubleshooting section.
- Try powering up without the battery installed. If it boots, replace the battery connector cable.
- Reset the power manager (SMC). See new procedures in the “Resetting the Power Manager (SMC)” section earlier in this lesson.
Boot up the system and watch the sleep indicator. If it turns on solid and turns off, the main logic board is getting power and completing the initial boot cycle. If the light does not turn off, the boot cycle is not being completed. This may be caused by the hard drive not being seen by the system, by corrupted system software, or by a hardware issue. Try booting off the Mac OS X Install Disc 1. If no video appears, there may be a hardware issue. See the following section.
- Press the Caps Lock key to see if key light comes on. If it does, hold down the power button for six seconds to shut down the computer and restart.
- If it still doesn’t start, verify that the power button cable is connected properly to the top case flex cable assembly and that the flex cable is connected correctly to the logic board. If the power button is damaged or not functioning correctly, replace the top case.
- Disconnect the keyboard completely. Inspect the connectors. Restart with the keyboard disconnected.
- Remove any additional RAM.
- Try removing the AirPort Extreme Card from its socket and start the computer. If it starts, shut it down and check the flex cable connector and the connector on the logic board and replace the damaged parts.
- Reseat the following flex cables:
• Left I/O flex cable
• Hard drive flex cable (will boot to flashing folder if not connected or corrupt)
• Optical drive flex cable
• Trackpad flex cable
• Display LVDS cable
• Thermal sensor cables
- If the computer starts up, inspect the flex cable connector and its terminal on the logic board for damage and replace the damaged parts.
- Try a known-good left I/O board.
- Replace the logic board.
Computer begins to power up, the fans and hard drive are spinning, pressing the Caps Lock key turns on the LED, but there is no startup chime or video
- Reset the power manager (SMC). See new procedures in the “Resetting the Power Manager (SMC)” section earlier in this lesson.
- Try connecting an external display to check for a video signal that is not being displayed on the LCD. If no external video appears, skip to step 4. Otherwise proceed to step 3.
- Check all cable and flex connections to the logic board. Try restarting.
- Replace the logic board.
System shuts down intermittently
- Disconnect all external peripherals and eject any ExpressCard.
- Make sure a known-good, fully charged battery is properly inserted. Check that the battery latch is fully engaged and is not broken or getting caught before fully catching. Check the battery connection to the logic board.
- Inspect the battery connector in the battery bay. Make sure all blades are visible and not bent. If the battery connector is damaged, replace it.
- Make sure the system is not overheating, the air vents are clear, and the unit was not used on a soft surface.
- Make sure all feet are still on the bottom case. If not, order a foot replacement kit.
- Check that the fan cables are connected and the fans are operational.
- Remove the battery and connect a known-good 85W power adapter and power cord or plug to a known-good power outlet; make sure the DC plug is properly seated.
The MagSafe connector LED should light up. If it does not light up, consult the Power Adapter troubleshooting section first to determine the issue.
- Verify that both thermal sensors are well seated with no damage to the cables or connectors.
- Verify that the left I/O board cable is securely connected and that the cable shows no signs of wear.
- Try a known-good left I/O board.
- Check that the thermal material between the heatsink and the logic board is making contact by unscrewing the logic board and gently pulling up on the left side to verify resistance caused by adhesion of the thermal material. If it’s not making contact, replace the thermal material for the processor, control ASIC, and video chip (see the Logic Board take-apart chapter in the service manual).
- Replace the logic board.
Computer shuts down almost immediately after startup
- Disconnect all external peripherals and eject any ExpressCard.
- Make sure a known-good battery is fully inserted. Check the battery charge and make sure that at least two LED charge indicators light; otherwise connect the adapter.
The MagSafe connector LED should light up. If it does not light up, consult the Power Adapter troubleshooting section first to determine the issue.
- After charging for a while, if the battery does not seem to charge, or if it is charged but quickly discharges, replace the battery.
- Check the battery connection to the logic board, and check wire attachment to connectors.
- If just before the system shuts down the sleep LED comes on briefly, check the thermal sensor connections to the main logic board. They should be fully seated with no damage to the wiring. If the thermal sensor cable or connector is damaged, replace the thermal sensor.
- If a known-good battery does not charge, replace the left I/O board.
- Replace the logic board.
Application quits, kernel panic, or other booting problems
- If a specific application quits, reinstall or replace the application. Verify that the application is compatible with the current version of Mac OS X.
- Clear parameter RAM (PRAM). Hold down Command-Option-P-R during startup until you hear a second startup chime. For more information, consult Knowledge Base document 2238, “Resetting Your Mac’s PRAM and NVRAM.”
- Run Disk Utility from the Software Install and Restore DVD.
- Perform a clean install of system software with the Software Install and Restore DVD that came with the computer.
- Reboot the system. Run Apple Service Diagnostic in loop mode (Control-L) for an extended time to test the memory. If the test finds bad memory, replace the modules one at a time and test until all bad modules are replaced with known-good modules.
- Replace the logic board.
AirPort Extreme
Note
The AirPort Extreme Card is now separate from the Bluetooth module. In addition, the AirPort antenna is now in the clutch barrel behind the gray plastic window. The Bluetooth antenna is now separate from AirPort and mounted just in front of the hard drive.
AirPort Extreme Card is not recognized
- In Mac OS X, use Software Update in System Preferences, or see the Apple Software Updates webpage, to make sure the latest version of AirPort Extreme software is installed.
- Restart the computer.
- Open Network preferences and make sure AirPort is on and a wireless network is selected.
- Reseat the AirPort Extreme Card in its slot.
- Remove and reinstall the AirPort Extreme software.
- Replace with a known-good AirPort Extreme Card.
- Replace the left I/O board.
- Replace the main logic board.
AirPort connection is slow
- Move the computer closer to the AirPort Base Station or other AirPort device.
- Check the number of users trying to use AirPort in the area.
Too many users accessing the network at the same time causes heavy network traffic and slowdowns. To improve network connection speed, consider adding AirPort Base Stations.
- Check for other changes in the environment that may cause interference with the AirPort signal. For more information, consult Knowledge Base document 58543, “AirPort: Potential sources of interference.”
- Use Software Update in System Preferences, or see the Apple Software Updates webpage, to make sure the latest version of AirPort Extreme software is installed.
- Restart the computer.
- Check the AirPort Extreme antenna connection to the AirPort Extreme Card.
- Reseat the AirPort Extreme Card in its slot.
- Replace with a known-good AirPort Extreme Card.
- Check the AirPort Extreme antenna wires coming from the clutch barrel for a nicked insulator or crimped wire. If the wires are bad, replace the AirPort Extreme antenna in the clutch barrel.
- Replace the left I/O board.
- Replace the main logic board.
Battery
Battery will not pop up
- Flip over the unit and slide the battery latches.
- If the battery does not pop up, use a small plastic flat-blade tool to pry up the battery around the battery latch.
- Try a new battery.
- Verify proper latch operation by exercising the latch. If it does not move smoothly or evenly, replace the bottom case.
- If the latch does operate correctly, verify that the customer is not installing the battery with excessive force or the body of the battery has not been deformed around its perimeter. If there is no sign of abuse (dents or scratch marks), replace the battery under warranty.
Warning
If the battery plastic housing has been damaged, or the two halves of the housing have separated, the battery is unsafe for use.
Battery will not charge
- Remove any externally connected peripherals or any ExpressCard.
- Try a known-good power outlet.
- Connect a known-good 85W power adapter and power cord or plug; make sure the DC plug is properly inserted. The MagSafe connector LED should light up. If it does not light up, consult the Power Adapter troubleshooting section first to determine the issue. If the power adapter light is green, turn over the computer and press the battery button. The battery lights should glow green and stay on if the power adapter is operating correctly.
- Try a known-good battery. If it charges, replace the battery. If doesn’t charge, check the battery connector and its connection to the logic board.
- Replace the battery connector assembly (requires removing the logic board).
- Reset the power manager. See new procedures in the “Resetting the Power Manager (SMC)” section earlier in this lesson.
- Make sure the left I/O cable is firmly connected. Look for damaged insulation or wires.
- Replace the left I/O power cable.
- Replace the left I/O board.
- Replace the logic board.
Battery will not charge completely
If the battery appears to stop charging between 95 and 99 percent, this is normal operation. Refer to Knowledge Base document 88344, “Apple portable computer’s battery does not show full charge in Mac OS X.” The information in this article applies to the MacBook Pro as well.
Short battery life
Refer to Apple Knowledge Base document 86284, “Calibrating your computer’s battery for best performance,” for tips on extending battery life and explanations of some concepts of battery use.
There are three categories of scenarios to consider:
If there is a system issue (not the battery):
- If you have the customer’s power adapter, plug it into a known-good outlet and verify that it can charge the system. Make sure it is the correct 85W power adapter.
- Plug a known-good 85W power adapter into a known-good outlet. Verify that the MagSafe connector is fully seated in the computer.
- Check whether the customer’s system is set up for heavy battery power use (AirPort on, Bluetooth on, optical media always in drive, Processor Performance set to Highest in Options pane of Energy Saver preferences, and so on).
- Test the computer with all third-party devices removed.
- Reset the power manager (SMC). See new procedures in the “Resetting the Power Manager (SMC)” section earlier in this lesson.
If the battery needs calibration or is nearing the end of its useful life:
• Calibration should be done when you first use the battery, and every few months after. It allows the battery to properly calculate how much power is left in the battery.
Note
Consult pages 194 and 195 of the service manual for additional information on how to perform the battery calibration procedure.
• The battery is a consumable part. You can charge and discharge it only so many cycles before it becomes depleted and can no longer hold a charge.
If the battery has a defect:
- Symptoms include, but are not limited to, a relatively new battery that:
• Will not charge at all
• Displays an “X” in the Battery menu extra icon
• Has a status light on its case that will not go out
In the first two cases, the battery may need calibration—try this first. In addition, after troubleshooting at the system level, if the battery causes abrupt shutdowns or goes to sleep without warning, the battery can be considered severely degraded; follow the procedure in the note below.
- After recalibrating the battery, test it under the performance test specified in Knowledge Base document 86440, “PowerBook, iBook: Battery Life.” If the battery lasts less than two hours, it is considered to have severely degraded performance.
Note
If the battery was purchased (either with the computer or as a standalone part) in the last 90 days and exhibits severely degraded performance (as defined above), provide an in-warranty replacement. If the battery was purchased between the last 90 to 365 days, have the customer calibrate the battery. If, after calibration, the battery still exhibits severely degraded performance, then provide an in-warranty replacement. If the battery was purchased more than 365 days ago, the customer must purchase a new battery.
Bluetooth
Note
Unlike the previous PowerBook G4 (15-inch Double-Layer SD), the AirPort Extreme and Bluetooth 2.0 functions are on separate cards.
Bluetooth preferences does not appear in system preferences
- Check for software/firmware updates using Software Update.
- Check the Bluetooth card flex cable. Make sure the cable is not damaged and is fully seated.
- Check the hard drive flex cable to the main logic board.
- Replace the Bluetooth card.
- Replace the hard drive flex cable.
- Replace the logic board.
Other devices do not recognize Bluetooth card
- Open Bluetooth preferences and make sure that under the Settings tab, Discoverable is selected.
- Make sure the Bluetooth antenna is properly installed and connected to the Bluetooth card.
- Replace with a known-good Bluetooth card.
- Replace the logic board.
Display
Display latch not working
When the display is being closed, two latch hooks in the top of the display housing should be magnetically pulled down through the slots in the top case and secured by the latch mechanism. When the latch button is pushed, the hooks should release and retract into the display housing. If the latch hooks are broken, replace the display latch hook assembly.
When displaying a single color over the screen area, the LCD panel shows one or more pixels that are not properly lit
To determine whether or not the display has an acceptable number of pixel anomalies, consult the service manual on pages 196 and 197.
ExpressCard/34
ExpressCard will not insert into the ExpressCard slot
- Make sure the ExpressCard is 34mm in width. 54mm ExpressCards will not fit in this slot.
- Make sure the ExpressCard is right side up (cards are keyed and cannot be inserted upside down).
- Verify the ExpressCard is not warped or damaged in any way. If so, replace the card.
- Try a different ExpressCard.
- Carefully raise the ExpressCard slot cover and check for a foreign object inside the slot.
- If the slot cover is preventing the card from being inserted, reseat the ExpressCard on the left I/O board by making sure the cage is closer to the main logic board. The door may catch on the top of the ExpressCard mechanism.
- Replace the ExpressCard cage.
- Replace the left I/O board.
ExpressCard does not mount to the desktop
- Make sure the ExpressCard has its drivers installed.
- Check if a known-good ExpressCard works in this slot. The ExpressCard may be bad.
- Check the left I/O board flex cable connection to the logic board.
- Try inserting the card without the ExpressCard cage installed on the left I/O board. If the card is recognized, reinstall the ExpressCard cage with the card in place.
- Replace the ExpressCard cage.
- Replace the left I/O flex cable.
- Replace the logic board.
Hard Drive
Internal hard drive will not initialize
- Make sure the hard drive is a cable select drive set as a master (0).
- Start up from the MacBook Pro Mac OS X Install Disk 1 disc that came with the computer (hold down the C key during restart).
- When the Installer opens, select Open Disk Utility from the Installer menu.
If the hard drive is recognized, format it under the Erase tab.
If the hard drive is not recognized, reseat the hard drive flex cable, or replace if needed.
- If still not recognized, replace the hard drive.
- Reinstall system software using the MacBook Pro Mac OS X Install Disc 1, which came with the system.
Tip
If you have crucial data and require disk recovery services, an option would be to visit www.drivesavers.com. For additional information, refer to Knowledge Base document 31077, “DriveSavers: Hard Drive Data Recovery & Warranty Implications.” Mention of third-party products or services is for informational purposes only and constitutes neither an endorsement nor a recommendation on the part of any party associated with this book.
Apple Remote
Remote won’t communicate with system applications such as iTunes or iPhoto, or with the optical drive
- Make sure of the following when using the Apple Remote:
• You are within 30 feet of the front of the computer.
• You have an unobstructed line-of-sight to the front of the computer.
• You are pointing the lens end of the Apple Remote directly at the front of the computer.
• The computer is powered on and awake.
• The “Disable remote control infrared receiver” checkbox in Security preferences is not selected.
• Make sure the active application works with Apple Remote. Apple Remote uses Front Row, and from Front Row it can access DVD Player, iPhoto, iTunes, and QuickTime Player.
• Make sure the remote is paired with the computer. Open Security preferences and select Unpair if available. Close Security preferences and re-pair the Apple Remote with the computer. Consult Knowledge Base document 302545, “Pairing your Apple Remote with your computer.”
- Use a digital camera to test your Apple Remote. If you have a digital camera or DV camera with an LCD display, you can use it to see if your Apple Remote is emitting a signal. Infrared beams are invisible to the human eye, but most digital cameras and video cameras use Charged-Coupled Device (CCD) chips or image sensors that are sensitive to infrared light.
To use a camera to test your Apple Remote, follow these steps:
a. Turn on your digital camera or DV camera and remove any lens cover.
b. Point your Apple Remote toward the display latch button.
c. Press and hold the Menu button on the remote while looking at your camera’s LCD display.
d. If you see a faint blinking light coming from the Apple Remote in the camera’s LCD, the remote is working properly.
e. If you don’t see any blinking light in the camera’s LCD, replace the battery in your Apple Remote and then test it again with your computer.
- Replace the Apple Remote battery.
Note
To replace the Apple Remote battery, consult Knowledge Base document 302543, “How to replace the Apple Remote battery.”
- Replace the Apple Remote.
Infrared Board
Supported applications do not respond to input from the remote control
- Make sure the “Disable remote control infrared receiver” checkbox is not selected in Security preferences.
- If Unpair is available in Security preferences, another Apple Remote may be paired to the computer. (Pairing allows only one Apple Remote to control the computer.) To delete a pairing between the remote and the MacBook Pro, click Unpair. (You may have to enter your Administrator password to make changes in in Security preferences.)
- Perform the checks in the preceding section to verify that the Apple Remote is functioning correctly, and retest.
- Check that the infrared board cable is connected to the hard drive flex cable and infrared board.
- Verify that the infrared sensor can be seen in System Profiler. Open System Profiler and click the USB section. If you don’t see the infrared sensor, replace the infrared board and retest.
- Replace the hard drive flex cable and retest.
- Replace the logic board.
Built-in iSight Camera
The built-in camera is not recognized
- Boot the MacBook Pro to the desktop and launch iChat AV.
Note
You do not need to be connected to a network to use iChat AV to troubleshoot. Verify that the correct versions of Mac OS X and iChat AV are installed. Reinstall or update software as needed.
- Open the iChat AV preferences and click the Video icon. Verify that the camera is recognized by the iChat AV software.
- Check the camera connection to main logic board.
- Check the camera connection to the camera board (in the display assembly).
- Replace the camera (part of display bezel).
Camera image quality poor
- Verify that the lens assembly for the iSight camera is clean. Fingerprints and other contaminants can affect image quality. Clean the lens using a lint-free lens cleaning cloth, being careful not to scratch the lens.
- Verify that there is sufficient lighting to produce a good-quality image. Lighting comparable to that found in a well-lit office will produce a good-quality image. If possible, avoid having a brightly lit background. Diffused lighting is preferred over direct lighting.
- Launch iChat AV and open the iChat AV preferences. Click the Video tab. Is the video quality acceptable?
Yes: The camera is functioning normally. The image quality problems may be caused by bandwidth limitations when using iChat over the Internet. Instruct the customer to use the iChat AV connection doctor feature to verify that there is sufficient bandwidth to have a video iChat session without a significant degradation of image quality.
No: The camera may not be functioning normally. Replace display assembly and retest.
Camera is recognized but no audio
- Open Sound preferences. Verify that the built-in internal microphone has been selected as the device for sound input. Verify that the volume settings (on the slider bar) are appropriate.
- Launch iChat AV and open the iChat AV preferences. Click the Video icon. Speak into the microphone while monitoring the microphone level indicator. If the line meter responds, it was a settings problem.
- Check that the speaker assembly (includes the microphone) is plugged in.
- Replace the speaker assembly.
Audio quality is poor
The camera is recognized but the built-in microphone’s audio quality is poor.
- Open Sound preferences. Verify that the internal microphone has been selected as the sound input port and that the input volume settings are appropriate. Use the volume level meter to verify settings.
- Open iMovie and create a new project. Click the Audio button and record a sound sample. If audio quality is fine, it was a settings problem.
- Check that the speaker assembly (includes the microphone) is plugged in.
- Replace the speaker assembly.
Keyboard
No response from any key on keyboard
- Remove any connected peripherals and eject any ExpressCard.
- If only numbers appear, check if Num Lock (F6) is engaged.
- Open System Profiler.
- Attach an external USB keyboard. If it doesn’t work, go to step 6.
- Turn off the computer. Check the keyboard flex cable connections to trackpad and main logic board for proper seating and/or damage.
- Start up from the MacBook Pro Mac OS X Install Disc 1 that came with the computer (hold down the C key during restart, if possible) to verify that it is not a software problem.
- Replace the internal keyboard.
- Replace the top case.
- Replace the logic board.
No keyboard illumination
- Open Keyboard & Mouse preferences and make sure the “Illuminate keyboard in low light conditions” checkbox is selected. Try using system in a dimly lit environment.
Note
The keyboard illumination is not bright enough to be seen in most well lit spaces. In order to view the key being illuminated, the ambient light needs to be dim.
- Check the keyboard backlight cable connection to the top case flex cable.
- Replace the keyboard.
- Replace the top case.
- Replace the left ambient light sensor.
- Replace the logic board.
Keyboard is partially illuminated
- Check the keyboard backlight cable connection to the top case flex cable.
- Replace the keyboard.
- Replace the top case.
Microphone
The microphone is not working
- Open Sound preferences and verify that the selection under the Input tab is for the built-in microphone.
- Check the signal level and level meter and adjust the gain.
- Reset the PRAM. (Shut down the computer, press the power button, then hold down the Command-Option-P-R keys until you hear the startup chime at least one additional time after the initial startup chime.)
- If there is no sound output from the internal speaker, and the microphone is not working, verify cable connections.
- Replace the speaker assembly (which contains the microphone).
- Replace the left I/O flex cable.
- Replace the left I/O board.
- Replace the logic board.
Modem (External)
MacBook Pro does not have a built-in modem. Apple offers an optional external USB modem. Consult page 202 of the service manual for additional information.
Optical Drive
Optical drive not recognized
- Make sure the optical drive is a cable select drive set as a slave (1). ATA ID 1 is slave mode and the hard drive is usually set to ATA ID 0, which is master mode.
- Make sure the optical drive flex cable is undamaged and properly installed. If it’s damaged, replace the flex cable.
- Replace optical drive.
The optical drive does not accept CD or DVD disc (mechanical failure)
- Verify disc is not warped and is a 12-cm circular disc.
- Check that a small disc or other foreign object is not stuck inside. Remove drive from system to extract disc.
- Verify that the disc is pushed almost all the way into the slot.
- Make sure the optical drive flex cable is undamaged and properly installed. If damaged, replace the flex cable.
- Replace the optical drive.
The optical drive does not eject CD or DVD disc
- Verify the disc is not in use by quitting any applications that may be using the disc.
- Press and hold the Media Eject key at the upper-right corner of keyboard. If that does not work, hold down the Function (fn) key and Media Eject key.
- Drag the disc icon to the Trash, or select it and press Command-E.
- Choose Restart from the Apple menu, holding down the trackpad button during boot.
- Reseat the optical drive mechanism. Make sure the drive is oriented toward the back of the computer and that all four corners are seated so that the drive sits flat in its bay.
- Replace the optical drive. (See “How to remove a stuck disc from the optical drive” in the Optical Drive chapter in the Take Apart section of the service manual.)
The disc icon does not show up on desktop, or a dialog appears to initialize disc, when inserting a read-only disc
- Verify that the correct type of disc is being used.
- Use Software Update to check for updated firmware.
- Try cleaning the disc. If it is dirty or scratched, it may not mount.
- Try a different disc.
- Replace the optical drive cable.
- Replace the optical drive.
Difficulty writing to optical media
- Verify the correct type of disc is being used.
- Try a different brand or speed of CD-R disc.
Some brands of 24x or 32x CD-R media may not work with the SuperDrive.
There are two factors in the ability of the optical drive to write to media:
• First, there are varying qualities of blank optical media. Some media are made to such low specifications that the ability of the drive to write to it is marginal. There are variations in optical media even under the same brand. Some brands source their optical media from a variety of manufacturers, so there may be variations in the quality.
• Second, an optical drive that supports writing to a CD-R/RW or DVD-R/RW disc requires a special writing algorithm for discs from each disc manufacturer. There are hundreds of disc manufacturers; it is impossible to implement writing algorithms for each disc manufacturer. Usually drive manufacturers implement special writing algorithms for discs from major disc manufacturers. For discs that are not supported by the drive with special writing algorithms, the drive will use a generic writing algorithm to write the disc. In this case, the writeability and readability may not be optimal.
- Replace the optical drive flex cable.
- Replace the optical drive.
Ports
A USB port is not recognizing devices
- Shut down the computer; then press the power button to start the computer.
- Use Software Update to check for the latest software.
- Test USB ports with an Apple keyboard or mouse.
- If the left USB port is not recognized (and the right USB ports are), check the left I/O flex cable’s condition and connection. If the cable is damaged, replace it.
- If the left I/O flex cable is fine, replace the left I/O board.
- If the right ports are not recognized, check the backup battery flex cable and connections. If damaged, replace the backup battery.
- If all USB ports are unrecognized, and System Profiler does not recognize the bus, replace the logic board.
A USB device is not recognized by the computer
Note
If you are trying to use a serial device with a USB/serial adapter, check with the manufacturer of the adapter for compatibility.
- Shut down the computer; then press the power button to start the computer.
- Verify that the current driver for the device is installed.
- If the device is a camera, turn on the camera after initiating the download with the camera application.
- Try other USB ports.
- Try a different USB device on same port.
- Eliminate any USB chains by plugging in only one peripheral.
- Try a known-good Apple USB keyboard or mouse to verify that each port is working properly. If a port isn’t working correctly, see the preceding section.
A FireWire port is not recognizing devices
Note
In FireWire target disk mode, a MacBook Pro cannot be mounted on systems with Mac OS X 10.3.9 or earlier. Refer to Knowledge Base document 303118, “Intel-based Macs: About using target disk mode with Mac OS X 10.3.9 or earlier.”
- Test the FireWire port by connecting to another computer using FireWire Target Disk Mode. Refer to Knowledge Base document 58583, “How to Use FireWire Target Disk Mode.”
- Verify that drivers are installed properly for third-party devices, if needed.
- Make sure the cable is firmly attached.
- Try a different cable.
- If the device is self powered, make sure that the power supply is connected and the device’s LED indicates it is getting power.
- Replace the logic board.
Power Adapter
The power adapter LED does not turn on
- Confirm that the power adapter is connected to a known-good 85W outlet.
- Try replacing the AC plug or the AC power cord. If the adapter works, replace the appropriate plug or cord.
- Check the pins in the power adapter DC plug for pins that are stuck down.
If a pin or pins are stuck down, try cleaning the contacts or working the pin to release it. Remove debris with a soft, non-electrostatic generating (nonplastic bristle) brush. A tool such as a cotton swab may introduce foreign material that will cause the pins to seize up.
- If pins are missing or bent, replace the power adapter.
- If the LED on the MagSafe connector does not turn on, there may be contamination in the computer port, and/or the contact pins are dirty. It can be cleaned with a soft brush. Do not use liquid. In addition, foreign material may be covering the contacts or preventing the connector from seating far enough for the sense pin to connect to the system. The center pin is the sense pin.
- Remove the battery and connect the power adapter. If the adapter turns on and boots the system, replace the left I/O board.
Sound
No sound heard and the Output tab in Sound preferences incorrectly indicates that an external device is plugged in (to the headphone jack or USB ports)
- If nothing is plugged into the headphone jack or USB ports, the Output tab of Sound preferences should be set to the internal speakers.
- If nothing is plugged in, and Sound preferences is set to provide audio to the external speakers, try plugging in an external device such as headphones or external speakers, restart the computer, then remove the device you had plugged in.
- Reset the PRAM. (After restart, hold down the Command-Option-P-R keys until you hear the startup chime at least one additional time after the initial startup chime.)
- If the system continues to indicate a phantom device plugged into the system, replace the left I/O board.
- Replace the logic board.
No sound from internal speaker(s)
- Use Software Update to verify that the latest audio update has been installed.
- Press the F3 key (with the fn key pressed and not pressed) to verify that mute mode is not enabled.
- Press the F4 or F5 key (with the fn key pressed and not pressed) to check the volume setting.
- Verify that no external speakers or headphones are plugged in.
- Check the Output tab in Sound preferences to confirm that the software is correctly sensing that there are no external speakers or headphones connected.
- Shut down the computer and restart.
- Reset the PRAM. (After restart, hold down the Command-Option-P-R keys until you hear the startup chime at least one additional time after the initial startup chime.)
- Verify that the speaker cable is connected properly to the left I/O board.
- Check the speaker cable itself. Verify left and right cable connections.
- Check sound with headphones or external speaker. If audio is heard, replace speaker assembly.
- Replace the left I/O flex cable.
- Replace the left I/O board.
- Replace the logic board.
Distorted sound from internal speakers
- Verify sound is correct with external speakers/headphones. If sound is correct, check speaker wire and connections.
- In the Output tab of Sound preferences, check the Balance setting.
- Compare the same audio with two different units to make sure that the sound is distorted on both.
- Check speaker wire. If damaged, replace speaker assembly.
- If the distortion is coming from the right speaker with sound balance shifted toward the left, remove the right speaker. Check the gasket in the speaker housing. If the gasket is deformed, move the gasket back into a circular shape. If gasket cannot be fixed, replace the housing. You need to order the speaker assembly.
- Replace the left I/O flex cable.
- Replace the left I/O board.
- Replace the logic board.
Trackpad
The pointer does not move when you are using trackpad
- Verify that no USB device is connected.
- Boot from the Software Install and Restore DVD to verify that it is not a software problem. If the trackpad works, restore the system software.
- Reset the power manager (SMC). See new procedures in the “Resetting the Power Manager (SMC)” section earlier in this lesson.
- Check the trackpad flex cable connection to the logic board.
- Replace the top case.
- Replace the logic board.
The pointer intermittently does not move or moves erratically
Note
User must touch the surface with only one finger at a time and point directly down. When running Apple Hardware Test or Apple Service Diagnostic, the trackpad will respond to very small movements of the pointer. This behavior is normal.
- Clean the trackpad surface (with the computer off, using a non-static-inducing material).
- Shut down the computer; then press the power button to start the computer.
- Reset the power manager (SMC). See new procedures in the “Resetting the Power Manager (SMC)” section in earlier in this lesson.
- Make sure the power adapter is using the AC power cord, not the AC plug (also known as the “duckhead”). If the intermittent behavior goes away, recommend using the AC cord, because it provides a ground path for static.
- Disconnect the power adapter and run on battery power only. If the problem goes away, replace the power adapter.
- Place the MacBook Pro Mac OS X Install Disc 1 in the optical disc drive, restart, and hold down the C key. Check the pointer movement to see if the problem is software.
- Check the trackpad flex cable connection to the logic board.
- Replace the top case.
- Replace the logic board.
Video
No display, or dim display, but computer appears to operate correctly
- Remove any connected peripherals.
- Make sure the F1 key is not stuck down.
- Press the F2 key (with the fn key pressed and not pressed) to increase screen brightness.
- Reboot the computer holding down the Control and Command keys and pressing the power button. Or if necessary, press and hold the power button for 5 to 10 seconds to shut down the computer, and then press the power button to restart. Let the system run for an hour so the panel can warm up.
- Verify that the inverter cable and LVDS cable connections are seated properly and are not damaged.
- Replace the inverter board.
- Replace the display assembly.
- Replace the logic board.
Computer appears to work, but no video on external device connected to the S-video/composite port of the optional DVI-to-video adapter
- The device must be connected to the S-video/composite port while the MacBook Pro is sleeping or off for the device to be recognized.
- Verify that the test monitor is a known-good device and supported by this computer.
- Try a different DVI-to-video adapter.
- Replace the logic board.
No video on an external VGA device connected to the external monitor (DVI) port
- Verify that the test monitor is a known-good device and supported by this computer.
- Try another DVI-to-VGA adapter cable.
- Restart the computer and test again.
- Replace the logic board.
No display, or dim display, but the computer can display external video
- Remove any connected peripherals.
- Try adjusting the brightness using the F2 function key.
- Open Keyboard & Mouse preferences and adjust the brightness. If it works, replace the keyboard.
- Check the inverter cable connection to the main logic board.
- Check the cable connections to the inverter board and from the inverter board to the LCD.
- Replace the inverter board.
- Replace the display assembly.
- Replace the logic board.
Display has repetitive patterns or shifted color pattern
- Check for the latest system software update.
- Check that the LVDS connection is fully seated on the logic board.
- Replace the logic board.
Display has permanent vertical or horizontal lines
- Check for the latest system software update
- Replace the display assembly.
- Replace the logic board.
Miscellaneous symptoms
Consult pages 212 through 213 of the service manual for information.
Lesson Review
1. True or false: It is impossible to turn on a MacBook Pro when the top case is removed.
2. True or false: resetting the power manager (SMC) also resets Date & Time preferences.
3. True or false: The MacBook Pro may give indications that it is shut down when the logic board may actually be running.
4. What type of power adapter is recommended for a MacBook Pro?
a. 45W
b. 65W
c. 85W
5. True or false: If a MacBook Pro will not start up, the ExpressCard might be responsible.
6. True or false: When the AirPort Extreme Card is removed, the Bluetooth module will not function.
7. What key, when stuck down, might make a MacBook Pro appear to have a dim or broken display?
a. F1
b. F2
c. F12
8. You are troubleshooting a MacBook Pro that fails to respond to any key on the keyboard. What does Apple suggest as the first procedure?
a. Attach an external USB keyboard.
b. Remove any connected peripherals and eject any ExpressCard.
c. Restart the computer.
9. True or false: You can control the keyboard illumination feature of the MacBook Pro in Keyboard & Mouse preferences.
10. True or false: The optical drive in the MacBook Pro can accept mini-CDs less than 12 cm in diameter.
Answer Key
1. False, the power button pads on the logic board can be carefully shorted to act as a power button
6. False, the AirPort Extreme Card and Bluetooth module are separate parts