
Detection Mechanisms, Indicators of Compromise, and Signatures
Abstract
The detection phase of Network Security Monitoring is all about knowing your detection capabilities, understanding adversarial tactics, and then applying those capabilities to detect when an adversary acts. This process occurs when collected data is examined and anomalies are identified.
In this first chapter of the Detection section of Applied NSM, we will define detection mechanisms and indicators of compromise (IOC’s), and then examine how the IOC’s are comprised, and how they can be derived from network attacks. We will also look at several best practices for successful management of IOCs, and some common IOC frameworks.
Keywords
Network Security Monitoring; Intrusion Detection; Indicator; Indicator of Compromise; STIX; OpenIOC; Signature; Rule; Precision; Indicator Management
Chapter Outline
Indicators of Compromise and Signatures
Indicator and Signature Evolution
Critical Indicator and Signature Criteria
Managing Indicators and Signatures
Simple Indicator and Signature Management with CSV Files
Master Indicator/Signature List
Indicator/Signature Revision Table
The detection phase of Network Security Monitoring is all about knowing your detection capabilities, understanding adversarial tactics, and then applying those capabilities to detect when an adversary acts. This process occurs when collected data is examined and anomalies are identified.
In this first chapter of the Detection section of Applied NSM, we will define detection mechanisms, indicators of compromise (IOCs), and signatures, and then examine how the IOCs are comprised, and how they can be derived from network attacks. We will also look at several best practices for successful management of IOCs and signatures, and some common IOC and signature frameworks.
Detection Mechanisms
Generally, detection is a function of software that parses through collected data in order to generate alert data. This software is referred to as a detection mechanism. The alert data that is generated by the detection mechanism is presented to an analyst, and that’s when detection ends and analysis begins. This process may sound hands-off, but that couldn’t be farther from the truth. To perform detection successfully, you must take great care in choosing detection mechanisms and feeding them appropriately.
The majority of the detection mechanisms discussed in this book are network-based intrusion detection systems (NIDS). These can be divided into two primary categories: signature-based and anomaly-based detection.
Signature-based detection is the oldest form of intrusion detection, and it works by combing through data to find matches for specified patterns. Some patterns can be simple, like an IP address or a text string. Other patterns can be more complex, such as a particular number of null bytes occurring after a specific string while utilizing a specific protocol. When these patterns are broken down into objective platform-independent pieces of data, they become indicators of compromise. When they are expressed in the platform-specific language of a detection mechanism, they become signatures.
A subset of signature-based detection is reputation-based detection, which attempts to detect communication between friendly hosts on the network you are protecting and hosts on the Internet that are believed to be malicious based upon their participation in previous malicious actions. This essentially results in detection based upon a series of simple signatures that are usually based upon IP addresses or domain names.
We will cover several popular signature-based detection mechanisms, including Snort and Suricata in Chapter 9. We will also examine reputation-based detection mechanisms using multiple tools in Chapter 8.
Anomaly-based detection is a newer form of intrusion detection that is gaining popularity rapidly thanks to tools like Bro. Anomaly-based detection relies upon observing network occurrences and discerning anomalous traffic through heuristics and statistics. Instead of simply alerting whenever a specific pattern is seen, an anomaly-based detection mechanism has the ability to recognize attack patterns that deviate from normal network behavior. This type of detection is infinitely more powerful, but more difficult to implement. We will look into using Bro as an anomaly-based detection mechanism in Chapter 10, and performing statistical anomaly-based detection in Chapter 11.
A newly evolving subset of anomaly-based detection is the use of honeypot-based detection mechanisms. Honeypots have been used for many years to collect malware and attack samples for research purposes, but they have detection applications as well. This occurs by configuring honeypot systems to mirror production systems. These honeypots often contain known vulnerabilities, but have no actual confidential data on them. Instead, they are configured for an extensive level of logging, and often paired with other types of NIDS or HIDS. Detection with honeypots will be discussed in Chapter 12.
The detection mechanisms you will deploy depend on the maturity of your security program. Most SOCs start with only a signature-based mechanism and will wait to achieve confidence with that technology before moving on to something more advanced like an anomaly-based mechanism. This evolution lends itself well to the healthy development of a SOC. I’ve seen many organizations that try to implement the whole gamut of detection-mechanisms right off the bat, and end up failing because they just simply can’t handle developing these capabilities simultaneously.
Indicators of Compromise and Signatures
The detection mechanisms we just discussed are useless if they are not properly fed and cared for. This involves the development, maintenance, and implementation of IOCs and Signatures.
An IOC is any piece of information that can be used to objectively describe a network intrusion, expressed in a platform-independent manner. This could include a simple indicator such as the IP address of a command and control (C2) server or a complex set of behaviors that indicate that a mail server is being used as a malicious SMTP relay. IOCs can come in a variety of shapes and sizes, and can be formatted in different ways to be digested by various detection mechanisms. While one tool may be able to parse IP addresses in a comma-delimited list, another may require that they are inserted into a SQL database. Although the presentation of the IOC has changed, the IOC itself remains consistent. Furthermore, a single behavioral IOC may have to be broken down into several individual components and deployed to multiple detection mechanisms to be made actionable on a network. When an IOC is taken and used in a platform-specific language or format, such as a Snort Rule or a Bro-formatted file, it becomes part of a signature. A signature can contain one or more IOCs.
The remainder of this chapter is devoted to the classification and management of these indicators and signatures.
Host and Network Indicators
The broadest and most common manner in which indicators are classified is either as host-based or network-based. This basic level of classification helps frame the indicator so you can plan the detection mechanism it will be used with.
A host-based IOC is a piece of information that is found on a host, and objectively describes an intrusion. Some common host-based indicators include:
A network-based IOC is a piece of information that can be captured on the network between hosts, and objectively describes an intrusion. Some common network-based indicators include:
You could certainly argue that most of these indicators could be found on both the network and host levels at some point, but they are classified here based upon where they are primarily found. Some indicators are listed in both areas because they can be found equally as often in both locations, such as simple text strings and file names.
Dividing indicators into either host or network IOC’s is a great way to initially classify them, but you can go a lot further in your classification efforts with the use of static and variable indicators, which are discussed next.
Static Indicators
Static indicators are indicators for which values are explicitly defined. There are three variations of static indicators: Atomic, Computed, and Behavioral (Figure 7.1).
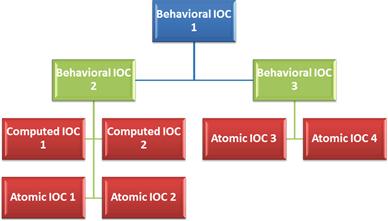
Atomic indicators are typically smaller and more specific indicators that cannot be broken down into smaller components, but still retain meaning in the context of an intrusion. This includes items such as IP addresses, text strings, hostnames, e-mail addresses, and file names.
Computed indicators are those that are derived from incident data. This includes items such as hash values, regular expressions, and statistics.
Behavioral Indicators are collections of atomic and computed indicators that are paired together with some form of logic, often to provide some useful context. This might include a set of data containing file names and matching hash values, or a combination of a text string and a regular expression.
Consider a scenario in which we have determined that a device on our network has been compromised. An analysis of NSM data and host-based forensic data helps us determine that the following sequence of events occurred:
1. A user received an e-mail message from [email protected] with the subject line “Payroll Information” and a PDF attachment called “Payroll.pdf.” The PDF has an MD5 hash value of e0b359e171288512501f4c18ee64a6bd.
2. The user opened the PDF, triggering the download of a file called kerndel32.dll with the MD5 hash value da7140584983eccde51ab82404ba40db. The file is downloaded from http://www.appliednsm.com/kernel32.dll.
3. The file was used to overwrite C:/Windows/System32/kernel32.dll.
4. Code within the DLL was executed, and an SSH connection is established to a host with the IP address 192.0.2.75 on port 9966.
5. Once this connection is established, the malware searches for every DOC, DOCX, or PDF file from the friendly host and transmits it over the SSH connection to the hostile host.
The overall description of this incident could be described as a single large behavioral indicator. While this initial indicator does paint a broad picture of the incident, it does us little good in the context of NSM detection because it is far too complex.
To effectively tune signature, anomaly, and statistical based detection mechanisms, we must first break down the indicator into more useful pieces, ensuring that appropriate context remains. This could result in the creation of the following behavioral (B) indicators:
• B-1: A user receives an e-mail from [email protected] with the subject line “Payroll Information” and a PDF attachment called “Payroll.pdf.” The PDF file has an MD5 hash value of e0b359e171288512501f4c18ee64a6bd.
• B-2: The file kernel32.dll with the MD5 hash da7140584983eccde51ab82404ba40db is downloaded from the http://www.appliednsm.com/kernel32.dll.
• B-3: The file C:/Windows/System32/Kernel32.dll is overwritten by a malicious file of the same name with MD5 hash value da7140584983eccde51ab82404ba40db.
• B-4: Victim host attempts SSH connection to hostile host 192.0.2.75 on port 9966.
• B-5: DOC, DOCX, and PDF files are transmitted to 192.0.2.75 on port 9966 via an encrypted connection.
Next, we can attempt to break these behavioral indicators down into individual atomic (A) and computed (C) indicators. The following could result:
• C-1: MD5 Hash e0b359e171288512501f4c18ee64a6bd
• C-2: MD5 Hash da7140584983eccde51ab82404ba40db
• A-1: Hostile Domain: appliednsm.com
• A-2: E-Mail Address: [email protected]
• A-3: Subject Line: “Payroll Information”
• A-5: File Name: Kernel32.dll
This gives us a total of five behavioral indicators, one computed indicator, and ten atomic indicators that can be incorporated into our detection mechanisms. This could result in indicators being converted into signatures for use with a variety of detection mechanisms, such as in these examples:
• C-1/2: Antivirus signature to detect existence of hash value
• A-1: Snort/Suricata Signature to detect any communication with hostile domain
• A-2: Snort/Suricata Signature to detect mail received from hostile e-mail address
• A-3: Snort/Suricata Signature to detect subject line
• A-3: Bro script to detect subject line
• A-4/C-1: Bro script to detect file name or MD5 hash value being transmitted across the network
• A-5/C-2: Bro Script to Detect File Named Kernel32.dll or file with MD5 hash value transmitted over the network
• A-6: Snort/Suricata Signature to detect communication with IP address
• A-7/A-8: Snort/Suricata Signature to detect SSH communication to port 9966
As you can see, there are different methods to approach detection of the various indicators we’ve generated from this single incident. With more detail, this scenario could present even more potential detection scenarios, such as the ability to detect certain malicious object calls within the PDF file itself, or characteristics of custom protocols that might be in use. Depending on the architecture of the network you’re protecting, you might have multiple detection mechanisms that can be used to implement signatures for a single indicator, or alternatively, you might not have any capability to detect certain indicators. Deciding which method might be best for the detection of a certain IOC depends upon the infrastructure of the network, the nuances of the detection methods, and the nature of the intelligence related to the IOC.
Variable Indicators
If the detection mechanisms used in your network were only configured to detect attacks where known indicators were used, then you would likely eventually miss detecting something bad. At some point, we have to account for variable indicators, which are indicators for which values are not known. These are usually derived by creating a sequence of events for which an attack might occur (forming a behavioral indicator), and identifying where variables exist. Essentially, it examines a theoretical attack, rather than one that has already occurred. This root-cause type of analysis is something performed on specific attack techniques, rather than instances of attacks executed by an individual adversary.
I like to think of variable indicators as resembling a movie script, where you know what will happen, but not who will play each particular role. Also, just like a movie script, there is always the potential for improvisation with a skilled actor. Variable indicators are not entirely useful for deployment to signature-based detection mechanisms, but find a great deal of use with solutions like Bro.
We can see an example of developing variable indicators by revisiting the scenario we looked at in the last section. Instead of basing the attack scenario on an attack that has actually occurred, we will base it on a theoretical attack. Restated, the attack scenario would broadly play out as follows:
1. A user received an e-mail message with a malicious attachment.
2. The user opens the attachment, triggering the download of a file from a malicious domain.
3. The file was used to overwrite a system file with the malicious version of that file.
4. Code within the malicious file was executed, triggering an encrypted connection to a malicious server.
5. Once the connection was established, a large amount of data was exfiltrated from the system.
These steps represent behavioral indicators that contain multiple variable atomic and computed indicators. We can enumerate some of these indicators here:
• VB-1: A user received an e-mail message with a malicious attachment.
• VA-3: Malicious E-Mail Source Domain
• VA-4: Malicious E-Mail Source IP Address
• VA-5: Malicious Attachment File Name
• VC-1: Malicious Attachment MD5 Hash
• VB-2: The user opens the attachment, triggering the download of a file from a malicious domain.
• VA-6: Malicious Redirection Domain/IP
• VA-7: Malicious Downloaded File Name
• VC-2: Malicious Downloaded File MD5 Hash
• VB-3: The file was used to overwrite a system file with the malicious version of that file.
• VB-4: Code within the malicious file was executed, triggering an encrypted connection to a malicious server on a non-standard port.
• VA-8: External C2 IP Address
• VB-5: Once the connection was established, a large amount of data was exfiltrated from the system.
In this example, the V in the indicator names describes a variable component of the indicator. As we’ve laid it out, there are potentially ten variable atomic indicators, two variable computed indicators, and five variable behavioral indicators. Now, we can hypothesize methods in which these indicators can be built into signatures to be paired with detection mechanisms. Variable indicators will commonly be reused and combined in order to derive detection for broad attack scenarios.
• VB-1 (VA-3/VA-4) VB-2 (VA-6) VB-4 (VA-8) VB-5 (VA-8): Snort/Suricata rule to detect communication with known bad reputation IP addresses and domains
• VB-1 (VA-5/VC-1) VB-2 (VA-7/VC-2): Bro script to pull files off the wire and compare their names and MD5 hashes with a list of known bad reputation file names and MD5 hashes.
• VB-1 (VA-5/VC-1) VB-2 (VA-7/VC-2): Bro script to pull files off the wire and place them into a sandbox that performs rudimentary malware analysis.
• VB-2 (VA-6/VA-7/VC-2): HIDS signature to detect the browser being launched from a document
• VB-3: HIDS signature to detect a system file being overwritten
• VB-4 (VA-9/VA-10) VB-5: A Bro script to detect encrypted traffic occurring on a non-standard port
• VB-4 (VA-9/VA-10) VB-5: A Snort/Suricata rule to detect encrypted traffic occurring on a non-standard port
• VB-5: Custom written script that uses session data statistics to detect large volumes of outbound traffic from workstations
SOC analysts commonly monitor information security news sources like conference proceedings and the blogs and Twitter feeds from industry experts. This allows the SOC to stay abreast of new and emerging attack techniques so that the organization’s defensive posture can be modeled around these techniques. When this happens, it becomes incredibly useful to break down the attack into variable indicators. When platform-specific signatures are provided, those can be reverse engineered into individual indicators so that they can be used in conjunction with the detection mechanisms in place on your network. These are incredibly useful exercise for NSM analysts. It helps the analyst to better understand how attacks work, and how detection mechanisms can be used to effectively detect the different phases of an attack.
The components of the variable indicator can be used for all varieties of detection, and they are most useful in determining how to detect things with unknown entities.
Indicator and Signature Evolution
Software development usually goes through an evolution, in which the software is considered immature until it is fully tested. It then reaches a mature state while it is in production use before being retired once it is no longer useful. Indicators and signatures, just like software, have a shelf life. Indicator and signature evolution has the same steps: Immature, Mature, and Retired (Figure 7.2).
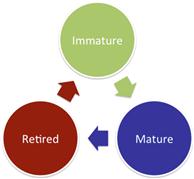
An immature indicator or signature is one that has been newly discovered as the result of some form of intelligence, including intelligence gained from the internal investigation of an incident, or from a third-party source. This also includes newly created variable indicators that have not yet been evaluated fully within a detection mechanism signature. The confidence associated with immature indicators and signatures may vary initially, depending upon its source. An immature indicator or signature may change frequently, and might be deployed to a test environment before being deployed into production, which might include deployment to multiple detection mechanisms in order to determine which is the most appropriate. Because of this, analysts should closely monitor the deployed signature for false positives and false negatives. In some scenarios, it may be appropriate to only allow level two or three analysts to access the alerts generated from immature indicators and signatures, so that they can be taken with a grain of salt until being evaluated thoroughly.
Once an indicator or signature has proven that it is useful in the NSM environment, that it doesn’t result in an excess of false positives, and that it doesn’t result in missed activity through false negatives, it is considered to be mature. A mature indicator or signature doesn’t usually undergo as many revisions as an immature one, and is considered reliable and stable. Mature indicators can also be more confidently combined with other indicators in order to make more granular behavioral indicators, resulting in more advanced signatures. Any change or revision to a mature indicator or signature should be documented.
Eventually, an indicator or signature may prove to no longer be effective, or the intelligence supporting it may call for its dismissal. This is especially common with items related to phishing campaigns, websites hosting drive-by downloads, and botnet C2. Proper record keeping and historical analysis dictates that you should never delete these items, so instead an indicator or signature that is no longer being actively used is considered retired. A retired indicator is no longer deployed within a signature to any detection mechanism. A retired signature isn’t currently being utilized by a detection mechanism. If it is necessary that a retired indicator or signature be modified and reused, then it should be reverted into either an immature or a mature state.
Tuning Signatures
A task that will be continuous for any security team is the tuning of signatures. This ensures that the indicators the signatures are based on are being used reliably and effectively, and that they are passed through the steps of indicator evolution appropriately. In some cases it can be easy to determine how effective a signature is. For instance, if you deploy a signature containing new indicators and it immediately starts filling up every analyst’s screen with thousands of alerts, then there is a good chance that the signature is too broad and might need some work to eliminate false positives. However, not all signatures’ performance is that easy to track. For example, if you had two signatures that detected the same thing, how would you compare them to determine which was more effective? This is where some statistics come in to play.
When determining the maturity and confidence level of a deployed signature, there are four data points that should be considered: true positives, false positives, true negatives, and false negatives.
True Positive (TP). An alert that has correctly identified a specific activity. If a signature was designed to detect a certain type of malware, and an alert is generated when that malware is launched on a system, this would be a true positive, which is what we strive for with every deployed signature.
False Positive (FP). An alert has incorrectly identified a specific activity. If a signature was designed to detect a specific type of malware, and an alert is generated for an instance in which that malware was not present, this would be a false positive.
True Negative (TN). An alert has correctly not been generated when a specific activity has not occurred. If a signature was designed to detect a certain type of malware, and no alert is generated without that malware being launched, then this is a true negative, which is also desirable. This is difficult, if not impossible, to quantify in terms of NSM detection.
False Negative (FN). An alert has incorrectly not been generated when a specific activity has occurred. If a signature was designed to detect a certain type of malware, and no alert is generated when that malware is launched on a system, this would be a false negative. A false negative means that we aren’t detecting something we should be detecting, which is the worst case scenario. False negatives can be incredibly difficult to calculate. After all, how do you detect false negatives if your signatures are missing the activities they were designed to detect? This is one of the many reasons why it is so important to do post-mortem analysis after an incident has occurred. It is here that you can step through an incident to systematically determine when a signature should have detected an activity, and record those results.
These data points are useful by themselves to determine how successful the signature is for detection. However, we can derive more value from these numbers by using them to calculate a signature’s precision.
Precision
The precision of a signature, also sometimes called the positive predictive value, refers to its ability to identify positive results. This is shown by determining the proportion of true positives against all positive results (both true positives and false positives) with the formula:
Precision = TP / (TP + FP)
This information can be used to determine the probability that, given an alert being generated, the activity that has been detected has truly occurred. Therefore, if a signature has a high precision and an alert is generated, then the activity has very likely occurred.
In a comparison scenario, consider that the same network traffic has generated two separate alerts, classifying the attack as two different pieces of malware. SID 1 in one of the alerts identifies Malware A, and SID 2 in the other alert identifies Malware B. If SID 1 has a precision of 90, and SID 2 has a precision of 40, then it is likely that SID 1 has actually correctly identified the malware.
High precision is desired for signatures, and should increase your confidence in a signature. If you find that a signature has low precision, then you can attempt to rectify this by refining the signature, adding additional indicators to the signature, or deploying it in conjunction with other signatures.
In lieu of a custom application, you can track these statistics fairly easily in a spreadsheet or CSV file. An example of how this could be done is shown in Table 7.1.
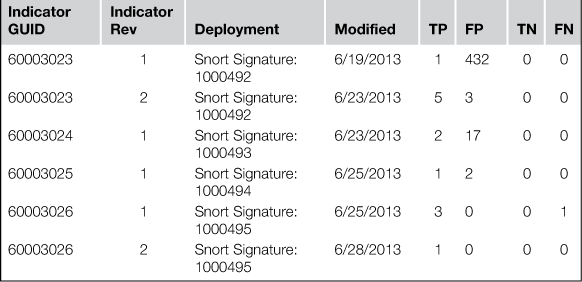
The statistics presented here should help determine how much confidence you place in a signature, how you react when an alert from a signature is generated, and how much effort you place into tweaking a signature for better reliability. There are several other techniques and statistics that can be used for assessing the effectiveness of a signature, but precision has always worked consistently well for me in multiple SOC environments.
Critical Indicator and Signature Criteria
An indicator or signature without context is not entirely useful. One of the first things an analyst should do when receiving a new alert is to examine the supporting context of the signature, along with the supporting context of any indicators contained in the signature. The context you can provide with a signature or indicator will vary, but it is critical in the investigation of a potential incident. It is important that you establish a standard that maintains a few critical criteria for each indicator and signature that you use. This is to ensure the indicators and signatures are unique, attributable, and able to be properly referenced in the event of an intrusion, an audit, or an instance where accuracy is called into question. These critical criteria are:
• Unique Identifier: A value that can be used to uniquely identify every indicator or signature. These should never be repeated. Most organizations will simply use an auto incrementing or randomly generated globally unique identifier (GUID) for indicators. The identifier that is used for signatures is usually dictated by the detection mechanism associated with the signature. This is most commonly a Signature ID (SID) number. This level of identification also has the benefit of allowing you to reference the indicator or signature in various forms of communication without actually listing the item itself. This will prevent false positives that might occur when indicators or signatures are mentioned in e-mail messages and similar forms of communication.
• Author: The analyst who created or added the indicator or signature. In the event that an alert is triggered and there is confusion regarding the indicator or signature itself or how it was implemented, this provides the opportunity to reach back to the individual who created, added, and deployed it.
• Creation Date: The original date the indicator or signature was created. In the event that it was drawn from another source, this would be the date that it was added to your internal management system.
• Modified Date: The most recent modification date of the indicator or signature. Ideally, you will track any time an indicator or signature is modified. This will be discussed later.
• Source: The original source of the indicator or signature. This can reference another organization, a URL, an internal case number, or even another indicator.
• Type: The type of indicator: Host or Network, Static or Variable, and Atomic, Computed, or Behavioral. Alternatively, the type of signature: Snort, Suricata, Bro, Antivirus, etc.
• Classification: The general classification type of the indicator or signature. This could be an IP Address, Hash Value, File Name, E-Mail Subject, DNS Name, or any other appropriate classification for an indicator. This could be the general category the signature is most closely associated with: malware activity, botnet C2, exploit activity, phishing, etc.
• Evolution Stage: The stage of the indicator or signature in relation to its evolution: Immature, Mature, or Retired.
• Confidence: A rating representing the amount of trust that can be placed in the indicator or signature. This is used to establish how reliable it is, and how much surety can be placed in its accuracy when it results in the generation of an alert. This can take several factors into account, including its precision, its source, or its evolutionary stage. It’s not uncommon for an indicator or signature’s confidence rating to change frequently over time. This is typically either a numerical value (1-100) or a relative value (low, medium, high, very high).
• Indicator/Signature: The indicator or signature itself, in its native format.
Along with the particulars of how you store and classify indicators and signatures, it is also tremendously important that you remain consistent in your efforts. The key to this consistency is ensuring the process is well-documented and frequently practiced within the organization.
Managing Indicators and Signatures
The number of indicators and signatures being managed by an organization can grow large in a short time. It is critical that an organization adopts a strategy for storing, accessing, and sharing them.
Most organizations tend to store indicators and signatures solely within the detection mechanisms that they are being used with. For instance, if the organization is using Snort to detect and log access to known malicious domains (an atomic indicator), then those indicators will be stored as Snort signatures where they are directly accessed by Snort. While this is the easiest manner in which to store these items, this limits your ability to interact with and reference them. It can also prohibit easily sharing individual indicators or converting them to signatures designed for another detection mechanism. In order to get the most out of your indicators and signatures, it helps to manage them with these best practices in mind:
Raw Data Format. Indicators are the easiest to work with when they are in their native form. You should always be able to access an indicator without any additional content or extraneous processing. This ensures that indicators are portable and can be parsed easily by automated and custom tools, allowing them to be deployed within unique signatures to a variety of detection mechanisms. For example, this means that IP addresses and file hashes should be plain text, while binary data should exist in binary format.
Ease of Access. Analysts should be able to access and edit indicators and signatures with relative ease. If they have to go through many inconvenient steps in order to add new ones or find out the source of an existing one, this will eat up valuable time. This can discourage the analyst from interacting with the indicators and signatures, which is something you absolutely don’t want to happen.
Easily Searchable. It won’t take long before a directory or database full of indicators and signatures becomes too large to browse through manually. In order to facilitate the analysts’ ability to quickly examine them, they should exist in a format that is searchable. This includes the ability to search the indicators or signatures themselves, along with any contextual data that is stored with them such as the date they were added, their source, or their type. If they are stored in a database, this can be done with database client access or a simple web front-end. If they are stored in flat files, then solutions can be created using a variety of Linux command line tools like grep.
Revision Tracking. It is common to revise signatures. This can occur when a signature results in the generation of too many false positives, or when it fails to detect the desired activity, resulting in false negatives. Signatures are also revised to reflect changes to adversarial strategy or attack techniques. Whenever this occurs, the revision, the person who made the change, and the date of the change should be recorded so that any issues arising from the modification can be addressed. Ideally, the reason for the change would also be noted.
Deployment Tracking. The purpose of any indicator is to eventually be able to utilize it within a signature in conjunction with a detection mechanism. When this happens, the pairing of the indicator and the detection mechanism should be noted. This will help an analyst understand how the NSM infrastructure is being used with an indicator. This will also prevent duplication of effort so that indicators aren’t deployed multiple times across redundant detection mechanisms. This is often done with a simple mapping of an indicator GUID to a SID.
Data Backup. At this point, you should realize just how important indicators and signatures are for NSM detection. This data should be considered critical for the success of the NSM mission, and should be backed up accordingly. This should include an off-site backup in the event of a catastrophic event affecting the main SOC facility.
Simple Indicator and Signature Management with CSV Files
Organizations of differing sizes use a variety of techniques for the storage and management of indicators and signatures. Some organizations utilize commercial solutions, while others use custom-written web-front ends attached to some type of database. There is no question that these methods can be effective, but it generally takes a certain level of organizational maturity before their implementation can be feasible. That said, even smaller and more immature security teams still need to manage indicators and signatures.
While it may sound a bit rudimentary, these items can be managed very effectively with comma separated value (CSV) files. These are files containing data in rows and columns, with columns being separated by commas, and rows being separated by new lines. These files are a great format for a lot of types of data because they can be easily read and parsed via the command-line with built-in Linux tools like grep, cut, sed, awk, and sort. You can also interact with CSV files by using Microsoft Excel, Libre Office/Open Office Calc, or most other graphical spreadsheet editors.
In order to manage indicators and signatures effectively given the best practices discussed here, you should maintain at least three CSV files. This includes the statistics tracking file we discussed earlier (Table 7.1), a master list, and a tracking table.
Master Indicator/Signature List
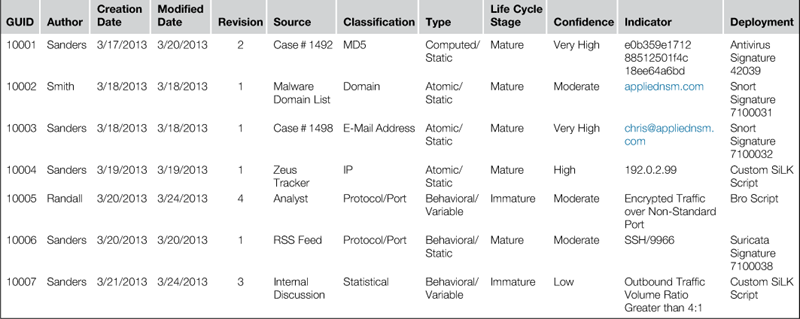
The primary CSV file used to store indicators and signatures is the Master IOC List. This contains fields for all of the critical criteria mentioned previously, as well as fields for tracking deployment. A sample of this is shown in Table 7.2
There are two simple ways to search this list. The first is to use a graphical spreadsheet editor like Microsoft Excel, where you can do simple sorting or Ctrl + F searches to find specific values. This might be appropriate for some users, but this becomes more difficult as the size of the CSV grows. Most commonly, analysts use Linux command line tools to query this list.
As an example, let’s say that an alert that references SID 710031 has just been generated, and you’d like to gain additional context on that signature and any associated indicators. In order to do this, you could use grep to search the file for all instances of the SID using the following command:
grep 7100031 master_ioc_list.csv
The results of this command are shown in Figure 7.3. You will see that our search returns both a signature, and the indicator that is used in the signature.

At some point it might come in handy to print column headers as well. Grep just sees data and isn’t aware of columns, so it doesn’t have this capability inherently. One option would be to use Sed or Awk for pattern matching, or you can just use the head command to print the first row of the file before performing your grep commands, like so:
head -1 master_ioc_list.csv && grep 7100031 master_ioc_list.csv
The commands are executed consecutively by combining them with two ampersands (&&). The output of this command is shown in Figure 7.4.

Now, if we want to simply pull out the signature itself, we can redirect the results of the previous command (without the column headers) to another grep command that searches for lines that have the text “sid” in them, to only match signatures rather than indicators. Then, we can pipe that output to the cut command with the pipe ‘|’ symbol. Cut is used by specifying the comma delimiter with the –d flag, and selecting the eleventh column with the –f flag. This command would look like this:
grep 7100031 master_ioc_list.csv | grep sid | cut –d , –f11
Another method that will achieve the same goal is using the awk command. Awk, with the –F switch, can be directed to print a specified column, which we have done here:
grep 7100031 master_ioc_list.csv | grep sid | awk –F ‘{print $11}’
These techniques can be expanded for more granular searches. For instance, you might want to retrieve every IP address within the list that is still active (not retired) so that you can deploy this to a detection mechanism. You can do this with the following command:
grep –v retired master_ioc_list.csv | grep IP | cut –d , -f11
In the first grep statement, you will notice the addition of the –v flag. This tells grep to match everything NOT matching the specified pattern. In this case, we are telling grep to list all of the indicators that are not retired, which will include both immature and mature indicators.
Next, we might want to search for all of the indicators that are domain names, and are actively deployed to the Snort IDS. This is done with this command:
head -1 master_ioc_list.csv && grep –v retired master_ioc_list.csv | grep Domain | grep Snort
You will notice the capitalization of the “Domain” and “Snort” searches that are used with grep. By default, grep is case sensitive, so we want to use this capitalization so that it matches our line entries appropriately, rather than matching any other instances of those words with other capitalizations. If you would like to make your searches not case-sensitive, you can use the –i command line argument. It is important to be aware of the case of items you are searching for so that grep can be used properly, with the –i switch if necessary.
Whenever the CSV file requires an addition or modification, this can be done with your favorite command line text editor, such as Vim, Emacs, or Nano. When doing this, be wary of accidentally creating new lines, which could negatively impact parsing of the file.
Indicator/Signature Revision Table
Earlier, I mentioned that indicators and signatures often undergo revisions, and it was important to track those revisions. When you are using a master CSV file to manage these items, you can manage the modification of them with an additional file. This file is meant to be very simple, and it only contains the unique identifier for the indicator or signature, the date of the change, the author of the change, the new revision number, the column value that changed, the old and new versions of the changed data, and a note explaining why the change occurred. This will serve as an audit trail so that the evolution of an indicator or signature can be followed, and so that it can be referenced in the event that an error was made. You should note that a change isn’t only recorded when the indicator or signature itself changes, but also when any of the contextual information associated with it changes, such as the detection method to which it is deployed. An example of this spreadsheet is shown in Table 7.3.
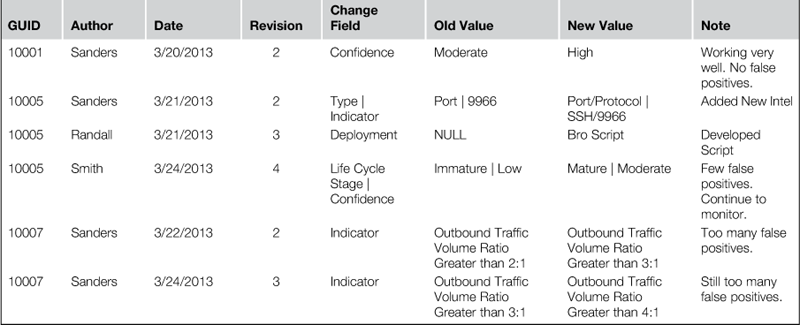
This CSV file isn’t meant to be all-encompassing, but rather, it should be used in conjunction with the Master Indicator/Signature List CSV file. You can then use similar commands to view the audit trail associated with an item:
head -1 master_ioc_list.csv && grep 10005 master_ios_list.csv
The results of this command illustrate the audit trail for indicator 10005, shown in Figure 7.5.

If you’ve never interacted with data using Linux command-line tools, it may be a bit cumbersome at first, and even a little intimidating. However, as you do this more, it will become second nature. The best way to learn is to immerse yourself in the tools, and keep trying something until you figure it out. Eventually, you will encounter some of the limits of tools like grep, and begin using other tools such as sed and awk for different tasks. A strong knowledge of these tools is very important for any analyst. Eventually, you might even combine these tools into scripts to automate common tasks.
While CSV files are nice because of their simplicity, this same simplicity requires that extra attention be paid to the sanity of the data. Since most inputs or modifications to these files will be made with a text editor, there are no controls in place to ensure data remains in a proper format. This might result in an analyst accidentally messing up the formatting of the CSV file or placing data in the wrong column. This is why it is critical to maintain backups of these files. It is also highly recommended that the sanity of the data is checked frequently. If you depend upon these CSV files for the operation of your SOC, it is worth investing the time to write a custom script that can ensure no errors exist within the data. This can be done in relatively short order using something like the CSV library for the Python scripting language.
If you’d like to download templates for these CSV files you can do that at http://www.appliednsm.com/resources.
Indicator and Signature Frameworks
One of the biggest problems facing the information security and intelligence communities at large is the lack of a common framework for the creation, management, and distribution of indicators and signatures. While everybody uses them, most everyone tends to use their individual methods for organizing and storing the data. Because of this, the indicators and signatures are not portable, and can’t easily be shared with other organizations. While sharing of the data itself can often be accomplished rather easily, such as with lists of IP addresses, sharing contextual information is where the real challenge arises.
In recent years, groups have made attempts to create frameworks for the sharing of indicator and signature data.
OpenIOC
One of the biggest advancements towards a common framework for threat intelligence is Mandiant’s OpenIOC project. This project, originally designed to enable Mandiant’s products to codify intelligence to rapidly search for potential security breaches, was released in 2010 as a standardized and open source schema for communication of threat information.
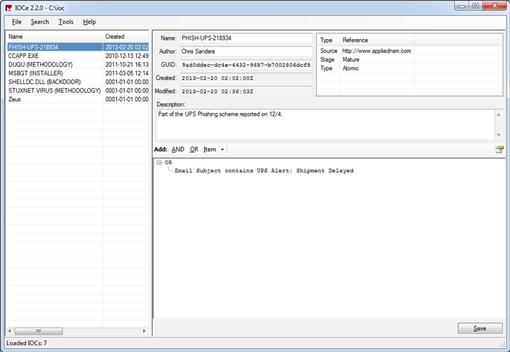
At its core, OpenIOC is just an XML schema used to describe technical characteristics that identify adversarial activities. The OpenIOC scheme allows you to manage IOC’s with a lot of the contextual information that is required in order to use the indicator efficiently. An example of an OpenIOC is shown in Figure 7.6.

In this IOC, you can see several pieces of contextual information are stored, including:
• 9ad0ddec-dc4e-4432-9687-b7002806dcf8 – A unique identifier
• PHISH-UPS-218934 – A short description or additional identifier
• Part of the UPS Phishing scheme reported on 12/4. – A detailed description
• 2013-02-20 T01:02:00 – The date/time the indicator was created
• http://www.appliednsm.com - The source of the indicator
• Mature – The stage of the indicator in the IOC life cycle
• Atomic – The type of indicator
• E-Mail/Subject – The classification of the indicator
• UPS Alert: Shipment Delayed – The indicator itself. In this case, an e-mail subject line.
If you have a Windows computer available, one of the easiest ways to get up and running with creating and modifying IOCs using the OpenIOC format is to use Mandiant’s free OpenIOC Editor tool. The tool is fairly simple, and allows you to create IOCs from scratch or modify existing IOCs.
When you launch OpenIOC Editor for the first time you will be asked to select your IOC directory. Once you do this, you will be presented with a screen similar to what is shown in Figure 7.7. The OpenIOC Editor is broken into three separate areas. The left pane contains a list of IOCs in the IOC directory. If you click on one of these IOCs, it will populate the other two areas. In the upper right pane you will find all of the basic information about the IOC, including its name, the author, its GUID, its created/modified dates, a description, and any custom criteria that has been defined such as source, stage, or type. In the lower right pane, you will find the indicator itself, which may include multiple indicators linked with AND/OR logic statements.
OpenIOC Editor treats each IOC as a separate file, which is what you will find in the IOC directory you specified after you create new IOCs.
Unfortunately, OpenIOC Editor only exists for the Windows platform as of the writing of this chapter. Therefore, if you are using a *nix-based platform as most NSM analysts are, creating and editing IOC’s in this format will have to be a manual endeavor. Alternatively, you can use a virtual machine or WINE to launch the OpenIOC Editor.
If you utilize any of Mandiant’s commercial products then you can use the majority of those products to interact with indicators in this format. The OpenIOC standard is gaining a lot of popularity, and it is only a matter of time before more free publicly available tools for the management of OpenIOC indicators become available.
You can read more about the OpenIOC format, download the XML schema, and even download some sample IOCs at http://www.openioc.org.
STIX
The Structured Threat Information eXpression (STIX) is an open source community-driven project developed by MITRE for the US Department of Homeland Security. STIX is designed to standardize threat intelligence information, and is gaining popularity within the government and defense arenas.
The STIX architecture is based upon independent constructs and how they are related (Figure 7.8).

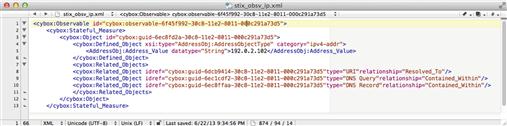
At the core of this architecture are observables, which STIX defines as stateful properties or measurable events pertinent to the operation of computers and networks. This could be a service being stopped, a file name, a system rebooting, or a connection establishment. These observables are stored in an XML format that uses the CybOX language, another MITRE project, for representing observables. An example observable is shown in Figure 7.9. This observable represents an IPv4 address, with a few related objects. The objects are linked together through the use of globally unique identifiers.
Within the STIX framework, observables can be linked to indicators, incidents, TTPs, specific threat actors, adversary campaigns, specific targets, data markings, and courses of action. These entities come together to form more than a simple indicator management system, rather, they form a complete threat intelligence management system.
Indicators are representations of potentially anomalous activity that are formed by combining observables. Figure 7.10 shows an indicator containing domains that are part of a watch list.
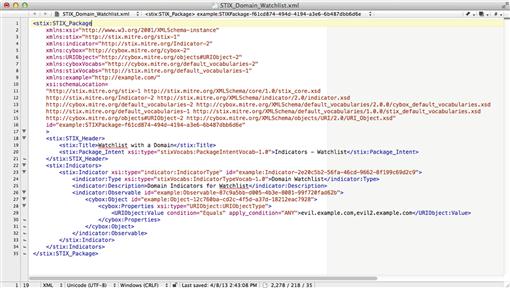
You should notice that this indicator is actually comprised of a single observable: a list of domain names. This would be an example of an atomic indicator within the STIX framework. An indicator can include as many observables as necessary, which means they are well suited for behavioral indicators as well. When these indicators are tied to the other constructs within STIX, there are a lot of possibilities.
As of the writing of this book, the only methods that exist for creating, editing, and managing STIX objects are the newly released set of Python bindings for writing custom Python applications, or using simple text or XML editors.
The STIX framework represents a lot of potential. Along with DHS, STIX is currently being evaluated by several organizations, including multiple government and defense agencies, defense contractors, and private organizations. While there aren’t currently a lot of tools available to help with the management of STIX, this will likely change over time as the framework matures and expands.
You can learn more about STIX at http://stix.mitre.org.
Conclusion
In this chapter we’ve looked at the fundamentals of detection mechanisms, indicators of compromise, and signatures along with the role they play in NSM detection. This includes indicator types, indicator and signature critical criteria, and some best practices for creating and managing them. We also looked at methods that smaller and younger security programs can use for the management of indicators and signatures, as well as the OpenIOC and STIX frameworks for IOC management. The remainder of the Detection portion of the book will be devoted to the applied use of several detection mechanisms that ingest indicators and signatures.