
Signature-Based Detection with Snort and Suricata
Abstract
The most common form of IDS is signature-based. Signature-based detection has been the bread and butter of network-based defensive security for over a decade. These systems work by examining packet data for indicators of compromise. Indicators are combined with IDS platform-specific directives to form signatures (also called rules) that instruct the IDS how to efficiently locate the indicators within network data. This chapter demonstrates the power of signature-based detection with two popular IDS engines, Snort and Suricata. It discusses the architecture and configuration of both tools before discussing how IDS rules are created. Tips are given for effective rule creation, as well as for rule precision and performance. This chapter also discusses mechanisms that can be used for viewing IDS alerts.
Keywords
Network Security Monitoring; Detection; Intrusion Detection System; IDS; NIDS; Snort; Suricata; Barnyard2; PulledPork; Security Onion; Snorby; Sguil
Chapter Contents
Changing IDS Engines in Security Onion
Initializing Snort and Suricata for Intrusion Detection
Configuring Snort and Suricata
Managing Rule Updates with PulledPork
Managing Rules in Security Onion
Additional NIDS Mode Command Line Arguments
The most common form of IDS is signature-based. These systems work by examining packet data for indicators of compromise. Indicators are combined with IDS platform-specific directives to form signatures (also called rules) that instruct the IDS how to efficiently locate the indicators within network data. Whenever a signature-based IDS locates data that matches content found in a signature, it generates alert data to notify analysts.
Signature-based detection has been the bread and butter of network-based defensive security for over a decade, partially because it is very similar to how malicious activity is detected at the host level with antivirus utilities. The formula is fairly simple: an analyst observes a malicious activity, derives indicators from the activity and develops them into signatures, and then those signatures will alert whenever the activity occurs again. This was incredibly effective in previous years when there were only a small number of malware strains to keep up with, but in the modern era using signature-based mechanisms as a means of “network-based antivirus” isn’t entirely efficient. The popular malware sharing repository http://www.virusshare.com currently has over 11 million unique malware samples as of the writing of this book. This is only a sampling of all of the malware that can be found in the far reaches of the Internet, and attempting to create and maintain signatures for this number of malware samples isn’t close to possible.
In the modern era, signature-based IDS can find itself efficiently positioned to detect malicious activity beyond just typical malware. This might include common post-exploitation activities such as the launch of a shell, the unexpected addition of a user account over the network, or policy violations such as the deployment of unauthorized servers or systems attempting to download updates from an unapproved server. Signature-based IDS can be used effectively for the detection of malware, but rather than attempting to use it to detect every instance of malicious code on your network, it is often best suited to detecting malware related to specific and current concerns. This might include detection of currently popular web-based exploit kits (Blackhole, Redkit, etc), or malware related to current world events. The ideal use of signature-based IDS will ultimately depend upon your network and the threats you are most concerned with, but it is a crucial component of an NSM deployment.
In this chapter we will introduce the two most popular signature-based detection IDS’s, Snort and Suricata. Common configuration items relevant to both tools will be discussed. We will also take an in-depth look at how signatures are created, and look at a couple of popular methods for viewing alerts generated by Snort and Suricata. This chapter won’t serve as an exhaustive resource on Snort and Suricata. Rather, it is meant to provide fundamental knowledge about how these technologies work, and how analysts can apply that knowledge to building effective signature-based detection.
Snort
The Snort IDS was originally developed by Martin Roesch in 1998 as a free and open source lightweight intrusion detection system, eventually leading to the creation of Sourcefire, Inc. In the years since Snort’s inception, it has grown to be the most popular IDS in the world. With over four million downloads, this “lightweight” system has grown into a very powerful and flexible IDS that has set the standard for the IDS industry. You can find Snort deployed in universities, private companies, and governments throughout the world. In 2013, Cisco announced its intent to acquire Sourcefire (although the deal was not yet completed when this chapter was finalized).
Snort is installed on Security Onion by default, and is also easy to install manually. Sourcefire provides installation guides for several operating systems at http://snort.org/docs.
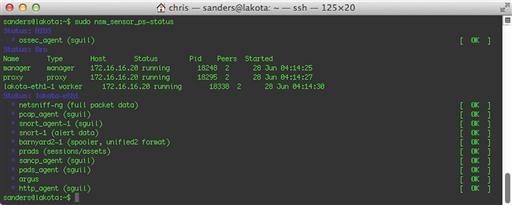
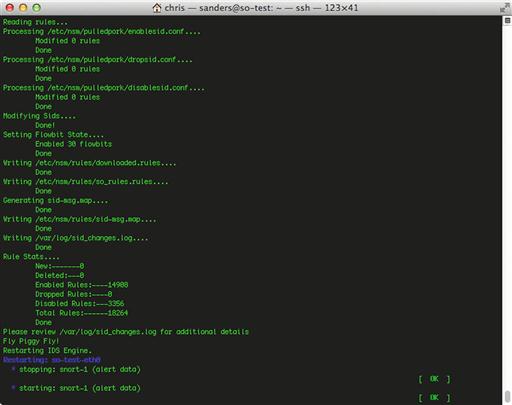
If you’ve gone through the Security Onion setup process and have chosen Snort as your IDS, then it is likely already running. You can verify this by running the command sudo nsm_sensor_ps-status. In the output shown in Figure 9.1, you will see that snort-1 (alert data) is listed as [OK].
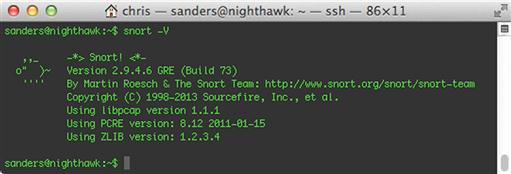
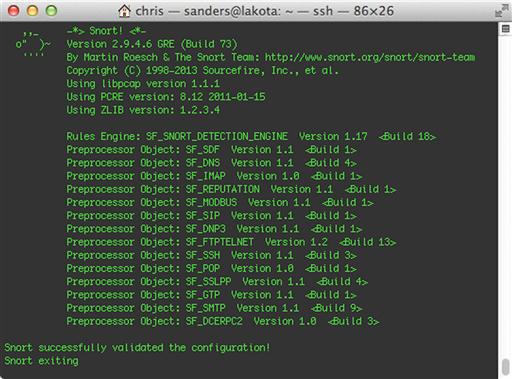
Snort itself is invoked from the command line. You can verify the version of Snort by running the command snort –V. The output of this command is shown in Figure 9.2.
Snort Architecture
The way Snort functions will depend on which operating mode is specified at runtime. Snort has three primary operating modes: sniffer mode, packet logger mode, and NIDS mode.
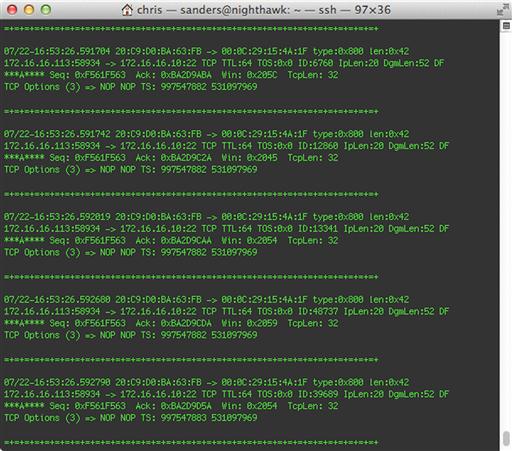
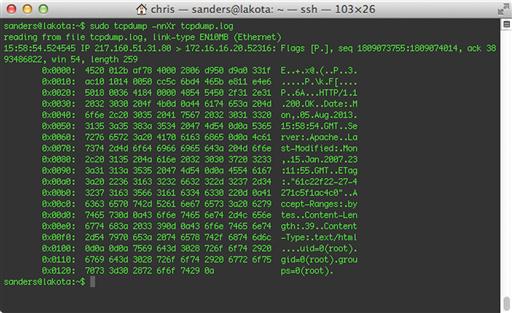
Sniffer mode allows Snort to capture packets off the wire and outputs them to the screen in a human readable format, just as tcpdump might do (we will talk about tcpdump in Chapter 13). However, the its output is quite a bit nicer than tcpdump at baseline because of how it labels certain aspects of the traffic it sees. It will also provide some useful traffic statistics when the capture process is stopped. A sample of packet data as shown by Snort can bee seen in Figure 9.3.
Packet sniffer mode is how Snort runs by default, so you can execute Snort in this mode by simply specifying a capture interface with the command snort –i < interface > .
Packet logger mode is much the same as sniffer mode, only it logs packets to a file rather than the screen. This data is most commonly logged in binary PCAP format. You can enable this operation mode by specifying the logging directory with the addition of the –l switch, like this: snort –l < log directory >. At some point, you will probably want to read these PCAP files, which can be done by invoking Snort with the –r command: snort –r < pcap file > .
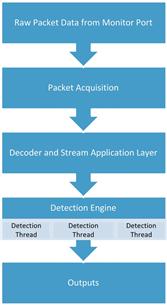
The mode we are primarily concerned about is NIDS mode, which is designed to read data captured from the network, with the ultimate goal of outputting alerts. To do this, packet data traverses different phases of Snort’s architecture, shown in Figure 9.4.

Snort can receive data by parsing a manually specified PCAP file or by pulling it directly from a sensors monitoring interface. When Snort receives this data, its first step is to analyze it with the packet decoder, which is actually a series of multiple decoders that analyze packet data and normalize it into a state suitable for parsing by the preprocessors and detection engines.
When data has finished being processed by the packet decoder, it is sent to Snort’s preprocessors. There are two types of preprocessors. The first type is used for detection purposes. The second type of preprocessor includes those that are used to modify packet data so that it can be better parsed by the detection engine.
After preprocessing is finished, data is shipped to the workhorse of the Snort architecture, the detection engine. The detection engine is the portion of the architecture that is responsible for parsing rules and determining if the conditions identified in those rules match the traffic being analyzed.
When the detection engine determines that network traffic matches a rule, it hands that data over to the output plugins that are enabled in the Snort configuration file, so that an analyst can be notified of the alert. Snort can log to a variety of formats, including single line alerts in a text file, a CSV file, a PCAP format containing the traffic matching the rule, XML format, Syslog, and more. In many production environments, Snort is configured to log to Unified2 format, an open format that can be read by tools such as Barnyard2 or Pigsty, which can be used for more flexible output formats such as direct output to a database.
Suricata
While Snort is the most popular signature-based IDS in use today, another alternative that is gaining popularity is Suricata, an open source IDS developed by the Open Information Security Foundation (OISF) and initially funded by the Department of Homeland Security. Since its release in 2010, it has gained a large following. This is primarily due to its performance ability, made possible by its multi-threaded design. In truth, Suricata functions very similarly to Snort, so if you are familiar with its operation then you should have no trouble using Suricata.
If you’ve gone through the Security Onion setup process and you chose Suricata as your IDS, then it is likely already running. You can verify this by running the command sudo nsm_sensor_ps-status. In the output shown in Figure 9.5, you will see that Suricata (alert data) is listed as [OK].

If you are using a sensor platform other than Security Onion, then Suricata will have to be installed manually. The OISF provides installation guides for several operating systems at https://redmine.openinfosecfoundation.org/projects/suricata/wiki/Suricata_Installation
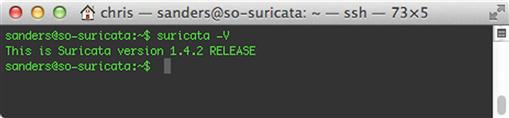
Suricata is invoked from the command line. You can verify the version of Suricata by running the command suricata –V. The output of this command is shown in Figure 9.6.
Suricata Architecture
Suricata is made up of several modules that can interact differently depending on how Suricata is initialized. The manner in which these modules and the threads and queues associated with them are arranged is referred to as Suricata’s runmode. This runmode is chosen based upon where Suricata’s processing priority should be placed.
The default runmode is one that is optimized for detection, which is typically the most resource intensive module. This runmode is depicted in Figure 9.7.
In another runmode, pfring is used to optimize packet acquisition and decoding for high throughput links. This runmode is shown in Figure 9.8.
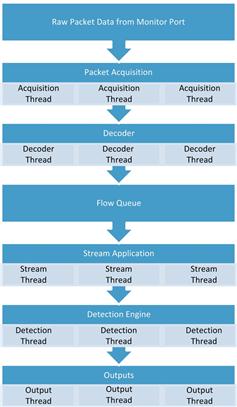
Regardless of which runmode is used, Suricata’s first step is to collect packets with its Packet Acquisition module. This module gathers packets from the network interface and feeds them to the packet decoder, which is responsible for determining the link type then normalizing the data for further processing by other modules. Once completed, the data is passed to the stream module. The stream module is primarily responsible for tracking session-aware protocols (such as TCP) and reassembling packet data in the appropriate order. In addition to this, the stream module also does some handling and resequencing of data from application layer protocols such as HTTP. All of this data pampering leads up to the data being fed into the detection module, which is what analyzes packet data for matches based upon usercreated signatures/rules. When an alert is generated, that alert and the associated data that caused it are sent to the output module, which can output data in a variety of formats.
Changing IDS Engines in Security Onion
If you’ve already completed the Security Onion setup process and initially chose either Snort or Suricata as your IDS engine, but would like to try the other engine without reinstalling Security Onion, this can be done with a few quick changes.
1. Stop the NSM sensor processes:
sudo nsm_sensor_ps-stop
2. Modify the primary SO configuration file:
Switch from Snort to Suricata:
sudo sed -i 's|ENGINE = snort|ENGINE = suricata|g' /etc/nsm/securityonion.conf
Switch from Suricata to Snort:
sudo sed -i 's|ENGINE = suricata|ENGINE = snort|g' /etc/nsm/securityonion.conf
3. Update the sensor rule set for the appropriate IDS engine:
sudo rule-update
If you’ve developed custom rules for your sensor, be sure that they are compatible with the IDS engine you are switching to in order to anticipate any issues that might prevent the IDS from initializing.
Initializing Snort and Suricata for Intrusion Detection
To invoke Snort or Suricata for the purpose of intrusion detection, all you have to do is specify the location of a valid configuration file with the –c command line option and a monitoring interface with the –i option.
Snort:
sudo snort –c snort.conf –i eth1
Suricata:
sudo suricata –c suricata.yaml –i eth1
Before doing this however, it is important to verify that the configuration file is valid. This can be done by adding the –T argument, which will execute each IDS engine with the supplied configuration file to ensure that they can launch successfully with the provided configuration.
Snort:
sudo snort –Tc snort.conf –i eth1
Suricata:
sudo suricata –Tc suricata.yaml –i eth1
If everything checks out with Snort, you should see a message saying that it has successfully validated the configuration, as shown in Figure 9.9. Snort will exit when this test is completed.
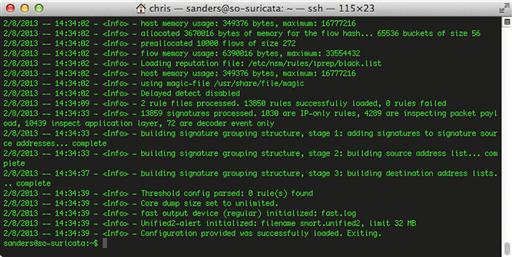
If Suricata initializes successfully, you should see a message saying that the configuration provided was successfully loaded, as shown in Figure 9.10. Suricata will exit when this test is completed.
If any errors are reported with Snort or Suricata during these tests, they should be fixed before attempting to run the tools in production. One common error is forgetting to invoke the tools with the proper permissions to sniff network traffic, most commonly done by using the sudo command.
If Snort launches in NIDS mode successfully, you should be notified that Snort is commencing packet processing, and be provided with the process ID (PID) number, as shown in Figure 9.11.

If Suricata launches successfully, you should be notified that threads have been initialized, and that the engine has been started, as shown in Figure 9.12.

In Security Onion, Snort and Suricata can be started by using the nsm_sensor_ps-start script, which is described in Appendix 1.
Configuring Snort and Suricata
Snort and Suricata both rely upon configuration files and/or command line arguments to control how they function. Snort uses a file called snort.conf, and Suricata uses one called suricata.yaml. These files can be used to control and tweak virtually every behavior in both applications, including the particulars of their detection engines, the location of rule files, and the declaration of variables used within those rules. If you are using Security Onion, these files are located in /etc/nsm/< sensor-interface >/. If you are responsible for managing a Snort or Suricata installation, or simply want to know more about how these tools function, you should take some time and step through the configuration files. They are commented incredibly well. Next, we will start stepping through some common configuration items that are applicable to both tools.
Variables
In computing, variables are symbolic names that reference a stored value. Snort and Suricata both use variables within their respective configurations to add flexibility to IDS rules and to ease their creation and maintenance. Snort also uses variables within its configuration file to reference common paths. A variable only has to be specified once so that it is loaded when Snort is executed, and then it can be referenced at any time within the configuration file or within Snort rules. There are three different types of variables used in this context: IP variables, port variables, and standard variables.
IP Variables
IP variables are used to define network addresses or a range of addresses for use in IDS rules when referring to the source or destination of traffic being examined. By using variables to specify frequently referenced IP ranges, you only have to update the variable once to apply the change to any rule referencing that range.
With Snort, an IP variable is identified in snort.conf by the ipvar keyword, followed by the variable name and the IP address(es) that comprise the variable. For instance, you could specify the following variable to identify a DNS server on your network:
ipvar DNS_SERVERS 192.168.1.10
You can specify multiple IP addresses by enclosing the addresses in square brackets and separating them with commas. Here, we do this to identify several SMTP mail servers:
ipvar SMTP_SERVERS [192.168.1.75,192.168.1.76,192.168.1.77]
You can specify ranges of addresses using CIDR notation. These ranges can be combined in comma-separated lists, which must be enclosed in square brackets. Below, we identify two subnets that contain only web servers:
ipvar HTTP_SERVERS [192.168.2.0/24,192.168.12.0/24]
Suricata doesn’t use a particular keyword to identify variables; instead, it requires that variables of particular types be defined in specific sections of suricata.yaml. Specifically, you must define all variables under the vars heading, and IP variables under the address-groups subheading. Apart from this, the same rules mentioned above regarding the formatting of addresses and the use of CIDR notation apply:
vars:
address-groups:
DNS_SERVERS 192.168.1.10
SMTP_SERVERS [192.168.1.75,192.168.1.76,192.168.1.77]
HTTP_SERVERS [192.168.2.0/24,192.168.12.0/24]
In order to use an IP variable in a rule you must refer to it with the dollar sign ($) followed by the variable name. In the case of the below rule, both the $SMTP_SERVERS and $EXTERNAL_NET variables are used to attempt to detect SMTP AUTH LOGON brute forcing.
alert tcp $SMTP_SERVERS 25 - > $EXTERNAL_NET any (msg:“GPL SMTP AUTH LOGON brute force attempt”; flow:from_server,established; content:“Authentication unsuccessful”; offset:54; nocase; threshold:type threshold, track by_dst, count 5, seconds 60; classtype:suspicious-login; sid:2102275; rev:3;)
The two most important network variables are $HOME_NET and $EXTERNAL_NET.
The $HOME_NET variable is used to identify IP address ranges that Snort/Suricata is responsible for protecting. This will often be configured for internally used RFC1918 (non-routable) IP addresses, such as 10.0.0.0/8, 172.16.0.0/12, or 192.168.0.0/16m and will vary based upon the placement and visibility of the sensor.
A common $HOME_NET declaration may look like this:
Snort:
ipvar HOME_NET [192.168.0.0/16,10.0.0.0/8,172.16.0.0/12]
Suricata:
vars:
address-groups:
HOME_NET [192.168.0.0/16,10.0.0.0/8,172.16.0.0/12]
The $EXTERNAL_NET variable is used to identify IP address ranges that are not being protected by Snort/Suricata. This often includes any address range that doesn’t belong to the organization and is considered exterior to the network perimeter. As you might imagine, this will generally include anything that is NOT a part of $HOME_NET. As such, it is common to set this variable to !$HOME_NET. The exclamation point can be used within a variable to negate the value specified. It is also quite common for this variable to be set to “any”, which encompasses all IP addresses.
Snort:
ipvar EXTERNAL_NET !$HOME_NET
Suricata:
vars:
address-groups:
EXTERNAL_NET !$HOME_NET
The $HOME_NET and $EXTERNAL_NET network variables are required for Snort and Suricata, and most publicly available rules are written to use these values. The remainder of the network variables you will find already listed in snort.conf and suricata.yaml are optional, but are highly recommended as they allow for increased flexibility and granularity when writing rules. In addition, the public rule sets we will talk about later all make use of these variables. Some of them include:
• $HTTP_SERVERS – Useful for creating and deploying rules related to server-side or client-side web exploitation.
• $DNS_SERVERS – Useful for creating and deploying rules related to domain reputation or malware command and control.
• $SMTP_SERVERS – Useful for creating and deploying rules related to mail spam or malicious attachments.
• $SSH_SERVERS – Useful for logging activity related to the management of switches, routers, and other network devices over the SSH protocol.
You can also create your own variables using this syntax. This can be a useful tactic for grouping all sorts of devices, including:
The possibilities are endless, and the more precise your groups are, the more flexibility you have when creating rules.
Port Variables
Port variables define a layer four port or port range for use in IDS rules when referring to the source or destination ports of traffic being examined.
With Snort, these variables are created using the portvar keyword in snort.conf. This example is used to specify a single port that would be used by the SMTP service:
portvar SMTP_PORTS 25
You can specify a range of ports by using a semicolon in between the start and end of the range. This example identifies two ports that are commonly used by the FTP service:
portvar FTP_PORTS 20:21
When necessary, a list of ports can be declared using the same format as with IP variables, a comma-separated list surrounded by square brackets. Here we declare several ports that might be used for HTTP communication:
portvar HTTP_PORTS [80,81,82,83,84,85,86,87,88,89,311,383,591,593,631,901,1220,1414,1741,1830,2301,2381,2809,3037,3057,3128,3702,4343,4848,5250,6080,6988,7000,7001,7144,7145,7510,7777,7779,8000,8008,8014,8028,
8080,8085,8088,8090,8118,8123,8180,8181,8222,8243,8280,8300,8500,8800,8888,8899,9000,9060,9080,9090,9091,9443,9999,10000,11371,34443,34444,41080,50002,55555]
Port variables are useful when writing rules for communication with a service that doesn’t always use an expected port. For instance, while HTTP communication typically occurs over port 80, several web servers (especially those used for the management of specialized applications or devices) will use non-standard ports. Port variables can also come in handy if these services within your network are configured to use non-standard ports. This is a common practice for administrative protocols like SSH, where administrators will use something other than default port 22 to prevent automated scans from finding these services.
Standard Variables
Standard variables are the last variable type that you will encounter, and they are only used by Snort. These variables are created by using the var keyword, and are typically used to specify directories. The default snort.conf file uses these frequently; for example, to specify the directories containing different types of Snort rules:
var RULE_PATH /etc/nsm/rules
var SO_RULE_PATH /etc/nsm/rules
var PREPROC_RULE_PATH /etc/nsm/rules
The majority of these variable declarations can be found in the first section of snort.conf. If you are going to create custom variables and you want to place them into snort.conf instead of including a separate file, it is a good practice to place those variables in this section so that you don’t lose track of them.
Defining Rule Sets
For Snort or Suricata to inspect network traffic for indicators of compromise, you must have rules in place. Snort and Suricata rules are platform-specific methods of implementing indicators of compromise. The rules essentially tell their detection engines how to locate the indicator within network traffic.
Rules exist in rule files, which are simply text files that contain rules in a line-delimited format. In order for Snort or Suricata to parse these rules, they must be included in their respective configuration files.
Defining Snort Rule Files
In snort.conf, the last section of the configuration file is where rule declarations are usually made. You must specify a rule directory, typically done by using the include keyword, followed by the path and file name of the rule file. Typically, the rule path is specified using the $RULE_PATH variable, which is defined in the first section of snort.conf.
include $RULE_PATH/emerging-exploit.rules
Snort also allows for the use of non-standard rule types. These are:
• Preprocessor Rules: These rules are dependent upon functionality provided by preprocessors, and are parsed prior to rules parsed by the detection engine.
• Shared Object Rules: These rules are compiled rather than being interpreted from a line of text. They are useful for the creation of very advanced rules, or deploying rules without divulging the details of the indicators in the rule itself.
These rules may be located in different locations, so they have their own rule path variables. Rule files can be included using these variables:
include $PREPROC_RULE_PATH/preproc.rules
include $SO_RULE_PATH/sharedobj.rules
Snort loads its rules at initialization, but you can force a configuration update without completely restarting Snort. This is advantageous, because it means that you don’t have to disable your detection for a few seconds every time you make a rule change. This assumes that Snort is compiled with the -enable-reload option. To perform a live reload, complete the following steps:
1. Find the process ID of the running Snort process. To list this process, use the ps command to list running processes and use grep to search for the Snort process:
ps aux | grep snort.conf
In this case, the process ID is 22859, shown in Figure 9.13:
2. Finally, send a SIGHUP kill signal to the process to initiate a live rule reload. In this example, the command would be:
sudo kill -SIGHUP 22859
3. Snort should restart and parse the updated snort.conf file and the associated rules. Keep in mind that some configuration options are not supported by live reload. Those are listed here: http://manual.snort.org/node24.html.

Defining Suricata Rule Files
With Suricata, rule files are identified by placing them into the appropriate section of suricata.yaml. To do this, the default rule path must be specified, then the rule files can be listed under the rule-files heading, with each file identified on a new line with a hyphen.
default-rule-path: /etc/nsm/rules/
rule-files:
- local.rules
- downloaded.rules
Like Snort, Suricata does not have to be reloaded in order for new rules to take effect. The following steps will allow you to force rule additions, deletions, or modifications without restarting Suricata:
1. First, ensure that live rule reloads are enabled in Suricata.yaml:
# When rule-reload is enabled, sending a USR2 signal to the Suricata process will trigger a live rule reload. Experimental feature, use with care.
- rule-reload: true
2. Next, find the process ID of the running Suricata process. In order to list this process, use the ps command to list running processes and use grep to search for the Suricata process:
ps aux | grep suricata.yaml
In this case, let’s assume the process ID is 30577.
3. Finally, send a USR2 kill signal to the process to initiate a live rule reload. In this example, the command would be:
sudo kill –USR2 30577
This log output of this action is shown in Figure 9.14:

Public Rule Sources
Rules can be created manually, shared between organizations, or retrieved from public sources. Building custom rules will be examined later in this chapter, but before that, there are two primary sources for Snort and Suricata rules that must be examined: Emerging Threats and the Sourcefire VRT.
Emerging Threats (ET), originally called Bleeding Snort, was originally launched in 2003 by Matt Jonkman, and was designed to serve as an open-source community for sharing IDS signatures. ET fostered the development of a large and active signature development community, and eventually received several grants that helped further their cause.
Now, the ET community is as strong as ever and provides rule sets for both Snort and Suricata. These come in the form of a free open rule set that is community-driven and maintained, and a paid subscription based “ETPro” rule set that is maintained by the Emerging Threats research team. You can read more about the ET rule set at http://www.emergingthreats.net/open-source/etopen-ruleset/. The ET team also has a blog that provides rule update notifications at http://www.emergingthreats.net/blog/.
The Sourcefire Vulnerability Research Team (VRT), from the same company that created Snort, is an elite team of security researchers who work proactively to develop detection capabilities for trending attack techniques, malware, and vulnerabilities. The VRT employs some very talented individuals, and they are responsible for the development and maintenance of rules in the official Snort.org rule set.
There are three official Snort rule sets. The VRT rule set is their premium offering. It requires a paid subscription, but provides immediate access to all VRT developed rules when they are released. Next is the Registered User release, which requires free registration on the snort.org website and provides access to VRT developed rules thirty days after they have been released. The third and final offering is the community rule set, which is a freely distributed subset of the subscriber rule set. The community rule set doesn’t require registration, and is updated daily. All rules released in this rule set are licensed via GPLv2.
While the Sourcefire VRT doesn’t provide a Suricata specific rule set, some of their rules will work with Suricata. However, Suricata doesn’t support many of the rule options that are provided by Snort preprocessors. Therefore, if you are a Suricata user and would like to use VRT rules, it is recommended that you choose individual rules and test them with Suricata rather than attempting to implement the entire VRT rule set. By using this method, you can modify rules to work on a case-by-case basis.
You can download Snort VRT rules at http://www.snort.org/snort-rules/. You can also find the very informative VRT blog at http://vrt-blog.snort.org/, as well as find out about rule updates and the latest news for the ruleset at http://blog.snort.org.
Managing Rule Updates with PulledPork
Both Emerging Threats and the Sourcefire VRT release new rules nearly every day. The task of checking for new rule updates, downloading those updates, placing them in the appropriate directory, and ensuring that they are put into production can be very tedious if done manually.
PulledPork was created to automate this process, and it can be used to ensure that your rules stay up to date. It provides a variety of features that make it useful for a number of scenarios. Among these, it provides mechanisms for downloading rule updates, the ability to manage and distribute custom rule files, and the ability to track rule changes. The configuration of PulledPork is beyond the scope of this book, but you can read more about it at https://code.google.com/p/pulledpork/.
Managing Rules in Security Onion
By default, rules in Security Onion are placed in /etc/nsm/rules/. Rules that are downloaded from publicly available sources such as the Sourcefire VRT or Emerging Threats are placed into the downloaded.rules file, and custom created rules should be placed into the local.rules file. Additional rule files can be used, but they must first be specified in snort.conf or suricata.yaml.
If you are using Security Onion as your NSM platform, you should avoid updating your rules using the methods mentioned in the previous sections, and instead use the rule-update script. This script performs additional tasks required by other tools such as Barnyard2 and PulledPork. The script is run like this:
sudo rule-update
An excerpt of the output from the rule-update script is shown in Figure 9.15.
There are two files that are especially important for the maintenance of rules in Security Onion: disablesid.conf and modifysid.conf. These files are part of PulledPork and are used in the same way described in this chapter, even if you aren’t running Security Onion.
The disablesid.conf file is used to persistently disable rules that you do not wish to use. This is especially important when interacting with publicly obtained rules because of their constant updates. As an example, let’s say that you want to disable a rule that is identified by SID 12345. Your first inclination might be to either delete the rule from the rule file, or to disable it by commenting it out with a pound sign. This might work initially, but when PulledPork runs later that night and downloads a new rule update from Emerging Threats or Sourcefire, the rule that was deleted or disabled will be restored and put back into production. Because of this, the more appropriate way to disable rules is to use disablesid.conf. Whenever PulledPork downloads a new rule update, it parses this file so that it can go back and re-disable any rule that shouldn’t be turned on. Entries are stored in this file with the format GID:SID. In this case, we can add the following entry to disablesid.conf to persistently disable this rule:
1:12345
The modifysid.conf file is used to persistently modify rules that are obtained from public sources. Just as with deleted rules, if we were to modify a rule obtained from a public source, the nightly PulledPork update would serve to replace that rule file and eliminate any changes that were made. Because of this, PulledPork parses modifysid.conf after every rule update so that it can go back and apply modifications to rules that have been customized.
As an example, let’s modify the following rule:
alert ip any any - > any any (msg:“GPL ATTACK_RESPONSE id check returned root”; content:“uid = 0|28|root|29|”; fast_pattern:only; classtype:bad-unknown; sid:2100498; rev:8;)
To modify this rule, we need to add an entry to modifysid.conf that specifies the SID of the rule we are modifying, the content we would like to change, and what we want the content changed to. In this case, we will replace “alert ip any any” with “alert ip $HOME_NET any”. This will modify the signature so that it only alerts when the specified pattern occurs within traffic that is coming from an IP address that is external to the network the sensor is protecting. In order to make this change, we would add the following entry to modifysid.conf:
2100498 “alert ip any any” “alert ip $HOME_NET any”
Both disablesid.conf and modifysid.conf come with several examples listed in the respective files. You can read some more SO-specific examples here: https://code.google.com/p/security-onion/wiki/ManagingAlerts.
Alert Output
Snort and Suricata both provide a lot of flexibility in how alert data can be output for analysis, which is useful for adapting them to a variety of scenarios.
In Snort, alert output is controlled in the output plugin section of snort.conf. To specify a particular output plugin you can use the output keyword, followed by the name of the plugin. This can be followed by any options required by the output plugin.
output < plugin name >: < options >
If it is not specified at runtime with the –l argument, Snort’s default log directory is set to /var/log/snort.
In Suricata, alert output is controlled in the outputs section of Suricata.yaml. Underneath the outputs heading, each output option is listed, along with each one’s relevant options.
outputs:
- < output type >:
< options >
If it is not specified at runtime with the –l argument, Suricata’s default log directory is set to /var/log/suricata.
Now we will look at some of the more commonly used outputs. Remember, there are a lot more output options than those mentioned here, so if you are looking for something particular, refer to the Snort or Suricata documentation because it might already be available to you. For the alerting examples shown below, I visited http://www.testmyids.com in order to generate an alert based upon the rule identified by SID 2100498:
alert ip any any - > any any (msg:“GPL ATTACK_RESPONSE id check returned root”; content:“uid = 0|28|root|29|”; fast_pattern:only; classtype:bad-unknown; sid:2100498; rev:8;)
Fast
The fast alerting format will display alerts in a very simple one-line format. This is the most compact alerting format, and is easy for an analyst to digest visually from the command line. It provides the minimum amount of information needed to start reviewing data associated with the alert.
08/05-15:58:54.524545 [**] [1:2100498:8] GPL ATTACK_RESPONSE id check returned root [**] [Classification: Potentially Bad Traffic] [Priority: 2] {TCP} 217.160.51.31:80 - > 172.16.16.20:52316
Full
The full alerting formatting will display everything that is shown in a fast alert, along with additional details from the packet header of the packet that generated the alert. This alerting format generates multi-line alerts, so it may not be as easy to parse with command line tools.
[**] [1:2100498:8] GPL ATTACK_RESPONSE id check returned root [**]
[Classification: Potentially Bad Traffic] [Priority: 2]
08/05-15:58:54.524545 217.160.51.31:80 - > 172.16.16.20:52316
TCP TTL:40 TOS:0x20 ID:44920 IpLen:20 DgmLen:299 DF
***AP*** Seq: 0x6BD4465B Ack: 0xE811E4E6 Win: 0x36 TcpLen: 20
Syslog
The syslog alerting format is designed to be sent to a syslog server that can either be running locally on the sensor, or on another device. Syslog is a very common logging format, thus it is supported by a wide variety of devices and can be digested by most log management and analysis tools. Syslog output is stored on a single line, and is easily searchable from a command line interface. The amount of information provided in this output is identical to the fast alerting format.
Aug 5 15:58:54 lakota snort: [1:2100498:8] GPL ATTACK_RESPONSE id check returned root [Classification: Potentially Bad Traffic] [Priority: 2]: {TCP} 217.160.51.31:80 - > 172.16.16.20:52316
Packet Logging
While text-based alerts are a great place to start, you will likely want to manually inspect the packet(s) that cause an alert to be generated. If you are utilizing a full packet capture solution like we discussed in Chapter 5, then that is probably where you will look. If not, you can also configure Snort and Suricata to log the packet(s) that generated the alert in PCAP format. The packet that generated the sample alert we have been working with is shown in Figure 9.16.
Unified2
In an enterprise environment, the most commonly used log format is Unified2. This is a binary format capable of storing both the alert data and the packet data associated with it. If you attempt to examine one of these files manually you will find it isn’t readable as it is stored. Unified2 output isn’t designed to be read manually or via command line tools, but rather, it is meant to be used in conjunction with tools like Barnyard2 or Pigsty. These tools are used for interpreting Unified2 output and placing that alert data into a database, such a MySQL or Postgres SQL database. Snort also includes a tool called u2spewfoo that is able to read the unified2 format and dump it out on the command line.
Barnyard2 is the de facto standard tool for storing Unified2 alerts in database format for years, and works well. It also supports several other output modes. You can read more about Barnyard2 at https://github.com/firnsy/barnyard2.
Pigsty is a newer tool developed by the folks at Threat Stack, who brought us Snorby, which is discussed later in this chapter. Pigsty was written to achieve the same goals as Barnyard2, but in a more extensible way. It provides the ability to create custom output plugins to add even more flexibility to the wide array of output options for Snort and Suricata alert data. Along with database output plugins, Pigsty also supports other methods of output such as Websockets, Sguild, IRC, and REST output. You can read more about Pigsty at https://github.com/threatstack/pigsty.
If you’d like more information regarding the configuration of alert output, check out the appropriate sections of the Snort and Suricata online documentation.
Snort Preprocessors
While the majority of Suricata’s features are built into its core architecture, many of the features provided by Snort are made available by using individual preprocessors. As we discussed earlier when overviewing the Snort architecture, preprocessors come in two types and can be used for further normalizing data before it is parsed by the detection engine, or they can be used to provide additional flexibility for Snort rules used by the detection engine. Both types of preprocessors can be configured in snort.conf. A preprocessor is identified by the preprocessor keyword, followed by the preprocessor name and then its associated options. Some preprocessors, like the portscan detection preprocessor, only have a few configurable options.
# Portscan detection. For more information, see README.sfportscan
# preprocessor sfportscan: proto { all } memcap { 10000000 } sense_level { low }
Others, such as the SSH anomaly detection preprocessor, have several options:
# SSH anomaly detection. For more information, see README.ssh
preprocessor ssh: server_ports { 22 }
autodetect
max_client_bytes 19600
max_encrypted_packets 20
max_server_version_len 100
enable_respoverflow enable_ssh1crc32
enable_srvoverflow enable_protomismatch
It is important to realize that the preprocessors listed in the configuration file are executed in order. Because of this, they are ordered in accordance with the network layer they are associated with. Network layer preprocessors such as frag3, which deals with IP fragment assembly, come first. This is followed by transport layer protocols such as Stream 5, which handles TCP stream reassembly. This is followed by application layer preprocessors such as the SSH, HTTP, and SMTP anomaly detectors. This order is critical because application layer preprocessors might be unable to process data if it is fragmented, out of sequence, or received in an otherwise unexpected state.
When you begin using Snort, you likely won’t take advantage of too many preprocessors, and you might not be aware of the ones you are using. However, you should definitely make the time to review all of the preprocessors listed in snort.conf and read the associated README files. There are several that will come in handy, and some that are completely necessary. You might even find yourself attempting to write complex rules that a preprocessor will make much simpler. A few of these include:
• Reputation: Used to do reputation-based detection and blocking of communication with certain IP addresses (we looked at this in Chapter 8).
• ARPSpoof: Designed to be able to detect the occurrence of ARP spoofing.
• SFportscan: Detects potential reconnaissance scans.
• Frag3: Performs defragmentation of IP packets and helps prevent IDS evasion.
• Stream5: Allows for state tracking of TCP connections and the creation of stateful rules.
• HTTP_Inspect: Normalizes HTTP traffic so that it can be properly parsed by the detection engine. Provides several directives that can be used within Snort rules.
You can learn more about each of Snort’s preprocessors in the “Preprocessors” section of the Snort Users Guide, or by reviewing the README files for each preprocessor in the documentation included with Snort.
Additional NIDS Mode Command Line Arguments
While most options can be configured in snort.conf and suricata.yaml, any options that are specified as command line arguments will be given preference over what is specified in the configuration files. It is common to execute Snort and Suricata with several of these arguments.
If you are using Security Onion, you can see an example of command line arguments being used by listing the running IDS engine process. In the case of Figure 9.17, we can see that Snort is running.

Here we see several commonly used command line arguments for Snort. These, along with some other commonly used arguments are:
• -A < mode >: Specifies the level of alerting for plain text alerts. This can be set to fast, full, unsock, console, cmg, or none.
• -c < file >: Used to specify the path to the snort.conf configuration file used for NIDS mode.
• -D: Executes Snort as a daemon (in the background)
• -F < file >: Read Berkeley Packet Filters from a file. BPF’s are discussed in depth in Chapter 13.
• -g < group >: Specifies the group Snort runs under after it has initialized. This can be used to allow Snort to drop root privileges after initializing.
• -i < interface >: Specifies a specific interface to use for monitoring traffic
• -l < directory >: Used to specify an output directory for text reporting of alerts.
• -L < directory >: Used to specify an output directory for binary reporting of alerts.
• -m < umask >: Forces the creation of new files to the specified umask permissions
• -u < user >: Specifies the user Snort runs under after it has initialized. This can be used to allow Snort to drop root privileges after initializing.
• -U: Changes the timestamps associated with all logs and alerts to UTC
• -T: Used to test a configuration file
• --perfmon-file < file >: Specifies the file used by the perfmon preprocessor for tracking Snort statistics.
In Figure 9.18, you can see an example of Suricata running with several command line arguments in Security Onion.

The command line arguments shown above, along with some other commonly used arguments are:
• -c < file >: Used to specify the path to the suricata.yaml configuration file
• -D: Executes Suricata as a daemon (in the background)
• --group < group >: Specifies the group Suricata runs under after it has initialized. This can be used to allow Suricata to drop root privileges after initializing.
• -F < file >: Read Berkeley Packet Filters from a file. BPF’s are discussed in depth in Chapter 13.
• -i < interface >: Specifies a specific interface to use for monitoring traffic
• -l < directory >: Used to specify the default logging directory.
• -r < pcap file >: Parse a PCAP file in offline mode
• --runmode < mode id >: The ID of the runmode that Suricata will be initialized in.
• -s: Used to manually specify a file containing IDS signatures along with those specified in suricata.yaml.
• -T: Used to test a configuration file
• --user < user >: Specifies the user Suricata runs under after it has initialized. This can be used to allow Suricata to drop root privileges after initializing.
There are several other command line arguments that are available when initializing Snort and Suricata. You can view a full list of these options in each tool’s respective manual pages, accessible by typing either man snort or man suricata at the command line of a system where the tools are installed.
IDS Rules
We have already looked at how rules can be provided to Snort and Suricata, as well as some public rule sources and mechanisms for keeping those rules up to date. While these things are important, the primary interaction that an analyst will have with Snort or Suricata on a daily basis is the creation of new rules, and the modification of existing rules to make those rules more efficient, also referred to as “tuning”. In this section we will look at how rules are built, some common rule options, and step through some practical rule creation scenarios.
The majority of the content in this section will apply to both Snort and Suricata rules, as they use the same basic syntax. Whenever a rule option is used that doesn’t work with one of these technologies, I will explicitly say so.
Rule Anatomy
The syntax used by Snort and Suricata rules is incredibly flexible, but it does require that certain conventions be followed. This is an example of a very simple rule:
alert tcp $EXTERNAL_NET 80 - > $HOME_NET any (msg:”Users Downloading Evil); content:”evil”; sid:55555555; rev:1;)
This rule is very rudimentary, and would generate an alert if a user on your internal network downloaded data from a web server that contains the word “evil.” Of course, detecting when users download evil things from the Internet isn’t entirely that easy!
Before examining each specific component of this rule, you should recognize that rules have two distinct parts: the rule header and the rule options. The rule header is everything occurring before the parenthesis, and the rule options are everything occurring within the parenthesis. This breakdown is shown in figure 9.19.
Rule Header
The rule header is always the first portion of the rule and it is a required component of the rule. The header is responsible for defining “who” is involved in the traffic pattern than is attempting to be matched. Everything defined in the rule header can be found within the header of a packet, which is crucial in the parsing of these rules. The breakdown of the rule header is shown in Figure 9.20.
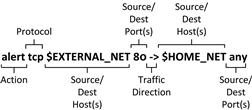
The rule header always consists of the same parts: rule action, protocol, source/dest hosts, source/dest ports, and the direction of the traffic.
Rule Action
The first part of any rule is the action declaration which tells the IDS engine what to do when the alert fires. There are three possible actions:
• Alert: Tells the IDS engine to log the rule match, and the packet data associated with the match. This is the most common rule action.
• Log: Tells the IDS engine to log the rule match, but not the packet data associated with the match.
• Pass: Tells the IDS engine to do no further processing of the packet.
Protocol
This field tells the IDS engine what protocol the rule will apply to. Valid options include tcp, idp, icmp, ip, and any. Note that only one of these can be selected, so if you wish to write a rule that applies to both TCP and UDP traffic, use the IP protocol option in the rule header. For the sake of performance, try to be specific to the traffic pattern you are attempting to match. In the sample rule, we are concerned about HTTP traffic, which sits on top of the TCP protocol, so that is what is specified.
Source and Destination Hosts
In order to create a rule, you can specify the source and destination host for the traffic pattern you are trying to match. These hosts must be specified as IP addresses, which can be done in a variety of formats such as in lists or CIDR ranges, as was discussed earlier when discussing Snort and Suricata configuration. In the example rule we are working with, you will see that we opted to use the $HOME_NET and $EXTERNAL_NET variables to define IP addresses in this rule. If the rule cannot be limited to any particular grouping of hosts, the keyword “any” can be used to match any hosts.
Source and Destination Ports
Along with specifying the hosts that we are concerned with matching our rule, we can also specify specific layer four ports. Remember, these can be specified as individual ports, lists, or ranges as we looked at earlier in this chapter. In cases when no specific ports are applicable, the keyword “any” can be used to match any ports. In the example rule, we have specified port 80 in association with the $EXTERNAL_NET IP variable and the any keyword with the $HOME_NEY IP variable.
Traffic Direction
The final piece of the puzzle when creating a rule header is to specify the destination of the traffic. There are only two possible options here:
Because there are only two options here, when writing rules you must decide if the direction of the communication matters. If the direction of the communication doesn’t matter, then the ordering of the source and destination hosts and port numbers in the header doesn’t matter. However, if the direction does matter, then the source host and port number should be listed first.
In the case of the rule header shown in our sample rule, we are concerned about users downloading evil from an external web server. This means that the potential sources of the evil packets are external web servers, and the destination is one of our internal hosts. Therefore, the external hosts and ports are listed first ($EXTERNAL_NET 80), followed by the source to destination direction indicator (->), followed by the internal host and port ($HOME_NET any).
Rule Options
While the rule header section is responsible for the “who”, the rule options section is responsible for the “what.” This section tells the IDS engine exactly what it is looking for in the packets it is examining, and how to find it. The contents of the rule options section are variable and can include several things, but no matter what you choose to include, the options section must always be enclosed in parenthesis. Within these parentheses, individual options take the form of:
< option >: < option values >;
The option name and its values are separated by a colon (:) and the option values are terminated with a semicolon (;). If the option values contain spaces, those values must be enclosed in quotes.
In some cases, options won’t have values, and are simply invoked like this:
< option >;
Notice that the option name is terminated with a semicolon. If you fail to include colons or semicolons as required, the IDS engine you are using will fail to initialize when parsing that rule.
Now, we will look at several common rule options.
Event Information Options
The event information options are used to provide contextual information about a rule. The more verbose you can be with event information, the more effective an analyst will be when investigating data associated with that alert. This includes:
Message (msg)
Descriptive text associated with the rule. This is commonly thought of as the “name” of the rule, and it is what will be initially displayed to the analyst when they are reviewing alerts generated by an IDS engine. It is a good idea to make these as descriptive as possible. Some examples include:
Signature Identifier (sid)
Used to uniquely identify rules. Each rule must have a unique SID, which is simply a numeric value. It is important to note that some ranges are considered to be reserved. These are:
In order to avoid a conflict, you should use SIDs above 3000000. You should also track and maintain a listing of the local SIDs used on your sensors.
Revision (rev)
The revision option is used to denote when a rule has been changed. When a new rule is created, it should be assigned rev:1; to indicate that it is the first revision of the rule. Instead of generating a new SID every time a rule is changed, you should retain the same SID and increment the revision number. In the event that Snort or Suricata encounter a duplicate SID, they will utilize the rule with the higher revision number.
Reference
The reference keyword provides the ability to link to external information sources to provide additional context to the rule. The most common way to do this is to simply include a reference to a URL, as shown in this rule:
alert tcp $HOME_NET any - > $EXTERNAL_NET $HTTP_PORTS (msg:“ET CURRENT_EVENTS FakeAlert/FraudPack/FakeAV/Guzz/Dload/Vobfus/ZPack HTTP Post 2”; flow:established,to_server; content:“POST”; http_method; content:“/perce/”; nocase; http_uri; content:“/qwerce.gif”; nocase; http_uri; content:"data = “; nocase; reference:url,threatinfo.trendmicro.com/vinfo/virusencyclo/default5.asp?VName = TROJ_AGENT.GUZZ&VSect = T; reference:url,www.threatexpert.com/threats/trojan-fraudpack-sd6.html; reference:url,vil.nai.com/vil/content/v_157489.htm; reference:url,doc.emergingthreats.net/2010235; classtype:trojan-activity; sid:2010235; rev:6;)
The rule above is used to detect the presence of several pieces of malware that all make a similar type of HTTP POST to a remote server. In this case, the rule references that there are four individual references in the rule:
• reference:url,threatinfo.trendmicro.com/vinfo/virusencyclo/default5.asp?VName = TROJ_AGENT.GUZZ&VSect = T;
• reference:url,www.threatexpert.com/threats/trojan-fraudpack-sd6.html;
Note that references take the following format:
reference: < reference name >,<reference >;
Reference types are defined in the reference.config file that is used by Snort and Suricata. The name and location of this file is configurable in snort.conf and suricata.yaml. In Security Onion, it is located in /etc/nsm/< sensor name >/reference.config. An example of this file is shown in Figure 9.21.
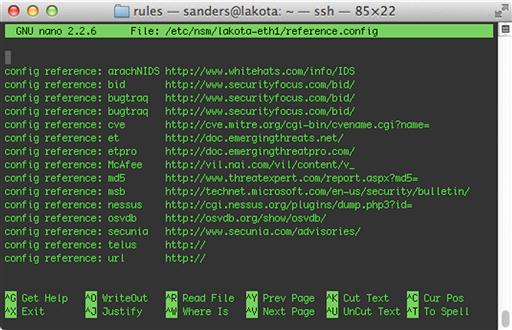
In reference.config, a reference type is defined with the following syntax:
config reference: < reference name > < reference prefix >
The reference name can be any single word that you would like to use. The reference prefix is used to assign a URL value that will precede whatever is specified as the reference in the rule itself. This is done to keep rules concise, and to provide added flexibility to graphical front ends so that an analyst can click on the reference and be directed to the proper link.
Therefore, when specifying the URL reference:
reference:url,vil.nai.com/vil/content/v_157489.htm;
The full reference will actually be:
http://url,vil.nai.com/vil/content/v_157489.htm
Other reference types utilize this feature more effectively. For example, consider the following rule that is used to detect an NTPDX overflow attempt:
alert udp $EXTERNAL_NET any - > $HOME_NET 123 (msg:“GPL EXPLOIT ntpdx overflow attempt”; dsize:>128; reference:bugtraq,2540; reference:cve,2001-0414; classtype:attempted-admin; sid:2100312; rev:7;)
In this rule, two references are specified; bugtraq and cve. If you examine the reference.config file shown in Figure 9.21, you will see that both of those reference types use special URL prefixes that allow that data to be referenced quickly:
config reference: bugtraq http://www.securityfocus.com/bid/
config reference: cve http://cve.mitre.org/cgi-bin/cvename.cgi?name=
Using this configuration, the actual reference associated with SID 2100312 would be:
As you can see, the ability to only include the reference name and value can greatly decrease the size of a rule, which makes them easier to edit and manage. The ability to create custom reference types adds quite a bit of flexibility to how you include contextual data with your rules.
Priority
The priority field can be used to manually specify the priority for a rule, which can be used by analysts to help them best use their time when reviewing alerts. This option can be set to any integer value, but most public rule sets will only use a value of 1 through 10, with 1 being the highest priority and 10 being the lowest. The following syntax is used for this option:
priority:<value >;
If you have assigned a classification to a rule, then that rule will assume whatever default classification is specified for the rule in classification.config, but if you explicitly specify the priority, Snort uses that value instead.
Classification
The classification option is used to assign rules to categories based upon the type of activity they are attempting to detect. The following rule shows the usage of the classification option:
alert tcp $HOME_NET any - > $EXTERNAL_NET $HTTP_PORTS (msg:“ET CURRENT_EVENTS Potential Fast Flux Rogue Antivirus (Setup_245.exe)”; flow:established,to_server; content:“GET”; nocase; http_method; content:“/Setup_”; nocase; http_uri; content:“.exe”; nocase; http_uri; pcre:“//Setup_d + .exe$/Ui”; reference:url,www.malwareurl.com/listing.php?domain=antivirus-live21.com; classtype:trojan-activity; sid:2012392; rev:3;)
Classification must be specified using the following syntax:
classtype:<classification name >;
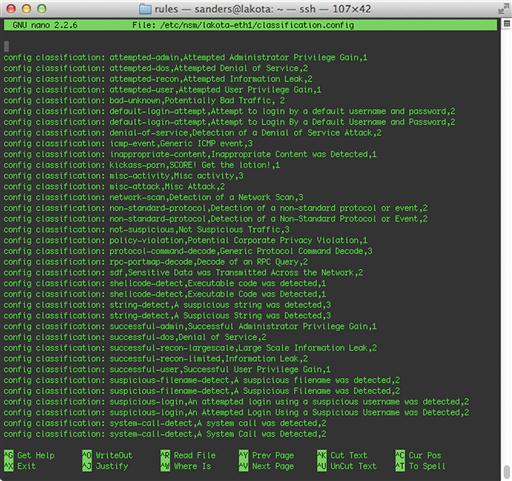
Both Snort and Suricata draw classification names from the classification.config file. The name and path to this file is configurable in snort.conf and suricata.yaml. On Security Onion, the file can be found at /etc/nsm/< sensor name >/classification.config.
Entries within this file must use the following format:
config classification: < classification name >,<classification description >,<default priority >
The classification name is what is referenced within the rules, and it should be short and contain no spaces. The classification description can be longer and provide more detail related to the classification. The default priority specifies the baseline priority for any rules using this classification name.
Snort and Suricata both ship with some classification types built-in, and when you download rules from a public source such as Sourcefire VRT or Emerging Threats, those downloads will include a classification.config file containing all of the classifications used in the provided rules. Figure 9.22 shows an example classification.config file from Security Onion.
Generally, it is a good idea to strive to classify every rule in some form or another. If you are properly tracking the creation and modification of rules, then you have likely already established some form of classification that you can apply to your IDS rules. If you are just beginning to establish a signature-based detection capability, then the classification types provided by Snort and Suricata are a good starting point.
Content Inspection
The most basic action that can be taken within the options section of an IDS rule is to perform a basic content match. Using the content keyword, you can instruct the IDS engine to examine the application layer content (the payload) of a packet for the data you specify. Chapter 13 will go into detail on how to tell exactly where the payload area of a packet begins. This data can be expressed as text, binary data in hexadecimal format, or a combination of both.
For example, if we wanted to examine the content of a packet for the string “evilliveshere”, then we could specify:
content:“evilliveshere”;
You can also specify multiple content matches in a single rule, which will come in handy later when we talk about content modifiers and looking for content in specific places.
content:“evillives”; content:“here”;
Negation can also be used in content matches with the exclamation character (!). For example, the following content matches could be combined to capture all login attempts, except for those associated with the anonymous user account:
content:“USER”; content:!“anonymous”;
Binary data can also be matched by expressing that binary data as hexadecimal characters surrounded by pipe symbols (|). If we wanted to examine packet data for the existence of JPEG files by matching occurrences of the JPEG “magic numbers”, we would express, as shown here:
content:“|FF D8|”;
String data and binary data can be combined in content searches. In the following example, we are looking for three colons, followed by the text “evilliveshere”, followed by three null bytes:
content:“ |3A 3A 3A|evilliveshere|00 00 00|”;
It is important to note that all content matches are case sensitive, and they will match content found anywhere in the packet.
Content Inspection Modifiers
There are several modifiers that can be applied to content matches by placing them after the content being matched. These will allow you to specify exactly how the IDS engine will look for the content matches within network data. These modifiers help increase the accuracy of content matches in your rules, and they also help increase the performance of the detection process within the IDS engine, as they allow the engine to look in a specific location for specified content rather than having to examine the complete payload of every packet.
To apply a content modifier to a content match, it should be placed directly after the content match in the rule. We will look at several of these modifiers now.
Nocase
Content matches are case sensitive by default. Therefore, if you specify a content match for the text “root” and a packet contains the string “ROOT”, an alert will not be generated. To signify a content match as case insensitive, you can use the nocase modifier, like so:
content:“root”; nocase;
This content match will match any capitalization of the word “root.”
Offset and Depth
The offset modifier is used to match content occurring at a specific position with a packets payload, starting at the first byte of the payload. Note that the payload begins at byte 0, rather than byte 1. Therefore, if you specify offset 0, the detection engine will look for the content to start at the beginning of the payload. If you specify an offset of 1, the detection engine will look for the content to start at the second byte of the payload.
As an example, let’s examine the following FTP packet:
14:51:44.824713 IP 172.16.16.139.57517 > 67.205.2.30.21: Flags [P.], seq 1:15, ack 27, win 16421, length 14
0x0000: 4510 0036 efe4 4000 4006 4847 ac10 108b E..6..@[email protected]....
0x0010: 43cd 021e e0ad 0015 0bcb 6f30 fcb2 e53c C.........o0…<
0x0020: 5018 4025 2efb 0000 5553 4552 2073 616e P.@%....USER.san
0x0030: 6465 7273 0d0a ders..
If we wanted to write a content matching rule that detected any time a user attempted to login to this external FTP server with this username, we could start with a rule like this:
alert tcp $HOME_NET any - > 67.205.2.30 21 (msg:“Suspicious FTP Login”; content:“sanders”; sid:5000000; rev:1;)
This rule would definitely generate an alert for the given packet, but it is also prone to false positives. For instance, if someone were to login to another account on that FTP server and browse to a folder named “sanders”, that would also generate an alert.
We can narrow the scope of this rule by specifying the offset where the username appears in the payload of the packet. In this case, the first byte of the packet payload is 0x55. The first character of the actual username appears at offset 5 (0x73). Don’t forget, we are counting starting from zero. With this in mind, we can rewrite the rule to begin matching that content string at that offset:
alert tcp $HOME_NET any - > 67.205.2.30 21 (msg:“Suspicious FTP Login” content:“sanders”; offset:5; sid:5000000; rev:1;)
Not only will this rule yield less false positives, but it will also perform faster as it limits the number of bytes that the IDS engine must examine.
While the offset modifier can be used to specify where an IDS engine begins looking for a content match, the depth modifier can be used to specify where it will cease looking for a content match. This is done by specifying the byte offset relative to the first payload content byte being examined. If you aren’t using the offset modifier, the depth will be relative to the first byte of the packet payload. If you are using the offset modifier, the depth will be relative to the byte specified in the offset value.
If we examine the Snort rule we created in the previous FTP login example, we can make our rule even more efficient by limiting its depth. Here, we’ve limited the depth to 6 bytes, which is the length of the string we are attempting to match (again, counting from 0). In this case, we have combined the offset and depth modifiers to specify the absolute location of the content we are attempting to match.
alert tcp $HOME_NET any - > 67.205.2.30 21 (msg:“Suspicious FTP Login” content:“sanders”; offset:5; depth:7; sid:5000000; rev:1;)
Distance and Within
As we saw earlier, rules can be written so that they contain multiple content matches. When working with a rule like this, it can be incredibly useful to be able to specify how the content matches are positioned relative to each other. One way to do this is the distance rule modifier, which is used to specify the distance from the end of the previous content match to start the next content check.
The following rule makes use of the distance modifier:
alert tcp $HOME_NET 1024: - > $EXTERNAL_NET 1024: (msg:“ET P2P Ares Server Connection”; flow:established,to_
server; dsize:<70; content:“r|be|bloop|00|dV”; content:“Ares|00 0a|”; distance:16; reference:url,aresgalaxy
.sourceforge.net; reference:url,doc.emergingthreats.net/bin/view/Main/2008591; classtype:policy-violation;
sid:2008591; rev:3;)
The rule shown above is used to detect activity related to the Ares peer-to-peer file sharing network.
1. content:”r|be|bloop|00|dV”;
Match content occurring within any point of a packet payload
2. content:”Ares|00 0a|”; distance:16;
Match content starting at least 16 bytes after the previous content match., counting from 1.
The following packet payload will generate an alert from this rule:
0x0000: 72be 626c 6f6f 7000 6456 0000 0000 0000 r.bloop.dV.......
0x0010: 0000 0000 0000 0000 0000 0000 0000 0000 .................
0x0020: 4172 6573 000a Ares..
However, this payload will not match the rule, because the second content match does not occur at least 16 bytes after the first match:
0x0000: 72be 626c 6f6f 7000 6456 0000 0000 0000 r.bloop.dV.......
0x0010: 4172 6573 000a 0000 0000 0000 0000 0000 Ares.............
Another rule modifier that can be used to dictate how multiple content matches relate to each other is the within modifier. This modifier specifies the number of bytes from the end of the first content match that the second content match must occur within. The following rule combines both the distance and within modifiers with multiple content matches:
alert tcp $HOME_NET any - > $EXTERNAL_NET 3724 (msg:“ET GAMES World of Warcraft connection”; flow:established,to_server; content:“|00|”; depth:1; content:“|25 00|WoW|00|”; distance:1; within:7; reference:url,doc.emergingthreats.net/bin/view/Main/2002138; classtype:policy-violation; sid:2002138; rev:9;)
This rule is designed to detect connections to the online World of Warcraft game by detecting two content matches occurring in the correct order:
1. content:”|00|”; depth:1;
Match content occurring on the first or second byte of the packet payload.
2. content:”|25 00|WoW|00|”; distance:1; within:7;
Start matching content 1 byte after the end of the previous content match, ending by the seventh byte.
Considering these criteria, the following packet payload would generate an alert from this rule:
0x0000: 0000 2500 576f 5700 0000 0000 0000 0000 …WoW...........
0x0010: 0000 0000 0000 0000 0000 0000 0000 0000 .................
The following would not generate an alert, because the second content match falls outside of the values specified by the distance and within modifiers:
0x0000: 0000 0000 0000 0000 2500 576f 5700 0000 ..........WoW....
0x0010: 0000 0000 0000 0000 0000 0000 0000 0000 .................
HTTP Content Modifiers
One of the most common types of rules you will be writing are ones that inspect HTTP traffic. This is because HTTP is a heavily used protocol for legitimate traffic, and malicious activity often tries to hide here. The content modifiers we’ve already discussed can be used to effectively detect actions occurring within HTTP traffic, but using this method can be a bit cumbersome.
As an example, consider the following HTTP packet:
11:23:39.483578 IP 172.16.16.139.64581 > 67.205.2.30.80: Flags [P.], seq 1:806, ack 1, win 16384, length 805
0x0000: 4500 034d 532b 4000 4006 e1f9 ac10 108b E..MS + @.@.......
0x0010: 43cd 021e fc45 0050 2b1e 34a5 9140 5480 C....E.P + .4..@T.
0x0020: 5018 4000 5334 0000 4745 5420 2f20 4854 [email protected]./.HT
0x0030: 5450 2f31 2e31 0d0a 486f 7374 3a20 7777 TP/1.1..Host:.ww
0x0040: 772e 6170 706c 6965 646e 736d 2e63 6f6d w.appliednsm.com
0x0050: 0d0a 436f 6e6e 6563 7469 6f6e 3a20 6b65 ..Connection:.ke
0x0060: 6570 2d61 6c69 7665 0d0a 4163 6365 7074 ep-alive..Accept
0x0070: 3a20 7465 7874 2f68 746d 6c2c 6170 706c :.text/html,appl
0x0080: 6963 6174 696f 6e2f 7868 746d 6c2b 786d ication/xhtml + xm
0x0090: 6c2c 6170 706c 6963 6174 696f 6e2f 786d l,application/xm
0x00a0: 6c3b 713d 302e 392c 2a2f 2a3b 713d 302e l;q = 0.9,*/*;q = 0.
0x00b0: 380d 0a55 7365 722d 4167 656e 743a 204d 8..User-Agent:.M
0x00c0: 6f7a 696c 6c61 2f35 2e30 2028 4d61 6369 ozilla/5.0.(Maci
0x00d0: 6e74 6f73 683b 2049 6e74 656c 204d 6163 ntosh;.Intel.Mac
0x00e0: 204f 5320 5820 3130 5f38 5f34 2920 4170 .OS.X.10_8_4).Ap
0x00f0: 706c 6557 6562 4b69 742f 3533 372e 3336 pleWebKit/537.36
0x0100: 2028 4b48 544d 4c2c 206c 696b 6520 4765 .(KHTML,.like.Ge
0x0110: 636b 6f29 2043 6872 6f6d 652f 3238 2e30 cko).Chrome/28.0
0x0120: 2e31 3530 302e 3935 2053 6166 6172 692f .1500.95.Safari/
0x0130: 3533 372e 3336 0d0a 4163 6365 7074 2d45 537.36..Accept-E
0x0140: 6e63 6f64 696e 673a 2067 7a69 702c 6465 ncoding:.gzip,de
0x0150: 666c 6174 652c 7364 6368 0d0a 4163 6365 flate,sdch..Acce
0x0160: 7074 2d4c 616e 6775 6167 653a 2065 6e2d pt-Language:.en-
0x0170: 5553 2c65 6e3b 713d 302e 380d 0a43 6f6f US,en;q = 0.8..
If we considered the domain appliednsm.com to be malicious, then it would be reasonable that we might write an IDS rule that will attempt to detect users browsing to this domain with their browser. Using only the rule options that we’ve learned about so far, that rule might look like this:
alert tcp $HOME_NET any - > $EXTERNAL_NET any (msg:“Evil Domain www.appliednsm.com”; content:“GET ”; offset:0; depth:4; content:“Host|3a 20|www.appliednsm.com”; distance:0; sid:5000000; rev:1;)
This rule would do the following:
1. content:”GET ”; offset:0; depth:4;
Match content starting at the beginning of the packet payload and ending by the fourth byte of the payload.
2. content:”Host|3a 20|www.appliednsm.com”;
Match content occurring after the first content match.
While this would work perfectly fine, there is a better way. Both Snort and Suricata provide HTTP stream reassembly as well as a few rule modifiers that can be used to write more efficient rules related to this type of traffic. As an example, we could utilize the http_method and http_uri modifiers to rewrite the rule above:
alert tcp $HOME_NET any - > $EXTERNAL_NET any (msg:“Evil Domain www.appliednsm.com”; content:“GET”; http_method; content:“www.appliednsm.com”; http_uri; sid:5000000; rev:1;)
As you can see, this rule is a lot easier to write, and it accomplishes the same objective in a more efficient manner. There are several of these HTTP modifiers available for use. Some of the more common HTTP modifiers are shown in Table 9.1.
Table 9.1
| HTTP Modifier | Description |
| http_client_body | Content in the body of an HTTP client request |
| http_cookie | Content in the “Cookie” HTTP header field |
| http_header | Content anywhere in the header of an HTTP request or response |
| http_method | The HTTP method being used by the client (GET, POST, etc) |
| http_uri | Content in the HTTP client request URI |
| http_stat_code | Content in the HTTP status field of a server response |
| http_stat_message | Content in the HTTP status message of a server response |
| http_encode | The type of encoding being used in the HTTP transation |
Perl Compatible Regular Expressions (PCRE)
At some point you might encounter a situation where it isn’t possible to write a rule based upon the constructs provided by the IDS engine. In this case, rules can be extended with the use of a PCRE. Regular expressions are incredibly powerful and provide syntax that allows for matching any type of content you can think of.
PCRE’s can be fairly simple, as seen in this rule that will detect credit card numbers:
alert ip any any - > any any (msg:“ET POLICY SSN Detected in Clear Text (dashed)”; pcre:”/ ([0-6]dd|7[0-2
56]d|73[0-3]|77[0-2])-d{2}-d{4} /”; reference:url,doc.emergingthreats.net/2001328; classtype:policy-viol
ation; sid:2001328; rev:13;)
Or they can be very complex, as we see here in this rule that detects malicious java requests to dynamic DNS domains:
alert tcp $HOME_NET any - > $EXTERNAL_NET $HTTP_PORTS (msg:“ET CURRENT_EVENTS SUSPICIOUS Java Request to Cha
ngeIP Dynamic DNS Domain”; flow:to_server,established; content:” Java/1.”; http_header; pcre:”/ˆ Hostx3ax2
0[^ ] + .(?:m(?:y(?:p(?:op3.(?:net|org)|icture.info)|n(?:etav.(?:net|org)|umber.org)|(?:secondarydns|
lftv|03).com|d(?:ad.info|dns.com)|ftp.(?:info|name)|www.biz|z.info)|(?:r(?:b(?:asic|onus)|(?:slov|fac
)e)|efound).com|oneyhome.biz)|d(?:yn(?:amic(?:dns.(?:(?:org|co|me).uk|biz)|-dns.net)|dns.pro|ssl.com
)|ns(?:(?:-(?:stuff|dns)|0[45]|et|rd).com|[12].us)|dns.(?:m(?:e.uk|obi|s)|info|name|us)|(?:smtp|umb1).
com|hcp.biz)|(?:j(?:u(?:ngleheart|stdied)|etos|kub)|y(?:ou(?:dontcare|rtrap)|gto)|4(?:mydomain|dq|pu)|q(?:
high|poe)|2(?:waky|5u)|z(?:yns|zux)|vizvaz|1dumb).com|s(?:e(?:(?:llclassics|rveusers?|ndsmtp).com|x(?:idu
de.com|xxy.biz))|quirly.info|sl443.org|ixth.biz)|o(?:n(?:mypc.(?:info|biz|net|org|us)|edumb.com)|(?:
(?:urhobb|cr)y|rganiccrap|tzo).com)|f(?:ree(?:(?:ddns|tcp).com|www.(?:info|biz))|a(?:qserv|rtit).com|tp
(?:server|1).biz)|a(?:(?:(?:lmostm|cmeto)y|mericanunfinished).com|uthorizeddns.(?:net|org|us))|n(?:s(?:0
(?:1.(?:info|biz|us)|2.(?:info|biz|us))|[123].name)|inth.biz)|c(?:hangeip.(?:n(?:ame|et)|org)|leansite
.(?:info|biz|us)|ompress.to)|i(?:(?:t(?:emdb|saol)|nstanthq|sasecret|kwb).com|ownyour.(?:biz|org))|p(?:
ort(?:relay.com|25.biz)|canywhere.net|roxydns.com)|g(?:r8(?:domain|name).biz|ettrials.com|ot-game.or
g)|l(?:flink(?:up.(?:com|net|org)|.com)|ongmusic.com)|t(?:o(?:ythieves.com|h.info)|rickip.(?:net|org)
)|x(?:x(?:xy.(?:info|biz)|uz.com)|24hr.com)|w(?:ww(?:host|1).biz|ikaba.com|ha.la)|e(?:(?:smtp|dns).b
iz|zua.com|pac.to)|(?:rebatesrule|3-a).net|https443.(?:net|org)|bigmoney.biz)(x3ad{1,5})? $/Hmi"; c
lasstype:bad-unknown; sid:2016581; rev:1;)
As you can see in the rule examples shown above, a PCRE content match can be inserted into a rule using the following syntax:
pcre:<regular expression >;
Writing regular expressions is beyond the scope of this book, however, there are several online tutorials that provide a jump-start on the topic. If you are looking for a more thorough reference text, two books I like for varying skill levels are “Introducing Regular Expressions” by Michael Fitzgerald and “Mastering Regular Expressions” by Jeffrey E.F. Friedl.
Communication Flow
Snort and Suricata both provide the ability to write rules based upon the state of communication flow for network traffic using the TCP protocol. While this may seem redundant when combined with the source or destination IP addresses and ports in the rule header, that is not actually the case. While that rule header information will help determine which direction the traffic is going (inbound or outbound), it does not always necessarily tell you who is responsible for which part of the communication.
To understand how flow options work and why they are important, you should understand what constitutes a TCP session. In a normal TCP session, there are a client and server that communicate. The client is the device that starts the connection to the server by sending a SYN packet to the server on a listening port. The server should, at that point, respond to the client with a SYN/ACK packet. Upon receipt, the client will respond back to the server with an ACK packet. At this point, a three-way handshake has been completed and the client and server can communicate until one of them terminates the connection, either abruptly with a RST packet, or more gracefully with a series of FIN packets known as a TCP teardown. We will examine this more in depth in Chapter 13, but this is the basic premise of what makes up a TCP session.
With this in mind, the flow rule option has several options of its own. These are broken down into three categories: state options, directional options, and traffic modeling state. These options are configured using the following format, where at least one option is required and additional ones are discretionary:
flow: < option >,<option >,<option >;
The two available state options are established and stateless. The established option will only match traffic where an established TCP session exists. The stateless option will match regardless of whether an established connection exists.
There are four directional options:
• to_server: Traffic from the client to the server
• from_server: Traffic from the server to the client
The final two options are the no_stream and only_stream options that are used to define whether the data being matched is a reassembled stream or just a single packet.
As an example of flow option usage, let’s examine the following rule:
alert tcp $HOME_NET any - > $EXTERNAL_NET 5222 (msg:“GPL CHAT MISC Jabber/Google Talk Outgoing Traffic”; flo
w:to_server,established; content:” < stream”; nocase; reference:url,www.google.com/talk/; classtype:policy-vi
olation; sid:100000230; rev:2;)
This rule is used to detect authentication to a Jabber/Google Talk chat server. In this case, we see that a simple content match is being used, but before that, the flow:to_server,established option is used. This increases the performance of Snort/Suricata by ensuring that only established TCP sessions are examined for this rule, and it increases the accuracy of the rule by ensuring that only traffic to the actual server as defined by the TCP session is detected.
While your rules might not always directly benefit from flow rules from an accuracy perspective, they can serve to increase performance when using flow state options, so I try to include this option whenever possible.
Protocol Header Detection Options
Snort and Suricata provide the ability to detect values in the headers of the packets being examined. This includes most of the values in the ICMP, IP, TCP, and UDP headers. I won’t rehash all of these values here as they can be found in the Snort and Suricata documentation, but some of the items I use most often include:
• TTL: Matches a specified TTL value. This can be specified as an exact value (=) or using a relational operator (>,>=, <, <=). This is useful for detecting certain types of operating system based upon their initial TTL value.
• dsize: Matches a packet with a specific payload size. This can be specified as an exact value (=) or using a relational operator (>, <). This is useful for increasing rule performance by combining it with content matching rules.
• itype: Matches a specific ICMP type value.
• icode: Matches a specific ICMP code value.
• ip_proto: Matches a specific IP protocol. This can be specified as either the protocol name (IGMP, GRE, etc) or number.
Rule Tuning
In Chapter 7 we discussed techniques for determining the effectiveness of a signature through metrics like false positive rate and precision. There are several methods that can be used to enhance signatures when these become a concern. Some of these methods, and others, can also be used to increase the performance of certain rules. Now we will look at a few of these best practices for IDS rule tuning.
Event Filtering
Sometimes rules may need to exist that generate an extremely high number of alerts by nature. An example of this would be a rule that detects a particular type of denial of service (DoS) attack. While it is important to be able to detect this type of attack, if the rule you’ve written matches every DoS packet sent, and you are receiving thousands of these packets per second, then you will receive thousands of alerts per second. This many alerts will eventually overwhelm your IDS engine or your analysts. The event filtering options provided by Snort and Suricata allow you to apply thresholds to rules to prevent this kind of alert explosion.
Instead of being placed inline with the rule as a rule option, event filters are designed to be placed in the threshold.conf file. The name and location of this file is configurable in snort.conf and suricata.yaml as needed. On Security Onion, this file is stored at /etc/nsm/< sensor name >/threshold.conf.
There are three types of event filters:
• Limit: Generate an alert on the first number of specified matches (count) during the time interval (seconds), and then ignore the remaining alerts for the rest of the time interval.
• Threshold: Generate an alert every time there is a match (count) during this interval (seconds).
• Both: Generate an alert once per time interval (seconds) after the specified number of matches (count) has occurred, then ignore any further matches during the time interval.
Event filter entries use the following syntax:
event_filter gen_id < value >, sig_id < value >, type < limit|threshold|both >, track < by_src|by_dst >, count < value >, seconds < value >
The options shown are broken down as:
• gen_id: Specifies the generator ID of the rule.
• sig_id: Specifies the SID of the rule
• type < limit|threshold|both >: Specifies the type of event filter being applied. These are described above.
• track < by_src/by_dst >: Specifies whether rule matches are tracked by unique source or unique destination address
• count: The number of rule matches occurring within the specified time that will cause the event filter limit to be exceeded
• seconds: The number of seconds that are used to track the count of rule matches
As an example of a usage scenario for event filtering, consider this rule:
alert tcp $HOME_NET any - > !$WSUS_SERVERS $HTTP_PORTS (msg:“ET POLICY Windows Update in Progress”; flow:established,t
o_server; content:“Windows-Update-Agent”; http_header; content:“Host|3a|”; http_header; nocase; within:20;
pcre:“/User-Agentx3a[ˆ ] + Windows-Update-Agent/i”;
reference:url,windowsupdate.microsoft.com; reference:url,doc.emergingthreats.net/2002949; classtype:pol
icy-violation; sid:2002949; rev:8;)
The rule shown above is used to detect a device downloading Windows updates from a non-approved update server by matching a specific user agent string. When a Windows computer updates, this string can be seen in multiple packets and will result in a single host generating a significant number of alerts. If you have more than a few hosts exhibiting this behavior, the number of alerts can quickly overwhelm an analyst. This makes this rule a perfect candidate for an event filter. The following will do the trick:
event filter gen_id 1,sig_id 2002949,type limit,track by_s
rc,count 1, seconds 300
The event filter shown here will track the source address of the alert and count every event occurring over a 300 second interval. Since this is a limit filter and the count value is set to 1, only one alert per host will be generated for rule matches every 300 seconds.
Another great use of event filters is with rules associated with scanning. When scanning activity occurs, it will generate a lot of packets. Therefore, generating an alert for every packet matching the criteria specified in the rule could quickly overwhelm an analyst. In order to combat this, an event filter can be applied to notify an analyst of the scan without dominating their analysis console.
Alert Suppression
I’ve seen many instances where an analyst has written a new rule that they’ve put a lot of work into, only to find that one or two hosts within the network generate some type of traffic that results in a plethora of false positives. This leads to frustration that eventually causes the analyst to scrap the rule all together. What those analysts typically don’t know about is the alert suppression feature of Snort and Suricata. This feature allows you to specify a rule and an IP address (or group of IP addresses from a variable), and suppress alerts that would be generated from those hosts in relation to a rule.
Suppression entries are also included in the threshold.conf file, and take the following syntax:
suppress gen_id < value >,sig_id < value >,track < by_s
rc|by_dst >,ip < value >
The options shown are broken down as:
• gen_id: Specifies the generator ID of the rule.
• sig_id: Specify the SID of the rule
• track < by_src|by_dst >: Specifies whether suppression occurs for source or destination addresses generating traffic that matches a rule. This is optional.
• ip < value >: The IP address whose alerts from the specified rule are suppressed
The following entry would be used to suppress any alerts generated by SID 5000000 with the source IP address 192.168.1.100:
suppress gen_id 1, sig_id 5000000, track by_src, ip 192.168.1.100
Suppression is a useful tactic for eliminating individual hosts that are causing false positive issues with certain rules. This should be your first stop before removing a rule.
Alert Detection Filters
Snort and Suricata provide the ability to use detection filters to set a threshold on the number of rule matches that must occur before an alert is generated. A detection filter can be applied to a rule based upon source or destination address of the traffic, and can apply its threshold based upon the number of rule matches that have been detected in a specified time interval.
The detection filter option is applied in line with a rule and takes the following format:
detection_filter: track < by_src|by_dst >, count < value >, seconds < value >;
• track < by_src|by_dst >: Specifies whether rule matches are tracked by unique source or unique destination address
• count: The number of rule matches in the specified time that will cause an alert to be generated
• seconds: The number of seconds that the specified number of rule matches must occur in order for an alert to be generated
As an example of detection filters in practice, let’s look at this rule:
alert tcp $EXTERNAL_NET any - > $HTTP_SERVERS $HTTP_PORTS (msg:“ET SCAN Sqlmap SQL Injection Scan”; flow:to_
server,established; content:“User-Agent|3a| sqlmap”; fast_pattern:only; http_header; detection_filter:track
by_dst, count 4, seconds 20; reference:url,sqlmap.sourceforge.net; reference:url,doc.emergingthreats.net/2
008538; classtype:attempted-recon; sid:2008538; rev:8;)
This rule is used to detect scanning activity by the Sqlmap tool, which is used to detect and orchestrate SQL injection attacks. In this case, the rule matches content associated with the user agent that is used by Sqlmap. Generally, seeing this user agent only once or twice might not indicate any type of scanning activity since Sqlmap’s scans are usually more verbose than that. As such, generating an alert every time this user agent is seen might generate a significant number of false positives. Because of this, the rule was configured with the following detection filter:
detection_filter:track by_dst, count 4, seconds 20;
This detection filter requires that a certain threshold be met before the detection engine will generate an alert from this rule. Specifically, the detection engine will track the number of rule matches to the destination address, and when this number exceeds four matches in a period of twenty seconds, it will generate an alert.
Detection filters are good for a variety of situations. They are especially useful when a little of something isn’t a bad thing, but several could be. For instance, when a user is attempting to log into a web service and has one or two failed authentication attempts due to a forgotten password, we would consider this normal. However, when a user attempts to log into a web service a few hundred times within a couple of minutes, that might attempt a password guessing or brute force attempt that warrants further investigation.
Eliminate Unwanted Traffic
A common misconception is that every option you add to a rule serves to decrease the performance of this rule, when in reality, the opposite is normally true. Whenever you add options to an IDS rule that limit the amount of traffic the IDS engine has to examine, you are increasing the performance of the rule. As such, you should do everything possible to add these options and limit the amount of traffic the IDS engine has to examine to evaluate traffic against a rule. A few ideas include:
• Always use protocol header detection options when possible. The detection engine will examine these first before examining the payload of a packet, so if you can exclude packets before content inspection this will save valuable processing cycles.
• Be selective with the use of the “any” keyword in the rule header. If you can limit the rule to a specific host or group of hosts, this will limit the amount of traffic that the IDS engine has to parse.
• Always specify exact locations of content being detected. For instance, if you know that a content string you are attempting to match always occurs at the same position within a packet payload, you should use the offset and depth options to keep the detection engine from having to inspect the entire content of the packet.
• Limit the size of the packets being examined based upon their payload size. Even if you don’t know where the exact location of the content you are attempting to match will appear, if you know that it always occurs in packets of a certain size then you can limit the size of the packet that the detection engine will examine with the dsize option, which will increase performance.
• Always use flow options when possible. If the traffic you are attempting to match only exists inside of an established “to server” connection, then the detection engine can easily throw out all other traffic when attempting to match data to the rule. This can yield a significant performance increase.
• Select the appropriate protocol in the rule header. When you can specify TCP or UDP instead of simply IP, this will drastically reduce the number of packets that the detection engine will have to parse for the rule you are working with.
Target the Vulnerability
When writing rules designed to catch exploitation of a service, it is often easier to write rules so that they catch specific exploits. While this is easier, it leaves a lot of room for false negatives. While a rule developed with an exploit in mind will catch that particular exploit, it will not catch other exploits targeting the same vulnerability. Because of this, it is always better to write a rule with the vulnerability in mind.
For example, consider a vulnerability that is exploited by way of a buffer overflow in the input field of a network application. It would be trivial to write a rule that detects the publicly available version of this exploit, but it would be equally as trivial for an attacker to modifier the exploit string to use different padding or a different shellcode or payload. Instead of content matching a string from the exploit, try writing a rule that content matches based upon the submission of that input field where there are an extraordinarily large number of characters. This rule will be harder to write and might yield some false positives, but it will more accurately detect attempts to exploit the vulnerable service.
While this strategy is more labor intensive, it will yield better results and will decrease your chances of missing malicious activity.
Pair PCRE and Content Matches
While PCRE rules infinitely increase the flexibility of IDS rules, they also increase the performance load on the system. One strategy that can be used to decrease this load is to pair rules that utilize PCRE matching with content matching. The detection engine will parse the content match first, ensuring that only traffic that matches the content will be subjected to testing for the PCRE match.
As an example, consider the following rule:
alert tcp $EXTERNAL_NET any - > $HOME_NET any (msg:“ET TROJAN IRC potential reptile commands”; flow:establis
hed,from_server; content:“PRIVMSG|20|”; depth:8; content:“|3a|”; within:30; pcre:“/.((testdlls|threads|nsp
|speed|uptime|installed|secure|sec|unsecure|unsec|process|ps|rand|exploitftpd|eftpd|flusharp|farp|flushdns|
fdns|resolve|dns|pstore|pst|sysinfo|si|netinfo|ni|driveinfo|di|currentip)s*[ ]|(iestart|ies|login|l|mir
ccmd|system|files + (cat|exists|e|del|rm|rmdir|move|copy|attrib)|down|dldx|update|regs + (query|delete|write
))s + w + |(banner|ban|advscan|asc|scanall|sa|ntscan|nts)s*[ ])/i“; reference:url,doc.emergingthreats.net
/2002363; classtype:trojan-activity; sid:2002363; rev:15;)
This rule is used to detect the presence of the “Reptile” malware strain when it attempts to execute commands via IRC. While this command does include a very CPU intensive regular expression, it also includes two individual content matches:
These content matches will ensure that the IDS engine is only examining packets that already appear to be associated with IRC traffic before attempting to perform the PCRE match.
Fast Pattern Matching
When multiple content matches are present within a rule, Snort and Suricata will attempt to match the most unique string first so that they can stop processing the data quickly if no match is found. Because of this, their default behavior is to attempt to match the longest content string first, as they assume that it will be the most unique string. While this strategy is typically effective, it doesn’t always stand the test. Because of this, the Snort and Suricata detection engines provide the fast pattern matching content option modifier. This modifier can be specified with a shorter content option to instruct the detection engine to attempt to match this content first.
The following rule provides a good example of the fast pattern matching modifier in action:
alert tcp $EXTERNAL_NET any - > $HOME_NET $HTTP_PORTS (msg:“ET SCAN Nessus User Agent”; flow: established,to
_server; content:“User-Agent|3a|”; http_header; nocase; content:“Nessus”; http_header; fast_pattern; nocase
; pcre:“/^User-Agent:[^ ] + Nessus/Hmi”; threshold: type limit, track by_src,count 1, seconds 60; reference
:url,www.nessus.org; reference:url,doc.emergingthreats.net/2002664; classtype:attempted-recon; sid:2002664;
rev:12;)
As you can see, there are two content options here.
In this case, the “User-Agent|3a|” content is the longest, but it is certainly not the most exclusive since this string is present in the standard HTTP client request header. Because of this, it makes more sense to match “Nessus” first, which is the shorter content option. This is why this option has the fast_pattern; modifier enabled.
Manually Test Rules
When you’ve written a rule, it is important to test it thoroughly. We’ve already covered the process of testing rule syntax, but this is only one step of the process. You should also make sure that the rule detects the traffic it is supposed to match, and that it does not match on other similar traffic. Since recreating the attack or malicious activity itself can be incredibly time consuming, there are a couple of other options.
In the case of a SOC environment, for example, any analyst could be writing a rule based upon something that has already happened. If that is the case, and you have the packet capture of the activity, you can replay that activity to the monitoring interface of a sensor (preferably a test machine running an IDS engine with the newly deployed rule) to attempt to trigger an alert. Tcpreplay is a good option for replaying packet captures over a live interface. An example of Tcpreplay replaying a capture file is shown in Figure 9.23. You can learn more about Tcpreplay at http://tcpreplay.synfin.net/wiki/tcpreplay.
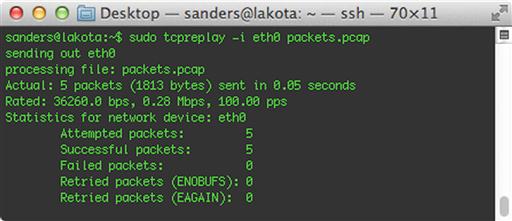
If you don’t have a capture file available for the activity associated with your rule, it is possible to manually generate the traffic using Scapy. Scapy is a powerful python library that can be used to generate and receive packets on the wire. While we don’t cover Scapy in depth in this book, it is an incredibly valuable tool for an analyst to be familiar with. The sample shown below is a very basic Python script that uses Scapy to send a TCP packet with the payload “AppliedNSM” to the host at 192.168.1.200 on port 80.
ip = IP()
ip.dst = “192.168.1.200”
ip.src = “192.168.1.100”
tcp = TCP()
tcp.dport = 80
tcp.sport = 1234
payload = “AppliedNSM”
send(ip/tcp/payload)
You can learn more about Scapy at http://www.secdev.org/projects/scapy/.
Viewing Snort and Suricata Alerts
Once your IDS engine of choice is configured on a sensor and you have downloaded or created IDS rules, all that is left is to sit back and wait for alerts to roll in. While these alerts can be read directly from the sensor and the files that Snort and Suricata generate, you will probably want to use a third-party graphical tool to help with this process. There are a variety of mechanisms available for viewing alerts that are generated by Snort or Suricata. Let’s look at two of the most popular free and open source alert management interfaces: Snorby and Sguil. You will see these tools referenced through this book.
Snorby
Snorby is a newer alert management console that is written in ruby on rails and operates in the web browser. Snorby was created by Dustin Weber, who has since founded a company called Threat Stack, which maintains Snorby as a free open source application. The overall goal of Snorby is to provide analysts a means of reviewing and analyzing alerts in a manner that is “all about simplicity,” while providing all of the power needed to perform effective analysis.
You can access an online demo of Snorby at http://demo.snorby.org, using the username [email protected] and the password snorby. In addition to this, if you are using Security Onion you can access Snorby by clicking the Snorby icon on your desktop, or by visiting https://<Security_Onion_IP>:444/. Figure 9.24 shows the main Snorby dashboard.
You can read more about Snorby at http://www.snorby.org.
Sguil
Sguil has been the de facto alert management console for NSM analysts for many years. Unlike Snorby, Sguil operates as a desktop application that connects back to a central data source. Sguil was written by Bamm Visscher, and is maintained as a free and open source application. It is installed on Security Onion by default, and can be accessed by clicking the Sguil icon on the desktop. Figure 9.25 shows the main Sguil interface.

You can read more about Sguil at http://sguil.sourceforge.net/.
Conclusion
In this chapter, we’ve discussed signature-based detection with Snort and Suricata at length. We looked at how both IDS engines operate, what makes each one unique, and how to write detection rules for them. Signature-based detection has been the backbone of intrusion detection and network security monitoring for quite some time, and while it isn’t always enough on its own, it is a critical capability of any NSM environment. Later in the analysis section, we will look at methods for viewing and analyzing alerts generated from Snort and Suricata.