
Chapter 9. Implementation of Near Real-Time Event Processing
In the previous chapter, we introduced many tools that we did not use in the previous use case implementation, including Storm, Spark, and Kafka. This book is focused on HBase usage, so we will not review the installation of all these new tools, and we will assume that they are correctly installed and running on your environment. In addition, because Twitter decommissioned Storm and identified flaws in its design and scalability,1 the examples here are implemented using Flume.
Because the Cloudera QuickStart VM already comes with Flume, Kafka, Spark, Solr, Lily Indexer, and HBase, we used it to develop and test this use case. Because we used only standard applications and APIs, if you are able to install all those tools locally outside of a VM, or if you have any other VM with all those tools available, it should work exactly the same way.
Keep in mind that the more services you are running, the more memory you need. We assigned 12 GB to our virtual machine to run these examples. If you are lacking memory, you can stop some of those services and run the different steps one by one with the services you have running.
Again, we will not discuss each and every implementation detail, but will cover all the required tools and examples to help you understand what is important during this phase.
Before we begin, you’ll need to make sure that all services are running correctly.
If you are using Cloudera Manager, you can check the status of all the services from the web UI, as illustrated in Figure 9-1.
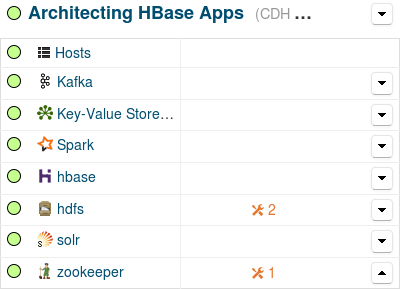
Figure 9-1. Cluster Services in Cloudera Manager
If you are not using Cloudera Manager, or if you don’t have any web UI, you might want to make use of the sudo jps command to make sure all the services are running.
The important services are highlighted here:
$ sudo jps
12867 Main
5230 Main
12735 EventCatcherService
22423 DataNode
12794 Main
22920 HMaster
12813 HeadlampServer
12753 NavServer
12841 AlertPublisher
22462 SecondaryNameNode
22401 NameNode
22899 HRegionServer
22224 QuorumPeerMain
29753 Jps
12891 NavigatorMain
24098 Application
24064 Main
23055 Bootstrap
22371 Kafka
822962 ThriftServer
The Flume agent will appear on this list only when it will be running.
Application Flow
As described in Chapter 8, Flume will pick up data from external data sources and store that into Kafka for queuing.
Then another Flume agent will read the different Kafka queues, process the data if required, then send it into HBase for storage where the Lily Indexer will pick it up and send it into Solr for indexation.
This is what we are going to implement here.
We will not implement all the sources nor all the real-time processing options, but we will make sure we have an entire data flow going from the initial Flume event up to the Solr indexation.
To have an easy way to ingest testing events into our flow, we will make Flume read the events from a Kafka queue where we will insert test data from the kafka-console-producer command line.
Figure 9-2 shows a simplified version of the data flow.
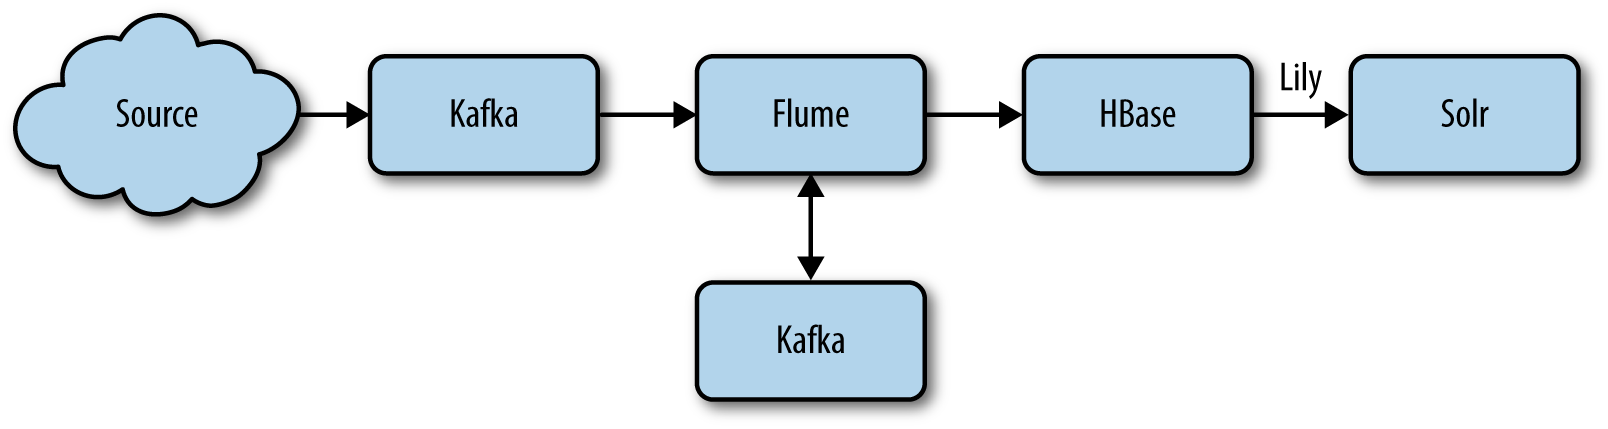
Figure 9-2. Data flow
For the purpose of this example, we will consider the incoming data to be XML files that we will transform over the process into Avro objects that we will insert into HBase and get all the fields separately indexed into Solr.
Kafka
Because Kafka will be the entry point for all our data, it is the first thing we need to get running and configured. Kafka will be used for two purposes. It will first be used to queue all the data received from the external sources and make it available for the downstream consumers. Then it will also be used for the Flume channel.
To populate the Kafka queue, we will build our own data generator script using a small Java application to create random XML documents. We will use the Kafka command line to load them into Kafka. To read and process all those events, we will configure a Flume agent that we will enhance with an interceptor to perform the XML to Avro transformation.
Flume
Flume is a stream engine commonly used to stream data from a source to a sink, applying small modifications if required. It also needs to have a channel configured. The channel is where Flume will store incoming data until it’s sent to the destination.
Storm was initially selected in the original project implementation; however, we feel it is better to use Flume, which is widely adopted and used by the community.
For the examples, we will use Flume to read the events from Kafka source, transform and enrich them, and push them to HBase. We will need to use a Kafka source, a Kafka channel, an interceptor, and an HBase sink.
HBase
As we saw in Chapter 8, the HBase key has been initially designed to be the customer ID followed by a random hash. For better distribution, we also talked about the option to use an MD5 hash. In the current implementation, we will not follow exactly the same key pattern, and we will build one that will achieve the same goal, a bit differently. Here is the reasoning and how we are going to implement it.
The end goal for this use case is to get the XML documents indexed into Solr but also stored into HBase so they can easily be retrieved. Each document represents medical information for a specific person. Therefore, one person can be assigned multiple documents. A natural ID to identify a person is by insurance number or customer ID. However, the distribution of this ID cannot be guaranteed and might result in some regions being more loaded than others. For this reason (and because scanning by insurance number is untenable), we want to look at the option to hash this number. As we have seen in the previous use case, hashing a key allows it to have a better distribution. So our key can be an MD5 of the insurance number. Even if MD5s have very low risk of collisions, the risk nonetheless still exists. What if when retrieving a medical record for a patient, because of an MD5 collision, we also retrieve the records for another patient? This can create confusion, can result in bad diagnostics, and can have very dramatic consequences, including legal ramifications. Data collisions in the medical world are simply not acceptable. That means we need to find a way to preserve the distribution of the MD5 and to be absolutely certain that there will never be any collision. The easiest way to achieve this goal is to simply append the customer or insurance ID at the end of the MD5. Therefore, even if two different IDs result in the same MD5, they can still be used as a differentiator for the key and each person will then have its own row into HBase. For a row to be returned, it needs the ID and its MD5 to both match the key, which makes it unique. In comparison to the key proposed in the previous chapter, this option allows a better distribution of the data accross the table, but at the cost of a bigger footprint. Indeed, an MD5 plus the ID will be bigger than the ID plus some random bytes. However this extra cost can prove to be valuable for improving the table distribution and simplifying the splits identification.
As we already noted, the goal of the hash is to improve the distribution of the keys accross the entire table. An MD5 hash is 16 bytes. But to achieve a good distribution, just a few bytes will suffice. Thus, we will only keep the first two bytes that we will store in a string format. We chose to use MD5 hash because we already used it in the examples in Chapter 8, but any other kind of hash that offers enough distribution can be used as a replacement of MD5 (e.g., you could also use CRC32, if you prefer). Last, because we have to index the row key, it will be easier to store it as a printable string instead of a byte array. The first four characters will represent the hash, and the remaining characters of the key will represent the insurance number.
Also, even for patients undergoing treatment for a serious illness, we would not expect millions of documents per person, and a virtual limit of 10,000 documents seems reasonable. This allows us to store all those documents into the same row instead of adding the document ID to the row key and storing them as different rows.
Figure 9-3 illustrates three different approaches for the key design:
-
Option 1 shows the initial key design where the key is based on the customer ID and a random hash.
-
Option 2 shows the design where each document is stored in a different row.
-
Option 3 shows the final design where each document for the same patient is stored into the same row.
We will implement option 3.
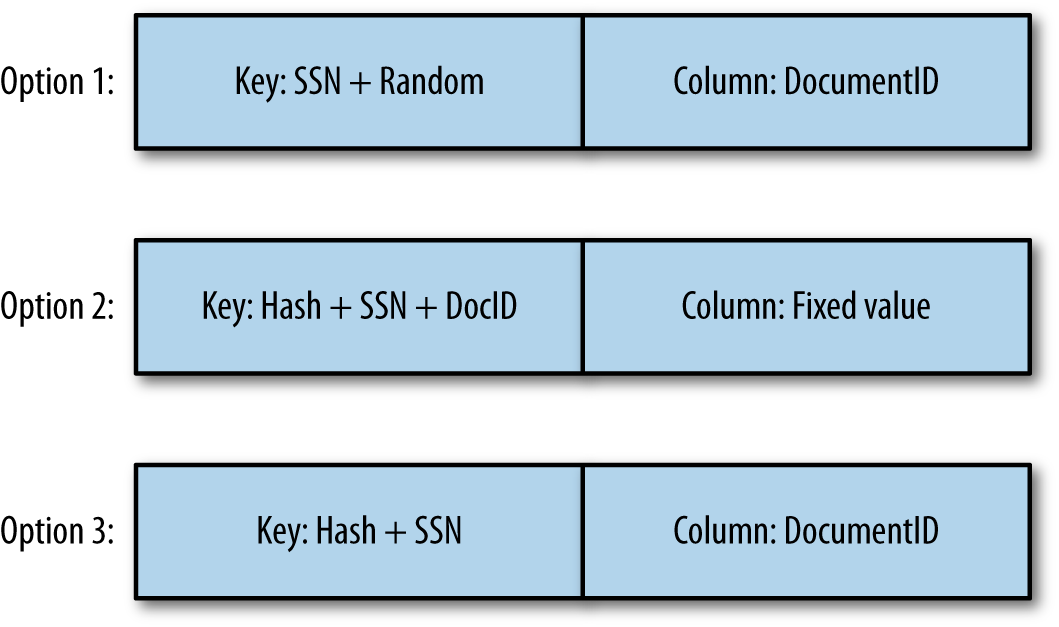
Figure 9-3. Key options
You might be wondering why we decided to go with option 3 instead of option 2. In the two last options, the document ID is stored once in the key and once as the column qualifier. Since we are storing the same information at the end whatever option is chosen, the storage size of the two options will be the same. Again, in both cases, when retrieving a document, we will query HBase given the customer ID and its MD5, and the document ID. So for both cases again, the access pattern will be direct, and identical.
The main difference here is that storing the documents together allows you to benefit from HBase row-level consistency. Indeed, if your upstream system wants to upload two documents at the same time, with the guarantee that they will both go, or both fail, having them in the same line will allow you to achieve this goal. However, having them on two different rows can potentially land the documents into two different regions. This can be problematic in case of a partial failure. If you do not have any consistency constraint, to improve the scalability, it is totally fine, and even preferred, to use the design described in version 2.
Last, keep in mind that HBase will never split within a row. So this approach works well only if your rows are a decent limited size. This is why we have estimated the maximum number of columns a row might realistically have. If we consider that we can have a maximum of 10,000 columns of small 10 KB Avro objects, this is only about 100 MB of data for this specific row. Given that HBase regions can easily grow above 10 GB, that gives us plenty of space to store those outlier rows.
Lily
The goal of the Lily Indexer is to replicate into Solr all the mutations received into HBase. We will not go into all the technical details, but Lily is built on top of the HBase replication framework. Therefore, all mutations are guaranteed to be forwarded to Solr, even in case of a node failure where the region and the related HLogs are assigned to another RegionServer. Because the indexer will receive the data that is stored into HBase, it will be accountable to translate it into a Solr document. In our use case, we are going to store Avro objects into HBase. The indexer will have to map the fields of the Avro objects to the fields of the Solr document we want to index. This mapping is defined using a Morphlines script. As described on the project’s website, “Morphlines is an open source framework that reduces the time and skills necessary to build and change Hadoop ETL stream processing applications that extract, transform and load data into Apache Solr, Enterprise Data Warehouses, HDFS, HBase or Analytic Online Dashboards.”
Solr
We already discussed Solr in Chapter 8, so we will not repeat the details here. Part of the Solr schema that we will use is the following:
<field name="id" type="string" indexed="true" stored="true" required="true"
                                                        multiValued="false" />
<field name="rowkey" type="binary" indexed="false" stored="true" omitNorms="true"
                                                             required="true"/>
<field name="documentId" type="string" indexed="true" stored="true"
                                         omitNorms="true" required="true"/>
<field name="payload" type="text_general" indexed="true" stored="false"
                                        required="true" multiValued="false" />
<field name="_version_" type="long" indexed="true" stored="true"/>
And again, the complete schema is available in the book’s example files.
Implementation
Now that we have defined all of our main components (Kafka, Flume, HBase, Lily, and Solr), it is time to make sure data can flow from the entry point up to the Solr index. To allow you to test the examples as you advance into this chapter, we will implement the different required parts in the same order as the data flow.
Before going into all the details, we recommend creating the HBase table right from the beginning. Indeed, having the table available will allow you to test the examples as we describe them. Later, we will review the details of this table creation and provide a more efficient creation script, but to quickly start, simply type the following into the HBase shell:
create 'documents', 'c'
Data Generation
First of all, if we want to test our examples, we need to make sure we have data to send into our flow. Because we are going to ingest XML documents into Kafka, we will need a small XML documents generator. Because it doesn’t add much value to the book, the code for this generator will not be printed here, but it is available in the example files. The generated data will follow the following format:
<ClinicalDocument>
  <PatientRecord>
    <FirstName></FirstName>
    <LastName></LastName>
    <SIN></SIN>
  </PatientRecord>
  <MedicalRecord>
    <Comments></Comments>
  </MedicalRecord>
</ClinicalDocument>
Of course, a real-world medical document will contain way more fields than what we are generating here; however, the few fields we’re using here are enough to implement the examples. The social insurance number is a mandatory field, but the other fields might not always be populated. When a field is missing, at the ingestion time, HBase will try to look up the missing information.
The first thing we do to generate those documents is to create a random social insurance number (SIN).
We want the same SIN to always represent the same person.
Therefore, we will generate a first name and a last name based on this number.
That way, the same number will always return the same name.
However, because we also want to demonstrate the use of an interceptor, we are going to generate some of the messages without the first name or the last name.
Leveraging a Flume interceptor, we can add missing field detection. This will not only transform the message from XML to Avro, but will allow HBase to perform a Get to retrieve previous messages that may contain the missing fields. This would allow us to fully populate the document.
To run the XML document generator, from the command line, simply use the following command:
java -classpath ~/ahae/target/ahae.jar com.architecting.ch09.XMLGenerator
Kafka
Now that we have our messages ready to enter our flow, we need to prepare Kafka to accept them.
Tip
Make sure that Kafka is configured with the zookeeper.chroot property pointing to the /kafka zookeeper path.
Indeed, by default, some distributions will keep the Kafka folder as being the root ZooKeeper path.
If the default is used, you will end up with all the Kafka folders created under the root path, which could become confusing when it’s time to differentiate those Kafka folders from other applications folders.
Also, not setting the value could result in the following error: Path length must be > 0.
The first step is to create a Kafka queue, which can be achieved as follows:
[cloudera@quickstart ~]$ kafka-topics --create --topic documents --partitions 1
                          --zookeeper localhost/kafka --replication-factor 1
Created topic "documents".
Tip
In production, you will most probably want more partitions and a bigger replication factor. However, in a local environment with a single Kafka server running, you will not be able to use any bigger number.
To learn more about the different parameters this command accepts, refer to the online Kafka documentation.
When the queue is created, there are multiple ways to add messages into it. The most efficient approach is to use the Kafka Java API. However, to keep the examples simple, we will use the command-line API for now. To add a message into the newly generated Kafka queue, use the following command:
java -classpath ~/ahae/target/ahae.jar com.architecting.ch09.XMLGenerator |
kafka-console-producer --topic documents --broker-list localhost:9092
This method will call the XMLGenerator we have implemented earlier and will use its output as the input for the kafka-console-producer.
At the end of this call, one new XML message will have been created and pushed into the Kafka queue.
To validate that your topic now contains the generated messages, you can make use of the following command:
kafka-console-consumer --zookeeper localhost/kafka --topic documents
                              --from-beginning
This command will connect to the documents topic and will output all the events present in this topic, starting from the first available one.
The output of this last command should look like this:
<ClinicalDocument>
<PatientRecord>
<FirstName>Tom</FirstName>
<LastName>...
This shows you that at least one event is available into the Kafka topic.
Also, because we configured Flume to use Kafka as a channel, we also need to create the Flume Kafka channel using the following:
[cloudera@quickstart ~]$ kafka-topics --create --topic flumechannel
    --partitions 1 --zookeeper localhost/kafka --replication-factor 1
Created topic "flumechannel".
Flume
Now that our topic is getting events, we will need something to consume them and store them into HBase.
The configuration of Flume is done via a property file where we define all the parts to be put in place together. Flume parameters are in the following form:
<agent-name>.<component-type>.<component-name>.<parameter> = <value>
We will use ingest as the agent name for all the configuration.
For more details about how Flume works and all of its parameters, check out the project’s online documentation or Hari Shreedharan’s book Using Flume (O’Reilly, 2014). For all Kafka plus Flume-specific parameters, refer to the blog post “Flafka: Apache Flume Meets Apache Kafka for Event Processing” on the Cloudera Engineering Blog.
Flume Kafka source
Flume can be configured with many different sources, most of them being already developed. If the source you are looking for is not already built, you can develop your own. Were are looking here for a Kafka source. We will inform Flume about this source using the following parameter:
ingest.sources = ingestKafkaSource
This tells Flume that the ingest agent has only one source called ingestKafkaSource.
Now that we have told Flume that we have a source, we have to configure it:
ingest.sources.ingestKafkaSource.type =
    org.apache.flume.source.kafka.KafkaSource
ingest.sources.ingestKafkaSource.zookeeperConnect = localhost:2181/kafka
ingest.sources.ingestKafkaSource.topic = documents
ingest.sources.ingestKafkaSource.batchSize = 10
ingest.sources.ingestKafkaSource.channels = ingestKafkaChannel
Again, this provides Flume with all the details about the source that we are defining.
Flume Kafka channel
A Flume channel is a space that Flume uses as a buffer between the source and the sink. Flume will use this channel to store events read from the source and waiting to be sent to the sink. Flume comes with a few different channel options. The memory channel is very efficient, but in case of server failure, data stored into this channel is lost. Also, even if servers have more and more memory, they still have a limited amount compared to what disks can store. The disk channel allows data to be persisted in case of a server failure. However, this will be slower than the other channels, and data lost still exists in case the disk used to store the channel cannot be restored. Using a Kafka channel will use more network than the other channels, but data will be persisted in a Kafka cluster and therefore cannot be lost. Kafka will store the information mainly in memory before returning to Flume, which will reduce the disk’s latency impact on the application. Also, in case the source provides events way faster than what the sink can handle, a Kafka cluster can scale bigger than a single disk channel and will allow to store more of the backlogs to be processed later when the source will slow down. In our use case, we are storing healthcare information, and we cannot afford to lose any data. For this reason, we will use a Kafka queue as our Flume channel.
The channel configuration is similar to the source configuration:
ingest.channels = ingestKafkaChannel
ingest.channels.ingestKafkaChannel.type = org.a.f.channel.kafka
ingest.channels.ingestKafkaChannel.brokerList = localhost:9092
ingest.channels.ingestKafkaChannel.topic = flumechannel
ingest.channels.ingestKafkaChannel.zookeeperConnect = localhost:2181/kafka
This tells our ingest agent to use a channel called ingestKafkaChannel backed by Kafka.
Flume HBase sink
The goal of the Flume sink is to take events from the channel and store them downstream. Here, we are looking at HBase as the storage platform. Therefore, we will configure an HBase Flume sink. Flume comes with a few default serializers to push the data into HBase. The goal of a serializer is to transform a Flume event into an HBase event (and nothing else). However, even if they can be used most of the time, those serializers don’t give you full control over the row key and the column names. We will have to implement our own serializer to be able to extract our row key from our Avro object.
The sink configuration can be done using the following:
ingest.sinks = ingestHBaseSink
ingest.sinks.ingestHBaseSink.type = hbase
ingest.sinks.ingestHBaseSink.table = documents
ingest.sinks.ingestHBaseSink.columnFamily = c
ingest.sinks.ingestHBaseSink.serializer =
    com.architecting.ch09.DocumentSerializer
ingest.sinks.ingestHBaseSink.channel = ingestKafkaChannel
Interceptor
A Flume interceptor is a piece of code that can update a Flume event before it is sent to the sink or dropped.
In our case, we want to transform our XML source into an Avro object and perform some HBase lookups to enrich the event before sending it back to HBase. Indeed, if the first name or the last name is missing, we need to perform a lookup into HBase for already existing events to see if it is possible to enrich the current event with the information.
The interceptor is where this transformation and this enrichment takes place. This process should be executed as fast as possible to the table to return the event to Flume very quickly. Taking too much time or performing too much processing in the interceptor will result in Flume processing events performing slower than when they arrived and might end up overwhelming the channel queue.
The interceptor is configured similarly to what has been done for the source, the sink, and the channel:
ingest.sources.ingestKafkaSource.interceptors = ingestInterceptor
ingest.sources.ingestKafkaSource.interceptors.ingestInterceptor.type =
                              com.architecting.ch09.DocumentInterceptor$Builder
Tip
Instead of building your own XmlToAvro interceptors, it is possible to apply the transformation using the Morphlines interceptor. However, for simplicity, to be able to update HBase records and to not have to go over all the Morphlines details, we chose to implement our own Java interceptor.
Conversion
The first step of the interceptor is to convert the event into an Avro object. Like in the previous chapter, we will need to define an Avro schema:
{"namespace": "com.architecting.ch09",
 "type": "record",
 "name": "Document",
 "fields": [
     {"name": "sin", "type": "long"},
     {"name": "firstName", "type": "string"},
     {"name": "lastName", "type": "string"},
     {"name": "comment", "type": "string"}
 ]
}
The related Java class is also generated the same way:
java -jar ~/ahae/lib/avro-tools-1.7.7.jar compile schema
                                ~/ahae/resources/ch09/document.avsc ~/ahae/src/
Code similar to what has been done in the previous chapter will be used to serialize and de-serialize the Avro object. We will use the XPath method to parse the XML document to populate the Avro object. The code in Example 9-1, extracted from the complete example available on the GitHub repository, shows you how to extract those XML fields.
Example 9-1. XML extraction
expression="/ClinicalDocument/PatientRecord/FirstName";nodes=getNodes(xpath,expression,inputSource);if(nodes.getLength()>0)firstName=nodes.item(0).getTextContent();expression="/ClinicalDocument/PatientRecord/LastName";inputAsInputStream.reset();nodes=getNodes(xpath,expression,inputSource);if(nodes.getLength()>0)lastName=nodes.item(0).getTextContent();expression="/ClinicalDocument/PatientRecord/SIN";inputAsInputStream.reset();nodes=getNodes(xpath,expression,inputSource);if(nodes.getLength()>0)SIN=Long.parseLong(nodes.item(0).getTextContent());expression="/ClinicalDocument/MedicalRecord/Comments";inputAsInputStream.reset();nodes=getNodes(xpath,expression,inputSource);if(nodes.getLength()>0)comment=nodes.item(0).getTextContent();
Lookup
The second step of the interceptor is to inspect the last name and first name fields to validate that they contain the required information, and if not, to perform an HBase lookup to try to find this information. HBase might contain many records without the customer information before we find one with it. Reading all those records will consume time and resources, and will have to be performed for all the received records where this is missing. Because we want to keep all the interceptor operations as fast as possible, if the record with information we found is not the first record in HBase, we will also update the first record to get faster lookups for subsequent calls.
If the diagram in Figure 9-4 represents the data for the key 12345, because documents 1 to 4 don’t have any first or last name information, when document 6 is received from Flume again without any last name and first name, the interceptor will perform an HBase lookup, scan the row to read the columns one by one, and will find the required information from document 5 only.
It will then have to update document 1 to make sure that next insertions for the same row will not have to look up all the documents from 1 to 5 to find the first and last name but will find it right from the first entry.

Figure 9-4. Backward update of previously inserted documents
Doing a put into HBase from a Flume interceptor is a side effect of the operation. This is something we want to avoid. Because we already have a sink for the HBase table we want to update, why don’t we simply output two events from the Flume interceptor (one for the updated cell, and another for the newly inserted cell)? Flume doesn’t allow this. On a Flume interceptor, you should output the exact same number of events you received, or less, but never more. However, on the serializer side, it is possible to generate two puts for the same row from one received event. Therefore, on the interceptor side, if an additional column needs to be updated for a given row, we are going to add the related information into the Flume event header. This information will be transfered to the Flume serializer in charge to build the put for the actual event. Based on this information, the serializer will generate an additional put for the same row, which will update the required cell.
Figure 9-5 shows the order of the operations.
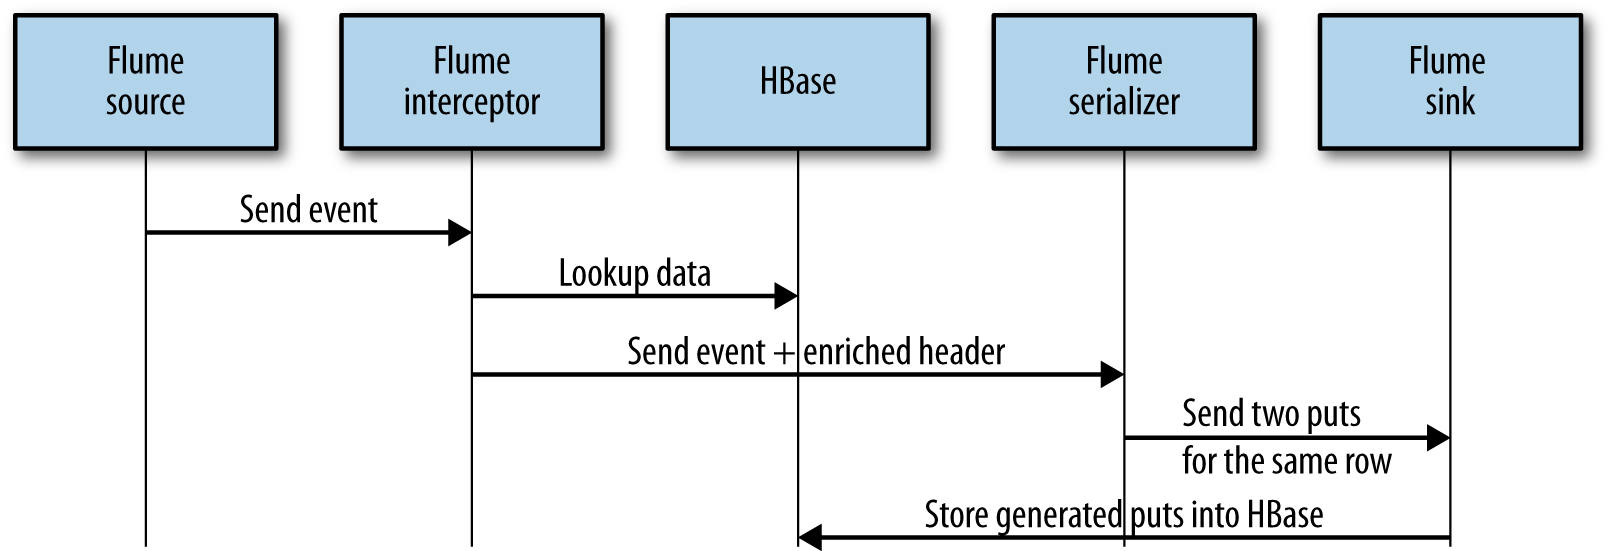
Figure 9-5. Operations flow
After all those operations, the data should now look as shown in Figure 9-6.
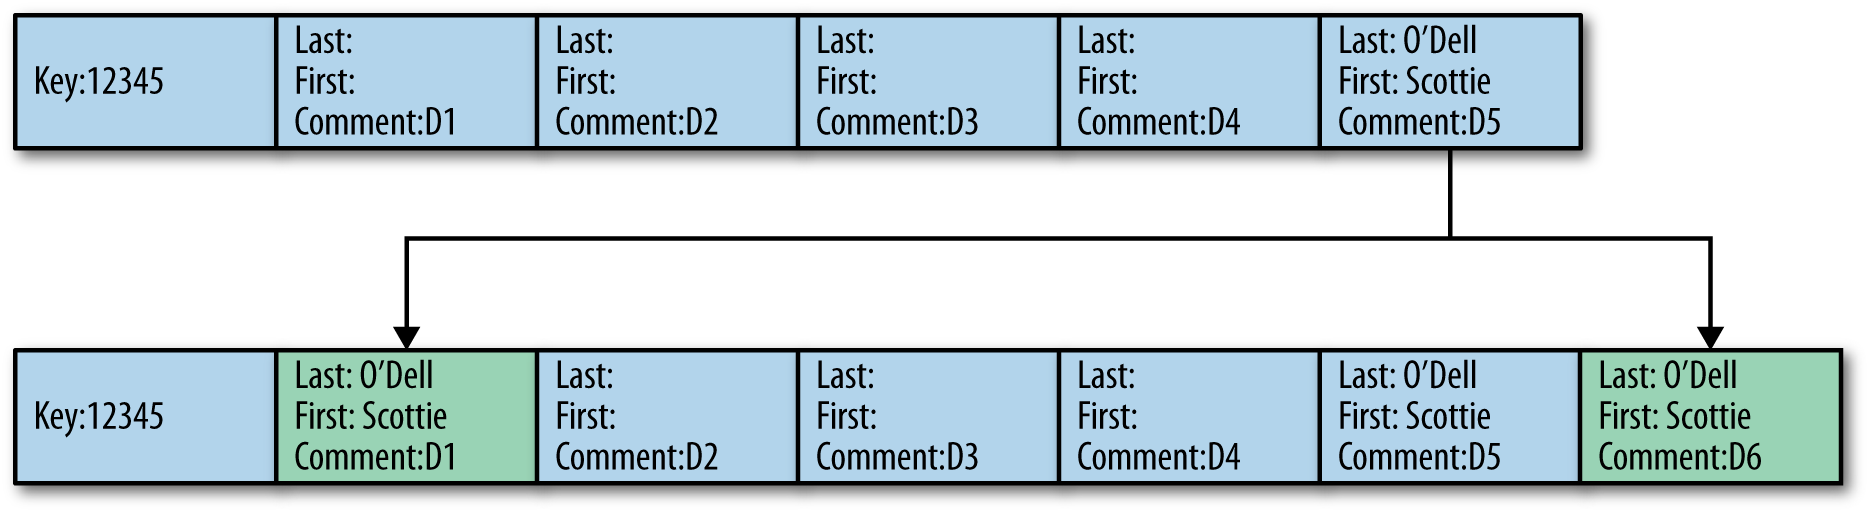
Figure 9-6. Interceptor result
Depending on your use case, this might not be optimal. Indeed, to avoid lookups, the first and last name fields might have been extracted and inserted into their own cell. However, we still did it that way for a few reasons. First, this allows us to illustrate how to correctly use the interceptor and the serializer to communicate with HBase for lookups and generate multiple HBase puts from a single Flume event. Second, combining the first and last name into the same cell as the other fields allows you at the read time to get everything in a single call, instead of having to perform a get for the document and then another get for the personal information. Third, we are here looking up the first and last name, but you might also be able to look up a doctor name (or any information about the clinic, a prescription, etc.) from the ID, and enrich the document itself again to not have to perform this lookup at the read time. Thus, in order to provide you with the most diverse and complete examples possible, we decided to still go with this table design.
Example 9-2 shows how to perform those different operations into the Flume interceptor.
Example 9-2. HBase lookup
byte[]rowKeyBytes=Bytes.add(DigestUtils.md5(""+SIN),Bytes.toBytes((int)SIN));if(StringUtils.isBlank(firstName)||StringUtils.isBlank(lastName)){LOG.info("Some personal information is missing. Lookup required");TabledocumentsTable=connection.getTable(tableName);Getget=newGet(rowKeyBytes);Resultresult=documentsTable.get(get);if(!result.isEmpty()){result.advance();CellfirstCell=result.current();CellcurrentCell=firstCell;while(true){document=cellToAvro(currentCell,document);if(document.getFirstName()!=null)firstName=document.getFirstName().toString();if(document.getLastName()!=null)lastName=document.getLastName().toString();if((!"".equals(firstName)&&!"".equals(lastName))||(!result.advance()))break;currentCell=result.current();}if((firstCell!=currentCell)&&StringUtils.isNotBlank(lastName)&&StringUtils.isNotBlank(firstName)){LOG.info("Need to update first cell. Updating headers.");document=cellToAvro(firstCell,document);document.setFirstName(firstName);document.setLastName(lastName);byte[]qualifier=Bytes.copy(firstCell.getQualifierArray(),firstCell.getQualifierOffset(),firstCell.getQualifierLength());Map<String,String>headers=event.getHeaders();headers.put(COLUMN,Base64.encodeBytes(qualifier));headers.put(PAYLOAD,Base64.encodeBytes(avroToBytes(document)));}}}

To improve performances, it is important to reuse a single connection to retrieve the table.

Get the current customer row and prepare to iterate across all its documents.

Iterate until we found both customer last and first names.

If we found the information we were looking for and it is not coming from the first cell of the row, update the first cell to make subsequent requests faster.

We have decided to give the entire document into the header. Doing that will allow us to not have to lookup the table again on the serializer side but just directly create the related
Putobject. You might want to avoid doing that if your documents are too big.
The last part of the code, shown in Example 9-3, is to make sure modified information is applied back to the Avro object, which will be serialized and sent back to Flume.
Example 9-3. Avro enrichment
document.setFirstName(firstName);document.setLastName(lastName);document.setSin(SIN);document.setComment(comment);
Tip
All those classes are going to be run by the Flume agent. Therefore, it is important for Flume to have access to the project JAR. Flume has a plugin.d directory where each project should create its own subdirectories with a specific structure. The Flume documentation provides more details about how this directory is structured.
Build those classes using Maven the same way you are building the other examples (using Eclipse or the command line) and copy the generated JAR into the Flume plugin directory. To simplify the process for the examples, we will just give everyone access to this directory (in a production environment, you should make sure that only required people have access to it):
sudo mkdir -p /var/lib/flume-ng/plugins.d/ahae/lib
sudo chmod a+rwx /var/lib/flume-ng/plugins.d/ahae/lib
cp ~/ahae/target/ahae.jar /var/lib/flume-ng/plugins.d/ahae/lib/
You will need to restart Flume for this JAR to be taken into consideration by the application. You will also have to restart the Flume agent each time you deploy a new version of your JAR.
Serializer
A Flume serializer is a class that given a Flume event, serializes the required output for a given sink. In our example, we will need to build an HBase Flume serializer. This serializer will receive our Avro objects generated by the interceptor plus the required headers, and will transform that into one HBase Put operation. Depending on what we will receive on the headers, our single put operations might impact one or two columns.
An HBase Flume serializer has to implement the org.apache.flume.sink.hbase.HbaseEventSerializer interface. This interface requires the methods shown in Example 9-4 to be implemented.
Example 9-4. Flume HBase serializer interface
/*** Initialize the event serializer.* @param Event to be written to HBase.*/publicvoidinitialize(Eventevent,byte[]columnFamily);/*** Get the actions that should be written out to HBase as a result of this* event. This list is written to HBase using the HBase batch API.* @return List of {@link org.apache.hadoop.hbase.client.Row} which* are written as such to HBase.** 0.92 increments do not implement Row, so this is not generic.**/publicList<Row>getActions();publicList<Increment>getIncrements();/** Clean up any state. This will be called when the sink is being stopped.*/publicvoidclose();
In our case, we will implement the initialize method and the getActions.
We will not have anything specific to do on the close method, and because we do not need nor want to count our events, the getIncrements will stay empty, too.
Example 9-5 shows our serializer code.
Example 9-5. XML to HBase Flume serializer
@Overridepublicvoidinitialize(Eventevent,byte[]cf){if(LOG.isDebugEnabled())LOG.debug("Performing initialization for a "+event.getBody().length+" bytes event");elseLOG.info("Performing initialization for an event");this.payload=event.getBody();this.cf=cf;this.headers=event.getHeaders();reader=newSpecificDatumReader<Document>(Document.class);}@OverridepublicList<Row>getActions()throwsFlumeException{if(LOG.isInfoEnabled())LOG.info("Retrieving actions.");List<Row>actions=newLinkedList<Row>();try{decoder=DecoderFactory.get().binaryDecoder(payload,decoder);document=reader.read(document,decoder);byte[]rowKeyBytes=Bytes.add(DigestUtils.md5(""+document.getSin()),Bytes.toBytes(document.getSin().intValue()));LOG.info("SIN = "+document.getSin());LOG.info("rowKey = "+Bytes.toStringBinary(rowKeyBytes));Putput=newPut(rowKeyBytes);put.addColumn(cf,Bytes.toBytes(System.currentTimeMillis()),payload);actions.add(put);StringfirstCellColumn;if((firstCellColumn=headers.get(COLUMN))!=null){Stringpayload=headers.get(PAYLOAD);put.addColumn(cf,Base64.decode(firstCellColumn),Base64.decode(payload));LOG.info("Updating first cell "+Bytes.toStringBinary(Base64.decode(firstCellColumn)));}}catch(Exceptione){LOG.error("Unable to serialize flume event to HBase action!",e);thrownewFlumeException("Unable to serialize flume event to HBase action!",e);}returnactions;}
Store the payload, the column family name, and the headers to reuse them later.
Construct the
documentAvro object from the received payload.Create the required HBase
Putobject to be sent to the table.If required, add a second column of the existing
Putobject to overwrite the first cell with updated information.
At the end of the interceptor and serializer steps, the Flume HBase sink will receive the generated put from the serializer and will apply it against the configured table. All the steps up to this point can be run individually. You do not need to have the Lily Indexer nor the Solr service running. If you try them, you should be able to see your generated data in the input Kafka queue, your intermediate data into the Flume channel Kafka queue, and your transformed data into your HBase table, which you will need to created.
The following commands will help you to figure what has been created where.
First, to perform a lookup into the Kafka topic used as a source for the entire process, use the following command:
kafka-console-consumer --zookeeper localhost/kafka --topic ingest
                            --from-beginning
This should show you all the events that you have inserted into the topic to be picked up by Flume. To start and to simplify the debugging, make sure to insert only few events.
If the Flume agent is running and the Flume source is correctly configured, you should also see all those events being picked up and inserted into the Flume Kafka channel topic. To inspect this specific topic, use the following command:
kafka-console-consumer --zookeeper localhost/kafka --topic flumechannel
                            --from-beginning
If everything is working correctly, the content of this topic should be the same as the content of the ingest topic, and therefore the output of the two commands should be the same. At this point, you confirmed that both your Kafka service and your Flume service are running correctly. The next step is to validate that the interceptor and the serializer are working fine, too. Because the Flume sink is the HBase sink, the result of our operations should be visible in HBase. Performing the following scan in the HBase shell against the previously created table should show you as many cells as there was events in the ingest Kafka topic:
hbase(main):001:0> scan 'documents'
Warning
If you have inserted millions of events into your Kafka input topic, there will be millions of entries in the two topics as well as millions of lines into HBase.
If this is the case, make sure to use the LIMIT keyword of the HBase scan and use | more or | less in conjonction with the kafka-console-consumer commands.
The produce.sh file into the resources/ch09/ folder will produce five events (four without last name and first name, and one with the first and last name). At the end of the process, you should see into HBase the first cell being updated, the fourth event being populated with its own first and last name, and the fifth event being enriched with the last name and first name for the other events.
There are different places where those steps might fail.
If you do not see your data in the ingest topic, check the logs and the code of your data generation steps, and try to push some data from the command line.
If you do not see your data in the flumechannel topic, your Flume agent might not be running or it might be incorrectly configured.
Check the logs of your Flume agent and its configuration.
If you do not see your data in the HBase table, there might be an issue with your interceptor or your serializer code.
Check the logs of your Flume agent and your Java code, and make sure it has been deployed and is accessible for Flume.
HBase
Even if HBase is probably the most important part of this design, its implementation is the smallest one. Indeed, even if everything here is related to HBase, there is not any specific HBase code required. There are two things we will have to look into on the HBase side.
Table design
As usual, the first and most important one is the table and key design.
As we said previously, to have a very good distribution of our keys, we are going to use an MD5 hash of the social insurance number as a prefix, followed by the number itself.
An MD5 hash is represented by a byte array, values of those bytes being anything between 0 of 255.
This information is what we need to correctly presplit the table and choose the correct logic to calculate the split points.
Because we are going to generate binary keys, we will make use of the UniformSplit algorithm here.
The number of regions we will create depends on the size of the cluster and on the size of the dataset we expect to have.
For our example, we will create an eight-region table called documents with a single column family called c:
create 'documents', { NUMREGIONS => 8, SPLITALGO => 'UniformSplit' },
                             { NAME => 'c' }
Table parameters
The second most important part of the HBase design is the table parameters. Indeed, as we have already seen, there are many different values and parameters we can adjust on a table. First, we want to activate the compression for XML. Since XML is text based, it normally compresses quite well. Also, because the SLA regarding the read latency for this project is high (documents needs to be returned within one second), we will choose a compression algorithm that will provide a better compression ratio than the others.
To activate the compaction for this table column family, use the following command:
alter 'documents', { NAME => 'c', COMPRESSION => 'GZ' }
In addition to the compression, we want to disable the Bloom filters. All the reads done into the HBase table will be base on the key returned by Solr. Therefore, they will all always succeed. Bloom filters might still be useful if there are many files within a single region; however, major compactions being scheduled daily at night, most of the regions will have only a single file, and the Bloom filters are going to be an overhead.
Warning
If you are not sure about using Bloom filters or not, it’s better to keep them activated. There are very few use cases for which it is advisable to disable them. If your reads always succeed (e.g., in cases when they are looked up from an external index) or if there is only one file (or very few files) per region, then Bloom filters can be disabled. However, for all other use cases, Bloom filters will help to skip reading some files and will improve the read latency.
To disable the Bloom filters, use the following command:
alter 'documents', { NAME => 'c', BLOOMFILTER => 'NONE' }
Tip
This example will also work very well if you keep Bloom filters activated and compression disabled.
At the end, your HBase table should look like this:
hbase(main):021:0> describe 'documents'
Table documents is ENABLED
documents
COLUMN FAMILIES DESCRIPTION
{NAME => 'c', DATA_BLOCK_ENCODING => 'NONE', BLOOMFILTER => 'NONE',
REPLICATION_SCOPE => '0', VERSIONS => '1', COMPRESSION => 'GZ',
MIN_VERSIONS => '0', TTL => 'FOREVER', KEEP_DELETED_CELLS => 'FALSE',
BLOCKSIZE => '65536', IN_MEMORY => 'false', BLOCKCACHE => 'true'}
1 row(s) in 0.0290 seconds
Java implementation
It is also possible to perform the same table create using the Java API. This might be useful if you want to keep track of how your table has been created in a version control system. Example 9-6 shows how to create a table with a single column family, the required splits and the parameters configured as we did previously using the shell.
Example 9-6. Java table creation code
TableNamedocuments=TableName.valueOf("documents");HTableDescriptordesc=newHTableDescriptor(documents);HColumnDescriptorfamily=newHColumnDescriptor("c");family.setCompressionType(Algorithm.GZ);family.setBloomFilterType(BloomType.NONE);desc.addFamily(family);UniformSplituniformSplit=newUniformSplit();admin.createTable(desc,uniformSplit.split(8));
Lily
Configuring Lily is quite easy. The only thing we have to give it is a Morphlines script to describe what to do with the HBase cell and where to push it:
SOLR_LOCATOR : {
  # Name of solr collection
  collection : DocumentCollection

  # ZooKeeper ensemble
  zkHost : "$ZK_HOST"
}


morphlines : [
{
  id : morphline
  importCommands : ["org.kitesdk.**", "com.ngdata.**"]

  commands : [
    { logInfo{ format : "Getting something from HBase: {}", args : ["@{}"] } }
    {
      extractHBaseCells {
        mappings : [
        {
          inputColumn : "c:*"
          outputField : "_attachment_body"
          type : "byte[]"
          source : value
        }
        {
          inputColumn : "c:*"
          outputField : "documentId"
          type : "string"
          source : qualifier
        }]
      }
    }
    { logInfo{ format : "Reading Avro schema: {}", args : ["@{}"] } }
    {
      readAvro {
        writerSchemaFile : /home/cloudera/ahae/resources/ch09/document.avsc
      }
    }
    { logInfo{ format : "Extracting Avro paths: {}", args : ["@{}"] } }
    {
      extractAvroPaths {
        paths : {
          sin : /sin
          firstName : /firstName
          lastName : /lastName
          comment : /comment
        }
      }
    }

    { logInfo{ format : "output record: {}", args : ["@{}"] } }
    {
      sanitizeUnknownSolrFields
      {
        solrLocator : ${SOLR_LOCATOR}
      }
    }
  ]
}
]
This says to Lily that we want to extract the column qualifier and store it into the documentId field, then extract the cell content as an Avro object and extract the specific fields we wish to replicate.
We also need an XML file to configure the indexer. This file will be given as a parameter to the command line. It defines what kind of mapper we want to use and provides some parameters for this mapper:
<?xml version="1.0"?>
<indexer table="documents"
 mapper="com.ngdata.hbaseindexer.morphline.MorphlineResultToSolrMapper"
 mapping-type="column" row-field="rowkey">

<!-- The relative or absolute path on the local file system to the morphline -->
<!-- configuration file. Use relative path "morphlines.conf" for morphlines  -->
<!-- managed by Cloudera Manager -->
<param name="morphlineFile" value="morphlines.conf"/>

</indexer>
The XML will configure Lily to use the MorphlineResultToSolrMapper.
It will also configure this mapper to process the HBase cells at the column lever (instead of the default row-level mode).
Last, it will also configure Lily to provide the HBase row key into the rowkey field.
More information regarding the XML file content is available on the NGData GitHub page.2
The last step is to enable to the indexer using the following command:
hbase-indexer add-indexer --name myIndexer --indexer-conf indexer-config.xml
                          --connection-param solr.zk=quickstart/solr
        --connection-param solr.collection=DocumentCollection
        --zookeeper localhost:2181
If you want to disable and remove the indexer (because you want to try another one or if something goes wrong with the configuration), use the following command:
hbase-indexer delete-indexer --name myIndexer
After this step, Lily will create a Solr document for each cell inserted into HBase by Flume. However, because Solr is not yet configured, this will probably fail. Continue to the next section to configure Solr and test Lily.
Solr
The implementation part of Solr is straightforward. We simply need to create a Solr collection based on the schema that we have defined previously. To do so, we will follow the exact same steps described in Chapter 7.
To create the collection, use the following commands:
export PROJECT_HOME=~/ahae/resources/ch09/search
rm -rf $PROJECT_HOME
solrctl instancedir --generate $PROJECT_HOME
mv $PROJECT_HOME/conf/schema.xml $PROJECT_HOME/conf/schema.old
cp $PROJECT_HOME/../schema.xml $PROJECT_HOME/conf/
solrctl instancedir --create DocumentCollection $PROJECT_HOME
solrctl collection --create DocumentCollection -s 1
When this is done, the collection should be visible on the web UI: http://quickstart.cloudera:8983/solr/#/DocumentCollection_shard1_replica1
Testing
Now that all the parts are installed and implemented, any data inserted into the Kafka queue should be visible in both HBase and Solr. A Solr query such as the following should return all the records indexed by Solr: http://quickstart.cloudera:8983/solr/DocumentCollection_shard1_replica1/select?q=%3A&wt=json&indent=true. All those records should also be into HBase and can be viewed using the shell.
Inserting this XML:
<?xml version="1.0" encoding="UTF-8"?>
<ClinicalDocument>
  <PatientRecord>
    <SIN>12345</SIN>
    <FirstName>Scottie</FirstName>
    <LastName>O'Dell</LastName>
  </PatientRecord>
  <MedicalRecord>
    <Comments>Scottie is doing well.</Comments>
  </MedicalRecord>
</ClinicalDocument>
Will produce this entry in HBase:
hbase(main):002:0> get 'documents', '827c12345'
COLUMN          CELL
c:1448998062581 timestamp=1448998062683
                value=xF2xC0x01x0EScottiex0CO'Dell6Scottie is doing well.
1 row(s) in 0.0290 seconds
And this output in Solr:3
{
  "responseHeader":{
    "status":0,
    "QTime":0,
    "params":{
      "indent":"true",
      "q":"rowkey: "827c12345"",
      "wt":"json"}},
  "response":{"numFound":1,"start":0,"docs":[
      {
        "id":"827c12345-c-1448998450634",
        "lastName":"O'Dell",
        "rowkey":"827c12345",
        "firstName":"Scottie",
        "documentId":"1448998450634",
        "_version_":1519384999917256704}]
  }}
You can now query Solr by any of the indexed fields, and using the returned information, query HBase given a specific row and a specific column qualifier to get a direct, low-latency random access to the record.
Going Further
If you want to extend the examples presented in this chapter, the following list offers some options you can try based on our discussions from this chapter:
- Bigger input file
-
Here again we tried our workflow by ingesting one document at a time and only a few. Try to ingest way more documents. Also try to ingest documents with very big fields. When producing documents bigger than one MB, you can also even try the HBase MOB features.
- Extract patient record
-
Extract the patient name from the document and store it separately in a specific column. Modify the lookup to populate only this column and only if information is missing. Then, instead of storing the Avro object inside of HBase, only store the comment field.
- Duplicate flows
-
Produce two kinds of documents in two different topics and two Flume agents. Merge those two streams into a single HBase table and a single Solr index.
- Row key
-
The row key for a new document is calculated twice (once in the interceptor, and once in the serializer). Using the event header, store, transfer, and reuse this information.
- Change Solr schema
-
To make things easier, in the current schema, we store, index, and return the row key. However, the Solr document ID (stored in the ID field) already contains the row key as well as the column family and the column qualifier. Update the Solr schema to only index the row key and the document ID but not store them.
1 http://blog.acolyer.org/2015/06/15/twitter-heron-stream-processing-at-scale/
2 https://github.com/NGDATA/hbase-indexer/wiki/Indexer-configuration
3 http://quickstart.cloudera:8983/solr/DocumentCollection_shard1_replica1/select?q=rowkey%3A+%22827c12345%22&wt=json&indent=true