

Planning and deployment of BLU Acceleration
New technology sometimes includes the burden of complex deployments. DB2 with BLU Acceleration, however, can be easily adopted and is practically “load and go.” This chapter shows how fast and easy it is to get DB2 activated with BLU Acceleration.
Although the examples in this chapter are based on the Cognos “Sample Outdoors Warehouse model,” the commands shown apply to any BLU Accelerated environment.
The following topics are covered:
2.1 BLU Acceleration deployment made easy
The term BLU Acceleration represents several IBM technologies that are deeply integrated with DB2 for Linux, UNIX, and Windows Version 10.5. IBM did not just bolt on a new component. Instead, everything is already included in the DB2 engine so that DBAs or developers do not have to learn a new set of skills. For this reason, setting up, configuring, and using can be easy.
Simply stated, you only need to install DB2 10.5 on the currently supported platforms, either AIX on IBM POWER® or Linux on x86 64-bit, and enable a single configuration parameter to tell DB2 that you will optimize defaults for analytical workload characteristics. Next, you create your database and tables, and load data using common DB2 tools. Such a workload can then immediately benefit from the significant performance boost without the need for SQL syntax or schema changes.
At the center of BLU Acceleration is the column-organized table store. It is combined with actionable compression that operates on a column and page level to save on storage space. The column organization eliminates the need for creating and maintaining secondary indexes and aggregates. In DB2 10.5, both column-organized and traditional row-organized tables can coexist in the same database. For optimal performance, run analytical queries against tables that are all column-organized.
Other new IBM technologies such as data skipping, parallel vector processing, core-friendly parallelism, and scan-friendly memory caching work in sync to make efficient use of hardware resources and to deliver these compelling advances.
2.2 Data environments targeted for analytic workloads
Users with typical data warehouses, data marts, or databases that are dedicated for analytic workloads can benefit most from loading and converting of the entire database schemas that support analytic workloads into BLU Accelerated column-organized tables. These workloads can involve regular analytic reporting queries and business intelligence ad hoc queries. For example, workloads that carry the following characteristics benefit most from BLU Acceleration:
•Analytical, data mart workloads
•Queries that involve grouping, aggregation, range scans, and joins
•Queries that access only subset of columns in a table
•Star or dimensional schemas
•SAP Business Warehouse application workloads (for more information, see Chapter 8, “DB2 with BLU Acceleration and SAP integration” on page 245)
In past client experiences, for databases with purely analytic workloads, immediate query performance and storage improvements are seen after converting the entire database schemas to use BLU Acceleration.
To provide great flexibility, DB2 with BLU Acceleration supports both row-organized and column-organized tables in the same database, schema table spaces, buffer pools, and queries. Some users might choose to load or convert only certain tables to column-organized tables for their own reasons. When tables are selected to convert, we suggest that all tables accessed in join queries be converted to column-organized tables for optimal performance. Otherwise, additional internal casting operations are needed to join row-organized tables and column-organized tables together and can consume unnecessary resources.
|
Tip: Put as many tables as possible into column-organized format for environment with a purely analytics or OLAP workload. This includes typical data marts or data warehouse workloads with extensive range scans, grouping, joins, or aggregation.
|
2.3 Data environments with mixed workloads
DB2 with BLU Acceleration introduces a new, innovative, way to handle mixed workloads. The new shadow table feature takes advantage of BLU Acceleration technologies to eliminate the overhead involved in the traditional handling of mixed workloads, making processing faster, simpler and easier. Instead of maintaining separate systems for transactional and analytic processing, BLU Acceleration Cancun release allows efficient processing for both OLTP and OLAP workloads on the same data. Chapter 3, “Planning and deployment of BLU Acceleration shadow tables for mixed workload environments” on page 53 discusses the deployment and use of shadow tables in greater detail.
For users intending to convert existing tables to facilitate their analytic processing needs in a mixed workload environment, it is suggested to choose the use of BLU Acceleration only on those tables that are purely used for analytics. The db2convert utility converts row-organized tables to column-organized tables, while source tables remain accessible online.
Another database tool, IBM InfoSphere Optim™ Query Workload Tuner for DB2 for Linux, UNIX, and Windows (version 4.1 or later), is extended with an advisor called the Workload Table Organization Advisor (WTOA). With WTOA, users can run analysis of their existing workloads, and get recommendations for tables that are expected to benefit from BLU Accelerated column-organized table storage. The tool virtually tests the conversion of existing row-organized tables to column-organized tables, and provides estimated performance improvement statistics of your workloads to help with easier BLU Acceleration deployment decisions.
We describe more about using Optim Query Workload Tuner and WTOA with DB2 in Chapter 4, “Optim Query Workload Tuner and BLU Acceleration” on page 137.
2.4 Prerequisites
Review the requirements and recommendations when you get ready to deploy DB2 with BLU Acceleration.
2.4.1 DB2 system requirements
The BLU Acceleration feature in DB2 10.5 is supported on the AIX and Linux x86 (Intel and AMD) platform using 64-bit hardware. It shares the same DB2 10.5 minimum operating system requirements.
For the most recent information about DB2 system requirements, consult the general documentation at the following location:
Hardware for DB2 with BLU Acceleration
As of this writing, we suggest the hardware and operating systems for DB2 with BLU Acceleration as shown in Table 2-1. The processors supported in DB2 10.5 are also supported for BLU Acceleration. The processors listed in the table include specific hardware optimizations that BLU Acceleration can benefit from.
Table 2-1 Hardware and platforms suggested for DB2 with BLU Acceleration
|
Operating
system |
Minimum version requirement
|
Version to use
|
Hardware suggested
|
|
AIX
|
•AIX 6.1 TL7 SP6
•AIX 7.1TL1 SP6
|
• AIX 7.1 TL2 SP1 or later
|
IBM POWER7® or later
|
|
Linux x86 64-bit
|
•Red Hat Enterprise Linux (RHEL) 6
•SUSE Linux Enterprise Server (SLES) 10 SP4
•SLES 11 SP2
|
•RHEL 6.3 or later
•SLES 11 SP2 or later
|
Intel Nehalem (or
equivalent) or later
|
2.4.2 DB2 license requirements and functionality
DB2 for Linux, UNIX, and Windows Version 10.5 is available in multiple product editions, each including a different number of features and providing functionality that we describe in this section.
In terms of required license entitlements, the BLU Acceleration feature includes the following DB2 10.5 editions for production environments:
•Advanced Enterprise Server Edition (AESE)
•Advanced Workgroup Server Edition (AWSE)
Non-production environments can use the following DB2 10.5 edition that also entitles the use of BLU Acceleration:
•Developer Edition (DE)
DB2 Advanced Enterprise Server Edition (AESE)
This is the premier DB2 product edition with the largest set of features. It can be characterized as follows:
•Suitable for transactional, warehouse, and mixed workloads
•No processor, memory, or database size limits
•Provides all features from DB2 Enterprise Server Edition plus column-organized tables, in-memory database, data compression, workload management, replication, and distributed partitioning capability
•Available on either a Processor Value Unit or per Authorized User Single Install pricing model
For more information, see the following web page:
DB2 Advanced Workgroup Server Edition (AWSE)
This DB2 edition is similar to the DB2 Advanced Enterprise Server Edition, but applies resource limits:
•Data server of choice for deployment in a departmental, workgroup, or medium-sized business environment
•Limits on processor (16 cores), memory (64 GB), and database size (15 TB)
•Available on either a Processor Value Unit or per Authorized User Single Install pricing model
For more information, see the following web page:
DB2 Developer Edition (DE)
This edition is suitable for a single application developer for the purpose of designing and implementing applications for deployment on any of the IBM Information Management client or server platforms. It is characterized as follows:
•For non-production development use only
•Includes all the DB2 server editions, IBM DB2 Connect™ Enterprise Edition
•Requires a user license for each Authorized User of this product
For more information, see the following web page:
Other DB2 product editions
For other DB2 product editions with descriptions of functionality and features, see the following web page:
http://pic.dhe.ibm.com/infocenter/db2luw/v10r5/topic/com.ibm.db2.luw.licensing.doc/doc/c0058536.html
2.4.3 Capacity planning
DB2 with BLU Acceleration is optimized for parallel vector processing using single-instruction, multiple-data (SIMD) architecture while exploiting physical attributes of multi-core processors, and to efficiently use large memory configurations.
For production environments, the general suggestion is to use a minimum of eight processor cores with 8 GB of main memory per core. For high concurrency environments, increase the main memory to16 GB per core. We suggest maintaining the main memory-to-processor core ratio when adding more processors as demanded by a growing workload with a higher query complexity and with increasing data volumes.
An essential measurement in sizing the memory that BLU Acceleration uses for a workload is the amount of raw active data. This value does not describe the total database size, but does describe the amount of required data frequently needed for processing active queries.
Although DB2 with BLU Acceleration does not require all active data to fit in memory, it can process queries faster with more data to keep in memory while not having to wait for synchronous, physical reads from the storage system. Based on the estimated raw active data size combined with the levels of concurrency and query complexity, a sizing decision can be made regarding how much memory and how many processor cores to accommodate for.
You can approach the estimation of the raw active data size by two steps:
1. Calculate the uncompressed table sizes of frequently accessed tables.
2. Narrow the number from step 1 to the percentage of rows and columns actually accessed.
For example, if you have a total of four years of sales data in the analytics database, and your reports usually query the last year of data, then frequently accessed table data is 1/4 (25%) of the total database size. At the same time, not all columns might be accessed by the queries. By using column-organized tables, BLU Acceleration does not have to read or look at columns that are not in the queries. Both the accessed column and row data gives an approximate percentage of the active table data, the raw active data size.
A first rough estimate for this indicator can be taken from the raw size of your comma-separated value (CSV) load files. If the data is already loaded, you can use the sizes of the used table spaces as a starting point. Alternatively, you can list the table sizes using the SQL query as shown in Example 2-1. Note that the query returns most accurate results with updated table statistics.
Example 2-1 Raw data size calculation of existing DB2 tables
select sum(a.fpages * (1.0/(1.0 - (cast(a.pctpagessaved as
decimal(5,2))/100))) * c.pagesize/1024/1024/1024) as
uncompressed_table_data_GB
FROM
syscat.tables a, syscat.datapartitions b, syscat.tablespaces c
WHERE
a.tabschema not like 'SYS%' AND
a.tabschema = b.tabschema AND
a.tabname = b.tabname AND
b.datapartitionid = 0 AND
b.tbspaceid = c.tbspaceid
More information about sizing system resources is in Best practices: Optimizing analytic workloads using DB2 10.5 with BLU Acceleration, at this location:
2.4.4 Storage requirements
There is no special storage requirement for DB2 with BLU Acceleration. A general suggestion is to store column-organized tables on storage systems with good random read and write I/O performance. This notably helps in situations where active table data exceeds the main memory available to DB2 or when temporary tables are populated during query processing.
In these situations, the following storage types can be of benefit:
•Solid-state drives (SSDs)
•Enterprise SAN storage systems
•Flash-based storage with write cache
The following IBM storage systems exhibit good random I/O characteristics:
•IBM FlashSystem™ 810, 820, and 840
•IBM Storewize V7000 (loaded with SSDs)
•IBM XIV® storage system
•IBM DS8000® Series
2.5 Deployment
This section describes and demonstrates the activation of DB2 with BLU Acceleration in new or existing DB2 databases. We assume that an installation of a standard DB2 product with required prerequisites exists and an instance in a current or previous version already exists.
2.5.1 Single tuning parameter for analytical workloads
To enable BLU Acceleration, a single registry variable, DB2_WORKLOAD=ANALYTICS, is required. Setting this registry variable to ANALYTICS informs DB2 that the database is used for analytic workloads. It automatically configures relevant configuration parameters to optimize existing hardware capacity and performance of analytic workloads. For example, when recommended settings are auto-configured on a database, intraquery parallelism is enabled (to use multi-core parallelism) and the default table organization (DFT_TABLE_ORG) is set to COLUMN. Utility heap is set to AUTOMATIC. Other relevant sort parameters are set to a higher value to optimize the existing hardware. Automated workload management is BLU-aware, optimizing server utilization for analytics concurrency. Last but not least, automatic space reclamation is enabled.
For details of the database behavior that is affected by DB2_WORKLOAD=ANALYTICS, see 2.6.1, “Changes applied with DB2_WORKLOAD=ANALYTICS” on page 31. This single-touch automatic database tuning saves effort from manual settings.
For the DB2_WORKLOAD registry parameter to become active, the DB2 instance must be restarted after setting DB2_WORKLOAD=ANALYTICS. As part of a new database creation process, the configuration advisor automatically applies all required BLU Acceleration settings to optimize analytic workloads. Optionally, this can also be applied explicitly through the AUTOCONFIGURE keyword as part of the database creation. For existing databases, analytics-optimized settings can be applied through a separate AUTOCONFIGURE statement. More details are explained in 2.5.4, “Existing database deployments” on page 28.
If for any reason you do not want to use the single-touch, instance-level parameter DB2_WORKLOAD=ANALYTICS (for example when using multiple databases within the same instance and for different purposes, or when running a mixed workload against the same database with significant transactional queries happening at the same time), see 2.6, “Configuration preferred practices for BLU Acceleration deployment” on page 31 for parameters that you might want to set manually to best suit your environment.
|
Preferred practice: Create each BLU Accelerated database in its own separate instance.
The configuration change suggested by the AUTOCONFIGURE option, which is also called Configuration Advisor, accounts for only one database per instance. This means multiple databases should be put into separate instances to be more independent when using auto-configure to tune initial database manager and database configuration parameters.
|
For more information about this topic, see the “Column-organized tables” information in the IBM Knowledge Center:
2.5.2 New database deployments
This section describes the steps to create a new BLU Accelerated database. In a typical scenario for analytical workloads, a DB2 instance holds a single database. We suggest assigning the majority of the instance memory to this database.
If you intend to have a BLU-enabled database and other non-analytics databases within the same instance, see 2.5.3, “Multiple mixed-workload databases in a single instance” on page 27.
When you create a new database, create it with a UNICODE code set, IDENTITY collation, and automatic storage management. These are the default settings and do not need to be specified explicitly.
By default, the configuration advisor is run automatically and assigns up to 25% instance memory for the database when a new database is created. Example 2-2 overwrites this default through the autoconfigure keyword with using mem_percent 80, which assigns 80% of the instance memory to this single active database in the instance. The AUTOCONFIGURE keyword also recommends the enablement of Self Tuning Memory Manager (STMM), allowing various database memory parameters to adjust to workload requirement as needed. At the same time, AUTOCONFIGURE applies all tuning parameters to the instance and to the database (APPLY DB AND DBM). Then, the new database is optimized for analytic workloads based on available hardware. At this point, you can start creating and loading your tables as listed in this example.
Example 2-2 Activating BLU Acceleration in a new database
db2set DB2_WORKLOAD=ANALYTICS
db2stop
db2start
db2 CREATE DB GS_DB ON /dbpath/gs_db AUTOCONFIGURE USING mem_percent 100 APPLY DB AND DBM
db2 CONNECT TO GS_DB
db2 CREATE TABLE GOSALESDW.EMP_SUMMARY_FACT (...)
db2 LOAD FROM EMP_SUMMARY_FACT.DEL OF DEL REPLACE INTO GOSALESDW.EMP_SUMMARY_FACT
If you have existing table and object creation DDL statements from an existing data warehouse, you can reuse them without making changes to the table creation statements. With the DB2_WORKLOAD=ANALYTICS registry variable set and one of its underlying settings DFT_TABLE_ORG=COLUMN in effect, all tables are created as column-organized tables by default.
Having said that, both column and row organization tables can coexist in the same database and even in the same table space. The new CREATE TABLE statement includes a new ORGANIZE BY keyword. It allows tables to be created with an explicit definition of either ORGANIZE BY ROW or ORGANIZE BY COLUMN. This easily overrides the value assigned to the DFT_TABLE_ORG parameter.
After all the tables are created, you can start loading tables. No new syntax of data loading is required, as demonstrated in Example 2-2.
For more detail about creating column-organized table and loading data, see 2.6.3, “Creating column-organized tables” on page 35 and 2.6.4, “Using insert and ingest with column-organized tables” on page 38.
2.5.3 Multiple mixed-workload databases in a single instance
Although the preferred practice is to create a BLU-accelerated database in its own instance, it is possible to create and enable a BLU database in an instance that has multiple databases, if required. This section demonstrates how to create a new database with BLU Acceleration to optimize analytic workloads while keeping other existing or future non-analytics databases in the same instance untouched.
DB2_WORKLOAD is an instance-level registry variable. When set to ANALYTICS, it enables intra-partition parallelism because BLU Acceleration requires these parallelism settings to process. If more than one database is in the same instance and not all of the databases are intended for analytic workloads, you can follow Example 2-3 to create an analytics database while allowing other databases to use their own separate configuration for memory and intra-partition parallelism.
In this example, we first set the DB2_WORKLOAD=ANALYTICS single-touch registry variable and create a new database that optimizes the settings for analytic workloads. The procedure shown in Example 2-3 includes an ALTER WORKLOAD statement. It enables the maximum degree of parallelism equivalent to a DFT_DEGREE with a value of ANY to enable intra-partition parallelism. Then, unsets the DB2_WORKLOAD instance-level registry variable and restarts the instance, so that this parameter does not affect other databases in the same instance.
Example 2-3 Mixing BLU-accelerated and non-analytics databases in a single instance
db2set DB2_WORKLOAD=ANALYTICS
db2stop
db2start
db2 CREATE DB GS_DB ON /dbpath/gs_db AUTOCONFIGURE APPLY DB ONLY
db2 CONNECT TO GS_DB
db2 ALTER WORKLOAD sysdefaultuserworkload MAXIMUM DEGREE 32767
db2set DB2_WORKLOAD=
db2 TERMINATE
db2stop
db2start
db2 CONNECT TO GS_DB
db2 CREATE TABLE GOSALESDW.EMP_SUMMARY_FACT (...)
db2 LOAD FROM EMP_SUMMARY_FACT.DEL OF DEL REPLACE INTO GOSALESDW.EMP_SUMMARY_FACT
2.5.4 Existing database deployments
An existing DB2 10.5 database installed on a single node and using the required settings of UNICODE code set and IDENTITY collation can be optimized for BLU Acceleration. There is no method for changing the code set and collation of an existing database. If you have an existing database with a different code set or collation, see 2.5.2, “New database deployments” on page 26 for steps to create a new database with the correct code set and collation to take advantage of BLU Acceleration.
For deployment, we suggest using the latest fix pack. At the time of this writing, the latest fix pack is Fix Pack 4 (Cancun release). Check the following link for the latest available fix pack level:
If you are currently using a major release earlier than 10.5, follow the steps in 2.5.5, “Upgrade from a previous release to DB2 10.5” on page 30 to upgrade DB2 to the suggested version.
Example 2-4 shows the commands to activating the BLU Acceleration in an existing database. The first step is to set optimal defaults for analytical workloads using the single-touch DB2_WORKLOAD registry variable. Then, restart the DB2 instance. The tuning parameters behind the DB2_WORKLOAD registry variable become active only at database creation or when manually applying it using the autoconfigure statement. The assumption for this example is an already created database, so we specify the autoconfigure command explicitly.
Example 2-4 Activating BLU Acceleration in an existing database
db2set DB2_WORKLOAD=ANALYTICS
db2stop
db2start
db2 connect to GS_DB
db2 alter workload sysdefaultuserworkload maximum degree default
db2 autoconfigure apply db only
|
Note: Use db2 autoconfigure apply db only to apply analytics-optimized settings to the current database without affecting other databases in the same instance.
|
Converting table spaces to automatic storage management
BLU Acceleration provides simplicity and allows column-organized tables to coexist with row-organized tables in existing table spaces. With computing trends toward autonomics, BLU Acceleration only works with automatic storage table spaces.
If your database is not already using automatic storage management, you can now create a new table space, or convert and rebalance existing table spaces. Example 2-5 also shows the creation of a new table space. Note that the new table space creation statement is using the generally suggested page size and extent size for BLU Acceleration.
Example 2-5 Creating a new automatic storage table space
db2 CREATE TABLESPACE newtbsp PAGESIZE 32 K EXTENTSIZE 4
Example 2-6 shows the conversion of an existing table space to use automatic storage management.
Example 2-6 Converting table spaces to automatic storage management
db2 CREATE STOGROUP ibmcolstogrp ON ‘/data1’ SET AS DEFAULT
db2 ALTER TABLESPACE oldtbsp MANAGED BY AUTOMATIC STORAGE
db2 ALTER TABLESPACE oldtbsp REBALANCE
Converting a row-organized table to column-organized
Existing tables created traditionally with row organization can be converted using the db2convert tool shown in Example 2-7. You can find more preferred practices considerations on converting row-organized tables to column-organized tables stored in newtbsp, the newly created table space, in Example 2-5.
Example 2-7 Converting a row-organized table to column-organized
db2convert –d GS_DB -z GOSALESDW -t EMP_SUMMARY_FACT -ts newtbsp
Creating and loading new tables
The LOAD command syntax and input data source for loading column-organized tables do not differ compared to loading data into row-organized tables. Column-organized data loading takes the same sources in row-organized files, such as delimited files.
Example 2-8 shows how to create and load a new table.
Example 2-8 Populating new tables in an existing database
db2 "CREATE TABLE GOSALESDW.EMP_SUMMARY_FACT (...)"
db2 LOAD FROM EMP_SUMMARY_FACT.DEL OF DEL REPLACE INTO GOSALESDW.EMP_SUMMARY_FACT
With BLU Acceleration, column-organized tables are always compressed through the use of column-level and page-level compression dictionaries. Both are used transparently to map frequently occurring patterns to shorter symbols. Additionally, less space is typically required compared to row-organized tables as there is no need for indexes and aggregates.
When loading data into column-organized tables using an initial LOAD operation the incoming data is scanned and a compression dictionary is built for each column based on a histogram analysis. The dictionaries are then used to reduce the number of pages needed to store the same amount of data. This initial load employs the new Analyze load phase specific to column-organized tables.
Subsequent LOAD operations, INGEST operations and regular table INSERTs add page-level compression dictionaries to further compress data by exploiting new data patterns not found in the data used to populate the table initially.
When using a single load operation, metadata is created (synopsis tables and constraints). Also, statistics are collected automatically within the process. DBAs do not need to run RUNSTATS after loading data into column-organized tables.
2.5.5 Upgrade from a previous release to DB2 10.5
Upgrading from the previous version of DB2 release to DB2 10.5 requires the database to already be using a UNICODE code set and IDENTITY collation. If this is not the case, a new database must be created after the DB2 instance is upgraded to DB2 10.5 and activated for BLU Acceleration.
Use the following steps to upgrade an existing database:
1. Run the db2chkupgrade tool to verify if existing GS_DB101 database can be upgraded:
db2ckupgrade GS_DB101 -l db2ckupgrade.log
2. Upgrade the db2inst1 DB2 instance by using the db2iupgrade utility:
db2iupgrade db2inst1
3. Upgrade the databases by using one of the following methods:
– In-place upgrade using the UPGRADE DATABASE command:
db2 UPGRADE DATABASE GS_DB101 REBINDALL
– If you do not choose to upgrade the database in place, you can restore a database from a DB2 backup image taken from an older DB2 release. This can be accomplished using the following RESTORE command. As part of the database restore, the database is then automatically upgraded to the DB2 10.5 level.
db2 RESTORE DATABASE GS_DB101 FROM /backups TAKEN AT 2014XXXXXXXXXX
4. Now, the database can be activated for BLU Acceleration. Follow the same steps described in 2.5.4, “Existing database deployments” on page 28.
2.6 Configuration preferred practices for BLU Acceleration deployment
This section explains some preferred practices for BLU Acceleration deployment.
2.6.1 Changes applied with DB2_WORKLOAD=ANALYTICS
When activating DB2 with BLU Acceleration by setting the single aggregate DB2 registry parameter, DB2_WORKLOAD to ANALYTICS, this new value causes the configuration advisor (AUTOCONFIGURE) to optimize various parameters for analytics workloads as listed:
•Database parameters:
– DFT_DEGREE=ANY
– DFT_TABLE_ORG=COLUMN
– PAGESIZE=32768
– DFT_EXTENT_SZ=4
– SORTHEAP= [higher than default optimized for current hardware; self-tuning disabled]
– SHEAPTHRES_SHR=[higher than default optimized for current hardware; self-tuning disabled]
– UTIL_HEAP_SZ=AUTOMATIC (and at least 1 000 000 pages)
– CATALOGCACHE_SZ=[higher than default optimized for current hardware]
– AUTO_REORG=ON
•Workload management (WLM) objects:
– Work Action SYSMAPMANAGEDQUERIES=Y
– SYSDEFAULTMANAGEDSUBCLASS Service Subclass is enabled
– SYSDEFAULTCONCURRENT threshold = [value optimized for current hardware]
DFT_DEGREE=ANY
BLU Accelerated databases require intra-partition parallelism to be enabled. When configuring DB2_WORKLOAD=ANALYTICS, all incoming connections to a database are implicitly enabled with intra-partition parallelism, which is controlled through a workload management database object (WLM). This mechanism operates independently from the INTRA_PARALLEL instance-wide configuration parameter. Intra-partition parallelism allows DB2 to divide single database operations into multiple parts that can be executed in parallel threads on multiple processor cores.
Every new database (with or without DB2_WORKLOAD=ANALYTICS set) includes the same standard WLM object, a workload definition that is named SYSDEFAULTUSERWORKLOAD. All database connections are, by default, routed through this workload definition that applies certain attributes to the connections.
One of the attributes for the WLM object is MAXIMUM DEGREE DEFAULT. In this context, DEFAULT instructs DB2 to use a default value for the degree of parallelism. With DB2_WORKLOAD=ANALYTICS set, this directly translates into intra-partition parallelism to be enabled. When DB2_WORKLOAD is not set, intra-partition parallelism is disabled. If DB2_WORKLOAD is not set or if it is set to a value other than ANALYTICS, intra-partition parallelism can still be enabled on a per database level by altering SYSDEFAULTUSERWORKLOAD, as shown in Example 2-3 on page 27.
With intrapartition parallelism, the SQL optimizer can choose the degree of query parallelism based on the configured maximum degree. The degree of parallelism can be controlled on an instance level using the databases manager configuration parameter MAX_QUERYDEGREE, which by default, is set to ANY (numerical value of -1). On a database level, the degree of parallelism can be further controlled through the database parameter DFT_DEGREE, which by default is set to 1 and with DB2_WORKLOAD=ANALYTICS set to ANY (numerical value of -1). In addition, the degree can be controlled using the CURRENT DEGREE register or through binding the application with a specific value.
At run time, you can use the SET RUNTIME DEGREE command. An application can also use the stored procedure ADMIN_SET_INTRA_PARALLEL to enable or disable parallelism for its connection beginning with the next transaction.
For more details about managing and controlling intra parallelism, either instance wide or on a per statement level, see the DB2 10.5 documentation:
DFT_TABLE_ORG=COLUMN
The DFT_TABLE_ORG=COLUMN setting switches the default table organization to be implicitly organized by columns versus rows. An ORGANIZED BY [ROW | COLUMN] keyword in the CREATE TABLE statement syntax can be used to override that default.
PAGESIZE=32768 and DFT_EXTENT_SZ=4
As suggested for BLU Acceleration, the database-wide default parameters have the following settings:
•The page size (PAGESIZE) is set to 32 KB.
•The extent size (DFT_EXTENT_SZ) is set to 4 pages.
These settings are assumed by DB2 if they are not specified during the creation of table spaces or buffer pools.
SHEAPTHRES_SHR, SORTHEAP, and CATALOGCACHE_SZ
The database memory parameters CATALOGCACHE_SZ, SORTHEAP, and SHEAPTHRES_SHR are set to a value that is higher than the default and optimized for the hardware in use. Self-tuning must be disabled for both SHEAPTHRES_SHR and SORTHEAP. In addition, SHEAPTHRES database manager configuration parameter must be set to a value of 0 so that all sort memory consumers for the database is determined by the SHEAPTHRES_SHR value instead of private sort memory.
UTIL_HEAP_SZ=AUTOMATIC
To assist the build process of the compression dictionary during table load operations, UTIL_HEAP_SZ should be set to at least 1 000 000 pages and AUTOMATIC.
AUTO_REORG=ON
Automatic space reclamation is performed for column-organized tables and applies to BLU by setting the database parameters AUTO_MAINT=ON and AUTO_REORG=ON.
Automatic workload management
Several other WLM objects are created and set to maximize throughput in your database on your hardware to process every running query when many large analytic type queries are submitted. For workload management in a BLU Acceleration environment, see 6.6, “Workload management” on page 205.
2.6.2 Memory distribution
In DB2 10.5 with BLU Acceleration, specifically after the auto-configure operation is applied (DB2_WORKLOAD=ANALYTICS), specific sort memory parameters are set to a fixed value and must be tuned manually. To achieve dramatic performance improvements for analytic workloads, BLU Acceleration use a set of innovative algorithms to join and group column-organized data in extremely fast manner. These algorithms utilize hashing techniques, which requires sort memory to process. Typically, because of the nature of analytics queries, sort memory becomes more important because more complex queries often require more working memory. The following operations commonly require sort memory:
•Hash joins
•Block index AND’ing
•Merge joins
•Dynamic bitmaps (used for index ANDing and star joins)
•Partial early distinct operations
•Partial early aggregation operations
•Hashed GROUP BYs
•Columnar vector buffering
In terms of sort memory parameters, we first look at the database-specific parameter, SHEAPTHRES_SHR, which defines the total amount of database shared memory that can be used by operations using sort memory (when the SHEAPTHRES database manager configuration parameter is set to 0). The SORTHEAP database parameter configures how much of that overall memory (SHEAPTHRES_SHR) DB2 can be dedicated to each of these operations.
For workloads that exhibit lower query concurrency (less than 20 concurrent queries), we suggest using the DB2_WORKLOAD=ANALYTICS autoconfigured distribution of memory, which is as much memory for buffer pools as for sort memory with a total of approximately 80% of the available database memory. This means half of that memory, about 40% of the total database memory, should be made available to sort memory, which can be set through the SHEAPTHRES_SHR database configuration parameter. Then, the other half of that memory should be allocated to those buffer pools that are frequently accessed by the queries of your workload.
You can look up the available database memory through the DATABASE_MEMORY database configuration parameter. However, this memory can possibly be increased to the value of the INSTANCE_MEMORY database manager configuration parameter, which specifies the global memory available to all databases in the same DB2 instance. Keep in mind that if you are currently in a development or testing phase without a workload constantly running, the self-tuning memory manager might have tuned down the memory allocation for the database (DATABASE_MEMORY). In this case, more unused memory is likely available that should be considered as available database memory.
With increasing query concurrency, the suggestion is to manually tune the database configuration by decreasing the total buffer pool memory in favor of sort memory (SHEAPTHRES_SHR), because queries likely benefit from increased sort memory. Consider this example:
•Set 40% of available database memory to SHEAPTHRES_SHR, and 40% to buffer pool for less than 20 concurrent workloads.
•Set 50% of available database memory to SHEAPTHRES_SHR, and lower buffer pool to 25% for higher concurrency.
Further testing and tuning should be made depending on your own workloads and requirements.
If not enough overall sort memory is available, your workload may benefit additionally from reducing the memory heap (database configuration parameter SORTHEAP) that is available to each operation requiring sort. Typical SHEAPTHRES_SHR:SORTHEAP ratio usually lies between 1:5 to 1:20. Examples of SHEAPTHRES_SHR and SORTHEAP ratios are as follows:
•Set SORTHEAP to a value of (SHEAPTHRES_SHR/5) for low concurrency
•Set SORTHEAP to a value of (SHEAPTHRES_SHR/20) for higher concurrency
Using these examples as baseline, further adjustments should be made depending on your own workloads and environment.
Analytic queries are often more complex and can take advantage of higher than default memory values for STMTHEAP, which defines how much heap memory is available during the statement preparation. If you see queries returning SQL0437W with reason code 1, STMTHEAP should be increased by 50% in the tuning steps.
2.6.3 Creating column-organized tables
Creating a column-organized table is straightforward. Existing DDL statements to create tables can remain the same if the database is created or autoconfigured with DB2_WORKLOAD=ANALYTICS enabled. The reason is that the default table organization setting (DFT_TABLE_ORG database parameter) was set to COLUMN.
This means, when it is not explicitly specified, CREATE TABLE creates new tables in column-organized format by default. To create a row-organized table in such a configured database, specify the ORGANIZED BY ROW clause in your CREATE TABLE statement. Column-organized tables are created in automatic storage table spaces.
This means, when it is not explicitly specified, CREATE TABLE creates new tables in column-organized format by default. To create a row-organized table in such a configured database, specify the ORGANIZED BY ROW clause in your CREATE TABLE statement. Column-organized tables are created in automatic storage table spaces.
Optional: Table space setup
As of DB2 9.1, databases are created by using automatic storage, by default. Many new autonomic DB2 features, going forward, are supported only on automatic storage, as are column-organized tables.
DB2 includes a default large table space, called USERSPACE1, for storing user-defined data and objects. This can be sufficient for test environments. However, for users who are looking to deploy BLU Acceleration in production and for better manageability, we suggest organizing your data in your own table spaces.
Creating an automatic storage table space is simple. Example 2-9 shows a command to create a new automatic storage table space. For column-organized tables, we suggest using 32 K page size and an extent size of 4 pages. This suggestion is already part of the default settings when the database is created in analytics mode; therefore no extra option is needed.
Example 2-9 Creating an automatic storage table space
db2 create tablespace GOSALES_COLTS
|
Tip: Keep your fact tables and dimension tables in separate table spaces to maximize performance and manageability. For instance, with fact tables in their own table spaces, storage groups, and buffer pools, you can independently manage your backup and restore of fact tables.
|
CREATE TABLE statement
When creating tables, the ORGANIZE BY clause can be used to explicitly specify the table organization you want. For existing DB2 users, you can optionally use the db2look utility to generate a DDL script. For example, you can explicitly define specific tables in either format despite the default organization format configured with DFT_TABLE_ORG.
You can create a new column-organized table using CREATE TABLE. Because the table organization is defaulted to COLUMN when DB2_WORKLOAD=ANALYTICS, specifying the ORGANIZE BY clause in the statement is not required. In Example 2-10 on page 37, we create a column-organized table in GOSALES_COLTS using the CREATE TABLE statement. The ORGANIZE BY COLUMN clause here is purely optional as the database was configured for an ANALYTICS workload.
Example 2-10 CREATE TABLE statement
CREATE TABLE GOSALESDW.EMP_SUMMARY_FACT (
ORGANIZATION_KEY INTEGER NOT NULL,
EMPLOYEE_KEY INTEGER NOT NULL,
SALARY DECIMAL(19,2) NOT NULL,
VACATION_DAYS_TAKEN DOUBLE NOT NULL)
IN GOSALES_COLTS
ORGANIZE BY COLUMN;
|
Tip: Put as many tables as possible into column-organized format for an environment with a purely analytics or OLAP workload. This includes typical data marts or data warehouse workloads with extensive range scans, grouping, joins, or aggregation.
|
INDEX IN clause
As with row-organized tables, it is a common database preferred practice to keep indexes in their own table spaces. In BLU Acceleration, no user-defined indexes are required, but it is possible to define informational primary key or unique constraints as they can be beneficial to the query optimizer. Informational (not enforced) keys require less storage and time to create. Also, all index objects in BLU Acceleration are maintained by DB2 automatically, without a DBAs intervention.
|
Tip: Take advantage of not enforced key constraints in your environment. Keep indexes in separate table spaces.
|
Users who have primary keys or unique constraints in their tables can optionally group index objects in a separate table space by using the INDEX IN clause, as demonstrated in Example 2-11.
Example 2-11 CREATE TABLE statement with keys
CREATE TABLE GOSALESDW.MRK_PRODUCT_SURVEY_FACT (
BRANCH_KEY INTEGER NOT NULL,
PRODUCT_KEY INTEGER NOT NULL,
PRODUCT_SURVEY_KEY INTEGER NOT NULL
PRODUCT_TOPIC_SCORE DOUBLE
PRIMARY KEY (PRODUCT_KEY) )
IN GOSALES_COLTS INDEX IN GOSALES_IDXTS
ORGANIZE BY COLUMN;
2.6.4 Using insert and ingest with column-organized tables
DB2’s user interfaces for adding data to column-organized tables are identical to the traditional row-organized tables. While initial LOAD operations on empty tables create column-level compression dictionaries to compress data, subsequent LOADs, table inserts, and inserting data using the INGEST utility in addition create page-level compression dictionaries automatically to further improve compression rates on column-organized tables. The following examples merely demonstrate the usual user interface known for loading data into row-organized tables.
Example 2-12 shows an example for an insert on a column organized table and how to verify the number of pages used with the percentage of pages saved with page-level compression dictionary.
Example 2-12 Insert into a column-organized table creates page-level dictionary
CREATE TABLE "DB2BLU "."FLIGHTS" (
"origin_airport" VARCHAR(5 OCTETS) NOT NULL ,
"destination_airport" VARCHAR(5 OCTETS) NOT NULL ,
"flights" BIGINT NOT NULL ,
"passengers" BIGINT ,
"month" BIGINT )
IN "USERSPACE1"
ORGANIZE BY COLUMN;
[db2blu@db2pure06 scripts]$ db2 "INSERT INTO FLIGHTS_INSERT SELECT * FROM FLIGHTS"
[db2blu@db2pure06 ~]$ db2 runstats on table FLIGHTS_INSERT
with distribution on all columns and detailed indexes all;
[db2blu@db2pure06 scripts]$ db2 -tvf page_level_dict_check.sql
SELECT substr(tabschema,1,20) AS TABSCHEMA, substr(tabname,1,20) AS TABNAME,CARD,NPAGES,PCTPAGESSAVED FROM SYSSTAT.TABLES WHERE TABSCHEMA='DB2BLU'
TABSCHEMA TABNAME CARD NPAGES PCTPAGESSAVED
-------------------- -------------------- -------------------- -------------------- -------------
DB2BLU FLIGHTS 3606803 719 87
DB2BLU FLIGHTS_INSERT 3606803 1294 68
In Example 2-13 on page 39, the same operation is done using ingest instead of insert. It is possible to check how the table benefits from page-level compression with a lower number of pages and 70% percent of pages saved with this compression technique.
Example 2-13 Ingest into a column-organized tables creates page-level dictionary
[db2blu@db2pure06 ~]$ db2 "ingest from file flights_with_colnames.csv format delimited insert into FLIGHTS_INGEST"
SQL2979I The ingest utility is starting at "14/08/2014 22:49:07.780995".
SQL2914I The ingest utility has started the following ingest job:
"DB21005:20140814.224907.780995:00002:00020".
Number of rows read = 3606803
Number of rows inserted = 3606803
Number of rows rejected = 0
SQL2902I The ingest utility completed at timestamp "14/08/2014
22:49:23.514394". Number of errors: "0". Number of warnings: "0".
[db2blu@db2pure06 ~]$db2 runstats on table FLIGHTS_INSERT
with distribution on all columns and detailed indexes all;
[db2blu@db2pure06 scripts]$ db2 “SELECT substr(tabschema,1,20) AS TABSCHEMA, substr(tabname,1,20) AS TABNAME,CARD,NPAGES,PCTPAGESSAVED FROM SYSSTAT.TABLES WHERE TABSCHEMA='DB2BLU'”
TABSCHEMA TABNAME CARD NPAGES PCTPAGESSAVED
-------------------- -------------------- -------------------- -------------------- -------------
DB2BLU FLIGHTS 3606803 719 87
DB2BLU FLIGHTS_INGEST 3606803 1474 70
DB2BLU FLIGHTS_INSERT 3606803 1294 68
2.6.5 Converting tables to column-organized tables
By using the db2convert tool included in DB2 10.5, the tables that are originally created in row-organized tables can be directly converted in an automated fashion. The db2convert tool uses the ADMIN_MOVE_TABLE stored procedure to move data between the source table and a target table that it automatically defines as column-organized. During this operation, it removes unnecessary objects such as indexes and materialized query tables (MQTs). User-defined tables can be selected for the conversion process by using the following criteria:
•Single tables (-t parameter)
•All tables created by a specific user (-u parameter)
•All tables associated with a particular schema (-z parameter)
•All tables in the database (-d parameter).
Alternatively, a target table space that differs from the source can be specified using the -ts parameter.
Example 2-14 through Example 2-17 demonstrate these parameters.
Example 2-14 Converting an existing user-defined table to column-organized format
$ db2convert -d GS_DB -z GOSALESDW -t EMP_SUMMARY_FACT
Example 2-15 Converting all tables created by user martin in different table space
$ db2convert -d GS_DB -u martin -ts coltbsp
Example 2-16 Converting all user-defined tables in a given schema
$ db2convert -d GS_DB -z GOSALESDW
Example 2-17 Converting all user-defined tables in a database
$ db2convert -d GS_DB
For more information about db2convert, see the following resource:
http://pic.dhe.ibm.com/infocenter/db2luw/v10r5/topic/com.ibm.db2.luw.admin.cmd.doc/doc/r0060728.html
2.7 Configuration preferred practices for HADR
This section explains some general preferred practices for deploying HADR, including deploying HADR for column-organized tables.
2.7.1 Column-organized tables now support high availability and disaster recovery
DB2 High Availability and Disaster Recovery (HADR) has been available for a long time and it offers an effortless solution for high availability (HD) and disaster recovery (DR) for your DB2 database. Now the DB2 Cancun Release 10.5.0.4 release extends the HADR feature to column-organized tables.
HADR works in the same way with column-organized tables as with row-organized tables and it supports the same functionality and synchronization modes. In this section, we describe how HADR in DB2 works and how it is configured.
Introduction
Whether you are looking to make your database highly available or ready for disaster recovery, HADR is the DB2 feature to use. HADR ships database transaction logs at runtime between a primary database and a standby database. The standby database receives logs from the primary database and replays these logs in real time to keep the standby database in sync with the primary database.
Easy setup
To set up HADR, you can simply use a backup image from the primary HADR database to establish a standby HADR database. The configuration for HADR is also fairly simple as all is done on the database configuration parameters. After you have the necessary configuration updated and the backup restored on the standby database, you can start the HADR with one of the four synchronization modes available:
•SYNC
•NEARSYNC
•ASYNC
•SUPERASYNC
Roles
In a high availability and disaster recovery scenario, an HADR setup has different types of roles for each mode according to the context of each database server.
The basic HADR scenario has two databases on two database servers. The source database, where applications are connecting to, is known as the primary database. The target database, where transaction logs coming from the primary database are applied, is known as the standby database. As its name says, the role of the target database is to be in synchronization with the primary database. in case of a disaster recovery or just a failure on the primary database, the standby server can become active and applications can seamlessly connect to it.
In addition to this basic scenario, HADR also allows to have additional standby databases for higher availability and for reporting purposes. In a multiple standby mode, it is possible to have up to three standby databases. One of these is the principal HADR standby database and any other standby database is known as the auxiliary standby.
2.7.2 Column-organized tables and HADR synchronization modes
Users can decide the level of protection from potential loss of data by specifying one of the four HADR synchronization modes:
•Synchronous (SYNC)
This mode provides the greatest protection against transaction loss and it also has the longest transaction response time when compared to the other three modes.
Log write is considered successful only when the data is written on the primary log after receiving an acknowledgement to confirm that it is also written to the log files of the standby database. In this mode, there can be no data loss while HADR is in Peer state.
•Near-synchronous (NEARSYNC)
This is the default mode for an HADR set up. This mode provides a shorter transaction response time compared to the synchronous mode but it also results in a slightly less protection against a possible transaction loss.
Log write is successful only when the log buffer on the primary is written to log files on the primary and an acknowledgement is received when the log buffer is received on the standby.
•Asynchronous (ASYNC)
The ASYNC mode offers a shorter transaction response time when compared to SYNC and NEARSYNC, but it also might cause greater transaction loss in case of a failure of the primary database.
Log write is considered successful when logs are written to disk on the primary and the log data is sent through the network TCP/IP socket to the standby. In this mode, data loss can occur as there is no acknowledgement if the log data is received on the standby or not.
•Super-asynchronous (SUPERASYNC)
The transaction response time in this mode is the shortest compared to the others, but this also result in the highest probability of transaction loss if the primary database fails. This can be useful to avoid transactions to be blocked or experience higher response time due to network traffic.
Log writes are considered as successful when the log records are written to log files on the primary database. The primary database does not wait for any acknowledgement from the standby database and transactions are marked as committed even before the log data is sent over to the network.
DB2 Cancun Release 10.5.0.4 with BLU Acceleration supports all these HADR synchronization modes for databases with column-organized tables. The only feature not supported so far for column-organized tables is the possibility to use the standby database in read-only, known as “read on standby” (RoS).
Figure 2-1 illustrates the different HADR synchronization modes supported in DB2.
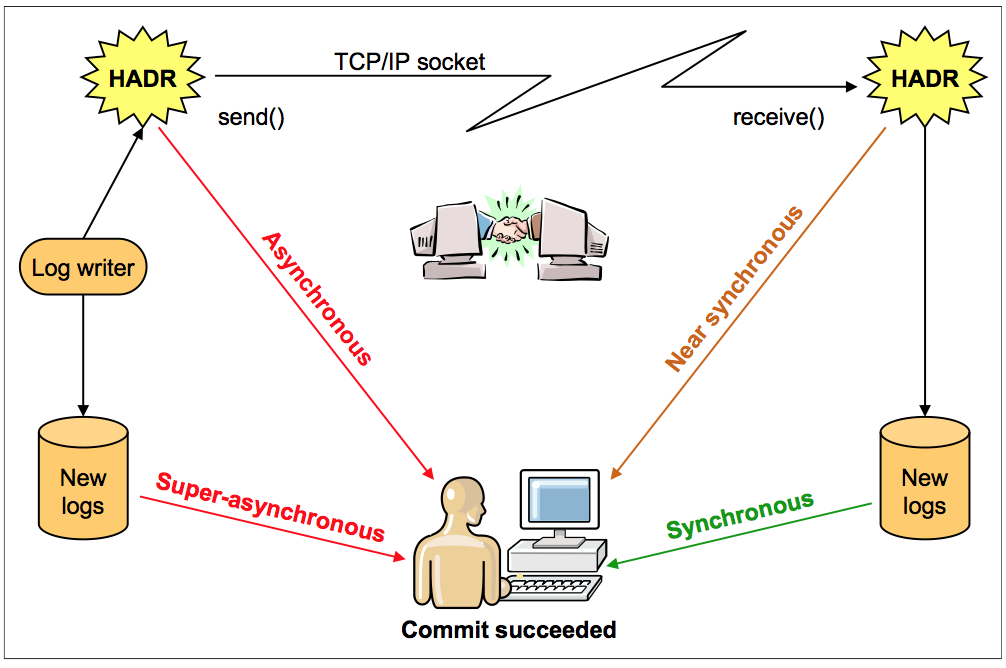
Figure 2-1 DB2 10.5 supported synchronization modes
2.7.3 Configuring primary and standby databases
One of the benefits of HADR is its simplicity to set up and configure to enable high availability and disaster recovery capabilities for your mission critical database. In failover situations, you can just recover your database from a planned or unplanned failure by just using one DB2 command.
Requirements for setting up HADR
To set up HADR, there are some requirements to be met by the environment:
•The operating system and DB2 version and level must be the same on the primary server and any standby server.
•DB2 must have the same bit size (Intel, Power).
•TCP/IP interface must be available between the HADR primary server and the standby server.
•The database name must be the same on the primary and any standby server
The following steps are involved to enable HADR on your database based on a basic scenario with one primary and one standby database:
1. Determine the information for your environment.
2. Update the database configuration on your primary database.
3. Take a backup image of your primary database.
4. Copy and restore the backup image on your standby database server.
5. Update the database configuration on your standby database.
6. Start HADR on the standby database.
7. Start HADR on the primary database.
Primary database
The information required to set up HADR in your environment is basically as follows:
•Standby and primary host name
•Standby and primary instance name
•Standby and primary service port for HADR
•Synchronization mode to be used
When you know this information, you can start to update the configuration on the primary database. You use DB2 commands to update the HADR related parameters that establish the communication between primary and standby databases.
To enable HADR, complete the following steps on the primary database server:
1. Activate log archive for your database. Use the following commands to enable log archive and specify where the archive log would be placed (LOGARCHMETH1):
db2 "update db cfg for BLUDB using LOGRETAIN recovery"
db2 "update db cfg for BLUDB using LOGARCHMETH1 DISK:/space/BLUDB/ARCH"
2. Update the database configuration parameters that tell DB2 how to connect the primary- standby pair. Here you specify both primary and standby host names, connection ports and the HADR synchronization mode required.
db2 "'UPDATE DB CFG FOR BLUDB USING
HADR_LOCAL_HOST $PRIMARY_HOSTNAME
HADR_LOCAL_SVC $PRIMARY_PORT
HADR_TARGET_LIST {$STANDBY_HOSTNAME}
HADR_REMOTE_HOST $STANDBY_HOSTNAME
HADR_REMOTE_SVC $STANDBY_PORT
HADR_REMOTE_INST $STANDBY_INSTANCE
LOGINDEXBUILD ON
HADR_SYNCMODE $MODE'"
3. Take a backup from your primary database to build the standby database.
db2 "backup database $DBNAME online to $BACKUP_DIR"
When the backup is complete, take note of the timestamp because that will be used during the restore step.
Standby database
On the database server where you want to deploy the standby database, you only need to have a DB2 instance with same operating system, same version and level code as the primary database server.
Based on that, you just have to restore the backup image taken before from the primary that has to be copied over for the restore.
Use the following command to restore the database to build the standby database:
db2 "restore database $DBNAME taken at $BACKUP_TIMESTAMP from $ARCH_DIR"
Just after the database restore, the next step is to update the database configuration for the standby database. Use the following command to update the HADR related parameters needed to establish a network connection between the standby and the primary databases:
db2 "'UPDATE DB CFG FOR BLUDB USING
HADR_LOCAL_HOST $STANDBY_HOSTNAME
HADR_LOCAL_SVC $STANDBY_PORT
HADR_TARGET_LIST $PRIMARY_HOSTNAME
HADR_REMOTE_HOST $STANDBY_HOSTNAME
HADR_REMOTE_SVC $PRIMARY_PORT
HADR_REMOTE_INST $PRIMARY_INSTANCE
LOGINDEXBUILD ON
HADR_SYNCMODE $MODE'"
With this step completed, the standby is now ready to be activated and HADR can start to ship transaction logs from the primary to the standby database.
Starting HADR
One of the features often appreciated by clients is the simplicity to set up and configure HADR for high availability or disaster recovery.
This is also shown during the process to start HADR, where only one command needs to be run on each standby and primary database.
Starting HADR on the standby
The following command must be run on the standby database to start it as standby:
db2 start hadr on database $DBNAME as standby
After HADR is started on the standby, the standby database is ready to start to receive transaction logs from the primary.
Starting HADR on the primary
On the primary, run the following command so DB2 starts HADR as primary and starts to send the transaction log to the standby database according to the synchronization mode selected during the configuration steps:
db2 start hadr on database $DBNAME as primary
2.7.4 Automatic Client Reroute and HADR
Now that HADR is started, the primary database is shipping transaction logs to the standby database. At the same time, the standby database is applying them so it can be in sync with the primary based on the synchronization mode selected for the environment.
But what if the primary database suffers an unplanned failure and suddenly becomes not available? HADR is used for these scenarios and the standby database can be made the new primary to recover from the failure on the primary.
A really useful DB2 feature that comes to help in these kind of situations is Automatic Client Reroute. You can define an alternate server to each of your primary and standby databases. The alternate server information is retrieved and refreshed by DB2 clients connecting to the database server. By connecting the client to alternate server once, the client will have the alternate server information to reroute when needed.
Alternate servers can be enabled on primary and standby using the following commands:
•Primary pointing to standby:
db2 UPDATE ALTERNATE SERVER FOR DATABASE $DATABASE USING HOSTNAME $STANDBY PORT $INSTANCE_PORT
•Standby pointing to primary:
db2 UPDATE ALTERNATE SERVER FOR DATABASE $DATABASE USING HOSTNAME $MEMBER PORT $INSTANCE_PORT
Having these settings configured on both databases means that in case of an unplanned failure on the primary database, you can just do a failover to the standby. When the applications fail to connect to the primary database, they make use of the alternate server parameter to connect to the new primary database just when it becomes available.
2.7.5 Switching the roles in your HADR environment
As the name says, HADR feature in DB2 offers a high level of protection for your database. A standby database where all data from the primary is being replicated is useful not only in the event of disaster recovery but also for maintenance purposes. With few simple DB2 commands, you can switch the role for the standby database to become the primary weather you have an planned or unplanned failure (failover) in your environment.
Unplanned failure
In the event of an unplanned failure affecting your primary database, it is possible to easily switch the primary role to the standby database to restore the database service as soon as you realize about the failure.
In the event of an unplanned failure, the DB2 command to perform a takeover from the standby specifies the “BY FORCE” parameter that lets DB2 know that it does not have to wait any acknowledge from the actual primary before switching the role (as the primary could be down and might not respond).
DB2 TAKEOVER HADR ON DATABASE $DATABASE BY FORCE
After the command is run, it just takes few seconds to complete and the new primary database will be available to attend to clients and applications requests.
Planned takeover
HADR is also useful to handle upgrades or failures smoothly in your environment and a planned takeover can be very useful for a planned temporary downtime on the primary database.
With an easy command on the standby, it is possible to switch the primary role to the standby database so it becomes the new primary, while the original primary has its role changed to standby:
db2 takeover hadr on database $DATABASE
At this point, clients and application can connect to the new primary and the new standby starts to receive the data replicated from the primary.
Automated takeover using Tivoli System Automation
It is also possible to automate the process to perform a takeover using Tivoli System Automation for Multiplatforms.
For further details, more information is available here:
2.7.6 Checking HADR status
To check the actual status of HADR configuration, you can use the mon_get_hadr table function or the db2pd command.
Example 2-18 shows the table function example. Perform this command on the primary database server.
Example 2-18 Checking HADR status with table function
db2 "select HADR_ROLE,HADR_SYNCMODE, HADR_STATE,
varchar(PRIMARY_MEMBER_HOST,30)
as PRIMARY_MEMBER_HOST, varchar(STANDBY_MEMBER_HOST,30) as
STANDBY_MEMBER_HOST from table (mon_get_hadr(-2))"
HADR_ROLE HADR_SYNCMODE HADR_STATE PRIMARY_MEMBER_HOST STANDBY_MEMBER_HOST
------------- ------------- ----------------------- ------------------------------ ------------------------------
PRIMARY SYNC PEER db2pure06 db2pure04
1 record(s) selected.
The following db2pd command syntax is used for checking the HADR status:
db2pd -hadr -db $DATABASE
When issuing this command on the primary, it shows information for both the primary and standby. When issuing this command on the standby, the output is just for that specific standby.
Example 2-19 shows an example of checking HADR status on the primary with db2pd. The first row HADR_ROLE = PRIMARY indicates that the output is for the primary database.
Example 2-19 Checking HADR status on the primary with db2pd
[db2blu@db2pure06 ~]$ db2pd -hadr -db bludb
Database Member 0 -- Database BLUDB -- Active -- Up 0 days 00:08:57 -- Date 2014-07-28-12.43.29.955740
HADR_ROLE = PRIMARY
REPLAY_TYPE = PHYSICAL
HADR_SYNCMODE = SYNC
STANDBY_ID = 1
LOG_STREAM_ID = 0
HADR_STATE = PEER
HADR_FLAGS =
PRIMARY_MEMBER_HOST = db2pure06
PRIMARY_INSTANCE = db2blu
PRIMARY_MEMBER = 0
STANDBY_MEMBER_HOST = db2pure04
STANDBY_INSTANCE = db2blu
STANDBY_MEMBER = 0
HADR_CONNECT_STATUS = CONNECTED
HADR_CONNECT_STATUS_TIME = 28/07/2014 12:38:37.693945 (1406547517)
HEARTBEAT_INTERVAL(seconds) = 30
HEARTBEAT_MISSED = 0
HEARTBEAT_EXPECTED = 13
HADR_TIMEOUT(seconds) = 120
TIME_SINCE_LAST_RECV(seconds) = 22
PEER_WAIT_LIMIT(seconds) = 0
LOG_HADR_WAIT_CUR(seconds) = 0,000
LOG_HADR_WAIT_RECENT_AVG(seconds) = 0,005752
LOG_HADR_WAIT_ACCUMULATED(seconds) = 0,012
LOG_HADR_WAIT_COUNT = 2
SOCK_SEND_BUF_REQUESTED,ACTUAL(bytes) = 0, 19800
SOCK_RECV_BUF_REQUESTED,ACTUAL(bytes) = 0, 87380
PRIMARY_LOG_FILE,PAGE,POS = S0001007.LOG, 0, 12679490414
STANDBY_LOG_FILE,PAGE,POS = S0001007.LOG, 0, 12679490414
HADR_LOG_GAP(bytes) = 0
STANDBY_REPLAY_LOG_FILE,PAGE,POS = S0001007.LOG, 0, 12679490414
STANDBY_RECV_REPLAY_GAP(bytes) = 0
PRIMARY_LOG_TIME = 28/07/2014 12:34:56.000000 (1406547296)
STANDBY_LOG_TIME = 28/07/2014 12:34:56.000000 (1406547296)
STANDBY_REPLAY_LOG_TIME = 28/07/2014 12:34:56.000000 (1406547296)
STANDBY_RECV_BUF_SIZE(pages) = 4304
STANDBY_RECV_BUF_PERCENT = 0
STANDBY_SPOOL_LIMIT(pages) = 460000
STANDBY_SPOOL_PERCENT = 0
STANDBY_ERROR_TIME = NULL
PEER_WINDOW(seconds) = 0
READS_ON_STANDBY_ENABLED = N
Example 2-20 shows the db2pd command run on the standby database server.
Example 2-20 Checking the status of the standby server with db2pd
[db2blu@db2pure04 ~]$ db2pd -hadr -db bludb
Database Member 0 -- Database BLUDB -- Standby -- Up 0 days 00:05:26 -- Date 2014-07-28-12.44.03.587977
HADR_ROLE = STANDBY
REPLAY_TYPE = PHYSICAL
HADR_SYNCMODE = SYNC
STANDBY_ID = 0
LOG_STREAM_ID = 0
HADR_STATE = PEER
HADR_FLAGS =
PRIMARY_MEMBER_HOST = db2pure06
PRIMARY_INSTANCE = db2blu
PRIMARY_MEMBER = 0
STANDBY_MEMBER_HOST = db2pure04
STANDBY_INSTANCE = db2blu
STANDBY_MEMBER = 0
HADR_CONNECT_STATUS = CONNECTED
HADR_CONNECT_STATUS_TIME = 28/07/2014 12:38:37.696446 (1406547517)
HEARTBEAT_INTERVAL(seconds) = 30
HEARTBEAT_MISSED = 0
HEARTBEAT_EXPECTED = 10
HADR_TIMEOUT(seconds) = 120
TIME_SINCE_LAST_RECV(seconds) = 19
PEER_WAIT_LIMIT(seconds) = 0
LOG_HADR_WAIT_CUR(seconds) = 0,000
LOG_HADR_WAIT_RECENT_AVG(seconds) = 0,005752
LOG_HADR_WAIT_ACCUMULATED(seconds) = 0,012
LOG_HADR_WAIT_COUNT = 2
SOCK_SEND_BUF_REQUESTED,ACTUAL(bytes) = 0, 19800
SOCK_RECV_BUF_REQUESTED,ACTUAL(bytes) = 0, 87380
PRIMARY_LOG_FILE,PAGE,POS = S0001007.LOG, 2, 12679500171
STANDBY_LOG_FILE,PAGE,POS = S0001007.LOG, 2, 12679500171
HADR_LOG_GAP(bytes) = 0
STANDBY_REPLAY_LOG_FILE,PAGE,POS = S0001007.LOG, 2, 12679500171
STANDBY_RECV_REPLAY_GAP(bytes) = 0
PRIMARY_LOG_TIME = 28/07/2014 12:43:45.000000 (1406547825)
STANDBY_LOG_TIME = 28/07/2014 12:43:45.000000 (1406547825)
STANDBY_REPLAY_LOG_TIME = 28/07/2014 12:43:45.000000 (1406547825)
STANDBY_RECV_BUF_SIZE(pages) = 4304
STANDBY_RECV_BUF_PERCENT = 0
STANDBY_SPOOL_LIMIT(pages) = 460000
STANDBY_SPOOL_PERCENT = 0
STANDBY_ERROR_TIME = NULL
PEER_WINDOW(seconds) = 0
READS_ON_STANDBY_ENABLED = N
2.7.7 Considerations for fix pack upgrades in an HADR environment
When applying a fix pack upgrade in a DB2 HADR environment, there are some considerations to be made. The procedure of upgrading the DB2 software is done by the rolling update process and this keeps the database service available during the upgrade. This means that the database stays up while each database server is being upgraded, one at a time.
In case of an HADR environment, the upgrade starts with the standby member. After the upgrade is done on the standby member, a takeover is performed to switch the primary role to the recently upgraded member. At this point, after all the clients and applications are connected to the standby database (that is, using automatic client reroute), the original primary can be upgraded. After the original primary (now standby) is upgraded, HADR synchronization can continue and once the pair becomes in peer state again, the upgrade procedure is complete.
For more details and the detailed instructions to perform a rolling update in a HADR environment, see the following website:
2.7.8 HADR best practices
HADR is a proven technology that offers high availability and disaster recovery under various DB2 environments.
Here are a few suggestions for an HADR environment:
•Use dedicated and high performing disks or file systems for the database logs.
Database changes are logged in a single log stream, so it is important to have enough I/O capacity available on the file system.
•Make the location of archived logs accessible to both the primary and standby databases.
The primary database is the one that archives logs, but after a takeover, the new primary database (original standby database) starts to archive logs as well. During a takeover, the step to catch up and synchronize both databases could require to retrieve archive logs. Using a shared location for primary and standby simplifies the configuration and also reduces the network traffic caused by archive logs.
•Use a dedicated network for the HADR primary-standby connection.
Though each of synchronization modes might have different network bandwidth requirements, the performance and stability of HADR rely on the network communication channel. In particular, the bandwidth of this network should meet certain requirements based on the log generation rate.
•Consider using multiple network adapters.
For high availability, multiple network adapters should be used to ensure that the failure of a single network adapter does not result in the loss of network.
•Consider using a virtual IP for the database server.
By using a virtual IP for the database server, the client applications can always connect to the same virtual IP address independently from which member actually has the primary role.
•Consider using automatic client reroute.
Instead of a virtual IP, a different option to consider is to use the automatic client reroute feature built in DB2 engine. In the event of a failover, a DB2 client is redirected from the primary server to the standby server.
For more information about the HADR best practices, see High Availability Disaster Recovery at this website:
..................Content has been hidden....................
You can't read the all page of ebook, please click here login for view all page.