Chapter 10
Worksharing
Understanding multi-user workflow is essential to completing your Autodesk® Revit® Architecture training. There’s plenty of work to go around in the design, development, and eventual documentation of a building project for multiple team members.
If you’ve never used Revit Architecture before in a multi-user environment, you may be familiar with the CAD workflow. Multi-user workflow in CAD is a very different process. Whereas CAD projects are typically divided along the lines of what needs to be drawn (plan, section, and elevation at various levels of detail), Revit Architecture envelops you in the entire process. 2D, 3D, schedules, and so on are in a single database, waiting for the input and direction of your team.
In this chapter, you’ll learn to:
- Enable worksharing
- Create a Central Model and a local file
- Create worksets
- Adjust workset visibility
- Use worksharing display modes
- Understand editing requests
- Review worksharing best practices
Configuring Worksharing
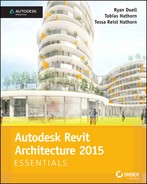
The default configuration of your Revit Architecture project allows for one user to open and work with the model. When the project reaches a milestone where more than one user needs to work simultaneously, worksharing can be enabled to accommodate multiple user collaboration. Revit identifies each user in the project by the username specified in the Application menu ![]() Options
Options ![]() General
General ![]() Username (Figure 10.1). It is critical that each user working in the model have a unique username.
Username (Figure 10.1). It is critical that each user working in the model have a unique username.
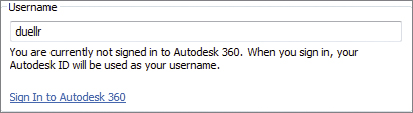
FIGURE 10.1 Username setting in Options
In the following exercise you will open an existing project, enable worksharing, and save it as the new Central Model.
Exercise 10.1: Enable Worksharing
 To begin, go to the book’s web page at www.sybex.com/go/revit2015essentials, download the files for Chapter 10, and open the file
 c10-ex-10.1start.rvt.
- With the example file now open, navigate to the Collaborate tab and select the Worksets tool. The initial Worksharing dialog box (Figure 10.2) appears, outlining the worksets that project elements will be assigned to.
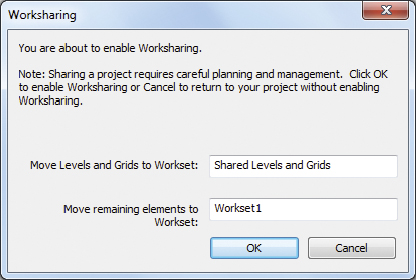
FIGURE 10.2 The initial Worksharing dialog box
- By default, datum objects are moved to a workset called Shared Levels and Grids. Project content that is not view specific (geometry and rooms) is all assigned to Workset1. Click OK to continue.
- The Worksets dialog box (Figure 10.3) opens next. Your username appears in the Owner field. Currently, you own everything in the project since you enabled worksharing. Click OK to continue.
FIGURE 10.3 Worksets dialog box
- Next, you want to save the project as the Central Model. Navigate to Application
 Save As Project. Before clicking Save, click the Options button. In the File Save Options dialog you can confirm that this will be the Central Model. You will have other options, such as the maximum number of backups that Revit Architecture will maintain for the Central Model (Figure 10.4). Confirm that Make this a Central Model after save is checked, and click OK to close the File Save Options dialog.
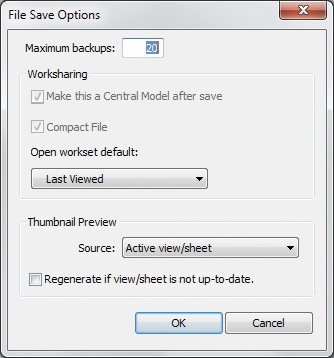
FIGURE 10.4 File Save Options dialog
- In the Save As dialog, enter the filename
c10-ex-10.2start.rvt. You will use this Central Model for the start of the next exercise. Click Save to create your Central Model (Figure 10.5).
FIGURE 10.5 Save the Central Model.
- After the save completes, from the Collaborate tab click the Relinquish All Mine tool. This will release ownership of all model elements and is an important step to allow other users to work with the model.

- Close the Central Model. You should not be prompted to save or relinquish any elements since you have already done so.
In the following exercise you will create a local file using the newly saved Central Model from Exercise 10.1.
Exercise 10.2: Create the Local File and Worksets
To begin, ensure that Exercise 10.1 has been completed. You will utilize the Central Model you previously saved to create your local file. This is important because in order to create a local file, the Central Model cannot be moved around (since the initial save includes the model location).
- Click Open in the Application menu and browse to your Central Model,
c10-ex-10.2start.rvt. - Select it, but don’t open it just yet.
- As shown in Figure 10.6, ensure that the Create New Local option is checked.

FIGURE 10.6 Creating the local file
- Selecting this option will not open the Central Model directly but instead will create a local file (Figure 10.6).
- By default, your local file is saved in your
Documentsfolder with a suffix based on your Revit username. In this author’s case, the username is duellr. So, the local file is saved in theDocumentsfolder asc10-ex-10.2start_duellr.rvt.
- Click Open to create a local file that communicates directly with the Central Model. This is the process you would use when working on real-world projects.
- Next, you’ll create several worksets that can be used to organize your model elements.
- Open the Worksets dialog box from the Collaborate tab Worksets.
- Click New, and then create three additional worksets called Core, Exterior, and Interior (Figure 10.7).
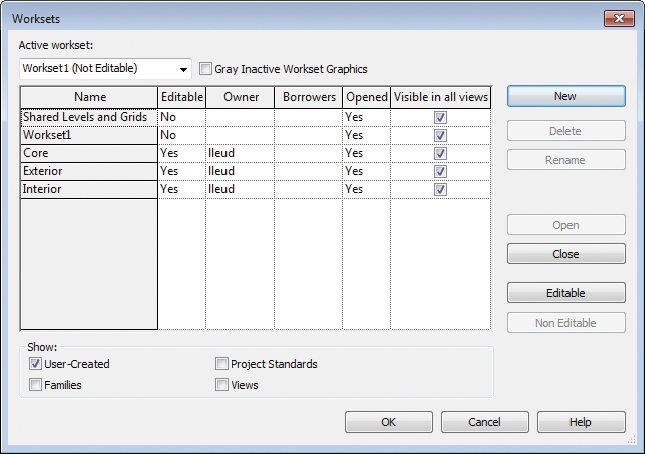
FIGURE 10.7 Creating additional worksets
- Keep in mind that worksets are not layers, and little granularity is required. Basically, worksets should be used as collections of objects based on how you want them to be organized in the project.
- Click OK to close the dialog.
- Open the Visibility/Graphic Overrides dialog box for the view (keyboard shortcut VG).
- Notice that there is now an additional Worksets tab that didn’t exist before worksharing was enabled. This tab allows you to turn off the visibility of elements based on their workset assignment. When you’ve finished examining this tab, close the local file before starting the next exercise.
In the following exercise you will assign model elements to worksets and adjust the workset visibility settings of the view.
Exercise 10.3: Assign Elements to Worksets and Control Visibility
To begin, make sure that you’ve downloaded the file c10-ex-10.3start.rvt, but don’t open it just yet.
- From the Revit Application menu click Open, browse to
c10-ex-10.3start.rvt, and select the file. Check Detach From Central and click Open. This will allow you to open an existing Central Model to resave it in a new location.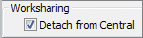
- When the Detach Model From Central dialog displays, choose Detach And Preserve Worksets. This will preserve all worksets in the model. After the model opens, click the Save button and save as
c10-ex-10.3start.rvt. If you’re saving the file in the same location as the original model, when prompted that the workset file already exists, click Yes. - The model should open the Level 1 floor plan view. Open the Visibility/Graphic Overrides dialog box for the view (keyboard shortcut VG) and click the Worksets tab. Change the Visibility setting for the Core, Exterior, and Interior worksets to Hide (Figure 10.8). Click OK to close the dialog.
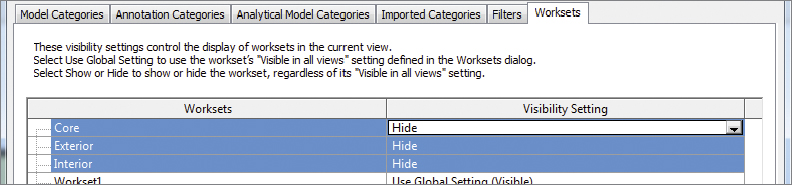
FIGURE 10.8 Workset Visibility setting
- Window-select the elements shown in Figure 10.9. While the elements are selected, click the Filter tool from the Selection contextual panel. Uncheck Room Tags and click OK to close the Filter dialog (Figure 10.9).

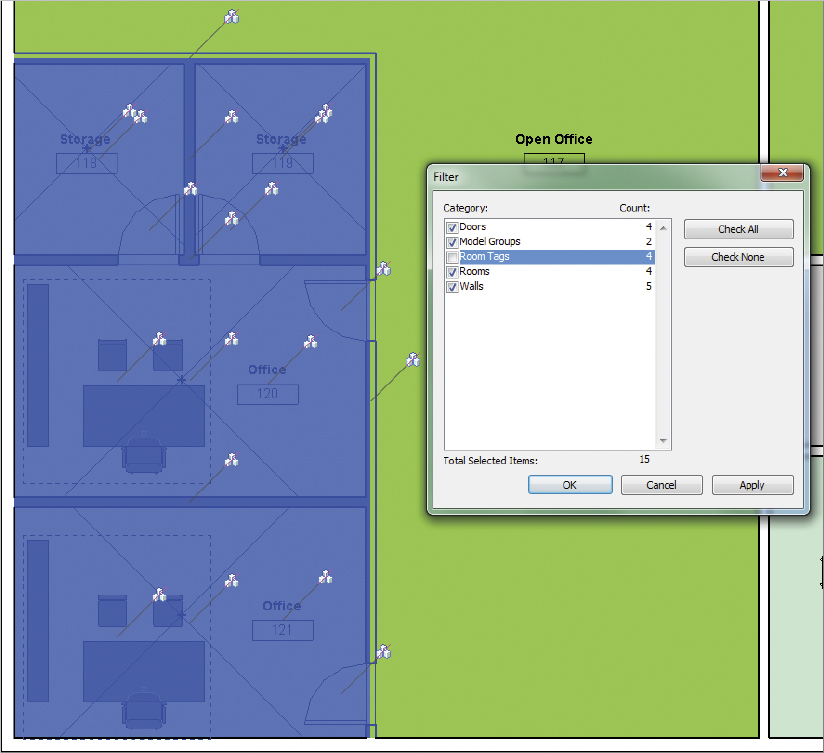
FIGURE 10.9 Element selection and filter
- From the Properties palette, locate the Workset parameter. This indicates the element’s workset assignment. With the multiple elements still selected, change this value from Workset1 to Core. Notice that the elements are no longer visible, since in step 3 you set this workset to be hidden.
- Next, you will assign some interior elements to the Interior workset. Draw a selection window from the lower right to the upper left inside the exterior walls. Windowing from this direction will include every element you cross or include within the window you draw. (If you windowed from left to right, it would select only the elements fully contained within the selection box (Figure 10.10).
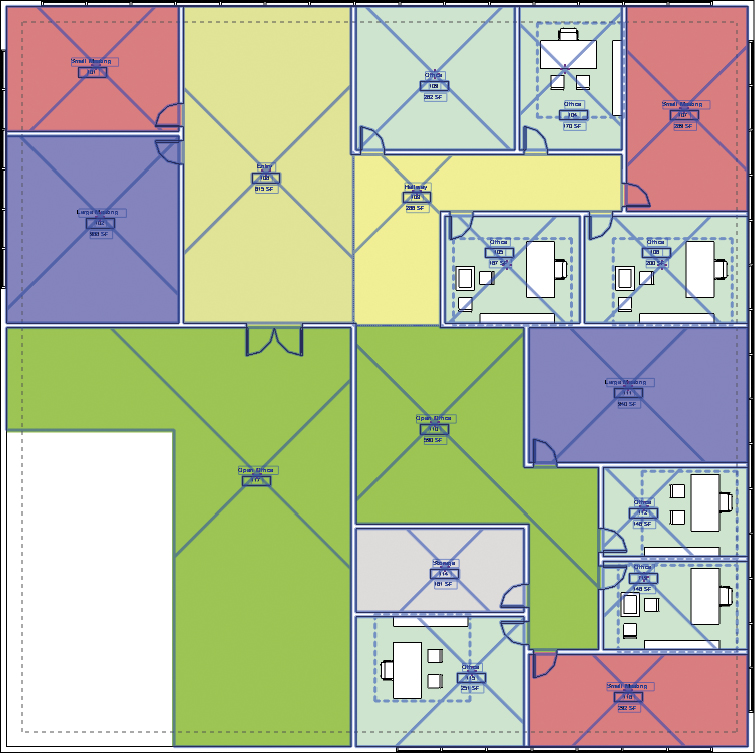
FIGURE 10.10 Selecting and assigning the Interior workset
- With the multiple elements still selected, use the Filter tool again to uncheck Room Tags and <Room Separation>. Change the Workset value from Workset1 to Interior.
- For the final selection set, select everything remaining in the view, and use the Filter tool. Click Check None; then check only Walls and click OK. In the Properties palette change the workset from Workset1 to Exterior.
- By this step the only items visible are two room separation lines. Select them and assign them to the Interior workset. Now no geometry should be visible in the Level 1 view. Open the Visibility/Graphic Overrides dialog for the view, and reset the visibility settings back to Use Global Setting (Visible), as shown in Figure 10.11. Click OK to return to the view, and all elements should once again be visible.
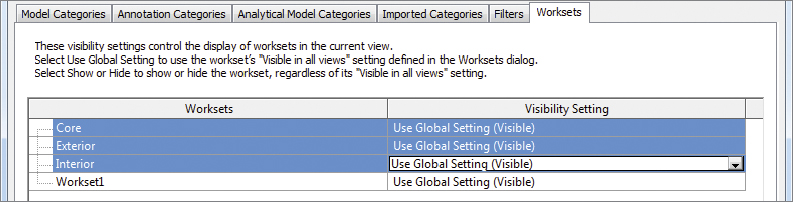
FIGURE 10.11 Resetting the visibility settings
At this point you can close this model and save your changes when prompted. The next section elaborates on the options available when working in local files and interacting with the Central Model (such as saving your changes).
Saving to the Central Model
When working in your local file there are several options available for saving your changes back to or interacting with the Central Model. The following worksharing-specific options are available on the Synchronize panel of the Collaborate tab. Synchronize And Modify Settings and Synchronize Now are available in the Synchronize With Central flyout.
Synchronize And Modify Settings Synchronize And Modify Settings provides more specific control when saving the Central Model. The dialog box shown in Figure 10.12 displays the Central Model location and gives you options to relinquish worksets, compact the Central Model, and save your local file (after the sync with the Central Model is complete).
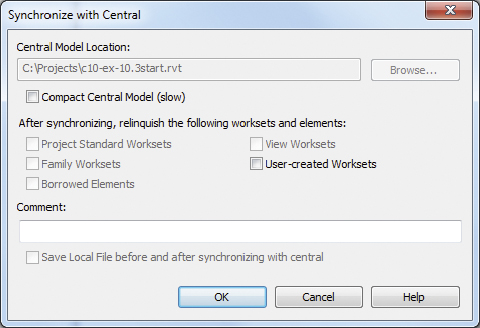
FIGURE 10.12 Synchronize And Modify Settings
Synchronize Now This option is probably used more frequently than the other options. Consider creating a keyboard shortcut so you don’t have to return to the Collaborate tab as you work when you want to save to the central file.
Synchronize Now saves your local copy and syncs with the Central Model as well as updates your file with any changes from the Central Model. Any borrowed elements are also relinquished by default. But if you have an entire workset checked out, it’s not checked back in. It will still be editable by you after the save completes.
Reload Latest The Reload Latest option lets you reload the latest version of the Central Model in your local project. However, it doesn’t publish any of your work in the Central Model.
Relinquish All Mine Relinquish All Mine allows you to check in elements that you may have borrowed but did not change. If you’ve made changes, you have to either sync them with the Central Model or discard the changes without saving. You cannot relinquish elements in a file that has been modified.
If you select this option, Revit Architecture will ask you what to do with the elements you’ve borrowed or worksets you have enabled (Figure 10.13). If you relinquish the elements and worksets, other people will be able to modify them in their local files. If you keep ownership, the changes you’ve made will be lost, but you’ll still have the elements and worksets enabled.
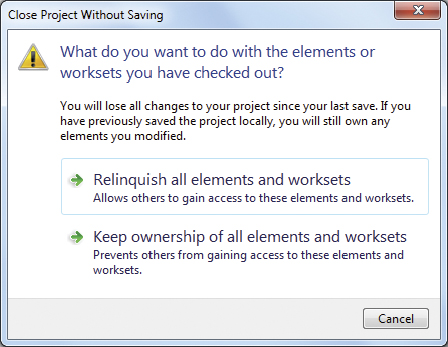
FIGURE 10.13 Relinquishing elements and worksets
When you have no elements or worksets enabled in a project, you can confirm this by opening the Worksets dialog box, shown in Figure 10.14.
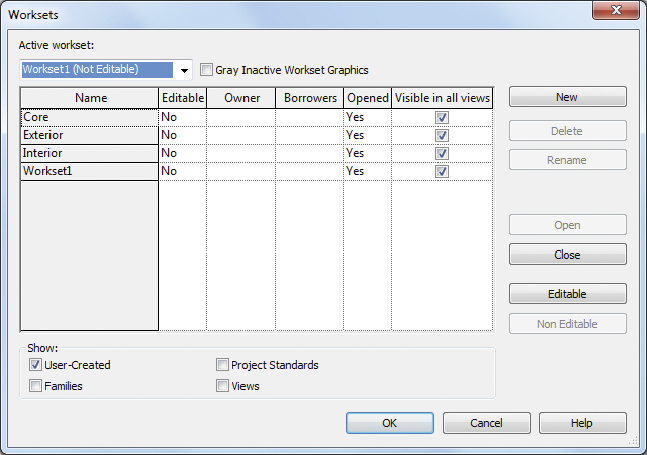
FIGURE 10.14 Relinquished elements and worksets
In the following exercise you will work with closing and opening worksets in an existing model to globally update visibility.
Exercise 10.4: Open and Close Worksets
To begin, make sure you’ve downloaded the file c10-ex-10.4start.rvt, but don’t open it just yet.
- From the Revit Application menu browse to
c10-ex-10.4start.rvtand select the file. Check Detach From Central and click Open. This will allow you to open an existing Central Model to resave it in a new location. - When the Detach Model From Central dialog displays, choose Detach And Preserve Worksets. This will preserve all worksets in the model. After the model opens, click the Save button and save as
c10-ex-10.4start.rvt. If you’re saving in the same location as the original model, when prompted with The Workset File Already Exists, click Yes. - Open the Worksets dialog box under Collaborate Worksets (or click the Worksets button on the status bar). Notice that currently all worksets are set to Open (the Opened column will read Yes or No accordingly).
- In this example model there are five worksets: Doors-Windows, Exterior Walls, Furniture, Interior Walls, and Rooms. Select the Furniture and Rooms worksets and click the Close button (Figure 10.15). You can select multiple worksets at the same time by holding down the Ctrl key while selecting.
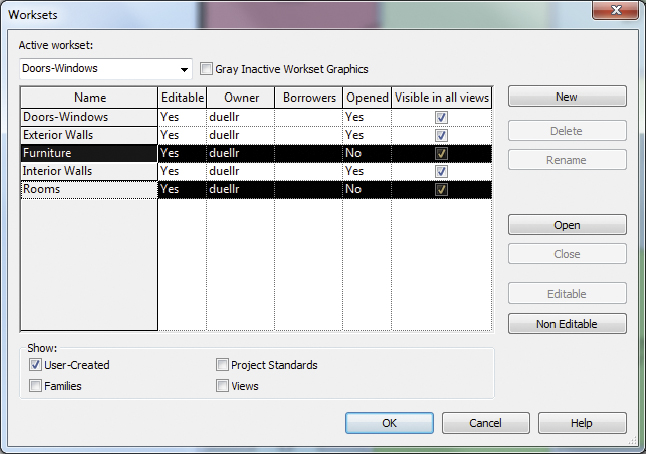
FIGURE 10.15 Closing worksets in the model
- Click OK to close the Worksets dialog. Notice in the Level 1 view that the rooms and furniture are no longer visible. Unlike the Visibility/Graphic Overrides Worksets Visibility setting, closing or opening a workset will affect all views.
- Open the {3D} view to confirm this and note that the furniture is not visible. Open the Worksets dialog and additionally close the Interior Walls and Doors-Windows worksets. Click OK to return to the {3D} view (Figure 10.16).
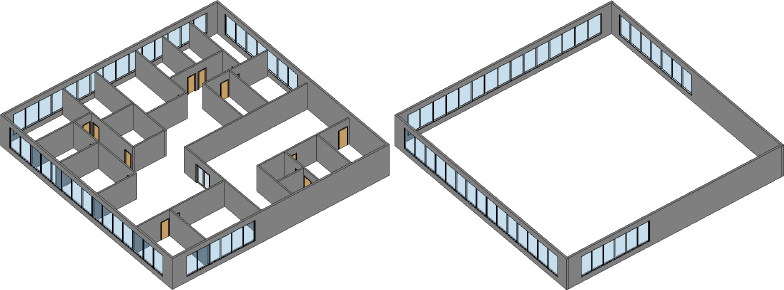
FIGURE 10.16 Worksets Open and Closed
- At any point you can reopen worksets to make the elements on those worksets visible again. Open the Worksets dialog again and select the Furniture and Interior Walls worksets. Click Open, and then click OK to return to the {3D} view. Note that the furniture is visible again in this and any additional project views where it was previously. You can save and close this model when finished.
Worksharing Display Modes
Worksharing display modes are a great way to visually understand the current worksharing status of your project. For this example, all three authors of this book are accessing the Central Model saved on the server (from the three local files) at the same time. Furthermore, all of us have borrowed elements in the central file.
In Figure 10.17, the Worksets dialog box shows that no worksets are editable but that the user duellr has borrowed elements.
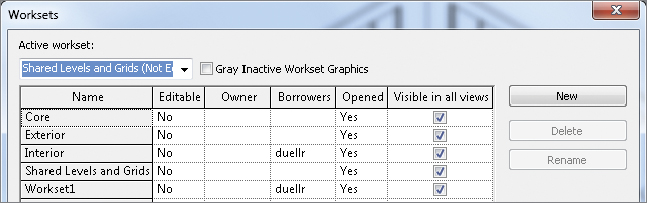
FIGURE 10.17 Borrowed elements in the Worksets dialog box
Now let’s look at the Worksharing Display Settings available for worksharing display in a project: Checkout Status, Owners, Model Updates, and Worksets. These settings are based on the particular parameters in your project (number of worksets, active users, and so forth). To activate any of these settings, click the icon ![]() on the bottom of the view window (View Control Bar), and choose one of the menu items from the list (Figure 10.18).
on the bottom of the view window (View Control Bar), and choose one of the menu items from the list (Figure 10.18).
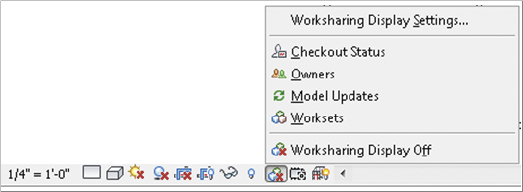
FIGURE 10.18 Worksharing Display Settings options
Activating any of the worksharing display modes from the menu toggles your visibility settings and applies an orange border to the view you’re in, alerting you that you’ve activated the mode. To turn it back off, choose the Worksharing Display Off option from the same menu.
Let’s set some of these modes active one at a time and view the results. Click the Worksharing Display button and choose Worksharing Display Settings. Start with the Checkout Status tab; the checkout status helps you distinguish between elements that are owned by you, others, or no one (Figure 10.19).
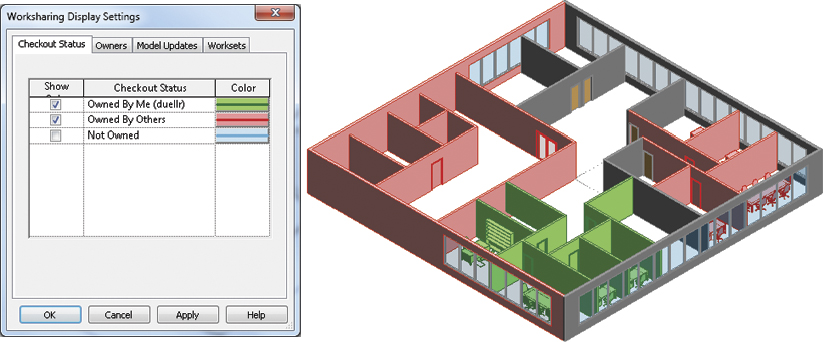
FIGURE 10.19 Checkout Status tab
Selecting the Owners display mode will show you exactly which elements belong to which users (Figure 10.20).
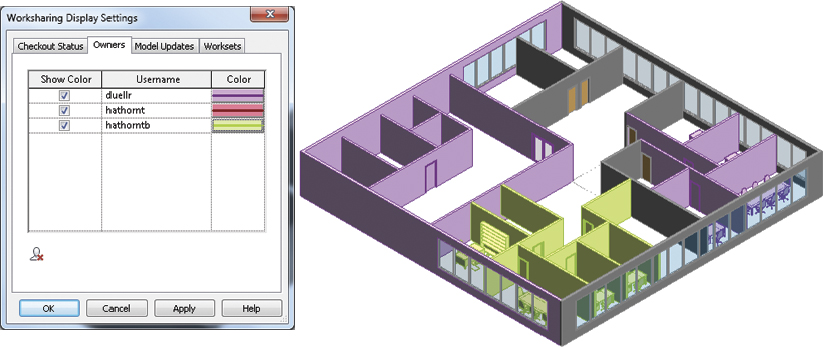
FIGURE 10.20 Owners tab
The Worksets tab helps you visualize elements based on the workset to which they’re associated (Figure 10.21).
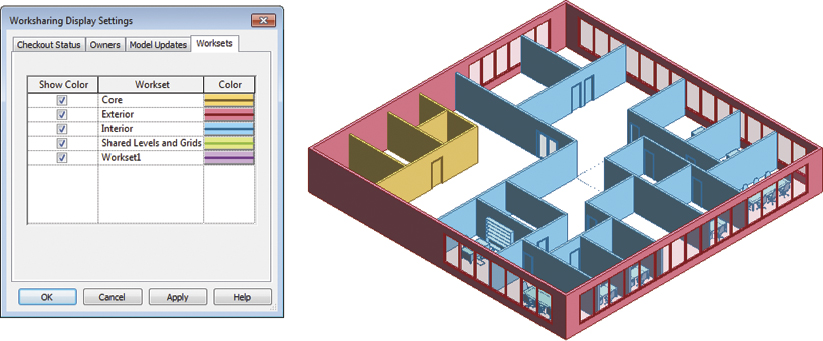
FIGURE 10.21 Worksets tab
Editing Requests
Eventually while working on a project team, another user will own an element you need to modify. For you to modify that element, the other user will first need to relinquish it. Let’s take UserA and UserB as a simple example for this scenario:
- UserA attempts to modify a wall but receives an error dialog noting that UserB currently owns the element (Figure 10.22).
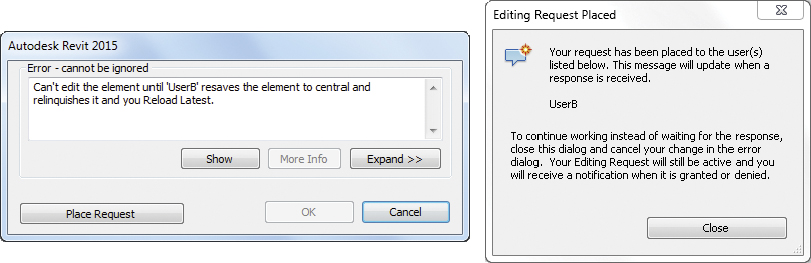
FIGURE 10.22 Placing a request
- UserA clicks the Place Request button in the dialog so UserB will be notified (Figure 10.22).
- While UserB is working in their local file, they receive a modal Editing Request Received dialog indicating that UserA has requested the wall element.
- UserB clicks Grant, which will give editability to UserA for that wall element only (Figure 10.23).
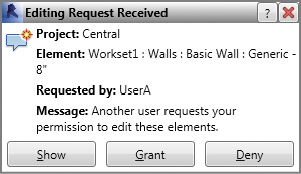
FIGURE 10.23 Granting a request
- Lastly, UserA receives the confirmation dialog back that UserB has granted permission to edit the wall element (Figure 10.24).
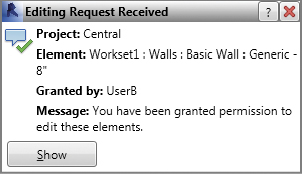
FIGURE 10.24 Granted confirmation
In this example, no further action is required from UserA; UserA can start making modifications to the wall. The editing request serves as both a user notification system and an automated method to swap element ownership.
Worksharing Best Practices
Now that you have a general understanding of how worksharing and worksets operate, take a moment to consider a few best practices.
Think of worksets as containers. Worksets aren’t layers as in CAD. Think of them as containers for major systems in your building (interior, exterior, roof, core, and so on). You need to manage or be mindful only of objects that belong to user-created worksets, such as the following:
- Datum (levels and grids)
- Geometry (building elements that show up in multiple views)
- Rooms (the spaces that can be tagged)
Be mindful of the active workset. As you’re creating datums, geometry, or rooms, be mindful of the active workset. And keep in mind that Revit Architecture automatically manages the worksets for everything else (views, families, and project standards), and these cannot be changed by the user.
Borrow elements on the fly. Don’t check out worksets by making the entire workset editable. Instead, just borrow elements on the fly. This approach lets you avoid many conflicts that occur when one person needs to modify something you own (but don’t really need) in the model. With the interconnected nature of buildings, you don’t even need to deliberately make an element editable. All you have to do is modify an existing element, and Revit Architecture will transparently borrow it for you. This works the same when adding new elements as well.
Associate linked files to their own workset. Associate any linked files to their own workset. Then you can open and close the worksets associated to those links. This strategy is much more predictable than loading and unloading links (which will have an effect on everyone working on the project). Opening or closing a workset affects only your local file.
Stay out of the Central Model. Stay out of the Central Model—don’t move it, and don’t rename it (unless you know what you’re doing). Opening the Central Model restricts access by the files that are trying to connect to it. And if you break something in the Central Model, you’ll break the connections that others have from their local file, which means they may end up losing their work (which in turn means your team will not like you).
Open and close worksets selectively. Selectively opening and closing worksets is a lot faster than opting to modify the visibility settings of multiple views or using hide/isolate on a view-by-view basis. If you’re supposed to be working only on the core and internal areas of a multistory building, opening only the worksets associated to those areas will save a lot of computing power.