
I would like to start with an apology to any Harry Potter fans who have accidentally stumbled across this book. If you’re looking for a guide to magic and spells, then I’m afraid you’ve come to the wrong place. However, if you’re looking for the place to get a firm grasp on sound design and using synthesizers, then you have come to the right place.
This book is intended for:
People who are new to synthesis and who want to understand the basics, taking their first steps in creating and controlling sounds with synthesizers.
Musicians who are familiar with synthesis, but who want to solidify or expand that knowledge so they can use their tools more fully.
The book covers four main areas:
Getting started with synthesis and digital audio. The early chapters introduce you to the world of digital music creation. We then move to an introduction to synthesizers and sound creation.
Modules. The second section of the book looks at the modules that are available to create and shape sounds. In short, this is the palette from which you can create your sounds.
Synthesizer architecture. As we look at the modules, we will start to think about synthesizer architecture and how the elements of synthesis—in other words, the modules we are looking at—can be put together. Partly this is a matter of structure, but it also has a significant effect on the sound, and as you will see, the architecture is inextricably linked with sound design.
Sound design. Once you have a grasp of synthesizer basics, the elements of synthesis, and synthesizer architecture, you can start putting the pieces together to build the sound that you hear in your head, but which you may not have been able to realize. You can then apply these principles to any synthesizer in your arsenal.
As you can see, this is not about how to be creative. Instead, it’s about the process for understanding the mechanics behind sound creation and giving you a firm grasp of the building blocks. With this knowledge, you can then use your own creativity and take control of your sounds, creating the tones that are right for you. In working through this book, it might be useful to understand my intentions:
First, I do not try to emulate specific sounds, so I have not attempted to show you how to perfectly re-create, say, a violin or a specific synthesizer tone. Where I have made reference to specific sounds (such as a violin), the purpose has been to offer a point where we can have a common understanding of a sound (otherwise, it can get quite difficult to try to describe sounds on the printed page). My intention in not looking at specific sounds is to help you find how to create your own sound, not how to create someone else’s sound. Added to which, as I will mention in the sound design chapter (Chapter 9), there are logistical impracticalities associated with replicating highly nuanced tones (not least that each different articulation has to be programmed, and you then have to record the MIDI tracks playing the different sound for each articulation).
Second, this is not a manual for any synthesizer, and it is in no way intended to replace the guidance that is provided by the developers for the featured synthesizers. While I will illustrate my points with specific synthesizers—and you can learn a lot about using those synthesizers—my aim is to show general principles that can then be widely applied to as many different synthesizers as possible. As you will see, this means I will ignore some of the modules from the featured synthesizers, and equally, I’m not intending to illustrate all of the potential functionality that is available in all of the featured synths.
This book is about picking up skills, attuning your ears, and getting your hands dirty. This book is not intended to be read from cover to cover before you go near a synthesizer—read a bit, then try out what you have read. Then read some more. Ideally, read the book while you are sitting next to your synthesizer so you can try things immediately.
As a follow-up to the previous point, there are only a few presets that accompany the book (after all, it’s called “From Presets...,” as in getting away from). I talk you through a number of sounds in the book—I have not included presets because I want you to follow what I am doing and create sounds for yourself by listening and using your own sense of what sounds good. I don’t want you to become skilled at loading presets. Also, as you work through a particular sound, you may decide you don’t like the course I’m following with that sound, in which case you can take the sound in the direction you want. And if you do, that’s fine with me.
After reading this book, the only limitations to your sound design skills will be your imagination and your computer’s CPU (and you can always get a new CPU).
One last point before we move on—I talk in terms of patches and sounds, as well as presets. Generally, all three terms are interchangeable. With patches and presets, all I am referring to is a combination of settings that make a sound.
Before we go too much further, it might be useful to have a bit of synthesizer history that can help to give some context to the tools and techniques featured in this book. For the detail freaks, please be aware that this is only a very brief history, just to give a bit of context to the position we have reached today—it is not intended to mention every synthesizer that has ever been made available. If you’re after further information and detail, then I suggest you start with an internet search and follow that with a look at the books that have been published on the subject.
Synthesizers can be traced back to the 19th century, when early telephone technology could be applied to create sounds. Arguably, the first practical synthesizers that were available to musicians were organs that offered a wide range of tones, such as the Hammond Organ (see Figure I.1). However, I don’t want to argue... so let’s start by looking at the first beasts that resemble what we might think of today as a synthesizer.
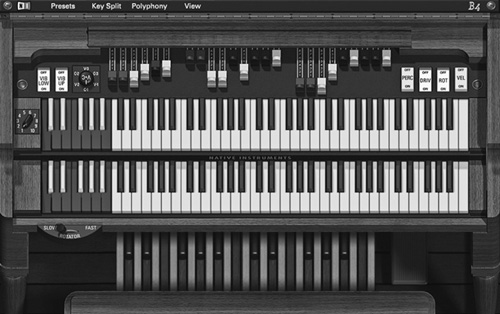
Figure I.1. A software incarnation of the Hammond B3 Organ—in this case, the B4 organ from Native Instruments (native-instruments.com).
The earliest synthesizers that we would recognize today as synthesizers were essentially boxes for creating noises—some didn’t even have keyboards attached, which could make pitch control something of a challenge. These devices were collections of what might now be seen as oldfashioned electronics: resistors, transistors, and diodes. There were no chips or integrated circuits like you may find today. This was true handcrafted analog electronics, which lent these synthesizers a warm sound but also made them susceptible to atmospheric conditions (so if the temperature in a room changed, then the synthesizer could go out of tune).
One of the first widely available synthesizers was the Minimoog. (See Figure I.2—again, I’m showing a software implementation of the original hardware because these pictures let us see more detail.) When this synthesizer was released in 1970 (as in when the hardware was first released), it cost $1,495 (which would be around $8,500 if you take account of the change in consumer prices to January 2009). While it was phenomenally expensive, the Minimoog could only play one note. If you listen to any records made during the 1970s that feature a synthesizer, then there is a very strong chance that you are hearing a Minimoog (or one of the Moog Modular synthesizers).
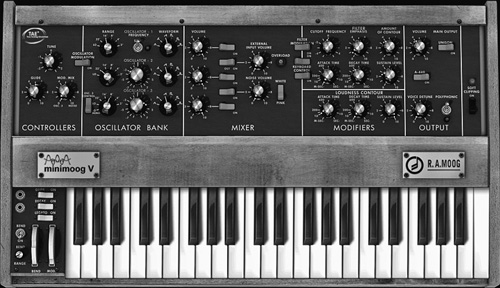
Figure I.2. A software incarnation of the Minimoog—in this case, the minimoog V from Arturia (arturia.com).
Perhaps the next highly significant synthesizer was the Prophet 5 from Sequential Circuits (see Figure I.3). The Prophet 5 took two important steps forward (when compared with the Minimoog). First, it was polyphonic. The Moog was monophonic—that is, it only allowed one note to be played. By contrast, the Prophet 5 could play up to five notes simultaneously. Second, the Prophet 5 had a patch memory—very often people would take Polaroid snaps of a Minimoog sound in order to remember the correct settings.
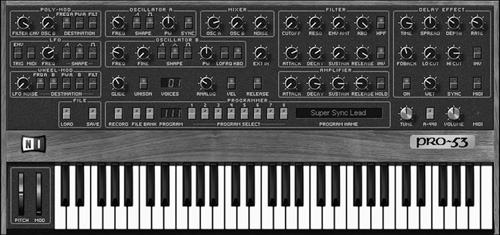
Figure I.3. A software incarnation of the Prophet 5—in this case, the Pro-53 from Native Instruments (native-instruments.com).
In the early 1980s, the Prophet 5 was eclipsed (no space pun intended) by the Roland Jupiter-8 (see Figure I.4). On paper, this shared many features with the Prophet 5, but it had a larger patch memory and was generally felt to be more reliable than the Prophet. Both the Prophet 5 and the Jupiter-8 can be heard on many records released during the 1980s.

Figure I.4. A software incarnation of the Jupiter-8—in this case, the Jupiter-8V from Arturia (arturia.com). By the way, this is a software rendering intended to make the instrument look three-dimensional—the actual virtual instrument (if that’s not too much of a contradiction) shows as a two-dimensional representation on the screen.
In the 1980s, things got digital.... For the first time, sounds were created without using analog components. One of the first digital synthesizers was the Fairlight CMI (Computer Music Instrument)—the first sampler. At the time, the introduction of sampling was revolutionary and profound. With sampling, a note could be digitally recorded and then replayed at any pitch. For the first time, this meant that a real instrument could be “perfectly” reproduced on a machine. Suddenly, it was no longer necessary to hire an orchestra to record a piece; instead, you just needed to hire one keyboard player with a Fairlight.
Needless to say, the Fairlight was eye-wateringly expensive (although there were even more expensive digital synthesizers available). However, one cheaper digital synthesizer (which didn’t offer sampling) was the Yamaha DX-7 (see Figure I.5). The DX-7 was the first synthesizer to widely employ the use of frequency modulation (or FM) synthesis to create its sound. For the moment, don’t get too hung up on not knowing what FM synthesis is all about—by the time you have finished this book, you will know a lot about it.

Figure I.5. A software incarnation of the DX-7 synthesizer—in this case, the FM7 from Native Instruments (native-instruments.com).
The DX-7 was also radical for another reason: It was the first mainstream synthesizer to do away with knobs on the synthesizer. Instead, its sound control interface was accessible through a menu-driven system. Although this kept costs down, it also stopped many people from tinkering—the combination of the extreme complexity of FM programming, lack of access to the controls, and lack of knowledge about FM synthesis was enough to deter all but the very brave. However, in terms of numbers sold, the DX-7 is perhaps the most popular hardware synthesizer ever.
The synthesizers we have looked at so far were all self-contained instruments where everything that you could need to create sounds was included within the instrument, and if you wanted anything else—such as another oscillator or another filter—then you were out of luck. Before these self-contained instruments, and in parallel with them, several manufacturers—including Moog, ARP, Roland, and Buchla, to name a few—produced modular synthesizers. Take a look at Figures I.6 and I.7.
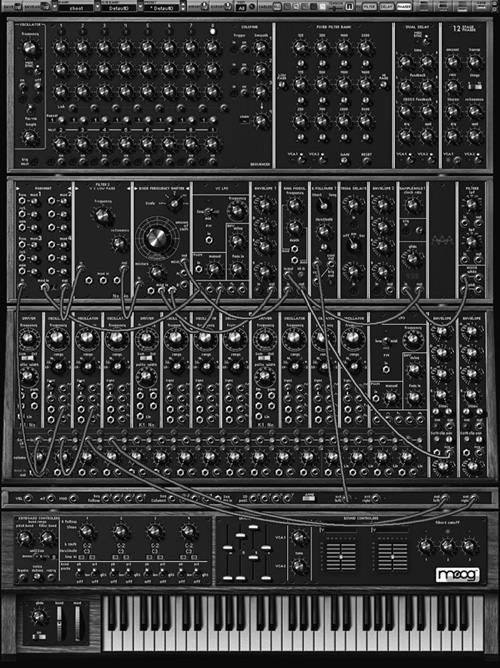
Figure I.6. A software implementation of the Moog Modular synthesizer—in this case, the Moog Modular V from Arturia (arturia.com).
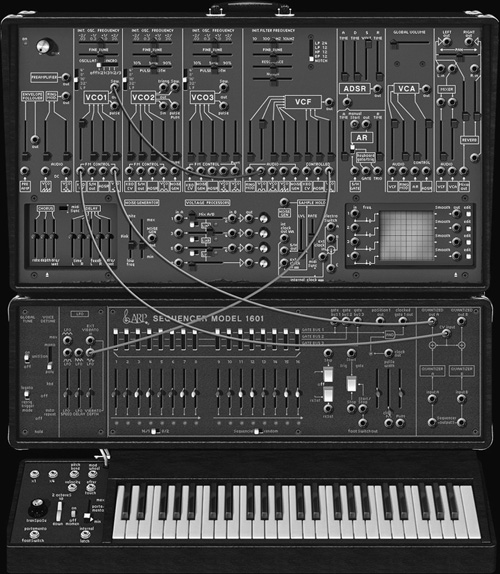
Figure I.7. A software implementation of the ARP 2600 modular synthesizer—in this case, the ARP 2600 V from Arturia (arturia.com).
Modular synthesizers were so named because they included modules that the musician could wire together to make sounds. Some of these synthesizers were produced as individual modules so musicians could buy what they wanted. Others came as a number of modules that were physically grouped together—these could then be wired up, and additional modules (outside of the framework) could also be hooked up.
While modular synthesizers were—and are—hugely powerful, they do have a number of significant downsides:
First, they are (and always have been) expensive. These synthesizers are usually handmade and use many high-quality and expensive components. The designs are highly specialized and they are made in extremely small numbers, meaning that the notion of making these instruments in a low-cost manufacturing location is simply not practical.
Manufacturing takes a long time. As a corollary to the small numbers manufactured, the high price, and the impracticability of manufacturing through a conventional factory process, manufacturing usually has to be undertaken by highly skilled individuals. The combination of these factors means that costs remain high, and manufacturing takes a long time.
They are complicated and impractical. Whereas the functions of most self-contained synthesizers could be accessed from the front panel, modulars are more complicated. You cannot get any sound out of the synthesizer until it has been connected up. In practice, this means that a number of patch leads have to be plugged in to attach the keyboard, the sound generators, the filters, the amplifiers, and the envelopes. While this could be fun and allows lots of room for experimentation, it also makes these synthesizers anything but simple and straightforward to use.
They are large, cumbersome, and fragile. This (coupled with the complication and lack of patch memory) makes them impractical for use on the road. However, that is not to say that these tools have never been on the road. Some people have been that brave.
The combination of these factors made the wide-scale adoption of modular synthesizers highly limited. Often they would only be found in universities and in the studios of musicians with large incomes.
The 1990s saw a new and revolutionary development: software instruments. These offered some huge advantages over their hardware counterparts, including:
Price. The physical costs of software are much lower than the costs associated with hardware.
Interface. Most software synthesizers have a much more accessible interface than their digital hardware counterparts. This is because there is no cost associated with adding lots of knobs to a piece of software. By contrast, each hardware knob and hardware switch has a direct cost.
Try before you buy. With software you can try a demo version of a synthesizer before you lay down your money. With hardware, you might try the synthesizer in a store, but generally you will only get to find out how good it is after you have paid.
Upgradeable. Software can be easily upgraded. Some hardware can be upgraded (or rather, the computer software within the hardware can be upgraded), but proper analog hardware cannot be changed (except with a soldering iron). Also, as software can be upgraded, this means that synthesizers can be released at a much earlier stage in their development (because developers know they can work out the problems/add features easily).
Some of the earliest software instruments were modular-like synthesizers. In many ways the combination of software and modular synthesis gave the perfect combination.
However, there were (and remain) some problems with software-based instruments:
Power. The synthesizer is only as powerful as the computer on which it is running. So, if your computer is dedicated to doing other things (such as running other software instruments, recording audio, processing software effects units, and so on), then there may not be much grunt left for your synthesizer, and so the sound could be degraded or the whole computer could become sluggish.
Audio quality. Very often, computers are not optimized for audio, which could lead to poor sound quality. A second factor affecting sound is the lack of experience of many programmers—it has taken a long time for people to understand how to create pleasing digital audio in the software realm.
While synthesizer history is superficially interesting, you’re probably reading this book because you want to know more about how you can create sounds with the tools that are available today, so let’s move on.
Unless you want to invest several thousands of dollars, then the synthesizer you are most likely to come into contact with is a software synthesizer—in other words, a synthesizer that comes as a piece of software that will run on your computer. As I have mentioned, there are advantages and disadvantages to software, but unless you want to invest thousands of dollars, you will probably reach the conclusion that the advantages of software outweigh the disadvantages. This is a sensible conclusion, and given that this book features software synthesizers, it is quite advantageous for me.
Most software synthesizers that are available today have a fixed architecture—in other words, the modules are routed together in a certain way, and you (as the user/musician) have few options to change these routings. The four main synthesizers mentioned in the last section (Minimoog, Prophet 5, Jupiter-8, and DX-7) all have fixed architecture. For many synthesizers, the architecture is one of the key design decisions that will affect the sound of the synthesizer.
Another feature of virtually all software synthesizers is that they are totally contained—in other words, you cannot add other modules to them, and if you don’t like certain features, you can’t make any changes. However, one of the platforms in this book (SynthEdit) does allow for the inclusion of external modules, and another—VAZ Modular—allows external effects.
In addition to the sound, the architecture has an influence on every aspect of a synthesizer, including:
Its interface
Its simplicity (or otherwise) from a user’s perspective
Its CPU load
Let’s have a look at some of the features of these different types of synthesizers.
With a fixed-architecture synthesizer, the number of modules, the number of filters, the number of envelopes, the number of low-frequency oscillators, and so on is fixed. In addition, the path of the audio signal through the synthesizer is fixed. Some synthesizers offer flexibility—for instance, an option to set up modulation or audio routing changes (perhaps offering a series or parallel filter option)—and others have a very large number of modulation sources, but in essence, there are limits to the synthesizer.
But these limits are not necessarily a bad thing. Indeed, they generally give many advantages:
Usually the synthesizer’s interface will be clear and intuitive from the user’s perspective. This will make the synthesizer easy to learn so the musician can focus on creating sounds, not on reading the manual.
Generally, the synthesizer designer will have built the synthesizer in such a way that the features the user would want most frequently will be in place or easily called up. Again, this makes using a synthesizer a more intuitive/organic process and not one where the musician has to fight against the synthesizer.
Assuming that the synthesizer has been built by a good software engineer, there will have been extensive amounts of optimization, giving the very lowest CPU hit. That isn’t to say that there will be no CPU hit, simply that the engineer will have been able to design the synthesizer so that it is optimized, which allows the key elements (the sound-generation parts and the filter) to use more CPU to give the very best sound.
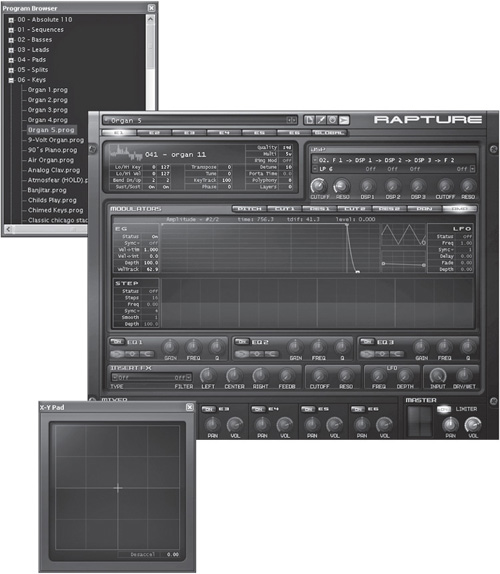
Although fixed architecture may seem limiting, you can have two synthesizers that on the face of it have very similar features, but due to the architecture are very different beasts. As an example, take two leading software synthesizers: Z3TA+ (see Figure I.8) and Rapture (see Figure I.9), which are both made by Cakewalk (cakewalk.com). These synthesizers both have six oscillators, but after that they are very different:
Z3TA+ mixes the six oscillators together and then passes the mixed signal through the filter and processing block. Although it is possible to set up two separate busses (in other words, two separate audio channels), you are essentially dealing with one sound.
By contrast, Rapture operates like six separate single-oscillator synthesizers strapped together. Each separate oscillator has its own filters and digital signal processing blocks and a wide variety of modulation options. Only after each oscillator has been fully processed are the sounds mixed, immediately before the output.

Neither approach is better or worse—they are just different and achieve different results in different circumstances.
As a side note, you can read more about Z3TA+ and Rapture in my book Cakewalk Synthesizers: From Presets to Power User (Course Technology PTR, 2006).
There are two main forms of software modular synthesizers. The first contains what I am categorizing as “synthesizer building” programs.
With these programs you are given a bunch of modules that can be hooked up. You can then build an interface to access some or all of the controls in the modules. Once you have hooked up the modules and created the interface, you save the result as a synthesizer, which can then be loaded into your audio program. For all intents and purposes, this synthesizer is then treated like any other fixed-architecture synthesizer, and so, for instance, you can build a set of presets to accompany it.
Two examples of this type of synthesizer are:
SynthEdit (synthedit.com), which is one of the synthesizers I will be featuring in this book
Reaktor from Native Instruments (native-instruments.com), which is one of the most well-established modular environments, being the successor to Generator, which was both one of the earliest software synthesizers and one of the first modular software synthesizers
The other form of modular synthesizer is the more commonly understood implementation, which could be characterized as a “modules-and-wires” approach. With this approach, the software offers a bunch of modules that can be hooked up with software “wires.” Each patch (in other words, each sound) will have a different set of modules and routings. This approach has several key differences from the synthesizer-building approach:
The interface will show the modules and the wiring (depending on the particular synthesizer and whether individual modules have been hidden).
Within each patch you can edit every parameter—nothing is hidden behind the interface.
Each patch is different—there is no freestanding synthesizer with its own range of associated sounds.
From a sonic perspective, there is no difference between the synthesizer-building approach and the modules-and-wire approach. However, there is clearly a huge difference between the two when you look at workflow. In addition, different synthesizers will sound different (and I will explain some of these differences later in the book).
All of these factors make any meaningful comparison of the two approaches somewhere between very difficult and pointless, so I won’t attempt such an exercise.
Irrespective of which synthesizer you use, you will have a range of different sound-creation techniques on hand. I will talk about these in much greater detail later in the book, but for the moment, let me give you a brief introduction. All of the synthesizers covered feature several of these synthesis techniques. You should note that these techniques are not mutually exclusive—you could (as you will see later in the book), for instance, create a sound using FM and subtractive techniques at the same time.
Subtractive synthesis is perhaps the most common form of synthesis. It is the process of taking a sound source that is rich in harmonic content and then reducing and shaping those harmonics with a filter. This technique is available in most synthesizers and was the main synthesis technique in the Minimoog, Prophet 5, and Jupiter-8.
I’m sorry to throw a whole range of terms at you, but unfortunately, while frequency modulation and phase modulation/distortion are technically different techniques:
They can give similar sounds, and
People tend to use the terms interchangeably (or incorrectly, if you want to be a stickler).
This is the technique that was first widely used in the DX-7. It is the process by which one wave will modulate another wave, thereby distorting its waveform. Now, this may sound horrible— and sometimes it is—but when done properly, it can give a pleasing and broad range of tones, allowing sounds with very detailed and delicate nuances to be created.
This technique is most commonly used to create metallic tones (such as bells and electric pianos) and also to create quite “hard” sounds (for instance, very “in your face”-type bass sounds).
Additive synthesis is in some ways the opposite of subtractive synthesis. With additive synthesis you take individual sine waves and add them together to create a new sound.
I’ve already briefly mentioned some of the synthesizers that will be featured in this book. Let’s look at them in a bit more detail.
Each of the four synthesizers has slightly different features and may be more or less preferable as a tool in different situations. I see the different flavors as being a good thing—I don’t want this book to be about the one and only way to do things. Instead, I’m aiming to illustrate different options and different colors/techniques.
I have chosen these four because (a) they are good and (b) they are popular. Hopefully, many of you reading this book already own one or more of these synthesizers. In case it’s not clear, then let me be clear—I like all of the synthesizers and think they’re all good. You will not make a bad decision by getting hold of any of these synthesizers. The developers all offer demo versions, which I recommend you check out, and if you’ve got the cash, then I suggest you invest in one or more of these synthesizers to support the developers (and to get your hands on a top-class synthesizer).
While this book does feature four synthesizers, it is intended to illustrate techniques that can be applied to these synthesizers and to other synthesizers, too (including fixed-architecture synths). The book uses specific synthesizers to illustrate specific points because you cannot illustrate with generic synths (since there is, by definition, no such thing as a generic synthesizer).
Developer: Jeff McClintock
Website: synthedit.com
Price: Free (shareware). There is a paid option (£47.54/$49.95) if you want to redistribute your creations.
Platform: Windows
SynthEdit (see Figure I.10) is a synthesizer (and effects) building program. It allows for synthesizers and effects to be created and for an interface to be added to control the synthesizer/effects unit. These creations can then be exported as VST/VSTi-format effects/synthesizers. (VST will be explained in Chapter 1.)
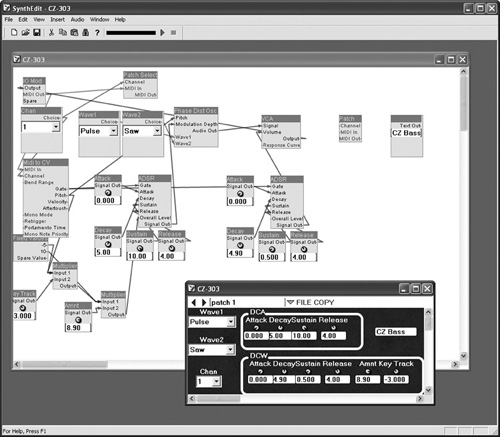
On its own, SynthEdit is highly powerful. However, that power is then multiplied, and the whole product has been taken forward by the range of additional modules that have been developed by external programmers who are part of an impressive SynthEdit community. This facility to add third-party modules has meant that programmers can create singular, highly-specialized modules, focusing on their programming strength without having to create a whole synthesizer.
At the time of this writing, there is one problem with SynthEdit: Plug-ins created with the software do not play nice with multi-core systems, with the result that you cannot use more than one instance of any SynthEdit plug-in (without some behind-the-scenes kludging). However, hopefully by the time you read this book, that issue will have been addressed.
Developer: Kasper Nielsen/KarmaFX
Website: karmafx.net
Price: €95 (including VAT)/$96
Platform: Windows VST
The KarmaFX Synth Modular (see Figure I.11) is a modules-and-wires type of program—indeed, of all the featured synthesizers, the KarmaFX Synth Modular’s interface is probably the closest to a hardware-based modules-and-wires approach. The synthesizer comes with a large array of modules, including many sound-creation modules and many different types of filters.
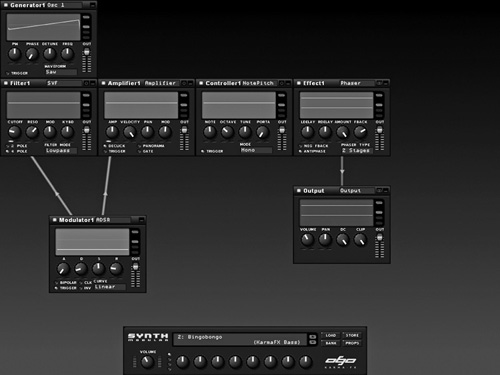
KarmaFX Synth Modular is © Copyright KarmaFX 1998–2009. All rights reserved. The KarmaFX logo is a registered trademark of KarmaFX.
Developer: Martin Fay at Software Technology
Website: software-technology.com
Price: A downloadable version of VAZ Modular costs £l99.95/€236.90/$298.29, and a retail boxed version with a CD is available for £249.95/€296.14/$372.88.
Platform: Windows (stand-alone, VST, and DXi). While it is a Windows-based synthesizer, Martin has suggested that it will also run under OS X. If this is of interest to you, I suggest you chat with him before you purchase.
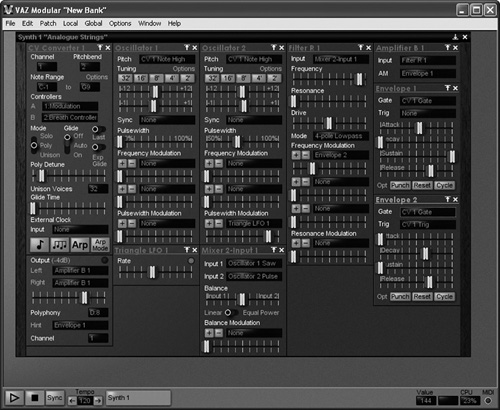
VAZ Modular is a well-established synthesizer that Martin continues to develop (see Figure I.12). It is a modules-and-wires type of program that has an incredibly wide range of modules, including many specialized modules.
Developer: Urs Heckman
Website: u-he.com
Price: $199
Platform: Windows VSTi, Mac (AU, VST, and RTAS)
Zebra 2 (see Figure I.13) is an incredibly popular cross-platform (Windows and Mac) synthesizer that is described as a wireless modular. In practice this means that it is a modules-and-wires design, but the wires bit is handled very elegantly. (Then again, the whole interface is quite elegant.)
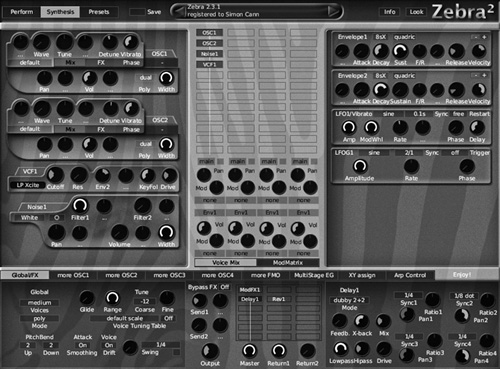
One factor that sets Zebra 2 apart from the other synthesizers is that there are limitations to this synthesizer. There are a limited number of sound generators, a limited number of filters, a limited number of envelopes, and so on. However, it’s flexible enough and has sufficient power to justify its place in the book, so I decided to let Zebra 2 in.
Throughout this book, I will be using the Windows versions of these pieces of software, so don’t get too discouraged if the screenshots don’t show the signs of running on a Mac. Also, the mouse-click commands listed here are for PC users. If you’re using a Mac, you might want to spend a moment or two checking the Mac-equivalent clicks.
So which synth should you choose? Now that is a really tough question—they’re all great synths, and I suggest you get them all. However, that advice may not be practical, so here are a few thoughts:
If you’ve already got one of the synths, then stick with it through this book. You will get much further much sooner with your understanding of how to use synthesizers and to create sounds with synthesizers if you focus. If you try them all, you will get lost with learning the basics and comparing/contrasting each synth. Don’t be a jack of all trades—be a master of one, the synthesizer that you own.
If you want the cheapest option, then SynthEdit can’t be beaten. The downside to SynthEdit is that you have to create a synthesizer in order to play your sounds in a host. This is not the end of the world, but it is not the most flexible option.
If you are using a Mac, then the choice is pretty limited, so go with Zebra 2 (or perhaps see how well VAZ Modular will run on a Mac at the point you are looking to buy).
If you are after a modules-and-wires modern re-creation of analog, then you have two choices: KarmaFX Synth Modular and VAZ Modular. My feeling—and it really is a feeling on my part and most definitely not a recommendation—is that if you’re after a re-creation of an analog modular, then VAZ Modular may be the place to start looking, but if you’re after something more modern, then KarmaFX Synth Modular is the place to start.
All of the synths have demos, so do take some time to check these out to see what sounds good to you and works in a way that feels right for your purposes.
As its title suggests, this book is intended to take you from your first steps with a synthesizer through to an advanced level of proficiency. However, that is not the end of the story as far as synthesizer programming goes. There will always be more to learn about the subject, and so it is quite lucky for me that I am able to suggest some of my other books for your consideration once you have finished this one.
I have written a number of music-related books, but let me recommend two:
How to Make a Noise. (Coombe Hill Publishing, 2007). This book looks at creating sounds with six specific synthesizers. Whereas the book in your hands looks at general principles that can be applied to a range of specific synthesizers, How to Make a Noise takes a much closer look at what can be achieved with a number of today’s leading software synthesizers and looks at the details of creating some very specific sounds with those synthesizers. It also looks at creating a much wider range of sounds than are created in this book.
Cakewalk Synthesizers: From Presets to Power User. (Course Technology PTR, 2006). This book looks at the Cakewalk/rgcaudio synthesizer range and how to create sounds with these synthesizers. It also details the SFZ format (which is a sample format that is mentioned later on in this book that can be loaded into KarmaFX Synth Modular), as well as other sample-based synthesizers not featured in this book.
You can check out details of all my music-related books at noisesculpture.com (where you can also download the materials mentioned in the next chapter).