
12
Creating games
What you will learn
Writing games is great fun. Unlike applications created to solve a specific problem, games are not always tied to a formal specification and don’t need to do anything useful. They only need to be fun to play. Games are a great place to experiment with your software. You can write code just to see what happens when it runs and see whether the result is interesting. Everyone should write at least one computer game in their lives. In this chapter, you’ll start creating games. You’ll learn how to make a complete game and finish with a framework you can use to create more games of your own design. Along the way you’ll discover how to use the HTML Canvas and learn more about the asynchronous loading of resources.
Use the HTML Canvas
In this section, we’ll get started with the HTML canvas element. We’ll create some shapes and display them. Up until now the browser has determined the final position of every element on the screen. We have used Hyper Text Markup Language (HTML) and Cascading Style Sheets (CSS) to express preferences about layout, style, and color, but these are only general instructions. This is as it should be. It makes it possible for a page designer to create content without having to worry about the specifics of the output device. However, some displays must be drawn with pixel-level precision. The HTML Canvas is provided to allow programs to do this. The canvas is an area of the display, within which a program can precisely draw items.
<canvas id="canvas" width="800" height="600">
  This browser does not support a canvas.
</canvas>
The HTML above shows how we create a canvas element in an HTML document. It works in the same way as the audio element that we saw in Chapter 2 in the “Adding sound to the egg timer” section. In the same way that not all browsers can support audio, not all browsers can support the canvas element. If the canvas element is not supported (meaning the browser does not know what to do when it sees the word canvas) the HTML enclosed in the element is displayed. However, if the browser understands the word canvas it will ignore the text in the element so that the message does not appear. All modern browsers provide canvas support, but it is still important to make sure that your pages do sensible things when running on ones that don’t.
MAKE SOMETHING HAPPEN
Draw on a canvas
The best way to understand how a canvas works is to draw something on it. Open the browser and go to the Ch12 Creating GamesCh12-01 Empty Canvas example page. An empty canvas is displayed as a white area on the screen underneath the heading. Press F12 to open the Developer View of the web page and select the Console tab so that we can enter some JavaScript statements and draw on the canvas.

The initial color of a canvas is white, so the canvas in the figure above just looks like an empty area of the page. Now we need to write some JavaScript to draw items on the canvas. We know that JavaScript programs interact with an HTML document by obtaining a reference to an element in the document and then interacting with that element. The first thing we need to do is get a reference to the canvas element by using the document.getElementById method. Enter the statement below and press Enter.
> var myCanvas = document.getElementById("canvas");
When you press Enter, a variable called myCanvas is created and made to refer to the canvas element. This process does not return a value, so the JavaScript console displays undefined.
> var myCanvas = document.getElementById("canvas");
<- undefined
You might think that we could now call methods on the myCanvas reference to draw things on the canvas in the HTML document. However, this is not how it works. A canvas provides a drawing context that is used to perform drawing operations. We want to use the 2D drawing context, so we have to ask the canvas for it. Enter the statement below and press Enter:
> var myContext = myCanvas.getContext('2d');
When you press Enter, a variable called myContext is created that refers to the 2D graphics context of the canvas. This process does not return a value, so the JavaScript console displays undefined.
> var myContext = myCanvas.getContext('2d');
<- undefined
The context object can be used for all further graphics operations. It exposes many methods for drawing on the canvas. One way to draw is to define a path and then ask the context to draw the path. Enter the following statement to begin a path:
> myContext.beginPath();
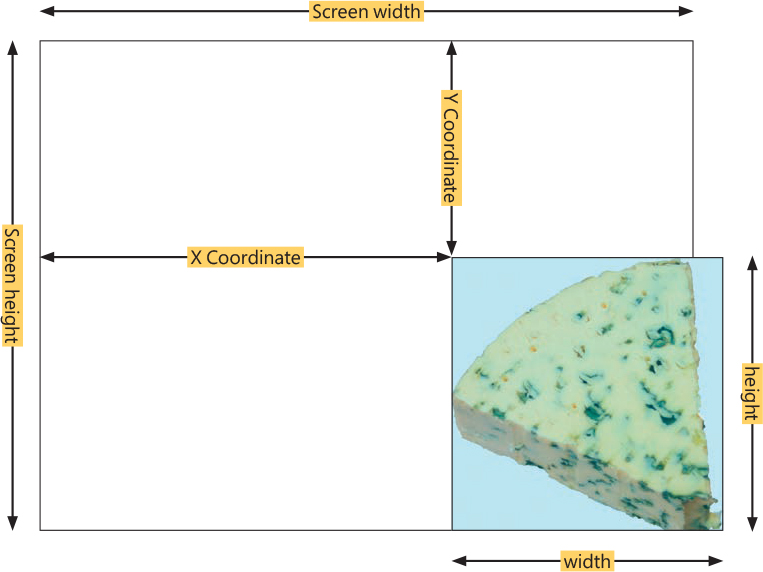
A path contains move and draw operations. You can add many of these operations to the path. We are going to start the path by moving to the origin. The moveTo method accepts two parameters. The first is the “x coordinate” or distance across the screen of a pixel position. The second parameter is the “y coordinate” or distance down the screen. The position (0,0) is known as the origin of the graphics coordinates. Let’s move the path position to the origin. Enter the following statement to move the path position to (0,0).
> myContext.moveTo(0,0)
Moving doesn’t draw anything on the canvas. To draw a line, we use the lineTo method, which also accepts x and y coordinates as parameters. Enter the following statement to draw a line to the position (800,600).
> myContext.lineTo(800,600);
We have told JavaScript to draw a line, but the line has not appeared on the screen yet. This is because the context saves all the move and draw operations until the stroke method is called. Enter the following statement to draw the line on the canvas:
> myContext.stroke();

When you enter the stroke method, you should see a diagonal line drawn down the entire canvas. This is because the canvas has been defined as being 800 pixels wide and 600 pixels high.
Canvas coordinates
You might have been surprised by the line that has just been drawn. You might have expected the line to start at the bottom-left corner, rather than the top. This is because placing the origin in the top-left corner is standard practice when drawing graphics on a computer. The important thing to remember is that the origin, which is the point with the coordinate (0,0), is the top-left corner of the display. Increasing the value of x moves you toward the right of the screen, and increasing the value of y will move you down the screen, as shown in Figure 12-1. If you draw outside the range of the canvas dimensions—for example, if we tried to draw something at location (1000,1000)—this would not be displayed, but it would not cause an error in the program. I’ve chosen a canvas size of 800 pixels wide and 600 pixels high because this results in a reasonable game display on most devices.

Figure 12-1 Canvas coordinates
Computer art
We can use JavaScript graphics to create some nice-looking images. The program below draws 100 colored lines and 100 colored dots. The program uses functions that create random colors and positions on the display area.


The computer art program can produce some rather nice-looking images, as you can see in Figure 12-2. You can find it in the example Ch12 Creating GamesCh12-02 Art Maker folder. Each time you run the program, it will generate a different image because the positions of each item are determined randomly.

Figure 12-2 Computer art
CODE ANALYSIS
Random artwork
As you can see in Figure 12-2, the program above can produce some vaguely artistic-looking images. However, you may have some questions about the code.
context.arc(x, y, radius, 0, 2 * Math.PI);
var radius = getRandomInt(5, 100);
var x = getRandomInt(radius, canvasWidth-radius);
var y = getRandomInt(radius, canvasHeight-radius);
context.fillStyle = "blue";
context.fillRect(0, 0, canvasWidth, canvasHeight);
rgb(255,0,0)
function getRandomColor() {
  var r = getRandomInt(0,255);
  var g = getRandomInt(0,255);
  var b = getRandomInt(0,255);
  return "rgb("+r+","+g+","+b+")";
}
MAKE SOMETHING HAPPEN
Make some of your own art
You can have a lot of fun with the art program above to make some really interesting images. Here are a few ideas that you might like to explore:
You could create a program that displays a different pattern every now and then.
You could use the time of day and the current weather conditions to determine what colors to use in the pattern and create a display that changes throughout the day (perhaps with bright primary colors in the morning and mellower and darker colors in the evening).
If the weather is warm, the colors could have a red tinge, and if it’s colder, you could create colors with more blues.
Draw images on a canvas
In Chapter 2, in the “Add images to web pages” section, we saw that an HTML document can use img elements to display images. The images were stored in files on the server alongside the HTML documents. The browser loads the image files and displays them. We are going to use images for the objects in our game. Our game must load the images and can then draw them on the canvas.
Image file types
There are several different formats for storing pictures on computers. There are two popular formats that you might want to use:
PNG—The PNG format is lossless, meaning it always stores an exact version of the image. PNG files can also have transparent regions, which is important when you want to draw one image on top of another. Files containing PNG images have a
.pngfile name extension.JPEG—The JPEG format is lossy, meaning the image is compressed in a way that makes it much smaller but at the expense of precise detail. Files containing JPEG images have the file name extension
.jpgor.jpeg. I tend to use the shorter extension (.jpg) to name my JPEG files, but you can use either. Just make sure that the name of the file matches the reference in the web page.
The games you create should use JPEG images for the large backgrounds and PNG images for smaller objects drawn on top of them. If you have no usable pictures of your own, you can use the ones I’ve provided with the sample files for this chapter, but your games will work best if you use your own pictures.
If you need to convert images into the PNG format, you can load an image using the Microsoft Paint program and then save it in this format. With Paint, you can also scale and crop images if you want to reduce the number of pixels in the image. Mac owners can use the Preview image editor, and if you are using a Unix-powered PC, you can use the Gimp program, which is freely available for most machines. You can download Gimp here: https://www.gimp.org.
Figure 12-3 shows my picture of the cheese we’ll be using in the game that we will create. In the game, the player will control the cheese and use it to catch crackers around the screen. You can use another picture if you wish. In fact, I strongly advise that you do.

Figure 12-3 Cheese
Load and draw an image
The JavaScript to create and draw an image looks very easy to write:

The statements above are all completely correct. They create a new Image, tell the image that the path to the image resource is the URL cheese.png, and then draw the image on the canvas context at the top-left corner of the screen (coordinate 0,0). Unfortunately, these statements will not work. This is because loading images is like fetching everything else from the network. It takes a while to complete. The image starts to load when the src attribute is set, but the JavaScript code above draws the image before it has loaded. This means that the cheese would not be displayed. Loading an image is performed asynchronously. We first saw asynchronous operation in Chapter 11 in the “Fetch data from a server” section. In that section, we used the fetch function to get weather data from a server.
We can get a notification that an image has been loaded by connecting a function to the onload property exposed by the image. When the image has been fetched, it calls this function. This is called an event, and the function connected to the event is called an event handler. Connecting an event handler to an event is called binding the handler to the event. We could bind an event handler function that draws the image as soon as it has arrived:
var image = new Image();
image.src = "cheese.png";
image.onload = () => context.drawImage(image, 0, 0) ;
These statements would draw the cheese as soon as it was loaded. The last statement binds an arrow function to the onload event so that the image is drawn when it has been loaded. You can find a program that draws cheese in this way in the Ch12 Creating GamesCh12-04 Image Load Event folder in the example programs. We can also bind an event handler to the onerror event that an image will generate if the image cannot be loaded.
image.onerror = () => alert("image not loaded");
This statement binds an arrow function to the onerror event. The arrow function displays an image not loaded alert. You can find a program that produces this error alert in the Ch12 Creating Games Ch12-05 Image Load Fail example programs folder.
Create an image loading promise
A JavaScript program can use an event to detect when a single image is loaded, but our game will need to load several images for the different elements in the game. We need to draw cheese, crackers, tomatoes, and a tablecloth background. It would be hard work to bind event handlers to all the onload events for all these images in turn. However, it turns out that JavaScript has a very neat way of managing multiple asynchronous operations that is based around the JavaScript Promise object.
When we used the fetch function in Chapter 11 in the “Fetch data from a server” section, we discovered that the fetch function returns a Promise object. Our program bound handlers to the then and catch events exposed by a Promise. The first thing we need to do is create a function that generates a Promise for the image loading process.
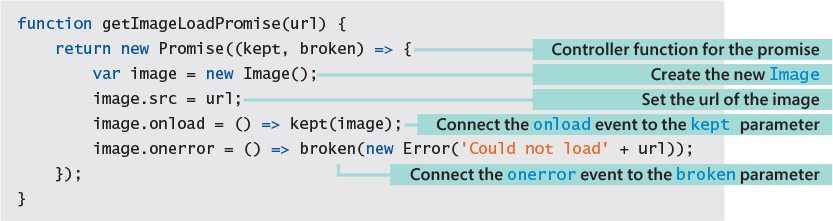
The getImageLoadPromise function is given the URL of the image resource and returns an Image object containing that resource. The constructor for a new Promise object is given a function that accepts two parameters. This is the controller function for the promise. The controller function above is an arrow function that accepts two parameters that specify event handlers to be called when the promise has been kept (the image was loaded) or broken (the image could not be loaded). The controller function creates the new image, sets the src property to the url, and then connects the onload event in the new image to the kept function in the promise and the onerror event in the new image to the broken function in the promise. You might need to take some time getting your head around this, so it might be helpful if we look at how a Promise is used:

This code uses getImagePromise to get a promise and then uses the then part to trigger drawing the image and the catch part to trigger displaying an alert. You can find a program that uses this promise in the Ch12 Creating GamesCh12-06 Promise Image Load in the example programs folder.
Use Promise.all to handle multiple promises
Now that we can create promises to handle image loading, we can use a very powerful JavaScript feature called Promise.all to manage image loading. Promise.all lets a program wait for a number of promises to complete. All our program has to do is assemble a list of promises and give them to a call of Promise.all. The Promise.all method delivers a single promise that is fulfilled when all the promises have been fulfilled.

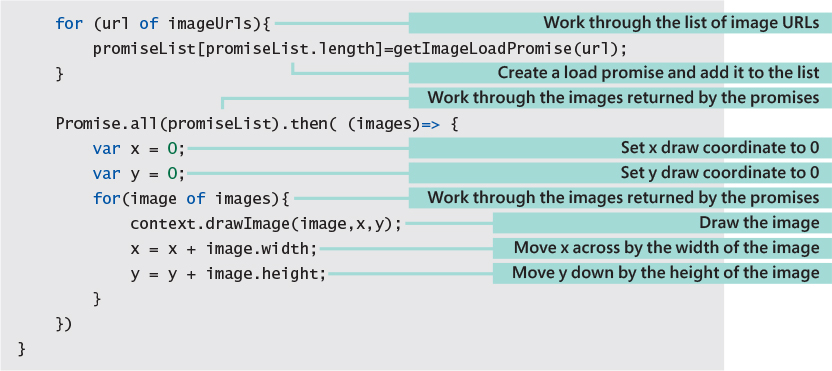
The getImages function creates a list of promises by calling the getImageLoadPromise function for each of the image URLs it has been asked to load. It then calls Promise.all and passes it this list. When all the promises in the list have been fulfilled, the then part of Promise.all is called, which works through the images that were returned and draws them down the canvas. The getImages function is called with a list of image paths:
var imageNames = ["cheese.png", "tomato.png", "cracker.png", "background.png"];
getImages(imageNames);
Figure 12-4 shows the result produced for each of the images in the game that have been loaded from the image files.

Figure 12-4 Game images that have been loaded and displayed
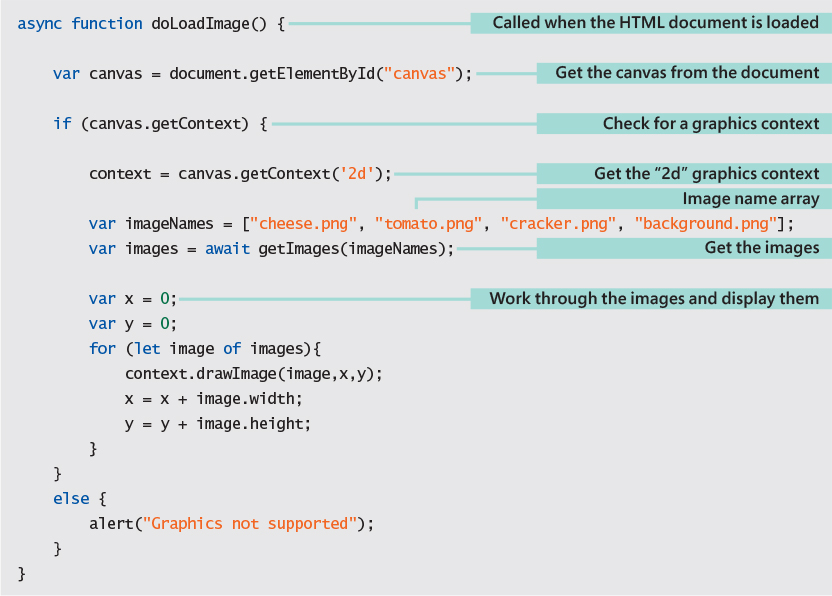
Use async to “wait” for promise results
The getImages function that we have created draws the images on the screen when they have all been loaded. However, the game program will not want to do this. Once the images are ready, the game application will want to start running and display the images as the game runs. Ideally, we would just like the program to be able to “wait” for the result from a call of the getImages method.
It turns out that there is a way of doing this, but it doesn’t involve waiting. Instead, it involves await. To understand how await works, we must first go back to why we are doing all this. The problem we are solving is in two parts:
Some things (for example fetching images) take a while to perform.
Our programs are not allowed to stand and wait for things to be performed.
JavaScript solves this problem by letting us create a Promise object that describes the intent of the action. We attach code to the then part of the Promise, which will run when the promise is kept. Setting up a promise doesn’t take very long so our program does not spend time waiting. But using then is a bit clumsy in this situation. We don’t want to do something when the images have arrived; we just want to move on to the next part of the game.
JavaScript provides a way of “wrapping” up a Promise, which makes things easier. It uses the keywords async and await. Firstly, any function that contains an await must be marked as async. This tells JavaScript to change the way that the function is called to make the await possible. Then the function can use the await keyword to wait for the results of promises. We could make an asynchronous version of getImages as follows:
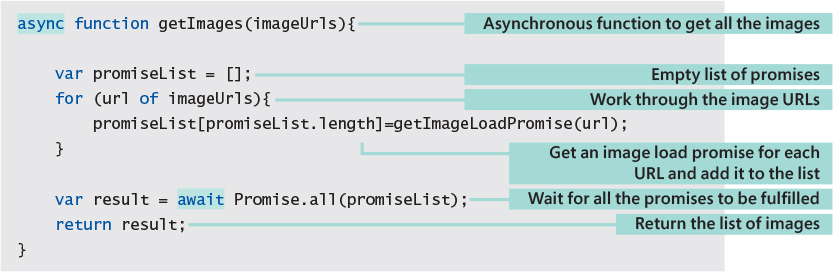
I’ve highlighted the await and async keywords in the listing above. When a program reaches a statement that awaits a promise, the JavaScript execution of the function containing the statement is suspended until the promise is fulfilled. The getImages function now awaits the result of the call of the Promise.all function. When the promise is fulfilled, the function is resumed.
We don’t need to know how this magic works, we just have to marvel at how much easier it makes it for a program to wait for asynchronous actions to complete. The only hard thing to remember about this is that calls of async functions must always be made using await. In other words, any calls to this version of getImages must await it. This is the complete code of the method that draws the images using await:
CODE ANALYSIS
Promise.all and async/await
You can find the async/await version of the image loading program in the Ch12 Creating GamesCh12-08 Promise Await Load in the example files folder. It displays the images just like the earlier versions. However, the code to fetch and use the images is much simpler because it looks like sequential code. You may have some questions about all this:
Animate images
The drawImage function is given x and y values that specify where the image is to be drawn.
context.drawImage(cheese,x,y);
The statement above would draw the Image referred to by cheese on the canvas. The values in the variables x and y specify where in the canvas the image above would be drawn. We can make an image appear to move by repeatedly drawing the image at slightly different positions. This is how all games work. To perform the game animation, we need a regular source of update events. In Chapter 3 in the “Create a ticking clock” section, we used the setInterval function to repeatedly call a function at regular intervals and make our clock tick. We could use this to trigger game display updates, but this would not be a very good idea because it would result in the game display flickering.
If the browser redraws the screen while our game is halfway through updating the positions of objects on the screen, the player would see the display appear to flicker. To avoid flickering, we need to synchronize the game updates with screen updates from the browser. Fortunately, there is a way to do this. The browser maintains a window object, which contains methods that we can use in our applications. One of these is the requestAnimationFrame method. This method accepts a single parameter, which specifies a function to call the next time the browser is updating the display.
window.requestAnimationFrame(gameUpdate);
The statement above asks the browser to call the gameUpdate method the next time the browser is updating the display. The game can then redraw the canvas as part of this process.

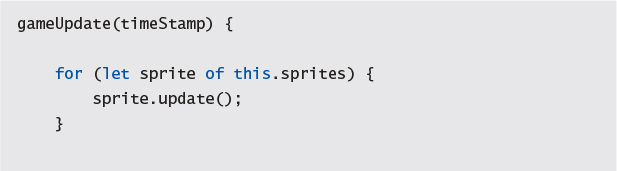
This is a gameUpdate function that will draw the cheese image moving down the screen. The screen is cleared before each redraw. After each draw, the values of the x and y positions of the cheese are increased by 1, which will move the cheese draw position.
MAKE SOMETHING HAPPEN
Move an image
We can investigate the way that games make objects appear to move by opening the example page in the Ch12 Creating GamesCh12-09 Moving Cheese folder. If you open this page, you should find that the cheese moves majestically down the screen for a while and then disappears off the bottom.

Most browsers update the display 60 times a second. The screen is 600 pixels high, and the cheese is moved down the screen one pixel each time it is updated. This means that after around 10 seconds, the cheese will vanish off the bottom of the screen. If you want to make the cheese appear to move more quickly, you can increase the amount you add to the position. The amount you change the position of an item on the screen gives you the speed of that item. See if you can change the program to make the cheese move twice as fast down the screen. These are the two statements that you need to look for:
x = x + 1;
y = y + 1;
By changing the values to 2, you can double the speed. You can find my faster version in the Ch12 Creating GamesCh12-10 Speedy Cheese example folder.
Control gameplay
Now that we know how to make things move around the screen, the next thing we need is a way that a player can control them. We are going to use the keyboard to steer the cheese with the arrow keys. When the user presses an arrow key, we want the cheese to move in the corresponding direction. To make this work, we are going to create an event listener that runs when the player presses a key on the keyboard.
Window events
We have already used the requestAnimationFrame function to ask the window object to tell our game when it is time to redraw the screen. Now we are going to ask the window object to bind a function to events generated by the keyboard. The addEventListener provided by the window object lets a program connect a JavaScript function to a particular event. The events are specified by name, and there are many events. We can start by investigating how events work. We are going to use the keydown event.


The function above adds an arrow function to the keydown event. The function is supplied with an event parameter. It displays the code attribute of the event in a paragraph in the document.
CODE ANALYSIS
Keyboard events
You can find the keyboard event handler code in the Ch12 Creating GamesCh12-11 Keyboard Events example folder. Use the browser to open this page and investigate what it does.
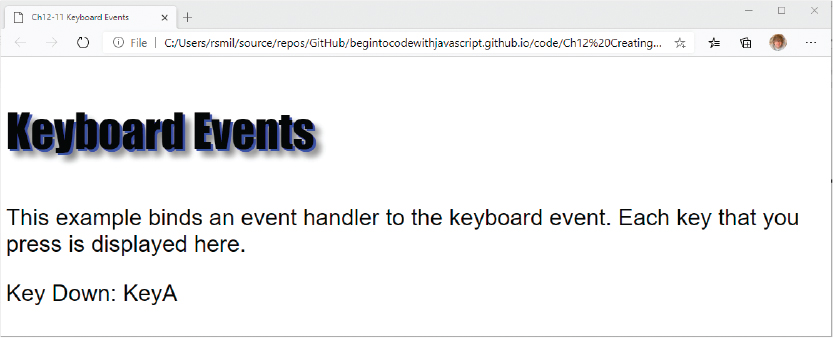
Above, you can see the display that is produced when I pressed the A key on the keyboard. Try some other keys, including nonprinting ones such as Shift and Control. Also, try holding down the Shift key and pressing letters.
Control object position with a keyboard
We can now use the keyboard to control the draw position of the cheese, making it possible for the player to steer the cheese around the screen:

The code above binds an event listener to the keydown event and then uses key values to control the x and y positions of the cheese. When the cheese is drawn at its new position, it will appear to move under the control of the player.
CODE ANALYSIS
Cheese steering
You can find the cheese steering code in the Ch12 Creating GamesCh12-12 Keypress Cheese Control example folder. Use the browser to open this page and investigate what it does.

You can press the arrow keys to move the cheese around the screen. Each time you press an arrow key, the cheese moves one pixel in that direction.
Use keydown and keyup events
The previous example showed the principle of controlling an object with a keyboard, but it was not very user friendly. We don’t want the user to have to press the key each time they want to move the cheese a small amount. It would be much better if the cheese would move while a key was held down and stop when the key was released. We can do this by detecting both keydown and keyup events and using them to control the speed of the cheese.

These variables control the speed and position of the cheese in our game. The speed and position values are used in the function gameUpdate, which updates the cheese position and then draws it.

Each time this function is called, it will clear the screen, update the position of the cheese, and then draw the cheese at the new position. If the speed values are zero, the cheese will not move with each redraw.
window.addEventListener("keydown", (event) => {
    switch(event.code){
        case 'ArrowLeft':
            cheeseXSpeed = -cheeseSpeed;
            break;
        case 'ArrowRight':
            cheeseXSpeed = cheeseSpeed;
            break;
        case 'ArrowUp':
            cheeseYSpeed = -cheeseSpeed;
            break;
        case 'ArrowDown':
            cheeseYSpeed = cheeseSpeed;
            break;
    }
});
This event hander starts the cheese moving when the user presses a key. It doesn’t move the cheese on the screen; instead, it sets the speed value of the cheese so that it will move in the selected direction the next time the update method is called. If the cheese is to move backward or upward, the speed for that direction will be negative. Because the position of the cheese is being updated repeatedly by the gameUpdate function, this will mean that the cheese will start to move as soon as the key is pressed down.
window.addEventListener("keyup", (event) => {
    switch(event.code){
        case 'ArrowLeft':
            cheeseXSpeed=0;
            break;
        case 'ArrowRight':
            cheeseXSpeed=0;
            break;
        case 'ArrowUp':
            cheeseYSpeed=0;
            break;
        case 'ArrowDown':
            cheeseYSpeed=0;
            break;
    }
});
This is the event handler that causes the cheese to stop moving when the player releases a key. It sets the speed value for the particular direction to zero.
WHAT COULD GO WRONG
Losing focus
You can find this cheese steering code in the example program Ch12 Creating GamesCh12-13 Steerable Cheese. If you open the page in this folder with a browser, you will find that you can control the cheese movement very well. If you hold down two arrows you can even make the cheese move diagonally. However, the code does have a problem. If you start the cheese moving and then select another window on your desktop the cheese doesn’t stop when you release the movement key. This is because a modern windowed operating system like Windows 10, macOS, or Linux has the idea of focus.
At any given instant, the events from the keyboard and mouse are sent to the currently selected window, which is called the one that has focus. As soon as you select another application, the browser moving our cheese around loses focus and keyboard events are no longer sent to it. This means that there is no keyup message to stop the cheese moving, which causes it to keep moving and eventually vanish off the canvas.
We can fix this by binding a handler to a window event that is fired when the application loses focus. This is called the blur event. When this event fires, the game must stop the movement of the cheese.
window.addEventListener("blur", (event) => {
    cheeseXSpeed = 0;
    cheeseYSpeed = 0;
});
The code above shows how we would do this. When the window loses focus, it now sets the speed values for the cheese to 0, causing it to stop moving. The application in the Ch12 Creating GamesCh12-14 Steerable Cheese with focus example folder uses this event handler to stop the cheese moving when browser loses focus. If you repeat the experiment you performed with the earlier version, you will find that the cheese stops moving as soon as you select a different window from the browser.
Create game objects
The game we are making is called “Cracker Chase.” The player will control the cheese, with the aim of capturing as many crackers as possible while avoiding the deadly killer tomatoes. The game will display four different items on the screen:
The tablecloth background—This contains an image that is the background of the game.
Cheese—The player will steer the cheese around the screen trying to capture crackers and avoid the killer tomatoes.
Crackers—The player will try to capture crackers by touching them with the cheese.
Killer tomato—The tomatoes will chase the cheese. If a tomato catches the cheese, the game ends.
Game sprites
Each of these screen objects is called a sprite. A sprite has an image drawn on the screen, a position on the screen, and a set of behaviors. Each sprite will do the following things:
Initialize itself when the game is loaded.
Draw itself on the screen.
Update itself. Each sprite will have a characteristic behavior.
Reset itself between games. When we start a new game, we must reset the state of each sprite.
Sprites might have other behaviors, but these are the fundamental things that a sprite must do. We can put these behaviors into a class:
CODE ANALYSIS
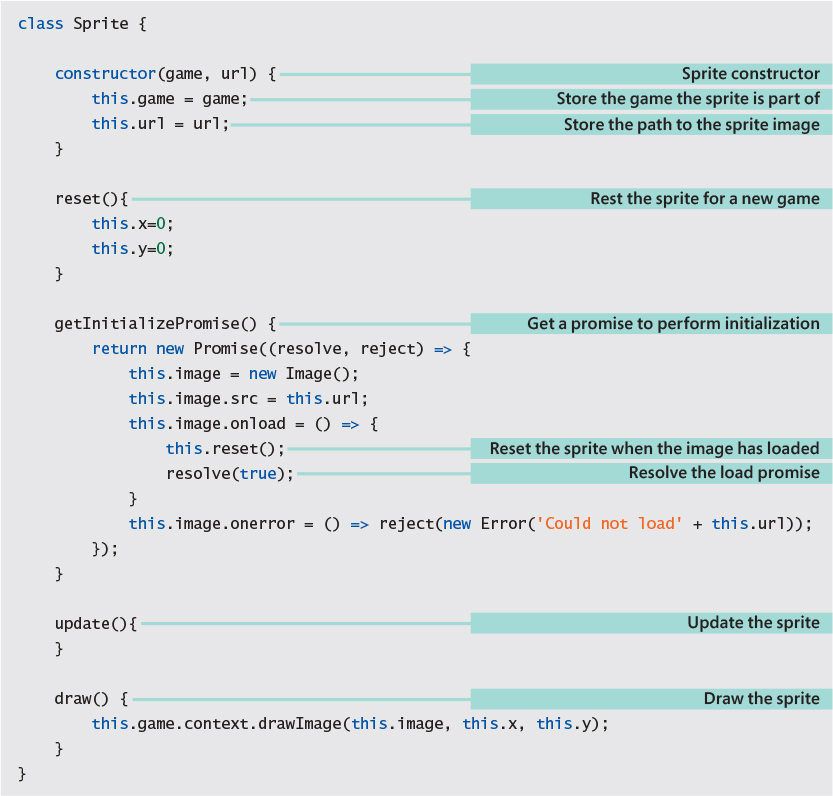
Sprite superclass
The code above defines the superclass for all the sprites in the game. You may have some questions about it.
The Sprite class doesn’t do much, but it can be used to manage the background image for this game. The game will take place on a “tablecloth” background. We can think of this as a sprite that fills the screen. We can now make our first version of the game object that contains a game loop that just displays the background sprite.
The game object
The CrackerChaseGame object holds all the game data, including a list of all the sprites that the game will use. It also holds methods that will enable the gameplay.


CODE ANALYSIS
The CrackerChaseGame class
The code above defines the class that will implement our game. You might have some questions about it.
this.background = new Sprite(this, 'images/background.png');
Starting the game
Now that we have our game class, we can start the game running. Below is the body of the HTML document for the game. It contains a canvas, and the <body> element has an onload attribute that calls the JavaScript function doGame when the page is loaded.
<body onload="doGame()">
  <canvas id="canvas" width="800" height="600">
    This browser does not support a canvas.
  </canvas>
</body>
async function doGame() {
    var activeGame = new CrackerChaseGame();
    await activeGame.gameInitialize();
    activeGame.gameStart();
}
Below, you can see the gameStart method. The first statement calls the gameReset method to reset the game and make it ready to play. The second statement calls window.requestAnimationFrame to connect the gameUpdate method to the next screen animation event. We need to have a detailed look at the code here because it tells us some important things about the this reference.

Investigating this
We started using the this reference when we created the stock storage objects in the Fashion Shop application in Chapter 10. We discovered that in a method inside a class the keyword this means “a reference to the object that this method is running inside.” If this seems confusing, consider the sequence of statements that are being performed. The function doGame contains the following statement to start the game running:
activeGame.gameStart();
The statement means “follow the reference activeGame to an object and call the gameStart method on that object.” The JavaScript system finds the object and calls the gameStart method in it. Just before it runs the code in gameStart, the JavaScript system sets the keyword this to refer to the same object as activeGame. The gameStart method contains the statement:
this.gameReset();
The statement follows the this reference (which is referring to the activeGame object) and then calls the method gameReset on that object. So everything works as it should, and the correct game object is reset and ready for play. The reference this.gameUpdate refers to the game update method that we want to have called to update our game. So you might think that we can just pass the method reference into the window.requestAnimationFrame method as a parameter.
window.requestAnimationFrame(this.gameUpdate);
The problem is that the code above does not work because the gameUpdate method will not be called from a reference to the activeGame object. It is called by the JavaScript window object when it is time to redraw the display. In other words, the this reference inside gameUpdate will refer to the wrong thing when the function runs. We can fix this by explicitly binding the this reference in the call of gameUpdate to a reference to the active game object:
window.requestAnimationFrame(this.gameUpdate.bind(this));
The bind part of the call above is highlighted. It explicitly says to JavaScript “When you call the gameUpdate function, make the value of this in the gameUpdate the same as the value of this in the gameReset function.” You might find this confusing. I certainly did. It helps to remember just who is calling the gameUpdate function. It is not called via a reference to a game object; it is called from within the window object. The result is that it can’t have a this reference to the active game at the point it runs. So we need to explicitly bind in a value of this for the method to use. If you run the example program in the Ch12 Creating GamesCh12-15 Background Display folder, you will see the background displayed.
Add a cheese sprite
The player sprite will be a piece of cheese that is steered around the screen. We’ve seen how a game can respond to keyboard events; now we’ll create a player sprite and get the game to control it. The Cheese class below implements the player object in our game.
class Cheese extends Sprite {
    constructor(game, url) {
        super(game,url);

        this.width = game.canvasWidth / 15;
        this.height = game.canvasWidth / 15;

        this.speed = 5;
        this.xSpeed = 0;
        this.ySpeed = 0;

        window.addEventListener("keydown", (event) => {
            switch(event.code){
                case 'ArrowLeft':
                    this.xSpeed = -this.speed;
                    break;
                case 'ArrowRight':
                    this.xSpeed = this.speed;
                    break;
                case 'ArrowUp':
                    this.ySpeed = -this.speed;
                    break;
                case 'ArrowDown':
                    this.ySpeed = this.speed;
                    break;
            }
        });
        window.addEventListener("keyup", (event) => {
            switch(event.code){
                case 'ArrowLeft':
                    this.xSpeed = 0;
                    break;
                case 'ArrowRight':
                    this.xSpeed = 0;
                    break;
                case 'ArrowUp':
                    this.ySpeed = 0;
                    break;
                case 'ArrowDown':
                    this.ySpeed = 0;
                    break;
            }
        });
    }

    update(){
        super.update();

        this.x = this.x + this.xSpeed;
        this.y = this.y + this.ySpeed;

        if(this.x<0) this.x=0;
        if(this.x + this.width > this.game.canvasWidth){
            this.x = this.game.canvasWidth - this.width;
        }

        if(this.y<0) this.y=0;
        if(this.y + this.height > this.game.canvasHeight){
            this.y = this.game.canvasHeight - this.height;
        }
    }

    draw() {
        this.game.context.drawImage(this.image, this.x, this.y, this.width, this.height);
    }
}
CODE ANALYSIS
Player sprite
The code above defines the Cheese sprite. You can find it in the Ch12 Creating GamesCh12-16 Background and Cheese sample code folder. Use your browser to open the web page there.
You can use your cursor to move the cheese around the canvas. Note what happens when your cheese reaches the edge of the canvas. You might have some questions about this.
this.width = game.canvasWidth / 15;
this.height = game.canvasWidth / 15;
draw() {
    this.game.context.drawImage(this.image, this.x, this.y, this.width, this.height);
}
if(this.x + this.width > this.game.canvasWidth){
    this.x = this.game.canvasWidth - this.width;
}
reset() {
    this.x = (this.game.canvasWidth - this.width) / 2.0;
    this.y = (this.game.canvasHeight - this.height) / 2.0;
}
Add a Cracker sprite
Moving the cheese around the screen is fun for a while, but we need to add some targets for the player. The targets are crackers the player must capture with the cheese. When a cracker is captured, the game score is increased, and the cracker moves to another random position on the screen. The Cracker sprite is a subclass of the Sprite class:
class Cracker extends Sprite {

    constructor(game, url) {
        super(game, url);

        this.width = game.canvasWidth / 20;
        this.height = game.canvasWidth / 20;
    }

    getRandomInt(min, max) {
        var range = max - min + 1;
        var result = Math.floor(Math.random() * (range)) + min;
        return result;
    }

    reset() {
        this.x = this.getRandomInt(0, this.game.canvasWidth-this.width)
        this.y = this.getRandomInt(0, this.game.canvasWidth-this.height)
    }

    draw() {
        this.game.context.drawImage(this.image, this.x, this.y, this.width, this.height);
    }
}
The Cracker class is very small because it gets most of its behavior from its superclass, the Sprite class. The constructor sets the width of a cracker to a 20th of the screen size. The reset method for the cracker picks a random location on the canvas. It uses the same random number function that we used to position dots in the art program. We can add a Cracker to our game by creating it and then adding it to the list of sprites in the game:
this.sprites = [];

this.background = new Sprite(this, 'images/background.png');
this.sprites[this.sprites.length] = this.background;

this.cracker = new Cracker(this, 'images/cracker.png');
this.sprites[this.sprites.length] = this.cracker;

this.cheese = new Cheese(this, 'images/cheese.png');
this.sprites[this.sprites.length] = this.cheese;
The sample in the Ch12 Creating GamesCh12-17 Cheese and Cracker folder shows how this works. See Figure 12-5.
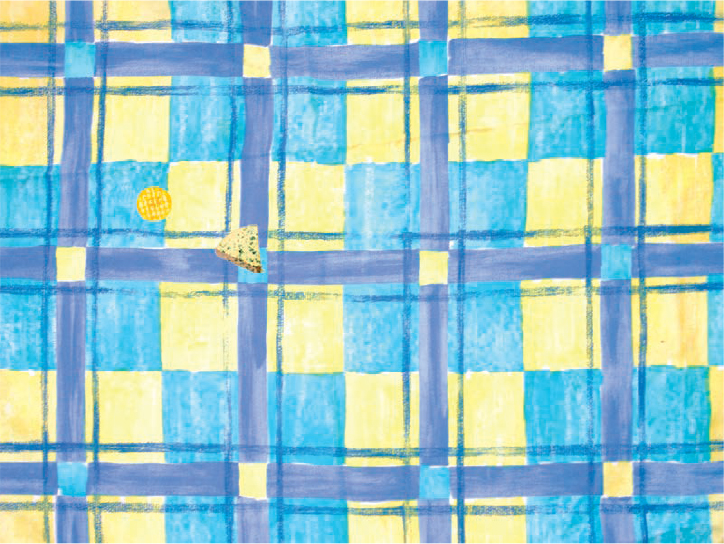
Figure 12-5 Cheese and cracker
Add lots of crackers
We would like to have 30 crackers in the game for the player to chase after. It turns out that this is very easy to do. We can use a loop to create crackers and add them to the sprite list.
for (let i = 0; i < 30; i = i + 1) {
    this.sprites[this.sprites.length] = new Cracker(this, 'images/cracker.png');
}
Figure 12-6 shows the game now. If we want to have even more crackers, we just need to change the limit of the range in the for loop that creates them. The sample in the Ch12 Creating GamesCh12-18 Cheese and Crackers folder contains this code. If you run the sample, you will see a screen full of crackers that a player can move the cheese over.
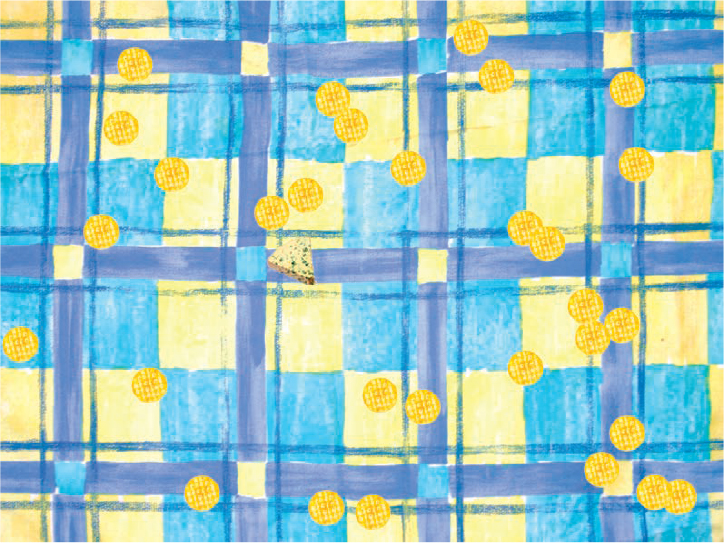
Figure 12-6 Cheese and crackers
Catch the crackers
The game now has lots of crackers and a piece of cheese that can chase them. But nothing happens when the cheese “catches” a cracker. We need to add a behavior to the Cracker that detects when the cracker has been “caught” by the cheese. A cracker is caught by the cheese when the cheese moves “on top” of it. The game can detect when this happens by testing whether rectangles enclosing the two sprites intersect.
Figure 12-7 shows the cheese in the process of catching a cracker. The rectangles around the cheese and cracker images are called bounding boxes. When one bounding box moves “inside” another, we say that the two are intersecting. When the cracker updates, it will test to see whether it intersects with the cheese. The cheese is intersecting with the cracker because the right and bottom edges are “inside” the cheese.

Figure 12-7 Intersecting sprites
Figure 12-8 shows how the test will work. In this figure, the two sprites are not intersecting because the right edge of the cheese is to the left of the left edge of the cracker. In other words, the cheese is too far to the left to intersect with the cracker. This would also be true if the cheese were above, below, or to the right of the cracker.
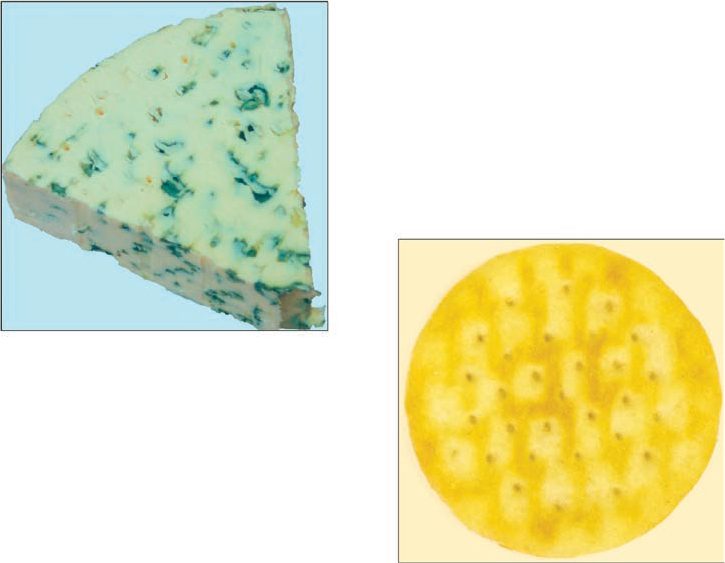
Figure 12-8 Nonintersecting sprites
We can create a method that tests for these four situations. If any of them are true, the rectangles do not intersect.
intersectsWith(sprite) {
    if ((this.x + this.width) < sprite.x) return false;
    if ((this.y + this.height) < sprite.y) return false;
    if (this.x > (sprite.x + sprite.width)) return false;
    if (this.y > (sprite.y + sprite.width)) return false;
    return true;
}
The method can be added to the Sprite class. The method returns true if the sprite intersects with a particular target. We add this method to the Sprite class so that all sprites can use it. Now we can add an update method to the Cracker class that checks to see whether the cracker intersects with the cheese:
update() {
    if (this.intersectsWith(this.game.cheese)) {
        this.reset();
    }
}
When the cheese moves over a cracker, it is reset to a different position in the screen. The sample in the Ch12 Creating GamesCh12-19 Eating Crackers folder contains this code. If you run the sample, you will see a screen full of crackers that a player can move the cheese over. When the cheese is moved over a cracker, the cracker disappears and is redrawn somewhere else on the screen.
Add sound
At the moment our game is silent, which is a bit boring. We could improve the cracker class so that it plays a sound when it is eaten. We’ve made JavaScript programs that play sound in the past. We added a sound element to the egg timer in Chapter 2. Our game can make sound by using an Audio object:

The constructor for the Cracker class now accepts an additional parameter giving the URL that specifies the location of the sound resource. When the Cracker constructor runs, it creates an Audio object for the sound effect and then sets the src property of the new Audio object to the sound resource location.
this.cracker = new Cracker(this, 'images/cracker.png', 'sounds/burp.wav');
When the cracker is created, the constructor is given a path to the sound file to be used. The update method can now play the sound whenever the cheese “eats” a cracker:

You can find the noisy version of the game in the Ch12 Creating GamesCh12-20 Eating with sound example folder. If you want to create your own sound effects, you can use the program Audacity to capture and edit sounds. It is a free download from http://www.audacityteam.org/ and is available for most types of computers.
Adding scores
Keeping score is another great way to motivate the player of a game. In Cracker Chase, the player will increase their score by 10 each time they eat a cracker.
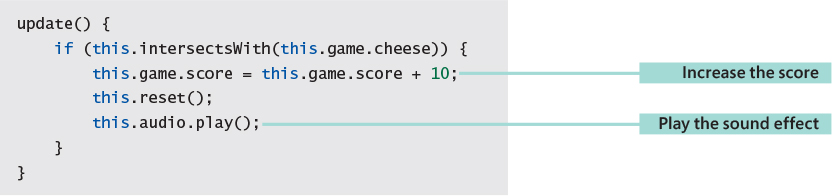
The Cracker update method above adds 10 to the score in the game each time a cracker is eaten. The score value is held in the CrackerChaseGame class and is drawn each time the screen is updated:
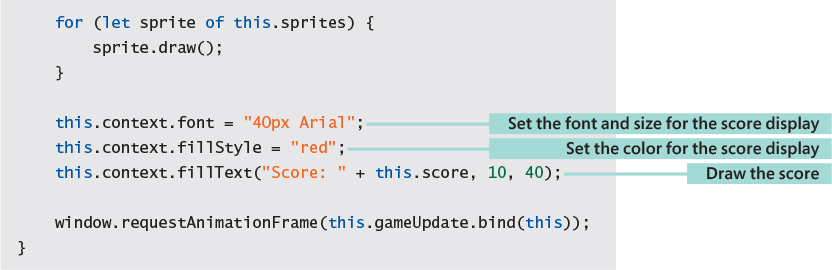
We draw the score on the canvas using a set of methods from the canvas context that we’ve not seen before. The fillText method draws filled text on the screen. The fillStyle method lets us set the color of the text, and we can set the text size and style by assigning a value to the font property of the context.
Figure 12-9 shows how the score is displayed. You can find the scoring version of the game in the Ch12 Creating GamesCh12-21 Eating with scores example folder.

Figure 12-9 Score display
WHAT COULD GO WRONG
Bad collision detection

There are some problems with using bounding boxes to detect collisions. The image above shows that the cheese and the cracker are not colliding, but the game will think that they are. This should not be too much of a problem for our game. It makes it easier for the player, as they don’t always have to move the cheese right over the cracker to score a point. However, the player might have grounds for complaint if the game decides they have been caught by a killer tomato because of this issue. There are a few ways to solve this problem:
When the bounding boxes intersect (as they do above), we could check the intersecting rectangle (the part where the two bounding boxes overlap) to see if they have any pixels in common. Doing so provides very precise collision detection, but it will slow down the game.
We could make the bounding boxes slightly smaller so that they don’t overlap as much.
We could detect collisions using distance rather than intersection, which works well if the sprites are mostly round.
The final solution is the one I like best. I could make all the game images rectangular, so the sprites fill their bounding boxes, and the player always sees when they have collided with something.
Add a killer tomato
Currently, the game is not much of a game. There is no jeopardy for the player. When you make a game, you set up something that the player is trying to achieve. Then you add some elements that will make this difficult for them. In the case of the game Cracker Chase, I want to add “killer tomatoes” that will relentlessly hunt down the player. As the game progresses, I want the player to be chased by increasing numbers of tomatoes until the game becomes all about survival. The tomatoes will be interesting because I’ll give them “artificial intelligence” and physics.
Add “artificial intelligence” to a sprite
Artificial intelligence sounds difficult to achieve, but in the case of this game, it is actually very simple. At its heart, artificial intelligence in a game simply means making a program that would behave like a person in that situation. If you were chasing me, you’d do this by moving toward me. The direction you would move would depend on my position relative to you. If I were to your left, you’d move left, and so on. We can put the same behavior into our killer tomato sprite:
if(this.game.cheese.x > this.x){
    this.xSpeed = this.xSpeed + this.acceleration;
}
else {
    this.xSpeed = this.xSpeed - this.acceleration;
}

if(this.game.cheese.y > this.y){
    this.ySpeed = this.ySpeed + this.acceleration;
}
else {
    this.ySpeed = this.ySpeed - this.acceleration;
}
This condition shows how we can make an intelligent killer tomato. It compares the x positions of the cheese and the tomato. If the cheese is to the right of the tomato, the x speed of the tomato is increased to make it move to the right. If the cheese is to the left of the tomato, it will accelerate in the other direction. The code above then repeats the process for the vertical positions of the two sprites. The result is a tomato that will move intelligently toward the cheese. We could instead make a “cowardly” tomato that runs away from the player by making the acceleration negative so that the tomato accelerates in the opposite direction of the cheese. This would be useful for games where the player has to chase down targets.
Add physics to a sprite
Each time the game updates, it can update the position of the objects on the screen. The amount that each object moves each time the game updates is the speed of the object. When the player is moving, the cheese’s position is updated by the value 5. In other words, when the player is holding down a movement key, the position of the cheese in that direction is being changed by 5. The updates occur 60 times per second because this is the rate at which the game loop runs. In other words, the cheese would move 300 pixels (60*5) in a single second. We can increase the speed of the cheese by adding a larger value to the position each time it is updated. If we used a speed value of 10, we’d find that the cheese would move twice as fast.
Acceleration is the amount that the speed value is changing. The statements below update the xSpeed of the tomato by the acceleration and then apply this speed to the position of the tomato.
this.xSpeed = this.xSpeed + this.acceleration;
this.x = this.x + this.xSpeed;
The initial speed of the tomato is set to zero, so each time the tomato is updated, the speed (and hence the distance it moves) will increase. If we do this in conjunction with “artificial intelligence,” we get a tomato that will move rapidly toward the player.
Add friction to a sprite
If we just allowed the tomato to accelerate continuously, we’d find that the tomato would just get faster and faster, and the game would become unplayable. The statement below adds some “friction” to slow down the tomato. The friction value is less than 1, so each time we multiply the speed by the friction, it will be reduced, which will cause the tomato to slow down over time.
this.xSpeed = this.xSpeed * this.friction;
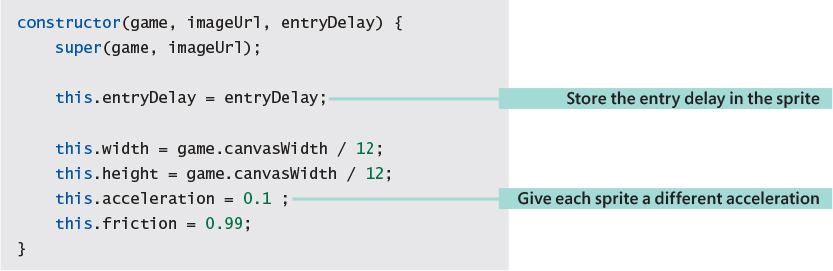
The friction and acceleration values are set in the constructor for the Tomato sprite:
constructor(game, imageUrl) {
    super(game, imageUrl);

    this.width = game.canvasWidth / 12;
    this.height = game.canvasWidth / 12;
    this.acceleration = 0.1;
    this.friction = 0.99;
}
After some experimentation, I came up with the acceleration value of 0.1 and a friction value of 0.99. If I want a sprite that chases me more quickly, I can increase the acceleration. If I want the sprite to slow down more quickly, I can increase the friction. You can have a lot of fun playing with these values. You can create sprites that drift slowly toward the player and, by making the acceleration negative, you can make them run away from the player. You can have some fun avoiding the killer tomato with the game example in the Ch12 Creating GamesCh12-22 Killer tomato folder.
Create timed sprites
It’s important that a game be progressive. If the game started with lots of killer tomatoes, the player would not last very long and would not enjoy the experience. I’d like the first tomato to appear after five seconds and a new tomato to appear every 10 seconds after that. We can do this by giving each tomato an “entry delay” value when we construct it:
for (let tomatoCount = 0; tomatoCount < 5; tomatoCount = tomatoCount + 1) {
    let entryDelay = 300 + (tomatoCount * 600);
    this.sprites[this.sprites.length] =
        new Tomato(this, 'images/tomato.png', entryDelay);
}
This code uses a loop to create 5 tomato sprites with delay values starting at 300 and going up in steps of 600. The constructor in the Tomato class stores the value of entryDelay for that tomato.
The entryDelay value is used to delay the entry of the sprite:
update() {

    this.entryCount = this.entryCount + 1;

    if (this.entryCount < this.entryDelay) {
        return;
    }

    .. the rest of the update method goes here
}
The update method is called 60 times per second. The first tomato has an entry delay of 300, which means that it will arrive at 300/60 seconds, which is 5 seconds after the game starts. The next tomato will appear 10 seconds after that, and so on, up until the last one. When I played the game with 5 tomatoes chasing me, I noticed that the gameplay was not very thrilling because all the sprites merged into one another, making them very easy to avoid. This is because they were all accelerating at the same rate. To fix this, I used the entry delay to calculate a change to the acceleration. This means that the later sprites accelerate more quickly and don’t bunch together.

The example program in the Ch12 Creating GamesCh12-22 Killer tomatoes folder shows how this works. It can get rather frantic after a few tomatoes have turned up and are chasing you.
Complete the game
We now have a program that provides some gameplay. Now we need to turn this into a proper game. To do so, we need to add a start screen, provide a way that the player can start the game, detect and manage the end of the game, and then add a high score because it adds a lot to the gameplay.
Add a start screen
A start screen is where the player will—you guessed it—start the game. When the game is complete, the game returns to the start screen. Figure 12-10 shows the start screen for this game.
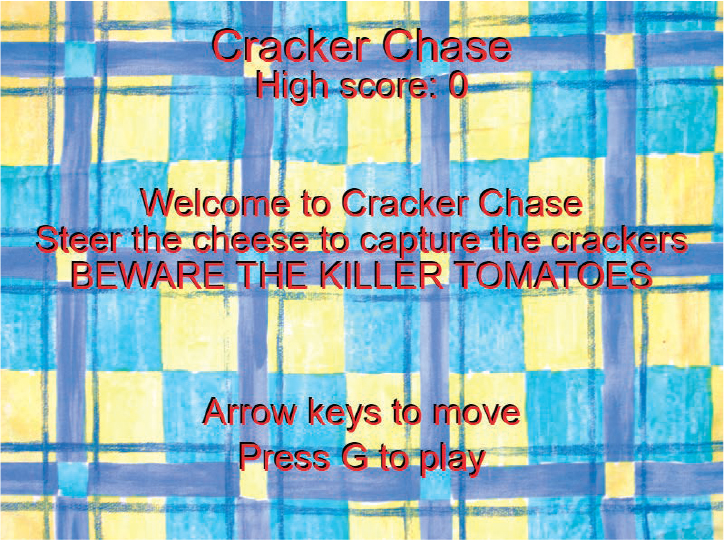
Figure 12-10 Start screen
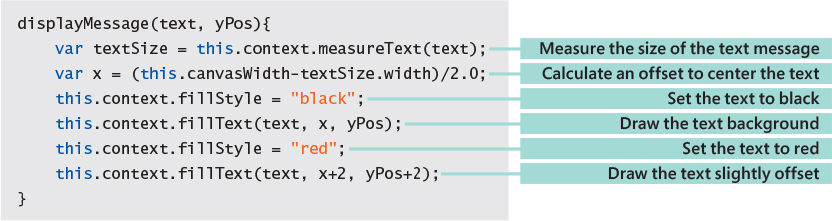
The drawStartScreen method draws the start screen. It uses a helper function called displayMessage that centers text on the screen.
drawStartScreen(){
    this.background.draw();
    this.context.font = "50px Arial";
    this.displayMessage("Cracker Chase",70);
    this.context.font = "40px Arial";
    this.displayMessage("High score: " + this.topScore, 110);
    this.displayMessage('Welcome to Cracker Chase', 240);
    this.displayMessage('Steer the cheese to capture the crackers', 280);
    this.displayMessage('BEWARE THE KILLER TOMATOES',320);
    this.displayMessage('Arrow keys to move', 470);
    this.displayMessage('Press G to play', 520);
}
We saw the screen drawing methods earlier when we added code to the update method that drew the score on the screen. The displayMessage method also uses the measureText method to get the width of the text so that it can be centered on the screen. It draws the text twice. The first time, the text is drawn in black, and then the text is drawn again in red. The second time the text is drawn, it is moved slightly to make it appear that the black text is a shadow.
Start the game running
The start screen in Figure 12-10 tells the player to press the G key to start the game. So now we need to add the code to make this happen.
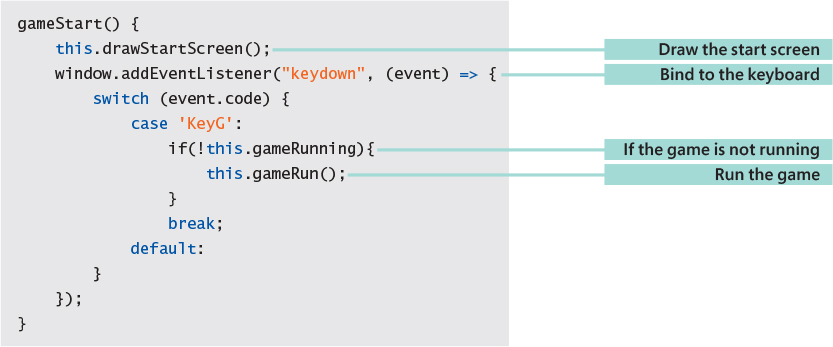
The gameStart method is called when the user starts the game. It calls drawStartScreen to draw the start screen and then binds an arrow function to the keydown event. The arrow function checks for the 'KeyG' key and calls the gameRun method if the gameRunning property of the game is false.

The gameRun method runs the game, sets gameRunning to true, and then triggers the first animation frame in the game. When the game is running, the gameUpdate method updates the sprites and then checks to see if any of them have ended the game. If the game is over, it displays the start screen and the final game score:


Detect the game end
We’ve seen that the game has two states, which are managed by the gameRunning property. This property is set to true when the game is running and false when the start screen is displayed. Now we need to create the code that manages the gameRunning value. The game ends when the player collides with a killer tomato, which is detected in the update method for the tomato sprite:
update() {
    // update the tomato here
    if (this.intersectsWith(this.game.cheese)) {
        this.game.gameEnd();
    }
}
The test in the update method for the Tomato sprite checks to see if this tomato intersects the cheese. If it does gameEnd method is called to end the game.

The gameEnd method sets gameRunning to false. It also updates the highScore value. If the current score is greater than the highest score so far, it is updated to the new high score. The value of the high score is displayed on the start screen of the game.
You can find the completed game in the Ch12 Creating GamesCh12-24 Complete Crackerchase folder. It’s fun to play for short bursts, particularly if there are a few of you trying to beat the high score. My highest score so far is 740, but then I never was any good at playing video games.
MAKE SOMETHING HAPPEN
Build your own game
The Cracker Chase game can be used as the basis of any sprite-based game you might like to create. You can change the artwork, create new types of enemies, make the game two-player, or add extra sound effects. When I said at the start of this book that programming is the most creative thing you can learn to do, this is the kind of thing I was talking about. You can create a game called “Closet Frenzy” where you are chased around by coat hangers while you search for a matching sock. You could create “Walrus Space Rescue,” where you must steer an interplanetary walrus through an asteroid minefield. Anything you can think up, you can build. However, one word of caution. Don’t have too many ideas. I’ve seen lots of game development teams get upset because they can’t get all their ideas to work at once. It is much more sensible to get something simple working and then add things to it later.
Now that you know how a game works, you can take a look at some game engines, which do a lot of the hard work for you. The Phasor game engine is a great place to start, with many example games you can use as starting points. You can find it at https://phaser.io. If you want to create multiplayer games, you should take a look at Socket.io, which you can use to create a game that is hosted on a Node.js server and can be played by people all over the world. You can find it at https://socket.io/.
What you have learned
An HTML document can contain a canvas element within which items can be drawn at arbitrary positions.
JavaScript can draw Image objects on a canvas at a particular position and of a particular size.
JavaScript images are loaded asynchronously. The
onloadevent will fire when an image is loaded. This can be used to create aPromiseobject to manage a load.A number of simultaneous promises can be placed in a list and resolved with a single call of
Promise, all of which generates a promise that returns when all the promises in the list have been fulfilled.An asynchronous JavaScript function (one which has been declared with
async) can use theawaitkeyword to await the result of a promise. The asynchronous function is suspended while the result of the promise is awaited. Suspended functions do not block browser execution.Animation in a game is achieved by repeated redrawing of the game screen. The
window.requestAnimationFramemethod allows a game to bind a function call to the screen redraw event in the browser.A game can bind to window events including
keyupandkeydownevents that produce events specifying which keyboard key has been pressed or released. Keyboard events do not necessarily indicate that a printable character has been entered. There are events for Shift and Control keys, which all have characteristic names.It is also possible to bind to an event that indicates that the user has moved their window “focus” to another window—at which point, a game should stop updating.
The display of a game can be made up of sprites. A sprite is an object that has an associated image, position, and perhaps other properties such as speed and acceleration.
A class hierarchy containing a Sprite superclass and game object subclasses is a good way to manage the objects in a game. A class can also be used for the game itself. The game class contains a list which holds all the sprites as well as properties that indicate the state of the game.
The
thisreference to be used in a function body can be bound to a specific reference by adding bind information to the call of the function. This technique is especially useful when functions are to be called by external frameworks (such as the browser window object) and you want to set the context of the function call to be an object in your application.Sprites in a game can be given simple physics and “artificial intelligence” that allows them to interact with the player and make the game much more interesting.
Hopefully, you’ve also taken a few ideas of your own and used them to create some more games.
Here are some points to ponder about game development:
What does await do?
Await is a way of allowing a function to return “early” if code in the function must perform an operation that will take a long time. To understand how this works, imagine if I had the power to make copies of myself. When I went shopping, I could select all the items I wanted to buy, make a duplicate Rob, and then send him to pay for the items and bring them home. I could go home and get on with something more interesting. At some point in the future, “duplicate Rob” would turn up with my shopping.
The await keyword works in exactly the same way. When execution reaches an await statement, a new process is created, which will wait for the awaited promise to be fulfilled. In the meantime, execution returns from the function containing the await. When the awaited promise is fulfilled, the process then moves on to the statement in the function after the awaited one. This continues until the process reaches the end of the function, at which point the process is destroyed.
Functions that contain awaited operations are called “asynchronous.” We don’t know when they will finish executing. With a normal function, we know that when the function returns it has performed all the statements in the function. However, an asynchronous function will return before any awaited actions have finished. In other words, completion of the function is not synchronized with the call. For this reason, we need to mark functions that contain await as async.
Can a function contain multiple awaits?
Yes, it can. Each awaited statement is awaited in turn as the function is performed.
Must a function that is called asynchronously always perform an awaited action?
No. Sometimes when a function runs, it might decide that the awaited action cannot be performed, so it can return without awaiting anything. However, marking a function as async makes it slightly less efficient to call, so you should only mark a function as async if it contains await.
Can an anonymous function contain awaits?
Yes, it can. However, the declaration of the anonymous function must be preceded by the async keyword to mark the anonymous function as asynchronous.
Can you draw any HTML element on a canvas?
No. An HTML document brings together a collection of HTML elements. However, when an object is drawn on a canvas all that happens is that a particular path or image is rendered onto that canvas. The commands to set the format of drawing actions (for example select a font or fill style to be used) look very similar to attributes that you might add to an HTML element. However, these commands just control the drawing operation, not the properties of an object in the canvas.
Can a page contain multiple HTML canvases?
Yes. A JavaScript program could hold several context references that can be used to draw on different canvases.
Will the browser slow down if I draw a lot on the canvas?
Yes, it will slow down eventually. However, modern browsers are very good at drawing graphics, so you will have to draw something very complicated for this to be noticeable.
How would I create an attract mode for my game?
Many games have an “attract mode” screen as well, which displays some gameplay. Currently, our game just has two states that are managed by the Boolean gameRunning property. We could use an integer to hold a range of states, including “attract mode.” We could make an “AI player” who moved the cheese around the screen in a random way and then just run the game with the random player at the controls. We could add an “attract mode” behavior to the tomatoes so that they were aiming for a point some distance from the player, to make the game last longer in demo mode.
How could I make the gameplay the same each time the game is played?
The game uses the JavaScript random number generator to produce the position of the crackers, which means each time the game runs, the crackers are in a different position. We could replace this with a random number generator that always produced the same sequence of numbers, or we could add a table of fixed positions that could be used to place the crackers. This would mean that the crackers would be drawn and would respawn in the same sequence each time the game was played. A determined player could learn the pattern and use this to get a high score.
Is the author of the game always the best person at playing it?
Most definitely not. I’m often surprised how other people can be much better than me at playing games I’ve created. Sometimes, they even try to help me with hints and tips about things to do in the game to get a higher score.