In the ancient days of web programming, developers created web pages with simple text editors such as Notepad. Other choices were available, but each suffered from its own quirks and limitations. The standard was a gloves-off approach of raw HTML with blocks of code inserted wherever necessary.
Visual Studio changes all that. First, it's extensible and can even work in tandem with web editors such as Microsoft Expression Web or Adobe Dreamweaver. In other words, you can do the heavy-duty coding with Visual Studio but use another web design tool to make everything look pretty. Second, Visual Studio includes indispensable time-saving features. For example, it gives you the ability to drag and drop web pages into existence and troubleshoot misbehaving code. Visual Studio even includes a built-in test web server, which allows you to create and test a complete ASP.NET website without worrying about setting up a real web server.
In this chapter, you'll learn how to create a web application using Visual Studio. Along the way, you'll take a look at the anatomy of an ASP.NET web form and review the essentials of XHTML. You'll also learn how IntelliSense can dramatically reduce the number of errors you'll make and how to use Visual Studio's legendary single-step debugger to look under the hood and "watch" your program in action. By the end of this chapter, you'll be well acquainted with the most important tool in any ASP.NET developer's toolkit (Visual Studio), and you'll understand the basic principles of web development with ASP.NET.
All .NET applications are built from plain-text source files. VB code is stored in .vb files, and C# code is stored in .cs files, regardless of whether this code is designed for a stand-alone Windows application or the Web. Despite this fact, you'll rarely find VB or C# developers creating Windows applications by hand in a text editor. The process is not only tiring, but it also opens the door to a host of possible errors that a design tool could catch easily. The same is true for ASP.NET programmers. Although you can write your web page classes and code your web page controls by hand, you'll spend hours developing and testing your code. Instead, it makes sense to use one of the many editions of Visual Studio.
Visual Studio is an indispensable tool for developers on any platform. It provides several impressive benefits:
- Integrated error checking:
Visual Studio can detect a wide range of problems, such as data type conversion errors, missing namespaces or classes, and undefined variables. As you type, errors are detected, underlined, and added to an error list for quick reference.
- The web form designer:
To create a web page in Visual Studio, you simply drag ASP.NET controls to the appropriate location and configure their properties. Visual Studio does the heavy lifting and automatically creates the actual web page markup.
- An integrated web server:
To run an ASP.NET web application, you need a web server running the Internet Information Services (IIS) web server software. The web server has a straightforward job—it waits for browser requests and serves the appropriate pages. Setting up a web server isn't difficult, but it is inconvenient. Thanks to the integrated development web server in Visual Studio, you can run a website directly from the design environment. (Of course, you'll still need to deploy your application to a real web server when it's finished, as you'll see in Chapter 26.)
- Developer productivity enhancements:
Visual Studio makes coding quick and efficient, with a collapsible code display, automatic statement completion, and color-coded syntax. You can even create sophisticated macro programs that automate repetitive tasks.
- Fine-grained debugging:
Visual Studio's integrated debugger allows you to watch code execution, pause your program at any point, and inspect the contents of any variable. These debugging tools can save endless headaches when writing complex code routines.
- Complete extensibility:
You can use macros, change project templates, and even add your own custom add-ins to Visual Studio. And even if you don't intend to use these features yourself, you might still want to use handy third-party utilities that depend on them.
Note
The tips and techniques you learn in this chapter will work equally well with all versions of Visual Studio, including the free Visual Web Developer Express.
You start Visual Studio by selecting Start
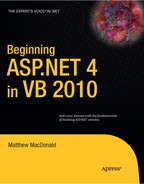
The Start Page includes a list of recently opened applications. You can click a link in this list to quickly resume your work where you last left off. The Start Page also includes links to online developer content from the Microsoft Developer Network (MSDN) website. Although you're free to ignore this content, you might find an interesting article, a handy code example, or a nifty add-on that you'll want to try. (If your surfing habits are a bit more traditional, you can find the same content online. A good starting point is the ASP.NET community at http://www.asp.net.)
To do anything practical with Visual Studio, you need to create a web application. The following sections show you how.
To create your first Visual Studio application, follow these steps:
Select File

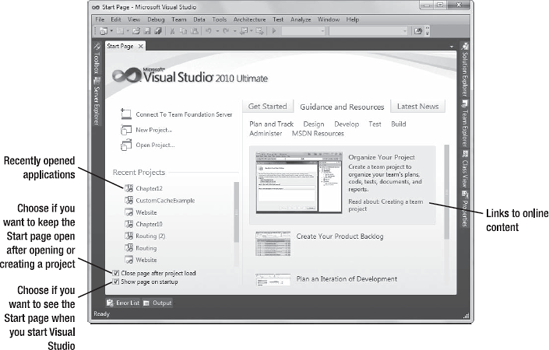
In the list on the left, choose the language you want to use to write your code.
Note
The programming language is just a default—you can actually add Visual Basic web pages to a C# website, and you can add C# pages to a VB website.
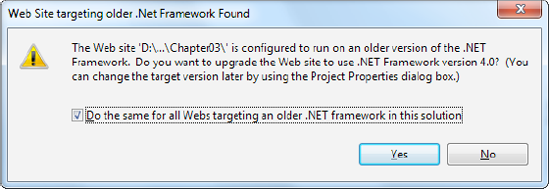
In the drop-down list at top of the window, choose the version of .NET that you want to use. Usually, you'll pick .NET Framework 4. However, you can also use Visual Studio to create web applications that are designed for older versions of .NET, all the way back to .NET 2.0.
In the list of templates in the middle of the window, choose the type of application that you want to create. For now, the best option is ASP.NET Empty Web Site, which won't clutter your website a pile of pregenerated files and settings. For more information about the differences between Visual Studio's website templates, check out the "Website Templates" sidebar.
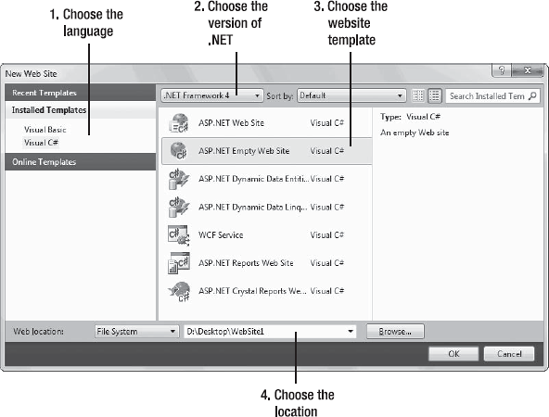
Choose a location for the website. The location specifies where the website files will be stored. Typically, you'll choose File System and then use a folder on the local computer. You can type in a directory by hand in the Location text box and skip straight to step 7. Alternatively, you can click the Browse button, which shows the Choose Location dialog box (see Figure 4-3) that's discussed in step 6.
Using the Choose Location dialog box, browse to the directory where you want to place the website. Often, you'll want to create a new directory for your web application. To do this, select the directory where you want to place the subdirectory, click the Create New Folder icon (found just above the top-right corner of the directory tree), type in a name for your new folder, and press Enter. Either way, once you've selected your directory, click Open. The Choose Location dialog box also has options (represented by the buttons on the left) for creating a web application on an IIS virtual directory or a remote web server. You can ignore these options for now. In general, it's easiest to develop your web application locally and upload the files once they're perfect.
Tip
Remember, the location where you create your website probably isn't where you'll put it when you deploy it. Don't worry about this wrinkle—in Chapter 26 you'll learn how to take your development website and put it on a live web server so it can be accessible to others over a network or the Internet.
Click OK to create the website. At this point, Visual Studio generates a new website with just a single file, named web.config. This is a configuration file where you can place various settings that influence how your web application works. You'll use the configuration file throughout this book, and you'll pay special attention to it in Chapter 5.
Now you have a new plain-vanilla website, and you're ready to begin designing your first web page. But before you go ahead, you might want to know a bit more about how Visual Studio keeps track of your website files using projects (optionally) and solutions. The next two sections have all the details.
Ordinarily, Visual Studio uses project files to store information about the applications you create. Web applications are a little unusual because Visual Studio doesn't necessarily create project files for them. In fact, if you followed the steps in the previous section, you created a new website with no project file.
This system, which is called projectless development, is different from the way Visual Studio works with other types of applications, such as stand-alone components and Windows programs. It's designed to keep your website directory clean and uncluttered and thereby simplify the deployment of your web application. This way, when it's finally time to upload your website to a live web server, you can copy the entire folder without worrying about excluding files that are used only for development purposes. Projectless development is also handy if you're programming with a team of colleagues, because you can each work on separate pages without needing to synchronize project and solution files.
For most web developers, this is all you need to know. However, there's actually another option: project-based development, or web projects. Web projects are the original way of creating ASP.NET web applications, and they're still supported in Visual Studio 2010.
You can create a web project by choosing File
There are a few reasons why you would consider using web projects:
You have an old web project that was created in a version of Visual Studio before Visual Studio 2005. When you open this project in Visual Studio 2010, it will be migrated as a web project automatically to avoid strange compatibility quirks that might otherwise crop up.
You want to place two (or more) web projects in the same website folder. Technically, ASP.NET will consider these two projects to be one web application. However, with web projects, you have the flexibility to work on the files separately in Visual Studio. You simply add the files that you want to group together to your project.
You have a really huge website that has lots of resources files (for example, thousands of images). Even though these files are part of your website, you might not want them to appear in the Solution Explorer window in Visual Studio because they can slow down the development environment. If you use web projects, you can easily get around this issue—just don't add these resource files to your project.
You want to use the Visual Studio web package feature or the MSBuild utility to automate the way your web application is deployed to a web server. For example, a large company might devise a build strategy that automatically signs compiled web application files and deploys them to a production web server. You'll consider the basics of website deployment in Chapter 26.
All the examples that are shown in this book use the projectless website model. However, you're free to create web projects if you fit into one of the scenarios just described. You still write the same code to power your web pages. It's really just a matter of taste.
The Hidden Solution Files
As you've learned, Visual Studio allows you to create ASP.NET applications without project files. However, you might be surprised to learn that Visual Studio still creates one type of resource file, called a solution file. Solutions are a similar concept to projects—the difference is that a single solution can hold one or more projects. Whenever you're working in Visual Studio, you're working with a solution. Often, that solution contains a single projectless website, but in more advanced scenarios it might actually hold additional projects, such as a web application and a component that you're using with your website.
At this point, you're probably wondering where Visual Studio places solution files. It depends, but in a typical projectless web application, Visual Studio quietly tucks the solution files away into the user-specific document directory that's named in this form:
c:Users[UserName]DocumentsVisual Studio 2010Projects[WebsiteFolderName]
This system can get a bit confusing, because the rest of your website files will be placed in a completely different directory.
Each solution has two solution files, with the file extensions .sln and .suo. In the previous section, a new website was created named SampleSite. Behind the scenes, Visual Studio generates the following solution files for SampleSite:
SampleSite.sln
SampleSite.suo
When you open a previously created website, Visual Studio locates the matching solution file automatically and uses the settings in that solution.
The solution files store some Visual Studio–specific details that aren't directly related to ASP.NET, such as debugging and view settings. For example, Visual Studio tracks the files that are currently open so it can reopen them when you resume your website development.
The solution files aren't essential. In fact, if you move your website to another computer (or just place them in another location on your computer), Visual Studio won't be able to locate the original solution files, and you'll lose the information they store. You can also run into trouble if you create two websites with the same name in different locations, in which case the newer solution files may overwrite the older ones. However, because the information in the solution files isn't really all that important, losing it isn't a serious problem. The overall benefits of a projectless system are usually worth the trade-off.
Usually, you can forget about solutions altogether and let Visual Studio manage them seamlessly. But in some cases, you might want to keep a closer eye on your solution files so you can use them later. For example, you might want to use a solution file to open a combination of projects that you're working on at the same time. You'll see this technique in action in Chapter 22, when you develop your own components.
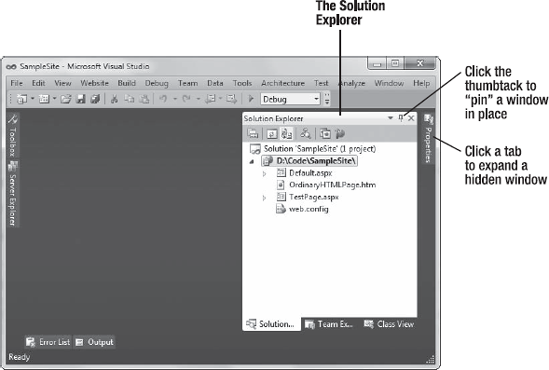
To take a high-level look at your website, you can use the Solution Explorer—the window at the top-right corner of the design environment that lists all the files in your web application directory (see Figure 4-4).
Note
Depending on your Visual Studio settings, you may need to click the Solution Explorer tab on the right side of the window to expand it into view. (You can then click the thumbtack icon in the top-right corner of the Solution Explorer to lock it into place so that it's permanently visible.) If you still have trouble finding the Solution Explorer, you can always summon it into view through the Visual Studio menu. Just choose View
The Solution Explorer reflects everything that's in the application directory of a projectless website. No files are hidden. This means if you add a plain HTML file, a graphic, or a subdirectory in Windows Explorer, the next time you fire up Visual Studio you'll see the new contents in the Solution Explorer. If you add these same ingredients while Visual Studio is open, you won't see them right away. Instead, you'll need to refresh the display. To do so, right-click the website folder in the Solution Explorer (which appears just under the Solution item at the top of the tree) and choose Refresh Folder.
Of course, the whole point of the Solution Explorer is to save you from resorting to using Windows Explorer. Instead, it allows you to perform a variety of file management tasks within Visual Studio. You can rename, delete, or copy files by simply right-clicking the item and choosing the appropriate command.
When you create a new website using the ASP.NET Empty Web Site template, the Solution Explorer starts out as a lonely place, with nothing more than a basic configuration file. To start creating your website, you need to add web forms.
As you build your website, you'll need to add new web pages and other items. To add these ingredients, choose Website
You can add various types of files to your web application, including resources you want to use (such as bitmaps), ordinary HTML files, code files with class definitions, style sheets, data files, configuration files, and much more. Visual Studio even provides basic designers that allow you to edit most of these types of files directly in the IDE. However, the most common ingredients that you'll add to any website are web forms—ASP.NET web pages that are fueled with VB code.
To add a web form, choose Web Form in the Add New Item dialog box. You'll see two additional options in the bottom-right corner of the Add New Item dialog box (as shown in Figure 4-5).
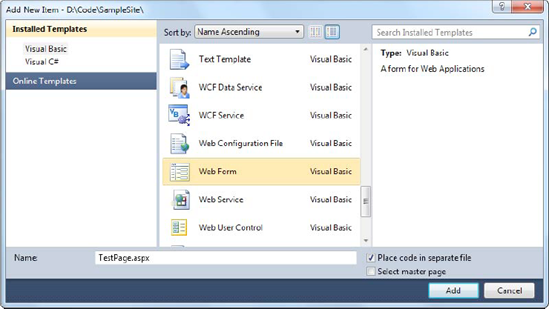
The Place Code in a Separate File option allows you to choose the coding model for your web page. If you clear this check box, Visual Studio will create a single-file web page. You must then place all the VB code for the file in the same file that holds the HTML markup. If you select the Place Code in a Separate File option, Visual Studio will create two distinct files for the web page, one with the markup and the other for your VB code. This is the more structured approach that you'll use in this book. The key advantage of splitting the web page into separate files is that it's more manageable when you need to work with complex pages. However, both approaches give you the same performance and functionality.
You'll also see another option named Select Master Page, which allows you to create a page that uses the layout you've standardized in a separate file. For now, disregard this setting. You'll learn how to create master pages in Chapter 12.
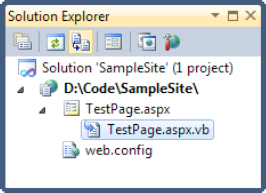
Once you've chosen the coding model and typed in a suitable name for your web page, click Add to create it. If you've chosen to use the Place Code in Separate File check box (which is recommended), your project will end up with two files for each web page. One file includes the web page markup (and has the file extension .aspx). The other file stores the source code for the page (and uses the same file name, with the file extension .aspx.vb). To make the relationship clear, the Solution Explorer displays the code file underneath the .aspx file (see Figure 4-6).
Tip
Most ASP.NET websites include a page named Default.aspx, which acts as the website start page. Usually, web servers are configured to show the start page to all visitors, unless they explicitly specify a different page in the URL. For example, if you surf to http://www.amazon.com/Beginning-ASP-NET-4-C-2010/dp/1430226080, Amazon shows you a product page for a specific book. But if you surf to just http://www.amazon.com, you get the default start page, which can guide you to wherever you need to go.
You can also add files that already exist by selecting Website
If you have an existing ASP.NET web application created with an earlier version of Visual Studio, you can migrate it to the ASP.NET world with ease.
If you created a projectless website with an earlier version of Visual Studio, you use the File
If you created a web project with an earlier version of Visual Studio, you need to use the File
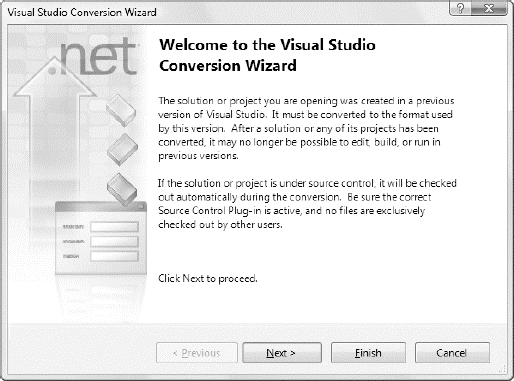
When you click Finish, Visual Studio performs an in-place conversion, which means it overwrites your web page files with the new versions. Any errors and warnings are added to a conversion log, which you can display when the conversion is complete.
MULTITARGETING
Visual Studio supports multitargeting, which means you can build web applications that are intended for .NET 2.0, .NET 3.0, .NET 3.5, or .NET 4. Typically, you'll choose the latest version that your web server supports. Later versions give you access to more recent features, and all the samples that are included with this book target .NET 4.
You've already seen how to choose the version of .NET when you create a new website (it's the drop-down list at the top of the window). You can also change the version of .NET that you're targeting after you've created your website. To do that, follow these steps:
Choose Website
In the list on the left, choose the Build category.
In the Target Framework list, choose the version of .NET you want to target.
When you change the .NET version, Visual Studio modifies your web.config file quite significantly. For example, the web.config file for a .NET 4 application is short and streamlined, because all of the plumbing it needs is set up in the computer's root web.config file. But the web.config file for a .NET 3.5 application is quite messy and filled with tedious boilerplate. (Technically, this is because ASP.NET 3.5 was released as a sort of "add-on" to the core ASP.NET 2.0 engine.)
Now that you understand the basic organization of Visual Studio, you can begin designing a simple web page. To start, in the Solution Explorer, double-click the web page you want to design. (Start with Default.aspx if you haven't added any additional pages.)
Visual Studio gives you three ways to look at an .aspx page:
- Design view:
Here you'll see a graphical representation of what your page looks like.
- Source view:
Here you'll see the underlying markup, with the HTML for the page and the ASP.NET control tags.
- Split view:
This combined view allows you to see both the design view and source view at once, stacked one on top of the other.
You can switch between these three views freely by clicking the Design, Split, and Source buttons at the bottom of the designer window.
You'll spend some time in the source view a bit later in this chapter, when you dig into the web page markup. But first, it's easiest to start with the friendlier design view and start adding content to your page.
Tip
If you have a wide-screen monitor, you'll probably prefer to have the split view use two side-by-side regions (rather than a top and bottom region). Fortunately, it's easy to configure Visual Studio to do so. Just select Tools
To add an ASP.NET web control, drag the control you want from the Toolbox on the left, and drop it onto your web page. Technically speaking, you can drop your controls onto a design view window or onto a source view window. However, it's usually easiest to position the control in the right place when you use design view. If you drop controls carelessly into the source view, they might not end up in the <form> section, which means they won't work in your page.
The controls in the Toolbox are grouped in numerous categories based on their functions, but you'll find basic ingredients such as buttons, labels, and text boxes on the Standard tab.
Tip
By default, the Toolbox is enabled to automatically hide itself when your mouse moves away from it. This behavior is often exasperating, so you may want to click the thumbtack in the top-right corner of the Toolbox to make it stay in its fully expanded position. And if you inadvertently close the Toolbox, you can show it again by choosing View
In a web form, controls are positioned line by line, like in a word processor document. You can type in ordinary HTML or add ASP.NET controls. To add a control, you need to drag and drop it to an appropriate place. To organize several controls in design view, you'll probably need to add spaces and hard returns (just hit Enter) to position elements the way you want them. Figure 4-9 shows an example with a TextBox, a Label, and a Button.
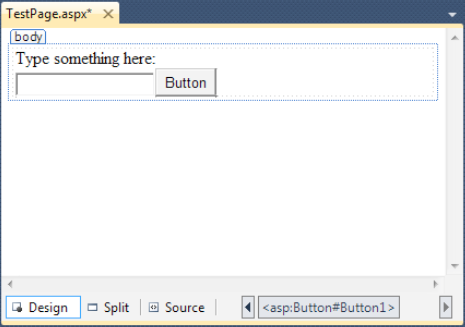
You'll find that some controls can't be resized. Instead, they grow or shrink to fit the amount of content in them. For example, the size of a Label control depends on how much text you enter in it. On the other hand, you can adjust the size of a Button or a TextBox control by clicking and dragging in the design environment.
As you add web controls to the design surface, Visual Studio automatically adds the corresponding control tags to your .aspx file. To look at the markup it's generated, you can click the Source button to switch to source view (or click the Split button to see both at once). Figure 4-10 shows what you might see in the source view for the page displayed in Figure 4-9.
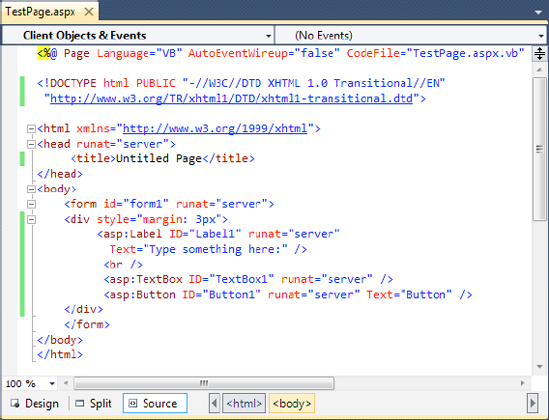
Using the source view, you can manually add attributes or rearrange controls. In fact, Visual Studio even provides IntelliSense features that automatically complete opening tags and alert you if you use an invalid tag. Whether you use the design or source view is entirely up to you—Visual Studio keeps them both synchronized.
Note
When you use split view, Visual Studio keeps the source and design area synchronized. However, this synchronization process isn't always instantaneous. Generally, if you make a change in the design region, the source region is updated immediately. However, if you make a change in the source region, a yellow message bar appears at the top of the design region to warn you that the content has changed. To refresh the design region, simply click anywhere inside the design region. To refresh the design region without taking your fingers off the keyboard, press Ctrl+S to save the web page.
Once you've added a web control to a web page, you'll probably want to tweak it a bit. For example, you might want to change the text in the button, the color of a label, and so on. Although you can make all your changes by editing the source markup by hand, Visual Studio provides an easier option. Just under the Solution Explorer, in the bottom-right corner of the Visual Studio window, you'll see the Properties window, which shows you the properties of the currently selected web control—and lets you tweak them.
To configure a control in design view, you must first select it on the page (either click it once in the design view or click somewhere inside the tag for that control in the source view). You'll know the right control is selected when you see its name appear in the drop-down list at the top of the Properties window. Alternatively, you can select your control by picking its name from the Properties window list.
Once you've selected the control you want, you can modify any of its properties. Good ones to try include Text (the content of the control), ID (the name you use to interact with the control in your code), and ForeColor (the color used for the control's text).
Tip
If the Properties window isn't visible, you can pop it into view by choosing View
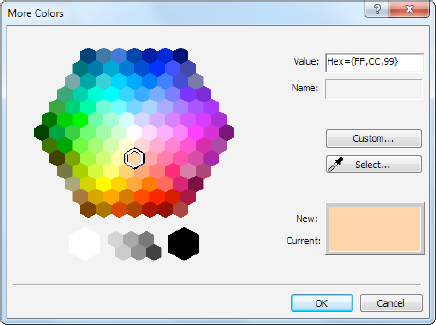
Every time you make a selection in the Properties window, Visual Studio adjusts the web page markup accordingly. Visual Studio even provides special "choosers" that allow you to select extended properties. For example, if you select a color property (such as ForeColor or BackColor) in the Properties window, a button with three dots (...) will appear next to the property, as shown in Figure 4-11.
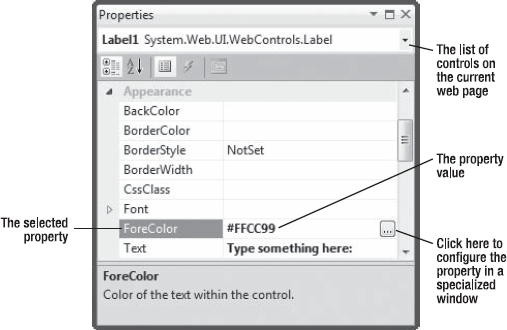
If you click this button, Visual Studio will show a dialog box where you can pick a custom color (Figure 4-12). Once you make your selection and click OK, Visual Studio will insert the HTML color code into the Properties window and update your web page markup.
You'll see a similar feature when configuring fonts. First, select the appropriate control on the design surface (or in the list at the top of the Properties window). Next, expand the Font property in the Properties window, and select the Name subproperty. A drop-down arrow will appear next to the property. Click this to choose from a list of all the fonts that are installed on your computer. (Don't go too crazy here. If you choose a font that isn't installed on the computer of the person who is visiting your web page, the browser will revert to a standard font. Chapter 6 has more about font choosing.)
Along with web controls, you can also select ordinary HTML tags in the Properties window. However, there's a lot less you can do with them. Ordinary HTML tags aren't live programming objects, so they don't have nifty features that you can control. And ordinary HTML tags don't offer many options for formatting. If you want to change the appearance of a tag, your best choice is to create a style for your control. If you're a web guru, you can do this by hand. If not, you can use Visual Studio's style building features, which you'll learn about in Chapter 12.
Finally, you can select two objects in the Properties window that need some explanation—<PAGE> and DOCUMENT. <PAGE> includes a number of ASP.NET options that are tied to the page directive—the essential one- or two-line statement that sits at the top of your .aspx files and is described in the next section. The DOCUMENT item is less interesting. It consists of a smaller set of properties, including a subset of the <PAGE> options and a few properties that let you alter the <title> and <body> elements.
So far, you've spent most of your time working with the web page in design view. There's nothing wrong with that—after all, it makes it easy to quickly assemble a basic web page without requiring any HTML knowledge.
However, it probably won't be long before you dip into the source view. Some types of changes are easier to make when you are working directly with your markup. Finding the control you want on the design surface, selecting it, and editing the properties one at a time in the Properties window can be tedious.
The source view is often helpful when you want to add plain HTML content—after all, not everything in your web page needs to be a full-fledged web control. You can add ordinary HTML elements using design view (just drag the element you want from the HTML tab of the Toolbox), but it's often easier to type them in by hand, because you'll usually need to use a combination of elements to get the result you want.
If you haven't written HTML pages before, the web page source might look a little intimidating. And if you have written HTML pages before, the web page source might look a little odd. That's because the source for an ASP.NET web form isn't 100 percent HTML. Instead, it's an HTML document with an extra ingredient—ASP.NET web controls.
Every ASP.NET web form includes the standard HTML tags, such as <html>, <head>, and <body>, which delineate the basic sections of your web page. You can insert additional HTML tags, such as paragraphs of text (use the <p> tag), headings (use <h1>, <h2>, <h3>), tables (use <table>), and so on. Along with standard HTML, you can add ASP.NET-only elements to your web pages. For example, <asp:Button> represents a clickable button that triggers a task on the web server. When you add an ASP.NET web control, you create an object that you can interact with in your web page code, which is tremendously useful.
Here's a look at the web page shown in Figure 4-9. The details that are not part of ordinary HTML are highlighted, and the lines are numbered for easy reference:
1 <%@ Page Language="VB" AutoEventWireup="False"2 CodeFile="Default.aspx.vb" Inherits="_Default" %>3 <!DOCTYPE html PUBLIC "-//W3C//DTD XHTML 1.0 Transitional//EN" 4 "http://www.w3.org/TR/xhtml1/DTD/xhtml1-transitional.dtd"> 5 <html xmlns="http://www.w3.org/1999/xhtml"> 6 <headrunat="server"> 7 <title>Untitled Page</title> 8 </head> 9 <body> 10 <form ID="form1"runat="server"> 11 <div>12 <asp:Label ID="Label1" runat="server"13 Text="Type something here:" />14 <br />15 <asp:TextBox ID="TextBox1" runat="server" />16 <asp:Button ID="Button1" runat="server" Text="Button" />17 </div> 18 </form> 19 </body> 20 </html>
Obviously, the ASP.NET-specific details (the highlighted bits) don't mean anything to a web browser because they aren't valid HTML. This isn't a problem, because the web browser never sees these details. Instead, the ASP.NET engine creates an HTML "snapshot" of your page after all your code has finished processing on the server. At this point, details like the <asp:Button> are replaced with HTML tags that have the same appearance. The ASP.NET engine sends this HTML snapshot to the browser.
This summary is just a quick introduction to the ASP.NET web control model. You'll learn much more about web controls and how web forms work behind the scenes in the following two chapters. But before you go any further, it's important to consider a few essential details about ASP.NET web forms. In the following sections, you'll learn about the page directive (lines 1 and 2 in the previous code sample) and the doctype (lines 3 and 4). You'll then take a quick detour to review some of the essential rules of XHTML, the markup language used to create modern web pages.
The Default.aspx page, like all ASP.NET web forms, consists of three sections. The first section is the page directive:
<%@ Page Language="VB" AutoEventWireup="False"
    CodeFile="Default.aspx.vb" Inherits="_Default" %>
The page directive gives ASP.NET basic information about how to compile the page. It indicates the language you're using for your code and the way you connect your event handlers. If you're using the code-behind approach (which is recommended), the page directive also indicates where the code file is located and the name of your custom page class. You won't need to modify the page directive by hand, because Visual Studio maintains it for you.
Note
The page directive is for ASP.NET's eyes only. The page directive doesn't appear in the HTML that's sent to the browser—instead, ASP.NET strips it out.
In an ordinary, non-ASP.NET web page, the doctype occupies the very first line. In an ASP.NET web form, the doctype gets second place and appears just underneath the page directive.
The doctype indicates the type of markup (for example, HTML or XHTML) that you're using to create your web page. Technically, the doctype is optional, but Visual Studio adds it automatically. This is important, because depending on the type of markup you're using, there may be certain tricks that aren't allowed. For example, strict XHTML doesn't let you use HTML formatting features that are considered obsolete and have been replaced by CSS.
The doctype is also important because it influences how a browser interprets your web page. For example, if you don't include a doctype on your web page, Internet Explorer (IE) switches itself into a legacy mode known as quirks mode. While IE is in quirks mode, certain formatting details are processed in inconsistent, nonstandard ways, simply because this is historically the way IE behaved. Later versions of IE don't attempt to change this behavior, even though it's faulty, because some websites may depend on it. However, you can specify a more standardized rendering that more closely matches the behavior of other browsers (like Firefox) by adding a doctype.
Tip
If you have a web page that looks dramatically different in Internet Explorer than it does in Firefox, the culprit may be a missing or invalid doctype. Common idiosyncrasies that appear in web pages that don't have doctypes include varying text sizes and varying margin space between elements.
There are a small set of allowable doctypes that you can use. By default, newly created web pages in Visual Studio use the following doctype:
<!DOCTYPE html PUBLIC "-//W3C//DTD XHTML 1.0 Transitional//EN"
 "http://www.w3.org/TR/xhtml1/DTD/xhtml1-transitional.dtd">
This indicates that the web page uses XHTML 1.0 transitional. The word transitional refers to the fact that this version of XHTML is designed to be a stepping stone between the old-fashioned HTML world and the ultra-strict XHTML world. XHTML transitional enforces all the structural rules of XHTML but allows some HTML formatting features that have been replaced by Cascading Style Sheets (CSS) and are considered obsolete.
If you don't need to use these details, you can step up to XHTML strict using this doctype:
<!DOCTYPE html PUBLIC "-//W3C//DTD XHTML 1.0 Strict//EN"
 "http://www.w3.org/TR/xhtml1/DTD/xhtml1-strict.dtd">
These are the two most common doctypes in use today.
Note
Throughout this book, you'll find many references to HTML. However, this is just a convenient shorthand that includes HTML and XHTML. The web page examples that you'll see in this book use valid XHTML.
There are still a few more doctypes that you can use. If you're working with an existing website that's based on the somewhat out-of-date HTML standard, this is the doctype you need:
<!DOCTYPE HTML PUBLIC "-//W3C//DTD HTML 4.01//EN"
 "http://www.w3.org/TR/html4/strict.dtd">
And if you want to use the slightly tweaked XHTML 1.1 standard (rather than XHTML 1.0), you need the following doctype:
<!DOCTYPE html PUBLIC "-//W3C//DTD XHTML 1.1//EN"
 "http://www.w3.org/TR/xhtml11/DTD/xhtml11.dtd">
XHTML 1.1 is mostly identical to XHTML 1.0 but streamlines a few more details and removes a few more legacy details. It doesn't provide a transitional option.
Note
There are a few more doctypes that you can use to create frames pages, which allow you to split a browser window into multiple panes, each of which shows a separate page. Frames pages are discouraged in modern-day web development, because they don't work well with different window sizes and aren't always indexed correctly by search engines. You can see a more complete list of allowed doctypes, which includes the doctype for a frames page, at http://www.w3.org/QA/2002/04/Web-Quality.
Remember, the ASP.NET server controls will work equally well with any doctype. It's up to you to choose the level of standards compliance and backward compatibility you want in your web pages. If you're still in doubt, it's best to start out with XHTML 1.0 transitional, because it eliminates the quirks in different browser versions without removing all the legacy features. If you're ready to make a clean break with HTML, even if it means a bit more pain, consider switching to XHTML 1.0 strict or XHTML 1.1 (which is always strict) instead.
Note
In this book, the web page markup listings omit the doctype (because it's just one more detail chewing up extra pages). If you download the sample code, you'll find that most pages use the XHTML 1.1 doctype.
Part of the goal of ASP.NET is to allow you to build rich web pages without forcing you to slog through the tedious details of XHTML (or HTML). ASP.NET delivers on this promise in many ways—for example, in many situations you can get the result you want using a single slick web control rather than writing a page full of XHTML markup.
However, ASP.NET doesn't isolate you from XHTML altogether. In fact, a typical ASP.NET web page mingles ASP.NET web controls with ordinary XHTML content. When that page is processed by the web server, the ASP.NET web controls are converted to XHTML markup (a process known as rendering) and inserted into the page. The final result is a standard XHTML document that's sent back to the browser.
This design gives you the best of both worlds—you can mix ordinary XHTML markup for the parts of your page that don't change, and you can use handy ASP.NET web controls for the parts that need to be interactive (such as buttons, lists, text boxes, and so on) or the parts that you need to update with new information (for example, a block of dynamic text). This design also suggests that ASP.NET developers should have a solid understanding of XHTML basics before they begin coding web forms. The following sections provide a brief overview that introduces you to the XHTML standard (or refreshes your memory, if you've learned it before). If you already know all you want to know about XHTML, feel free to skip ahead to the "Writing Code" section.
Note
The full XHTML standard is fairly straightforward, but it's a bit beyond the scope of this book. If you want to learn all the details, you can surf to http://www.w3schools.com/xhtml for a concise online tutorial.
The most important concept in the XHTML (and HTML) standard is the idea of elements. Elements are containers that contain bits of your web page content. For example, if you want to add a paragraph of text to a web page, you stuff it inside a paragraph element. A typical web page is actually composed of dozens (or hundreds) of elements. Taken together, these elements define the structure of the web page. They're also the starting point for formatting the web page. For example, headings usually look different from ordinary paragraphs, and tables look different from bulleted lists.
The XHTML language defines a small set of elements that you can use—in fact, there are fewer than you probably expect. XHTML also defines the syntax for using these elements. A typical element consists of three pieces: a start tag, some content, and an end tag. Here's an example:
<p>This is a sentence in a paragraph.</p>
This example uses the paragraph element. The element starts with the <p> start tag, ends with the </p> end tag, and contains some text inside. Tags are easy to recognize, because they're always enclosed in angled brackets. And here's a combination that adds a heading to a web page followed by a paragraph:
<h1>A Heading</h1>
<p>This is a sentence in a paragraph.</p>
Browsers have built-in rules about how to process and display different elements. When a browser digests this markup, it always places the heading in a large, bold font and adds a line break and some extra space underneath it, before starting the paragraph. Of course, there are ways to modify these formatting rules using the CSS standard, which you'll consider in Chapter 12.
Many XHTML elements can contain other elements. For example, you can use the <b> element inside the <p> element to apply bold formatting to a portion of a paragraph:
<p>This is a <b>sentence</b> in a paragraph.</p>
The <h1> and <p> elements usually hold content inside. As a result, they're split into a start tag and an end tag. For example, a heading begins with <h1> and ends with </h1>. However, some elements don't need any content and can be declared using a special empty tag syntax that fuses the start and end tag together. For example, the <br> element represents a line break. Rather than writing <br></br>, you can simply use <br />, as shown here:
<p>This is line one.<br />
This is line two.<br />
This is line three.</p>
Other elements that can be used in this fashion include <img> (for showing an image), <hr> (for creating a horizontal rule, or line), and most ASP.NET controls.
Note
Line breaks are important because XHTML collapses whitespace. That means you can add a series of spaces, tabs, and hard returns in your element content, and the browser will simply render a single space character. If you really do want line breaks, you need to use separate elements (for example, more than one <p> paragraph) or line breaks. If you want extra spaces, you need to add the HTML character entity instead (which stands for nonbreaking space). The browser converts this code into a single space character.
Table 4-1 lists some of the most commonly used XHTML elements. The Type column distinguishes between two types of XHTML—those that typically hold content or other nested elements (containers) and those that can be used on their own with the empty tag syntax you just considered (stand-alone).
Table 4.1. Basic XHTML Elements
Tag | Name | Type | Description |
|---|---|---|---|
<b>, <i>, <u> | Bold, Italic, Underline | Container | These elements are used to apply basic formatting and make text bold, italic, or underlined. Some web designers prefer to use <strong> instead of <b> and <emphasis> instead of <i>. Although these elements have the same standard rendering (bold and italic, respectively), they make more sense if you plan to use styles to change the formatting sometime in the future. |
<p> | Paragraph | Container | The paragraph groups a block of free-flowing text together. The browser automatically adds a bit of space between paragraphs and other elements (such as headings) or between subsequent paragraphs. |
<h1>, <h2>, <h3>, <h4>, <h5>, <h6> | Heading | Container | These elements are headings, which give text bold formatting and a large font size. The lower the number, the larger the text, so <h1> is for the largest heading. The <h5> heading is normal text size, and <h6> is actually a bit smaller than ordinary text. |
<img> | Image | Stand-alone | The image element shows an external image file (specified by the src attribute) in a web page. |
<br> | Line Break | Stand-alone | This element adds a single line break, with no extra space. |
<hr> | Horizontal Line | Stand-alone | This element adds a horizontal line (which gets the full width of the containing element). You can use the horizontal line to separate different content regions. |
<a> | Anchor | Container | The anchor element wraps a piece of text and turns it into a link. You set the link target using the href attribute. |
<ul>, <li> | Unordered List, List Item | Container | These elements allow you to build bulleted lists. The <ul> element defines the list, while the <li> element defines an item in the list (you nest the actual content for that item inside). |
<ol>, <li> | Ordered List, List Item | Container | These elements allow you to build numbered lists. The <ol> element defines the list, while the <li> element defines an item in the list (you nest the actual content for that item inside). |
<table>, <tr>, <td>, <th> | Table | Container | The <table> element allows you to create a multicolumn, multirow table. Each row is represented by a <tr> element inside the <table>. Each cell in a row is represented by a <td> element inside a <tr>. You place the actual content for the cell in the individual <td> elements (or, in the case of the header cells that sit at the top of the table, you can use <th> elements instead). |
<div> | Division | Container | This element is an all-purpose container for other elements. It's used to separate different regions on the page, so you can format them or position them separately. For example, you can use a <div> to create a shaded box around a group of elements. |
<span> | Span | Container | This element is an all-purpose container for bits of text content inside other elements (such as headings or paragraphs). It's most commonly used to format those bits of text. For example, you can use a <span> to change the color of a few words in a sentence. |
<form> | Form | Container | This element is used to hold all the controls on a web page. Controls are HTML elements that can send information back to the web server when the page is submitted. For example, text boxes submit their text, list boxes submit the currently selected item in the list, and so on. |
Every XHTML document fuses together two types of information: the document content and information about how that content should be presented. You control the presentation of your content in just three ways: by using the right elements, by arranging these elements to get the right structure, and by adding attributes to your elements.
Attributes are individual pieces of information that you attach to an element, inside the start tag. Attributes have many uses—for example, they allow you to explicitly attach a style to an element so that it gets the right formatting. Some elements require attributes. The most obvious example is the <img> element, which allows you to pull the content from an image file and place it in your web page.
The <img> tag requires two pieces of information—the image URL (the source) and the alternate text that describes the picture (which is used for accessibility purposes, as with screen-reading software). These two pieces of information are specified using two attributes, named src and alt:
<imgsrc="happy.gif"alt="Happy Face" />
The <a> anchor element is an example of an element that uses attributes and takes content. The content inside the <a> element is the blue, underlined text of the hyperlink. The href attribute defines the destination that the browser will navigate to when the link is clicked.
<p>
Click <a href="http://www.prosetech.com">here</a> to visit my website.
</p>
You'll use attributes extensively with ASP.NET control tags. With ASP.NET controls, every attribute maps to a property of the control class.
Along with the <b> (or <strong>) element for bold, XHTML also supports <i> (or <emphasis>) element for italics. However, this is about as far its formatting goes.
XHTML elements are intended to indicate the structure of a document, not its formatting. Although you can adjust colors, fonts, and some formatting characteristics using XHTML elements, a better approach is to define formatting using a CSS style sheet. For example, a style sheet can tell the browser to use specific formatting for every <h1> element in a page. You can even apply the styles in a style sheet to all the pages in your website.
Tip
In the downloadable samples, you'll find that many of the web pages use a style sheet named Styles.css. This style sheet applies the Verdana font to all elements of the web page.
In an ASP.NET web page, there are two ways you can use CSS. You can use it directly to format elements. Chapter 12 outlines the basics of this approach. Or, you can configure the properties of the ASP.NET controls you're using, and they'll generate the styles they need automatically, as you'll see throughout this book.
You now know enough to put together a complete XHTML page.
Every XHTML document starts out with this basic structure (right after the doctype):
<html xmlns="http://www.w3.org/1999/xhtml">
  <head runat="server">
    <title>Untitled Page</title>
  </head>
  <body>

  </body>
</html>
When you create a new web form in Visual Studio, this is the structure you start with. Here's what you get:
XHTML documents start with the <html> tag and end with the </html> tag. This <html> element contains the complete content of the web page.
Inside the <html> element, the web page is divided into two portions. The first portion is the <head> element, which stores some information about the web page. You'll use this to store the title of your web page, which will appear in the title bar in your web browser. (You can also add other details here like search keywords, although these are mostly ignored by web browsers these days.) When you generate a web page in Visual Studio, the <head> section has a runat="server" attribute. This gives you the ability to manipulate it in your code (a topic you'll explore in the next chapter).
The second portion is the <body> element, which contains the actual page content that appears in the web browser window.
In an ASP.NET web page, there's at least one more element. Inside the <body> element is a <form> element. The <form> element is required because it defines a portion of the page that can send information back to the web server. This becomes important when you start adding text boxes, lists, and other controls. As long as they're in a form, information like the current text in the text box and the current selection in the list will be sent to the web server using a process known as a postback. Fortunately, you don't need to worry about this detail yet—just place all your web page content inside the <form> element.
Most of the time, when you're working with a page, you'll focus on the markup inside the <form> element, which contains most of the page content. When you create a new web page in Visual Studio, there's one more detail—the <div> element inside the <form> element:
<html xmlns="http://www.w3.org/1999/xhtml">
  <head runat="server">
    <title>Untitled Page</title>
  </head>
  <body>
    <form ID="form1" runat="server">
      <div>
      </div>
    </form>
  </body>
</html>
Strictly speaking, the <div> element is optional—it's just a container. You can think of it as an invisible box that has no built-in appearance or formatting. However, it's useful to use a <div> tag to group portions of your page that you want to format in a similar way (for example, with the same font, background color, or border). That way, you can apply style settings to the <div> tag, and they'll cascade down into every tag it contains. You can also create a real box on your page by giving the <div> a border. You'll learn more about formatting and the <div> element in Chapter 12.
Note
The <div> element is also useful because you can place text directly inside it, without needing a container element (such as a paragraph). On the other hand, adding text directly inside the <form> element violates the rules of XHTML.
Now you're ready to pop the rest of your content in the <div> tag. If you add a Label, TextBox, and Button control, you'll end up with the same markup you created using the designer earlier in this chapter—but now you'll understand its markup underpinnings.
Many of Visual Studio's most welcome enhancements appear when you start to write the code that supports your user interface. To start coding, you need to switch to the code-behind view. To switch back and forth, you can use two View Code or View Designer buttons, which appear just above the Solution Explorer window. Another approach that works just as well is to double-click either the .aspx page in the Solution Explorer (to get to the designer) or the .aspx.vb page (to get to the code view). The "code" in question is the VB code, not the HTML markup in the .aspx file.
When you switch to code view, you'll see the page class for your web page. For example, if you've created a web page named SimplePage.aspx, you'll see a code-behind class that looks like this:
Partial Class SimplePage
    Inherits System.Web.UI.Page

End Class
You may notice that your code files are surprisingly bare. In particular, they don't have any Imports statements. (As you learned in Chapter 3, Imports statements allow you to access classes in a specific namespace without writing a long, fully qualified name. For example, you can replace the qualified name System.Web.UI.Page with just Page if you import the System.Web.UI namespace.)
As you begin coding with ASP.NET, you'll find that a great many ASP.NET classes are available for you to use, without requiring fully qualified names. That's because many commonly used namespaces are imported. However, they're imported automatically based on the settings in a computer-wide configuration file that you'll learn about in Chapter 5. For the most part, this is a worthwhile convenience. But as you'll see throughout this book, you'll still need to import additional namespaces to get access to more specialized features, such as the classes for reading and writing files and the classes for connecting to SQL Server.
Inside your page class you can place methods, which will respond to control events. For example, you can add a method with code that reacts when the user clicks a button. The following section explains how you can create an event handler.
Most of the code in an ASP.NET web page is placed inside event handlers that react to web control events. Using Visual Studio, you have three easy ways to add an event handler to your code:
- Type it in manually:
In this case, you add the subroutine directly to the page class in your VB code file. You must specify the appropriate parameters. You'll also need to add the Handles keyword at the end to specifically connect the event handler to the appropriate event.
- Double-click a control in design view:
In this case, Visual Studio will create an event handler for that control's default event, if it doesn't already exist. For example, if you double-click a Button control, it will create an event handler for the Button.Click event. If you double-click a TextBox control, you'll get an event handler for the TextBox.TextChanged event. If you double-click the surface of the page, you'll get an event handler for the Page.Load event. If the event handler already exists, Visual Studio simply takes you to the relevant place in your code.
- Choose the event from the Properties window:
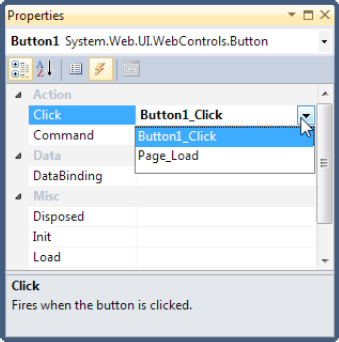
Just select the control, and click the lightning bolt in the Properties window. You'll see a list of all the events provided by that control. Double-click next to the event you want to handle, and Visual Studio will automatically generate the event handler in your page class. Alternatively, if you've already created the event handler method, just select the event in the Properties window, and click the drop-down arrow at the right. You'll see a list that includes all the methods in your class that match the signature this event requires. You can then choose a method from the list to connect it. Figure 4-13 shows an example where the Button.Click event is connected to the Button1_Click method in the page class.
Tip
If you're using the last approach, you may stumble across a Visual Studio quirk. Sometimes, while editing in source view, the Properties window won't show the lightning bolt icon for the current control. To fix this problem, switch into design view, and select the control there.
No matter which approach you use, the event handler looks (and functions) the same.
For example, when you double-click a Button control, Visual Studio creates an event handler like this:
Protected Sub Button1_Click(ByVal sender As Object, ByVal e As EventArgs) _
  Handles Button1.Click
    ' Your code for reacting to the button click goes here.
End Sub
The important part is the Handles clause at the end. This tells ASP.NET to wire up the Click event from the Button1 control to this event handler. (If you want to disconnect your event handler, just remove this part of the code.)
Inside your event handler method, you can interact with any of the control objects on your web page using their IDs. For example, if you've created a TextBox control named TextBox1, you can set the text using the following line of code:
Protected Sub Button1_Click(ByVal sender As Object, ByVal e As EventArgs) _
  Handles Button1.Click
    TextBox1.Text = "Here is some sample text."
End Sub
This is a simple event handler that reacts when Button1 is clicked and updates the text in TextBox1.
Note
You might wonder why your code file includes the event handlers, but it doesn't actually declare the controls that you use (like the Button1 and TextBox1 objects in the previous example). The reason is that ASP.NET generates the declarations for these controls automatically. You'll never see these declarations, but you can assume they're part of your class. That's also why every page class you create is defined with the Partial keyword. This allows ASP.NET to merge your code with the portion it generates automatically. The end result is that you can easily access all the controls on your page by name, but you don't need to bother with extra code to create and initialize these objects.
You'll learn much more about how the ASP.NET web form model works in the next two chapters. But for the rest of the chapter, it's time to take a small break and consider two of Visual Studio's great coding conveniences: outlining and IntelliSense.
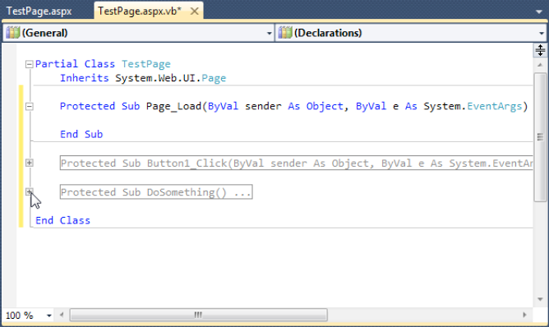
Outlining allows Visual Studio to "collapse" a method, class, structure, namespace, or region to a single line. It allows you to see the code that interests you while hiding unimportant code. To collapse a portion of code, click the minus (-) symbol next to the first line. To expand it, click the box again, which will now have a plus (+) symbol (see Figure 4-14).
You can hide every method at once by right-clicking anywhere in the code window and choosing Outlining
Visual Studio tries hard to make your life easier with a number of automatic time-savers. The most powerful of these is IntelliSense—a group of features that prompt you with valuable code suggestions (and catch mistakes) as you type.
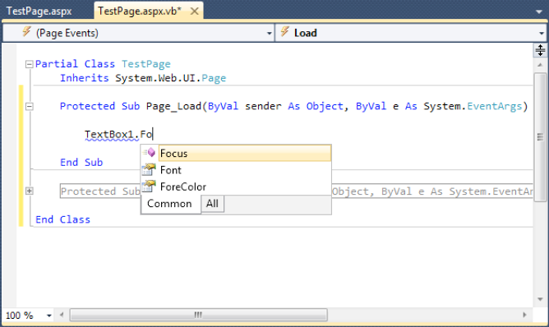
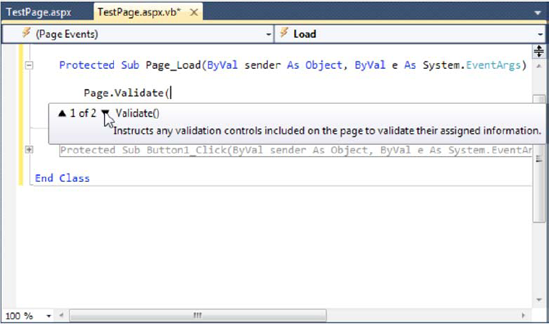
Visual Studio makes it easy for you to interact with controls and classes. When you type a class or object name, it pops up a list of available properties and methods that match what you've typed so far (see Figure 4-15). It uses a similar trick to provide a list of data types when you define a variable or to provide a list of valid values when you assign a value to an enumeration.
Tip
Forgotten the names of the controls in your web page? You can get IntelliSense to help you. Just type the Me keyword followed by a period (which is also known as the dot operator). Visual Studio will pop up a list with all the methods and properties of the current form class, including the control variables.
Visual Studio also provides a list of parameters and their data types when you call a method or invoke a constructor. This information is presented in a tooltip below the code and appears as you type. Because the .NET class library uses method overloading a lot, these methods may have multiple versions. When they do, Visual Studio indicates the number of versions and allows you to see the method definitions for each one by clicking the small up and down arrows in the tooltip. Each time you click the arrow, the tooltip displays a different version of the overloaded method (see Figure 4-16).
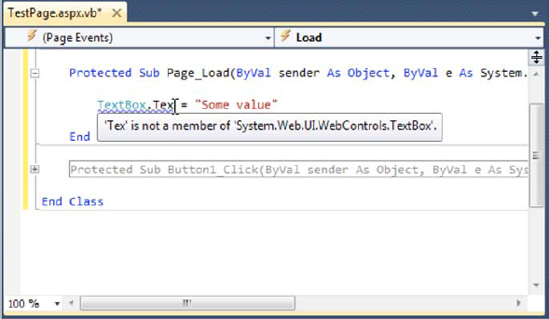
One of the code editor's most useful features is error underlining. Visual Studio is able to detect a variety of error conditions, such as undefined variables, properties, or methods; invalid data type conversions; and missing code elements. Rather than stopping you to alert you that a problem exists, the Visual Studio editor underlines the offending code. You can hover your mouse over an underlined error to see a brief tooltip description of the problem (see Figure 4-17).
If you try to run a web page that contains an error, Visual Studio will ask you whether it should continue. At this point, you'll almost always decide to cancel the operation and fix the problems Visual Studio has discovered. (If you choose to continue, you'll actually wind up using the last compiled version of your application, because Visual Studio can't build an application that has errors.)
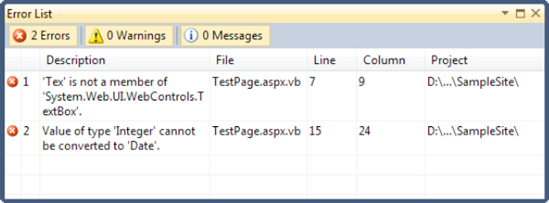
Whenever you attempt to build an application that has errors, Visual Studio will display the Error List window with a list of all the problems it detected, as shown in Figure 4-18. You can then jump quickly to a problem by double-clicking it in the list.
You can also configure the level of error checking Visual Studio performs for markup in your .aspx files. Usually, you'll want to set the level of validation to match the doctype that you're using. Unfortunately, Visual Studio doesn't take this step automatically. Instead, it's up to you to choose the level of validation you want from the drop-down list in the HTML Source Editing toolbar. (If the HTML Source Editing toolbar is not currently displayed, right-click the toolbar strip and choose HTML Source Editing.) The most common validation choices are HTML 4.01, XHTML 1.0 Transitional, and XHTML 1.1. For example, if you choose XHTML 1.0 Transitional or XHTML 1.1, you'll receive a warning in the Error List if your web page includes syntax that's not legal in XHTML, such as incorrect capitalization, an obsolete formatting attribute, or an element that's not properly closed. You'll still be able to run your web page, but you'll know that your page isn't completely consistent with the XHTML standard.
Not only does IntelliSense help you code and catch mistakes you make, but it can also suggest corrections with a feature called AutoCorrect.
To see AutoCorrect in action, enter this line of code inside an event handler:
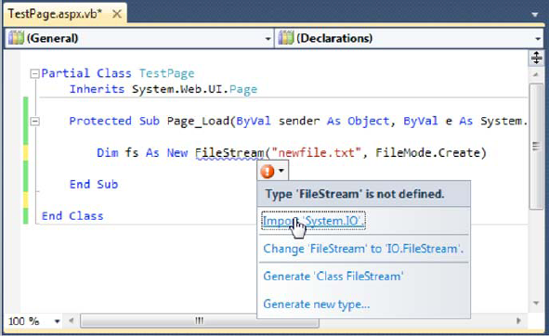
Dim fs As New FileStream("newfile.txt", FileMode.Create)This line creates an instance of the FileStream class, which resides in the System.IO namespace. However, if you haven't imported the System.IO namespace, you'll run into a compile-time error, and the line will be underlined in blue. Unfortunately, the error simply indicates that no known class named FileStream exists—it doesn't indicate whether the problem is a misspelling or a missing import, and it doesn't tell you which namespace has the class you need. However, AutoCorrect can help.
To see AutoCorrect in action, hover over the error. A red exclamation mark icon will appear that, when clicked, shows a window with the suggested correction (see Figure 4-19).
Other problems that AutoCorrect can resolve include automatic data type conversion (if you have Option Strict switched on), misspelled keywords, and missing lines in a block structure.
Visual Studio also provides some cosmetic conveniences. It automatically colors your code, making comments green, keywords blue, and normal code black. The result is much more readable code. You can even configure the colors Visual Studio uses by selecting Tools
In addition, Visual Studio is configured by default to automatically format your code. This means you can type your code lines freely without worrying about tabs and positioning. Visual Studio automatically applies the "correct" indenting. Fortunately, if you have a different preference (for example, you want five spaces instead of four spaces of indenting, or you want to use tabs instead of spaces), you can configure this behavior. Just select Tools
Once you've created an application, you can compile and run it by choosing Debug
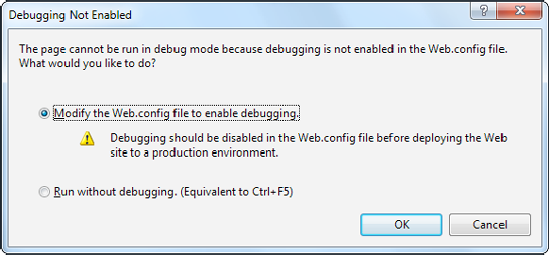
The first time you launch a web application, Visual Studio will ask you whether you want to configure your web application to allow debugging by adjusting its configuration file. (Figure 4-20 shows the message you'll see.) Choose "Modify the Web.config file to enable debugging," and click OK.
When you run a web application, Visual Studio starts its integrated web server. Behind the scenes, ASP.NET compiles the code for your web application, runs your web page, and then returns the final HTML to the browser. The first time you run a web page, you'll see a new icon appear in the system tray at the bottom-right corner of the taskbar. This icon is Visual Studio's test web server, which runs in the background hosting your website. The test server only runs while Visual Studio is running, and it only accepts requests from your computer (so other users can't connect to it over a network).
When you run a web page, you'll notice that the URL in the browser includes a port number. For example, if you run a web application in a folder named OnlineBank, you might see a URL like http://localhost:4235/OnlineBank/Default.aspx. This URL indicates that the web server is running on your computer (localhost), so its requests aren't being sent over the Internet. It also indicates that all requests are being transmitted to port number 4235. That way, the requests won't conflict with any other applications that might be running on your computer and listening for requests. Every time Visual Studio starts the integrated web server, it randomly chooses an available port.
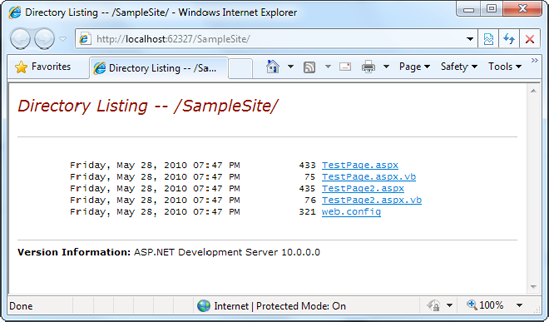
Visual Studio's built-in web server also allows you to retrieve a listing of all the files in your website. This means if you create a web application named SampleSite, you can request it in the form http://localhost:port/SampleSite (omitting the page name) to see a list of all the files in your web application folder (see Figure 4-21). Then, just click the page you want to test.
This trick won't work if you have a Default.aspx page. If you do, any requests that don't indicate the page you want are automatically redirected to this page.
Single-step debugging allows you to test your assumptions about how your code works and see what's really happening under the hood of your application. It's incredibly easy to use. Just follow these steps:
Find a location in your code where you want to pause execution. (You can use any executable line of code but not a variable declaration, comment, or blank line.) Click in the margin next to the line of code (or press F9), and a red breakpoint will appear. Figure 4-22 shows an exceedingly simply page, which reads numeric content out of a TextBox control, multiplies it by two, and displays it in a Label control. (If you want to practice debugging this page yourself, you can get it with the sample code for this chapter.)
Now start your program as you would ordinarily (by pressing the F5 key or using the Start button on the toolbar). When the program reaches your breakpoint, execution will pause, and you'll be switched to the Visual Studio code window. The breakpoint statement won't be executed yet.
At this point, you have several options. You can execute the current line by pressing F11. The following line in your code will be highlighted with a yellow arrow, indicating that this is the next line that will be executed. You can continue like this through your program, running one line at a time by pressing F11 and following the code's path of execution.
Whenever the code is in break mode, you can hover over variables to see their current contents (see Figure 4-23). This allows you to verify that variables contain the values you expect.
You can also use any of the commands listed in Table 4-2 while in break mode. These commands are available from the context menu by right-clicking the code window or by using the associated hot key.

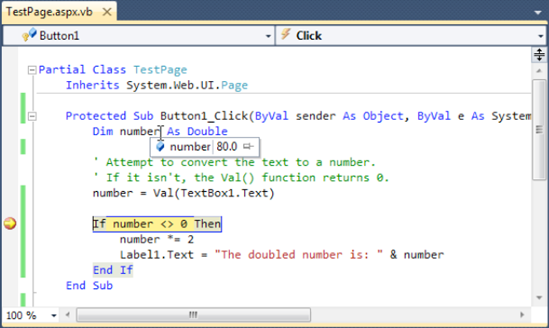
Table 4.2. Commands Available in Break Mode
You can switch your program into break mode at any point by clicking the Pause button in the toolbar or selecting Debug
Tip
As you're just starting out with ASP.NET, you won't have a lot of code to debug. However, be sure to return to this section as you try out more detailed examples in the following chapters. Visual Studio's debugging tools are an invaluable way to get a close-up look at how code operates.
When debugging a large website, you might place breakpoints in different places in your code and in multiple web pages. To get an at-a-glance look at all the breakpoints in your web application, choose Debug
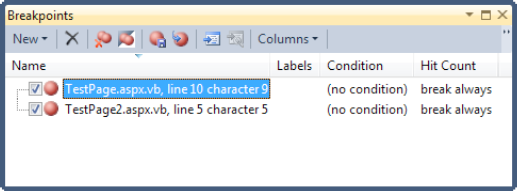
You can jump to the location in code where a breakpoint is placed by double-clicking it in the list. You can also remove a breakpoint (select it and press Delete) or temporarily disable a breakpoint (by removing the checkmark next to it). This allows you to keep a breakpoint to use in testing later, without leaving it active.
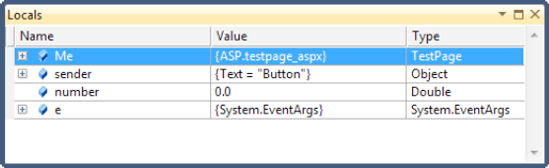
In some cases, you might want to track the status of a variable without switching into break mode repeatedly. In this case, it's more useful to use the Autos, Locals, and Watch windows, which allow you to track variables across an entire application. Table 4-3 describes these windows.
Table 4.3. Variable Watch Windows
Window | Description |
|---|---|
Autos | Automatically displays variables that Visual Studio determines are important for the current code statement. For example, this might include variables that are accessed or changed in the previous line. |
Locals | Automatically displays all the variables that are in scope in the current method. This offers a quick summary of important variables. |
Watch | Displays variables you have added. Watches are saved with your solution, so you can continue tracking a variable later. To add a watch, right-click a variable in your code while in break mode, and select Add Watch. Alternatively, double-click the last row in the Watch window and type in the variable name. |
Each row in the Autos, Locals, and Watch windows provides information about the type or class of the variable and its current value. If the variable holds an object instance, you can expand the variable and see its members and properties. For example, in the Locals window you'll see the variable Me (see Figure 4-25), which is a reference to the current object inside of which your code is executing (in this case, the web page). If you click the plus (+) sign next to the word Me, a full list will appear that describes many page properties (and some system values).
If you are missing one of the Watch windows, you can show it manually by selecting it from the Debug
Tip
The Autos, Locals, and Watch windows allow you to change simple variables while your program is in break mode. Just double-click the current value in the Value column, and type in a new value. This allows you to simulate scenarios that are difficult or time-consuming to re-create manually and allows you to test specific error conditions.
In this chapter, you took a quick look at Visual Studio. First, you saw how to create a new web application using the clean projectless website model. Next, you considered how to design basic web pages, complete with controls and code. Finally, you saw how to use Visual Studio's rich set of debugging features to get into the brain of your web page code and track down elusive problems.
In the next chapter, you'll start building simple web applications with Visual Studio and get your first full look at the ASP.NET web page model.