
XML is designed as an all-purpose format for organizing data. In many cases, when you decide to use XML, you're deciding to store data in a standardized way, rather than creating your own new (and to other developers, unfamiliar) format conventions. The actual location of this data—in memory, in a file, in a network stream—is irrelevant.
In this chapter, you'll learn the ground rules of the XML standard. You'll learn how to read XML content using the classes of the .NET library and how you can create and read your own XML documents. You'll also study some of the other standards that support and extend the basic rules of XML, including XML namespaces, XML schema, and XSLT.
The best way to understand the role XML plays is to consider the evolution of a simple file format without XML. For example, consider a simple program that stores product items as a list in a file. Say when you first create this program, you decide it will store three pieces of product information (ID, name, and price), and you'll use a simple text file format for easy debugging and testing. The file format you use looks like this:
1
Chair
49.33
2
Car
43399.55
3
Fresh Fruit Basket
49.99
This is the sort of format you might create by using .NET classes such as the StreamWriter. It's easy to work with—you just write all the information, in order, from top to bottom. Of course, it's a fairly fragile format. If you decide to store an extra piece of information in the file (such as a flag that indicates whether an item is available), your old code won't work. Instead, you might need to resort to adding a header that indicates the version of the file:
SuperProProductListVersion 2.01
Chair 49.33True2 Car 43399.55True3 Fresh Fruit Basket 49.99False
Now, you could check the file version when you open it and use different file reading code appropriately. Unfortunately, as you add more and more possible versions, the file reading code will become incredibly tangled, and you may accidentally break compatibility with one of the earlier file formats without realizing it. A better approach would be to create a file format that indicates where every product record starts and stops. Your code would then just set some appropriate defaults if it finds missing information in an older file format.
Here's a relatively crude solution that improves the SuperProProductList by adding a special sequence of characters (##Start##) to show where each new record begins:
SuperProProductListVersion 3.0##Start##1 Chair 49.33 True##Start##2 Car 43399.55 True##Start##3 Fresh Fruit Basket 49.99 False
All in all, this isn't a bad effort. Unfortunately, you may as well use the binary file format at this point—the text file is becoming hard to read, and it's even harder to guess what piece of information each value represents. On the code side, you'll also need some basic error checking abilities of your own. For example, you should make your code able to skip over accidentally entered blank lines, detect a missing ##Start## tag, and so on, just to provide a basic level of protection.
The central problem with this homegrown solution is that you're reinventing the wheel. While you're trying to write basic file access code and create a reasonably flexible file format for a simple task, other programmers around the world are creating their own private, ad hoc solutions. Even if your program works fine and you can understand it, other programmers will definitely not find it easy.
This is where XML comes into the picture. XML is an all-purpose way to identify any type of data using elements. These elements use the same sort of format found in an HTML file, but while HTML elements indicate formatting, XML elements indicate content. (Because an XML file is just about data, there is no standardized way to display it in a browser, although Internet Explorer shows a collapsible view that lets you show and hide different portions of the document.)
The SuperProProductList could use the following, clearer XML syntax:
<?xml version="1.0"?>
<SuperProProductList>
    <Product>
        <ID>1</ID>
        <Name>Chair</Name>
        <Price>49.33</Price>
        <Available>True</Available>
        <Status>3</Status>
    </Product>
    <Product>
        <ID>2</ID>
        <Name>Car</Name>
        <Price>43399.55</Price>
        <Available>True</Available>
        <Status>3</Status>
    </Product>
    <Product>
        <ID>3</ID>
        <Name>Fresh Fruit Basket</Name>
        <Price>49.99</Price>
        <Available>False</Available>
        <Status>4</Status>
    </Product>
</SuperProProductList>
This format is clearly understandable. Every product item is enclosed in a <Product> element, and every piece of information has its own element with an appropriate name. Elements are nested several layers deep to show relationships. Essentially, XML provides the basic element syntax, and you (the programmer) define the elements you want to use. That's why XML is often described as a metalanguage—it's a language you use to create your own language. In the SuperProProductList example, this custom XML language defines elements such as <Product>, <ID>, <Name>, and so on.
Best of all, when you read this XML document in most programming languages (including those in the .NET Framework), you can use XML parsers to make your life easier. In other words, you don't need to worry about detecting where an element starts and stops, collapsing whitespace, and so on (although you do need to worry about capitalization, because XML is case sensitive). Instead, you can just read the file into some helpful XML data objects that make navigating the entire document much easier. Similarly, you can now extend the SuperProProductList with more information using additional elements, and any code you've already written will keep working without a hitch.
Part of XML's popularity is a result of its simplicity. When creating your own XML document, you need to remember only a few rules:
XML elements are composed of a start tag (like <Name>) and an end tag (like </Name>). Content is placed between the start and end tags. If you include a start tag, you must also include a corresponding end tag. The only other option is to combine the two by creating an empty element, which includes a forward slash at the end and has no content (like <Name />). This is similar to the syntax for ASP.NET controls.
Whitespace between elements is ignored. That means you can freely use tabs and hard returns to properly align your information.
You can use only valid characters in the content for an element. You can't enter special characters, such as the angle brackets (< >) and the ampersand (&), as content. Instead, you'll have to use the entity equivalents (such as < and > for angle brackets, and & for the ampersand). These equivalents will be automatically converted to the original characters when you read them into your program with the appropriate .NET classes.
XML elements are case sensitive, so <ID> and <id> are completely different elements.
All elements must be nested in a root element. In the SuperProProductList example, the root element is <SuperProProductList>. As soon as the root element is closed, the document is finished, and you cannot add anything else after it. In other words, if you omit the <SuperProProductList> element and start with a <Product> element, you'll be able to enter information for only one product; this is because as soon as you add the closing </Product>, the document is complete. (HTML has a similar rule and requires that all page content be nested in a root <html> element, but most browsers let you get away without following this rule.)
Every element must be fully enclosed. In other words, when you open a subelement, you need to close it before you can close the parent. <Product><ID></ID></Product> is valid, but <Product><ID></Product></ID> isn't. As a general rule, indent when you open a new element, because this will allow you to see the document's structure and notice if you accidentally close the wrong element first.
XML documents must start with an XML declaration like <?xml version="1.0"?>. This signals that the document contains XML and indicates any special text encoding. However, many XML parsers work fine even if this detail is omitted.
These requirements should sound familiar—they're the same rules you learned for XHTML in Chapter 4. After all, XHTML is just another specialized language that's built using the standardized rules of XML.
As long as you meet these requirements, your XML document can be parsed and displayed as a basic tree. This means your document is well formed, but it doesn't mean it is valid. For example, you may still have your elements in the wrong order (for example, <ID><Product></Product></ID>), or you may have the wrong type of data in a given field (for example, <ID>Chair</ID><Name>2</Name). You can impose these additional rules on your XML documents, as you'll see later in this chapter when you consider XML schemas.
Elements are the primary units for organizing information in XML (as demonstrated with the SuperProProductList example), but they aren't the only option. You can also use attributes.
Attributes add extra information to an element. Instead of putting information into a subelement, you can use an attribute. In the XML community, deciding whether to use subelements or attributes—and what information should go into an attribute—is a matter of great debate, with no clear consensus.
Here's the SuperProProductList example with ID and Name attributes instead of ID and Name subelements:
<?xml version="1.0"?>
<SuperProProductList>
    <Product ID="1" Name="Chair">
        <Price>49.33</Price>
        <Available>True</Available>
        <Status>3</Status>
    </Product>
    <Product ID="2" Name="Car">
        <Price>43399.55</Price>
        <Available>True</Available>
        <Status>3</Status>
    </Product>
    <Product ID="3" Name="Fresh Fruit Basket">
        <Price>49.99</Price>
        <Available>False</Available>
        <Status>4</Status>
    </Product>
</SuperProProductList>
Of course, you've already seen this sort of syntax with HTML elements and ASP.NET server controls:
<asp:DropDownList id="lstBackColor" AutoPostBack="True"
  Width="194px" Height="22px" runat="server" />
Attributes are also common in the configuration file:
<sessionState mode="Inproc" cookieless="false" timeout="20" />
Using attributes in XML is more stringent than in HTML. In XML, attributes must always have values, and these values must use quotation marks. For example, <Product Name="Chair" /> is acceptable, but <Product Name=Chair /> or <Product Name /> isn't. However, you do have one bit of flexibility—you can use single or double quotes around any attribute value. It's convenient to use single quotes if you know the text value inside will contain a double quote (as in <Product Name='Red "Sizzle" Chair' />). If your text value has both single and double quotes, use double quotes around the value and replace the double quotes inside the value with the " entity equivalent.
Tip
Order is not important when dealing with attributes. XML parsers treat attributes as a collection of unordered information relating to an element. On the other hand, the order of elements often is important. Thus, if you need a way of arranging information and preserving its order, or if you have a list of items with the same name, then use elements, not attributes.
You can also add comments to an XML document. Comments go just about anywhere and are ignored for data processing purposes. Comments are bracketed by the <!-- and --> character sequences. The following listing includes three valid comments:
<?xml version="1.0"?>
<SuperProProductList>
    <!-- This is a test file. -->
    <Product ID="1" Name="Chair">
        <Price>49.33<!-- Why so expensive? --></Price>
        <Available>True</Available>
        <Status>3</Status>
    </Product>
    <!-- Other products omitted for clarity. -->
</SuperProProductList>
The only place you can't put a comment is embedded within a start or end tag (as in <myData <!-- A comment should not go here --></myData>).
.NET provides a rich set of classes for XML manipulation in several namespaces that start with System.Xml. One of the most confusing aspects of using XML with .NET is deciding which combination of classes you should use. Many of them provide similar functionality in a slightly different way, optimized for specific scenarios or for compatibility with specific standards.
The majority of the examples you'll explore use the types in the core System.Xml namespace. The classes here allow you to read and write XML files, manipulate XML data in memory, and even validate XML documents.
In this chapter, you'll look at the following options for dealing with XML data:
Reading and writing XML directly, just like you read and write text files using XmlTextWriter and XmlTextReader. For sheer speed and efficiency, this is the best approach.
Dealing with XML as a collection of in-memory objects using the XDocument class. If you need more flexibility than the XmlTextWriter and XmlTextReader provide or you just want a simpler, more straightforward model (and you don't need to squeeze out every last drop of performance), this is a good choice.
Using the Xml control to transform XML content to displayable HTML. In the right situation—when all you want to do is display XML content using a prebuilt XSLT style sheet—this approach offers a useful shortcut.
Note
When it comes to XML, Microsoft is a bit schizophrenic. The .NET Framework includes at least a dozen ways to read and manipulate XML, including many that are too specialized or limited to cover in this chapter. In the following sections, you'll spend most of your time exploring the two most practical ways to work with XML. First, you'll learn to use the basic XmlTextWriter and XmlTextReader classes, which guarantee good performance. Second, you'll explore the XDocument class, which can simplify intricate XML processing.
One of the simplest ways to create or read any XML document is to use the basic XmlTextWriter and XmlTextReader classes. These classes work like their StreamWriter and StreamReader relatives, except that they write and read XML documents instead of ordinary text files. This means you follow the same process you saw in Chapter 17 for creating a file. First, you create or open the file. Then, you write to it or read from it, moving from top to bottom. Finally, you close it and get to work using the retrieved data in whatever way you'd like.
Before beginning this example, you'll need to import the namespaces for file handling and XML processing:
Imports System.IO
Imports System.Xml
Here's an example that creates a simple version of the SuperProProductList document:
' Place the file in the App_Data subfolder of the current website.
' The System.IO.Path class makes it easy to build the full file name.
Dim file As String = Path.Combine(Request.PhysicalApplicationPath, _
  "App_DataSuperProProductList.xml")

Dim fs As New FileStream(file, FileMode.Create)
Dim w As New XmlTextWriter(fs, Nothing)

w.WriteStartDocument()
w.WriteStartElement("SuperProProductList")
w.WriteComment("This file generated by the XmlTextWriter class.")
' Write the first product.
w.WriteStartElement("Product")
w.WriteAttributeString("ID", "", "1")
w.WriteAttributeString("Name", "", "Chair")
w.WriteStartElement("Price")
w.WriteString("49.33")
w.WriteEndElement()
w.WriteEndElement()
' Write the second product.
w.WriteStartElement("Product")
w.WriteAttributeString("ID", "2")
w.WriteAttributeString("Name", "Car")
w.WriteStartElement("Price")
w.WriteString("43399.55")
w.WriteEndElement()
w.WriteEndElement()
' Write the third product.
w.WriteStartElement("Product")
w.WriteAttributeString("ID", "3")
w.WriteAttributeString("Name", "Fresh Fruit Basket")
w.WriteStartElement("Price")
w.WriteString("49.99")
w.WriteEndElement()
w.WriteEndElement()
' Close the root element.
w.WriteEndElement()
w.WriteEndDocument()
w.Close()You create the entire XML document by calling the methods of the XmlTextWriter, in the right order. To start a document, you always begin by calling WriteStartDocument(). To end it, you call WriteEndDocument().
The next step is writing the elements you need. You write elements in three steps. First, you write the start tag (like <Product>) by calling WriteStartElement(). Then you write attributes, elements, and text content inside. Finally, you write the end tag (like </Product>) by calling WriteEndElement().
The methods you use always work with the current element. So if you call WriteStartElement() and follow it up with a call to WriteAttributeString(), you are adding an attribute to that element. Similarly, if you use WriteString(), you insert text content inside the current element, and if you use WriteStartElement() again, you write another element, nested inside the current element.
In some ways, this code is similar to the code you used to write a basic text file. It does have a few advantages, however. You can close elements quickly and accurately, the angle brackets (< >) are included for you automatically, and some errors (such as closing the root element too soon) are caught automatically, thereby ensuring a well-formed XML document as the final result.
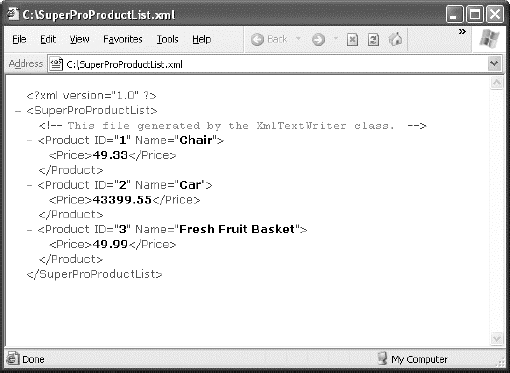
To check that your code worked, open the file in Internet Explorer, which automatically provides a collapsible view for XML documents (see Figure 18-1).
Reading the XML document in your code is just as easy with the corresponding XmlTextReader class. The XmlTextReader moves through your document from top to bottom, one node at a time. You call the Read() method to move to the next node. This method returns True if there are more nodes to read or False once it has read the final node. The current node is provided through the properties of the XmlTextReader class, such as NodeType and Name.
A node is a designation that includes comments, whitespace, opening tags, closing tags, content, and even the XML declaration at the top of your file. To get a quick understanding of nodes, you can use the XmlTextReader to run through your entire document from start to finish and display every node it encounters. The code for this task is as follows:
Dim file As String = Path.Combine(Request.PhysicalApplicationPath, _
  "App_DataSuperProProductList.xml")
Dim fs As New FileStream(file, FileMode.Open)
Dim r As New XmlTextReader(fs)

' Use a StringWriter to build up a string of HTML that
' describes the information read from the XML document.
Dim writer As New StringWriter()

' Parse the file, and read each node.
Do While r.Read()
    writer.Write("<b>Type:</b> ")
    writer.Write(r.NodeType.ToString())
    writer.Write("<br />")

    ' The name is available when reading the opening and closing tags
    ' for an element. It's not available when reading the inner content.
    If r.Name <> "" Then
        writer.Write("<b>Name:</b> ")
        writer.Write(r.Name)
        writer.Write("<br />")
    End If

    ' The value is when reading the inner content.
    If r.Value <> "" Then
        writer.Write("<b>Value:</b> ")
        writer.Write(r.Value)
        writer.Write("<br />")
    End If

    If r.AttributeCount > 0 Then
        writer.Write("<b>Attributes:</b> ")
        For i As Integer = 0 To r.AttributeCount - 1
            writer.Write("  ")
            writer.Write(r.GetAttribute(i))
            writer.Write("  ")
        Next
        writer.Write("<br />")
    End If

writer.Write("<br />")
Loop fs.Close() ' Copy the string content into a label to display it. lblXml.Text = writer.ToString()
To test this, try the XmlText.aspx page included with the online samples. It produces the result shown in Figure 18-2.
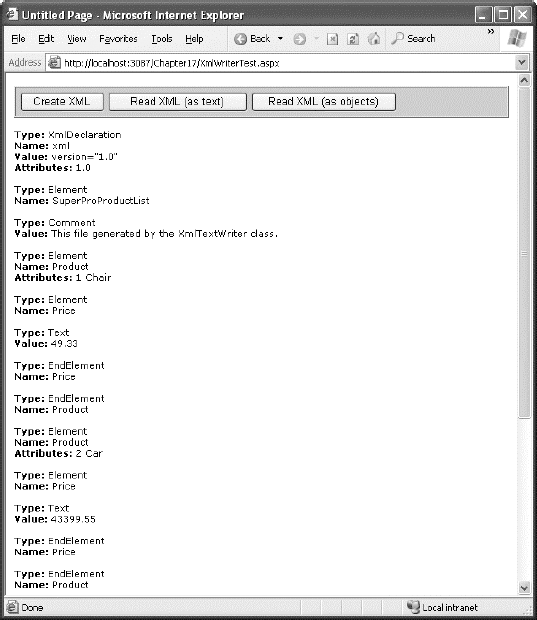
The following is a list of all the nodes that are found, shortened to include only one product:
Type: XmlDeclaration
Name: xml
Value: version="1.0"
Attributes: 1.0Type: ElementName: SuperProProductListType: CommentValue: This file generated by the XmlTextWriter class.Type: ElementName: Product Attributes: 1 ChairType: ElementName: PriceType: TextValue: 49.33Type: EndElementName: PriceType: EndElementName: ProductType: EndElementName: SuperProProductList
If you use the indentation trick described earlier (in the "Formatting Your XML" sidebar), you'll see additional nodes that represent the bits of whitespace between elements.
In a typical application, you would need to go fishing for the elements that interest you. For example, you might read information from an XML file such as SuperProProductList.xml and use it to create Product objects based on the Product class shown here:
Public Class Product
    Public Property ID() As Integer
    Public Property Name() As String
    Public Property Price() As Decimal
End Class
Nothing is particularly special about this class—all it does is allow you to store three related pieces of information (price, name, and ID). Note that this class uses automatic properties rather than public member variables, so its information can be displayed in a web page with ASP.NET data binding.
A typical application might read data from an XML file and place it directly into the corresponding objects. The next example (also a part of the XmlWriterTest.aspx page) shows how you can easily create a group of Product objects based on the SuperProProductList.xml file. This example uses the generic List collection, so you'll need to import the System.Collections.Generic namespace.
' Open a stream to the file.
Dim file As String = Path.Combine(Request.PhysicalApplicationPath, _
  "App_DataSuperProProductList.xml")
Dim fs As New FileStream(file, FileMode.Open)
Dim r As New XmlTextReader(fs)
' Create the collection of products.
Dim Products As New List(Of Product)()

' Loop through the products.
Do While r.Read()

    If r.NodeType = XmlNodeType.Element And r.Name = "Product" Then
        Dim NewProduct As New Product()
        NewProduct.ID = Int32.Parse(r.GetAttribute("ID"))
        NewProduct.Name = r.GetAttribute("Name")

        ' Get the rest of the subelements for this product.
        Do Until r.NodeType = XmlNodeType.EndElement
            r.Read()

            ' Look for Price subelement.
            If r.Name = "Price" Then
                Do Until (r.NodeType = XmlNodeType.EndElement)
                    r.Read()
                    If r.NodeType = XmlNodeType.Text Then
                        NewProduct.Price = Val(r.Value)
                    End If
                Loop
            End If

            ' We could check for other Product nodes
            ' (like Available, Status, etc.) here.
        Loop

        ' Add the product to the list.
        Products.Add(NewProduct)
    End If
Loop

fs.Close()

' Display the retrieved document.
gridResults.DataSource = Products
gridResults.DataBind()This code uses a nested looping structure. The outside loop iterates over all the products, and the inner loop searches through all the child elements of <Product>. (In this example, the code processes the <Price> element, and ignores everything else.) The looping structure keeps the code well organized.
The EndElement node alerts you when a node is complete and the loop can end. Once all the information is read for a product, the corresponding object is added into the collection.
All the information is retrieved from the XML file as a string. Thus, you need to use methods like Int32.Parse() to convert it to the right data type.
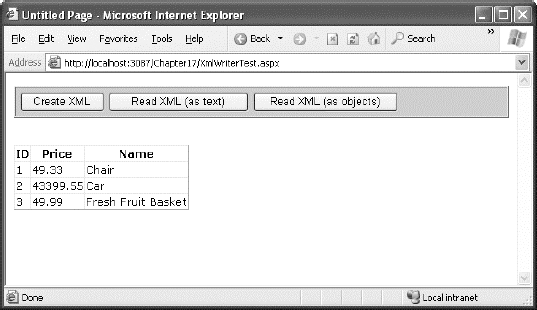
Data binding is used to display the contents of the collection. A GridView set to generate columns automatically creates the table shown in Figure 18-3.
Note
The XmlTextReader provides many more properties and methods. These additional members don't add functionality; they allow for increased flexibility. For example, you can read a portion of an XML document into a string using methods such as ReadString(), ReadInnerXml(), and ReadOuterXml(). These members are all documented in the class library reference in the Visual Studio Help.
The XmlTextReader and XmlTextWriter use XML as a backing store. These classes are streamlined for quickly getting XML data into and out of a file (or some other source). When using these classes, you open your XML file, retrieve the data you need, and use that data to create the appropriate objects or fill the appropriate controls. Your goal is to translate the XML into something more practical and usable. The rest of your code has no way of knowing that the data was initially extracted from an XML document—and it doesn't care.
Note
Remember, the terms XML document and XML file are different. An XML document is a collection of elements structured according to the rules of XML. An XML document can be stored in virtually any way you want—it can be placed in a file, in a field, or in a database, or it can simply exist in memory.
This approach is ideal for storing simple blocks of data. For example, you could modify the guest book page in the previous chapter to store guest book entries in an XML format, which would provide greater standardization but wouldn't change how the application works. Your code for serializing and deserializing the XML data would change, but the rest of the application would remain untouched.
The XDocument class provides a different approach to XML data. It provides an in-memory model of an entire XML document. You can then browse through the entire document, reading, inserting, or removing nodes at any location. (You can find the XDocument and all related classes in the System.Xml.Linq namespace.)
When using this approach, you begin by loading XML content from a file (or some other source) into an XDocument object. The XDocument holds the entire document at once, so it isn't a practical approach if your XML content is several megabytes in size. (If you have a huge XML document, the XmlTextReader and XmlTextWriter classes offer the best approach.) However, the XDocument really excels with the editing capabilities that it gives you. Using the XDocument object, you can manipulate the content or structure of any part of the XML document. When you're finished, you can save the content back to a file. Unlike the XmlTextReader and XmlTextWriter, the XDocument class doesn't maintain a direct connection to the file.
Note
The XDocument is .NET's most modern tool for in-memory XML manipulation. It was introduced as part of LINQ (a feature you'll learn about in Chapter 24), in .NET 3.5. Before this, .NET developers used a similar but slightly more awkward class called XmlDocument. This distinction is important, because the XmlDocument is still kicking around in .NET 4 and there are a few old classes and methods that expect it, instead of the XDocument. However, because the XDocument is more powerful and more convenient, Microsoft recommends that you make it your go-to tool for serious XML work.
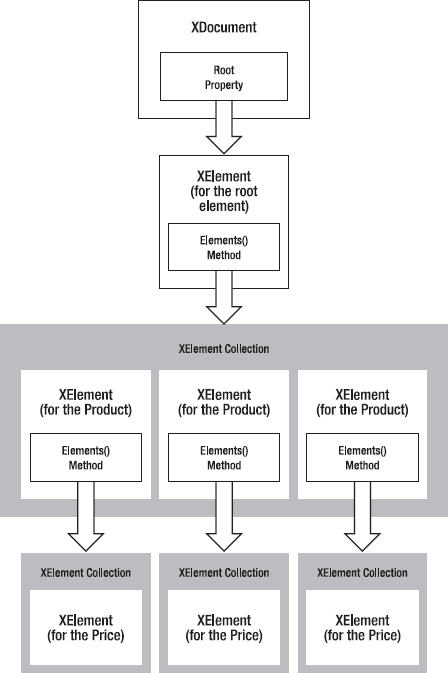
When you use the XDocument class, your XML document is created as a series of linked .NET objects in memory. Figure 18-4 shows the object model. (The diagram is slightly simplified from what you'll find when you start using the XDocument class—namely, it doesn't show the attributes, each of which is represented by an XAttribute object.)
To start building a next XML document, you need to create the XDocument, XElement, and XAttribute objects that comprise it. All these classes have useful constructors that allow you to create and initialize them in one step. For example, you can create an element and supply text content that should be placed inside using code like this:
Dim element As New XElement("Price", "23.99")This is already better than the XmlTextWriter, which forces you to start an element, insert its content, and close it with three separate statements. But the code savings become even more dramatic when you consider another feature of the XDocument and XElement classes—their ability to create a nested tree of nodes in a single code statement.
Here's how it works. Both the XDocument and XElement class include a constructor that takes a parameter array for the last argument. This parameter array holds a list of nested nodes.
Note
A parameter array is a parameter that's preceded with the ParamArray keyword. This parameter is always the last parameter, and it's always an array. The advantage is that users don't need to declare the array—instead, they can simply tack on as many arguments as they want, which are grouped into a single array automatically.
Here's an example that creates an element with three nested elements and their content:
Dim element As New XElement("Product", _
  New XElement("ID", 3), _
  New XElement("Name", "Fresh Fruit Basket"), _
  New XElement("Price", "49.99"))
Here's the scrap of XML that this code creates:
<Product>
<ID>3</ID>
<Name>Fresh Fruit Basket</Name>
<Price>49.99</Price>
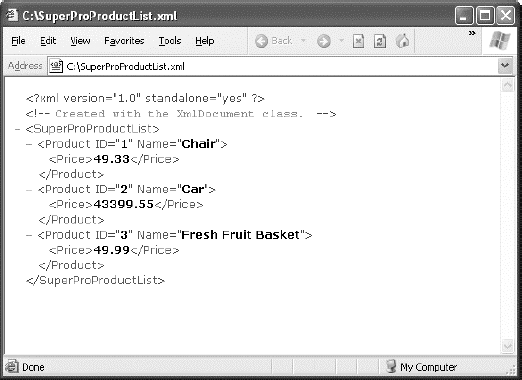
</Product>You can extend this technique to create an entire XML document, complete with elements, text content, attributes, and comments. For example, here's the complete code that creates the SuperProProductList.xml document in memory. When the document is completely built, the code saves it to a file using the XDocument.Save() method.
' Build the XML content in memory.
Dim doc As New XDocument( _
  New XDeclaration("1.0", Nothing, "yes"), _
  New XComment("Created with the XDocument class."), _
  New XElement("SuperProProductList", _
    New XElement("Product", _
      New XAttribute("ID", 1), _
      New XAttribute("Name", "Chair"), _
      New XElement("Price", "49.33")), _
    New XElement("Product", _
      New XAttribute("ID", 2), _
      New XAttribute("Name", "Car"), _
      New XElement("Price", "43399.55")), _
    New XElement("Product", _
      New XAttribute("ID", 3), _
      New XAttribute("Name", "Fresh Fruit Basket"), _
      New XElement("Price", "49.99"))))

' Save the document.
doc.Save(file)
This code creates the same XML content as the XmlTextWriter code you considered earlier. However, this code is shorter and easier to read.
Every separate part of the XML document is created as an object. Elements are created as XElement objects, comments are created as XComment objects, and attributes are represented as XAttribute objects.
Unlike the code that uses the XmlTextWriter, there's no need to explicitly close elements.
Another nice detail is the way the indenting of the code statements mirrors the nesting of the elements in the XML document. If one element is followed by another and both elements have the same indenting, then the two elements are at the same level (for example, one <Product> element after another). If one element is followed by another and the second element has a greater indenting, it's being placed inside the preceding element (for example, the <Price> element in the <Product> element). The same holds true for other types of nodes, such as comments and attributes. This indenting allows you to look at your code and quickly take in the overall shape of the XML document.
One of the best features of the XDocument class is that it doesn't rely on any underlying file. When you use the Save() method, the file is created, a stream is opened, the information is written, and the file is closed, all in one line of code. This means this is probably the only line you need to put inside a Try/Catch error handling block.
Figure 18-5 shows the file written by this code (as displayed by Internet Explorer).
The XDocument makes it easy to read and navigate XML content. You can use the shared XDocument.Load() method to read XML documents from a file, URI, or stream, and you can use the shared XDocument.Parse() method to load XML content from a string.
Once you have the XDocument with your content in memory, you can dig into the tree of nodes using a few key properties and methods of the XElement and XDocument class. Table 18-1 lists the most useful methods.
Table 18.1. Useful Methods for XElement and XDocument
Method | Description |
|---|---|
Attributes() | Gets the collection of XAttribute objects for this element. |
Attribute() | Gets the XAttribute with the specific name. |
Elements() | Gets the collection of XElement objects that are contained by this element. (This is the top level only—these elements may in turn contain more elements.) Optionally, you can specify an element name, and only those elements will be retrieved. |
Element() | Gets the single XElement contained by this element that has a specific name (or null if there's no match). If there is more than one matching element, this method gets just the first one. |
Descendants() | Gets the collection of XElement objects that are contained by this element and (optionally) have the name you specify. Unlike the Elements() method, this method goes through all the layers of the document and finds elements at any level of the hierarchy. |
Nodes() | Gets all the XNode objects contained by this element. This includes elements and other content, such as comments. However, unlike the XmlTextReader class, the XDocument does not consider attributes to be nodes. |
DescendantNodes() | Gets all the XNode object contained by this element. This method is like Descendants() in that it drills down through all the layers of nested elements. |
These methods give you added flexibility to filter out just the elements that interest you. For example, when using the Elements() method, you have two overloads to choose from. You can get all the child elements (in which case you would supply no parameters) or get just those child elements that have a specific element name (in which case you would specify the element name as a string). For example, here's how you would get the root <SuperProProductList> element from an XDocument that contains the complete SuperProProductList.xml:
' Use the Element() method, because there is just one matching element.
Dim superProProductListElement As XElement = doc.Element("SuperProProductList")
You can then use this element as a starting point to dig deeper into the document. For example, if you want to find the child <Product> elements in the <SuperProProductList>, you would add this code:
' Use the Elements() method, because there are several matching elements.
Dim productElements = superProProductListElement.Elements("Product")
When defining the productElements object, this code does not specify a type. This shortcut works because the VB compiler can identify the correct type and fill it in automatically. (Technically, the Elements() method returns a strongly typed IEnumerable(Of XElement) collection, which is a generic collection that's customized to work with XElement objects.)
Getting the text inside an XElement is easy. In fact, Visual Studio is intelligent enough to automatically convert an XElement to the data type you want, as shown here:
Dim priceElement As XElement = productElement.Element("Price")
Dim price As Decimal = priceElement
This works because the XElement class defines specialized conversion operators. When you assign an XElement to a decimal variable, for example, the XElement automatically retrieves its inner value and attempts to convert that to a decimal.
If you have the Option Strict compilation set, which requires you to perform explicit data type conversion, you can use the same approach, but you need to use a conversion function like CType to make your intent clear to the VB compiler:
Dim priceElement As XElement = productElement.Element("Price")
Dim price As Decimal = CType(priceElement, Decimal)
Setting the text content inside an element is nearly as easy. You simply assign the new content to the Value property, as shown here:
priceElement.Value = CType(priceElement, Decimal) * 2;
You can use the same approach to read and set attributes with the XAttribute class.
Here's a straightforward code routine that mimics the XML processing code you saw earlier with the XmlTextReader. It scans through the elements that are available, creates a list of products, and displays that in a grid.
' Load the document.
Dim doc As XDocument = XDocument.Load(file)

' Loop through all the nodes, and create the list of Product objects .
Dim products As List(Of Product) = New List(Of Product)()

For Each element As XElement In _
  doc.Element("SuperProProductList").Elements("Product")
    Dim newProduct As New Product()
    newProduct.ID = element.Attribute("ID")
    newProduct.Name = element.Attribute("Name")
    newProduct.Price = element.Element("Price")

    products.Add(newProduct)
Next

' Display the results.
gridResults.DataSource = products
gridResults.DataBind()
' Display the retrieved document. gridResults.DataSource = Products gridResults.DataBind()
The XElement class offers quite a few more members. For example, you'll find members for quickly stepping from one node to the next (FirstNode, LastNode, NextNode, PreviousNode, and Parent), properties for testing for the presence of children (HasElements), attributes (HasAttributes), content (IsEmpty), and methods for inserting, removing, and otherwise manipulating the XML tree of nodes. For example, use Add() to place a new child element inside the current element (after any existing content); use AddFirst() to place a new child element inside the current element (before any existing content); use AddAfterSelf() to insert an element at the same level just after the current element; use AddBeforeSelf() to insert an element at the same level just before the current element; and so on. You can also use Remove(), RemoveNodes(), ReplaceWith(), and ReplaceNodes() to remove or replace elements and other nodes.
The following example shows how you can add a new product to the XDocument:
' Create the element for the new product.
Dim newProduct As New XElement("Product", _
  New XAttribute("ID", 4), _
  New XAttribute("Name", "Magic Lantern"), _
  New XElement("Price", "76.95"))

' Add the element to the end of the current product list.
doc.Element("SuperProProductList").Add(newProduct)
Tip
Whether you use the XDocument or the XmlTextReader class depends on a number of factors. Generally, you use XDocument when you want to deal directly with XML, rather than just using XML as a way to persist some information. It also gives you the ability to modify the structure of an XML document, and it allows you to browse XML information in a more flexible way (not just from start to finish). On the other hand, the XmlTextReader is best when dealing with large XML files, because it won't attempt to load the entire document into memory at once.
One of the nicest features of the XDocument is its support of searching, which allows you to find nodes when you know they are there—somewhere—but you aren't sure how many matches exist or where the elements are.
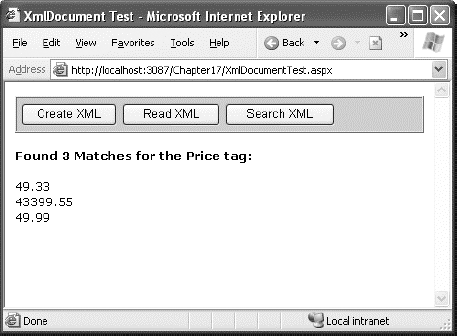
To search an XDocument, all you need to do is use the Descendants() or DescendantNodes() method. Both methods allow you to search through the entire document tree in one step. For example, here's how you can use Descendants() on the entire SuperProProductList.xml document to get a list of prices:
Dim doc As XDocument = XDocument.Load(file)

' Find the matches.
Dim results = doc.Descendants("Price")
' Display the results.
lblXml.Text = "<b>Found " & results.Count(Of XElement)().ToString() & " Matches "
lblXml.Text &= " for the Price tag: </b><br /><br />"
For Each result As XElement In results
lblXml.Text += result.Value & "<br />"
NextFigure 18-6 shows the result.
The Descendants() method is great if you want to find an element based on its name. If you want to use more sophisticated searching, match only part of a name, or examine only part of a document, you have two choices. First, you can to write code that loops through all the nodes in the XDocument and checks each one. Second, you can use the LINQ to XML feature to perform a query that extracts matching XElement objects from your XDocument. This is a natural fit, because the XDocument class was originally introduced as part of the LINQ feature in .NET 3.5. You'll learn much more about LINQ, including how to use it to perform searches, in Chapter 24.
XML has a rich set of supporting standards, many of which are far beyond the scope of this book. One of the most useful in this family of standards is XML Schema. XML Schema defines the rules to which a specific XML document should conform, such as the allowable elements and attributes, the order of elements, and the data type of each element. You define these requirements in an XML Schema document (XSD).
When you're creating an XML file on your own, you don't need to create a corresponding XSD file—instead, you might just rely on the ability of your code to behave properly. Although this is sufficient for tightly controlled environments, if you want to open your application to other programmers or allow it to interoperate with other applications, you should create an XSD. Think of it this way: XML allows you to create a custom language for storing data, and XSD allows you to define the syntax of the language you create.
Before you can create an XSD, you'll need to understand one other XML standard, called XML namespaces.
The core idea behind XML namespaces is that every XML markup language has its own namespace, which is used to uniquely identify all related elements. Technically, namespaces disambiguate elements by making it clear what markup language they belong to. For example, you could tell the difference between your SuperProProductList standard and another organization's product catalog because the two XML languages would use different namespaces.
Namespaces are particularly useful in compound documents, which contain separate sections, each with a different type of XML. In this scenario, namespaces ensure that an element in one namespace can't be confused with an element in another namespace, even if it has the same element name. Namespaces are also useful for applications that support different types of XML documents. By examining the namespace, your code can determine what type of XML document it's working with and can then process it accordingly.
Note
XML namespaces aren't related to .NET namespaces. XML namespaces identify different XML languages. NET namespaces are a code construct used to organize types.
Before you can place your XML elements in a namespace, you need to choose an identifying name for that namespace. Most XML namespaces use Universal Resource Identifiers (URIs). Typically, these URIs look like a web page URL. For example, http://www.mycompany.com/mystandard is a typical name for a namespace. Though the namespace looks like it points to a valid location on the Web, this isn't required (and shouldn't be assumed).
The reason that URIs are used for XML namespaces is because they are more likely to be unique. Typically, if you create a new XML markup, you'll use a URI that points to a domain or website you control. That way, you can be sure that no one else is likely to use that URI. For example, the namespace http://www.SuperProProducts.com/SuperProProductList is much more likely to be unique than just SuperProProductList if you own the domain www.SuperProProducts.com.
Tip
Namespace names must match exactly. If you change the capitalization in part of a namespace, add a trailing/character, or modify any other detail, it will be interpreted as a different namespace by the XML parser.
To specify that an element belongs to a specific namespace, you simply need to add the xmlns attribute to the start tag and indicate the namespace. For example, the <Price> element shown here is part of the http://www.SuperProProducts.com/SuperProProductList namespace:
<Price xmlns="http://www.SuperProProducts.com/SuperProProductList">
49.33
</Price>
If you don't take this step, the element will not be part of any namespace.
It would be cumbersome if you needed to type the full namespace URI every time you wrote an element in an XML document. Fortunately, when you assign a namespace in this fashion, it becomes the default namespace for all child elements. For example, in the XML document shown here, the <SuperProProductList> element and all the elements it contains are placed in the http://www.SuperProProducts.com/SuperProProductList namespace:
<?xml version="1.0"?>
<SuperProProductList
 xmlns="http://www.SuperProProducts.com/SuperProProductList">
    <Product>
        <ID>1</ID>
        <Name>Chair</Name>
        <Price>49.33</Price>
        <Available>True</Available>
        <Status>3</Status>
    </Product>

    <!-- Other products omitted. -->
</SuperProProductList>
In compound documents, you'll have markup from more than one XML language, and you'll need to place different sections into different namespaces. In this situation, you can use namespace prefixes to sort out the different namespaces.
Namespace prefixes are short character sequences that you can insert in front of a tag name to indicate its namespace. You define the prefix in the xmlns attribute by inserting a colon (:) followed by the characters you want to use for the prefix. Here's the SuperProProductList document rewritten to use the prefix super:
<?xml version="1.0"?><super:SuperProProductListxmlns:super="http://www.SuperProProducts.com/SuperProProductList"><super:Product> <super:ID>1</super:ID> <super:Name>Chair</super:Name> <super:Price>49.33</super:Price> <super:Available>True</super:Available> <super:Status>3</super:Status> </super:Product> <!-- Other products omitted. --> </super:SuperProProductList>
Namespace prefixes are simply used to map an element to a namespace. The actual prefix you use isn't important as long as it remains consistent throughout the document. By convention, the attributes that define XML namespace prefixes are usually added to the root element of an XML document.
Although the xmlns attribute looks like an ordinary XML attribute, it isn't. The XML parser interprets it as a namespace declaration. (The reason XML namespaces use XML attributes is a historical one. This design ensured that old XML parsers that didn't understand namespaces could still read newer XML documents that use them.)
Note
Attributes act a little differently than elements when it comes to namespaces. You can use namespace prefixes with both elements and attributes. However, attributes don't pay any attention to the default namespace of a document. That means if you don't add a namespace prefix to an attribute, the attribute will not be placed in the default namespace. Instead, it will have no namespace.
You can use the XmlTextWriter and XDocument classes you've already learned about to create XML content that uses a namespace.
The XmlTextWriter includes an overloaded version of the WriteStartElement() method that accepts a namespace URI. Here's how it works:
Dim ns As String = "http://www.SuperProProducts.com/SuperProProductList"
w.WriteStartDocument()
w.WriteStartElement("SuperProProductList", ns)

' Write the first product.
w.WriteStartElement("Product", ns)...
The only trick is remembering to use the namespace for every element.
The XDocument class deals with namespaces using a similar approach. First, you define an XNamespace object. Then, you add this XNamespace object to the beginning of the element name every time you create an XElement (or an XAttribute) that you want to place in that namespace. Here's an example:
Dim ns As XNamespace = "http://www.SuperProProducts.com/SuperProProductList"
Dim doc As New XDocument( _
  New XDeclaration("1.0", Nothing, "yes"), _
  New XComment("Created with the XDocument class."), _
  New XElement(ns & "SuperProProductList", _
    New XElement(ns & "Product", _
      New XAttribute("ID", 1), _
      New XAttribute("Name", "Chair"), _
      New XElement(ns & "Price", "49.33")), _
...
You may also need to change your XML reading code. If you're using the straightforward XmlTextReader, life is simple, and your code will work without any changes. If necessary, you can use the XmlTextReader.NamespaceURI property to get the namespace of the current element (which is important if you have a compound document that fuses together elements from different namespaces).
If you're using the XDocument class, you need to take the XML namespace into account when you search the document. For example, when using the XmlElement.Element() method, you must supply the fully qualified element name by adding the appropriate XNamespace object to the string with the element name:
Dim ns As XNamespace = "http://www.SuperProProducts.com/SuperProProductList"
...
Dim superProProductListElement As XElement = doc.Element(ns & "SuperProProductList")
Note
Technically, you don't need to use the XNamespace class, although it makes your code clearer. When you add the XNamespace to an element name string, the namespace is simply wrapped in curly braces. In other words, when you combine the namespace http://www.somecompany.com/DVDList with the element name Title, it's equivalent to the string {http://www.somecompany.com/DVDList} Title. This syntax works because the curly brace characters aren't allowed in ordinary element names, so there's no possibility for confusion.
An XSD, or schema, defines what elements and attributes a document should contain and the way these nodes are organized (the structure). It can also identify the appropriate data types for all the content. Schema documents are written using an XML syntax with specific element names. All the XSD elements are placed in the http://www.w3.org/2001/XMLSchema namespace. Often, this namespace uses the prefix xsd: or xs:, as in the following example.
The full XSD specification is out of the scope of this chapter, but you can learn a lot from a simple example. The following is a slightly abbreviated SuperProProductList.xsd file that defines the rules for SuperProProductList documents:
<?xml version="1.0"?>
<xs:schema
    targetNamespace="http://www.SuperProProducts.com/SuperProProductList"
    xmlns:xs="http://www.w3.org/2001/XMLSchema" elementFormDefault="qualified" >
  <xs:element name="SuperProProductList">
    <xs:complexType>
      <xs:sequence maxOccurs="unbounded">
        <xs:element name="Product">
          <xs:complexType>
            <xs:sequence>
              <xs:element name="Price" type="xs:double" />
            </xs:sequence>
            <xs:attribute name="ID" use="required" type="xs:int" />
            <xs:attribute name="Name" use="required" type="xs:string" />
          </xs:complexType>
        </xs:element>
      </xs:sequence>
    </xs:complexType>
  </xs:element>
</xs:schema>
At first glance, this markup looks a bit intimidating. However, it's actually not as complicated as it looks. Essentially, this schema indicates that a SuperProProductList document consists of a list of <Product> elements. Each <Product> element is a complex type made up of a string (Name), a decimal value (Price), and an integer (ID). This example uses the second version of the SuperProProductList document to demonstrate how to use attributes in a schema file.
By examining the SuperProProductList.xsd schema, you can learn a few important points:
Schema documents use their own form of XML markup. In the previous example, you'll quickly see that all the elements are placed in the
http://www.w3.org/2001/XMLSchemanamespace using the xs namespace prefix.Every schema document starts with a root <schema> element.
The schema document must specify the namespace of the documents it can validate. It specifies this detail with the targetNamespace attribute on the root <schema> element.
The elements inside the <schema> element describe the structure of the target document. The <element> element represents an element, while the <attribute> element represents an attribute. To find out what the name of an element or attribute is, look at the name attribute. For example, you can tell quite easily that the first <element> has the name SuperProProductList. This indicates that the first element in the validated document must be <SuperProProductList>.
If an element can contain other elements or has attributes, it's considered a complex type. Complex types are represented in a schema by the <complexType> element. The simplest complex type is a sequence, which is represented in a schema by the <sequence> element. It requires that elements are always in the same order—the order that's set in the schema document.
When defining elements, you can define the maximum number of times an element can appear (using the maxOccurs attribute) and the minimum number of times it must occur (using the minOccurs attribute). If you leave out these details, the default value of both is 1, which means that every element must appear exactly once in the target document. Use a maxOccurs value of unbounded if you want to allow an unlimited list. For example, this allows there to be an unlimited number of <Product> elements in the SuperProProductList catalog. However, the <Price> element must occur exactly once in each <Product>.
When defining an attribute, you can use the use attribute with a value of required to make that attribute mandatory.
When defining elements and attributes, you can specify the data type using the type attribute. The XSD standard defines 44 data types that map closely to the basic data types in .NET, including the double, int, and string data types used in this example.
The following example shows you how to validate an XML document against a schema, using an XmlReader that has validation features built in.
The first step when performing validation is to import the System.Xml.Schema namespace, which contains types such as XmlSchema and XmlSchemaCollection:
Imports System.Xml.Schema
You must perform two steps to create the validating reader. First, you create an XmlReaderSettings object that specifically indicates you want to perform validation. You do this by setting the ValidationType property and loading your XSD schema file into the Schemas collection, as shown here:
' Configure the reader to use validation.
Dim settings As New XmlReaderSettings()
settings.ValidationType = ValidationType.Schema

' Create the path for the schema file.
Dim schemaFile As String = Path.Combine(Request.PhysicalApplicationPath, _
  "App_DataSuperProProductList.xsd")

' Indicate that elements in the namespace
' http://www.SuperProProducts.com/SuperProProductList should be
' validated using the schema file.
settings.Schemas.Add("http://www.SuperProProducts.com/SuperProProductList", _
  schemaFile)
Second, you need to create the validating reader using the shared XmlReader.Create() method. This method has several overloads, but the version used here requires a FileStream (with the XML document) and the XmlReaderSettings object that has your validation settings:
' Open the XML file.
Dim fs As New FileStream(file, FileMode.Open)

' Create the validating reader.
Dim r As XmlReader = XmlReader.Create(fs, settings)
The XmlReader in this example works in the same way as the XmlTextReader you've been using up until now, but it adds the ability to verify that the XML document follows the schema rules. This reader throws an exception (or raises an event) to indicate errors as you move through the XML file.
The following example shows how you can create a validating reader that uses the SuperProProductList.xsd file to verify that the XML in SuperProProductList.xml is valid:
' Set the validation settings.
Dim settings As New XmlReaderSettings()
settings.Schemas.Add("http://www.SuperProProducts.com/SuperProProductList", _
schemaFile)
settings.ValidationType = ValidationType.Schema
' Open the XML file.
Dim fs As New FileStream(file, FileMode.Open)
' Create the validating reader.
Dim r As XmlReader = XmlReader.Create(fs, settings)
' Read through the document.
Do While r.Read()
' Process document here.
' If an error is found, an exception will be thrown.
Loop
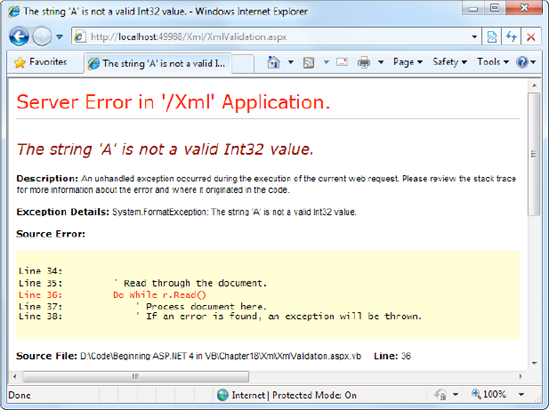
fs.Close()Using the current file, this code will succeed, and you'll be able to access each node in the document. However, consider what happens if you make the minor modification shown here:
<Product ID="A" Name="Chair">
Now when you try to validate the document, an XmlSchemaException (from the System.Xml.Schema namespace) will be thrown, alerting you to the invalid data type, as shown in Figure 18-7.
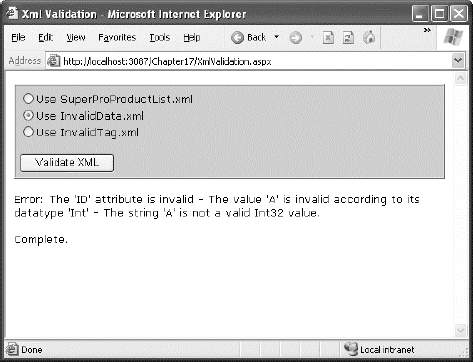
Instead of catching errors, you can react to the XmlReaderSettings.ValidationEventHandler event. If you react to this event, you'll be provided with information about the error, but no exception will be thrown. To connect an event handler to this event, you can attach an event handler before you create the XmlReader:
// Connect to the method named ValidateHandler.
AddHandler settings.ValidationEventHandler, AddressOf ValidateHandler
The event handler receives a ValidationEventArgs object as a parameter, which contains the exception, a message, and a number representing the severity:
Private Sub ValidateHandler(ByVal sender As Object, _
  ByVal e As ValidationEventArgs)
    lblStatus.Text &= "Error: " & e.Message & "<br />"
End Sub
To test the validation, you can use the XmlValidation.aspx page in the online samples. It allows you to validate a valid SuperProProductList, as well as two other versions, one with incorrect data and one with an incorrect element (see Figure 18-8).
Tip
Because all XmlReader objects process XML one line at a time, this validation approach performs the best and uses the least amount of memory. But if you already have an XDocument in memory, you can validate it in a similar way using the XDocument.Validate() method.
Another standard associated with XML is XSL Transformations (XSLT). XSLT allows you to create style sheets that can extract a portion of a large XML document or transform an XML document into another type of XML document. An even more popular use of XSLT is to convert an XML document into an HTML document that can be displayed in a browser.
Note
eXtensible Stylesheet Language (XSL) is a family of standards for searching, formatting, and transforming XML documents. XSLT is the specific standard that deals with the transformation step.
XSLT is easy to use from the point of view of the .NET class library. All you need to understand is how to create an XslCompiledTransform object (found in the System.Xml.Xsl namespace). You use its Load() method to specify a style sheet and its Transform() method to output the result to a file or stream:
' Define the file paths this code uses. The XSLT file and the
' XML source file already exist, but the XML result file
' will be created by this code.
Dim xsltFile As String = Path.Combine(Request.PhysicalApplicationPath, _
  "App_DataSuperProProductList.xsl")
Dim xmlSourceFile As String = Path.Combine(Request.PhysicalApplicationPath, _
  "App_DataSuperProProductList.xml")
Dim xmlResultFile As String = Path.Combine(Request.PhysicalApplicationPath, _
  "App_DataTransformedFile.xml")

' Load the XSLT style sheet.
Dim transformer As New XslCompiledTransform()
transformer.Load(xsltFile)

' Create a transformed XML file.
' SuperProProductList.xml is the starting point.
transformer.Transform(xmlSourceFile, xmlResultFile)
However, this doesn't spare you from needing to learn the XSLT syntax. Once again, the intricacies of XSLT aren't directly related to core ASP.NET programming, so they're outside the scope of this book. To get started with XSLT, however, it helps to review a simple style sheet example. The following example shows an XSLT style sheet that transforms the no-namespace version of the SuperProProductList document into a formatted HTML table:
<?xml version="1.0" encoding="UTF-8" ?>
<xsl:stylesheet xmlns:xsl="http://www.w3.org/1999/XSL/Transform"
    version="1.0" >

  <xsl:template match="SuperProProductList">
    <html>
      <body>
        <table border="1">
          <xsl:apply-templates select="Product"/>
        </table>
      </body>
    </html>
  </xsl:template>

  <xsl:template match="Product">
    <tr>
      <td><xsl:value-of select="@ID"/></td>
      <td><xsl:value-of select="@Name"/></td>
      <td><xsl:value-of select="Price"/></td>
    </tr>
  </xsl:template>

</xsl:stylesheet>
Every XSLT document has a root xsl:stylesheet element. The style sheet can contain one or more templates (the sample file SuperProProductList.xslt has two). In this example, the first template searches for the root SuperProProductList element. When it finds it, it outputs the tags necessary to start an HTML table and then uses the xsl:apply-templates command to branch off and perform processing for any contained Product elements.
<xsl:template match="SuperProProductList">
  <html>
    <body>
      <table border="1">
        <xsl:apply-templates select="Product"/>
When that process is complete, the HTML tags for the end of the table will be written:
</table>
    </body>
  </html>
</xsl:template>
When processing each <Product> element, the value from the nested ID attribute, Name attribute, and <Price> element is extracted and written to the output using the xsl:value-of command. The at sign (@) indicates that the value is being extracted from an attribute, not a subelement. Every piece of information is written inside a table row.
<xsl:template match="Product">
  <tr>
    <td><xsl:value-of select="@ID"/></td>
    <td><xsl:value-of select="@Name"/></td>
    <td><xsl:value-of select="Price"/></td>
  </tr>
</xsl:template>
For more advanced formatting, you could use additional HTML elements to format some text in bold or italics.
The final result of this process is the HTML file shown here:
<html>
  <body>
    <table border="1">
      <tr>
        <td>1</td>
        <td>Chair</td>
        <td>49.33</td>
      </tr>
      <tr>
        <td>2</td>
        <td>Car</td>
        <td>43398.55</td>
      </tr>
      <tr>
        <td>3</td>
        <td>Fresh Fruit Basket</td>
<td>49.99</td>
</tr>
</table>
</body>
</html>In the next section, you'll look at how this output appears in an Internet browser.
Generally speaking, if you aren't sure you need XSLT, you probably don't. The .NET Framework provides a rich set of tools for searching and manipulating XML files using objects and code, which is the best approach for small-scale XML use.
Tip
To learn more about XSLT, consider Jeni Tennison's excellent book Beginning XSLT 2.0: From Novice to Professional (Apress, 2005).
If you use an XLST style sheet such as the one demonstrated in the previous example, you might wonder what your code should do with the generated HTML. You could try to write it directly to the browser or save it to the hard drive, but these approaches are awkward, especially if you want to display the generated HTML inside a normal ASP.NET web page that contains other controls. The XslCompiledTransform object just converts XML files—it doesn't provide any way to insert the output into your web page.
ASP.NET includes an Xml web control that fills the gap and can display XML content. You can specify the XML content for this control in several ways. For example, you can assign a string containing the XML content to the DocumentContent property, or you can specify a string that refers to an XML file using the DocumentSource property.
' Display the information from an XML file in the Xml control.
XmlProducts.DocumentSource = Path.Combine(Request.PhysicalApplicationPath, __
  "App_DataSuperProProductList.xml")
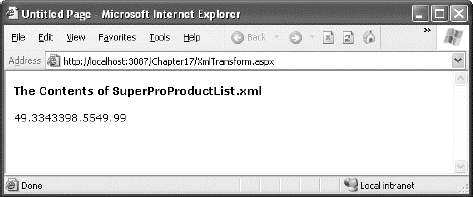
If you assign the SuperProProductList.xml file to the Xml control, you're likely to be disappointed. The result is just a string of the inner text (the price for each product), bunched together without a space (see Figure 18-9).
However, you can also apply an XSLT style sheet, either by assigning an XslCompiledTransform object to the Transform property or by using a string that refers to the XSLT file with the TransformSource property:
' Specify a XSLT file.
XmlProducts.TransformSource = Path.Combine(Request.PhysicalApplicationPath, _
  "App_DataSuperProProductList.xsl")
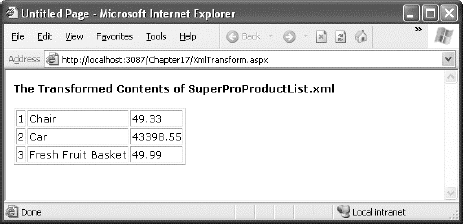
Now the output is automatically formatted according to your style sheet (see Figure 18-10).
Now that your tour of XML and ASP.NET is drawing to a close, you should have a basic understanding of what XML is, how it looks, and why you might use it in a web page. XML represents a new tool for breaking down the barriers between businesses and platforms—it's nothing less than a universal model for storing and communicating all types of information.
XML on its own is a remarkable innovation. However, to get the most out of XML, you need to embrace other standards that allow you to validate XML, transform it, and search it for specific information. The .NET Framework provides classes for all these tasks in the namespaces under the System.Xml branch. To continue your exploration, start with a comprehensive review of XML standards (such as the one provided at http://www.w3schools.com/xml) and then dive into the class library.